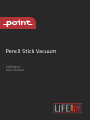
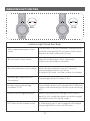
POINT PENCIL TRÅDLØS STØVSUGER Bruksanvisning
- Kategori
- Bärbara dammsugare
- Typ
- Bruksanvisning

Pencil Stick Vacuum
POPENCIL
User Manual

Thank you for purchasing your new POINT Rechargeable Vacuum Cleaner.
These operating instructions will help you use it properly and safely.
We recommend that you spend some time reading this instruction
manual in order that you fully understand all the operational features it
offers. Read all the safety instructions carefully before use and keep
this instruction manual for future reference.
GB
NO
Takk for at du kjøpte denne nye Oppladbar støvsuger fra POINT.
Denne bruksanvisningen vil hjelpe deg med å bruke den på en trygg og
riktig måte. Vi anbefaler at du tar deg tid til å lese gjennom hele
bruksanvisningen for å bli fortrolig med alle funksjonene som tilbys.
Les alle sikkerhetsanvisningene nøye før bruk, og oppbevar
bruksanvisningen for fremtidig referanse.
FI
Kiitos, kun valitsit uuden POINT-Ladattavan pölynimurin.
Nämä käyttöohjeet opastavat sinua käyttämään laitetta oikein ja
turvallisesti. Suosittelemme,että käytät hetken tämän käyttöoppaan
lukemiseen, jotta ymmärrät täysin, mitä toimintoja latteessaon. Lue
kaikki turvallisuusohjeet huolellisesti ennen laitteen käyttöä ja säilytä
käyttöopas myöhempää käyttöä varten.
DK
Tak for købet af din nye Genopladelig støvsuger fra POINT.
Disse brugervejledninger hjælper dig med at bruge dette apparat rigtigt og
sikkert. Vi anbefaler, at du læser denne brugervejledning, så du får en fuld
forståelse af hvordan alle funktionerne virker. Læs sikkerhedsforskrifterne
grundigt inden brug, og gem denne brugervejledning til senere brug.
SE
Tack för att du har köpt en ny POINT Uppladdningsbar dammsugare.
Denna bruksanvisning hjälper dig att använda den på ett säkert och
korrekt sätt. Vi rekommenderar att du tar dig tid att läsa igenom denna
bruksanvisning för att till fullo förstå alla driftfunktioner som den
erbjuder. Läs noga igenom alla säkerhetsinstruktioner före användning
och spara bruksanvisningen för framtida bruk.
2

Bruksanvisning – Svenska ......................................... sida 44 - 53
Bruksanvisning – Norsk ..............................................side 14 - 23
Brugervejledning – Dansk ...........................................side 34 - 43
Käyttöopas - Suomi ....................................................sivu 24 - 33
3
Instruction Manual – English ................................... page 4 - 13
NO
DK
SE FI GB

SAFETY WARNING
Do not use this product for water absorption, in order to
avoid failure.
The product is not suitable for people with physical, sensory
or mental disabilities or people who lack experience and
common sense (including children), unless supervised or
directed by others to ensure its safe use.
This product is only suitable to be used in dry
environments, do not take it outdoors or use it in wet
environments. Do not touch the plug or any live part of the
product with wet hands, to avoid the danger of electric
shock. If the charger or plug is damaged, stop using it.
Please call our professional maintenance personnel to
follow and replace, in order to avoid harm.
Do not vacuum hot materials (unextinguished cigarette
butts, matches or hot ashes, etc.), ultrafine substances in
non-domestic environments (e.g. lime, cement, wood chips,
gypsum powder, ash, toner, etc.), large sharp fragments (of
glass, nails, pins, etc), hazardous materials (e.g. solvents,
scale remover, etc.), chemicals (e.g. acids, detergents, etc.),
flammable and explosive liquids (gasoline, alcohol products)
and other substances with uncertain physical properties.
4
Before using this product, please read all the contents of
this instruction manual carefully. Follow the instructions
to install the machine. Take good care of this manual. If
you distribute the product to a third party for use, please
enclose this instruction manual with the machine. Any
operation inconsistent with the instructions may result in
product damage or serious personal injury. This product is
only suitable for household use, it is not suitable for
industrial or outdoor use.
1.
2.
3.
4.

5
Keep airflow channels and moving parts away from long
hair, loose clothing, fingers and other body parts. Do not
hold the vacuuming tube, attachment suction head or tools
to your eyes or ears, or put them in your mouth.
During use if you find leakages, the motor temperature is
too high, the fuselage overheats, there is an abnormal
sound or odor, the suition is weak etc, immediately stop
using. And call the company professional maintenance
personnel.
When charging, use the adapter provided by our company.
Other types of adapters may cause the battery to
malfunction or cause excessive heating.
If you do not use this product for a long time, power should
be turned o and the adapter unplugged.
After using the machine, please store it in a dry place.
Damp places can aect the insulation and service life of
electrical appliances.
Please check the dust cup regularly, and clean it in time.
Keep ventilation paths clear, avoid obstruction that cause
the suction power to drop and motor to heat, thus
aecting the service life of the vacuum cleaner.
When cleaning this product, do not use lubricant,
detergent, polishing agent, etc.
If the machine breaks down, do not repair it by yourself.
Please call our after-sales department for help.
All technical and other information related to the
specifications of this product must be obtained from our
company or a designated third-party testing company. The
final right of interpretation belongs to our company.
5.
6.
7.
8.
9.
10.
11.
12.
13.
GB

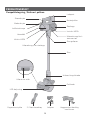
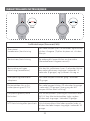
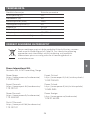
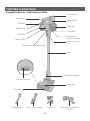
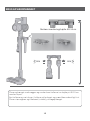
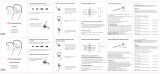
PRODUCT OVERVIEW
Power switch
Mode switch
Indicator light
Main body
Outlet HEPA
Dust cup release button
Roller release
LED lights
Charging port
Battery pack
Dust cup
Wand release
Wand
Floor head release
Floor head
Dust emptyrelease
button
Inlet HEPA
Crevice tool 2 in 1 brush tool Adapter Wall-mounted dock
with screws
Perspective drawing & What's in packing
6

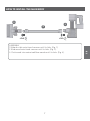
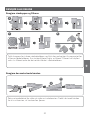
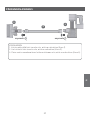
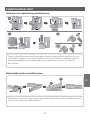
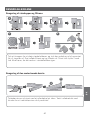
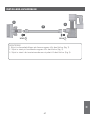
HOW TO INSTALL THE MAIN BODY
1
2
3
click click
ASSEMBLY
1.Slide dust bin onto hand vacuum until it clicks (Fig. 1).
2.Slide wand onto hand vacuum until it clicks (Fig. 2).
3. Push wand into motorized floor nozzle until it clicks (Fig. 3).
7
GB

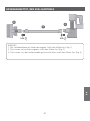
USEING WALL MOUNTING
Place mount against wall and use pencil to mark drill holes with the height of
40-55cm.
Drill holes and insert screws through holes on mount and tighten until firmly
attached.
Place assembled vacuum cleaner and accessories on wall mount.
click click
Dock mounting height: 40-55cm
8

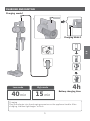
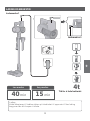
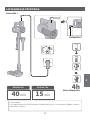
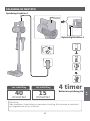
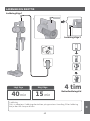
CHARGING AND RUNTIME
Charging mode 1
Battery charging time
Low mode High mode
Charging Mode 2
Charging
Plug the adapter into the charging connector on the appliance handle. After
charging, the blue light begins to flash.
9
40min 15min
4h
GB

Turn the outlet filter and separate the HEPA filter from the hand vacuum. The filter
can be rinsed in water. Allow the filter to dry before placing it back into the dust
container.
Cleaning the filters
Emptying the dust cup
To empty the dust container, press the emptying button. Open the container,
empty the dust and close the container cover.
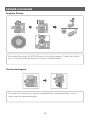
CLEAN ALL PARTS
10

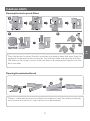
CLEAN ALL PARTS
Cleaning the dust cup and filters
1
23
4
Press the button to rotate the dust container and move it down and away from the
appliance to remove the dust container. Turn the inlet filter and separate the filter.
The filter can be rinsed in water. Allow the filter to dry before placing back into the
dust container.
There is a roller end cover on the side of the turbo brush,pull the roller end cover by
hand to take out the brush, then the brush can be removed.
Cleaning the motorized brush
11
1
2
GB

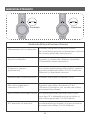
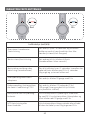
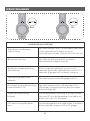
INDICATOR LIGHT FUNCTION
RED BLUE
Indicator Light (Scene Red/Blue)
Main motor overcurrent/short
circuit
Brush current/short circuit
No-load protection (main motor)
Overvoltage /overcurrent of
the adaptor
Battery pack undervoltage
shutdown 2.75V
Battery low voltage protection
NTC Short circuit or open circuit
The red light is on for 10 seconds, meanwhile the
machine stop working (If you press switch when
device is on and it does not turn on)
The red and blue lights flash alternately
(The main motor works normally)
After the blue indicator is on for 2 seconds,
the red indicator blinks at 2 Hz for
3 seconds (6 times), and the system shuts down
The red light blinks 10 times at 1hz
The red light blinks for 10 seconds(2hz) (20times)
(Every time the blue light flashes after switching
o)
When the battery pack voltage is less than or
equal to 14v, the battery pack cannot be charged
and blinks red at 2hz for 10 times
If the battery pack is not charged or discharged,
the red light blinks at 2hz for 14 times
12

Power International AS,
PO Box 523, N-1471 Lørenskog, Norway
Power Norge:
https://www.power.no/kundeservice/
T: 21 00 40 00
Expert Danmark:
https://www.expert.dk/kundeservice/
T: 70 70 17 07
Power Danmark:
https://www.power.dk/kundeservice/
T: 70 33 80 80
Punkt 1 Danmark:
https://www.punkt1.dk/kundeservice/
T: 70 70 17 07
ENVIRONMENT FRIENDLY DISPOSAL
This symbol on the product or in the instructions means that your
electrical and electronic equipment should be disposed at the end of its
life separately from your household waste. There are separate collection
systems for recycling in the EU. For more information, please contact the
local authority or your retailer where you purchased the product.
SPECIFICATION
Expert Finland:
https://www.expert.fi/tuki/asiakaspalvelu/
T: 020 7100 670
Power Finland:
https://www.power.fi/tuki/asiakaspalvelu/
T: 0305 0305
Power Sverige:
https://www.power.se/kundservice/
T: 08 517 66 000
Technical parameter
22.2
150
2000
0.6
3.5-4.5
15-40
26V/500mA
2.3
Product information
Working voltage (V)
Rated power (W)
Battery capacity (mAh)
The dust cup capacity (L)
Charge time (H)
Working time (Min)
Adapter parameters
The whole machine net weight(kg)
13
GB

SIKKERHETSADVARSEL
Ikke bruk dette produktet for å suge opp vann, for å unngå
feil.
Produktet er ikke egnet for personer med fysiske,
sensoriske eller mentale funksjonshemninger eller personer
som mangler erfaring og sunn fornuft (inkludert barn), med
mindre de holdes under oppsyn eller er godt nok instruert
av andre for å sikre trygg bruk.
Produktet er kun egnet for bruk i tørre omgivelser. Det skal
ikke tas utendørs eller brukes i våte omgivelser. Ikke berør
støpselet eller noen strømførende del av produktet med
våte hender, da det utgjør en fare for elektrisk støt. Hvis
laderen eller støpselet er skadet, må du slutte å bruke.
Kontakt vårt faglærte vedlikeholdspersonell for oppfølging
og erstatning for å unngå skade.
Ikke sug opp varme materialer (uslukkede sigarettsneiper,
fyrstikker eller varm aske osv.), ultrafine stoer som ikke er
fra husholdning (f.eks. kalk, sement, flis, gips, aske, toner
osv.), store skarpe fragmenter (av glass, spiker, stifter osv.),
farlige materialer (f.eks. løsemidler, kalkerner osv.),
kjemikalier (f.eks. syrer, vaskemidler osv.), brennbare og
eksplosive væsker (bensin, alkoholprodukter) og andre
stoer med usikre fysiske egenskaper.
Før du bruker produktet må du lese hele denne
bruksanvisningen nøye. Følg instruksjonene for å
installere maskinen. Ta godt vare på denne
bruksanvisningen. Hvis du gir videre produktet til en
tredjepart for bruk, må denne bruksanvisningen følge
med maskinen. Enhver operasjon som ikke samsvarer
med instruksjonene, kan føre til produktskade eller
alvorlig personskade. Dette produktet er kun egnet for
bruk i konvensjonelle hjem, og det er ikke egnet for
industriell eller utendørs bruk.
1.
2.
3.
4.
14

Hold luftstrøms kanaler og bevegelige deler unna langt hår,
løse klær, fingre og andre kroppsdeler. Ikke hold
støvsugerøret, tilbehørets sugehode eller verktøy mot
øynene eller ørene, eller legg dem i munnen.
Hvis du under bruken finner en lekkasje, eller motoren blir
for varm, gir en unormal lyd eller lukt, suger dårlig osv., må
du umiddelbart slutte å bruke. Kontakt faglært
vedlikeholdspersonell.
Når du lader må du bruke den medfølgende adapteren for å
lade. Andre typer adaptere kan forårsake batterifeil eller
ekstreme termiske eekter.
Hvis du ikke bruker produktet på lang tid, skal du slå av
strømmen og koble fra adapteren.
Når du har brukt maskinen, må du oppbevare den på et tørt
sted. Fuktige steder kan påvirke isolasjonen og levetiden til
elektriske apparater.
Sjekk støvkoppen regelmessig, og rydd den i tide. Hold
ventilasjons veiene frie, og unngå hindringer som
forårsaker fall i sugeevnen og motoroppvarming, noe som
vil påvirke levetiden til støvsugeren.
Når du rengjør dette produktet, må du ikke bruk
smøremidler, rengjøringsmidler, poleringsmidler osv.
Hvis maskinen bryter sammen, skal du ikke repare den på
egen hånd. Ring kundeservice for hjelp.
Alle tekniske og andre data som står i denne
produktspesifikasjonen, skal være innhentet av oss eller et
utpekt tredjeparts testfirma. Den endelige tolkningsretten
tilhører oss.
5.
6.
7.
8.
9.
10.
11.
12.
13.
15
NO

Strømbryter
Modusbryter
Indikatorlampe
Hoveddel
Uttaks-HEPA
Utløserknapp for støvkopp
Utløser for rulle
LED-belysning
Ladeport
Batteripakke
Støvkopp
Stangutløser
Stav
Utløser for gulvhode
Gulvhode
Utløserknapp for å
tømme støv
Inntaks-HEPA
Fugemunnstykke 2 i 1 børsteverktøy Adapter Veggmontert docking
med skruer
Perspektivtegning / Dette er i pakken
PRODUKTOVERSIKT
16

SETTE SAMMEN HOVEDENHETEN
1
2
3
klikk klikk
SETTE SAMMEN
1. Skyv støvbeholderen på håndstøvsugeren til den klikker på plass (fig. 1).
2. Skyv stangen på håndstøvsugeren til den klikker på plass (fig. 2).
3. Skyv stangen inn i den motoriserte gulvdysen til den klikker på plass (fig. 3).
17
NO

BRUKE VEGGFESTET
Plasser festet mot veggen, og bruk blyant for å markere borehull med en høyde
på 40–55 cm.
Bor hull, sett skruene gjennom hullene på festet, og stram til det er godt festet.
Plasser enheten av støvsugeren og tilbehøret på veggfestet.
klikk klikk
Høyde for montering av docking: 40–55 cm
18

LADING OG BRUKSTID
Lademodus 1
Tid for å lade batteriet
Lav modus
høy modus
Lademodus 2
Lading
Koble adapteren til ladekontakten på håndtaket til apparatet. Etter lading
begynner den blå lampen å blinke.
40min 15min
4t
19
NO

Snu utløpsfilteret og skill HEPA-filteret fra håndstøvsugeren. Filteret kan skylles i
vann. La filteret tørke før det settes tilbake i støvbeholderen.
Rengjøre filtrene
Tømme støvkoppen
Trykk tømme knappen for å tømme støvbeholderen. Åpne beholderen, tøm ut
støvet, og lukk beholderdekselet.
RENGJØR ALLE DELENE
20
Sidan laddas...
Sidan laddas...
Sidan laddas...
Sidan laddas...
Sidan laddas...
Sidan laddas...
Sidan laddas...
Sidan laddas...
Sidan laddas...
Sidan laddas...
Sidan laddas...
Sidan laddas...
Sidan laddas...
Sidan laddas...
Sidan laddas...
Sidan laddas...
Sidan laddas...
Sidan laddas...
Sidan laddas...
Sidan laddas...
Sidan laddas...
Sidan laddas...
Sidan laddas...
Sidan laddas...
Sidan laddas...
Sidan laddas...
Sidan laddas...
Sidan laddas...
Sidan laddas...
Sidan laddas...
Sidan laddas...
Sidan laddas...
Sidan laddas...
Sidan laddas...
-
 1
1
-
 2
2
-
 3
3
-
 4
4
-
 5
5
-
 6
6
-
 7
7
-
 8
8
-
 9
9
-
 10
10
-
 11
11
-
 12
12
-
 13
13
-
 14
14
-
 15
15
-
 16
16
-
 17
17
-
 18
18
-
 19
19
-
 20
20
-
 21
21
-
 22
22
-
 23
23
-
 24
24
-
 25
25
-
 26
26
-
 27
27
-
 28
28
-
 29
29
-
 30
30
-
 31
31
-
 32
32
-
 33
33
-
 34
34
-
 35
35
-
 36
36
-
 37
37
-
 38
38
-
 39
39
-
 40
40
-
 41
41
-
 42
42
-
 43
43
-
 44
44
-
 45
45
-
 46
46
-
 47
47
-
 48
48
-
 49
49
-
 50
50
-
 51
51
-
 52
52
-
 53
53
-
 54
54


POINT PENCIL TRÅDLØS STØVSUGER Bruksanvisning
- Kategori
- Bärbara dammsugare
- Typ
- Bruksanvisning
på andra språk
Relaterade papper
-
 POINT POSG5000 TOASTJERN Bruksanvisning
-
 POINT POVC112BL 12V HÅNDSTØVSUGER Bruksanvisning
-
 POINT POVCB50GR POSELØS STØVSUGER Bruksanvisning
-
 POINT PRO PRO73BL STØVSUGER Bruksanvisning
-
 POINT POVC618DB 18V TRÅDLØS STØVSUGER Bruksanvisning
-
 POINT POKM4WH800 KJØKKENMASKIN, HVIT Bruksanvisning
-
 POINT PRO POVC725DG 25.2V TRÅDLØS STØVSUGER Användarmanual
-
 POINT POAP2010 LUFTRENSER Bruksanvisning
-
 POINT PRO POVC918GR HÅNDSTØVSUGER Bruksanvisning
-
 POINT PRO POVC10ANIMAL TRÅDLØS STØVSUGER Bruksanvisning


Andra dokument
-
 SENZ SEVC107BK HÅNDHOLDT STØVSUGER Bruksanvisning
-
 SENZ SEVCB11GR POSELØS STØVSUGER Bruksanvisning
-
 SENZ SEFS4016WH 16" GULVVIFTE Bruksanvisning
-
 SENZ SH410W20 KJØKKENVENTILATOR Bruksanvisning
-
 Dacota Platinum RGB REKTANGEL VIDEOLYS SVART Bruksanvisning
-
 Dacota Platinum RGB VIDEO-RINGLYS SVART Användarmanual
-
 amadeus SPORTS IE HEADPHONES BLACK Bruksanvisning
-
 amadeus SPORTS IE HEADPHONES BLUE Användarmanual
-
LIVARNO 292097 Bruksanvisning


