SENZ SEFS4016WH 16" GULVVIFTE Bruksanvisning
- Typ
- Bruksanvisning

SEFS4016WH
SEFS4016BL


GBNOFIDKSE
Instruction Manual – English ........................ page
Bruksanvisning – Norsk ........................ sida
Käyttöopas – Suomi ........................ side
Brugervejledning – Dansk ........................ side
Bruksanvisning – Svenska ........................ sivu


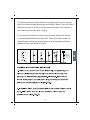
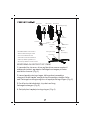
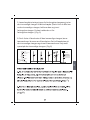
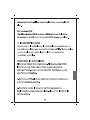
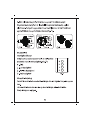
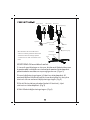
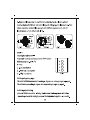
Spinner
Piano switch
Tighten
Loosen
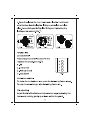
Motor housing
Clutch knob
Motor shaft
Front grill Plastic nut
Fan blade
Rear grill
Thumb screw
Note: All the pictures in this manual are for
explanation purpose only. Any discrepancy
between the real object and the illustration
in the drawing shall be subject to the real
subject.
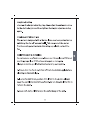
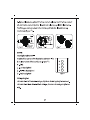
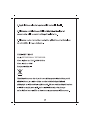
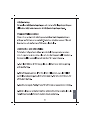
Internal Pole
Height
adjustment
ring
Fasten
Extension Pole
Stand ornament
Stand
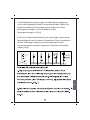
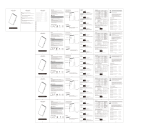
ASSEMBLY OF CROSS STAND & COLUMN UNIT
1. Loosen 4 sets of screws, washers and spring washers which are
tted in the center section on the stand and assembly the extension
pole onto the base enclosure with these screws originally. (Fig.1)
2. Loosen the height adjustment ring, lift the internal pole to the
max height and prevent the internal pole from slipping into the
extension pole, then screw out the height adjustment ring. (Fig.2)
3. To attach the stand ornament (cover for the stand), slide the
stand ornament down the extension pole. (Fig.3)
4. Reattach the height adjustment ring. (Fig.4)

5. From the extension pole loosen the height adjustment ring and
adjust the internal pole to the desired height. (Note: If you can’t nd
the internal pole, it slides inside the extension pole. You can pull it
out from the extension pole.) (Fig.5)
6. To attach the head unit to the internal pole, loosen the thumb
screw on the bottom of the head unit. Place the head unit on the
internal pole and tighten the thumb screw in alignment with the
groove on the internal pole. (Fig.6)
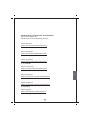
Four screws
Stand ornament
Fasten
Height Adjustment ring
Stand
Loosen LoosenTighten
Fig.1 Fig.2 Fig.3 Fig.4 Fig.5 Fig.6
Thumb screw
Annular groove
Mounting hole
7
8

9
9
10
10


SEFS4016WH / SEFS4016BL

Imported and Exclusively marketed by:
Power International AS,
Power Norge:
h�ps://www.power.no/kundeservice/
Expert Danmark:
h�ps://www.expert.dk/kundeservice/
T: 70 70 17 07
Power Danmark:
h�ps://www.power.dk/kundeservice/
T: 70 33 80 80
Punkt 1 Danmark:
h�ps://www.punkt1.dk/kundeservice/
T: 70 70 17 07
Expert Finland:
h�ps://www.expert.fi/tuki/asiakaspalvelu/
T: 020 7100 670
Power Finland:
h�ps://www.power.fi/tuki/asiakaspalvelu/
T: 0305 0305
PO Box 523, N-1471 Lørenskog, Norway
T: 21 00 40 00
Power Sverige:
h�ps://www.power.se/kundservice/
P: 08 517 66 000


NO

Viftenav
Knapper
Stram til
Viftenav
Motorhus
Innkoblings-knapp
Motoraksel
Gitter foran Plastmutter
Vifteblad
Gitter bak
Tommeskrue
Merk: Alle bildene som er brukt i
denne bruksanvisningen er kun
ment som forklarende. Ved
eventuelle uoverensstemmelser
mellom produktet og bildene, er
det selve produktet som har fortrinn.
Innvendig
stang
Høyde-
justeringring
Stram til
Forlengelsesstang
Stativdeksel
Fot
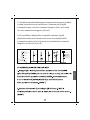
MONTERING AV KRYSSFOT OG STANG
1. Løsne de re skruene, skiver og ærskiver som er montert i
midten på stativet, og monter forlengelsesstangen på foten
med disse skruene. (Fig. 1)
2. Løsne høydejusteringsringen, løft opp den innvendige
stangen til maks høyde, unngå at den innvendige stangen faller
ned i forlengelsesstangen og skru ut høydejusteringsringen. (Fig. 2)
3. For å feste stativdekselet, skyv det ned lang
forlengelsestangen. (Fig. 3)
4. Sett på plass høydejusteringsringen. (Fig. 4)

NO
5. Løsne høydejusteringsringen fra forlengelsestangen og juster
den innvendige stangen til ønsket høyde. (Merk: Hvis du ikke kan
se den innvendige stangen, benner den seg inne i
forlengelsestangen. Du kan trekke den ut fra
forlengelsestangen.) (Fig. 5)
6. For å feste vifteenheten til den innvendige stangen, løsne
tommeskruen i bunnen av vifteenheten. Sett vifteenheten på
den innvendige stangen og stram til tommeskruen i linje med
sporet på den innvendige stangen. (Fig. 6)
Fire skruer
Stativdeksel
Stram til
Høydejusteringsring
Fot
Løsne LøsneStram til
Fig.1 Fig.2 Fig.3 Fig.4 Fig.5 Fig.6
Tommeskrue
Rundt spor
Monteringshull
8
7

9
10
9
10

NO

SEFS4016WH / SEFS4016BL

NO
Importert og utelukkende markedsført av:
Power International AS,
Power Norge:
h�ps://www.power.no/kundeservice/
Expert Danmark:
h�ps://www.expert.dk/kundeservice/
T: 70 70 17 07
Power Danmark:
h�ps://www.power.dk/kundeservice/
T: 70 33 80 80
Punkt 1 Danmark:
h�ps://www.punkt1.dk/kundeservice/
T: 70 70 17 07
Expert Finland:
h�ps://www.expert.fi/tuki/asiakaspalvelu/
T: 020 7100 670
Power Finland:
h�ps://www.power.fi/tuki/asiakaspalvelu/
T: 0305 0305
Power Sverige:
h�ps://www.power.se/kundservice/
Postboks 523, N-1471 Lørenskog, Norge
T: 21 00 40 00
T: 08 517 66 000

Sidan laddas...
Sidan laddas...
Sidan laddas...
Sidan laddas...
Sidan laddas...
Sidan laddas...
Sidan laddas...
Sidan laddas...
Sidan laddas...
Sidan laddas...
Sidan laddas...
Sidan laddas...
Sidan laddas...
Sidan laddas...
Sidan laddas...
Sidan laddas...
Sidan laddas...
Sidan laddas...
Sidan laddas...
Sidan laddas...
Sidan laddas...
Sidan laddas...
Sidan laddas...
Sidan laddas...
-
 1
1
-
 2
2
-
 3
3
-
 4
4
-
 5
5
-
 6
6
-
 7
7
-
 8
8
-
 9
9
-
 10
10
-
 11
11
-
 12
12
-
 13
13
-
 14
14
-
 15
15
-
 16
16
-
 17
17
-
 18
18
-
 19
19
-
 20
20
-
 21
21
-
 22
22
-
 23
23
-
 24
24
-
 25
25
-
 26
26
-
 27
27
-
 28
28
-
 29
29
-
 30
30
-
 31
31
-
 32
32
-
 33
33
-
 34
34
-
 35
35
-
 36
36
-
 37
37
-
 38
38
-
 39
39
-
 40
40
-
 41
41
-
 42
42
-
 43
43
-
 44
44


SENZ SEFS4016WH 16" GULVVIFTE Bruksanvisning
- Typ
- Bruksanvisning
på andra språk
Relaterade papper

Andra dokument
-
 POINT PENCIL TRÅDLØS STØVSUGER Bruksanvisning
-
 Dacota Platinum RGB VIDEO-RINGLYS SVART Användarmanual
-
 POINT POVC618DB 18V TRÅDLØS STØVSUGER Bruksanvisning
-
 POINT 3-SERIES PHB60STL20 KJØKKENVENTILATOR Bruksanvisning
-
 Dacota Platinum RGB REKTANGEL VIDEOLYS SVART Bruksanvisning
-
 Dacota Gaming NERO TRÅDLØS GAMINGMUS Bruksanvisning
-
 POINT PRO POSDH8020 AVFUKTER Bruksanvisningar
-
 POINT POAP2010 LUFTRENSER Bruksanvisning
-
 BIGHORN 3000 GASSGRILL Bruksanvisning


