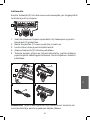
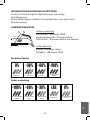
POINT PRO POVC10ANIMAL TRÅDLØS STØVSUGER Bruksanvisning
- Kategori
- Dammsugare
- Typ
- Bruksanvisning

21.6V 2-in-1
POVC10ANIMAL
User Manual
White Stickvac

2
Thank you for purchasing your new POINT PRO SERIES Vacuum Cleaner.
These operating instructions will help you use it properly and safely. We
recommend that you spend some time reading this instruction manual
in order that you fully understand all the operational features it oers.
Read all the safety instructions carefully before use and keep this
instruction manual for future reference.
GB
Tack för att du har köpt din nya dammsugare från POINT PRO SERIES.
Denna bruksanvisning hjälper dig att använda den på ett säkert och
korrekt sätt. Vi rekommenderar att du tar dig tid att läsa igenom
denna bruksanvisning för att till fullo förstå alla driftfunktioner som
den erbjuder.
Läs noga igenom alla säkerhetsinstruktioner före
användning och spara
bruksanvisningen för framtida bruk.
SE
Tak fordi du har købt din nye Støvsuger fra POINT PRO SERIES. Disse
brugervejledninger hjælper dig med at bruge dette apparat rigtigt og
sikkert. Vi anbefaler, at du læser denne brugervejledning, så du får en fuld
forståelse af hvordan alle funktionerne virker. Læs sikkerhedsforskrifterne
grundigt inden brug, og gem denne brugervejledning til senere brug.
DK
Takk for at du kjøpte denne nye støvsugeren i POINT PRO SERIES. Denne
bruksanvisningen vil hjelpe deg med å bruke den på en trygg og riktig måte.
Vi anbefaler at du tar deg tid til å lese gjennom hele bruksanvisningen for å bli
fortrolig med alle funksjonene som tilbys. Les alle sikkerhetsanvisningene
nøye før bruk, og oppbevar bruksanvisningen for fremtidig referanse.
NO
Kiitos, kun ostit uuden POINT PRO SERIES -pölynimurin. Nämä käyttöohjeet
opastavat sinua käyttämään laitetta oikein ja turvallisesti. On suositeltavaa
käyttää aikaa tämän käyttöoppaan lukemiseen, jotta ymmärrät täysin, mitä
toiminnallisia ominaisuuksia tuote tarjoaa. Lue kaikki turvallisuusohjeet
huolellisesti ennen laitteen käyttöä ja säilytä käyttöopas myöhempää
käyttöä varten.
FI

P.4 - 25
P.26 - 47
P.48 - 69
P.70 - 91
P.92 - 113
3
Instruction Manual - English ........................... page
Bruksanvisning - Norsk ................................... side
Käyttöohjeet - Suomi ..................................... sivu
Brugsanvisning - Dansk .................................. side
Bruksanvisning - Svenska ............................... side
GBFI
DK NOSE

4
IMPORTANT SAFETY INSTRUCTIONS
For your continued safety and to reduce the risk of injury
or electric shock, follow all the safety precautions listed
below.
Safety information
1. This appliance has been designed for domestic use
only. FOR DRY LOCATIONS ONLY. Do not use
outdoors or on wet surfaces. It must only be used
in accordance with these instructions. The
manufacturer will not be held responsible for any
damage caused by improper or misuse of the appliance.
2. This appliance can be used by children aged from 8
years and above and persons with reduced physical,
sensory or mental capabilities or lack of experience
and knowledge if they have been given supervision
or instruction concerning use of the appliance in
a safe way and understand the hazards involved.
Children shall not play with the appliance. Cleaning
and user maintenance shall not be made by children
without supervision.
3. The appliance is only to be used with the power supply
unit provided with the appliance.
4. It must only be supplied at safety extra low voltage
corresponding to the marking on the appliance.

GB
5
5. The batteries are not intended to be replaced by the
user.
6. Check that the voltage marked on the rating label
matches your mains voltage.
7. The battery must be removed from the appliance
before it is scrapped.
8. The appliance must be disconnected from the mains
power supply when removing the battery.
9. The battery is to be disposed of safely.
10. The device is not designed to aspirate aqueous solutions
that may contain foaming detergent.
11. Do not switch the appliance on if it can be detected
that it is not operating correctly or if it has
suffered any type of damage. Do not attempt to
repair this product yourself.
12. Do not use with a damaged mains power cable or
plug. If the mains power cable is damaged it must
be replaced by manufacturer, its service agent or
similarly qualified person in order to avaid a hazard.
13. Any type of repair work other than that stated
in “Cleaning & Maintenance” must be done by a
manufacturer service technician or an authorised
repair center.

6
Caution for Li-ion batteries
14. This product includes rechargeable Li-ion batteries.
Do not disassemble, short circuit, heat, drop or strike
the batteries, as they will electric shock or explode.
15. If the battery is used incorrectly, liquid may leak
out of the battery. Avoid touching the liquid. In the
event of accidental contact, rinse the affected area
with water. If the liquid comes into contact with
the eyes, seek medical assistance. If battery liquid
leaks, it can irritate or burn the skin.
Transportation information:
16. The Li-ion batteries in the appliance are subject to
the requirements of dangerous goods legislation. The
batteries can be transported by the user by road
without any further requirements. In the event that
they are shipped by a third party (e.g. transported
by air or freight carrier), special requirements
regarding packaging and identification must be
met. In this case, a dangerours goods expert must
be consulted when preparing the goods for dispatch.
Caution for Care & Storeage
17. Store the appliance indoors. Do not expose the
appliance to outdoor weather conditions, moisture,
rain, snow or heat. Do not use or store it below 0ºC
or above 40ºC. Ensure that the appliance is stored
in room temperature before operating.

GB
7
18. DO NOT IMMERSE THE MOTOR HOUSING, MAINS
POWER CABLE OR ADAPTOR IN WATER OR ANY
OTHER LIQUIDS.
19. Do not leave the appliance close to heat sources
such as ovens, heaters and radiators nor allow the
cord to come into contact with hot surfaces.
20. Clean the appliance only with a dry cloth. Do not
use any lubricants, cleaning agents, polishes or air
fresheners on any part of appliance.
Caution for Operation & Vacuuming
21. Suitable for dry locations ONLY. Do not use outdoors
or on wet surfaces.
22. Do not use wet hands when handling the appliance.
23. Do not operate while checking for blockages.
Always keep the openings clear and prevent dust
or dirt from blocking the air passage.
24. Empty the appliance after each use. Keep it free of
dust, lint, hair, or anythings that reduces airflow.
25. Never use the appliance without the filter.
26. Do not dismantle the appliance while the motor is
still operating.
27. Do not touch the rotating parts of power brush
when in operation.
28. Never leave the appliance unattended while it is
running.

8
29. Do not tug on the adaptor’s cable in order to un-
plug it.
30. Never vacuum up toxic materials, solvents, acids or
flammable liquids.
31. Never use the appliance to suck up anything that
may be still burning such as cigarette butts or ash/
cinders.
32. Never vacuum up solid, sharp, or piercing objects
such as metal screws, nails, tacks, rocks, gravel,
stones ......etc.and similar materials that may
damage the filter.
33. Do not point the Handheld Blower nozzle in the
direction of people or pets.
34. Be careful when using the appliance on stairs in order
to prevent falls.
Disposal information
35. The appliance, batteries, accessories and packaging
should be recycled in an evnironmentally responsible
manner.
36. Do not dispose of the appliance or the battereies along
with your normal household waste.
Packaging:
37. The packaging is designed to protect the appliance from
being damaged in transit. It is made of environmentally
friendly materials and can therefore be recycled. Disposal
of packaging that is no longer required at an appropriate
recycling point.

GB
9
Old appliance:
38. Old appliances often still contain valuable materials.
You
should therefore take appliances that have reached
the end of their service life to your dealer or a
recycling centre so that they can be recycled.
39. Ask your dealer or your local council about current
disposal methods.

10
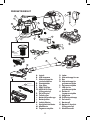
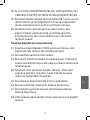
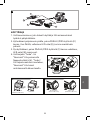
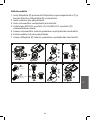
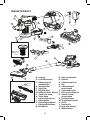
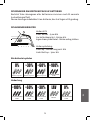
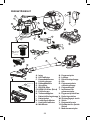
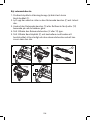
A. Inlet
B. LED lights
C.
Dust container release button
D. Dust container
E. Outer filter
F. EPA E10 filter
F1.
HEPA H13 filter (Additional)
G. On/O switch
H. Turbo switch
I. Battery release button
J. Battery pack
K. Charging indicator
L. Speed indicator
M. Mini brush
PRODUCT OVERVIEW
N. Crevice
O. Charger
P. Tube release button
Q. Tube
R.
Floor nozzle release button
S. Floor nozzle
T. Floor brush LED lights
U. Crevice holder
V. Docking station
W. Stand slide button
X. Stand
Y. Brush roller
Y1. Animal roller (Additional)
Z. Mattress cleaner
A
C
B
E
Y
DJ
G
F
H
I
K
U
L
N
M
V
Z
O
U
Floor Brush Accessories
Animal Shaft
(Additional)
F1
Filter Accessories
HEPA
H13 Filter
(Additional)
ST
P
Q
R

GB
11
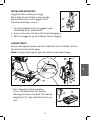
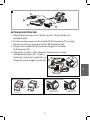
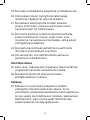
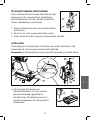
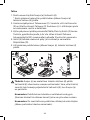
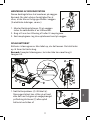
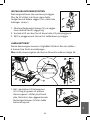
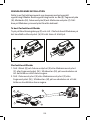
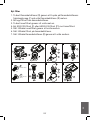
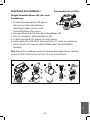
This docking station should be wall mounted.
Note: Care should be taken to ensure that there
are no dangerous objects hidden beneath the
wall surface (e.g. electrical wires, pipe, etc.)
1. Install the Docking station (V) to the wall
within reach of a mains power socket.
This vacuum cleaner is supplied in a low charge condition. It should be
charged for 6 hours prior to initial use.
Note: Recharge your vacuum cleaner after storing for a long time.
2. Use a 5mm drill for drilling holes for the plastic anchors.
3. Insert anchors and screw the charger base onto the wall.
INSTALLING DOCKING STATION
CHARGING THE BATTERY
J
1. Insert the plug into the Battery pack (J) of
Socket (a), you can place the vacuum cleaner
stand on a table or fix it on the wall mount
of Docking station (V) or charge the battery
independently.
O
O
O
J
K
K
aV
V

12
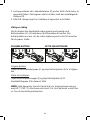
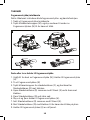
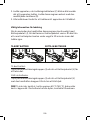
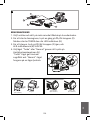
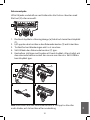
BATTERY RELEASE INSERT BATTERY
Important Note for Charging
2. Charge the appliance when the Charging indicator (K) is breathing Blue
LED light during operation, this means that the appliance is charging.
Only charge the vacuum cleaner with the Charger (O) supplied.
3. All LED turns on to indicate that the appliance is fully charged.
When using your handheld vacuum cleaner continuously with Battery
pack (J), the batteries in your battery pack will become hot. You should
let a hot battery pack cool down for approximately 30 minutes before
attempting to recharge.
Battery Release:
Press Battery release button (I) and slide back the Battery pack (J) for
release.
Insert Battery:
Press Battery release button (I) and slide the Battery pack (J) to the
handheld body until you hear a click sound.
NOTE: Do not disassemble, short circuit, heat above 60ºC (140ºF), or
incinerate and do not dispose of in fire. If the battery needs replacing
contact the manufacturer.
I
J
J
I
Click

GB
13
Do not dispose of the vacuum cleaner or the batteries along with
yours normal household waste.
This vacuum cleaner contains Li-ion batteries that must be taken
out for recycling.
BATTERY DISPOSAL INFORMATION
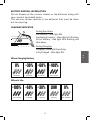
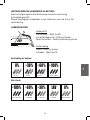
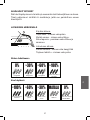
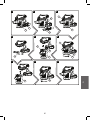
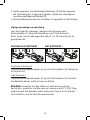
When Charging Battery
When In Use
CHARGING INDICATOR
During Operation:
Full Battery – Blue light ON
Low Battery Capacity – Blue light with flashing.
Out of Battery – Red light with flashing and
shut down.
During Charging:
Charging – Blue light Breathing
Fully Charged – Blue light ON
K
Breathing Breathing Breathing ALL LED ON
ALL LED ON ALL LED OFF2 LED ON 1 LED ON Flashing
~30%
~30% LOW
~60%
~60%
~100%
~100%
0%
0%

14
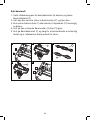
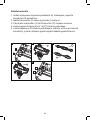
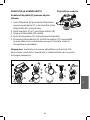
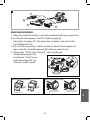
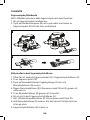
BASIC INSTALLATION
This is a multi-function appliance supplied with a full set of accessories. This
set of accessories includes: Tube (Q), Crevice (N), Mini brush (M), Floor
nozzle (S) and Mattress cleaner (Z). Simply insert the accessories to the
nozzle for dierent purposes.
Press Tube release button (P) and insert the Multi-function tools to
the Handheld nozzle (b) until you hear a click sound.
1. Insert the Tube (Q) and Floor nozzle (S) or Mattress cleaner (Z) or
Crevice (N) / Mini brush (M) into the main unit to become a stick
vacuum cleaner.
2. Insert the Floor nozzle (S) or Mattress cleaner (Z) or Crevice (N) /
Mini brush (M) into the main unit to become a handheld vacuum
cleaner.
Multi-function accessories release
Multi-function accessories
b
Q
S
NM
Click
Z
1

GB
15
L
B
OPERATION INSTRUCTIONS
1. Choose what feature you will use and fit the appropriate tools into
the main unit.
2. To switch on the vacuum cleaner, press the ON/ OFF switch (G)
once. When “Power ON” the White LED lights (B) will ON.
3. To stop, press the ON/OFF switch (G) once again the LED lights (B)
will OFF.
4. Select either the “Turbo” or “Normal” mode by press the Speed
switch (H). The “Turbo” mode
provide maximum suction power
and the “Normal” mode operates
at a lower sound level.
Power indicator Speed indicator
Power ON
(White LED light)
Note: This product is for dry pick-up only.
“Normal” mode
(Blue LED light)
“Turbo” mode
(White LED light)
Power OFF
S
N
M
G
H
L
B
Z
2

1616
Crevice/ Mini Brush
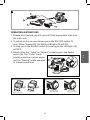
Add or Remove Crevice holder
This accessory includes both Crevice & Brush function.
1. Pull out the Crevice / Mini Brush.
2. Press Mini brush button (M) and Push downward to the end of the
Crevice (N) until you hear a “Click” sound.
1. Optional for using the Crevice (N) / Crevice holder (U).
2. Take out the Crevice (N)
3. Press Dust container release button (C) then turning anti-clockwise
of the Dust container (D).
4. Open the Dust container (D) together with the Filter (E) by turning
anti-clockwise.
5. Remove the Dust container (D) by pulling down.
6. Slide out and remove the Crevice holder (U).
7. Put back the Dust container (D) together with the Filter (E).
8. Turn the Dust container (D) clockwise until you hear a click sound
into position.
9. Crevice holder (U) is now removed.
ACCESSORIES
NM
Push
Press
Click
1
2

GB
17
N
N
U
U
D
C
C
D
E
C
UD
D
D
E
1
6
7
2
5
8
3
4
9

18
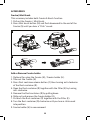
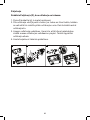
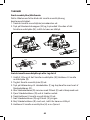
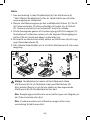
Change Brush Roller
1. Pull the Brush cover release button (e) backwards and dislodge the
Brush cover (f).
2. Lift up the left side of the Brush roller (Y) and then remove it.
3. Use either the Brush roller (Y) or the Animal roller (Y1) for
depending on your requirements.
4. Re-install the rotating Brush roller (Y or Y1) again.
5. Cover back brush cover (f) and check if the brush cover is securely
fixed and the roller brush easily rotates properly with your hand.
e
f
e
1 2
4 5
3
Y
Y
Y
Y1
f

GB
19
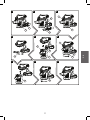
Change Filter
1. Remove the Dust container (D) by pressing the Dust container
r
elease
button (C) then turning anti-clockwise of the Dust container (D).
2. Pull up the Filter from the Dust container.
3. Remove the Inner Filter by turning anti-clockwise.
4. Change either EPA E10 filter (F) or HEPA H13 filter (F1) for Inner
filter.
5. Re-install the Inner Filter by turning clockwise.
6. Put back the Filter to the Dust container.
7. Re-install the Dust container (D) by turning clockwise.
F
F
F
E
D
F
E
D
E
F
E
C
D
C
D
1 2 3
4 5 6 7
EPA E10 Filter
HEPA H13 Filter
(Additional)
or
F1

20
Importance: The Protective cap (e) must be inserted back and
cover the Utility knife (d) to prevent any danger from the Utility
knife (d). Beware hands/fingers to get injury by the exposed
Utility knife (d) when the Protective cap (e) is removed.
Note: Cleaning Performance may vary according to hair type
(human or animal) and length.
Note: It is recommended to clean the roller brush after each use to
have a better result.
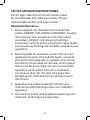
Stand
1. Before use, remove the Protective cap (e) from the Utility knife (d).
* After each cleaning of the roller brush, insert back the Protective
cap (e) to cover the Utility knife (d).
2. Place the stick vacuum cleaner on the Stand (X). Ensure the Floor
Nozzle (S) is inserted stably on the Hook (C) of the Stand (X). The
floor brush surface is horizontal but not tilting.
3. Turn on the vacuum cleaner by pressing the On/O switch (G) once.
Check the roller brush is rotating, then slowly slide the Stand slider
button (W) left and right 5 cycles or above.
4. Most of the dust and hair are cut by Utility knife (d) and sucked into
the Dust container (D).
5. After each cleaning, insert back the Protective cap (e) to cover the
Utility knife (d).
S
X
X
Wc
d
e
G
S
D
W
1
2 3
Sidan laddas ...
Sidan laddas ...
Sidan laddas ...
Sidan laddas ...
Sidan laddas ...
Sidan laddas ...
Sidan laddas ...
Sidan laddas ...
Sidan laddas ...
Sidan laddas ...
Sidan laddas ...
Sidan laddas ...
Sidan laddas ...
Sidan laddas ...
Sidan laddas ...
Sidan laddas ...
Sidan laddas ...
Sidan laddas ...
Sidan laddas ...
Sidan laddas ...
Sidan laddas ...
Sidan laddas ...
Sidan laddas ...
Sidan laddas ...
Sidan laddas ...
Sidan laddas ...
Sidan laddas ...
Sidan laddas ...
Sidan laddas ...
Sidan laddas ...
Sidan laddas ...
Sidan laddas ...
Sidan laddas ...
Sidan laddas ...
Sidan laddas ...
Sidan laddas ...
Sidan laddas ...
Sidan laddas ...
Sidan laddas ...
Sidan laddas ...
Sidan laddas ...
Sidan laddas ...
Sidan laddas ...
Sidan laddas ...
Sidan laddas ...
Sidan laddas ...
Sidan laddas ...
Sidan laddas ...
Sidan laddas ...
Sidan laddas ...
Sidan laddas ...
Sidan laddas ...
Sidan laddas ...
Sidan laddas ...
Sidan laddas ...
Sidan laddas ...
Sidan laddas ...
Sidan laddas ...
Sidan laddas ...
Sidan laddas ...
Sidan laddas ...
Sidan laddas ...
Sidan laddas ...
Sidan laddas ...
Sidan laddas ...
Sidan laddas ...
Sidan laddas ...
Sidan laddas ...
Sidan laddas ...
Sidan laddas ...
Sidan laddas ...
Sidan laddas ...
Sidan laddas ...
Sidan laddas ...
Sidan laddas ...
Sidan laddas ...
Sidan laddas ...
Sidan laddas ...
Sidan laddas ...
Sidan laddas ...
Sidan laddas ...
Sidan laddas ...
Sidan laddas ...
Sidan laddas ...
Sidan laddas ...
Sidan laddas ...
Sidan laddas ...
Sidan laddas ...
Sidan laddas ...
Sidan laddas ...
Sidan laddas ...
Sidan laddas ...
Sidan laddas ...
Sidan laddas ...
Sidan laddas ...
Sidan laddas ...
-
 1
1
-
 2
2
-
 3
3
-
 4
4
-
 5
5
-
 6
6
-
 7
7
-
 8
8
-
 9
9
-
 10
10
-
 11
11
-
 12
12
-
 13
13
-
 14
14
-
 15
15
-
 16
16
-
 17
17
-
 18
18
-
 19
19
-
 20
20
-
 21
21
-
 22
22
-
 23
23
-
 24
24
-
 25
25
-
 26
26
-
 27
27
-
 28
28
-
 29
29
-
 30
30
-
 31
31
-
 32
32
-
 33
33
-
 34
34
-
 35
35
-
 36
36
-
 37
37
-
 38
38
-
 39
39
-
 40
40
-
 41
41
-
 42
42
-
 43
43
-
 44
44
-
 45
45
-
 46
46
-
 47
47
-
 48
48
-
 49
49
-
 50
50
-
 51
51
-
 52
52
-
 53
53
-
 54
54
-
 55
55
-
 56
56
-
 57
57
-
 58
58
-
 59
59
-
 60
60
-
 61
61
-
 62
62
-
 63
63
-
 64
64
-
 65
65
-
 66
66
-
 67
67
-
 68
68
-
 69
69
-
 70
70
-
 71
71
-
 72
72
-
 73
73
-
 74
74
-
 75
75
-
 76
76
-
 77
77
-
 78
78
-
 79
79
-
 80
80
-
 81
81
-
 82
82
-
 83
83
-
 84
84
-
 85
85
-
 86
86
-
 87
87
-
 88
88
-
 89
89
-
 90
90
-
 91
91
-
 92
92
-
 93
93
-
 94
94
-
 95
95
-
 96
96
-
 97
97
-
 98
98
-
 99
99
-
 100
100
-
 101
101
-
 102
102
-
 103
103
-
 104
104
-
 105
105
-
 106
106
-
 107
107
-
 108
108
-
 109
109
-
 110
110
-
 111
111
-
 112
112
-
 113
113
-
 114
114
-
 115
115
-
 116
116


POINT PRO POVC10ANIMAL TRÅDLØS STØVSUGER Bruksanvisning
- Kategori
- Dammsugare
- Typ
- Bruksanvisning
på andra språk
Relaterade papper


Andra dokument
-
 SENZ SEVCS14BL TRÅDLØS STØVSUGER Bruksanvisning
-
SEVERIN HV 7147 Användarmanual
-
Koenic KVR 22221 Bruksanvisning
-
Hoover HF522YSP 011 Användarmanual
-
Grundig VCP 4130 2 In 1 Cordless Stick Vacuum Cleaner Användarmanual
-
SEVERIN HV 7152 Användarmanual
-
-
-
Aeg-Electrolux ZB2811 Bruksanvisning
-
Bosch BCH3P255 Användarmanual
