Denon DCD-2010AE Användarmanual
- Kategori
- CD-spelare
- Typ
- Användarmanual
Denna manual är också lämplig för

SUPER AUDIO CD PLAYER
DCD-2000AE
OPERATING INSTRUCTIONS
BEDIENUNGSANLEITUNG
MODE D’EMPLOI
ISTRUZIONI PER L’USO
INSTRUCCIONES DE OPERACION
GEBRUIKSAANWIJZING
BRUKSANVISNING

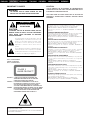
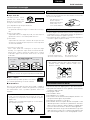
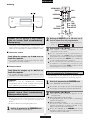
IMPORTANT TO SAFETY
WARNING:
TO PREVENT FIRE OR SHOCK HAZARD, DO NOT
EXPOSE THIS APPLIANCE TO RAIN OR MOISTURE.
CAUTION
RISK OF ELECTRIC SHOCK
DO NOT OPEN
CAUTION:
TO REDUCE THE RISK OF ELECTRIC SHOCK, DO NOT
REMOVE COVER (OR BACK). NO USER SERVICEABLE
PARTS INSIDE. REFER SERVICING TO QUALIFIED
SERVICE PERSONNEL.
The lightning flash with arrowhead symbol, within an
equilateral triangle, is intended to alert the user to the
presence of uninsulated “dangerous voltage” within
the product’s enclosure that may be of sufficient
magnitude to constitute a risk of electric shock to
persons.
The exclamation point within an equilateral triangle is
intended to alert the user to the presence of important
operating and maintenance (servicing) instructions in
the literature accompanying the appliance.
CAUTION:
USE OF CONTROLS OR ADJUSTMENTS OR PERFORMANCE OF
PROCEDURES OTHER THAN THOSE SPECIFIED HEREIN MAY RESULT
IN HAZARDOUS RADIATION EXPOSURE.
THE SUPER AUDIO CD PLAYER SHOULD NOT BE ADJUSTED OR
REPAIRED BY ANYONE EXCEPT PROPERLY QUALIFIED SERVICE
PERSONNEL.
• DECLARATION OF CONFORMITY
We declare under our sole responsibility that this product, to which this
declaration relates, is in conformity with the following standards:
EN60065, EN55013, EN55020, EN61000-3-2 and EN61000-3-3.
Following the provisions of 73/23/EEC, 89/336/EEC and 93/68/EEC
Directive.
• ÜBEREINSTIMMUNGSERKLÄRUNG
Wir erklären unter unserer Verantwortung, daß dieses Produkt, auf das
sich diese Erklärung bezieht, den folgenden Standards entspricht:
EN60065, EN55013, EN55020, EN61000-3-2 und EN61000-3-3.
Entspricht den Verordnungen der Direktive 73/23/EEC, 89/336/EEC und
93/68/EEC.
• DECLARATION DE CONFORMITE
Nous déclarons sous notre seule responsabilité que l’appareil, auquel se
réfère cette déclaration, est conforme aux standards suivants:
EN60065, EN55013, EN55020, EN61000-3-2 et EN61000-3-3.
D’après les dispositions de la Directive 73/23/EEC, 89/336/EEC et
93/68/EEC.
• DICHIARAZIONE DI CONFORMITÀ
Dichiariamo con piena responsabilità che questo prodotto, al quale la
nostra dichiarazione si riferisce, è conforme alle seguenti normative:
EN60065, EN55013, EN55020, EN61000-3-2 e EN61000-3-3.
In conformità con le condizioni delle direttive 73/23/EEC, 89/336/EEC e
93/68/EEC.
• DECLARACIÓN DE CONFORMIDAD
Declaramos bajo nuestra exclusiva responsabilidad que este producto al
que hace referencia esta declaración, está conforme con los siguientes
estándares:
EN60065, EN55013, EN55020, EN61000-3-2 y EN61000-3-3.
Siguiendo las provisiones de las Directivas 73/23/EEC, 89/336/EEC y
93/68/EEC.
• EENVORMIGHEIDSVERKLARING
Wij verklaren uitsluitend op onze verantwoordelijkheid dat dit produkt,
waarop deze verklaring betrekking heeft, in overeenstemming is met de
volgende normen:
EN60065, EN55013, EN55020, EN61000-3-2 en EN61000-3-3.
Volgens de bepalingen van de Richtlijnen 73/23/EEC, 89/336/EEC en
93/68/EEC.
• ÖVERENSSTÄMMELSESINTYG
Härmed intygas helt på eget ansvar att denna produkt, vilken detta intyg
avser, uppfyller följande standarder:
EN60065, EN55013, EN55020, EN61000-3-2 och EN61000-3-3.
Enligt stadgarna i direktiv 73/23/EEC, 89/336/EEC och 93/68/EEC.
ADVARSEL: USYNLIG LASERSTRÅLING VED ÅBNING, NÅR
SIKKERHEDSAFBRYDERE ER UDE AF FUNKTION.
UNDGÅ UDSAETTELSE FOR STRÅLING.
VAROITUS! LAITTEEN KÄYTTÄMINEN MUULLA KUIN TÄSSÄ
KÄYTTÖOHJEESSA MAINITULLA TAVALLA SAATTAA
ALTISTAA KÄYTTÄJÄN TURVALLISUUSLUOKAN 1
YLITTÄVÄLLE NÄKYMÄMTTÖMÄLLE LASERSÄTEILYLLE.
VARNING: OM APPARATEN ANVÄNDS PÅ ANNAT SÄTT ÄN I DENNA
BRUKSANVISNING SPECIFICERATS, KAN ANVÄNDAREN
UTSÄTTAS FÖR OSYNLIG LASERSTRÅLNING SOM
ÖVERSKRIDER GRÄNSEN FÖR LASERKLASS 1.
CLASS 1 LASER PRODUCT
LUOKAN 1 LASERLAITE
KLASS 1 LASERAPPARAT
,
CLASS 1
LASER
PRODUCT
,
,,
ATTENZIONE: QUESTO APPARECCHIO E’ DOTATO DI DISPOSITIVO
OTTICO CON RAGGIO LASER.
L’USO IMPROPRIO DELL’APPARECCHIO PUO’ CAUSARE PERICOLOSE
ESPOSIZIONI A RADIAZIONI!
DEUTSCH FRANCAIS ITALIANO ESPAÑOL NEDERLANDS SVENSKAENGLISH

NOTE ON USE / HINWEISE ZUM GEBRAUCH /
OBSERVATIONS RELATIVES A L’UTILISATION / NOTE SULL’USO
NOTAS SOBRE EL USO / ALVORENS TE GEBRUIKEN / OBSERVERA
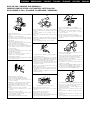
•Avoid high temperatures.
Allow for sufficient heat dispersion when installed in
a rack.
•Vermeiden Sie hohe Temperaturen.
Beachten Sie, daß eine ausreichend Luftzirkulation
gewährleistet wird, wenn das Gerät auf ein Regal
gestellt wird.
• Eviter des températures élevées
Tenir compte d’une dispersion de chaleur suffisante
lors de l’installation sur une étagère.
• Evitate di esporre l’unità a temperature alte.
Assicuratevi che ci sia un’adeguata dispersione del
calore quando installate l’unità in un mobile per
componenti audio.
• Evite altas temperaturas
Permite la suficiente dispersión del calor cuando
está instalado en la consola.
•Vermijd hoge temperaturen.
Zorg voor een degelijk hitteafvoer indien het
apparaat op een rek wordt geplaatst.
• Undvik höga temperaturer.
Se till att det finns möjlighet till god värmeavledning
vid montering i ett rack.
• Handle the power cord carefully.
Hold the plug when unplugging the cord.
• Gehen Sie vorsichtig mit dem Netzkabel um.
Halten Sie das Kabel am Stecker, wenn Sie den
Stecker herausziehen.
• Manipuler le cordon d’alimentation avec précaution.
Tenir la prise lors du débranchement du cordon.
• Manneggiate il filo di alimentazione con cura.
Agite per la spina quando scollegate il cavo dalla
presa.
• Maneje el cordón de energía con cuidado.
Sostenga el enchufe cuando desconecte el cordón
de energía.
• Hanteer het netsnoer voorzichtig.
Houd het snoer bij de stekker vast wanneer deze
moet worden aan- of losgekoppeld.
• Hantera nätkabeln varsamt.
Håll i kabeln när den kopplas från el-uttaget.
• Keep the apparatus free from moisture, water, and dust.
• Halten Sie das Gerät von Feuchtigkeit, Wasser und
Staub fern.
•Protéger l’appareil contre l’humidité, l’eau et
lapoussière.
•Tenete l’unità lontana dall’umidità, dall’acqua e dalla
polvere.
• Mantenga el equipo libre de humedad, agua y polvo.
• Laat geen vochtigheid, water of stof in het apparaat
binnendringen.
• Utsätt inte apparaten för fukt, vatten och damm.
• Unplug the power cord when not using the apparatus
for long periods of time.
•Wenn das Gerät eine längere Zeit nicht verwendet
werden soll, trennen Sie das Netzkabel vom Netzstecker.
• Débrancher le cordon d’alimentation lorsque l’appareil
n’est pas utilisé pendant de longues périodes.
• Disinnestate il filo di alimentazione quando avete
l’intenzione di non usare il filo di alimentazione per un
lungo periodo di tempo.
• Desconecte el cordón de energía cuando no utilice el
equipo por mucho tiempo.
• Neem altijd het netsnoer uit het stopkontakt wanneer
het apparaat gedurende een lange periode niet wordt
gebruikt.
• Koppla ur nätkabeln om apparaten inte kommer att
användas i lång tid.
* (For apparatuses with ventilation holes)
• Do not obstruct the ventilation holes.
• Die Belüftungsöffnungen dürfen nicht verdeckt
werden.
• Ne pas obstruer les trous d’aération.
• Non coprite i fori di ventilazione.
• No obstruya los orificios de ventilación.
• De ventilatieopeningen mogen niet worden beblokkeerd.
• Täpp inte till ventilationsöppningarna.
• Do not let foreign objects into the apparatus.
• Keine fremden Gegenstände in das Gerät kommen
lassen.
• Ne pas laisser des objets étrangers dans l’appareil.
• E’ importante che nessun oggetto è inserito
all’interno dell’unità.
• No deje objetos extraños dentro del equipo.
• Laat geen vreemde voorwerpen in dit apparaat vallen.
• Se till att främmande föremål inte tränger in i
apparaten.
• Do not let insecticides, benzene, and thinner come in
contact with the apparatus.
• Lassen Sie das Gerät nicht mit Insektiziden, Benzin
oder Verdünnungsmitteln in Berührung kommen.
• Ne pas mettre en contact des insecticides, du
benzène et un diluant avec l’appareil.
• Assicuratevvi che l’unità non venga in contatto con
insetticidi, benzolo o solventi.
• No permita el contacto de insecticidas, gasolina y
diluyentes con el equipo.
• Laat geen insektenverdelgende middelen, benzine of
verfverdunner met dit apparaat in kontakt komen.
• Se till att inte insektsmedel på spraybruk, bensen och
thinner kommer i kontakt med apparatens hölje.
• Never disassemble or modify the apparatus in any way.
•Versuchen Sie niemals das Gerät auseinander zu
nehmen oder auf jegliche Art zu verändern.
• Ne jamais démonter ou modifier l’appareil d’une
manière ou d’une autre.
• Non smontate mai, nè modificate l’unità in nessun
modo.
• Nunca desarme o modifique el equipo de ninguna
manera.
• Nooit dit apparaat demonteren of op andere wijze
modifiëren.
•Ta inte isär apparaten och försök inte bygga om den.
ENGLISHDEUTSCHFRANCAISESPAÑOLNEDERLANDSSVENSKA ITALIANO

CAUTION:
• Minimum distances around the apparatus for sufficient ventilation.
• The ventilation should not be impeded by covering the ventilation
openings with items, such as newspapers, table-cloths, curtains, etc..
• No naked flame sources, such as lighted candles, should be placed on the
apparatus.
• Attention should be drawn to the environmental aspects of battery disposal.
• The use of apparatus in tropical and/or moderate climates.
ACHTUNG:
• Die Belüftung sollte auf keinen Fall durch das Abdecken der
Belüftungsöffnungen durch Gegenstände wie beispielsweise Zeitungen,
Tischtücher, Vorhänge o. Ä. behindert werden.
• Auf dem Gerät sollten keinerlei direkten Feuerquellen wie beispielsweise
angezündete Kerzen aufgestellt werden.
• Bitte beachten Sie bei der Entsorgung der Batterien die geltenden
Umweltbestimmungen.
• Das Gerät sollte keinerlei Flüssigkeit, also keinem Tropfen oder Spritzen
ausgesetzt werden.
• Auf dem Gerät sollten keinerlei mit Flüssigkeit gefüllten Behälter wie
beispielsweise Vasen aufgestellt werden.
ATTENTION:
• La ventilation ne doit pas être gênée en recouvrant les ouvertures de la
ventilation avec des objets tels que journaux, rideaux, tissus, etc.
• Aucune flamme nue, par exemple une bougie, ne doit être placée sur
l’appareil.
•Veillez à respecter l’environnement lorsque vous jetez les piles usagées.
•L’appareil ne doit pas être exposé à l’eau ou à l’humidité.
• Aucun objet contenant du liquide, par exemple un vase, ne doit être placé
sur l’appareil.
PRECAUZIONI:
• Le aperture di ventilazione non devono essere ostruite coprendole con
oggetti, quali giornali, tovaglie, tende e così via.
• Non posizionare sull'apparecchiatura fiamme libere, come ad esempio le
candele accese.
•Prestare attenzione agli aspetti legati alla tutela dell'ambiente quando si
smaltisce la batteria.
• L'apparecchiatura non deve essere esposta a gocciolii o spruzzi.
• Non posizionare sull'apparecchiatura nessun oggetto contenete liquidi,
come ad esempio i vasi.
PRECAUCIÓN:
• La ventilación no debe quedar obstruida por hacerse cubierto las
aperturas con objetos como periódicos, manteles, cortinas, etc.
• No debe colocarse sobre el aparato ninguna fuente inflamable sin
protección, como velas encendidas.
•A la hora de deshacerse de las pilas, respete la normativa para el cuidado
del medio ambiente.
• No se expondrá el aparato al goteo o salpicaduras cuando se utilice.
• No se colocarán sobre el aparato objetos llenos de líquido, como jarros.
WAARSCHUWING:
• De ventilatie mag niet worden belemmerd door de ventilatieopeningen af
te dekken met bijvoorbeeld kranten, een tafelkleed, gordijnen, enz.
• Plaats geen open vlammen, bijvoorbeeld een brandende kaars, op het
apparaat.
• Houd u steeds aan de milieuvoorschriften wanneer u gebruikte batterijen
wegdoet.
• Stel het apparaat niet bloot aan druppels of spatten.
• Plaats geen voorwerpen gevuld met water, bijvoorbeeld een vaas, op het
apparaat.
OBSERVERA:
•Ventilationen bör inte förhindras genom att täcka för ventilationsöppningarna
med föremål såsom tidningar, bordsdukar, gardiner osv.
• Inga blottade brandkällor, såsom tända ljus, bör placeras på apparaten.
• Tänk på miljöaspekterna när du bortskaffar batteri.
• Apparaten får inte utsättas för vätska.
• Inga objekt med vätskor, såsom vaser, får placeras på apparaten.
A NOTE ABOUT RECYCLING:
This product’s packaging materials are recyclable and can
be reused. Please dispose of any materials in accordance
with the local recycling regulations.
When discarding the unit, comply with local rules or
regulations.
Batteries should never be thrown away or incinerated
but disposed of in accordance with the local regulations
concerning chemical waste.
This product and the accessories packed together
constitute the applicable product according to the WEEE
directive except batteries.
HINWEIS ZUM RECYCLING:
Das Verpackungsmaterial dieses Produktes ist für zum Recyceln
geeignet und kann wieder verwendet werden. Bitte entsorgen Sie alle
Materialien entsprechend der örtlichen Recycling-Vorschriften.
Beachten Sie bei der Entsorgung des Gerätes die örtlichen Vorschriften
und Bestimmungen.
Die Batterien dürfen nicht in den Hausmüll geworfen oder verbrannt
werden; bitte geben Sie die Batterien gemäß örtlichen Bestimmungen
an den Sammelstellen oder Sondermüllplätzen ab.
Dieses Produkt zusammen mit den Zubehörteilen ist das geltende
Produkt der WEEE-Direktive, davon ausgenommen sind die Batterien.
UNE REMARQUE CONCERNANT LE RECYCLAGE:
Les matériaux d’emballage de ce produit sont recyclables et peuvent
être réutilisés. Veuillez disposer de tout matériau conformément aux
réglements de recylage locaux.
Lorsque vous mettez cet appareil au rebut, respectez les lois ou
réglementations locales.
Les piles ne doivent jamais être jetées ou incinérées, mais mises au
rebut conformément aux réglements locaux concernant les déchets
chimiques.
Ce produit et les accessoires emballés ensemble sont des produits
conformes à la directive DEEE sauf pour les piles.
NOTA RELATIVA AL RICICLAGGIO:
I materiali di imballaggio di questo prodotto sono riutilizzabili e riciclabili.
Smaltire i materiali conformemente alle normative locali sul riciclaggio.
Per smaltire l’unità, osservare la normativa in vigore nel luogo di
utilizzo.
Non gettare le batterie, né incenerirle, ma smaltirle conformemente alla
normativa locale sui rifiuti chimici.
Questo prodotto e gli accessori inclusi nell’imballaggio sono applicabili
alla direttiva RAEE, ad eccezione delle batterie.
ACERCA DEL RECICLAJE:
Los materiales de embalaje de este producto son reciclables y se pueden
volver a utilizar. Disponga de estos materiales siguiendo los reglamentos
de reciclaje de su localidad.
Cuando se deshaga de la unidad, cumpla con las reglas o reglamentos
locales.
Las pilas nunca deberán tirarse ni incinerarse. Deberá disponer de ellas
siguiendo los reglamentos de su localidad relacionados con los
desperdicios químicos.
Este producto junto con los accesorios empaquetados es el producto
aplicable a la directiva RAEE excepto pilas.
EEN AANTEKENING WAT BETREFT HET RECYCLEREN:
Het inpakmateriaal van dit product is recycleerbaar en kan opnieuw gebruikt
worden. Er wordt verzocht om zich van elk afvalmateriaal te ontdoen
volgens de plaatselijke voorschriften.
Volg voor het wegdoen van de speler de voorschriften voor de verwijdering
van wit- en bruingoed op.
Batterijen mogen nooit worden weggegooid of verbrand, maar moeten
volgens de plaatselijke voorschriften betreffende chemisch afval worden
verwijderd.
Op dit product en de meegeleverde accessoires, m.u.v. de batterijen is de
richtlijn voor afgedankte elektrische en elektronische apparaten (WEEE) van
toepassing.
EN KOMMENTAR OM ÅTERVINNING:
Produktens emballage är återvinningsbart och kan återanvändas.
Kassera det enligt lokala återvinningsbestämmelser.
När du kasserar enheten ska du göra det i överensstämmelse med
lokala regler och bestämmelser.
Batterier får absolut inte kastas i soporna eller brännas. Kassera dem
enligt lokala bestämmelser för kemiskt avfall.
Denna apparat och de tillbehör som levereras med den är de som
uppfyller gällande WEEE-direktiv, med undantag av batterierna.
ENGLISHDEUTSCHFRANCAISESPAÑOLNEDERLANDSSVENSKA ITALIANO

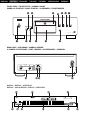
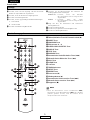
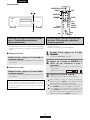
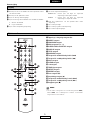
FRONT PANEL / FRONTPLATTE / PANNEAU AVANT
PANNELLO FRONTALE / PANEL FRONTAL / VOORPANEEL / FRONTPANELEN
REAR PANEL / RÜCKWAND / PANNEAU ARRIERE
IL PANNELLO POSTERIORE / PANEL TRASERO / ACHTERPANEEL / BAKSIDAN
!5
!4
!7
!6
SUPER AUDIO CD PLAYER
DCD-2000AE
!3
!2
!1
!0
i
u
r
q
e
w
t
y
o
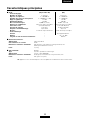
DISPLAY / DISPLAY / AFFICHAGE
DISPLAY / VISUALIZADOR / DISPLAY / DISPLAYEN
!8 !9 @0 @1
@4 @3@7 @2@5
@6
DEUTSCH FRANCAIS ITALIANO ESPAÑOL NEDERLANDS SVENSKAENGLISH

ENGLISH
1
Getting Started
Contents
Accessories ...................................................................................1
Before using .................................................................................1
Caution on handling
Discs
.............................................................................................2
Holding discs ...............................................................................2
Cleaning discs .............................................................................2
Cautions on handling discs .......................................................2
Inserting the batteries...............................................................3
Operating range of the remote control unit.......................3
Part names and functions
Front panel
...................................................................................4
Rear panel ....................................................................................4
Display ..........................................................................................5
Remote control unit ...................................................................5
Connections to the analog output terminal.......................6
Connections to the digital output terminal
(COAXIAL/OPTICAL)
..................................................................6
Normal playback
Opening and closing the disc holder and loading discs .....
7
Setting the top priority playback layer for
Super Audio CDs
........................................................................7
Starting playback.........................................................................8
Stopping playback.......................................................................8
Various playback functions
Direct play
....................................................................................8
Pause ............................................................................................8
Automatic search........................................................................8
Manual search.............................................................................9
Programmed play........................................................................9
Random play................................................................................9
Repeat play ................................................................................10
To display text (Super Audio CD only) ..................................10
Timer-controlled playback......................................................10
Troubleshooting ........................................................................11
Main Specifications..................................................................12
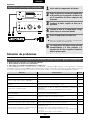
Thank you for purchasing this DENON Super Audio CD Player. Please read the operation instructions thoroughly in order to
acquaint yourself with the Super Audio CD player and achieve maximum satisfaction from it.
Be sure to keep these instructions for future reference, should any questions or problems arise.
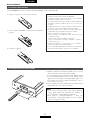
• Please check to make sure the following items are included
with the main unit in the carton:
q Remote control unit (RC-997) .......................................1
w R03/AAA batteries ........................................................2
e RCA pin-plug cord.........................................................1
r Power supply cord........................................................1
t Operating instructions ..................................................1
y Service station list.........................................................1
Accessories
Connections
Getting Started
Operation
Please, record and retain the Model name and serial number
of your set shown on the rating label.
Model name : DCD-2000AE
Serial No.
• Handle the power supply cord carefully
Do not damage or deform the power supply cord. If it is
damaged or deformed, it may cause electric shock or
malfunction when used. When disconnecting the power
supply cord from the wall outlet, hold the plug and do not
pull on the cord.
• Do not open the top cover
In order to prevent electric shock, do not open the top cover.
If problems occur, contact your DENON dealer.
• Do not place anything inside
Prevent metal objects from entering the Super Audio CD
player and avoid spilling liquids on it.
Electric shock or malfunction may result.
Before using
NOTE:
• This Super Audio CD player uses a semiconductor laser.
To ensure stable operation, it is recommended to use the
set indoors at a temperature of 5°C (41°F) ~ 35°C (95°F).
ENGLISH

ENGLISH
Getting Started
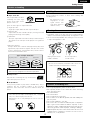
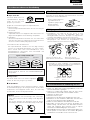
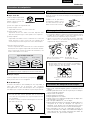
Caution on handling
2 Super Audio CD
Only Super Audio CD discs
containing one of the logos
shown at the right can be
played on this set.
Stereo
There are three types of Super Audio CDs.
q Single layer disc
Single layer Super Audio CD with only an HD layer.
w Dual layer disc
Super Audio CD with a double HD layer, offering extended
playing time and high sound quality.
e Hybrid disc
Two-layer Super Audio CD with an HD layer and a CD layer.
The signals on the CD layer can be played on a regular CD
player.
• About the HD layer
All Super Audio CDs contain an HD (High Density) layer with
high density Super Audio CD signals. This layer can contain
a stereo channel area, a multi-channel area, or both a stereo
channel and multi-channel area.
Types of Super Audio CDs
Single layer disc
Dual layer disc
Hybrid disc
HD layer HD layer CD layer
NOTE:
• This set is not equipped for multi-channel playback.
2 Compact Disc
Only CD discs containing the logo shown at the
right can be played on this set.
2 CD-R/-RW Disc
It may not be possible to play CD-R or CD-RW discs, due to
scratches, dirt, the recording condition or the recorder’s
properties. Discs that have not been finalized cannot be
played.
HD layer
• Fingerprints or dirt on the disc may lower sound and picture
quality or cause breaks in playback. Wipe off fingerprints or dirt.
• Use a commercially available disc cleaning set or a soft cloth
to wipe off fingerprints or dirt.
Wipe gently from the
middle outwards.
Do not wipe with a
circular motion.
NOTE:
• Do not use record spray or antistatic. Also do not use
volatile chemicals such as benzene or thinner.
Record
spray
Thinner Benzene
Avoid touching the surface of discs when loading and
unloading them.
Be careful not to get
fingerprints on the
signal surface (the
side which shines in
rainbow colors).
NOTE:
• CD’s with special shapes (heart-shaped CDs, octagonal
CDs, etc.) cannot be played on this set.
Attempting to do so may damage the set. Do not use
such CDs.
Discs
Holding discs
Cleaning discs
2
ENGLISH
• Do not get fingerprints, grease or dirt on discs.
• Be especially careful not to scratch discs when removing
them from their cases.
• Do not bend discs.
• Do not heat discs.
•Do not enlarge the center hole.
• Do not write on the labeled (printed) side with a ball-point
pen or a pencil.
• Do not stick a label etc. on a disc.
• Do not use discs on which the adhesive part of cellophane
tape or glue used to attach the label is exposed, or discs
with traces of tape or labels that have been peeled off. Such
discs may get stuck inside the player, resulting in damage.
•Water droplets may form on the surface if the disc is moved
suddenly from a cold place to a warm one. Do not use a
hairdryer, etc., to dry the disc.
Cautions on handling discs

ENGLISH
Getting Started
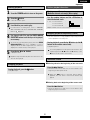
• The DCD-2000AE can be controlled from a distance using the included remote control unit (RC-997).
q Remove the remote control unit’s rear cover.
w Place 2 R03/AAA batteries in the battery compartment in
the direction indicated by the marks.
e Close the rear cover.
Cautions on Batteries:
• Use R03/AAA batteries in this remote control unit.
• Replace the batteries with new ones approximately once
a year, though this depends on the frequency with which
the remote control unit is used.
• If the remote control unit does not operate from close to
the main unit, replace the batteries with new ones, even
if less than a year has passed.
• The included batteries are only for verifying operation.
Replace it with a new battery as soon as possible.
• When inserting the batteries, be careful to do so in the
proper direction, following the < and > marks in the
remote control unit’s battery compartment.
•To prevent damage or battery fluid leakage:
•Do not use a new battery with an old one.
• Do not use two different types of batteries.
• Do not short-circuit, disassemble, heat or dispose of
batteries in flames.
• Remove the batteries when not planning to use the
remote control unit for a long period of time.
• If the batteries should leak, carefully wipe off the fluid
from the inside of the battery compartment, then insert
new batteries.
Inserting the batteries
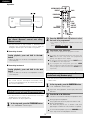
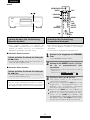
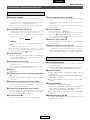
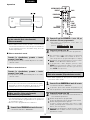
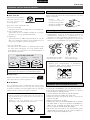
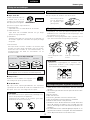
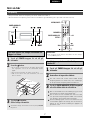
Operating range of the remote control unit
• When operating the remote control unit, point it at the
remote control sensor as shown in the figure.
• The remote control unit can be used from a direct distance
of approximately 8 meters. This distance will be shorter,
however, if there are obstacles in the way or if the remote
control unit is not pointed directly at the remote control
sensor.
• The remote control unit can be operated at a horizontal angle
of up to 30° with respect to the remote control sensor.
30°
30°
Approx. 8 meters
NOTE:
• It may be difficult to operate the remote control unit if the
remote control sensor is exposed to direct sunlight or
strong artificial light.
• Do not press the buttons on the main unit and on the
remote control unit at the same time. Doing so will result
in malfunction.
3
ENGLISH

ENGLISH
Getting Started
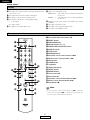
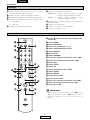
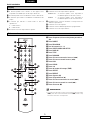
q POWER switch
•Press once to turn the power on.
• If a disc is loaded when the power is turned on, playback
starts automatically.
•Press again to set to the “OFF” position and turn the
power off.
w SUPER AUDIO CD SETUP button
• Use this button to switch the layer of the Super Audio
CD and to set the top priority playback layer.
• The name of the newly set layer is shown on the display
each time the button is pressed.
STEREO:
The Super Audio CD’s layer (stereo) is played.
CD:
The CD layer is played.
✽ For details on “Setting the Top Priority Playback Layer
for Super Audio CDs” ( page 7).
e PURE DIRECT button
• Both the digital output and the display are turned off. In
the PURE DIRECT mode, you can’t use the DISPLAY
button on the remote control unit function.
r Remote control sensor
•This sensor receives the infrared light transmitted from
the wireless remote control unit.
• For remote control, point the supplied remote control
unit RC-997 towards this sensor.
t Display
( page 5)
y Disc holder open/close button (5)
•Press this button to open and close the disc holder.
u Automatic search forward button (9)
•Press this button to move the pickup forward to the
beginning of the next track. Press again to move ahead
to other tracks.
i Automatic search reverse button (8)
•Press this button to return the pickup to the beginning of
the present track. Press again to return to other tracks.
o Stop button (2)
•Press this button to stop playback.
STEREO
CD
!0 Play/Pause button (1/3)
•Press this button to start playback the disc.
• When pressed while the disc holder is open, the disc
holder closes and playback starts.
•Press this button to stop playback temporarily.
!1 Disc holder
• Load discs here. ( page 7)
•Press the disc holder open/close button y to open and
close the disc holder.
• The disc holder can also be closed by pressing the
play/pause button !0.
!2 Super Audio CD indicator
• This indicator lights when playing a Super Audio CD.
!3 Advanced AL24 Processing indicator
• When a CD is loaded or the Super Audio CD’s CD layer
mode is set, the Advanced AL24 Processing circuit
(which reproduces analog waveforms) is activated and
this lights.
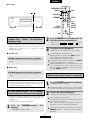
Part names and functions
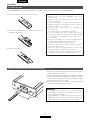
!4 ANALOG OUT terminal
• Connect these to the amplifier’s input terminal.
• Connect using the included RCA pin-plug cord or a
commercially available connection cord.
!5 OPTICAL terminal
• Digital data is output in optical form from this terminal.
• Connect using an optical fiber cable (commercially
available).
✽ With Super Audio CDs, no digital signals are output.
!6 COAXIAL terminal
• This terminal outputs digital data.
• Connect using a 75 Ω/ohms coaxial pin-plug cord
(commercially available) intended for digital audio
connections.
✽ With Super Audio CDs, no digital signals are output.
!7 Power input (AC IN)
• Connect to an AC power supply using the included
power supply cord.
Front panel
Rear panel
4
ENGLISH

ENGLISH
!8 This lights when a CD is loaded or the Super Audio CD’s CD
layer mode is set.
!9 This lights when the track number is displayed.
@0 This lights to indicate the time display mode.
@1 There light to indicate the currently playing audio.
L : Left channel
R : Right channel
@2 This lights in the random play mode.
Display
@3 Lights in the repeat play mode.
REPEAT ALL : This lights when the all-track repeat play
mode is set.
REPEAT 1 : This lights when the one-track repeat play
mode is set.
@4 Displays the title, track number and elapsed time during
playback
@5 This lights in the pause mode.
@6 This lights in the programmed play mode.
@7 This lights in the playback mode.
1 2 3
4 5 6
7 8 9
+10+10
CLEARCLEAR
0
CALLCALLDIRECTDIRECT PROGRAMPROGRAM
TIMETIME
SUPERSUPER
AUDIO CDAUDIO CD
SETUPSETUP
DISPLADISPLAY
ARTISTARTISTTITLETITLE
REPEAREPEATRANDOMRANDOM
OPEN / CLOSEOPEN / CLOSE
RC-997
!1
w
e
r
t
u
i
o
!0
q
y
!2
!3
!8
!4
!5
!6
!9
@0
@1
!7
q Disc holder open/close button (5)
w DIRECT button
e PROGRAM button
r Number buttons (0 ~ 9)
t SUPER AUDIO CD SETUP button
y DISPLAY button
u TITLE button
i RANDOM button
o Automatic search reverse button (8)
!0 Manual search reverse button (6)
!1 CALL button
!2 CLEAR button
!3 +10 button
!4 TIME mode button
!5 ARTIST button
!6 REPEAT button
!7 Pause button (3)
!8 Play button (1)
!9 Automatic search forward button (9)
@0 Manual search forward button (7)
@1 Stop button (2)
• If the automatic search forward button (9), automatic
search reverse button (
8) or +10 button are held in, the
function of these button will be repeated.
MEMO
Remote control unit
5
ENGLISH
Getting Started

ENGLISH
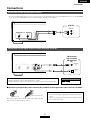
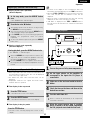
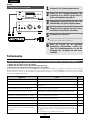
Connections
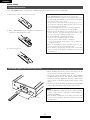
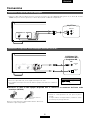
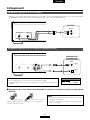
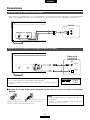
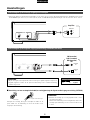
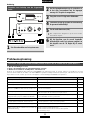
Connections to the analog output terminal
Amplifier
R
L
AUDIO IN
R
L
R
L
Connections
• Use the included RCA pin-plug cord to connect the left (L) and right (R) output terminal (ANALOG OUT) of the DCD-2000AE
to the CD, AUX or TAPE PLAY left (L) and right (R) input terminal of the amplifier.
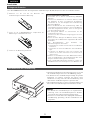
Connections to the digital output terminal (COAXIAL/OPTICAL)
CD Recorder/
D/A Converter/
MD Recorder/
etc.
COAXIAL
IN
OPTICAL
IN
NOTE:
•With Super Audio CDs, no digital signals are output.
• Digital signals are output from optical terminal and coaxial terminal with parallel.
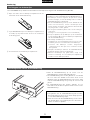
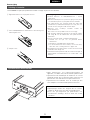
2 Connecting an optical fiber cable (commercially available) to the digital audio input connector (OPTICAL)
Line up in proper direction
Remove the dust cap, line up the cable in the proper directly,
then insert it securely as far as it goes.
NOTE:
•Store the dust cap in a safe place, and be careful not to
lose it.
When not using the terminal, attach the cap to protect
the terminal from dust.
Dust cap
OUT IN
Signal direction
AUDIO Signal
6
ENGLISH

ENGLISH
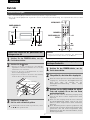
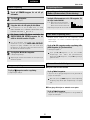
Operation
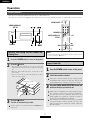
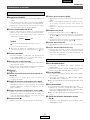
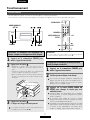
Opening and closing the disc holder and
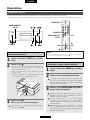
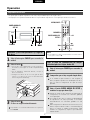
loading discs
1
Press the POWER switch to turn on the power.
2
Press the
55
button.
• Pick up the disc carefully so as not to touch the
signal surface and hold it with the labeled side facing
up.
•With the disc holder fully open, set the disc in the
disc holder.
• Set 12 cm discs in the outer disc guide, 8 cm discs
in the inner disc guide.
3
Press the
55
button.
The disc is automatically loaded.
NOTE:
• If your finger should get caught in the disc holder when it
closes, press the
5 button.
The disc holder closes automatically if the 1/ 3 button
is pressed.
POWER
SUPER AUDIO CD
SET UP
1 2 3
4 5 6
7 8 9
+10+10
CLEARCLEAR
0
CALLCALLDIRECTDIRECT PROGRAMPROGRAM
TIMETIME
SUPERSUPER
AUDIO CDAUDIO CD
SETUPSETUP
DISPLADISPLAY
ARTISTARTISTTITLETITLE
REPEAREPEATRANDOMRANDOM
OPEN / CLOSEOPEN / CLOSE
RC-997
OPEN/CLOSE
NUMBER
SUPER AUDIO CD
SETUP
+10
Normal playback
• The layer for top priority playback after the disc is loaded can be set.
• The layer set for top priority playback upon shipment from the factory (default setting) is the Super Audio CD (stereo) layer.
Setting the top priority playback layer for
Super Audio CDs
1
Press the POWER switch to turn on the power.
2
Check that no disc is loaded.
3
Press the SUPER AUDIO CD SETUP button and
switch to the layer you want to set.
If the layer is switched while the disc is being loaded,
the playback layer switches for that disc, but the top
priority playback layer setting itself does not change.
When a disc is loaded after the setting has been made,
the contents recorded on the set layer are displayed.
If a disc that does not contain the layer set for top
priority playback is loaded, the contents recorded on
another layer are displayed automatically.
This setting is stored in the memory and is not cleared
even when the disc holder is opened or closed or the
power is turned off. To change the setting, repeat the
procedure above.
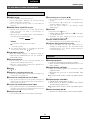
Outer disc guide
12cm disc
Disc holder
7
ENGLISH

ENGLISH
Operation
Various playback functions
Playing a specific track
(Remote control unit only) [Direct play]
Use the number buttons and the +10 button to
select the desired track.
• Ex. : To select track 4 :
To select track 12 :
,
To select track 30 :
,
, ,
Playback starts from the selected track.
0
+10+10+10
2
+10
4
Stopping playback temporarily [Pause]
During playback, press the 1/ 3 button (or the 3
button on the remote control unit).
•Playback pauses.
To resume playback from the position at which the disc
is paused, press the
1/ 3 button (the 1 button, or the
3 button on the remote control unit).
• Use this function to stop playback temporarily,and later
resume playback from that point.
Automatic search
Press the 9 button.
•Press the button more than once to move ahead to the
beginning of subsequent tracks.
When the
9 button is pressed during random
playback, the next track is selected at random and
played.
2 Moving ahead to the beginning of the next track
Press the 8 button.
•Press the button more than once to move back to the
beginning of previous tracks.
2 Moving back to the beginning of the current track
Starting playback
1
Press the POWER switch to turn on the power.
2
Press the
55
button.
• The disc holder opens.
3
Load the disc you want to play.
For Super Audio CDs, use the
SUPER AUDIO
CD SETUP
button to set the layer to be played,
as necessary.
5
Press the 1/ 3 or 1 button.
• Playback starts.
To check the currently playing layer, press the
SUPER
AUDIO CD SETUP button once. “STEREO” or “CD” is
displayed. Press the button again while one of these is
displayed to switch the layer to be played.
Playback stops automatically after the last track on the
disc has been played.
For instructions on loading discs, refer to “OPENING
AND CLOSING THE DISC HOLDER AND LOADING
DISCS” ( page 7).
Stopping playback
During playback, press the
22
button.
• Playback stops.
4
8
ENGLISH

ENGLISH
Operation
1 2 3
4 5 6
7 8 9
+10+10
CLEARCLEAR
0
CALLCALLDIRECTDIRECT PROGRAMPROGRAM
TIMETIME
SUPERSUPER
AUDIO CDAUDIO CD
SETUPSETUP
DISPLADISPLAY
ARTISTARTISTTITLETITLE
REPEAREPEATRANDOMRANDOM
OPEN / CLOSEOPEN / CLOSE
RC-997
OPEN/CLOSE
DIRECT
PROGRAM
TITLE
RANDOM
NUMBER
CALL
CLEAR
+10
TIME
ARTIST
REPEAT
Finding the desired spot while listening to
the sound (Remote control unit only)
[Manual search]
• Use this function to skip forward or backward while
listening to the sound. This function comes in handy for
finding the desired spot in the middle of long tracks.
During playback, press and hold in the 7
button.
• When the button is released, normal playback resumes
from that point.
2 Searching forward
During playback, press and hold in the 6
button.
• When the button is released, normal playback resumes
from that point.
2 Searching backward
NOTE:
• The sound may be interrupted momentarily when
resuming normal playback from the manual search mode.
This is not a malfunction.
Playing the tracks in the desired order
(Remote control unit only) [Programmed play]
• Use this function to select the desired tracks on the disc
and play them in the desired order.
• Up to 30 tracks can be programmed.
1
In the stop mode, press the PROGRAM button.
• The “PROGRAM” indicator lights.
Playing the tracks in random order (Remote
control unit only) [Random play]
• Use this function to play all the tracks on the disc once in
random order.
1
In the stop mode, press the RANDOM button.
• The “RANDOM” indicator lights.
2
Press the 1 or 1/ 3 button.
•A track is selected automatically and playback starts.
During programmed playback:
The programmed tracks are played in random order.
During repeat playback:
The tracks are played once in random order, then
played again in a different order, and this is repeated.
To cancel random playback, press the
RANDOM button
in the stop mode. Normal playback resumes.
If pressed during playback, random play starts from
that track.
Press the NUMBER and +10 buttons to select
the track to be programmed.
• For example, to program the 3rd track and the 12th
track,
press , , and .
2
+10
3
PROGRAM
Press the 1 or 1/ 3 button.
• The tracks are played in the programmed order.
To confirm the programmed playing order, press the
CALL button in the stop mode. The programmed
playing order appears in the display.
To cancel the entire program, press the
DIRECT button
or the
5 button in the stop mode.
If you program the wrong track, press the
CLEAR
button, and then program the right track. (The last track
in the program is erased each time the
CLEAR button
is pressed.)
2
3
9
ENGLISH

ENGLISH
Operation
Timer-controlled playback
1
Press the TITLE button.
• The album title scrolls on the display.
2
Press the ARTIST button.
• The album’s artist name scrolls on the display.
•With Super Audio CDs that contain text information, the
text information included on the disc can be displayed
while in the stop or play mode.
• The album title, artist name and track titles can be
displayed.
•Displayable characters are capital and small letters,
numbers and some symbols.
To display text (Super Audio CD only)
2 Text display in the stop mode
2 Text display in the play mode
Press the TITLE button.
• The title of the currently playing track scrolls on the
display.
•To switch to the display of the recorded time while text
information is being displayed, press the
TIME mode button.
• When the
TITLE or ARTIST button is pressed, the text scrolls
once, then only the first 13 characters of the text are
displayed.
• When the track is switched while the track title is being
displayed, the title of the new track is scrolled.
• “NO TEXT” is displayed if the
TITLE or ARTIST button is
pressed when a disc that does not contain text information
is loaded.
During playback, press the REPEAT button twice.
• The “REPEAT 1” indicator lights.
When the
REPEAT button is pressed twice while in the
stop mode, the set is readied for playback of the first
track. Press the
1 button to start playback.
Press the
REPEAT button once again to cancel the one-
track repeat mode. The display and playback return to
normal.
2 Playing a single track repeatedly
[One-track Repeat]
Repeat play (Remote control unit only)
1
2
Press the 1 or 1/ 3 button.
In the stop mode, press the REPEAT button
once.
• The “REPEAT ALL” indicator lights.
The all-track repeat mode can also be set by pressing
the
REPEAT button during playback.
The one-track repeat mode is set if the
REPEAT button
is pressed again during repeat playback.
If the
REPEAT button is pressed during programmed
playback, the programmed tracks are played
repeatedly.
To cancel the all-track repeat mode, press the
REPEAT
button twice.
2 Playing all the tracks repeatedly
[All-track Repeat]
10
ENGLISH
1
Turn on the power of all system components.
4
Check the time on the timer and then set the
desired turn-on time.
2
Set the input selector on the amplifier to
correspond to the inputs the CD player is
connected to.
3
Make sure a disc has been loaded in the disc
holder.
5
6
Turn the audio timer ON.
When the preset turn-on time is reached,
power is turned on in the system components
and CD playback starts from the first track.
Power is turned off automatically in all components
connected to the timer.

ENGLISH
Page
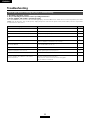
Troubleshooting
1. Are all the connections correct?
2. Are you following the instructions in the operating instructions?
3. Are the amplifier and speakers operating properly?
If the DCD-2000AE does not seem to be functioning properly, check the table below. If this does not solve the problem, the DCD-
2000AE may be defective. Turn off the power, unplug the power cord from the power outlet, and contact your store of purchase
or nearest Denon sales office.
Symptom Check
Disc holder does not open or close.
• Is the power on?
When a disc is loaded, “NO DISC” is displayed.
• Is the disc loaded properly?
When the 1 button is pressed, playback does not
start.
• Is the disc dirty or scratched?
There is no sound or it is distorted.
• Is the output cord properly connected to the amplifier?
•
Have the amplifier controls been set correctly?
No data is output from the digital output terminal
(OPTICAL/COAXIAL).
•
With Super Audio CDs, no digital signals are output.
•
Is the PURE DIRECT mode on?
A specific section of the disc will not play.
•
Is the disc dirty or scratched?
Programmed playback does not work.
•
Has programming been properly done?
CD-R and CD-RW discs cannot be played.
•
For CD-R/-RW discs, has the disc been finalized?
Incorrect operation when buttons on the remote
control are pressed.
•
Is the remote control unit being operated too far from the CD player?
•
Are there obstacles blocking the ray?
•
Is the remote control sensor exposed to strong light?
•
Are the batteries exhausted?
Check again before assuming the player is malfunctioning
7
2 , 7
2
6
–
6
4
2
9
2
3
–
–
–
11
ENGLISH
When a disc is loaded, “00m 00s” is displayed. • Are you attempting to play a disc other than a CD or Super Audio CD? 2

ENGLISH
12
ENGLISH
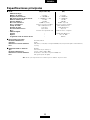
Main Specifications
2 Audio [Super Audio CD] [CD]
• Analog output
Number of channels: 2 channels 2 channels
Frequency response: 2 ~ 100,000 Hz 2 ~ 20,000 Hz
Frequency response range: 2 ~ 50,000 Hz (–3 dB) 2 ~ 20,000 Hz
Signal-to-noise ratio: 113 dB 119 dB
Dynamic range: 110 dB 100 dB
Harmonic distortion: 0.0006 %(1 kHz) 0.0017 %(1 kHz)
Wow and flutter: Below measurable limit Below measurable limit
Output voltage: 2.0 V (10k Ω/ohms) 2.0 V (10k Ω/ohms)
Signal system: 1-bit DSD 16-bit linear PCM
Sampling frequency: 2.822 MHz 44.1 kHz
Discs: Super Audio CD format Compact Disc format
•Digital output
Coaxial: – 0.5 Vp-p/75Ω/ohms
Optical: – –15 ~ 21 dBm
Light emission wavelength: – 660 nm
2 General characteristics
Power supply: AC 230 V, 50 Hz
Power consumption: 20 W
Maximum external dimensions: 434 (width) x 137 (height) x 335 (depth) mm (including protruding parts)
Mass: 13.3 kg
2 Remote control unit: RC-997
Type: Infrared pulse system
Power supply: DC 3 V, 2 R03/AAA batteries
Maximum external dimensions: 44 (width) x 233 (height) x 22 (depth) mm
Mass: 165 g (including batteries)
✽ Design and specifications are subject to change without notice.

DEUTSCH
1
Erste Schritte
Inhalt
Zubehörs........................................................................................1
Vor Inbetriebnahme ...................................................................1
Vorsichtsmassnahmen zur Handhabung
Discs
.............................................................................................2
Handhabung von Discs..............................................................2
Reinigung von Discs ..................................................................2
Vorsichtsmaßnahmen zur Handhabung von Discs...............2
Einlegen der Batterien...............................................................3
Betriebsbereich der Fernbedienung......................................3
Bezeichnung der teile und deren funktionen
Frontplatte
....................................................................................4
Rückwand ....................................................................................4
Anzeige.........................................................................................5
Fernbedienungsgerät .................................................................5
Anschlüsse an die Analog-Ausgangsbuchsen ...................6
Anschlüsse an die Digital-Ausgangsbuchse
(COAXIAL/OPTICAL)
..................................................................6
Normale wiedergabe
Öffnen und schliessen der plattenlade und einlegen einer CD
...7
Einstellung der Schicht-Wiedergabepriorität bei
Super-Audio-CDs
.........................................................................7
Wiedergabe starten....................................................................8
Wiedergabe beenden.................................................................8
Verschiedene wiedergabefunktionen
Direkter Suchlauf
........................................................................8
Pause ............................................................................................8
Automatischer Suchlauf ............................................................8
Manueller Suchlauf.....................................................................9
Programmierte Wiedergabe .....................................................9
Zufallswiedergabe.....................................................................10
Wiederholte Wiedergabe ........................................................10
Textanzeige (Nur Super-Audio-CD) ........................................10
Timergesteuerte wiedergabe ................................................11
Fehlersuche.................................................................................11
Technische daten ......................................................................12
Vielen Dank, daß sich für diesen DENON Super-Audio-CD-Spieler entschieden haben. Lesen Sie sich die folgende
Bedienungsanleitung bitte vollständig durch, so daß Sie sich mit den verschiedenen Funktionen des Gerätes vertraut machen und
diese optimal ausnutzen können.
Bewahren Sie diese Anleitung zum späteren Nachschlagen unbedingt auf, falls sich Fragen oder Probleme ergeben sollten.
• Bitte stellen Sie sicher, dass alle nachfolgend aufgeführten
Zubehörteile vorhanden sind:
q Fernbedienung (RC-997) ...............................................1
w R03/AAA-Batterien........................................................2
e RCA-Steckerkabel .........................................................1
r Netzkabel ......................................................................1
t Bedienungsanleitung ....................................................1
y Kundendienst-Verzeichnis.............................................1
Zubehörs
Anschlüsse
Erste Schritte
Betrieb
Vor Inbetriebnahme
HINWEIS:
• Der Super-Audio-CD-Spieler verwendet einen
Halbleiterlaser. Für einen stabilen Betrieb wird empfohlen,
das Gerät im Raum bei einer Temperatur von 5°C (41°F) ~
35°C (95°F) zu verwenden.
DEUTSCH
Bitte die Modellbezeichnung und die Seriennummer Ihres
Sets, die auf dem Leistungsschild gezeigt wird, aufschreiben
und behalten.
Modellbezeichnung : DCD-2000AE
Seriennummer
• Netzkabel vorsichtig behandeln
Das Netzkabel nicht beschädigen oder verformen. Wenn es
beschädigt oder verformt ist, kann es bei Benutzung einen
elektrischen Schlag oder eine Fehlfunktion verursachen.
Wenn das Netzkabel aus der Wandsteckdose
herausgezogen wird, ziehen Sie am Stecker und nicht am
Kabel.
• Nicht die obere Abdeckung öffnen
Um einen elektrische Schlag zu verhindern, nicht die obere
Abdeckung öffnen.
Wenn Probleme auftreten, setzen Sie sich mit Ihrem
DENON händler in Verbindung.
• Nichts in das Innere plazieren
Lassen Sie keine Metallgegenstände in den Super-Audio-
CD-Player gelangen, und verschütten Sie keine
Flüssigkeiten über dem Gerät.
Die Folge kann eine elektrischer Schlag oder eine
Fehlfunktion sein.

DEUTSCH
Erste Schritte
Vorsichtsmassnahmen zur Handhabung
2 Super-Audio-CD
Auf diesem Gerät können nur
Super-Audio-CD-Discs abgespielt
werden, die eines der rechts
gezeigten Logos enthalten.
Stereo
Es gibt drei verschiedene Typen von Super-Audio-CDs.
q Einschicht-Disc
Einschicht-Super-Audio-CD bestehen aus nur einer einzigen
HD-Schicht.
w Doppelschicht-Disc
Super-Audio-CD mit einer doppelten HD-Schicht liefern eine
längere Wiedergabezeit und erstklassige Tonqualität.
e Hybrid-Disc
Zweischicht-Super-Audio-CD bestehen aus einer HD-Schicht
und einer CD-Schicht. Die Signale auf der CD-Schicht können
auf einem normalen CD-Player abgespielt werden.
• Informationen über die HD-Schicht
Alle Super-Audio-CDs enthalten eine HD (High Density)-
Schicht mit Super-Audio-CD-Signalen von hoher Dichte.
Diese Schicht kann einen Stereokanal-Bereich, einen
Mehrkanal-Bereich oder beides, einen Stereokanal- und
Mehrkanal-Bereich, enthalten.
Typen von Super-Audio-CDs
Einschicht-Disc
Doppelschicht-Disc
Hybrid-Disc
HD-Schicht HD-Schicht
CD-Schicht
HINWEIS:
• Dieses Gerät ist nicht für eine Mehrkanal-Wiedergabe
ausgestattet.
2 Compact-Disc
Auf diesem Gerät können nur CD-Discs abgespielt
werden, die das rechts gezeigte Logo enthalten.
2 CD-R/-RW-Disc
CD-R- oder CD-RW-Discs können aufgrund von Kratzern, Schmutz,
der Aufnahmebedingungen oder der Eigenschaften des Recorders
möglicherweise nicht abgespielt werden. Discs, die nicht fertig
gestellt wurden, können nicht abgespielt werden.
HD-Schicht
•
Fingerabdrücke oder Staub auf der Disc können zu einer
Verschlechterung der Ton- und Bildqualität führen und
Wiedergabeausfälle verursachen. Beseitigen Sie möglicherweise
vorhandene Fingerabdrücke und Schmutz mit einem Tuch.
•Verwenden Sie für die Reinigung ein im Handel erhältliches
Reinigungsset oder wischen Sie Fingerabdrücke und
Schmutz einfach mit einem weichen Tuch ab.
Wischen Sie sanft von der
Mitte der Disc nach außen hin.
Wischen Sie nicht in
kreisförmigen Bewegungen.
HINWEIS:
•
Verwenden Sie weder Schallplatten- noch Antistatiksprays.
Auch flüchtige Chemikalien wie z.B. Benzin oder Farbverdünner
dürfen nicht für die Reinigung benutzt werden.
Schallplatten-
spray
Farbver-
dünner
Benzin
Vermeiden Sie beim Einlegen und Herausnehmen von Discs
das Berühren der Disc-Oberflächen.
Achten Sie darauf, daß keine
Fingerabdrücke auf die
Signalfläche gelangen (die in
Regenbogenfarben
schimmernde Seite).
HINWEIS:
• Speziell geformte CD’s (herzförmige CDs, achteckige
CDs, usw.) können auf dieser Anlage nicht abgespielt
werden.
Der Versuch derartige CDs abzuspielen kann die Anlage
beschädigen. Verzichten Sie auf die Benutzung solcher CDs.
Discs
Handhabung von Discs
Reinigung von Discs
2
DEUTSCH
• Achten Sie darauf, daß weder Fingerabdrücke, Fett noch
Schmutz auf die Discs gelangen.
• Achten Sie insbesondere darauf, daß die Discs beim
Herausnehmen aus ihrer Box nicht zerkratzt werden.
•Verbiegen Sie Discs nicht.
•Erhitzen Sie Discs nicht.
•Vergrößern Sie die Öffnung in der Mitte der Disc nicht.
•Beschriften Sie die etikettierte (bedruckte) Seite der Disc
nicht mit einem Kugelschreiber oder Bleistift.
• Kleben Sie keine Etiketten oder Ähnliches auf die CD.
•Verwenden Sie keine Discs, bei denen der Kleber vom
Etikett freiliegt oder bei denen sich das Etikett teilweise
gelöst hat. Derartige Discs könnten sich im Spieler
verklemmen und Beschädigungen verursachen.
•
Auf der Oberfläche der Disc können sich Wassertropfen bilden, wenn
die Disc plötzlich von einem kalten an einen warmen Ort gebracht
wird. Benutzen Sie in der Nähe von Discs keinen Fön usw..
Vorsichtsmaßnahmen zur Handhabung von Discs

DEUTSCH
Erste Schritte
• Der DCD-2000AE kann mit Hilfe des mitgelieferten Fernbedienunges (RC-997) bequem aus dem Sessel bedient werden.
q Entfernen Sie die sich auf der Rückseite des
Fernbedienunges befindliche Abdeckung.
w Legen Sie die 2 R03/AAA-Batterien entsprechend der
Markierungen in das Batteriefach ein.
e Setzen Sie die Abdeckung wieder auf.
Vorsichtsmaßnahmen zu Batterien
•Verwenden Sie in diesem Fernbedienung R03/AAA-
Batterien.
•Tauschen Sie die Batterien ca. einmal im Jahr aus, wobei
der Zeitpunkt, an dem ein Austausch der Batterien
erforderlich ist, von der Häufigkeit der Fernbedienung-
Benutzung abhängt.
•Wenn der Betrieb mit dem Fernbedienung selbst aus
kurzer Entfernung nicht möglich ist, müssen die Batterien
auch dann ausgetauscht werden, wenn sie weniger als
ein Jahr in Benutzung sind.
• Die beiliegende Batterie ist ausschießlich für den
Testbetrieb vorgesehen.
Tauschen Sie diese so bald wie möglich gegen eine neue
Batterie aus.
• Achten Sie beim Einlegen der Batterien auf die richtige
Ausrichtung der im Batteriefach aufgeführten <- und >-
Polaritäten.
• Um Beschädigungen und Auslaufen von
Batterieflüssigkeit zu vermeiden:
•Verwenden Sie niemals eine alte und eine neue Batterie
zusammen.
•Verwenden Sie nicht zwei Batterien unterschiedlichen
Typs.
• Schließen Sie Batterien nicht kurz, zerlegen und
erhitzen Sie sie nicht und werfen Sie sie auch nicht in
offenes Feuer.
• Nehmen Sie die Batterien aus dem Batteriefach heraus,
wenn sie beabsichtigen, das Fernbedienung über einen
längeren Zeitraum hinweg nicht zu benutzen.
• Sollte einmal Batterieflüssigkeit auslaufen, reinigen Sie
das Batteriefach sofort und legen Sie neue Batterien ein.
Einlegen der Batterien
Betriebsbereich der Fernbedienung
•Wenn die Fernbedienung verwendet wird, richten Sie sie auf
den Fernbedienungssensor wie in der Abbildung gezeigt.
• Die Reichweite des Fernbedienunges beträgt aus gerader
Entfernung ca. 8 Meter, verringert sich jedoch, wenn
Hindernisse im Weg sind oder das Fernbedienung nicht
direkt auf den Fernbedienungssensor gerichtet wird.
• Das Fernbedienung kann in einem horizontalen Winkel von
bis zu 30° zum Fernbedienungssensor betrieben werden.
30°
30°
Ca. 8 Meter
HINWEIS:
• Der Betrieb des Fernbedienunges ist möglicherweise
schwierig, wenn der Fernbedienungssensor direktem
Sonnenlicht oder starkem Kunstlicht ausgesetzt ist.
• Drücken Sie niemals Tasten am Hauptgerät und auf dem
Fernbedienung gleichzeitig, da dies Fehlfunktionen zur
Folge hätte.
3
DEUTSCH
Sidan laddas...
Sidan laddas...
Sidan laddas...
Sidan laddas...
Sidan laddas...
Sidan laddas...
Sidan laddas...
Sidan laddas...
Sidan laddas...
Sidan laddas...
Sidan laddas...
Sidan laddas...
Sidan laddas...
Sidan laddas...
Sidan laddas...
Sidan laddas...
Sidan laddas...
Sidan laddas...
Sidan laddas...
Sidan laddas...
Sidan laddas...
Sidan laddas...
Sidan laddas...
Sidan laddas...
Sidan laddas...
Sidan laddas...
Sidan laddas...
Sidan laddas...
Sidan laddas...
Sidan laddas...
Sidan laddas...
Sidan laddas...
Sidan laddas...
Sidan laddas...
Sidan laddas...
Sidan laddas...
Sidan laddas...
Sidan laddas...
Sidan laddas...
Sidan laddas...
Sidan laddas...
Sidan laddas...
Sidan laddas...
Sidan laddas...
Sidan laddas...
Sidan laddas...
Sidan laddas...
Sidan laddas...
Sidan laddas...
Sidan laddas...
Sidan laddas...
Sidan laddas...
Sidan laddas...
Sidan laddas...
Sidan laddas...
Sidan laddas...
Sidan laddas...
Sidan laddas...
Sidan laddas...
Sidan laddas...
Sidan laddas...
Sidan laddas...
Sidan laddas...
Sidan laddas...
Sidan laddas...
Sidan laddas...
Sidan laddas...
Sidan laddas...
Sidan laddas...
Sidan laddas...
-
 1
1
-
 2
2
-
 3
3
-
 4
4
-
 5
5
-
 6
6
-
 7
7
-
 8
8
-
 9
9
-
 10
10
-
 11
11
-
 12
12
-
 13
13
-
 14
14
-
 15
15
-
 16
16
-
 17
17
-
 18
18
-
 19
19
-
 20
20
-
 21
21
-
 22
22
-
 23
23
-
 24
24
-
 25
25
-
 26
26
-
 27
27
-
 28
28
-
 29
29
-
 30
30
-
 31
31
-
 32
32
-
 33
33
-
 34
34
-
 35
35
-
 36
36
-
 37
37
-
 38
38
-
 39
39
-
 40
40
-
 41
41
-
 42
42
-
 43
43
-
 44
44
-
 45
45
-
 46
46
-
 47
47
-
 48
48
-
 49
49
-
 50
50
-
 51
51
-
 52
52
-
 53
53
-
 54
54
-
 55
55
-
 56
56
-
 57
57
-
 58
58
-
 59
59
-
 60
60
-
 61
61
-
 62
62
-
 63
63
-
 64
64
-
 65
65
-
 66
66
-
 67
67
-
 68
68
-
 69
69
-
 70
70
-
 71
71
-
 72
72
-
 73
73
-
 74
74
-
 75
75
-
 76
76
-
 77
77
-
 78
78
-
 79
79
-
 80
80
-
 81
81
-
 82
82
-
 83
83
-
 84
84
-
 85
85
-
 86
86
-
 87
87
-
 88
88
-
 89
89
-
 90
90


Denon DCD-2010AE Användarmanual
- Kategori
- CD-spelare
- Typ
- Användarmanual
- Denna manual är också lämplig för
på andra språk
- italiano: Denon DCD-2010AE Manuale utente
- español: Denon DCD-2010AE Manual de usuario
- Deutsch: Denon DCD-2010AE Benutzerhandbuch
- français: Denon DCD-2010AE Manuel utilisateur
- English: Denon DCD-2010AE User manual
- Nederlands: Denon DCD-2010AE Handleiding
Relaterade papper
Andra dokument
-
Sony SCD-XE800 Bruksanvisning
-
Marantz DN-C615 Bruksanvisning
-
 Astar DVD-3800 Bruksanvisningar
-
Hitachi AXF100WUN Bruksanvisning
-
-
Ask Proxima S3000 Series Bruksanvisningar
-
-
-
-
