
Albert
Operating instructions
Gebrauchsanweisung
Mode d‘emploi
Istruzioni per l‘uso
Manual de instrucciones
Gebruiksaanwijzing
Brugsanvisning
Käyttöohje
Bruksanvisning
Bruksanvisning
Инструкция по эксплуатации

Albert
1
12
15
17
18
11
13
2
J
A
H
R
E
G
A
R
A
N
T
I
E
•
2
Y
E
A
R
S
W
A
R
R
A
N
T
Y
•
2
A
N
N
É
E
S
D
E
G
A
R
A
N
T
I
E
•
2

2
4
8
7
6
5
9
10
3
16
14


Stadler Form Aktiengesellschaft, Chamerstrasse 174, 6300 Zug, Switzerland
Phone +41 41 720 48 48, Fax +41 41 720 48 44, www.stadlerform.com/contact
Share your feedback about Albert on:
Teilen Sie Ihr Feedback von Albert auf:
Partagez votre commentaire sur Albert :
www.stadlerform.com/Reviews
Download instruction manual:
Bedienungsanleitung hier herunterladen:
Téléchargez le mode d’emploi :
www.stadlerform.com/Albert/manual
Watch the video of Albert:
Schauen Sie sich das Video zu Albert an:
Regardez la vidéo du Albert :
www.stadlerform.com/Albert/video
For frequently asked questions go to:
Für häufig gestellte Fragen besuchen Sie:
Trouvez la foire aux questions sur :
www.stadlerform.com/Albert/support

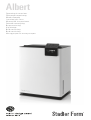
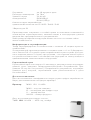
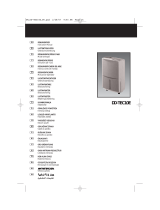
Congratulations! You have just purchased the exceptional air dehumidifier
ALBERT. It will give you great pleasure and improve the indoor air for you.
As with all domestic electrical appliances, particular care is needed with this
model also, in order to avoid injury, fire damage or damage to the appliance.
Please study these operating instructions carefully before using the appli-
ance for the first time and follow the safety advice on the appliance itself.
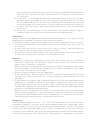
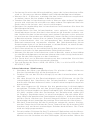
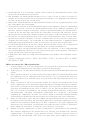
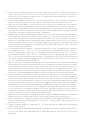
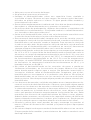
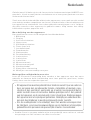
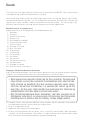
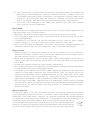
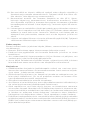
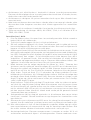
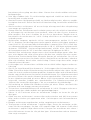
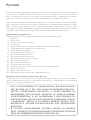
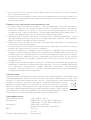
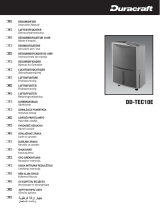
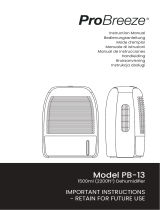
Description of the appliance
The appliance consists of the following main components:
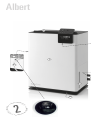
1. Housing
2. Display
3. On/off switch
4. Hygrostat
5. Speed level selector
6. Timer (on/off)
7. Set up timer
8. Swing mode
9. Night mode
10. Rotary control
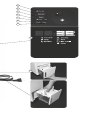
11. A ir out let
12. Air intake
13. Air filter
14. Water tank
15. Water tank level
16. Power cable
17. Hose for drainage operation
18. Wheels for easy transportation
Important safety instructions
Please read through the operating instructions carefully before you use the
appliance for the first time and keep them safely for later reference; if neces-
sary pass them on to the next owner.
• Stadler Form refuses all liability for loss or damage that arises as a result
of failure to follow these operating instructions.
• For indoor use only.
• Do not store the appliance outdoors.
• Place the dehumidifier on a firm, even, waterproof surface. Make sure it is
standing securely so that the dehumidifier cannot tip over or fall down. If it
English
• This appliance can be used by children aged from 8 years and above
and persons with reduced physical, sensory or mental capabilities or
lack of experience and knowledge if they have been given supervision or
instruction concerning use of the appliance in a safe way and understand
the hazards involved. Children shall not play with the appliance. Cleaning
and user maintenance shall not be made by children without supervision.
• If the supply cord is damaged, it must be replaced by the manufacturer,
or its service agent, or a qualified person in order to avoid a hazard.

tipped over, please pull out the plug at once. Water can damage furniture
and floor coverings.
• Unwind the cord completely. An incompletely unwound cord can lead to
overheating and cause a fire.
• Do not use an extension cord, a multiway connector, or a continuously
adjustable speed controller. This can cause overheating, fire, or electric
shock.
• Connect the dehumidifier only to a single-phase socket with the supply
voltage as stated on the type plate.
• Always switch the dehumidifier off with the power key and always discon-
nect the plug from the power socket when the dehumidifier is not in use,
or when it is moved, handled or cleaned. Do not tug at the cord to discon-
nect the plug. Do not disconnect the plug when the dehumidifier is running.
Always first switch the dehumidifier off with the power key.
• The dehumidifier functions optimally at a room temperature of between
13 °C and 35 °C. The specified dehumidifying performance is only achiev-
able in the higher temperature range (from 22 °C) and with higher room
humidity (from 70 %). The lowest recommended operating temperature
is 10 °C. In case of lower temperatures, the DEFROST mode is activated
too frequently. The highest operating temperature is 35 °C and the relative
humidity is 90 %.
• Do not use the dehumidifier anywhere near easily inflammable gases or
substances, near an open fire, or at a location where oil and water could
splash. Do not spray insecticides or similar substances onto the dehumidi-
fier. Make sure that the dehumidifier is not exposed to direct sunlight. Do
not use the dehumidifier in a hothouse or near a bathtub, shower or swim-
ming pool. Do not put any hot or heavy objects on the dehumidifier.
• The air intake and air outflow vents must always be kept open during de-
humidification. Make sure that no objects can get into the air intake or
air outflow vents. This can lead to overheating, fire or electric shock. The
dehumidifier must not be installed behind curtains, drapes or other objects
and obstacles that could impair the air circulation. A safety distance of at
least 50 cm from other objects must be maintained. In addition, a safety
distance of at least 60 cm from wet areas such as showers, washbasins,
sinks, bathtubs etc. must be maintained. A safety distance of 120 cm from
the water supply, e.g. a water tap, is necessary.
• When operating to dry clothes keep the clothing at least 50 cm away from
the unit and do not allow water to drip onto the unit.
• Do not remove the water tank while the dehumidifier is running. Drops of
remaining water could damage furniture and floor-coverings.
• Wait for 3 – 5 minutes after switching the dehumidifier off before you
switch it back on again.
• Do not immerse the dehumidifier into water or any other liquids and do not
pour water or any other liquids onto the appliance or into the air intake and
air outflow vents.
• Clean the dehumidifier regularly, following the cleaning instructions.
• Always transport the dehumidifier in an upright position. Before using the
dehumidifier for the first time, leave it standing in an upright position for
24 hours. Always stand the dehumidifier in an upright position immediately
after transporting the appliance, and wait for at least 60 minutes before
switching it back on. The water tank must be emptied every time before
transport.

• The dehumidifier must always be operated according to this instruction
manual. Non-observance of these instructions can lead to injuries, a fire,
electric shock or faults in the appliance.
• The dehumidifier is designed for private use indoors and is not intended
for commercial use.
• Do not use the dehumidifier if it is faulty or could show signs of damage, or
if it is not functioning correctly. Disconnect the plug from the power socket.
• The appliance shall be installed in accordance with national wiring regula-
tions.
• Type and rating of fuses: 2010; AC 250 V; T;5A; L or 2A*or UTE or TMD;
AC 250 V; T;10A
Setting up / operation
1. Place Albert on a flat surface in the desired area. Plug the power cable
(16) into an electric socket.
2. Press the on/off switch (3) to turn on the dehumidifier.
3. You can select the speed of the fan in the dehumidifier by pushing the
speed level selector (5). There are 3 speed levels. If the speed is higher,
the dehumidifying performance also increases.
4. With the hygrostat (4) the desired humidity level can be set. Press on the
knob hygrostat (4) and change to desired humidity level with the rotary
control (10). Humidity levels between 30 and 80 % or continuous running
(CO in display) can be selected. A humidity level not higher than 60 % is
suggested in general. If the dehumidifier reached the selected humidity,
the control panel is flashing and the unit will turn off. After that, Albert
will check the humidity level in constant intervals by turning on the fan
for a short time.
5. With the timer you can select precisely when Albert should be running.
The timer can be activated by pressing the knob timer on/off (6) and the
LED will be lit. If you press the knob again the timer will not be active and
the LED will be off. To set the timer follow these instructions:
6. Set the time: Press set (7) for 5 seconds and the symbol for hour is
shown blinking in the display, in addition the hours are blinking. Now you
can choose the correct hour with the rotary control (10). If the hours are
correct, press set (7) again and the minutes can be adjusted the same
way. To finish press set (7) again.
7. Set the timer: Press set (7) shortly and now you can set the time when
the unit should turn on (timer on) and the time when the unit should
stop (timer off), setting is the same as for the time above. If the timer
is activated (blue LED is on), the dehumidifier will start and stop every
day at the set time (this is ideal for example to use the cheaper power
tarifs at night).
8. The swing mode (8) allows to optimally distribute the dry air in the room.
This mode is also suitable for example to dry clothes fast and efficient.
9. If you find the display and LED too bright (in a bedroom for example), you
may reduce the light intensity by pressing the night mode (9).
10. Once the water tank is full, the blinking symbol will appear on the dis-
play and the dehumidifier turns off automatically. Please empty the tank.
Once you put back the tank, the unit will automatically restart.
11. Defrost function: If the temperature in the room is below 10 °C, the de-
humidifier automatically runs in defrost mode. This mode is shown on

the display and frost build up in the unit will be avoided during dehumidi-
fication. This function will be activated every 25 minutes for a duration
of 7 minutes.
12. If desired, it is possible to connect a drainage hose to the unit for per-
manent water drainage. In this case connect the hose (2 m) (17) to the
unit through the hole in the back of the dehumidifier and place the end
of the drainage in a water outlet. Please make sure the end of the hose
is lower than the spout, otherwise the water will not drain and flooding
may occur.
13. For easy side movement of the unit there are hidden wheels (18) at-
tached. Empty the tank first before moving the dehumidifier.
Cleaning
Before servicing the appliance and after each occasion of use, switch off the
appliance and unplug the mains cable from the socket.
• Attention: Never immerse the appliance in water (danger of short-circuit).
• To clean the appliance, only wipe it down with a damp cloth and then dry
it carefully.
• In case the filter (13) at the air inlet (12) is dirty or dusty, take the filter out
and remove the dirt/dust with a vacuum cleaner.
• If you don’t use the dehumidifier for some time, empty the water tank and
dry the unit fully before storing it in its original carton.
Repairs
• Repairs to electrical appliances must only be carried out by a qualified
electrical technician. If improper repairs are carried out, the warranty
lapses and all liability is refused.
• Never operate the appliance if the adaptor or plug is damaged, after it has
malfunctioned, if it has been dropped or has been damaged in any other
way (cracks/breaks in the casing).
• Do not push any object into the appliance.
• If the appliance is beyond repair, make it unusable immediately by cutting
through the cable and hand it in at the collection point provided for the
purpose.
• In the event of a repair, the following points must be observed before the
appliance is shipped or taken to the dealer: completely empty the water
in the appliance (water tray or water tank), and allow the appliance to dry
completely. Appliances containing residual water may be damaged during
transport, invalidating the warranty.
• Repairs to the refrigeration system of the device must not be carried out by
local service companies, since the device is operated with the flammable
refrigerant R290. Repair work on the refrigeration system may only be car-
ried out by the manufacturer’s authorized technicians.
Disposal
The European directive 2012 / 19 / CE on Waste Electrical and Electronic
Equipment (WEEE), requires that old household electrical appliances must
not be disposed in the normal unsorted municipal waste stream. Old appli-
ances must be collected separately in order to optimize the recovery and re-
cycling of the materials they contain and reduce the impact on human health
and the environment. The crossed out “wheeled bin” symbol on the product

reminds you of your obligation, that when you dispose of the appli-
ance it must be separately collected. Consumers should contact
their local authority or retailer for information concerning the cor-
rect disposal of their old appliance.
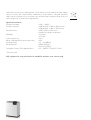
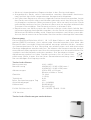
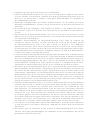
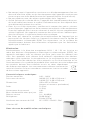
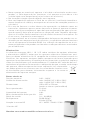
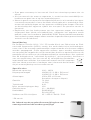
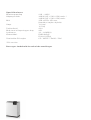
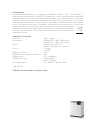
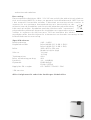
Specifications
Rated voltage 220 – 240 V
Power output 360 W (35 °C 90 % RH) max.*
330 W (35 °C 90 % RH) max.
Dimensions 350 x 655 x 252 mm
(width x height x depth)
Weight 13.3 kg*
12.5 kg
Tank capacity 4.6 L
Max. dehumidification per day 20 L
Sound level 33 – 44 dB(A)
Refrigerant: R290 (60 g)*
R134a (155 g)
Complies with EU regulations CE / WEEE / RoHS / EAC
*EU version
All rights for any technical modifications are reserved

Gratulation! Sie haben soeben den aussergewöhnlichen Luftentfeuchter
ALBERT erworben. Er wird Ihnen viel Freude machen und die Raumluft für
Sie verbessern.
Wie bei allen elektrischen Haushaltsgeräten wird auch bei diesem Gerät zur
Vermeidung von Verletzungen, Brand- oder Geräteschäden besondere Sorg-
falt verlangt. Bitte studieren Sie die vorliegende Betriebsanleitung vor der
Inbetriebnahme und beachten Sie die Sicherheitshinweise auf dem Gerät.
Gerätebeschreibung
Das Gerät besteht aus den folgenden Komponenten:
1. Gehäuse
2. Display
3. Ein/Aus-Knopf
4. Hygrostat
5. Wahl der Geschwindigkeitsstufe
6. Timer (ein/aus)
7. Einstellungen des Timers (Set)
8. Swing-Funktion
9. Nacht-Modus
10. Drehregler
11. Lu ft a u s l a s s
12. Lufteinlass
13. Luftfilter
14. Wassertank
15. Wasserstandsanzeige
16. Stromkabel
17. Schlauch für den Drainage-Betrieb
18. Versteckte Rollen für den einfachen Transport
Wichtige Sicherheitshinweise
Bitte lesen Sie die Gebrauchsanleitung genau durch, bevor Sie das Gerät das
erste Mal in Betrieb nehmen und bewahren Sie sie zum späteren Nachschla-
gen gut auf, geben Sie sie ggf. an den Nachbesitzer weiter.
• Für Schäden, die durch Nichtbeachten dieser Gebrauchsanleitung entste-
hen, lehnt Stadler Form jegliche Haftung ab.
Deutsch
• Dieses Gerät kann von Kindern ab 8 Jahren und Personen mit einge-
schränkten körperlichen, sensorischen oder geistigen Fähigkeiten, aber
auch von unerfahrenen und unwissenden Personen verwendet werden,
sofern diese das Gerät unter Aufsicht verwenden oder von einer anderen
Person über die sichere Verwendung des Gerätes unterwiesen wurden
und sich der damit verbundenen Gefahren bewusst sind. Kinder dürfen
nicht mit dem Gerät spielen. Kinder dürfen das Gerät nur unter Aufsicht
reinigen und warten.
• Wenn das Netzkabel beschädigt ist, muss es vom Hersteller oder in einer
vom Hersteller zugelassenen Werkstatt oder von ähnlich qualifizierten
Personen ersetzt werden, um Gefahren zu vermeiden.

• Das Gerät ist nur zur Verwendung in Innenräumen geeignet.
• Das Gerät nicht im Freien aufbewahren.
• Stellen Sie den Luftentfeuchter auf eine ebene, feste, wasserunempfind-
liche Fläche. Achten Sie auf einen sicheren Stand, so dass der Luftent-
feuchter weder umfallen noch herunterfallen kann. Sollte der Luftent-
feuchter umkippen, ziehen Sie umgehend den Stecker aus der Steckdose.
Wasser kann Möbel und Fußbodenbeläge beschädigen.
• Wickeln Sie das Netzkabel vollständig ab. Ein nicht vollständig abgewi-
ckeltes Kabel kann zu Überhitzung führen und einen Brand verursachen.
• Verwenden Sie kein Verlängerungskabel, Steckerleiste oder stufenlo-
sen Geschwindigkeitsregler. Dies kann zu einer Überhitzung, Brand oder
Stromschlag führen.
• Schließen Sie den Luftentfeuchter nur an eine einphasige, geerdete
Steckdose mit der auf dem Typenschild angegebenen Netzspannung an.
• Schalten Sie den Luftentfeuchter stets mit der Betriebstaste aus und zie-
hen Sie stets den Netzstecker aus der Steckdose, wenn der Luftentfeuch-
ter nicht gebraucht, oder wenn er bewegt, angefasst oder gereinigt wird.
Zum Herausziehen des Netzsteckers nicht an der Schnur zerren. Ziehen
Sie nicht den Netzstecker aus der Steckdose, während der Luftentfeuch-
ter in Betrieb ist, sondern schalten Sie immer zuerst den Luftentfeuchter
mit der Betriebstaste aus.
• Der Luftentfeuchter arbeitet optimal bei einer Raumtemperatur von 13 °C
bis 35 °C. Die angegebene Entfeuchtungsleistung ist nur im höheren
Temperaturbereich (ab 22 °C) und bei hoher Luftfeuchtigkeit (ab 70 %)
erreichbar. Die niedrigste empfohlene Betriebstemperatur beträgt 10 °C.
Bei tieferen Temperaturen wird die DEFROST (Abtau-) Funktion zu häufig
aktiviert. Die höchste Betriebstemperatur beträgt 35 °C, die höchste rela-
tive Luftfeuchtigkeit 90 %.
• Verwenden Sie den Luftentfeuchter nicht in der Nähe von leicht ent-
flammbaren Gasen oder Stoffen, in der Nähe von offenem Feuer oder
an einer Stelle, wo Öl oder Wasser spritzen können. Sprühen Sie keine
Insektizide oder ähnliche Substanzen auf den Luftentfeuchter. Stellen
Sie sicher, dass der Luftentfeuchter nicht direkter Sonneneinstrah-
lung ausgesetzt wird. Verwenden Sie den Luftentfeuchter nicht in
einem Treibhaus oder in der Nähe eines Bades, einer Dusche oder eines
Schwimmbeckens. Stellen Sie keine heißen oder schweren Gegenstände
auf den Luftentfeuchter.
• Die Luftein- und -austrittsöffnungen müssen während des Entfeuch-
tungsbetriebes immer geöffnet sein. Achten Sie darauf, dass keine Ge-
genstände in die Luftein- oder -austrittsöffnungen geraten können. Dies
kann zu einer Überhitzung, Brand oder Stromschlag führen. Der Luftent-
feuchter darf nicht hinter Vorhängen oder anderen Gegenständen oder
Hindernissen, die die Luftzirkulation störend beeinflussen können, auf-
gestellt werden. Ein Sicherheitsabstand von mindestens 50 cm von an-
deren Gegenständen ist einzuhalten. Zudem ist ein Sicherheitsabstand
von mindestens 60 cm zu Nasszellen wie Duschen, Waschbecken, Spül-
becken, Badewannen etc. einzuhalten. Von festen Wasseraustrittsstellen
ist zudem ein Abstand von 120 cm erforderlich.
• Beim Einsatz zur Trocknung von Textilien muss ein Mindestabstand von
50 cm zwischen Textilien und Luftentfeuchter eingehalten werden. Es
darf kein Wasser auf das Gerät tropfen.

• Entfernen Sie nicht den Wasserbehälter, wenn der Luftentfeuchter in Be-
trieb ist. Restwasser könnte Möbel und Fußbodenbeläge beschädigen.
• Warten Sie 3 – 5 Minuten, nachdem Sie den Luftentfeuchter ausgeschal-
tet haben, bevor Sie ihn wieder in Betrieb nehmen.
• Tauchen Sie den Luftentfeuchter nicht in Wasser oder andere Flüssigkei-
ten ein und schütten Sie nicht Wasser oder andere Flüssigkeiten über das
Gerät oder in die Luftein- und -austrittsöffnungen.
• Reinigen Sie regelmäßig den Luftentfeuchter und beachten Sie dazu die
Reinigungsanleitung.
• Transportieren Sie den Luftentfeuchter stets aufrecht. Vor der ersten
Inbetriebnahme lassen Sie den Luftentfeuchter 24 Stunden aufrecht ste-
hen. Stellen Sie den Luftentfeuchter nach jedem Transport sofort aufrecht
hin und warten Sie mindestens 60 Minuten, bevor Sie den Luftentfeuchter
in Betrieb nehmen. Leeren Sie vor jedem Transport den Wasserbehälter.
• Der Luftentfeuchter darf nur entsprechend den Anweisungen dieser
Gebrauchsanweisung verwendet werden. Bei Nichtbeachtung dieser
Anweisungen kann es zu Verletzungen, zu einem Brand, zu einem Strom-
schlag oder zu Gerätedefekten kommen.
• Der Luftentfeuchter ist ausschließlich für den privaten Gebrauch in Innen-
räumen und nicht für den gewerblichen Gebrauch bestimmt.
• Nehmen Sie diesen Luftentfeuchter nicht in Betrieb, wenn er beschädigt
ist oder Beschädigungen aufweisen könnte oder nicht richtig funktioniert.
Ziehen Sie den Netzstecker aus der Steckdose.
• Das Gerät darf nur in Übereinstimmung mit den nationalen Vorschriften
für elektrische Anschlüsse verwendet werden.
• Typ und Rating der Fuses: 2010; AC 250 V; T;5A; L or 2A*or UTE or TMD;
AC 250 V; T;10A
Inbetriebnahme / Bedienung
1. Nachdem Sie Albert am gewünschten Ort platziert haben, schliessen
Sie das Stromkabel (16) an der Steckdose an.
2. Drücken Sie auf den Ein/Aus-Knopf (3) um den Luftentfeuchter einzu-
schalten.
3. Mit dem Knopf für die Geschwindigkeitsstufe (5) können sie die Ge-
schwindigkeit des Ventilators des Luftentfeuchters steuern. Es gibt
drei Stufen. Bei den höheren Stufen ist die Entfeuchtungsleistung auch
etwas höher.
4. Mit dem Hygrostat (4) können Sie die gewünschte Luftfeuchtigkeit
auswählen. Drücken Sie auf den Knopf Hygrostat (4) und wählen Sie
die Ziel-Luftfeuchtigkeit mit dem Drehregler (10). Sie können zwischen
30 – 80% wählen oder den Entfeuchter auf Dauerbetrieb stellen (CO
im Display). Empfehlenswert ist eine Feuchtigkeit, die nicht über 60 %
liegt. Wenn die gewünschte Feuchtigkeit erreicht ist, blinkt die Anzeige
und das Gerät schaltet aus. Danach überprüft Albert in Intervallen die
Feuchtigkeit durch jeweilige kurzzeitige Einschaltung des Ventilators.
5. Mit dem Timer können Sie den Entfeuchter zeitgenau steuern. Sie kön-
nen den Timer durch Drücken der Taste Timer ein/aus (6) aktivieren (LED
leuchtet auf) und durch nochmaliges Drücken deaktivieren. Der Timer
wird wir folgt programmiert:
6. Zeit einstellen: Drücken Sie Set (7) während 5 Sekunden und das Uhren-
symbol erscheint blinkend im Display, zudem blinken die Stunden. Sie
können nun die Stunden mit dem Drehregler (10) einstellen. Wenn die

Stunden korrekt sind, drücken Sie Set (7) erneut und die Minuten kön-
nen gleich eingestellt werden. Zum Abschluss Set (7) erneut drücken.
7. Timer einstellen: Set Taste (7) kurz drücken und nun können Sie den
Einschaltzeitpunkt „Timer on“ und den Ausschaltzeitpunkt „Timer off“
definieren (Einstellung wie für die Zeit). Falls der Timer aktiviert ist
(blaue LED leuchtet), schaltet sich das Gerät täglich zum gewünschten
Zeitpunkt automatisch ein und wieder aus (ideal um z.B. die günstige-
ren Stromtarife in der Nacht zu nützen).
8. Der Swing-Modus (8) erlaubt es, die trockene Luft optimal im Raum zu
verteilen. Dieser Modus eignet sich z.B. ideal, um Wäsche schnell und
effizent zu trocknen.
9. Sollten Sie das Gerät in einem Raum betreiben, wo das Licht der Anzei-
ge störend wirkt, können Sie dieses durch Drücken des Knopfes für den
Nachtmodus (9) dimmen.
10. Ist der Wassertank voll, sehen Sie dies in Anzeige auf dem Display.
Der Entfeuchter schaltet sich automatisch ab. Bitte enleeren Sie den
Wassertank. Wenn Sie diesen wieder einsetzen, schaltet sich der Ent-
feuchter automatisch wieder ein.
11. Defrost Funktion: Falls die Raumtemperatur unter 10 °C fällt, dann
schaltet das Gerät automatisch auf Defrost. Dieser Vorgang wird im
Display angezeigt und verhindert die Bildung von Frost im Gerät wäh-
rend dem Entfeuchten. Alle 25 Minuten wird dieser Zyklus während 7
Minuten aktiviert.
12. Wenn Sie das Gerät direkt mit dem Abfluss verbinden wollen, haben
Sie die Möglichkeit den Drainage-Schlauch (2 m) (17) am Gerät einzu-
stecken und diesen direkt in einen Abfluss zu leiten. Bitte beachten Sie,
dass das Schlauchende tiefer als der Anfang liegen muss, ansonsten
kann das Wasser nicht abfliessen.
13. Für den einfachen seitlichen Transport sind unterhalb des Geräts Rollen
(18) angebracht. Leeren Sie den Tank zuerst vollständig, nun können Sie
den Entfeuchter ganz leicht an den gewünschten Ort schieben.
Reinigung
Vor jeder Wartung und nach jedem Gebrauch das Gerät ausschalten und von
der Steckdose trennen.
• Achtung: Das Gerät nie ins Wasser tauchen (Kurzschlussgefahr).
• Zur Reinigung nur mit einem feuchten Lappen abreiben und danach gut
trocknen.
• Sollte der Filter (13) beim Lufteinlass (12) verstaubt sein, entfernen Sie
diesen und reinigen Sie ihn mit dem Staubsauger.
• Sollten Sie das Gerät für längere Zeit nicht benötigen, leeren Sie den
Wassertank und lassen Sie das Gerät trocknen, bevor Sie dieses im Ori-
ginalkarton verstauen.
Reparaturen
• Reparaturen an Elektrogeräten (Wechseln des Netzkabels) dürfen nur
von instruierten Fachkräften durchgeführt werden. Bei unsachgemässen
Reparaturen erlischt die Garantie und jegliche Haftung wird abgelehnt.
• Nehmen Sie das Gerät nie in Betrieb, wenn ein Kabel oder Stecker be-
schädigt ist, nach Fehlfunktionen des Gerätes, wenn dieses herunterge-
fallen ist oder auf eine andere Art beschädigt wurde (Risse/Brüche am
Gehäuse).

• Nicht mit irgendwelchen Gegenständen in das Gerät eindringen.
• Ausgedientes Gerät sofort unbrauchbar machen (Netzkabel durchtren-
nen) und bei der dafür vorgesehenen Sammelstelle abgeben.
• Im Falle einer Reparatur müssen folgende Punkte beachtet werden, bevor
das Gerät verschickt oder zum Händler gebracht wird: das Wasser im Ge-
rät komplett ausleeren (Wasserwanne bzw. Wassertank) und das Gerät
vollständig trocknen lassen. Geräte mit Restwasser werden während des
Transports beschädigt. Die Garantie erlischt in diesem Falle.
• Reparaturen am Kältesystem des Gerätes dürfen nicht durch lokale Ser-
viceunternehmen durchgeführt werden, da das Gerät mit dem brennbaren
Kältemittel R290 betrieben wird. Reparaturarbeiten am Kältesystem dür-
fen nur durch autorisierte Techniker des Herstellers durchgeführt werden.
Entsorgung
Die europäische Richtlinie 2012 / 19 / CE über Elektro- und Elektronik-Alt-
geräte (WEEE) verlangt, dass elektrische Haushaltsgeräte nicht über den
Restmüll oder sonstigen Haushaltsabfall entsorgt werden dürfen, sondern
an Sammelpunkten für das Recycling von elektrischen und elektronischen
Geräten abgegeben werden müssen. So können die Verwertung der enthal-
tenen Materialien optimiert und ihre Auswirkungen auf die menschliche Ge-
sundheit und die Umwelt reduziert werden. Das durchgestrichene
Abfalltonnensymbol auf dem Produkt erinnert Sie an diese Ver-
pflichtung. Bitte fragen Sie bei Ihrer Gemeindeverwaltung nach
der zuständigen Entsorgungsstelle.
Technische Daten
Nennspannung 220 – 240 V
Nennleistung 360 W (35 °C 90 % RH) max.*
330 W (35 °C 90 % RH) max.
Abmessungen 350 x 655 x 252 mm
(Breite x Höhe x Tiefe)
Gewicht 13.3 kg*
12.5 kg
Tankinhalt 4.6 L
Max. Entfeuchtung pro Tag 20 L
Schalldruckpegel 33 – 44 dB(A)
Kältemittel: R290 (60 g)*
R134a (155 g)
Erfüllt EU-Vorschrift CE / WEEE / RoHS / EAC
*EU Version
Technische Änderungen vorbehalten

Félicitations! Vous venez de faire l’acquisition d’un superbe déshumidifica-
teur d’air ALBERT. Il vous procurera une grande satisfaction et améliorera la
qualité de votre air intérieur.
Comme pour tous les appareils électriques, ce modèle doit faire l’objet d’une
attention particulière, afin d’éviter les blessures, les incendies ou les dégâts
sur l’appareil. Merci de lire attentivement les instructions d’utilisation avant
la première mise en service de l’appareil et de suivre les conseils de sécurité
indiqués sur l’appareil.
Description de l’appareil
L’appareil se compose des principaux éléments suivants :
1. Boitier
2. Ecran
3. Interrupteur M/A
4. Hygrostat
5. Variateur de vitesse
6. Minuteur (M/A)
7. Programmation du minuteur
8. Fonction Swing
9. Mode nuit
10. Molette de commande
11. S or tie d’air
12. Arrivée d’air
13. Filtre à air
14. Réservoir d’eau
15. Niveau du réservoir d’eau
16. Câble d’alimentation
17. Tuyau pour drainage continu
18. Roue pour un transport facile
Conseils de sécurité importants
Veuillez lire attentivement le mode d‘emploi avant la première mise en
service de l’appareil et conservez-le pour toute consultation ultérieure ou
remettez-le, le cas échéant, au nouveau propriétaire.
• La société Stadler Form décline toute responsabilité des dommages
résultant du non-respect des indications données dans ce mode d‘emploi.
• Pour usage intérieur uniquement.
Français
• Cet appareil peut être utilisé par des enfants de 8 ans et plus et des
personnes dont les capacités physiques, sensorielles ou mentales sont
diminuées, ou manquent d‘expérience et de connaissances si elles ont
été formées ou encadrées pour l‘utilisation de l‘appareil d‘une manière
sécuritaire, et elles sont conscientes des risques encourus. Les enfants
ne doivent pas jouer avec cet appareil. Le nettoyage et l‘entretien de
l‘utilisateur ne doivent pas être effectués par des enfants sans surveil-
lance.
• Pour éviter tout danger, faites remplacer le cordon d‘alimentation
endommagé par le fabricant, un agent agréé ou une personne qualifiée.

• L’appareil ne doit pas être conservé à l’extérieur.
• Placez le déshumidificateur d’air sur une surface plane, solide et résistante
à l’eau. Veillez à une bonne stabilité afin que le déshumidificateur d’air ne
puisse ni se renverser ni tomber. L’eau peut endommager les meubles et
les revêtements de sol.
• Déroulez complètement le cordon d’alimentation. Si le cordon n’est pas
déroulé complètement, il peut y avoir surchauffe, ce qui peut entraîner un
incendie.
• N’utilisez pas de rallonge, ni de réglette à fiches, ni de régleur de vitesse
en continu. Il peut en résulter une surchauffe, un incendie ou une électro-
cution.
• Ne branchez le déshumidificateur d’air qu’à une prise de courant à une
phase, mise à la terre et correspondant à la tension de secteur mentionnée
sur la plaque signalétique.
• Eteignez constamment le déshumidificateur d’air avec la touche de
service et retirez toujours la fiche secteur de la prise de courant quand
le déshumidificateur d’air n’est pas utilisé ou quand il est déplacé,
touché ou nettoyé. Pour retirer la fiche secteur, ne pas tirer sur le cordon.
N’extrayez pas la fiche secteur de la prise de courant pendant que le dés-
humidificateur d’air fonctionne ; éteignez toujours d’abord le déshumidifi-
cateur d’air avec la touche de service.
• La performance de déshumidification précisée ne peut être atteinte qu’aux
températures élevées (à partir de 22 °C) et que lorsque le degré d’humidité
de l’air est élevé (à partir de 70 %). La plus faible température de fonction-
nement recommandée est de 10 °C. En cas de température plus faible, le
mode DEFROST (dégel) est trop souvent activé. La température de fonc-
tionnement la plus élevée est de 35 °C et l’humidité relative est 90 %.
• N’utilisez pas le déshumidificateur d’air à proximité de substances ou de
gaz facilement inflammables, à proximité d’un feu nu ou dans un endroit où
de l’huile ou de l’eau peuvent jaillir. Ne pulvérisez pas d’insecticide ou de
substances semblables sur le déshumidificateur d’air. Assurez-vous que le
déshumidificateur d’air n’est pas exposé directement aux rayons du soleil.
N’utilisez pas le déshumidificateur d’air dans une serre ou à proximité
d’une salle de bain, d’une douche ou d’une piscine. Ne posez pas d’objets
lourds ou chauds sur le déshumidificateur d’air.
• Pendant la déshumidification, les orifices d’entrée et de sortie d’air doivent
toujours être ouverts. Veillez à ce qu’aucun objet ne puisse pénétrer dans
ces orifices. Il pourrait en résulter une surchauffe, un incendie ou une
électrocution. Le déshumidificateur d’air ne doit pas être placé derrière
des rideaux ou d’autres objets ou obstacles susceptibles d’entraver la cir-
culation de l’air. Une distance de sécurité d’au moins 50 cm par rapport
à d’autres objets doit être respectée. En outre, une distance de sécurité
d’au moins 60 cm par rapport aux blocs sanitaires tels que les douches, les
lavabos, les éviers, les baignoires, etc., doit être respectée. Une distance
de 120 cm est, de plus, nécessaire par rapport aux sorties d’eau fixes.
• Lors de son utilisation pour sécher des vêtements, maintenez ces derniers
à une distance d’au moins 50 cm de l’appareil et évitez que l’eau goutte
au dessus.
• Ne retirez pas le réservoir d’eau quand le déshumidificateur d’air fonc-
tionne. L’eau peut endommager les meubles et les revêtements de sol ou
provoquer une électrocution.

• Attendez de 3 à 5 minutes après avoir éteint le déshumidificateur d’air
avant de le remettre en marche.
• Ne plongez le déshumidificateur d’air ni dans l’eau ni dans d’autres li-
quides et ne versez pas d’eau ni d’autres liquides sur l’appareil ou dans les
orifices d’entrée et de sortie d’air.
• Nettoyez régulièrement le déshumidificateur d’air et respectez pour cela
les consignes de nettoyage.
• Transportez toujours le déshumidificateur d’air debout. Avant la première
mise en service, laissez le déshumidificateur d’air debout pendant 24
heures. Après chaque transport, placez immédiatement le déshumidifi-
cateur d’air en position verticale et attendez au moins 60 minutes avant
de le mettre en marche. Avant chaque transport, videz le réservoir d’eau.
• N’utilisez le déshumidificateur d’air que conformément aux instructions
du présent mode d’emploi. Le non respect de ces instructions peut pro-
voquer des blessures, un incendie ou une électrocution. L’appareil peut
également être détérioré si ces instructions ne sont pas respectées.
• Le déshumidificateur d’air est conçu exclusivement pour un usage privé
dans des pièces intérieures et non pour un usage commercial.
• Ne mettez pas ce déshumidificateur d’air en marche s’il est endommagé
ou susceptible de l’être ou s’il ne fonctionne pas correctement. Retirez la
fiche secteur de la prise de courant.
• L’appareil doit être installé conformément aux règles de câblage natio-
nales.
• Type et rating des fuses: 2010; AC 250 V; T;5A; L or 2A*or UTE or TMD;
AC 250 V; T;10A
Mise en marche / Manipulation
1. Placez Albert sur une surface plate sur la zone de votre choix. Branchez
le câble d’alimentation (16) dans une prise électrique.
2. Appuyez sur l’interrupteur M/A (3) pour mettre le déshumidificateur en
route.
3. Vous pouvez choisir la vitesse du ventilateur dans le déshumidificateur
en appuyant sur le sélecteur de vitesse (5). Il y a 3 niveaux de vitesse.
Plus la vitesse est élevée, plus le processus de déshumidification est
efficace.
4. Avec l’hygrostat (4) vous pouvez régler le niveau d’humidité de votre
choix. Appuyez sur la molette hygrostat (4) et changez le niveau d’humi-
dité avec la molette de commande (10). Vous pouvez sélectionner des
niveaux d’humidité entre 30 % et 80 % ou un fonctionnement continu
(CO sur l’écran). En général, un niveau d’humidité inférieur à 60 % est
recommandé. Lorsque l’humidité souhaitée est atteinte, l’affichage
clignote et l’appareil se met en veille. Albert contrôle régulièrement
l’humidité en remettant le ventilateur en route pour un court moment.
5. Avec le minuteur, vous pouvez régler de manière précise les moments
ou Albert fonctionnera. Le minuteur peut être activé en appuyant sur la
molette de minuteur M/A (6) et la DEL s’allumera. Si vous appuyez de
nouveau sur la molette, le minuteur sera désactivé et la DEL s’éteindra.
Pour régler le minuteur, suivez les instructions suivantes:
6. Régler l’heure : Appuyez sur Set (7) pendant 5 secondes et le symbole
des heures apparaitra en clignotant sur l’écran, par ailleurs les heures
clignoteront. À présent, vous pouvez choisir l’heure correcte avec la
molette de commande (10). Une fois que vous avez réglé les heures,

appuyez sur Set de nouveau (7) et les minutes pourront être réglées de
la même manière. Pour terminer, appuyez de nouveau sur Set (7).
7. Régler le minuteur : Appuyez brièvement sur Set (7) et vous pouvez
désormais régler une heure pour activer l’unité (timer on) et une heure
pour éteindre l’unité (timer off), le réglage se fait de la même manière
que celle indiquée plus haut pour le réglage de l’heure. Si le minuteur
est activé (La DEL bleue est allumée), le déshumidificateur s’activera
et s’arrêtera tous les jours aux heures configurées (Cette fonction est
idéale par exemple pour bénéficier des prix d’électricité plus avanta-
geux de nuit).
8. Le mode Swing (8) vous permet de répartir l’air sec dans la pièce de
manière efficace et optimale. Ce mode convient également pour sécher
les vêtements rapidement et efficacement.
9. Si vous trouvez que l’écran DEL est trop lumineux (dans une chambre à
coucher par exemple), vous pouvez réduire l’intensité de la lumière en
appuyant sur le mode nuit (9).
10. Une fois le réservoir d’eau plein, le symbole clignotant apparaitra sur
l’écran et le déshumidificateur s’éteindra automatiquement. Veuillez
alors vider le réservoir. L’unité redémarrera automatiquement, dès que
vous aurez replacé le réservoir.
11. Fonction dégel : Si la température de la pièce est inferieure à 10 °C, le
déshumidificateur fonctionnera automatiquement en mode dégel. Ce
mode s’affiche sur l’écran et la formation de gel dans l’unité ne pourra
pas se produire. Il fonctionne toutes les 25 minutes pendant 7 minutes.
12. Si vous le souhaitez, il est possible de connecter un tuyau de drainage à
l’unité pour un drainage d’eau continu. Dans ce cas, connectez le tuyau
(2 m) (17) à l’unité par le trou à l’arrière du déshumidificateur et placez
l’extrémité du tuyau dans une bouche d’évacuation d’eau. Veuillez vous
assurer que l’extrémité du tuyau est inférieure au réservoir, autrement
l’eau ne sera pas évacuée et des inondations risquent de se produire.
13. Pour faciliter le mouvement latéral de l’unité, des roulettes cachées
sont intégrées (18). Videz le réservoir avant de déplacer le déshumi-
dificateur.
Nettoyage
Avant d’entretenir l’appareil et après chaque utilisation, éteignez l’appareil et
débranchez le câble secteur de la prise.
• Attention : N’immergez jamais l’appareil dans l’eau (risque de court-cir-
cuit).
• Pour nettoyer l’appareil, essuyez-le simplement avec un linge humide et
séchez soigneusement.
• Au cas ou le filtre (13) au niveau de l’arrivée d’air (12) est sale ou pous-
siéreux, sortez-le et enlevez les saletés/la poussière avec un aspirateur.
• Si vous n’utilisez pas le déshumidificateur pendant une longue période,
videz le réservoir d’eau et séchez l’unité complètement avant de la ranger
dans son emballage d’origine.
Réparations
• Les réparations sur les appareils électriques ne doivent être effectuées
que par des électriciens qualifiés. La garantie s’éteint et toute responsa-
bilité est exclue en cas de réparations non conformes aux règles de l‘art.

• Ne mettez jamais l‘appareil en service en cas d’endommagement d’un cor-
don ou d’une fiche, après un dysfonctionnement de l’appareil causé par une
chute ou par une autre détérioration de l’appareil (boîtier fissuré/cassé).
• Ne pas pénétrer avec des objets quelconques dans l’appareil.
• Arrivé au bout de sa durée de vie, l’appareil doit immédiatement être ren-
du inutilisable (sectionner le cordon d’alimentation) et être déposé dans
une déchetterie prévue à cet effet.
• Dans le cas d’une réparation, veuillez tenir compte des points suivants
avant d’envoyer l’appareil ou de le ramener en magasin: videz entièrement
l’eau de l’appareil (bac à eau ou réservoir à eau) et laissez complètement
sécher l’appareil. Les appareils contenant des restes d’eau s’abîment pen-
dant le transport. La garantie devient alors caduque.
• Ne faites pas réparer le système de refroidissement de l’appareil par un
prestataire de services local car l’appareil fonctionne avec le liquide de
refroidissement inflammable R290. Les réparations sur le système de
refroidissement doivent être effectuées uniquement par les techniciens
agrées par le fabricant.
Elimination
Conformément à la directive européenne 2012 / 19 / EC sur la mise au
rebut des déchets d’équipements électriques et électroniques (DEEE), les
appareils ménagers usés ne doivent pas être jetés avec les déchets non
triés. Ces appareils usés doivent être collectés séparément des déchets
ménagers pour optimiser la récupération et le recyclage de leurs compo-
sants dans le but de réduire les effets négatifs sur la santé humaine et sur
l’environnement. Le symbole de poubelle avec roulettes et croix indique que
ces produits doivent être collectés et mis au rebut séparément
des ordures ménagères. Les consommateurs doivent contacter les
autorités locales ou leurs revendeurs concernant la mise au rebut
de leurs vieux appareils.
Caractéristiques techniques
Tension nominale 220 – 240 V
Puissance de sortie 360 W (35 °C 90 % RH) max.*
330 W (35 °C 90 % RH) max.
Dimensions 350 x 655 x 252 mm
(largeur x hauteur x profondeur)
Poids 13,3 kg*
12.5 kg
Contenance du reservoir 4,6 L
Max. déshumidification par jour 20 L
Niveau sonore 33 – 44 dB(A)
Réfrigérant: R290 (60 g)*
R134a (155 g)
Conforme aux normes de l’UE CE / DEEE / RoHS / EAC
*Version UE
Sous réserve de modifications techniques
Sidan laddas ...
Sidan laddas ...
Sidan laddas ...
Sidan laddas ...
Sidan laddas ...
Sidan laddas ...
Sidan laddas ...
Sidan laddas ...
Sidan laddas ...
Sidan laddas ...
Sidan laddas ...
Sidan laddas ...
Sidan laddas ...
Sidan laddas ...
Sidan laddas ...
Sidan laddas ...
Sidan laddas ...
Sidan laddas ...
Sidan laddas ...
Sidan laddas ...
Sidan laddas ...
Sidan laddas ...
Sidan laddas ...
Sidan laddas ...
Sidan laddas ...
Sidan laddas ...
Sidan laddas ...
Sidan laddas ...
Sidan laddas ...
Sidan laddas ...
Sidan laddas ...
Sidan laddas ...
Sidan laddas ...
Sidan laddas ...
Sidan laddas ...
Sidan laddas ...
Sidan laddas ...
Sidan laddas ...
Sidan laddas ...
Sidan laddas ...
Sidan laddas ...
Sidan laddas ...
Sidan laddas ...
Sidan laddas ...
-
 1
1
-
 2
2
-
 3
3
-
 4
4
-
 5
5
-
 6
6
-
 7
7
-
 8
8
-
 9
9
-
 10
10
-
 11
11
-
 12
12
-
 13
13
-
 14
14
-
 15
15
-
 16
16
-
 17
17
-
 18
18
-
 19
19
-
 20
20
-
 21
21
-
 22
22
-
 23
23
-
 24
24
-
 25
25
-
 26
26
-
 27
27
-
 28
28
-
 29
29
-
 30
30
-
 31
31
-
 32
32
-
 33
33
-
 34
34
-
 35
35
-
 36
36
-
 37
37
-
 38
38
-
 39
39
-
 40
40
-
 41
41
-
 42
42
-
 43
43
-
 44
44
-
 45
45
-
 46
46
-
 47
47
-
 48
48
-
 49
49
-
 50
50
-
 51
51
-
 52
52
-
 53
53
-
 54
54
-
 55
55
-
 56
56
-
 57
57
-
 58
58
-
 59
59
-
 60
60
-
 61
61
-
 62
62
-
 63
63
-
 64
64


på andra språk
- italiano: Stadler Form Albert Manuale utente
- español: Stadler Form Albert Manual de usuario
- Deutsch: Stadler Form Albert Benutzerhandbuch
- français: Stadler Form Albert Manuel utilisateur
- dansk: Stadler Form Albert Brugermanual
- Nederlands: Stadler Form Albert Handleiding
Relaterade papper
Andra dokument
-
 Duracraft DD-TEC10E Bruksanvisning
-
 Duracraft DD-TEC10E Användarmanual
-
 Duracraft DD-TEC10E Bruksanvisning
-
 Stylies Pavo Bruksanvisning
-
 Pro Breeze PB-10-UK-FBA-2 Användarmanual
-
 Pro Breeze PB-15-UK-FBA Användarmanual
-
Woods M10 Användarmanual
-
 Pro Breeze PB-13-UK-FBA-2 Användarmanual
-
-


