Sidan laddas...

|TEM 74523
SPRßY.WORTIHG 'I'I
LILI
UVIDE AIRBRUSH ff RIGGER.TYPE)
7JV-2-, HG IV-)=Y r< t: (l.Uri-?,()) TAMTYA
,A xf,r,<tau'"
a.GEäfi.. drE D frr"\*s*är§äö < täL\. x.. &Eaaä
r7-fiEfirEo)nD *!,\iHrEt€. üdr§ 4lI:. altE < rta!,\"
a2!*txr+oEEETJEE Läl\? < /a ä rv\"
a^noli< "t . *§riE*&üL*ft*ä r,/rh?< /jäL\"
aa,rnE. ,\,, ts@Ea€ r?@**I,. s§r.t r:u3<raäu"
a^tt^@ü=f.ll7ltt§t uäL\rcT3 L!"
a:G*@t. lEfi EnäfnH. fttalt@;rE<.ltlnrE!!tl,riL\?<
ti 3 L\.
aa7 -a- ra=- t: rb@ftnä$*.<fü47t. EDrluin!@Bsl
L lr&E uär"\? < l:ä L\" */l+^t}äE?EDrtL,:tälrllD*
r\t.*tt/<<tiäu.
aaf 0)E116+{, v Tlidt+? ) aä U<1*t, i < riä u. +?
v -, E v /et\< ,)ZE +E*ljiGßlt a lJrlFELrJ,:t,.
a = - t,th / \- tEtl tr< äEtt u/J L\? < t a L\o =- l.rL,är|3t t,
<,äE<?"
ar:7-a. >ttll*t ä 8. tL. -7-fi-ztEmtöX. Et
L7-O&*Z)Lö<h'E rii a rJ, < < Lä!\"
a?G*1t*oE. qt-L (rr+- 7^)) za15.tzänöv*t.
I cr.mon
acaetulv Ead ad undeEtand the inst uctions pnor to use. Re6d ard tol-
l'rw dso the ,nanutacturcis ißtruclions supplie.l wilh th€ s€parately availabl€
air source (p.opelbr{ @ d air ()mpcsd.
aue üte ?rörctt fq spräy päirning only.
aDo not e q plep@ the ,iörush aroond a narne.
atlev€. p€irn n€r cnAdrcn or animals.
aNercr pairt a p€rson o. aninal.
allo not pard n€ar food or ddnk
avbdtihe the ttxm while paintiog.
aItE anb.ush needle has a shap point. CarEI€.s or inad€quato handing
nray ca'.6e s€io(§ e.,deiti Do nol l€movs lh€ rpedle änd/or its cos ex-
c€pl lor mirtena'E. Bmoval ol ttE reedle cove. lrom the airbrush ex-
pos€§ th€ needl€ whib paintiog.
aAüa.i üe cotr€rto üe p.irt oJp (trig LEe. Op€rEd or,rEy ca§ spal4e.
a§op tlE air supply wh6 aäaching/ßmoving th€ air hose, ard dudng dis-
6§muy of ttE antEstr.
alt is rccomnrend€d to w€ar protective glass€s/gpggles aid nr4k du.ing
t itr.6*frätx<!\ä&Ea)>7 t tt-p,
a7-hrta7 -ß.Lt <@fr<5 *l " a7
-, = 1> t-fitJ0)+r+r-f ;dti- st17 (P
Fl/A 2aü) <i" B€ZlLl;:6 2tz+ | tatl
äfi -atB-u< < /:ä!,\., =1,+urio+
? t )<ß, ö»l.ebäl\€ä€6D *!.@?,
ittr.< < r:ä r\.
*I7-hrz&Bt aEäß. Btlft4)7 t ,,
I> Ilz'v F nr'Z'€<t "
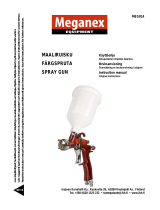
AIR SUPPLY FOR YOUR AIRBRUSH
Your Tamiya Aiörush requires a separately avail-
able air source such as propellant can or ajr com-
pessor for operation. Always read and follow the
manufacturer's caulions included with the air
source. Joint cap is of type-S, PF-1/8, 28 spec.
Use only a compatible air regulator hose.
*Compatible adapter set may be required when
using a propellant can.
@
in-Äo*ffi.äl ä?5Aß. Y a< > tsglo+r
'y 7Zl, )l»D UöLI"T, r7-t,tLäräl\l
L,<L\ä L. älsl@HrnrE<trä - Lh<6D *t "
ßt a7 -h>äEBt ä t 3 ß- a7-Zn$
ö4L. lE*Zl L<t\< 6rzä;Häl,zr,\ä4.
r\?of6Eä'rarrtd < ld ? < l- ä - i: L l;rr D
*rr.5rErl.,tE=t t < < /:äL\"
AIR HOSE
Screw air hos€ onro airbrush, makng sure there ls
no leäkage ot air at connectors. lmproper attäch-
ment of the connector will resutt in poor painling
resulls and loss of air supply.
r 7-ffi1-?L\?
-7 -)\'baff&offiEt ?L\?
Eßlo)itäo) gF
7a t-2-)'\->.v 21>Jl, rr-t,' F
cD1 > -J r'v t-t6B9äEeti. El@ j ) l.
a7-tvLafifraBt ry D r+ uz < liär\"
* 17 - t vt1fio'szwD t.Jlr/lää<EEeä L.
a:.,7 l, .y t -)i -btl*t "
*!7-'>ä&Re6EAlä- Bt LT -t\It
7$ffäryDf'flr< < r:ä L\"
AIR STOP VALVE
when using Spray-work Basic Compressor, re-
rnove ai stop valve and spring as shown.
*Neglecling this will damage the compressor
*Make sure to attach ar stop valve and spnng
when usang a propeilafit can-
(iz y F^ä)
Set contents
Tdgger
(r7-;H (E!ä) @E§)
Air sources (available separately)
HG1:/)Vv+r-.Vrl
SpEy-Wo* HG Air Compres- .LV-h>42OD
sor"Bevo" An Cän 420D
Zav-2-,
AC*,Ha17ry?- SW-653
Spray-Work AC A r Comprussor
,ifl',, t 7
a7-hrlaoD
AirCd 180D
,r[E^ I
iM
Jrlll(
ffi
iq4l
<a7-^-7o)*fr»
Connecring air hose
.nBßrylEFlryT (E!-)
-:,Plasüc painl cup (available separately) .
eI§l4§, v7
*r7-ra@*L\* i Ir, h'DffiÖiLd]*t"
* Make sue lherc is no air leakage.
x 77 L--r- rHG):,7 V rtt-. Vrß (Bt)fi)
x spray-Woi< HG Air Compressor "F*o"
(avaihble separatety)

)Ed?)46 äEEnrE;6?3'" Bfrl15; 3dtxt
ff z <il ä tiqti l-< < /:eL\" rrlfr@7^i7fi
FTLtJE,E*jf€L\t.idätEi!<9" 4f,+@tä
ttEfl@E§ü5il*+?tt i2<*t D*t" 4
=t te)ta=7t r, t7 tvo)fifr+- a.t\
>tirz FqRä u<#*u< < riäu"
* Ftxaröfiqei<3." ä=Et << l:3!\,
THINNING PAINT
Mosl iar paints are too thick lo spray. The paint
should be thim€d urtil n dnps as shom. Use a
mixing iar (not included) to thin paint and stir using
a glass rod, plastic sprue, €tc. The paintthickness
suitable for spraying differs according to the type
ol painl used, atrrosphere/temperature conditions
etc. Test spray uslng plastic sprues or parts
scraps and adjust thickness prior to painting a
model.
*Diagram shows rough guidelanes of thanning ra-
tio lor difierent paints.
- t r-*4H
a+ t tt**fl 7 u U )trK*&411
itfl : ;t.äE
1:1-2:3 4F+ : -?dr*
1:O-2:.1
t=-l:tl,Vr"79-OAQ.
*mä\!\tIäizt*rdEtr. SHtrdrE r,*T"
*) y,]-(tt \.\Ea2t@*l*l.fd D.q"
*Thsthinnerthe pajnt becomeq thenner a mist the air-
*Atoothick lacquer paint will€sult in a spiderweb like
:-ZFB=
a17-t\)t48fr.$t
I U )1-äat < L. *{r7-ä(E*A" ä6ri
1l < L+ xt 7äAü. äF+bt / l)th' 6 fr< z
*t" t-|)1-4 <tJtErr. *+[@qRzg Ll
lr*<tir*r"
aa.v - / \ )t)aßfrtt tJ
F r r-o)r*.lf t.B€1x/d <. :L7 - (J-' ) t t
t-@71 t roN<H tiELrtr& L ir D *e.
ff{iJ= tlE Lr?r.
(=- Frrz F v/§-o f)
=- Frl,Z F r/r,i-0)liil7, l-tfi-aalttJ
4dgi-*q" E+tuU**r D l-=- FlL,1 F
.y t\-ä@q t:- BläUaä(^ä<idD.4flo)
B.Z ti v tht* < ra D *t" :Et@ E t§Eälrr
<äEt < <,:ä L\"
*a7 -t\)taßz aEÄ<1,. a7-1.>*
*7 rtrir7-E flEl*?= *1JL" Eriq
E(,r7-Ffft 16?< < raäl\"
PAINT FLOI'Y ATUUSTMEMT
aAiörush with air stop valve
First, only the air will start iowing by slightly pull-
ing the tigger By further pulling, the paint mist will
be sprayed from the nozzle. The further the trigger
is pulled back, the more paint is sprayed.
aAürush without air stop valve
The air will continuously llow while the air com-
pressor power switch is turned on, whether the
trigger is pulled or not.
(NEEDI.I STOPPER AA'USTMENT)
Trigger movemem can be adjusted using the nee-
dle stoppei Tum the stopper counterclockwise to
ircrease triggEr movement and paint fow, lor a
heavier/broader spray. Adjust according to the
area to be spräyed.
"The air pressure can nol b€ adiusted on the air-
brush. Adjust it on the air source, if adjustable.
<a7-au>o)r+E,,»
How to hold airbrush.
«a7 -)\)ba*aoffi.ä»
Removing air stop valve
*i.7-/t)taaßFß, r:7 t\)ra
7.71)>Jt^t,ät"
*Remove air stop valve and spdng.
*arvJ=tt2+rz»t .
,tv7Z&ZryDtt.
*Loose. grip stop nut and
{Elqo)täo)#ffi)
Thinning paint /
%
Etr
Too thick
*fl EFI
Päint Thinns
*1§2 ^h.- * r e a& aqrr>*t.
*Fill paint cup and attach cover
*,Eljl@^1,?äliEfr u<< /iä!\"
*Avoid paint ovedlow.
0206 @2006 TAMTYA IAirlYA lNC. $7 ONDAWAFA SURUGA-KU, SHIZUOKA422-S6IOJAPAN 74s23 HG WideAnbrush Tngqer Type
{1057253}

ßä
ll&&*: Frr-oBtät zz).z<il*t ä?"
fi äfi UEEE# tr1 0-1scmäriöE?f" i6AääLE
#lärlctr'rtd(. lEtr?ä6Läl&6ärffi <id D *4"
,1>P*Pf;eOP tläB§: =- Frt7. F y,/§
-ä E;l*.tr D l.E l-, Elä U ää,1\ä < l, *3 . E
l&@pR*H UEärrrd< reD. E*6{;i6{ilr<t
E$+rrLhl.< <. lEr\/eE*ärl-f e<äDäf.
Painting large areas: lncrease trigger/needle
mov€ment. Allow about 10 - 15cm distance be-
bveen the aiürush and obiect. Spraying too close
results in paint runs and sägs; while spraying to far
away results in arough finish.
Spraying lines and camouflage patterns: Tum the
needle adjuster clockwise to reduce tdgger/needle
movement and paint fow. Take care to avoid splatter.
e**
*^ioi6<?l*fiEf,i1.6&L,reL\?< tiäL\"
*ü'f&fit*< ur. 4*t/<<l:ät\"
* E H:&tü, d'4 a>a t v t - oBlß.71.v + &tt)
O. e'iß.Lo*ffiä.4.U< < ääL\. */E17-r,
älfrR ULEä B. ü'q h >t t2 + 112 - I - Ä,a tl
Lz</aäL\"
*E@ E IJ,EEOH l\ E IIE* L /I L\? < I ä L\"
,E[ärl4 t^rääBA, 75rSt?. < ra D *l "
*^.?- Fr-rf -,l"iEJatis+?4161ältEä1iä
r L ll L,irL\<< ääL\"
SPRAY PAINTING CAUTIONS
*Never work near an open flame.
*Make sure there is adequate ventilation.
*Always turn off compressor and disconnect
power source after use, After using propellant can,
remove air rcguiator from it.
*Avoid oarnlinq on windv rainv or humid days.
* Do not use a hair dryer or heater for dryang paint.
8*&.a+^*7
a!&t{hv7 Lt4ßo+ ^tL: rä1t $Hdh'v7
ä.6 H l-< 6l Eßt 7li tr #idä?üä( r \. ER l-l.8*f
o)AfrJ 6tb*) z^rL. +Pr7&t *.1" =-F
./l,7' F )// (-äL\? td!\*Ttu6b, =- l: )tht\-
frffiHßä ^ä ä *-n " 17 -ä:ED :Äö, l- U 1l - ZE I
< L, 17-ärüifi L<6*ßrri*iäf" BHIär;6?L
,r < rdä *?2-38 f* O iE r,* l "
*=- F,/t,@+ffi ,*aH<6hTaor, ryDfi !\1.
§,I)25'5*ä.ltrrft dH?z:nrA D*r" trttrli
Eälnr^6äl\*äl-*HU<<riä!\" E&1.=tL
^H]€ifFU*q.
* t =\, h, -rf U h -fi+- FE*E Dälsl{J. &
ffi äL l:A E/<ä.EHEFlTift ,$t,z < liä l\. E
*6tERt?tEt t.< </aD**"
a)xIta+^tl: )7)tht\-t*t\ , ,/ 7:)t0)
*rr908F+ä, +riBFlä?t zEä.1,. i+§1,ä
6" **+. ä1610)sr'7:rEi</d?LD, r,ti{i@t,
oh1fr A ta Ett2 fta +^frä L<< liäl\.
CLEANING THEAIRBRUSH
Clean immediately after finishing painting. Never
allow paint to dry in the airbrush, nozzle or cup.
(acleaning inside the aiörush and cup: Clean
paint from cup and wipe cup and cover using a
rag. Fill cup with the appropriate thinner and at-
tach cove( Fully loosen the needle stopper and
block the nozzle tip with a rag. Allow air to flow
from compressor/can and pullthe tfgger This will
back iush air and thinnerthrough nozzle and cup.
Repeat this two - three times, using fresh thinner
untilall paint residue is eliminated.
*The aiörush needle has a sharp point. Take the
utmost carc while handlinycleaning. The thinner
may be ejected ftom the center hole on the paint
cup cover during cleaning. Be careful to avoid
contact to eye or skin.
Finally, fillfresh thinnerto the cup and spray itto a
rag for cleaning the nozzle.
*lmmediatelv cleän water soluble polycarbonate
(* ä {N [J EEEE}
Spray results
aß=HUEottwit& ORäH I.I,),,.äL\{AH§
Fine
2cn 2cn I 5cm
(E*offioeEE)
Spray painting cautions
**äBBrr.rE*r,*l,r)"
*lvlake surc to have adequate
ventilation while paintinq.
*,<5ffi*
(E#1, v 7e 6Eß@+^?x)
Cleaning internal palts and pairit cup
*F§flcrEljltrE * 5 ä L\) g E
*Clean aiörush belore paint cu€s.
*=- tr,rL@+ffiE;:EB't z <,i ä L\"
*Take the utmost care not to damage needle.

*lmrnediately dean waier soluble polycarbonate
paints with water or appropriate thinner after
painling. Never dbw it to cure in the aiürush, as
some polycarbonate paints cannot b€ r€mov€d
even by using thinrEr, once they have cured.
acleaning nozzl,e: Bemove extemal nozzle cover
and wipe painl from nozzle using thinner on an old
brush. Take care not to damage the needle. Clean
the nozrle il the paint does not flow smoothly duF
ing painting.
t< axE!,'\/Eti</Eüäti
a=-tr,/roryD,lL. faa/.:z<t\/. : =- l.r./l,BEä
,11,. EFI (arör*) €Ülatrlr+?. StrltÄä
u ??<AäL\.
) \- >, - & t+1, - =- l: ,7l-,ra +, z@äö,
=-FrLäfi äEDif 9" =-l:rLt^tra[i{ä. rE
ffi tg<<&t är,\i.l-;iELä,." :-FrLtif
ü. .,t A)tlEG<Et )t *-e=-l: )1,71-.v1r<,
tUütBAr*4"
a ) I )t@)w.o r|t :,/ z,vtt.t >räR-r<w, 9l
?iLäraä*r" Lr'r,. ül.tl.Lt ^tt. 4rs,
tt o), - )t^ir L?L<,.L7 - oüfr,o E 6 etD
*1" !!flär:*:/cD. it*ä(EltLiJ?< U * 2
/.ääl)(rl, n D rtä td L\?< ra ä l\"
DISASSEMBLY FOR THOROTJGH CLEANING
It is ecommended to perbdicalv emove needle
and c+an thoroughly using thinner and sott cloth.
Take enreme carc not to damage ne€dle and nonde.
Renrove air hose prior l,o disassembling the airbrush.
aHow to remove and install needle Flemove
balance weight, loosen needle chuck scrcw, and
carefully pull out the needle. Gently seat the ne€-
dle into nozzle by pressing forwad. and secure in
place by tightening needle chuck screw Attach
balancew€ight.
aRemoving nozzle: Nozzle can be removed us-
ing the included wrench. However, lrequent re-
moval and attachment of the nozzle will wear sea-
lant on its thread. resulting in back flush ot air.
Remove it only when necessary (to clean cured
paint in the nozzle etc).
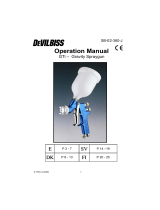
'I:-F/rr./r-/ Needle @8........ -. - -. 7@7145
2./ althr\-l Noale cw€tr............... 7807146
t .,/ Itv lc]&o.$n) I No.2te (o.5mm diä-).... 7807r4r
i5 F!r-lTdggtr......................... 7807057
§..rl,,-E.Ofilr4r l Tngg€, attach screr .780705a
, =-l<tVrry?lNeedtechek....... . . ' 7807059
3.=-l: tt77t:,al Nesl,e sprnB ..... -... 7807060
9 =-l: lV77!>r7l.rr (-/ Needle spdng
sropper.........-..-..-..-.............. 780706'l
ß=-l.,tzfv7+rl N€f,,Je chuck sc.ew .. 7807010
.!1=-Fl,/N€edte...................'..... 780714a
,l?.,(rrr-l Balance weight " """ " " "' 7807149
lr_1=-Frl,.7 Fy./t-/Ne€dleadiuster........ 7807013
lltV- t\)tal An 9,]pya|ve ............... 7807064
IttVlaTT rri/ yalve spnns ............ 7807065
Ii tvta 771) > , ^t- y t \-/ vatve sping
stopp€r . . . . . . . . . . . . . . . . . . . . . . . . . . . . . . . 7807066
il'7 l rA I Gnp..,....'.. -......... ....... 7807067
lqAl.ra 7F.ra +r t A^p stopnur........ 7807068
i0L>t/ Nozzle wench .................... 7807019
,oi!l+, v7 (äE&.1scc) / Paint cup (15cc). 9807036
?i+.t,y7l Paint cup cover........... . ... 9807036
sPntr-u,oH{HG
WIDEAIRBRI'S}I
(TRGGER-TYPE)
7av-2-2Hc
a7-)=y2<t
0.un-t<a)
$*tm ?:ßar{z.=äEäl*. ä€fi. e
Etr. üE*8. A=*Bärir|lä L\A/tr\<.
ttä E rt tr, z, Y -+,- ri7 r. d§is D <,tä
L\" ftär*sooBrxT@Eäräur+t,ei *r.
sootsl)at@ltät . EClg. ,E§,1\äC
ä.+UE < Aäu" *r,:. ci*61-B. r:t
,- F taßE&Ät.ir.lEr,\t/.H*l"
17 -a. > a&.ElEEtXl tth ^ t ? - +, -
Bf,.lirsElL\6b tr < /ja\\" JJB@Lr-tott
*,lraä ä reL\T < L ä L\a
O' =-Frl,r./(-....,.........'.39oFg
'a ./ llrr)\-..................7zle1
3 ./ Xrl (trGo.9in) ....."""r,520F9
a I t n-....................r,200F9
1j --- l. ,t 7l yaAr..........300ts
il tt - t 1v2..................s508
15 r\tta 71 u r,r..............27on
8 A t, 7 7 t-., 7 4 r..........3@F9
2q. 2! =§rr7tv l- (ial.lft.) .Z50oE
7a52a *är r7 (üEl.a&c) .5@8.*§140ts
(J§riuebraE*t)
,rB o54-283-OOO3
For Jäpan6e us€ ont!
Effi
t=
efr
01ll
Rt 03-3899-3765 (EE8^Et Ei*)
E=Ftr€/YE (E-e E)>8:00-20:00
l. E. iflE > 8:00-17:00 ftftffi
74523 HG Wide Aiörush Tdssff Typ€ {1 057253)
<=- t: )towD *v»
Rernoving ne€dle =- l: lV7 l- v 7 ?-,
«,,t /)tht\-ow.D^t »
Removing nozzle cover
9{ö*
* =- t: ltäß{; Lz ß, / x l,trE
täII:I?+Uürr*?.
*Make sue that needle is comctry
§sated a§ shown aner assembly.
O / 7)l,176 0.5nn
Nozzle (05mm dia.)
(äBE}
Explodod view fui,,
z"-,.--1#
61 rl
12
-.'*
4=f(9'
- ) _.-,..
o/1
,W,,
1/4