Parkside PDFP 500 B2 Instructions Manual
- Kategori
- Kraftfulla finspray-system
- Typ
- Instructions Manual
Denna manual är också lämplig för

IAN 109910
AIR PAINT SPRAY GUN PDFP 500 B2
PAINEILMAKÄ YTTÖINEN MAALIRUISKU
Käyttö- ja turvaohjeet
Alkuperäisen käyttöohjeen käännös
AIR PAINT SPRAY GUN
Operation and Safety Notes
Translation of the original instructions
TRYKLUFT-MALEPISTO
Brugs- og sikkerhedsanvisninger
Oversættelse af den originale driftsvejledning
FÄRGPISTOL TRYcKLUFT
Bruksanvisning och säkerhetsanvisningar
Översättning av bruksanvisning i original
PERSLUcHT VERFPISTOOL
Bedienings- en veiligheidsinstructies
Vertaling van de originele gebruiksaanwijzing
DRUcKLUFT-FARBSPRITZPISTOLE
Bedienungs- und Sicherheitshinweise
Originalbetriebsanleitung

GB / IE Operation and Safety Notes Page 5
FI Käyttö- ja turvaohjeet Sivu 13
SE Bruksanvisning och säkerhetsanvisningar Sidan 21
DK Brugs- og sikkerhedsanvisninger Side 29
NL Bedienings- en veiligheidsinstructies Pagina 37
DE / AT / CH Bedienungs- und Sicherheitshinweise Seite 45
Before reading, unfold the page containing the illustrations and familiarise yourself with all functions of the
device.
Käännä ennen lukemista kuvallinen sivu esiin ja tutustu seuraavaksi laitteen kaikkiin toimintoihin.
Vik ut bildsidan och ha den till hands när du läser igenom anvisningarna och gör dig bekant med
apparatens / maskinens funktioner.
Før du læser, vend siden med billeder frem og bliv bekendt med alle apparatets funktioner.
Vouw vóór het lezen de pagina met de afbeeldingen open en maak u vertrouwd met alle functies van het
apparaat.
Klappen Sie vor dem Lesen die Seite mit den Abbildungen aus und machen Sie sich anschließend mit allen
Funktionen des Gerätes vertraut.

5
2
3
4
67
8
1
B
12
10
A
10 11 4
9
D
C
1413


5 GB/IE
Introduction
Correct Usage ..................................................................................................................................... Page 6
Features and Fittings ...........................................................................................................................Page 6
Scope of Delivery ................................................................................................................................Page 6
Technical Data ....................................................................................................................................Page 6
Safety advice ...............................................................................................................................Page 6
Original accessories / attachments ....................................................................................................Page 7
Safety instructions for fine spray systems ...........................................................................................Page 7
Initial use
HVLP properties ...................................................................................................................................Page 8
Connecting the device ........................................................................................................................Page 8
Preparing the spraying surface ..........................................................................................................Page 8
Turning the device On / Off ................................................................................................................Page 8
Adjusting the paint jet .........................................................................................................................Page 9
Regulating the quantity of paint .........................................................................................................Page 9
Regulating the quantity of air .............................................................................................................Page 9
Maintenance and Cleaning ..............................................................................................Page 9
Service ...............................................................................................................................................Page 10
Warranty .........................................................................................................................................Page 10
Disposal ............................................................................................................................................Page 11
Translation of the original declaration of conformity /
Manufacturer ............................................................................................................................... Page 11
Table of contents

6 GB/IE
Safety advice
Introduction / Safety advice
Air paint spray gun PDFP 500 B2
Q
Introduction
We congratulate you on the purchase of your new
device. You have chosen a high quality product. The
instructions for use are part of the product. They
contain important information concerning safety,
use and disposal. Before using the product, please
familiarise yourself with all of the safety information
and instructions for use. Only use the unit as de
scribed
and for the specified applications. If you pass the
product on to anyone else, please ensure that you
also pass on all the documentation with it.
Q
Correct Usage
This compressed air-operated device is only intended
for the application / spraying of solvent-containing
and water-dilutable paints, glazes, primers, varnishes,
automotive topcoats, stains, wood preservatives,
pesticides, oils and disinfectants. The device is not
suitable for working with dispersion and latex paints,
alkalis, acidic coating materials, granular and par-
ticulate spraying material or injection and non-drip
materials. Any other use or modification shall be
deemed to be improper use and could give rise to
considerable risk of accident. We will not accept li-
ability for loss or damage arising from improper use.
The device is intended for private, domestic use only.
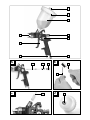
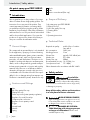
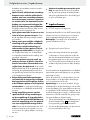
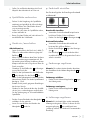
Features and Fittings
1
Vent
2
Lid of the gravity flow cup
3
Gravity flow cup
4
Stroke stop screw (paint quantity regulation)
5
Regulator for round / broad jet
6
Compressed air connection
7
Regulator for air quantity control
8
Trigger
9
Nozzle head
10
Needle
11
Spring
12
Brush
13
Filter
14
Interior screw thread (flow cup)
Q
Scope of Delivery
1 Air paint spray gun PDFP 500 B2
1 Gravity flow cup
1 Lid for the gravity flow cup
1 Cleaning brush
1 Filter
1 Operating Instructions
Q
Technical Data
Required air quality: purified, free of conden-
sate and oil
Air consumption: 380 l / min
Working pressure: 3 bar
Volume flow: typically 130–160 ml / min
Nozzle size: Ø 1.4 mm
Gravity flow cup: 500 ml
Recommended viscosity: 18–23 DIN / sec.
Sound pressure level: 72.1 dB(A)
Values determined in accordance with EN 14462.
Q
Safety advice
Read all the
safety advice and instructions.
Failure to observe the safety advice
and instructions could result in serious injury and /
or damage to property.
Keep all the safety advice and instructions
in a safe place for future reference!
RISK OF RECOIL FORCES!
High working pressures can give rise to recoil
forces that under certain conditions can result
in danger from continuous loading.
DANGER OF SUFFOCA-
TION! Working with nitrogen presents
a danger of suffocation! Work in well
ventilated spaces only.

7 GB/IE
Safety advice
DANGER OF INJURY!
Never exceed the maximum allowable working
air pressure of 3 bar. Use a pressure reducer
to set the working air pressure.
DANGER OF INJURY! IMPROPER USE!
Never point the device at people or animals.
DANGER OF / EXPLOSION AND FIRE
SMOKING PROHIBITED! Do not ignite any
sparks or open flames.
DANGER OF INJURY!
Never use oxygen or other combustible gas as
the energy source.
DANGER OF INJURY!
First disconnect the hose from the
compressed air source and only then
disconnect the compressed air supply
hose from the device. This will ensure that
the compressed air supply hose does not wave
around or recoil in an uncontrolled manner.
For your own safety, wear suitable
personal protective equipment. Wear
respiratory protection with active charcoal filters
and goggles.
Keep children and other people away
while you are operating the device.
Distractions can cause you to lose control of
the device.
Disconnect the device from the compressed air
source before carrying out any repair or main-
tenance work, during interruptions to operations
and before transporting the device.
When removing the hose coupling, hold the
hose tightly in your hand to avoid injury caused
by the hose shooting backwards.
Look out for damage on the device.
Check the device for damage before bringing
it into use. Do not use the device if you discover
any defects.
Do not kink the device’s hose, otherwise you
may damage it.
Please note the safety instructions of the manuf-
acturer of the sprayed material.
Remain alert at all times, pay attention
to what you are doing and use com
mon
sense in your work. Do not use any de-
vice when you are tired or under the in-
f
luence of drugs, alcohol or medications.
Do not remove rating plates or labels - they are
safety-relevant parts of the device.
If you are inexperienced in the use of this type
of device, you should seek out information or
training to learn how to handle it safely.
Q
Original accessories /
attachments
Use only the accessories and attach-
ments detailed in the operating instruc-
tions. The use of accessories other than those
recommended in the operating instructions could
lead to you being in danger of injury.
Q
Safety instructions for
fine spray systems
Keep your work area clean, well lit
and free of paint or solvent containers,
rags and other combustible materials.
Potential danger of spontaneous combustion.
Keep fully functioning fire extinguishers / ex-
tin-guishing equipment available at all times.
Ensure good ventilation in the spray-
ing area and sufficient quantities of
fresh air through-out the room. Evapo-
rating flammable solvents create an explosive
environment.
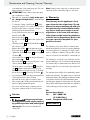
Do not spray or clean with materials
with a flashpoint below 21°C. Use
materials on the basis of water,
low-volatile hydrocarbons or similar
materials. Highly volatile evaporating sol-
vents create an explosive environment.
Do not spray in the area of ignition sourc-
es such as static electricity sparks, open
flames, pilot lights, hot objects, motors,
cigarettes and sparks from inserting
and disconnecting power cords or the
operation of switches. Such sources of sparks
can lead to ignition of the surrounding area.
Do not spray any materials for which
it is not known whether they pose a
danger. Unknown materials can create dan-
gerous conditions.
Introduction / Safety advice

8 GB/IE
Initial use / Maintenance and Cleaning
Safety advice / Initial use
Wear additional personal protective
equipment such as appropriate protec-
tive gloves and protective masks or
respirators when spraying or handling
chemicals. The wearing of protective equipment
in such conditions reduces exposure to harmful
substances.
Do not spray on yourself, other people
or animals. Keep hands and other body
parts away from the spray jet. If the
spray penetrates the skin, seek medical help
immediately. The material being sprayed can
even penetrate the skin through a glove and be
injected into your body.
Do not treat an injection as a simple cut.
A high pressure jet may inject toxins
into the body and cause serious inju
ries.
If the spray is injected into the skin, seek medical
help immediately.
Pay attention to any possible dangers
of the material being sprayed. Note
the markings on the container or the
manufacturer’s information relating to
the material being sprayed, including
the instruction to use personal protec-
tive equipment. The manufacturer’s in-struc-
tions must be followed to reduce the risk of fire, as
well as injuries caused by toxins, carcinogens, etc.
Never spray without the nozzle head
in place. The use of a special nozzle insert
with the appropriate nozzle head reduces the
probability of a high-pressure jet penetrating the
skin and injecting toxins into the body.
Q
Initial use
Q
HVLP properties
This device uses an HVLP system (High Volume Low
Pressure). It ensures the increased application of
(paint) materials with lower consumption.
Important: Do not exceed the maximum working
pressure of 3 bar.
Q
Connecting the device
Operate the product only with cleaned, con-
densate- and oil-free compressed air and never
exceed the maximum working air pressure at
the device of 3 bar.
The compressed air source must be fitted with a
(filter) / pressure reducer so that the air pressure
can be regulated.
In order to operate this device you require a flexible
compressed air hose with quick-release coupling
and an appropriate source of compressed air.
Observe the operating and safety instructions of the
compressed air source and any special instructions
concerning paint preparation.
Note: Ensure the correct working pressure. An ex-
cessive working pressure leads to increased fine
dispersion and results in too rapid evaporation of
the liquid. The surfaces become rough and develop
poor adhesion properties. If the working pressure is
too low on the other hand, the paint material is not
sufficiently atomised. Undulating surfaces and the
formation of drops are the result.
Connect the compressed air hose with the
rapid-release coupling to the compressed air
connection
6
of the device. This automatically
locks into place.
Use the filter pressure reducer of the compressed
air source to set the working pressure to 3 bar.
Q
Preparing the spraying surface
Mask off the surroundings of the spraying surface
thoroughly over a wide area. Otherwise all
non-covered areas or surfaces may become soiled.
Make sure that the spraying surface is clean,
dry
and free of grease.
Roughen smooth surfaces and then remove the
sanding dust.
Q
Turning the device On / Off
Working Instructions:
- Insert the filter in the gun (see Fig. C).

9 GB/IE
Initial use / Maintenance and Cleaning
- When working with the device you should open
the vent
1
.
- When diluting the material, make sure that the
spraying material and the dilution are suitable
for one another. If an incorrect dilution is used,
lumps may form and clog the gun as a result.
- Screw the flow cup
3
clockwise firmly on to
the gun.
- Fill the spraying material into the flow cup
3
and screw the lid
2
on tight.
- Always hold the paint spray gun at the same
distance from the object. The ideal spraying
distance is approximately 15 cm.
- Determine the appropriate settings in each case
by experimenting.
- Do not turn the device on / off when it is over the
spraying surface, but start and end the spraying
process approximately 10 cm outside of the
spraying area.
Press the trigger
8
to start spraying and keep
it held down.
In order to stop spraying, release the trigger
8
again.
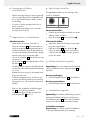
Q
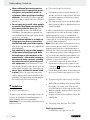
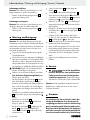
Adjusting the paint jet
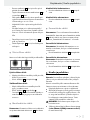
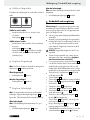
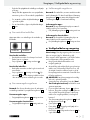
The device has the settings round and broad jet.
Round jet Broad jet
Adjusting the round jet:
Use the round jet, for example, for small surfaces,
corners and edges.
Turn the regulator
5
in a clockwise direction .
Adjusting the broad jet:
Use the broad jet vertically and horizontally
over larger areas.
Turn the regulator
5
in an anticlockwise direc-
tion
. The nozzle head
9
can be continuously
adjusted vertically and horizontally by turning
to the desired position.
Q
Regulating the
quantity of paint
Note: The front locking screw is used to limit the
adjustment range of the stroke stop screw
4
.
Increasing the quantity of paint:
Turn the stroke stop screw
4
in an anticlockwise
direction.
Reducing the quantity of paint:
Turn the stroke stop screw
4
in a clockwise
direction.
Q
Regulating the quantity of air
Note: It is advisable to start with the maximum
amount of air. In order to do this, open the air volume
regulator
7
as described below under “Increasing
the air quantity” up to the maximum setting.
Increasing the air quantity:
Note: Increasing the amount of air is generally
advisable when the degree of atomization is too
coarse.
Turn the air quantity regulator
7
in an anti-
clockwise direction.
Reducing the air quantity:
Note: Reducing the amount of air is generally
advisable when the paint spray is too strong.
Turn the air quantity regulator
7
in a clock-
wise direction.
Maintenance and Cleaning
Note: Thorough cleaning after each use is very
important for safety and operation. Otherwise, for
example, the needle will become clogged and the
proper functioning of the appliance can no longer
be guaranteed.
Wear suitable protective gloves when carrying
out cleaning work.
Do not use any hydrocarbon-containing halogen
solvents, such as trichloromethyl, ethyl chloride,
etc., as they undergo chemical reactions with
Safety advice / Initial use

10 GB/IE
… / Disposal / Translation of the original declaration of conformity / Manufacturer
Maintenance and Cleaning / Service / Warranty
some materials of the paint spray gun. This can
lead to dangerous reactions.
ATTENTION! Never immerse the paint spray
gun completely in solvent.
After each use, spray thinner (only in the
open
air – danger of explosion!) or water through
the device.
To clean the casing, nozzle head
9
and the
spray holes inside it, use a cloth or the cleaning
brush provided. Never use petrol, solvents or
cleaning agents that attack plastic.
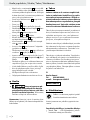
First unscrew the stroke stop screw
4
by turning
it anti-clockwise
.
Remove the spring
11
.
Remove the needle
10
with the aid of pliers (see
Fig. A).
Clean the needle
10
carefully with the brush
12
,
also refer to Fig. B.
Replace the needle
10
in the paint spray gun.
Position the spring
11
on the end of the needle
10
.
Tighten the stroke stop screw
4
by turning it
clockwise
.
Unscrew the flow cup
3
from the gun by turn
ing
anticlockwise
.
Remove the filter
13
, as shown in Figure C, and
clean it with the cleaning brush.
Clean the interior screw thread
14
of the flow
cup
3
with the cleaning brush (see Fig. D).
Replace the filter in the gun (see Fig. C) and tigh-
ten the flow cup
3
by turning it clockwise .
For rust protection you can spray sewing machine
oil through the device after cleaning.
Lubricate all moving parts from time to time.
After cleaning the needle, the thread and seal
must be lightly treated with grease.
Do not use any lubricants containing silicone.
Only store compressed air tools in dry areas.
Service
Compressed air-oper-
ated equipment should only be re
paired
by qualified specialists and with origi
nal
spare parts. This will ensure that devices
remain safe.
Note: Spare parts not listed (e.g. carbon brushes,
switches) can be ordered through our call centre.
Warranty
The warranty for this appliance is for 3
years from the date of purchase. The ap-
pliance has been manufactured with care
and meticulously examined before deliv-
ery. Please retain your receipt as proof
of purchase. In the event of a warranty
claim, please make contact by telephone
with our Service Department. Only in this
way can a post-free despatch for your
goods be assured.
The warranty covers only claims for material and
maufacturing defects, but not for transport damage,
for wearing parts or for damage to fragile compo-
nents, e.g. buttons or batteries. This product is for pri-
vate use only and is not intended for commercial use.
The warranty is void in the case of abusive and im-
proper handling, use of force and internal tampering
not carried out by our authorized service branch. Your
statutory rights are not restricted in any way by this
warranty.
The warranty period will not be extended by repairs
made unter warranty. This applies also to replaced
and repaired parts. Any damage and defects extant
on purchase must be reported immediately after
unpacking the appliance, at the latest, two days after
the purchase date. Repairs made after the expiration
of the warranty period are subject to payment.
GB
Service Great Britain
Tel.: 0871 5000 720
(0.10 GBP/Min.)
e-mail: k[email protected]
IAN 109910

11 GB/IE
… / Disposal / Translation of the original declaration of conformity / Manufacturer
IE
Service Ireland
Tel: 1890 930 034
(0.08 EUR/Min. (peak)
0.06 EUR/Min. (off peak))
e-mail: k[email protected]
IAN 109910
Disposal
The packaging is wholly composed of
environmentally-friendly materials that can
be disposed of at a local recycling centre.
Contact your local refuse disposal authority for
more details of how to dispose of your worn out
electrical devices.
Environmental compatibility and
disposal of materials:
Paint, varnishes etc. are special wastes which
must be disposed of in the appropriate manner.
Observe the regulations applicable in your area.
Observe the manufacturer’s instructions.
Environmentally damaging chemicals must not
be allowed to enter the soil, groundwater or
watercourses.
Carrying out spraying at the edge of water-
courses or adjoining areas (catchments) is
therefore prohibited.
Consider their environmental compatibility
when buying paints, varnishes etc.
Translation of the original
declaration of conformity /
Manufacturer
We, KOMPERNASS HANDELS GMBH, the person
responsible for documents: Mr Semi Uguzlu, BURG-
STRASSE 21, 44867 BOCHUM, GERMANY, here
by
declare that this product complies with the following
standards, normative documents and EU directives:
Machinery Directive
(2006 / 42 / EC)
Applicable harmonized standards
EN 1953:2013
Type / Machine designation:
Air paint spray gun PDFP 500 B2
Date of manufacture (DOM): 02–2015
Serial number: IAN 109910
Bochum, 28.02.2015
Semi Uguzlu
- Quality Manager -
We reserve the right to make technical modifications
in the course of product development.
Maintenance and Cleaning / Service / Warranty

12
Sisällysluettelo

13 FI
Sisällysluettelo
Johdanto
Määräystenmukainen käyttö ............................................................................................................... Sivu 14
Varustus ................................................................................................................................................ Sivu 14
Toimitukseen kuuluu ............................................................................................................................. Sivu 14
Tekniset tiedot ....................................................................................................................................... Sivu 14
Turvallisuusohjeet ..................................................................................................................... Sivu 14
Alkuperäiset varusteet / -lisälaitteet ..................................................................................................... Sivu 15
Hienoruiskujärjestelmien turvallisuusohjeet ......................................................................................... Sivu 15
Käyttöönotto
HVLP-ominaisuudet ............................................................................................................................... Sivu 16
Laitteen liitäntä ..................................................................................................................................... Sivu 16
Ruiskutettavan pinnan valmistelu ......................................................................................................... Sivu 16
Laitteen päälle- / poiskytkentä ............................................................................................................. Sivu 16
Värisuihkun säätö ................................................................................................................................. Sivu 17
Maalimäärän säätö ............................................................................................................................. Sivu 17
Ilmamäärän säätö ................................................................................................................................ Sivu 17
Huolto ja puhdistus .................................................................................................................. Sivu 17
Huolto.................................................................................................................................................. Sivu 18
Takuu ................................................................................................................................................... Sivu 18
Hävittäminen ................................................................................................................................ Sivu 18
Käännös alkuperäisestä EY-
vaatimustenmukaisuusvakuutuksesta / Valmistajan ................................ Sivu 19

14 FI
Turvallisuusohjeet
Johdanto / Turvallisuusohjeet
Paineilmakäyttöinen maaliruisku
PDFP 500 B2
Q
Johdanto
Onnittelemme sinua hyvästä valinnastasi! Valitsit erit-
täin korkealaatuisen tuotteen. Käyttöohje on osa tätä
tuotetta. Se sisältää tärkeitä turvallisuusohjeita sekä
käyttöä ja hävitystä koskevia ohjeita. Tutustu ennen
tuotteen käyttöä huolellisesti kaikkiin käyttöja turval-
lisuusohjeisiin. Käytä tuotetta ainoastaan ohjeen
mukaan ja siinä mainittuihin tarkoituksiin. Anna kaikki
ohjeet mukaan, jos luovutat tuotteen edelleen.
Q
Määräystenmukainen käyttö
Paineilmakäyttöinen laite soveltuu levittämään / ruis-
kuttamaan vain liuotinainepitoisia ja vesiohenteisia
lakkoja, kuultovärejä, pohjustusvärejä, kirkaslakkaa,
moottoriajoneuvojen peitemaaleja, petsivärejä,
puunsuoja-aineita, kasvinsuojeluaineita, öljyjä ja
desinfiointiaineita. Tämä laite ei sovellu dispersio-
ja lateksimaalien, lipeän, happopitoisten pinnoittei-
den, rakeisten ja kiinteää ainetta sisältävien aineiden
tai ruiskutusestoisten ja tiksotrooppisten aineiden
ruiskutukseen. Kaikki muunlainen käyttö tai muutos-
ten teko laitteeseen on määräystenvastaista ja voi
aiheuttaa huomattavia tapaturmavaaroja. Emme
ota mitään vastuuta määräystenvastaisesta käytöstä
aiheutuneista vahingoista. Laite on tarkoitettu ainoas-
taan yksityiskäyttöön.
Q
Varustus
1
Ilmanpoistoaukko
2
Nestesäiliön kansi
3
Nestesäiliö
4
Vasteruuvi (värinesteen määrän säätö)
5
Pyörö- / tasosuihkun säädin
6
Paineilmaliitäntä
7
Säädin ilmamäärän säätöön
8
Laukaisin
9
Suuttimenpää
10
Piikki
11
Jousi
12
Harja
13
Suodatin
14
Sisäpuolinen ruuvikierre (nestesäiliö)
Q
Toimitukseen kuuluu
1 paineilmakäyttöinen maaliruisku PDFP 500 B2
1 maaliastia
1 maaliastian kansi
1 puhdistusharja
1 suodatin
1 käyttöohje
Q
Tekniset tiedot
Vaadittava ilmanlaatu: puhdistettu, lauhteeton
ja öljytön
Ilmankulutus: 380 l / min
Työpaine: 3 bar
Läpivirtausmäärä: t
yypillinen 130–160 ml / min.
Suutinkoko: Ø 1,4 mm
Maaliastia: 500 ml
Suositeltava viskositeetti: 18–23 DIN / sek.
Äänenpainetaso: 72,1 dB(A)
Mittausarvo laskettu EN 14462 mukaan.
Q
Turvallisuusohjeet
Lue kaikki tur-
vallisuusohjeet ja käyttöohjeet
läpi. Mikäli turvallisuusohjeiden ja
määräysten noudattaminen laiminlyödään, siitä voi
olla seurauksena vakavia loukkaantumisia ja / tai
aineellisia vahinkoja.
Säilytä kaikki turvallisuusohjeet ja käyt-
töohjeet vastaisuuden varalle!
TAKAISKUVOIMAT!
Korkeissa työpaineissa voi esiintyä takaiskuvoimia,
joista voi aiheutua vaara jatjuvassa rasituksessa.

15 FI
Turvallisuusohjeet
Johdanto / Turvallisuusohjeet
TUKEHTUMISVAARA!
Typen käsittelystä voi aiheutua tukeh-
tumisvaara! Työskentele tästä syystä vain
hyvin tuuletetuissa tiloissa!
LOUKKAANTUMISVAARA!
Älä milloinkaan ylitä suurinta sallittua 3 barin
työpainetta. Käytä työpaineen asetuksessa
paineensäädintä.
LOUKKAANTUMISVAARA! MÄÄRÄYS-
TENVASTAINEN KÄYTTÖ! Älä suuntaa lai-
tetta ihmisiä ja / tai eläimiä kohti.
RÄJÄHDYS- / TULIPALOVAARA – TUPA-
KOINTI KIELLETTY! Älä sytytä kipinöintiä
äläkä avotulta.
LOUKKAANTUMISVAARA!
Älä koskaan käytä happea tai muita palavia
kaasuja energialähteenä.
LOUKKAANTUMISVAARA!
Irrota ensin letku ilmanpainelähteestä
ja poista vasta sitten syöttöletku lait-
teesta. Näin vältät syöttöletkun kontrolloimat-
toman pyörimisen sinne tänne ja sen takaiskun.
Käytä henkilökohtaiseksi turvallisuu-
deksesi soveltuvia suojavarusteita.
Käytä hengityssuojainta aktiivihiilisuodattimel-
la sekä suojalaseja.
Pidä lapset ja muut henkilöt loitolla
laitteesta sen ollessa käytössä. Jos kes-
kittymisesi häiriintyy, voit menettää laitteen hal-
linnan.
Irrota laite paineilmalähteestä ennen korjaus-
ja kunnossapitotöihin ryhtymistä sekä käytön
keskeytystä ja ennen laitteen kuljetusta.
Pidä letku tukevasti kädessäsi, kun irrotat letkun
kytkimen, näin vältät loukkaantumiset, jotka
lletkun takaisku voi aiheuttaa.
Varo vaurioittamasta laitetta. Tarkista
ennen laitteen käyttöönottoa, ettei laitteessa
mahdollisesti ole vaurioita. Jos havaitset lait-
teessa vaurioita, sitä ei missään tapauksessa
saa ottaa käyttöön.
Älä taita laitteen letkua mutkalle. Letku voi
vaurioitua.
Noudata ruiskutettavan aineen valmistajan tur-
vallisuusohjeita.
Ole aina tarkkaavainen, tarkista aina
mitä teet ja toimi järkevästi laitteella
työskennellessäsi. Älä käytä laitetta,
jos olet väsynyt tai käyttänyt huumei-
ta, alkoholia tai lääkkeitä.
Älä poista laitteen tyyppikilpiä, ne ovat laitteen
turvallisuuden kannalta tärkeä tekijä.
Jos olet kokematon laitteen käytössä, on koulutus
laitteen vaarattomassa käsittelyssä suositeltavaa.
Q
Alkuperäiset
varusteet / -lisälaitteet
Käytä vain varusteita ja lisälaitteita,
jotka on ilmoitettu käyttöohjeessa.
Muiden kuin käyttöohjeessa suositeltujen varus-
teiden käyttö voi aiheuttaa loukkaantumisriskin.
Q
Hienoruiskujärjestelmien
turvallisuusohjeet
Pidä työskentelyalueesi puhtaana,
hyvin valaistuna äläkä säilytä siinä
maali- tai liuotinsäiliöitä, riepuja tai
muita palavia aineita. Mahdollinen itsesy-
tytyksen vaara. Pidä toimiva palosammutin /
sammutuskalusto aina saatavilla.
Huolehdi hyvästä tuuletuksesta ruis-
kutusalueella ja tarvittavasta raittiin
ilman saannista koko tilassa. Haihtuvat
syttyvät liuottimet muodostavat räjähdysalttiin
ympäristön.
Älä käytä ruiskutukseen tai puhdis-
tukseen aineita, joiden leimahduspiste
o
n alle 21 °C. Käytä vesipohjaisia ai-
neita, vaikeasti haihtuvia hiilivety-
pohjaisia tai muita vastaavia aineita.
Helposti haihtuvat liuottimet muodostavat räjäh-
dysalttiin ympäristön.
Älä ruiskuta lähellä sytytyslähteitä,
kuten staattiset sähkökipinät, avotuli,
sytytysliekit, kuumat esineet, mootto
rit,
savukkeet tai kipinät, jotka syntyvät
sähköjohtojen liittämisestä tai irrotta-
misesta tai katkaisijoiden käytöstä.
Tällaiset kipinälähteet voivat sytyttää ympäris-
tön ilman.
Älä ruiskuta mitään aineita, joiden
vaarallisuus ei ole sinulle tunnettu.

16 FI
Käyttöönotto / Huolto ja puhdistus
Turvallisuusohjeet / Käyttöönotto
Tuntemattomat aineet voivat johtaa vaarallisiin
tilanteisiin.
Käytä lisäksi henkilökohtaista suojava-
rustusta, kuten asianmukaisia suojakä-
sineitä ja suoja- tai hengitysnaamaria,
kun ruiskutat tai käsittelet kemikaale
ja.
Kyseisiin olosuhteisiin soveltuvan suojavarustuk
sen
käyttö vähentää altistumisen vaarallisille aineille.
Älä ruiskuta itseäsi, muita henkilöitä
tai eläimiä kohti. Pidä kätesi ja muut
kehon osat loitolla suihkusäteestä. Jos
suihkusäde tunkeutuu ihon läpi, tulee välittömästi
turvautua lääkärin apuun. Ruiskutettava aine
voi tunkeutua ihoon jopa käsineen läpi ja jou-
tua kehoosi.
Älä käsittele ruiskutusvammaa taval-
lisen viillon tavoin. Korkeapainesäde
voi ruiskuttaa myrkkyaineita kehoon
ja johtaa vakaviin vammoihin. Jos suih
ku
tunkeutuu ihon läpi, tulee välittömästi turvautua
lääkärin apuun.
Ota huomioon ruiskutettavan aineen
mahdolliset vaarat. Ota huomioon
astiassa olevat merkinnät tai ruisku-
tettavan aineen valmistajan tiedot ja
noudata kehotusta käyttää henkilö-
kohtaisia suojavarusteita. Valmistajan
ohjeita on noudatettava tarkasti, tulipalon,
myrkkyjen, karsinogeenien jne. aiheuttamien
vammojen vähentämiseksi.
Älä koskaan suihkuta ilman että suu-
tinpää on asennettu paikoilleen. Kun
käytät erityistä suutinta ja siihen sopivaa suutin-
päätä pienenee todennäköisyys, että korkea-
painesuihku tunkeutuu ihon läpi ja ruiskuttaa
myrkkyä kehoon.
Q
Käyttöönotto
Q
HVLP-ominaisuudet
Laitteessa on HVLP-järjestelmä (High Volume Low
Pressure). Se huolehtii korkeasta (väri-) materiaalin
levityksestä pienellä kulutuksella.
Tärkeää: Älä ylitä maksimi 3 barin käyttöpainetta.
Q
Laitteen liitäntä
Laitetta saadaan käyttää ainoastaan puhdistetul-
la, öljyttömällä ja lauhteettomalla paineilmalla ja
maksimi 3 barin työpainetta ei saa ylittää laitteel
la.
Jotta voisit säätää ilmanpaineen, paineilmalähteen
on oltava varustettu (suodatin)-paineensä
ätimellä.
Tarvitset tämän laitteen käyttöön joustavan paineilmalet-
kun pikakytkimellä ja vastaavan paineilmalähteen.
Noudata paineilmalähteen käyttö- ja turvallisuusoh-
jeita ja erityisiä maalinvalmistusohjeita.
Huomautus: Tarkista, että työpaine on oikea.
Liian korkea työpaine johtaa liian voimakkaaseen
hienojakoon, josta on seurauksena liian nopea nes-
teen haihtuminen. Pinnat tulevat karheiksi ja niiden
kiinnittymisominaisuudet huononevat. Mikäli taas
työpaine on liian alhainen, väriainetta ei ruiskuunnu
riittävästi. Seurauksena ovat aaltomaiset pinnat ja
pisarojen muodostuminen.
Liitä paineilmaletku pikakytkimellä laitteen
paineilmaliitäntään
6
. Lukitus tapahtuu auto-
maattisesti.
Aseta paineilmalähteen suodatinpaineensäätä-
jällä työpaine 3 bariin.
Q
Ruiskutettavan pinnan
valmistelu
Peitä ruiskutettavan pinnan ympäristö riittävän
laajalti ja perusteellisesti. Muuten kaikki peittä-
mättömät pinnat saattavat likaantua.
Tarkista, että ruiskutettava pinta on puhdas,
kuiva eikä siinä ole rasvaa.
Karhenna sileät pinnat ja poista tämän jälkeen
hiomapöly.
Q
Laitteen päälle- / poiskytkentä
Työohjeet:
- Aseta suodatin pistooliin (kuva C).
- Avaa työvaiheen aikana ilmanvaihto
1
.
- Tarkista ohennettaessa, että ruiskutettava aine
ja ohenne sopivat yhteen. Jos käytät väärää
ohennetta, voi syntyä paakkuja, jotka saattavat
tukkia pistoolin.

17 FI
Käyttöönotto / Huolto ja puhdistus
Turvallisuusohjeet / Käyttöönotto
- Ruuvaa maaliastia
3
kiinni pistooliin myötä-
päivään kiertämällä.
- Täytä ruiskutettavaa ainetta maaliastiaan
3
ja
ruuvaa kansi
2
kiinni.
- Pidä maaliruiskutuspistoolia aina samalla etäi-
syydellä ruiskutettavasta kohteesta. Ihanteellinen
ruiskutusetäisyys on noin 15 cm.
- Määrää kulloinkin sopivat etäisyydet kokeile-
malla.
- Älä kytke laitetta pois ruiskutuspinta päälle /
pois toiminnolla, vaan aloita ja päätä ruiskutus
aina noin 10 cm ruiskutettavan pinnan ulkopuo-
lella.
Paina käynnistystä varten liipaisuvipua
8
ja
pidä se painettuna.
Päästä liipaisuvipu
8
taas irti, kun haluat päät-
tää käytön.
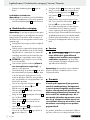
Q
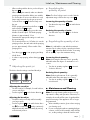
Värisuihkun säätö
Laitteessa on kaksi säätöä pyörösuihku ja viuhkasuihk
u.
Pyörösuihku Viuhkasuihku
Pyörösuihkun säätö:
Käytä pyöräsuihkua esimerkiksi pienillä pinnoil
la,
kulmissa ja reunoissa.
Kierrä säädintä
5
myötäpäivään .
Viuhkasuihkun säätö:
Käytä viuhkasuihkua suuremmilla pinnoilla
pysty- ja vaakasuorassa.
Kierrä säädintä
5
vastapäivään .
Suutinpää
9
voidaan kiertämällä säätää por-
taattomasti vaaka- ja pystysuorassa haluttuun
asentoon.
Q
Maalimäärän säätö
Huomautus: Etummaisen lukitusruuvin tehtävänä
on rajoittaa värimäärän säätöruuvin
4
säätöaluetta.
Maalimäärän kohottaminen:
Kierrä maalimäärän säätöruuvia
4
vastapäi-
vään.
Maalimäärän alentaminen:
Kierrä maalimäärän säätöruuvia
4
myötäpäi-
vään.
Q
Ilmamäärän säätö
Huomautus: On suositeltavaa aloittaa maksimi
ilmamäärällä. Avaa tätä varten ilmamäärän säädin
7
maksimi säätöön asti, kuten seuraavassa kap-
paleessa „Ilmamäärän kohottaminen“ on kuvattu.
Ilmamäärän kohottaminen:
Huomautus: Ilmamäärän kohottaminen on nor-
maalisti suositeltavaa, kun kyse on karkeammasta
sumutuksesta.
Kierrä ilmamäärän säädintä
7
vastapäivään.
Ilmamäärän alentaminen:
Huomautus: Ilmamäärän alentaminen on normaa-
listi suositeltavaa, kun kyse on liian voimakkaasta
värisumusta.
Kierrä ilmamäärän säädintä
7
myötäpäivään.
Huolto ja puhdistus
Huomio: Perusteellinen puhdistus jokaisen käytön
jälkeen on hyvin tärkeää turvallisuuden ja käytön
kannalta.
Muutoin esimerkiksi piikki saattaa tukkeentua eikä
laitteen moitteetonta toimintaa voida enää taata.
Käytä puhdistuksessa sopivia suojakäsineitä.
Älä käytä hiilivetypitoisia halogeeni-liuotinainei-
ta kuten trikloorimetyyliä, etyylikloridia tms., sillä
ne reagoivat kemiallisesti joidenkin väripistoo-
lissa käytettyjen materiaalien kanssa. Tämä
saattaa johtaa vaarallisiin reaktioihin.
HUOMIO! Älä koskaan upota väripistoolia
liuotinaineeseen.
Suihkuta jokaisen käytön jälkeen ohennusainetta
(vain ulkona-räjähdysvaaran vuoksi!)
tai vettä laitteen läpi.

18 FI
… / Käännös alkuperäisestä EY-vaatimustenmukaisuusvakuutuksesta / Valmistajan
Huolto ja puhdistus / Huolto / Takuu / Hävittäminen
Käytä kotelon, suuttimenpään
9
ja sen sisällä
olevien suihkutusreikien puhdistukseen mukana
toimitettua puhdistusharjaa tai liinaa. Älä käytä
koskaan bensiiniä, liuotinaineita tai puhdistusai-
neita, jotka syövyttävät muovia.
Poista ensin iskunvasteruuvi
4
vastapäivään
kiertämällä
.
Poista jousi
11
.
Poista piikki
10
pihtien avulla (kts. kuva A).
Puhdista piikki
10
huolellisesti harjalla
12
, katso
myös kuva B.
Aseta piikki
10
takaisin väripistooliin.
Aseta jousi
11
piikin
10
päähän.
Kiinnitä iskunvasteruuvi
4
takaisin paikoilleen
myötäpäivään kääntämällä
.
Irrota nestesäiliö
3
kiertämällä sitä vastapäi-
vään
väripistoolista.
Irrota suodatin
13
kuten kuvassa C näytetään
ja puhdista se harjalla.
Puhdista myös nestesäiliön
3
sisäpuolella olev
a
ruuvikierre
14
harjalla (kts. kuva D).
Aseta suodatin takaisin väripistooliin (kts. kuva
C)
ja kierrä nestesäiliö
3
myötäpäivään jälleen
tiukalle.
Puhdistuksen jälkeen voit suihkuttaa laitteeseen
ompelukoneöljyä, joka suojaa sitä ruosteelta.
Voitele kaikki liikkuvat osat silloin tällöin öljyllä.
Kun olet puhdistanut piikin, kierre ja tiivistys
täytyy käsitellä kevyesti rasvalla.
Älä käytä silikonipitoisia voiteluaineita.
Säilytä paineilmalaitteita vain kuivissa tiloissa.
Q
Huolto
Anna ainoastaan pä-
tevän alan ammattihenkilön korjata
paineilmakäyttöiset laitteet vain alku-
peräisiä varaosia käyttäen. Tällä taa
taan,
että laite on käytössä aina turvallinen.
Huomautus: Varaosia, joita ei ole mainittu (esim.
hiiliharjoja tai kytkimiä) voit tilata asiakaspalvelukes-
kuksestamme.
Q
Takuu
Laitteen takuu on 3 vuotta ostopäivästä.
Laite on valmistettu huolellisesti ja tarkis-
tettu tarkasti ennen toimitusta. Säilytä os-
tokuitti todisteeksi takuun voimassaolosta.
Ota takuutapauksessa puhelimitse yhteyttä
huoltopisteeseesi. Vain näin voidaan taata
tuotteesi maksuton lähettäminen huol
toon.
Takuu koskee ainoastaan materiaali- ja valmistusvir-
heitä, ei kuitenkaan kuljetusvaurioita, kuluvia osia
tai herkästi vaurioituvien osien, esim. kytkinten tai
akkujen vaurioita. Tuote on tarkoitettu ainoastaan
yksityiseen, ei kaupalliseen käyttöön.
Väärä tai asiaton käyttö, väkivallan käyttö ja muiden
kuin valtuutetun huoltopisteen suorittamat korjaukset
aiheuttavat takuun raukeamisen. Tämä takuu ei ra-
joita kuluttajan lakisääteisiä oikeuksia.
Takuukorjaus ei pidennä takuuaikaa. Tämä koskee
myös vaihdettuja ja korjattuja osia. Mahdollisista jo
ostettaessa olemassa olevista vahingoista ja puut-
teista on ilmoitettava välittömästi pakkauksesta pur-
kamisen jälkeen, kuitenkin viimeistään kaksi päivää
ostopäiväyksen jälkeen. Takuuajan jälkeen suoritetut
korjaukset ovat maksullisia.
FI
Huolto Suomi
Tel.: 010309 3582
e-mail: k[email protected]i
IAN 109910
Q
Hävittäminen
Pakkaus on valmistettu ympäristöystäväl-
lisistä kierrätettävistä materiaaleista.
Lisätietoja antavat mm. paikalliset ympäristöviran-
omaiset.
Ympäristöystävällisyys ja aineiden hävitys:
Maalit, lakat …. ovat ongelmajätteitä, jotka on
hävitettävä määräysten mukaisesti.

19 FI
… / Käännös alkuperäisestä EY-vaatimustenmukaisuusvakuutuksesta / Valmistajan
Huolto ja puhdistus / Huolto / Takuu / Hävittäminen
Noudata paikallisia määräyksiä.
Noudata valmistajan antamia ohjeita.
Ympäristölle haitallisia kemikaaleja ei saa pääs-
tää maaperään, pohjaveteen eikä vesistöön.
Ruiskutustyöt vesistöjen tai niiden lähialueiden
läheisyydessä (valuma-alue) eivät ole tästä syys-
tä sallittua.
Huomioi maalien, lakkojen... hankinnassa niiden
ympäristöystävällisyys.
Käännös alkuperäisestä
EY-vaatimustenmukaisuusva-
kuutuksesta / Valmistajan
Me, KOMPERNASS HANDELS GMBH, dokumentoin-
nista vastaava: herra Semi Uguzlu, BURGSTRASSE
21,
44867 BOCHUM, GERMANY, vakuutamme täten,
että tämä tuote vastaa seuraavia standardeja, nor-
matiivisia dokumentteja ja EY-direktiivejä:
Konedirektiivi
(2006 / 42 / EC)
Sovelletut harmonisoidut normit
EN 1953:2013
Tyyppi / Laitekuvaus:
Paineilmakäyttöinen maaliruisku PDFP 500 B2
Date of manufacture (DOM): 02–2015
Sarjanumero: IAN 109910
Bochum, 28.02.2015
Semi Uguzlu
- Laatumanageri -
Pidätämme oikeuden muutoksiin.

20
Innehållsförteckning
Sidan laddas ...
Sidan laddas ...
Sidan laddas ...
Sidan laddas ...
Sidan laddas ...
Sidan laddas ...
Sidan laddas ...
Sidan laddas ...
Sidan laddas ...
Sidan laddas ...
Sidan laddas ...
Sidan laddas ...
Sidan laddas ...
Sidan laddas ...
Sidan laddas ...
Sidan laddas ...
Sidan laddas ...
Sidan laddas ...
Sidan laddas ...
Sidan laddas ...
Sidan laddas ...
Sidan laddas ...
Sidan laddas ...
Sidan laddas ...
Sidan laddas ...
Sidan laddas ...
Sidan laddas ...
Sidan laddas ...
Sidan laddas ...
Sidan laddas ...
Sidan laddas ...
Sidan laddas ...
Sidan laddas ...
-
 1
1
-
 2
2
-
 3
3
-
 4
4
-
 5
5
-
 6
6
-
 7
7
-
 8
8
-
 9
9
-
 10
10
-
 11
11
-
 12
12
-
 13
13
-
 14
14
-
 15
15
-
 16
16
-
 17
17
-
 18
18
-
 19
19
-
 20
20
-
 21
21
-
 22
22
-
 23
23
-
 24
24
-
 25
25
-
 26
26
-
 27
27
-
 28
28
-
 29
29
-
 30
30
-
 31
31
-
 32
32
-
 33
33
-
 34
34
-
 35
35
-
 36
36
-
 37
37
-
 38
38
-
 39
39
-
 40
40
-
 41
41
-
 42
42
-
 43
43
-
 44
44
-
 45
45
-
 46
46
-
 47
47
-
 48
48
-
 49
49
-
 50
50
-
 51
51
-
 52
52
-
 53
53


Parkside PDFP 500 B2 Instructions Manual
- Kategori
- Kraftfulla finspray-system
- Typ
- Instructions Manual
- Denna manual är också lämplig för
på andra språk
- Deutsch: Parkside PDFP 500 B2
- English: Parkside PDFP 500 B2
- dansk: Parkside PDFP 500 B2
- suomi: Parkside PDFP 500 B2
- Nederlands: Parkside PDFP 500 B2
Relaterade papper
-
Parkside PDFP 500 A1 Bruksanvisningar
-
-
Parkside PFS 280 A1 Bruksanvisning
-
-
Parkside PFS 100 B2 Bruksanvisning
-
Kompernass PFSPS150 Användarmanual
-
-
Parkside PABK 60 A1 Operation and Safety Notes
-
-
Andra dokument
-
EINHELL 41.330.30 Paint Spray Gun Användarmanual
-
Cotech JS-910FA-UK Användarmanual
-
 Valex BX1800 Operating Instructions Manual
-
Metabo MEGA 500 W Bruksanvisningar
-
Magnum pro Finex H5 HV3900VEUG Operating Instructions Manual
-
Tristar SR-5240 Bruksanvisning
-
Tamiya 300074531 Bruksanvisningar
-
Tristar SM-6000 Användarmanual
-
-
