
SPRRY.WORH
Fr rSIG AIFIBFILTSH
7JV-2-rd-YviTV-J=Y
A;*su.tnu'," A "ou'o""
aef€Hätti. Z'?E D r&L\ü3rlE Jn#aTä !\" X, EEtILär acaretulry ead dd uncleßtand the instructio$ pdorto use. Bdd ed follow
Z-trtif.JE@ED&L\#Bta.AdrsffArEiä. af€HTäL\" also the ntänufactu€/s instructions supplied with the s€parately available air
aE&Dltf 0)EiEl.lt&E uiru<Tä L\"
a^frorE<?{ü, l6ijE4ä.&arä'ifFtä t//du?Tä L\o ause ih€ dörush ror spray painting only.
atLlhlF.. ^v l- o)86*Bi?olE*tl, ffe El,tJL\?Tä!\. aDo not use orPrcpatethe arÖrush a$und aflame
a^f*..@ Rä f'jtt tttBii E u 'ä L\(T ä L\. aNevd paint nea childEn or dimals.
aA*@H, &iEqäfil'. üel,o;lt< ?l*ß*it E*UtrL\?T aNever paint a person oranimal.
äu" a Do not pajnl near rood or drink
axV -J -i, a =- l: Ito)frftlt&.< läW7!'" WO,4'l'<fuaefr avqrütate the @m while painting.
Eu&HUtrL\3Tär\" ät +^tLtJETUD+U/.eät*Et*!\ alhe aiörush needle has a sharp point. careless or inadequate hddling
trEf;t <Tä!\" may calls€ senous accid€nts. Do not remove ths ne€dle an€Uor ils cove. d-
a**o)*lt4flh r 7EA-{+ \' t -rä l,<rt*V <T ä u. +rv cept ro. mantnde. Femoval oI the needle cover fom the anbtush expos€s
J ä Lts\,\< a)E&ft*ltEielä: lt!-JFE l. /r D ä !"" the n€edle rtlile paintiig
a--t:)Lr/\-ä-'rL<ä#äUtrL\?TäL\": F /L n( g S U < - _aAftach lhe covs to 0E pairt cup dudng us€. Opened cup may @s spillage.
JäF? ?" astop the alr supply wh€n dtacltngr'?€.noving the alr ho€s, and during dlsa!-
aa7-J=räa'ilgtAF.:tt, a7-th-zäE6tä*. Et d6mbtv ol the döGsh.
r7-o&ßZJLöt<b\a rs - ä r <F3 L\. alt is @ommerded to w€ p@tdtiw slase/qosgl€s and riask cn !€
r7-,lHlr?L\z
4-t t t ->J r'y t -1", FtLtlHc:17
7tt+r-. Lfi{-l*ffi-c= *d. ACeffi I >
7r- y+J-SW-653t-t*ffitä t ä t*. €H7
t v t l> tsh\'1447't " (t+!^ 7t <-,
-uZ?t *öTä*t. )
* 17 - 7 =, g)< a 7 - t rtdt 5 ?ltdr\/r dr.
t:v -hr$laH<= &E t""
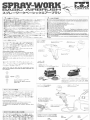
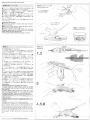
AIR SUPPLY FOR YOUF AIRBRUSH
Requi€s s€Frately avajlable ajr source such as Ba-
sic Comp€ssor or HG Comp.essor "REVO'. When
connecting with AC Compressor SW-653. optional
atlachment set (avarlable frorn loc€l Tamiya dealed is
required.
*Air can is not usable as ihis aiörusn cannot siop
airllow.
*+tt< Thtst 17 (PF 1 /a) Ar-7-^-
7-e, t = 1 :2 1 + t' y J nil*7 ä 6A€E -
\-t 7 r ./ - J > r 4 ) = .( > - + r )
*Air hose with S type (PF1l8) detachable screw
joint can be us€d if Joint Cap for Basic Airbrush can
4 rt 2 r7-A.rR
Joint Cap for Basic Aibrush
t/807158)
(?v Fp!ä)
Set contents
<-7 -J.tAr*s)
Cc."€cting aiörush
*r7-trlxo)trL\l -.
V./l'D LVöLdlet.
*Make su€ theE is no air
::- l: )t7, r 77-
,a4>l'+'1,'v7
HGa>7t ,t-. 'fi
Spmy-Wo HG AirCompresr "Flevo'
äH,] rJ
4-:/ ttatJr /= -, -
Spray Work BasE A r Compessor r,Äo.-s:
*,: :) :: :- - 3'- E = t 4 2: l: . :--@^-,
t t =7-i-:2, =< > ts+- t ih<A*7t.
*Seoarzre. :,::o.: .loLnt Cao for Bäsic
orolrtn "ieq! red when lsind vvith othe.
at)t t 7 (17cc)
l=il <+ lvl
\---l
fr
Aa7 -7 1-75Effia, = 4 > ts + r'y 7 ä
!7-a - io), 31> * gnt. LdJüaä L
@&*Ih'v 7&r7 -at > l..W.D tlb *.t "
@=>7 t t t-og Fz-r v täo N i- t-.
) z)t ht\-h'aa7 -är&<r\ä z: €ieä\
ür< < li ä r,\"
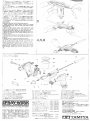
Connecting aiörush
' Screw hoqe connector ro fihrng on p,stol qlp
e) Screw paint cup into airbrush as shown.
(9 Switch on compressor lo contim air-flow from
nozzle.
zv-)tto&#
&H?ä6ESltitäo##
'it
,l
t =Po)7, u )r6ttxi5r+x/18+1. */r.
2 -r, -+. (EFIR) Etrelä äo)H4EEtralär
EHTä*4" AHo:Eä l*EorJ ) {-. Fo
hh,ät t < h<-ä'. ?Fts äe,EtrEiä?t"
EF.P ) 9 ö>*.8&2zte tEELz < tä
t\, =--A7.\7^f- )rA ä ää€L\{.ä2, t
(fttr?=6äflL;Eäoffig)
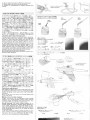
Useable painis ancl thjnning paint nL\ ,/z EiE ,/z
Ioo thick /,/'// o"* ,/,r/
z/

)
(1,
,'ft
Ol Screw hose connector to fitting on pistolgrip.
e) Screw paint cup into aiörush as shown.
e) Switch on compressor lo confirm air-flow from t -1> ts+" t -J
&H?ä6EfIEHä@iEg
I =Pa7' U tL5\1\5r' xJLil{+. */-.
.'vh-4 (äFiX) Ef+tJ ao)|*gHEX+r)r
1E,q?ätt" 4*+o);e3l*tro)i - 1.. Fo)
Jtt'6 r.?< är-trd?85 6i3,€rrRi6?? .
äfrJtä4töää1E: z;CääaEE L( < tiä
L\. ;uäOZ.{7rti F Jt,/J I ä*if€L\l-fJ6 I
Fttl?3- " t -]ih? -tli ! r-rti+- FH€
ED4#1t. t l' t >tt E o)2fr1+:6rdltE&
6 äEFl(ätttJ < ää@.effrE U tdr\? < /i
ä r\" EFto;Eä llE#l6DE€ \5ilE*.i+r. j
'>-a*trcD&t " zÄeLij2t 7-77t t+
7 JtOEßFa, J t )\>+l-7 7.I'vxäl,<#Z
L,.T < Eä L\"
*ffi ,tL\*rrz\Fid[+td, E#lägö{- u ät.
*2 t r-X.lt'Et\ t., Eo)Htr t;!iäS*f .
Useable paint and thinning paint
Tamiya acrylic, enamel, and lacquer paints (soluble),
may be used with this aiö.ush. Paint thickness
should be such that paint drips from the tip of a
stick one drop at a time. Use paint solvent or other
thrnning liqurd to thrn paint. Spare bottle for tl.rnnrng
is sold separately for your convenience. Do not use
2-part mixture paints such as urethane paints, They
cannot be removed by paint thinner atter cu.ing,
Paint thickness may vary depending on paint-type
and weather conditions. Use old plastic model parts
or plastic tray for experimentinq with thickness.
*Thin paintwhen fine mist is required.
*Thick lacquer based paint may have web-like con-
sistency when sprayed,
7Z FRä8=- F/t,7, F y,/r-@#E
t- t Jl-ä11< LSxlo)*br../ ^)rh,at7 =
äq" ]6td+h., JE^12-r-7 F!iä u. E
TIo)'HäIORäH LEAiE,\ö? < tJä I\. F
u h-21<tlt. allo)ü.z E t EtJt<:;
D.,ar\EfitoEi€rr U +'{ < rr D &q.
* ll]rd, , ta8t.D tli^h+;L'T< -:
ät,r" 31-. ü'4+P v7AU< <fiät\.
O =- F /rZ F'y J\-o)#*
_-F,/LZF ttt-OLEa, t- )h-a: a
U zEAi*t. XEI)ofrts)t =- t: )t7 t ,
/\-ä*rf'd-lll. t' U h-a :lZ L 1,ev:-z
iF@ tr F!,-ätritz-Eä# l, z < /iäL\"
ä{6E:F : :- l'r./l,7' l'. v./\-€l{aLTrf ,
I' U )J-oBlZ LZä*ä < L*4" piä{rJu
EEEEI*l o*l scm7:riE=?t" iE?ää LE#l
ärt l1i5? <. t#htt 4 ?:]6#-6hiH< tsD,
2\s6 DE4F-a tZ E)tiRärtE < < taD *q.
.4>P)XY6Ea6*: =- l:Jl,7. F v,/t-
äEU"ßIE€ 8 L, t'U r-o)llä L zEt\t <
L*E. E#lo)4=S LErr/r.ä< ä0. E*
Eit-iEauu t, E*i75{tE11.t < <tr.D&t.
Paint flow adjustment
Pull trigger to spray paint mist. First spray inio cup
to check paintflow and thickness. Pulling the trigger
harder will spray more paint, and cover morc sur-
*Do not fill paint cup above line. Always attach cup
cover after fillng.
aAdjusting needle stopper
Trjgger movement can be adiusted using needle
stopper Turn needle stopper toward anow mark to
increase trigger sensitivity and paint emission. Ad-
just spray to fityourairbrush requirements-
Overall painting; Pull back needle stopper to in-
crease trigger sensitivity. Optimal spray distance is
10 to 15cm. Spraying too close will resuit in clrip-
ping, and spraying too far away may cause uneven-
ness. Spraying gloss paints too far away will result
Lines and paäerns: Reiurn needle stopper to for-
wa,i posiUon to reduce tdgger sensitivity. By redLrc'
ing spray volume, you will reduce the dsk of drip-
p ng, even when spraying at a close distance.
(f€H?ääEhlL;ääoi6g)
Useable paints and thinninq paint
*fl
Eit r.
""" GLr
r1V)
lErr
\_-:2
4#baea,
Thinning method
- , h-L4*l
r 7l /r*E*1
Zr:: atöß. Atj: ,-?t=
1:1-2:3 1:Q-2:1
t.7.<,i.zL_-l:)t^ * , ,-r=+)
Pa-: ".\Y adjustment
standard
7 t , .t.-,=tt4+4
Acnlrc r:::-' soluble
I\\'2
(qRä.ßnE=)
Spray distar::
aVtZ ütJ Eo)? \\w€3
High spray volume
zcn I Ocm
a: =-,?.,-- -
L.n s:€r .: --:
2cn I O:-
./ra_ -

*o) tr t!l-äirlizaEg U ( < ta ä t\"
t- u fi-o)1lz u zä^ä < L*9. !iäfirJ
EESfit*1o-r scnörEE?q" iE3'ä6: ä*q
är/.t'Ll5? <. Ethqä6 eE*EitrH< ä ?,
2p6D:E*aL3t )t)Rtr?t. < </dD*t"
11>PiEletEo)8*: =- l.:lLz F y/(-
ä €,r"ßu l- t, ä U , f-rJJ-otlAUzAi\8<
U *q" 8*toEiäH LEir4.\tJ < ä D, 8*
Gilr:lEJtt<€äSlä{t lLE < < t}. D J.t.
Paint llow adjustment
Pull trigger to spray paint mist. First spray into cup
to check paintflowand thickness. Pulling the trigger
harder will spray more paint, and cover morc sur-
*Do not fill pajnt cup above line. Always attach cup
cover atterfllling.
OAdjusting needle stopper
Trigger movement can be adjusted using needle
stopper. Turn needle stopper toward anow mark to
increase trigger sensitivity and paint emission. Ad-
,ust spray to fit your aiörush requirements.
Overall painting: Pull back needle stopper to in-
crease trigger sensitivity. Optimal spray distance is
10 to 15cm. Spraying too close will result in drip-
ping, and spraying too far away may cause uneven-
ness. Spraying gloss pajnts too far away will result
in reduced luster.
Lines and patlens: Return needle siopper to toa
ward position to reduce trigger sensitiviiy. By reduc-
ing spray volume, you will reduce the risk of ddp-
ping, even when spraying at aclose distance.
E*FOEH
*tft@iE<-rl'ief,f {-Eär.äL\< < r: ä !\.
*U'd&ääJ < t Tä'6 EiF L'r < /a ä ! \.
*EHa&Iiüjta>j v y V-aElF.74 v *
tqD, ExR LoEffiä t*d r. ? < /i ä r\.
*^.1"- !j t -r l7-15;EJEIESS<A)HäF Eä
116 Z ä t* l, iJ r,\-c < E3 r,\"
*ffio) E l5iEEd)ät\ E o6*l* LtJlr? ( /-
äL\ 8*Giär < t, ? /. D (hJU) , av-+
r - 7oFsßll.r<ii5ärtz* äEähtöD *t"
'1 .t7 -7 a-JA|-YErrl. ä 6 L. E*it
L\, U & ''7]k'TOAäT L(. E*Eäfi5 UZ
U*L\ä'. a7-r.L-JL7k* o)< +,D
a t. a 6A o ht E Zti b tc 6, tv -a 2 > ä
l*t U < - > 7 V', t -t l tj Ir E iFfr Z tt,
;Eiäiar\S Lz < /jäL\"
Airbrushing cautions
*Never aiörush near an open flame,
*Make sure there is adequate ventilation,
*Always turn off compressor and disconnect pow-
*Do not use hair dryer or heater for drying paint.
*Avod painling on windy, rainy. or humid days.
Xwhen moisture collects an air tube, water will be
sprayed with paint and affect surface of part to be
air brushed. lf you see air tube begin to fog up, re-
move aiörush and let compressor run for one-min-
ute to clear out moisture.
17-' 1-JL-L\t^A tl7,kärrtJ < tJ6
*<a>JV y, ä7:\5Et Uä9.
ldle aircomp€s$rto €move moisture.
r\äi€Ho;iE)
Aiörushing ca-aons
#tffit't<t=-*tJJi"
Open windosi .nen aiörushing.
(Rä{-JuiE=)
Spray distance
a 0i ä tt UäO " t \lii;
2cn
a-t..== -Aot:; " 't E
2cn I Ocm
0208 ro2004 TAMTYA '153' ::s.-_ :,--r--s' ' :a_233

Ef&.a+^?L
8&1<. d'qt < E+^r1ä L< < t:ä l\.
a4*1, vTLF!*I@+^lx
*a t 4flä h, 7 h, öH r/<6Bßäfi trfi.rd E3
dä< L\*3-" f€H 1,fu8ß+o*fr1 ()töt*) €^?L
+ ",y 7tL,, =- t:./t,z F y./\-ät\ ' tJL\*T
Tlt<*i* *?. ->2 t2 t+t-oE,RZ^h:E7
-äiäD; a*. Bo*.L/ Tltht\-@ftffiäE
<n,ä ä*9. l- u rl -äEl < l:, .L7 - ntvfr,t'
r^*ßrrifti*t" h'v AiEoäfrJht'61."ta < t.a
*? 2-3 E< DiEl-;ftFt,*9. E6E=?LL\/d
ifti+ L * e"
A, =- l.rrroftffililH< JäFTEo<, ry+&r\l-
l*rtä;täU< < /:3r\. */.. +tv7+,L'o)i
rPtr r.EFltr^.BrdL\* ili;t€u<tft;9u< < l:
äL\.
a,/ l)Vo)+^tL
., /.tvhJ\-zt*tt , / /,ro*.bD o)EH21
r.B*tä?u<Eä\r/. :t;trr*q" 4*+. 4+l
@ü.u.ffs.(tectxD, ?ÄttESat a Etd? h
5+^'i,r,t L< < tiä !\.
xgFlt*. GH IJ<L\äEF{o)€EE#Jäd'?E:
< < /r3L\. {!@EFIäF;t. AHrr{L+4{Lt
di a t7 <t , -vi,-/dä - zh\ö D *t"
Cleaning airbrush after use
Clean airbrush immediately after use.
Ocleaning inside dfurush and paint cup.
Pour out unused paint. and wipe inside ol cup using
rag. Fill cup with appropriate paint thinnei cap cup,
and set needle stopper at rear. Tum compressor on
and covertip of nozzle with fingeras shown in illus-
tration. Pulltriggerto back flush air and clean inside
of nozzle and cup. Repeat this 2-3 times until clean
of all color. Finally, wipe ofi paint from inside of noz-
zle using paint thinner and rag.
AThe tjp of the needle is sharp so please take nec-
essary caution when handling, Also, paint thinner
mäy fly through air-hole in cap. Hold aiörush a safe
distance away from eyes and mouth when cleaning,
aCleaning nozzle
Remove extemal nozzle cover and wipe off paint
trom nozzle using thinner and an old brush. Clean
nozzle during aiörushing if paintflow is unstable.
.i Paint thinner must always be compatible with
paint. Use of incompatible thinner may cause con'
gealing.
ti'4t t) -=> t
&EIf€H t/ /- Bäfi4 L<6*ßä ä?1L\l- L <Js < L.
H ti €t+rtx*E?qk ä f'J tJ h<7 z t t "
*=-ts)r\5/1lt l:7,j t- F äo?. 1..:tij
L, j.f {-;i€ u /jni,31t* L < < /i ä L\,
5J*Q+n@
I . ä++, v7, ,,,1)tht\-. t\=>t-Eltt
u*q. =- l.r rr4ff ul,rtr,äö, =-t )rz.
W.ä LD*'{ " =- F./|,ät& < Z:- Frl,B.lr}tJ+
t Lh-_h.ßqh*t" ,,I)t ältBo)v>+<
Hdu*q.
2, i, v -JßaV)\-ä Eo*EIlOFl ä ETttij
7515. 66n,/\- (L) äl*tt,*f"
3. 4\ätÄ7 t 7l:.I t \- (No.I +J-l tO 1.ryfJ
ü C 7e@ 4b, +z> t -JE'r t ?WO fr V*.'* "
-0)Lt. =- l:,t1J4 l: llwljB<ö4/\,, +>
t*< ärdr\J. ) t-,*f,r/u < /:ä l\"
Disassembling ior thorough cleaning
For smoolh airbrushing, disassemble and clean ajr-
brush thoroughlyafter using it 2 or3times.
*Needle and nozzle are very delicate, so take ex-
treme care not to damagethem,
Disassembly procedures
l.Remove paint cup, nozzle cover, and balance
weight. Loosen needle holder screw and pull out
needle, The needle holder screw and collar can be
rcmoved after the needle is removed. Remove noz-
zle using supplied wrench,
2. Pu,l down iab on pistol grip as shown to remove
the left pistol grip shell "L".
3.Use small cross screwdriver to unscrew center
block screws- Make sure not to lose needle guide
packing when removing center block.
*#ott)-=>,
<1t81' t) _ => t,
Disassembling for thorolJgh cleaning
1t\-t+!- =- FrLry{iiJ+y
,I
( tlrarit
E
.,/l)t,
L r'l
lqt L rc-
-- lr
,,/ 7)th/\-
U
^4ft.h/t-zEdLbI,*t"
=-l: )V)ll F
Nedleguide
t>t -1. , t
Packing
a=- F./l, : ä41 (tqöDF) äol.LL*6n'!\fi
<dä < ? *; l.*pä,3,=: ? < < t ä !\"
aatlh rT , EF4zrt, ^h, +/dä?hs@E
fräE: l-. fitrlET,I'äED *d.
a/l)v. /alrhJ\-, 12>t-aE.r) : )z
ä^fr€@ (4F.I=) ,:EU!ä ^n- Za+r:1,
€; < 1_: r-:.;. -=tI=a-!-c.==,\=
=- ts )1,@+^h
Cleaning needle
48*&o+^nb
Cleaning aidrrush after use
äHh ") J tfrEßo)+^tL
Cleaning inside aibrush and paint cup
<e#o, | -:-
Cleaning each pan

packing when removing center block.
&ß0)r t) -=>2
a-- t^:./, : Efl (tqö*) äLf lE r./:*5ä'L\6
Tüä ( ä * i lrElläß'= L ?-r < L ä !\"
aä'*nh'yJ: FfrJ+'t t ^?l. +rde?68ßo)E
1tsrä*L l-. fiqä<ß'äryD *3-"
a)7)t, )Z)rht\-, E>t--JE'yt : l\ä
idlNr€o) (8&+m+) EEFIä^?x. ?@+ri u
tJä < r,f t uzr.B. 7<Eo)ää ETä#+ä;ftr\E
8r.,(</:äL\"
.xa7-7. r&6+t\t +>ßäfrj@+t ^?l"ti.
!\?< t:ä!\"
Cleaning each part
aNeedle: Dip needle in thinner and wipe off paint
using a soft cloth.
aPaint cupr Add thinner, clean ofl paint usi19 a
brush and wipe dry using a rag.
aNozzle, nozzle covei center blockr Fill adequaie
container (paint tray, etc.) with thinner and immers€
parts. Clean off paint using brush.
XNever put aiörush shellor packinq in solveni.
ffEü?
)tn+xE?*flü<< < /:är\"
1 . t>t-iav 2 Lt>7ä@)T,,/7ttäl)
) b' D L &JLA,*.'i " =- l: lrr l l: E + t lLö U,
+#r/\- (R) l.tv F l,*9.
2. tr@ j - {i6ftr./\- (R) ti?ttlr:- fi/LB
ls+tEh.*t2ü. =* f Il,ZEl,, Ett',
1:/t-71-JdE) iJtrL\* ä t-tsEiU< < t:
3. *6rl(- (L) ä,F6h/\- (R) Lebll- t
U'riEßtt;ä7<r/\-tlzv F l, *t"
L D +itJ*.1"
5. =- l.:.,rä# t,. ./ <trfiffiL#< ötz2< t
*cfcLzZ7. A rt tt ts&l,ü'iÄl"<@El'
6, t\- >+r -Z)ü, äFIh y Ad L D FIB *.t "
xEl&+. 8++, y 7AEr7-oi8ä{itä * i<'
t-tc a, t> t - 7 8, 2 L./ 7 l'h< 1, ) h, D Bft
äl.L?!\rdr\- LträzElL*.t " i a-E,}&t
<. EtUEU-( < /;ät\"
EE+. F'J r-Etä L <t':f4n:l/iätl:
/dat€ä,t, .=- F tr: .,/ l )voP8t- ^+r$h\ö>t \
<1,\ä.E" .b i-8./\t >r-ät*tu<sy l+
t t- ä.@ ab. =- t: )t'z'r t fr L^L?< liät\"
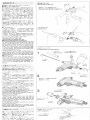
Assembly
Assemble airbrush in thetollowing manner
l.lnstall nozzle on center block, screw on ne€dle
guide/internal hose, and set into right half ol pistol
grip shell"R".
2.lnsert needl€ holder screw and collar from right
side into pistol grip shell "8," and pass the needle
through the holder Tighten up lock nut half-way.
3- Attach shell (L) to shell (R). Hold clip and set lever
4. Screw on extemal cover while holding pistol gnp
halves in place.
5. Gently seat needle into its nozzle by pressing for-
wad and seclre in place bytightening ne€dle ho€,
er knob.
6. Attach pajnt cup and ülen bälance weight.
Xlf paint in cup foarns-lp dLrdng ajörushing. rcz-
zle on center block may noi t€ completety fas-
tened. O's€ssemble arörush äno re-tighen .c.z€
::lDuring peinöng. il pajnt spray co.tinu6 elen J-
ier you let go of trigg€i then there € an open so€c€
between the needle and nozle. Re{rrove ti}e oal-
ance welght. loosen the lock nLi, ard Frsh in ne€-
dle.
{efra2 u-=>r,
Cleaning each part
=- t: )tQ+^tt
Cleaning needle
*E)\-'ya+^+'L
/ \-'Y a+ ^t1.
(iEü<)
,2
1
ll -.\
r:-.',i-Ä.i-t : Www.tamiya-COm

3. =t€r,/(- (L) z+Fr/\- (R) Eel2e- t
') .t 7 *,2*sä |-c Ll\-a! v l. l- *?"
t Dtitt*t"
5.:-F/l,?äSr-, ./ l)V*ffi|'*< 6f.)< JL
*)t t az7. nyt+.v I'Et,ü,.l.<laFL
6, t\- > t-d2 B. 81H'r'y J Z L D ltLt *q "
L L 6, E> t -1 E v, L., I lrb\U a b\D@rf
ätr< L\ä L\ - Lträiärr*d" t,;-EäF#l-
T. g€LgL<<t:äL\.
': =-=. F -r r-z€ ä L<3=ättHt* ä1.
'/e ä E -^ tt, =- F ) r L,,/ l ) r ofdE T +läh. 6 t\
<L\ä.ao g --,q./\t >t-ät*ttr<8, t,
y l- ätt' 6b, :- lirLä,r'U# l, j Ä<< l:ät\.
Assembly
Assemble aiörush in thefollowing mannei
l,lnstall nozzle on center block, screw on needle
guide,4nternal hose, and set into right half of pistol
gnp shell"R".
2,lnsert needle holder screw and collar from right
side into pistol grip shell "R," and pass the needle
throughthe holder. Tighten up lock nut haltway.
3. Attach shell{L)to shell(R). Hold clip and set iever
4. Screw on external cover while holding pisto gno
halves in place.
5. Gently seat needle inio its nozzle by pressing lo-
ward and secure in place by tightening need € ho c-
er knob,
6. Attach paint cup and then balance weight.
XIf paint in cup foams-up during airbrushing. noz-
zle on cenier block may not be compete't ias-
tened. Disassemble aiörush and re-tigh:E .cz e
+Dunng painlrg. ä parll so€y (o_i _ .es e,* i .
ter you let 9o ol irigger, then there s an op€r soace
betlveen the neede and nozle, Rernove üe c€l-
ance weight, loosen the ock nL,t. and push n ne€-
dle.
tif ir-Ä^-r:www.tamiya.com
-:.
17 *1- >tt*@
13 12 14 4
RJte--, (ß
22
\
art 6
15 r'x
€,-j
\
-+'
l
98
\----
1 . EiÄrlt- (R) / Pisiolgrip shell(B)
2 -1Är,/\- (L) / Pistolgdp shell (L)
3. tsl tj- / rngset
4.:-FlrzFy,,\- / Need estopper
5. il= -f> F / Hose connector
6. =-liJL,r-rF / Needle SUde
7. 1z> 9 -a A,y t / Cen\et block
L E#.//)t / s'ta datl nozte
9. ,/l)Lh/\- (fr) / Nozecover(rhin)
lO. J\->r- / Batance we 9h\
'I i. =- Fl, (€) / Needle rth n)
12. =-ts )rlt1.ltJ+-, / Ne€d e holder screw
13. a,tr't| / Lock n
14. h= / Ca )at
15. 77\>t / spnng
16.2x6mhgzl2x6mmscrcw
17. t\t+> / Packi^g
18 1>+-ta-2 / tntemathose
19 ,A\nhy-J (l7cc) / Paint cup (17cc)
20. +p.yJ (17ccB) / Paint cup cover (17cc)
21. OU>, / O-Rinq
22. trf / Wrcnch
a ztt D) ^ o)'"1, Fe $h 7 t a - t - x 7 L t;
f"lL\äbüTäL\"
a€eriäB4Eo)68<f"
a/ \-Y{tAEr! ^. {tE I =+üS+ä ü C}C
L\trl:rJf,ru (3r 5Ft) . .ltäEtaL\zE#?
o).:;+Yt MD*t"
(ö-8111€tr€äE)
;rEo54-2A3-0003
RFO3-3a99-3765 (ltE^6äai+)
g*E+rÄ / +E 8:00 - 2ooo
/i. E. nE 8:00 - I 7:00
7Av-9-rd-r,:ttaV-)t,
t t * li i&1€ a *{ o'E 7){2, * /d BA lJ. *,'ä E'r...
ellFtr, SßfE#B. €#*Bärir*ä l\t
l:L\<. {te:+ttzt 7 -.r-e ^E
*ji* D Fä L\. .ßAtlsooEr){T@86,1
ru+ntrz*'q " 5008r-lio)rۊr*, q
e*g. E&r\äSä e illHT ä L\" */r.
zi*eEtJ. t: tr- t t5sfFFi Sz
6r.J,H!\leljB*9.
:- F/' (€) (rI)......... 2oo3
R+/ l)L Le) ........... 35091
/ a|rrlt- (.$n) (9) ..... .. 3708
1z>t 1E tt 17).,,,, 12an
1>i-+ a-J ,JA) "" 124n
=- l< )t+:,; tz t I {12-14) ..3208
-- ts ttr4 F i2 t ts 16, 16, 17) .270n
v>v (22) ......... . .1201i
.\-tttr:7-J-tE
,=<>ts+r'rJ "."" 3a0ts
&X:1, y J (17..) (19,20,2l)
................... 300E.ixtcl120E
7^r7ni F,rl, (=#lEgfi 3.23cc)
.... ...... ........ 90E.illsl140E
7407127
7807126
7800163
7800159
7800173
9807004
9807005
7400175
7AO715A
74511
81041 ftftTAMTYA
*flire ß l"! tr! < 'rl! L lt 4 t)( ;n, $ t) * -f ,74531 Basic Airbrush (1057203)
-
 1
1
-
 2
2
-
 3
3
-
 4
4
-
 5
5
-
 6
6


på andra språk
Relaterade papper
Andra dokument
-
Parkside PABK 60 A1 Operation and Safety Notes
-
 Meganex MEG014 Användarmanual
-
Parkside PDFP 500 B2 Instructions Manual
-
Anest Iwata Classic Plus W400 WB-141G Användarmanual
-
Cotech JS-910FA-UK Användarmanual
-
-
Anest Iwata AN006 Användarmanual
-
 DeVilbiss SB-E2-360-J Användarmanual

