Abus TVVR30004 Användarmanual
- Kategori
- Digital videoinspelare (DVR)
- Typ
- Användarmanual

ABUS 4-Kanal Digitalrekorder
TVVR30004
D Bedienungsanleitung
User guide
Gebruikershandleiding
Notice d’utilisation
Betjeningsvejledning
E Manual de instrucciones
Instrukcja obsługi
S Bruksanvisning
I Istruzioni per l’uso
Инструкция по эксплуатации
Version 1.0

Deutsch
Nederlands
Diese Bedienungsanleitung enthält wichtige Hinweise zur
Inbetriebnahme und Handhabung.
Achten Sie hierauf, auch wenn Sie dieses Produkt an
Dritte weitergeben.
Heben Sie deshalb diese Bedienungsanleitung zum
Nachlesen auf!
Eine Auflistung der Inhalte finden Sie im Inhaltsverzeich-
nis mit Angabe der entsprechenden Seitenzahlen.
Deze gebruikershandleiding bevat belangrijke
opmerkingen over de ingebruikneming en bediening.
Houd hier rekening mee, ook als u dit product aan derden
doorgeeft.
Bewaar daarom de gebruikershandleiding om deze na te
kunnen lezen!
U vindt een opsomming van de inhoud in de
inhoudsopgave met vermelding van de betreffende
paginanummers
English
Dansk
This user guide contains important information on starting
operation and using the device.
Make sure that this user guide is handed over when the
product is given to other persons.
Keep this user guide to consult later.
A list of contents with the corresponding page number
can be found in the index.
Denne betjeningsvejledning indeholder vigtige
henvisninger til idriftsættelse og håndtering.
Vær også opmærksom på dette, hvis produktet gives
videre til en tredje person.
Opbevar derfor denne betjeningsvejledning til senere
brug!
I indholdsfortegnelsen findes der en liste over indholdet
med angivelse af de pågældende sidetal.
Français
Español
Les recommandations contenues dans cette notice
d’utilisation sont importantes pour la mise en service et
l'utilisation du produit.
Nous vous prions de bien vouloir les respecter. Si vous
étiez amené à revendre le produit, nous vous prions de
bien vouloir transmettre cette notice au nouvel acquéreur.
Nous vous recommandons également de conserver cette
notice d'utilisation afin de pouvoir la consulter à tout mo-
ment.
Le sommaire disponible donne un aperçu du contenu et
renvoie aux pages correspondantes.
Este manual de instrucciones contiene indicaciones
importantes para el manejo y la puesta en
funcionamiento del producto.
Téngalas también en cuenta si entrega la máquina a
terceros.
Por ello, consérvelas en un lugar adecuado para su
posterior lectura.
En el índice encontrará un listado de los contenidos con
las páginas donde podrá consultarlos.
Polski
Svenska
Są instrukcja obsługi zawiera informacje ważne dla
instalacji i eksploatacji.
Należy to również zauważyć, gdy ten produkt jest
przekazywana osobom trzecim.
Dlatego wyglądać po tych instrukcji obsługi dla
przyszłości!
Spis treści z odpowiednim numerem strony można
znaleźć w indeksie.
Denna bruksanvisning innehåller viktiga anvisningar för
idrifttagande och användning.
Dessa anvisningar ska observerad även om denna
produkt överlämnas till tredje part.
Förvara denna bruksanvisning för framtida referens!
Eine Auflistung der Inhalte finden Sie im Inhaltsverzeich-
nis mit Angabe der entsprechenden Seitenzahlen.
Русский
Italiano
Данная инструкция по эксплуатации содержит важные
указания по вводу в эксплуатацию и обращению с
продуктом.
Примите это во внимание, также при передаче
продукта в пользование третьим лицам.
По этой причине сохраните данную инструкцию для
повторного прочтения!
Вся информация отражена в Содержании с указанием
соответствующих номеров страниц.
Le presenti istruzioni per l'uso contengono note importanti
sulla messa in funzione e sull’utilizzo.
Vanno osservate anche in caso di cessione del prodotto a
terzi.
La preghiamo pertanto di conservare le presenti istruzioni
per l'uso in vista di una consultazione futura.
Un elenco dei contenuti con l’indicazione delle pagine
corrispondenti è riportato nell’indice
Sidan laddas...
Sidan laddas...
Sidan laddas...
Sidan laddas...
Sidan laddas...
Sidan laddas...
Sidan laddas...
Sidan laddas...
Sidan laddas...
Sidan laddas...
Sidan laddas...
Sidan laddas...
Sidan laddas...
Sidan laddas...
Sidan laddas...
Sidan laddas...
Sidan laddas...
Sidan laddas...
Sidan laddas...
Sidan laddas...
Sidan laddas...
Sidan laddas...

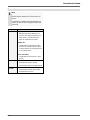
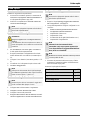
Konfiguration
25
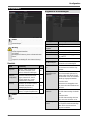
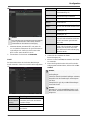
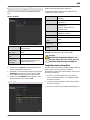
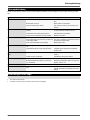
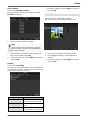
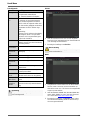
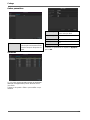
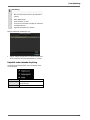
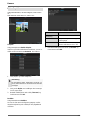
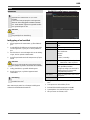
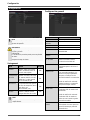
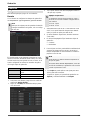
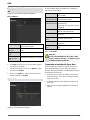
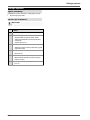
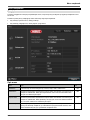
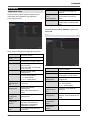
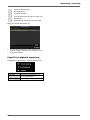
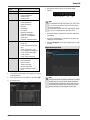
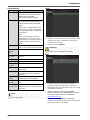
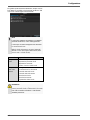
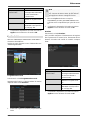
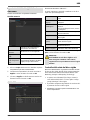
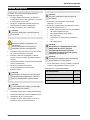
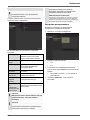
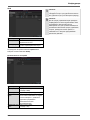
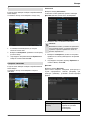
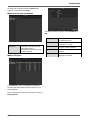
Konfiguration
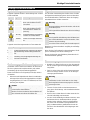
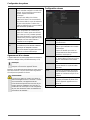
Hinweis
Das Menü Konfiguration verwaltet sämtliche Gerä-
teeinstellungen.
Warnung
Vergewissern Sie sich, dass Datum und Uhrzeit
korrekt eingestellt wurden.
ACHTUNG:
Nachträgliche Änderung kann zu Datenverlusten
führen!
Sorgen Sie rechtzeitig für eine Datensicherung.
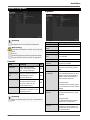
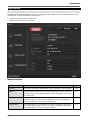
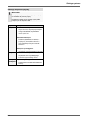
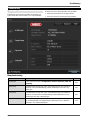
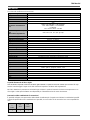
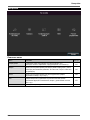
Überblick
Menü
Einstellung
Seite
Allgemein
Sprache, Video, Uhrzeit, Da-
tum, Maus, Passwort, Som-
merzeit, weitere Einstellungen
25
Netzwerk-
Konfiguration
Erforderliche Netzwerkeinstel-
lungen (manuelle IP, DHCP,
PPPOE, DDNS etc.) sowie
Netzwerkstatus-Übersicht
27
Warnung
Verhalten des Gerätes im Aus-
nahmefall (Festplatte voll,
Netzwerk getrennt etc.)
31
Benutzer
Hinzufügen, Ändern von Be-
nutzern, Vergabe Zugriffsrechte
31
Hinweis
Beachten Sie die Hinweise in den jeweiligen Kapi-
teln.
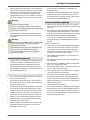
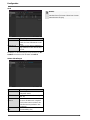
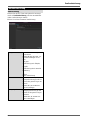
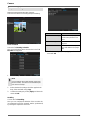
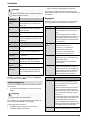
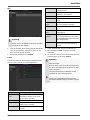
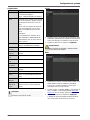
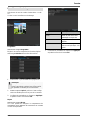
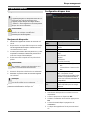
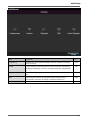
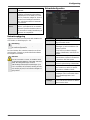
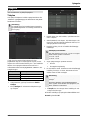
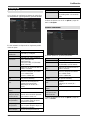
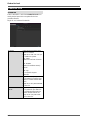
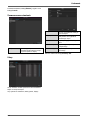
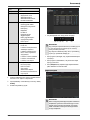
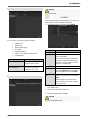
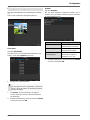
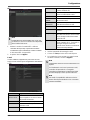
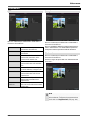
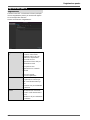
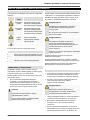
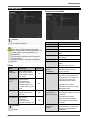
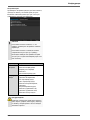
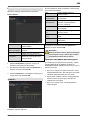
Allgemeine Einstellungen
TAB Allgemein
Einstellung
Sprache
OSD-Sprache
BNC-Ausgabe
Standard
PAL, NTSC
Auflösung
Monitor-Auflösung
Zeitzone
GMT (Greenwich Mean Time)
Datumsformat
MM-TT-JJJJ, TT-MM-JJJJ,
JJJJ-MM-TT
Systemzeit
Datum, Uhrzeit
Geschwindigkeit
des Mauszeigers
Schiebebalken, links niedrige,
rechts hohe Geschwindigkeit
Assistent aktivie-
ren
Checkbox aktiv:
Der Assistent erscheint bei Sys-
temstart.
ID-
Authentifizierung
aktivieren
Checkbox inaktiv:
Keine Passworteingabe am Re-
korder selbst nötig. Beim Zugriff
per Netzwerk muss das Passwort
allerdings eingegeben werden.
Checkbox aktiv:
Passwort muss eingegeben wer-
den, bevor das Menü bedient wer-
den kann.
LED Statusleiste
aktivieren
Checkbox inaktiv:
Die LED-Statusanzeige ist deakti-
viert.
Checkbox aktiv:
Die LED-Statsuanzeige leuchtet
blau, wenn der Rekorder an ist.
Remote Zugriff ak-
tivieren
Checkbox aktiv:
Der Zugriff für die Remotekonfigu-
ration durch den technischen
Support ist aktiviert.

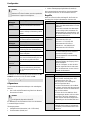
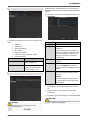
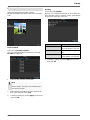
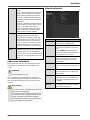
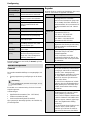
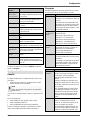
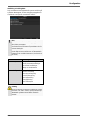
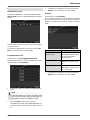
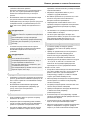
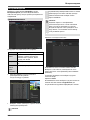
Konfiguration
26
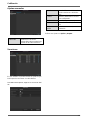
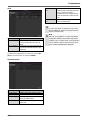
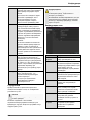
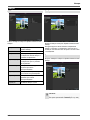
Hinweis
Remote Zugriff aktivieren
Aktivieren Sie diese Funktion um einen optimalen
technischen Support zu ermöglichen.
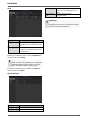
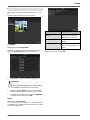
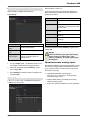
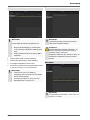
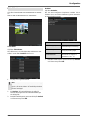
TAB DST Ein-
stellungen
Einstellung
Auto DST An-
passung
Bei aktivierter Checkbox stellt das
Gerät die Sommerzeit automatisch
um.
DST aktivieren
Bei aktivierter Checkbox kann ein
genaues Anfangs-/Enddatum gewählt
werden.
Von, bis
Datum Start, Ende Sommerzeit
DST Bias
Daylight Saving Time Bias: Korrektur
der Sommerzeit zur Referenzzeit
Weitere Ein-
stellungen
Einstellungen
Name
Eindeutige Spezifikation des Gerätes
Nr.
Zur eindeutigen Identifizierung bei
Benutzung mit einer Fernbedienung
CVBS Helligkeit
Schieberegler, links niedrige, rechts
höhere Helligkeit
Menü Verweil-
zeit
Nie / 1 … 30 Minuten – regelt die
Dauer der Menüeinblendung, bis das
Menü wieder ausgeblendet wird
Menü Ausga-
bemodus
Zeichnet das Bild weicher oder schä-
fer.
Ereignis Hin-
weis
Checkbox aktiv:
Akustische Alarmierung bei Hinwei-
sen wie Bewegungserkennung, Hdd
voll, etc.
Bestätigen Sie die Einstellungen mit einem Klick auf An-
wenden und verlassen Sie das Menü mit OK.
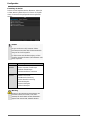
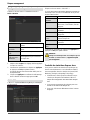
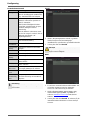
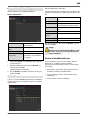
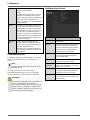
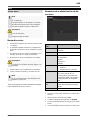
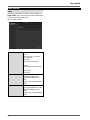
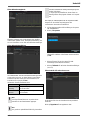
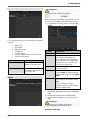
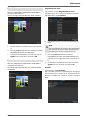
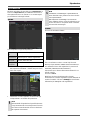
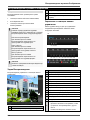
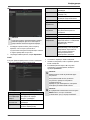
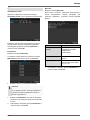
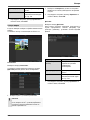
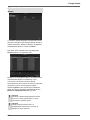
Netzwerk-Konfiguration
Allgemeines
Die korrekten Netzwerkeinstellungen sind unabdingbar,
falls Sie
das Gerät und die Überwachung über Ihren Browser
fernsteuern möchten.
Hinweis
Bitte lesen Sie vor der Einrichtung des Gerätes
nachfolgende allgemeine Hinweise.
Ein Netzwerk ist ein Zusammenschluss von mindestens
2 netzwerkfähigen Geräten.
Übertragungsarten:
kabelgebundene Netzwerke (z.B. CAT5-Kabel),
Funknetzwerke (WLAN) und
andere Übertragungsmöglichkeiten (Powerline).
Alle Systeme besitzen wesentliche Gemeinsamkeiten
aber unterscheiden sich in verschiedener Hinsicht.
Begriffe
Anbei eine Übersicht über die Begriffe, die für die Ver-
wendung des Gerätes in Netzwerken relevant sind.
Parameter
Einstellung
IP-Adresse
Eine IP-Adresse ist die eindeutige Ad-
resse eines Netzwerkgerätes in einem
Netzwerk.
Diese darf innerhalb eines Netzwerks
nur ein einziges Mal vorkommen. Es
gibt bestimmte IP-Adressbereiche, die
für öffentliche Netzwerke, wie z.B. das
Internet reserviert sind.
Private Ad-
ressbereich
z.B. 10.0.0.0 - 10.255.255.255,
Subnetzmaske 255.0.0.0
172.16.0.0 - 172.31.255.255
Subnetzmaske 255.255.0.0
192.168.0.0 - 192.168.255.255
Subnetzmaske 255.255.255.0
Subnetzmaske
Ist eine Bitmaske, die verwendet wird
um Entscheidungen bzw. Zuordnun-
gen beim Routing zu treffen.
In Heimnetzwerken standardmäßig
255.255.255.0
Gateway
Netzwerkgerät, das allen anderen
Netzwerkgeräten den Zugang zum In-
ternet ermöglicht.
Z.B. der Computer, an den das DSL-
Modem angeschlossen ist oder meis-
tens der Router bzw. Access Point in-
nerhalb des Netzwerks.
Parameter
Einstellung
Nameserver
Auch DNS (Domain Name Server) ge-
nannt, ist dafür zuständig, dass einer
Webadresse bzw. URL (z.B.
www.google.de) eine eindeutige IP-
Adresse zugeordnet wird.
Wenn man eine Domain in einem Brow-
ser eintippt, sucht der DNS die passende
IP-Adresse des Servers und leitet die An-
frage an diesen weiter.
Hier kann die IP eines DNS des Provi-
ders eingetragen werden. Oft ist es aber
ausreichend, die IP des Gateways zu
wählen. Dieser leitet die Anfragen dann
selbstständig an den Provider-DNS wei-
ter.
DHCP
Der DHCP-Server weist einem Netz-
werkgerät die IP-Adresse, Subnetzmas-
ke, Gateway und den Nameserver auto-
matisch zu.
Sidan laddas...
Sidan laddas...
Sidan laddas...
Sidan laddas...
Sidan laddas...
Sidan laddas...
Sidan laddas...
Sidan laddas...
Sidan laddas...
Sidan laddas...
Sidan laddas...

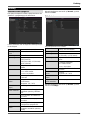
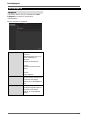
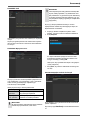
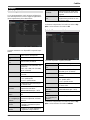
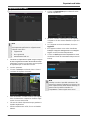
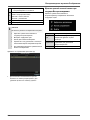
Kodierung
38
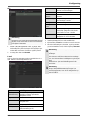
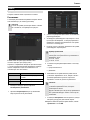
Kodierung
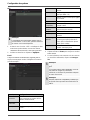
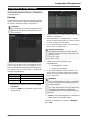
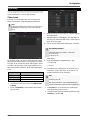
TAB Aufzeichnung
Mittels des Zeitplans werden die Aufzeichnungszeiten
bzw. „Auslöser“ (Aufzeichnungstyp) für die Kameras ein-
gerichtet.
In diesem Untermenü stehen Ihnen folgende Einstel-
lungsmöglichkeiten zur Verfügung:
Kamera
Einzustellende Kamera
Encoding Para-
meter
Einzustellender Stream
Stream Typ
Vordefinierter Stream Video
Auflösung
Auto, WD1(960x480)
4CIF(704x576),
2CIF(704 x 288), CIF(352x288),
QCIF(176x144)
Bitrate
Auswahl einer variablen bzw.
konstanten Bitrate
Videoqualität
verschiedene Qualitätsstufen
+++: mittlere Qualität
++++++: hohe Qualität
Bildrate
Einstellungen der Bildrate für den
Stream
Max. Bitrate-
Modus
Auswahl des Modus für die Ein-
stellungen der Bitrate
Benutzerdef. (32 – 3072)
Max. Bitrate
(Kbps)
Einstellungen der maximalen Bit-
rate
Max. Bitrate Be-
reich empfohlen
Empfohlene Bitrate in Abhängig-
keit der eingestellten Auflösung,
Bildrate, etc.
Vorlaufzeit
Zeit in Sekunden, die vor einem
Alarm aufgezeichnet wird
Nachlaufzeit
Zeit in Sekunden, die nach einem
Alarm aufgezeichnet wird
Bestätigen Sie die Einstellungen mit einem Klick auf An-
wenden und verlassen Sie das Menü mit OK.
TAB Substream
Folgende Parameter sind einstellbar:
Kamera
Einzustellende Kamera
Stream Typ
Vordefinierter Stream Video
Auflösung
Auto, 4CIF(704x576),
CIF(352x288), QCIF(176x144)
Bitrate Typ
Auswahl einer variablen bzw.
konstanten Bitrate
Video-Qualität
verschiedene Qualitätsstufen
+++: mittlere Qualität
++++++: hohe Qualität
Bildrate
Einstellungen der Bildrate für den
Stream
Max. Bitrate-
Modus
Allgemein,
Benutzerdef. (32 - 3072
Max. Bitrate
(Kbps)
Anzeige der maximalen Bitrate
Max. Bitrate Be-
reich empfohlen
192~320 (Kbps)
Bestätigen Sie die Einstellungen mit einem Klick auf An-
wenden und verlassen Sie das Menü mit Zurück.
Abgelaufene Zeit
markieren
Einstellung der längsten Aufbe-
wahrungszeit für aufgezeichnete
Dateien.
960-Modus akti-
vieren
Aktiviert:
Aufzeichnung mit WD1 Auflösung
möglich.
Sidan laddas...
Sidan laddas...
Sidan laddas...
Sidan laddas...
Sidan laddas...
Sidan laddas...
Sidan laddas...

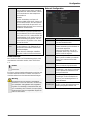
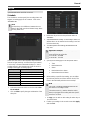
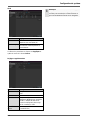
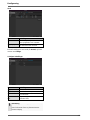
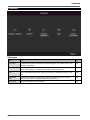
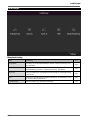
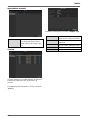
Wartung
46
Wartung
Hinweis
Das Menü dient zur Gerätewartung und sollte nur
von erfahrenen Benutzern bedient werden.
Menü
Einstellung
S.
System Info
Geräteinformationen (Serien-
nummer, Firmwarestatus etc.)
46
Protokoll
Suche
In der Protokoll Suche
(=Logdatei) kann nach be-
stimmten Kriterien z.B. Alarm,
Ausnahme, Bedienung oder In-
formation nach Aufzeichnungen
oder Informationen
(S.M.A.R.T.-Festplattenstatus)
gesucht werden.
46
Import/Export
Einstellungen exportieren, im-
portieren
47
Update
Firmware-Update durchführen
47
Standard
System-Reset
48
Netzwerk
Anzeige der Übertragungs- und
Empfangsrate des Rekorders
48
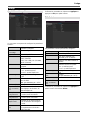
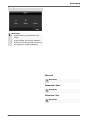
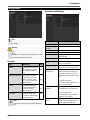
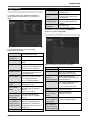
System Info
Hinweis
Im Informationsmenü werden die technischen Da-
ten des Gerätes sowie Informationen zu den ver-
schiedenen Einstellungen der Kameras, Aufzeich-
nung etc. dargestellt.
Dies ist z.B. hilfreich bei Support-Anfragen.
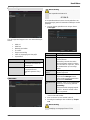
Protokoll Suche
Hinweis
Die Suche nach „Ereignissen“ kann nach folgen-
den Haupttypen/Ereignissen/Parametern erfolgen:
Alle
Alarm
Warnung
Vorgang
Information
Filter1
Filter2
Alle
-
Alarm
Alle
Bewegungserkennung
starten/beenden
Sabotageüberwachung
starten/beenden
Warnung
Alle
Videosignalverlust
Illegales Anmelden
HDD voll
HDD Fehler
IP Konflikt
Netzwerk getrennt
Ausnahme Aufzeichnung
Video Ein-/ausgangsignal
ungleich
Aufzeichnungspuffer
Sidan laddas...
Sidan laddas...
Sidan laddas...
Sidan laddas...
Sidan laddas...

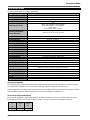
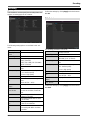
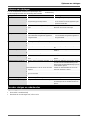
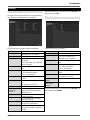
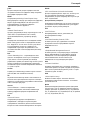
Technische Daten
52
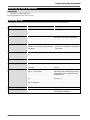
Technische Daten
Technische Änderungen und Irrtümer vorbehalten.
ABUS Digitalrekorder
TVVR30004
Videokomprimierung
H.264
Kameraeingänge
4
Monitorausgänge
Monitor: 1 x BNC (1.0 V p-p, 75 Ω), 1 x VGA
Betriebsmodus
Triplex
Auflösung (Liveansicht)
VGA:
1080P: 1920*1080/60Hz, 1280*1024/60Hz,
720P: 1280*720/60Hz,1024*768/60Hz
BNC Output:
PAL: 704×576, NTSC: 704×480
Auflösung @ Bildrate pro
Kamera (Aufnahme)
WD1, 4CIF, 2CIF, CIF, QCIF @ 25fps
Gesamtbildrate
100 fps
Kompressionsstufen
6
Nachalarmspeicher
0–30 sec. / 5–900 sec.
Speichermedium
1 x 2,5“ SATA HDD
Datensicherung
1 x USB 2.0
Ansichten
1 / 2 / 4
Aufnahmemodi
Manuell, Zeitplan, Bewegungserkennung
Suchmodi
Nach Ereignis, Datum & Zeit, S.M.A.R.T
Benutzerstufen
2 (max. 31 Benutzer)
Netzwerkanschluss
1 x RJ45 10/100 Mbps
Gleichzeitiger Netzwerkzugriff
128 Kameraverbindungen
Netzwerkfunktionen
Liveansicht, Wiedergabe, Datenexport
DDNS
√
NTP
√
Alarmierung
Akustisches Warnsignal, OSD Signal, E-mail
Steuerung
USB Maus
OSD Sprachen
Deutsch, Englisch, Französisch, Niederländisch, Dänisch,
Italienisch, Polnisch, Spanisch, Schwedisch, Russisch
Spannungsversorgung
12 VDC, 1,5 A, 50~60 Hz
Leistungsaufnahme
<13W (ohne Festplatte)
Betriebstemperatur
-10°C ~ + 55°C
Abmessungen (BxHxT)
200 x 45 x 200 mm
Gewicht
≤ 0,8 Kg ohne Festplatte
Zertifizierungen
CE
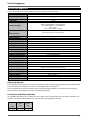
HDD-Speicherkapazität
Der benötigte Speicherplatz für Aufzeichnung und Überwachung hängt neben der physikalischen Speicherkapazität
der verwendeten Festplatte von der eingestellten Auflösung sowie der Bitrate der Aufzeichnung ab.
Auf der mitgelieferten CD finden Sie einen Kalkulator um den benötigten Speicherplatz auf einer Festplatte zu berech-
nen. Desweiteren finden Sie diese Softwaren auch auf unsere Homepage zum Download.
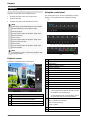
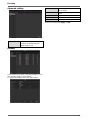
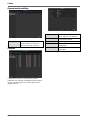
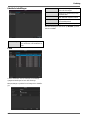
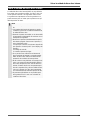
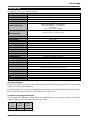
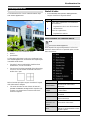
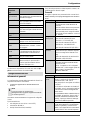
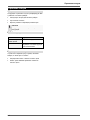
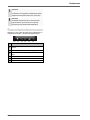
Übersicht Anschlusskombinationen
Es besteht die Möglichkeit, einen Spot-Monitor anzuschließen. Entnehmen Sie aus der Tabelle unterhalb, welche
Kombinationen möglich sind. Ein Haken steht für möglich, ein Kreuz steht für nicht kompatibel zueinander.
VGA
+
CVBS
VGA
only
CVBS
only
Sidan laddas...
Sidan laddas...
Sidan laddas...
Sidan laddas...

ABUS
4-Kanal Digitalrekorder
TVVR30004
Hersteller
ABUS Security-Center GmbH & Co. KG
Linker Kreuthweg 5
86444 Affing (Germany)

ABUS 4-channel digital recorder
TVVR30004
User guide
Version 1.0
Sidan laddas...

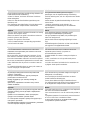
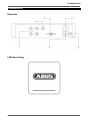
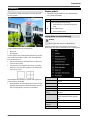
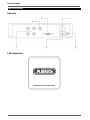
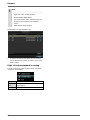
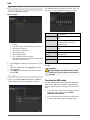
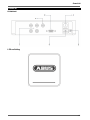
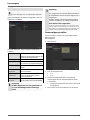
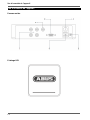
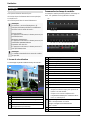
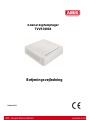
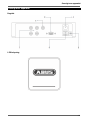
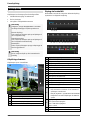
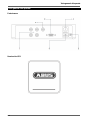
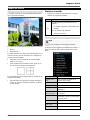
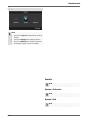
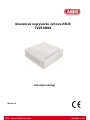
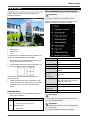
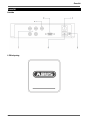
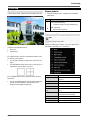
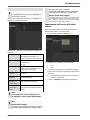
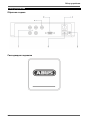
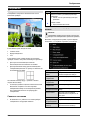
Device overview
60
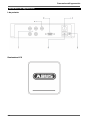
Device overview
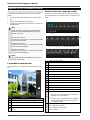
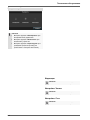
Rearside
LED illumination

System operation
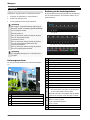
61
System operation
General information
The device can be controlled as follows:
Using the USB mouse
Connections on the rear of the device
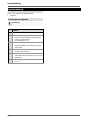
Note
Pay attention to the overview on page 60.
No.
Name
Function
1
VIDEO IN: BNC video inputs
2
VIDEO OUT: BNC video output
BNC plug for video output to connect to a
monitor as an alternative to
VGA output (No. 3)
3
VGA:
VGA monitor connection (9-pin), video output
signal
4
LAN:
Ethernet LAN connection
5
USB:
USB connections for operating with a mouse
and data export
6
Power IN:
12 V DC
Sidan laddas...
Sidan laddas...
Sidan laddas...
Sidan laddas...
Sidan laddas...
Sidan laddas...
Sidan laddas...
Sidan laddas...
Sidan laddas...
Sidan laddas...
Sidan laddas...
Sidan laddas...

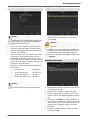
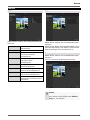
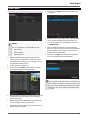
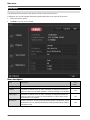
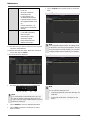
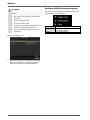
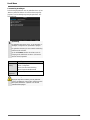
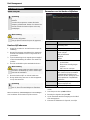
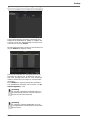
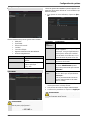
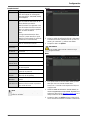
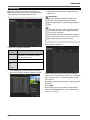
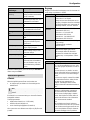
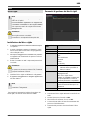
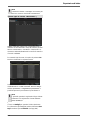
Setup wizard
74
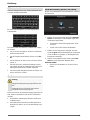
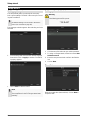
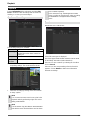
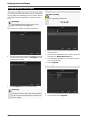
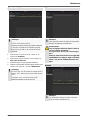
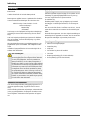
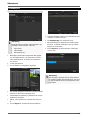
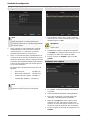
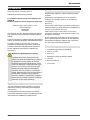
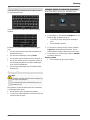
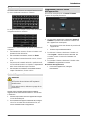
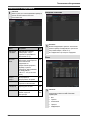
Network Settings
Note
To check whether DHCP can be selected (or if
you have to set the IP address and other settings
manually), consult your network administrator.
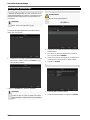
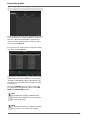
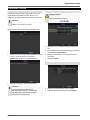
1. DHCP activated: If DHCP is set up in the network
router, then tick the DHCP box. All network settings
are then made automatically.
2. DHCP not activated: Enter the data manually (IPv4
address, IPv4 subnet mask and IPv4default gateway
= IPv4 address of the router). You can also optional-
ly enter the address of the DNS server that you need
for sending the E-mail.
A typical address specification is as follows:
IPv4 address: 192.168.0.50
IPv4 Subnet mask: 255.255.255.0
IPv4 Default gateway: 192.168.0.1
Preferred DNS server: 192.168.0.1
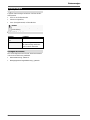
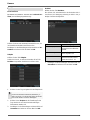
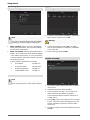
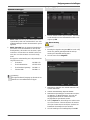
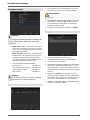
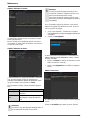
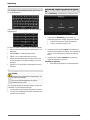
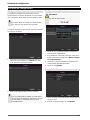
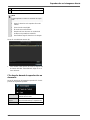
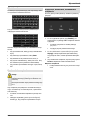
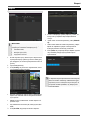
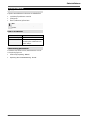
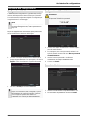
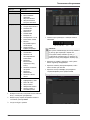
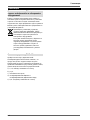
HDD Management
1. To set up a new hard disc, activate the “Check box”
with a left click and then click on Init.
Warning
All data on the drive is deleted!
2. Confirm the prompt by pressing OK. The HDD is
then set up for operation. The progress is displayed
on the status bar.
3. Exit the setting by pressing Next.
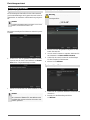
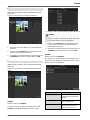
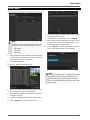
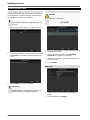
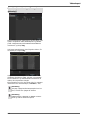
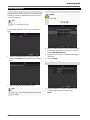
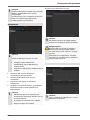
Camera recording
1. At “Camera” select a camera with which you would
like to record.
2. Activate the check box “Start recording”.
3. Select the type of recording. You can choose be-
tween “Time plan” and “Motion recognition”.
Arm the motion detection inside the camera for re-
cording motion.
4. Press Copy to take on the setting for other cameras.
For this, select the cameras that appear in the new
window. Activate the respective check box with a
mouse click.
5. Finalize the setting and end the installation assistant
with OK.
Note
When the device is accessed remotely via the in-
ternet, it should be given a fixed network address.

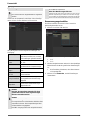
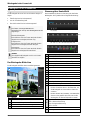
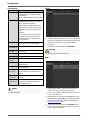
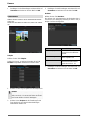
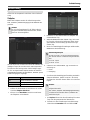
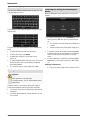
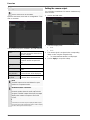
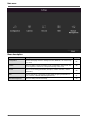
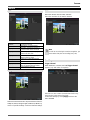
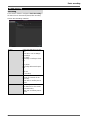
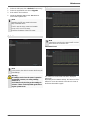
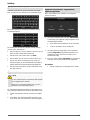
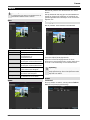
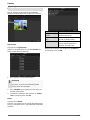
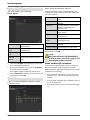
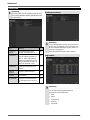
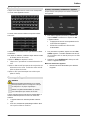
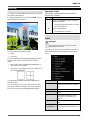
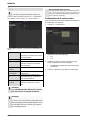
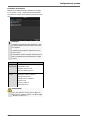
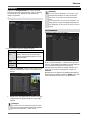
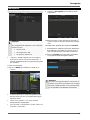
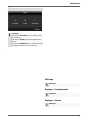
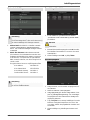
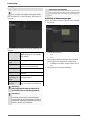
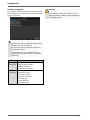
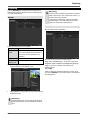
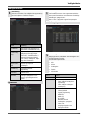
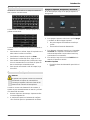
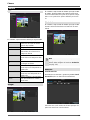
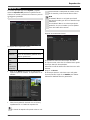
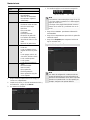
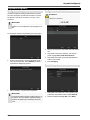
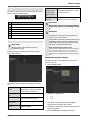
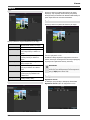
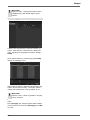
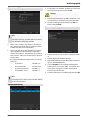
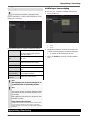
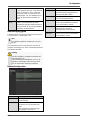
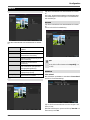
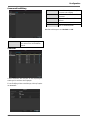
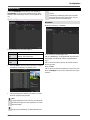
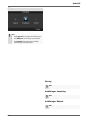
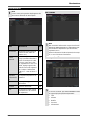
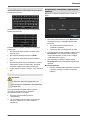
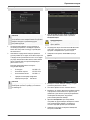
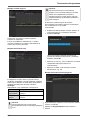
Live view
75
Live view
Overview
The live view starts automatically after the device is
switched on.
You can also go back to the live view by pressing the
Menu key repeatedly.
The following menus are found in the screen header:
Menu
Playback
PTZ
The view pop-up menu is found on the right. The time
and date are displayed on the right.
Click on the symbol to open the pop-up menu of the
multi view.
Click on one of the symbols to switch between the dif-
ferent views.
The signals of the connected cameras are displayed on
the main screen.
By double-clicking the left mouse key, you can dis-
play the camera image as a full-screen view or switch
back to the original view.
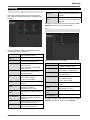
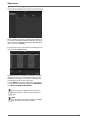
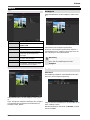
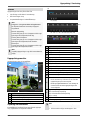
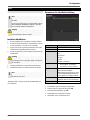
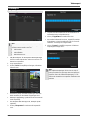
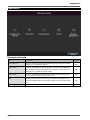
Status symbols
The following symbols are displayed depending on
the operating status of the device:
Symbol
Meaning
R
R
Yellow: Motion Recording
Recording at motion detection
Blue: Recording
Continuous recording
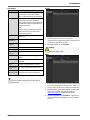
Pop-up menu for mouse operation
Note
Press the right mouse button when the cursor is
positioned on a live image.
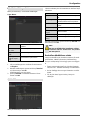
The following settings can be made. The arrow pointing
to the right indicates that a sub-menu is opened for selec-
tion:
Menu
Opens the main menu
Single Screen
Full-screen view for selected cam-
era
Multi Screen
Various camera layouts
Previous Screen
Changing the presentation of the
previous camera
Next Screen
Displays the next camera(s)
Start Auto-Switch
Starts the camera sequence
Start Recording
Starts motion detection or the
schedule for the entire day
Quick Set
Setting for the output mode
All-day playback
Switches to playback mode
Aux Monitor
to spot monitor
Sidan laddas...
Sidan laddas...
Sidan laddas...

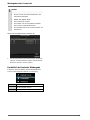
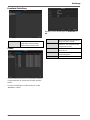
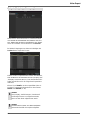
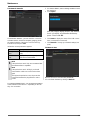
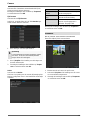
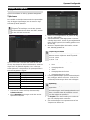
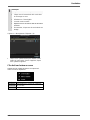
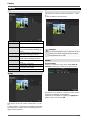
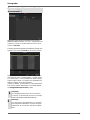
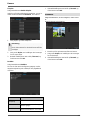
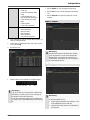
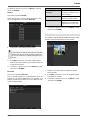
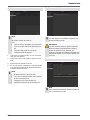
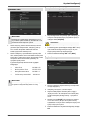
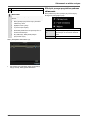
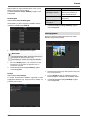
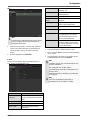
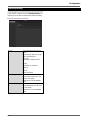
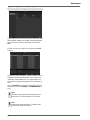
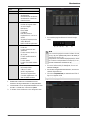
Playback
79
Note
You can zoom in on the screen image.
Right-click in the running playback.
Please choose ’Digital Zoom‘.
The zoom mode is active. Shift the zoom area
by means of the window in the miniature
screen.
Right-click the image to finish.
Please klick on ‚Tag management‘ (6):
In order to change the description of your marking,
click on the process symbol. To remove, click on the
delete symbol.
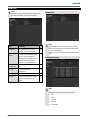
Right click when playback is running
Perform a right click on the playback image. The follow-
ing options are available:
Camera
Select a camera channel
Control
field
Display/hide the control field for control-
ling playback
Exit
End playback
Sidan laddas...

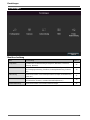
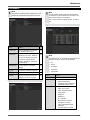
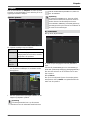
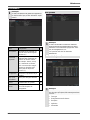
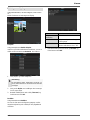
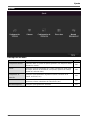
Main menu
81
Menu description
Menu
description
page
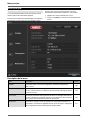
Configuration
Used for managing all device settings (General, Network, Live View, Excep-
tion, User).
82
Camera
Menu for setting camera parameters (OSD configuration, image mode, mo-
tion recognition, Private Zone, Tamper Monitoring, Video Loss).
90
Record
Menu to set recording parameters (time plan, camera resolution, camera
stream etc.).
94
HDD
Used for initialising or managing installed HDD (assigning read/write func-
tions, cameras, network HDD management etc.).
97
Manual Management
Menu for setting manual recordings.
99

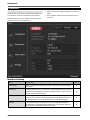
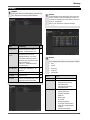
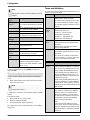
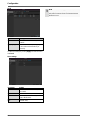
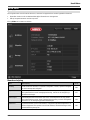
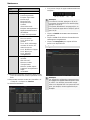
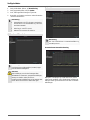
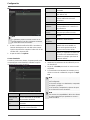
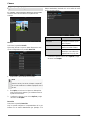
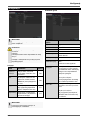
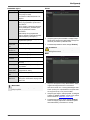
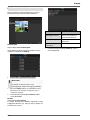
Configuration
82
Configuration
Note
The “Configuration” menu is used to manage all
device settings.
Warning
Ensure that the date and time are set correctly.
IMPORTANT:
Subsequent changes to the settings can lead
to data loss!
Ensure a data backup has been made in good
time beforehand.
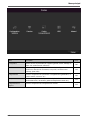
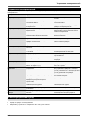
Overview
Menu
Setting
Page
General
Language, video, time, date,
mouse pointer, password, time
zones and other settings
82
Network
Required network settings
(manual IP, DHCP, PPPOE,
DDNS etc.)
83
Warning
Behaviour of the device in ex-
ceptional cases
(HDD full, network disconnect-
ed etc.)
88
User
Adding and changing users,
assigning authorisation rights
88
Note
Pay attention to the instructions in the correspond-
ing sections.
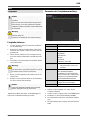
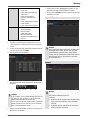
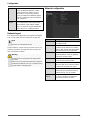
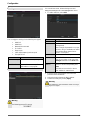
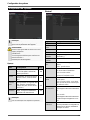
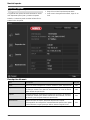
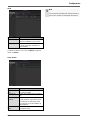
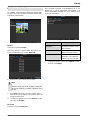
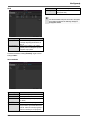
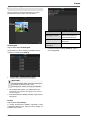
General
“General” tab
Setting
Language
Language on the OSD
CVBS Output
Standard
PAL / NTSC
Resolution
Resolution on the monitor
Time Zone
GMT (Greenwich Mean Time)
Date Format
MM-DD-YYYY, DD-MM-YYYY,
YYYY-MM-DD
System
Date/Time
Date and time
Mouse Pointer
Speed
Set on the scroll bar (left =
low speed; right = high speed)
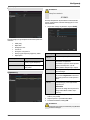
Enable Wizard
Box ticked:
Wizard will appear after restart of the
device.
Enable ID Au-
thentification
Box not ticked:
In order to enter a menu no password
has to be entered. At access by net-
work the password has to be entered.
Box ticked:
Password must be entered in order to
use the menu.
Activating LED
status bar
Box not ticked:
The LED status display is deactivat-
ed.
Box ticked:
The LED status display glows blue
when the recorder is on.
Activate remote
access
Box ticked:
Access for remote configuration is ac-
tivated for technical support.

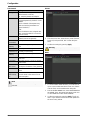
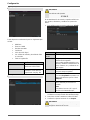
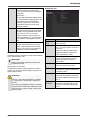
Configuration
83
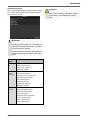
Note
Activate remote access
Activate this function to enable optimum technical
support.
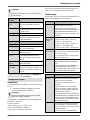
TAB “DST set-
tings”
Setting
Auto DST Ad-
justment
With an activated check box, the de-
vice converts automatically to summer
time.
Enable DST
With an activated check box, an exact
start / end date can be selected
From / To
Date of DST start / end
DST Bias
Daylight Saving Time Bias: Correc-
tion of the DST to the reference time
TAB “More
Settings”
Setting
Device Name
Unique specification of the device
Device Number
Used for unique identification when
using remote control
CVBS Output
Brightness
Scroll bar (left = darker;
right = brighter)
Operation
Timeout
Never / 1 to 30 minutes – regulates
how long the menu is shown
Output mode
menu
Renders the image softer or sharper
Event message
Box ticked:
Automatic alarming when notifica-
tions such as motion detection , HDD
full, etc. occur.
Confirm the settings by clicking Apply and leave the
menu with OK.
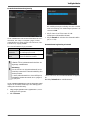
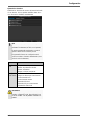
Network configuration
Correct network settings are essential in the following
cases:
When using remote control of the device and surveil-
lance over your server
Note
Please read the following basic instructions before
setting up the device.
A network is a connection of at least two network-capable
devices.
Transmission types:
Wired networks (e.g. CAT5 cable)
Wireless networks (WLAN)
Other transmission types (Powerline)
All systems have certain similarities, but can also differ in
many ways.
Terms and definitions
An overview of relevant terms when using the device in a
network can be found below.
Parameter
Setting
IP address
An IP address is the unique address of a
network device within a network.
This address may only appear once with-
in a network. Certain IP address ranges
are reserved for public networks (e.g. the
Internet).
Private
address
range
e.g. 10.0.0.0 – 10.255.255.255
Subnet mask: 255.0.0.0
172.16.0.0 - 172.31.255.255
Subnet mask: 255.255.0.0
192.168.0.0 - 192.168.255.255
Subnet mask: 255.255.255.0
Subnet
mask
A subnet mask is a bit mask used for
making decisions and assignments dur-
ing routing.
255.255.255.0 is the standard subnet
mask in home networks.
Gateway
A gateway is a network device which al-
lows all other network devices to access
the Internet.
This can be the computer connected to
the DSL modem or – usually – the router
or access point within the network.
Parameter
Setting
Name
server
The name server is responsible for as-
signing a unique IP address to a web ad-
dress or URL (e.g. www.google.de). Also
known as DNS (Domain Name Server).
When a domain name is entered into a
browser, the DNS searches for the cor-
responding IP address of the server and
forwards the query on.
The IP of the provider’s DNS can be en-
tered here. However, it is often sufficient
to select the IP of the gateway. This then
forwards the queries independently to the
provider DNS.
DHCP
The DHCP server automatically assigns
the IP address, subnet mask, gateway
and name server to a network device.
DHCPs are available in current routers.
The DHCP service must be specially set
and activated (see the corresponding
manual for more information).
Note:
When using fixed IP addresses and a
DHCP server, make sure that the fixed IP
addresses are outside the address range
assigned by DHCP. Otherwise, problems
could occur.
Sidan laddas...

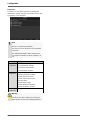
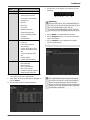
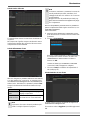
Configuration
85
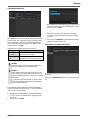
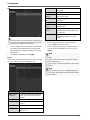
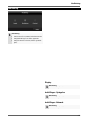
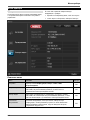
TAB General
Parameter
Setting
NIC Typ
Set the transmission speed of the in-
stalled network card here.
Tip: 10M/100/1000M self adaptive
Enable DHCP
Tick the box if the IP addresses are
assigned dynamically via DHCP in the
network.
DHCP activated: Subsequent entry
fields are inactive (parameters as-
signed via DHCP).
Note:
If the IP addresses are assigned man-
ually, ensure that DHCP is not active
(box not ticked).
IPv4 Adress
Address of the network device in the
network (manual assignment)
IPv4
Subnet Mask
Usually 255.255.255.0
IPv4 Default
Gateway
Address of the gateway for Internet ac-
cess
IPv6 Adress 1
Currently no functioning
IPv6 Adress 2
Currently no functioning
IPv6 Standard
Gateway
Currently no functioning
MAC Adress
Hardware address of the installed net-
work card
MTU (Bytes)
Describes the max. size of the largest
protocol data .
Preferred
DNS Server
Address of the Domain Name Server
(usually the IP address of the gateway)
Alternate DNS
IP address of the alternative DNS
server
Report net-
work interrup-
tion
Box ticked:
Acoustic alarm in the event of a net-
work interruption
Note
In certain modes some of these settings cannot be
selected.
PPPOE
1.
Tick the PPPOE box, enter the user name (Internet
access ID) and password, then confirm the pass-
word.
2.
Confirm the settings by pressing Apply.
Warning
Use PPPOE only if there is no router available.
DDNS
1.
To use the ABUS DDNS function, you must first set
up an account under www.abus-server.com. Please
note the FAQs on the website when doing this.
2.
Tick the “Enable DDNS” box, enter ‘ABUS DDNS’ as
the “DDNS Type”, then enter www.abus-server.com
or “62.153.88.107” under “Server Address”.
3.
Confirm the settings by pressing Apply. The IP ad-
dress of your Internet connection is now updated on
the server every minute.
Sidan laddas...

Configuration
87
UPnP
Parameter
Setting
Enable UPnP
Tick box to activate visibility in an IP
network.
Mapping Type
Select here whether port mapping is
to be conducted automatically or
manually.
Confirm the settings by clicking Apply and exit the menu
with Back.
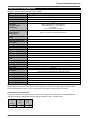
More settings
Parameter
Setting
Server Port
Port for data communication (Gen-
eral: 8000)
HTTP Port
Port for web server (General: 80)
Multicast IP
In order to minimize traffic you can
enter a Multicast IP.
RTSP Service
Port
RTSP-port
(Default: 554)
Note
Server port 8000 and HTTP port 80 are the stand-
ard ports for remote clients and remote Internet
browser access.
Sidan laddas...
Sidan laddas...
Sidan laddas...
Sidan laddas...
Sidan laddas...

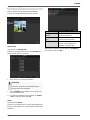
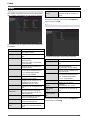
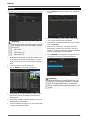
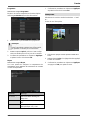
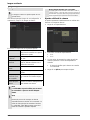
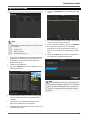
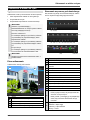
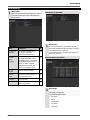
Camera
93
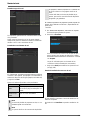
Video signal loss
Select the camera channel under “Camera”.
Set the checkmark for the alarm in the event of a “Video
Loss”.
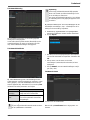
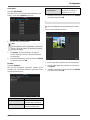
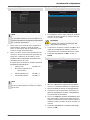
Armin Schedule
Select the TAB Arming Schedule.
Here you set the times when the reactions in the TAB
Reaction are triggered.
1. Select the day and enter the schedule.
Note
You can define up to 8 time periods (each from
00:00 to 00:00). The times in the individual peri-
ods must not overlap.
2. Select whether the settings should be applied to all
days of the week with using Copy.
3. Confirm the settings by clicking Apply and leave the
menu with OK.
Handling
Click on the TAB Handling.
Here you can configure the behavior of the recorder dur-
ing a detected event (for example: motion got detected)
by clicking the respective check box.
Parameter
Notification
Full Screen Monitoring
The camera is displayed as a
full-screen picture in live cast
Audible Warning
The device emits a repeating
tone
Send E-Mail
An e-mail is sent to a specific
e-mail address (see page 86)
Confirm the settings by clicking Apply and leave the
menu with OK
Sidan laddas...
Sidan laddas...
Sidan laddas...
Sidan laddas...
Sidan laddas...
Sidan laddas...
Sidan laddas...
Sidan laddas...
Sidan laddas...
Sidan laddas...
Sidan laddas...
Sidan laddas...
Sidan laddas...
Sidan laddas...
Sidan laddas...
Sidan laddas...
Sidan laddas...
Sidan laddas...
Sidan laddas...
Sidan laddas...
Sidan laddas...
Sidan laddas...
Sidan laddas...
Sidan laddas...
Sidan laddas...
Sidan laddas...
Sidan laddas...
Sidan laddas...
Sidan laddas...
Sidan laddas...
Sidan laddas...
Sidan laddas...
Sidan laddas...
Sidan laddas...
Sidan laddas...
Sidan laddas...
Sidan laddas...
Sidan laddas...
Sidan laddas...
Sidan laddas...
Sidan laddas...
Sidan laddas...
Sidan laddas...
Sidan laddas...
Sidan laddas...
Sidan laddas...
Sidan laddas...
Sidan laddas...
Sidan laddas...
Sidan laddas...
Sidan laddas...
Sidan laddas...
Sidan laddas...
Sidan laddas...
Sidan laddas...
Sidan laddas...
Sidan laddas...
Sidan laddas...
Sidan laddas...
Sidan laddas...
Sidan laddas...
Sidan laddas...
Sidan laddas...
Sidan laddas...
Sidan laddas...
Sidan laddas...
Sidan laddas...
Sidan laddas...
Sidan laddas...
Sidan laddas...
Sidan laddas...
Sidan laddas...
Sidan laddas...
Sidan laddas...
Sidan laddas...
Sidan laddas...
Sidan laddas...
Sidan laddas...
Sidan laddas...
Sidan laddas...
Sidan laddas...
Sidan laddas...
Sidan laddas...
Sidan laddas...
Sidan laddas...
Sidan laddas...
Sidan laddas...
Sidan laddas...
Sidan laddas...
Sidan laddas...
Sidan laddas...
Sidan laddas...
Sidan laddas...
Sidan laddas...
Sidan laddas...
Sidan laddas...
Sidan laddas...
Sidan laddas...
Sidan laddas...
Sidan laddas...
Sidan laddas...
Sidan laddas...
Sidan laddas...
Sidan laddas...
Sidan laddas...
Sidan laddas...
Sidan laddas...
Sidan laddas...
Sidan laddas...
Sidan laddas...
Sidan laddas...
Sidan laddas...
Sidan laddas...
Sidan laddas...
Sidan laddas...
Sidan laddas...
Sidan laddas...
Sidan laddas...
Sidan laddas...
Sidan laddas...
Sidan laddas...
Sidan laddas...
Sidan laddas...
Sidan laddas...
Sidan laddas...
Sidan laddas...
Sidan laddas...
Sidan laddas...
Sidan laddas...
Sidan laddas...
Sidan laddas...
Sidan laddas...
Sidan laddas...
Sidan laddas...
Sidan laddas...
Sidan laddas...
Sidan laddas...
Sidan laddas...
Sidan laddas...
Sidan laddas...
Sidan laddas...
Sidan laddas...
Sidan laddas...
Sidan laddas...
Sidan laddas...
Sidan laddas...
Sidan laddas...
Sidan laddas...
Sidan laddas...
Sidan laddas...
Sidan laddas...
Sidan laddas...
Sidan laddas...
Sidan laddas...
Sidan laddas...
Sidan laddas...
Sidan laddas...
Sidan laddas...
Sidan laddas...
Sidan laddas...
Sidan laddas...
Sidan laddas...
Sidan laddas...
Sidan laddas...
Sidan laddas...
Sidan laddas...
Sidan laddas...
Sidan laddas...
Sidan laddas...
Sidan laddas...
Sidan laddas...
Sidan laddas...
Sidan laddas...
Sidan laddas...
Sidan laddas...
Sidan laddas...
Sidan laddas...
Sidan laddas...
Sidan laddas...
Sidan laddas...
Sidan laddas...
Sidan laddas...
Sidan laddas...
Sidan laddas...
Sidan laddas...
Sidan laddas...
Sidan laddas...
Sidan laddas...
Sidan laddas...
Sidan laddas...
Sidan laddas...
Sidan laddas...
Sidan laddas...
Sidan laddas...
Sidan laddas...
Sidan laddas...
Sidan laddas...
Sidan laddas...
Sidan laddas...
Sidan laddas...
Sidan laddas...
Sidan laddas...
Sidan laddas...
Sidan laddas...
Sidan laddas...
Sidan laddas...
Sidan laddas...
Sidan laddas...
Sidan laddas...
Sidan laddas...
Sidan laddas...
Sidan laddas...
Sidan laddas...
Sidan laddas...
Sidan laddas...
Sidan laddas...
Sidan laddas...
Sidan laddas...
Sidan laddas...
Sidan laddas...
Sidan laddas...
Sidan laddas...
Sidan laddas...
Sidan laddas...
Sidan laddas...
Sidan laddas...
Sidan laddas...
Sidan laddas...
Sidan laddas...
Sidan laddas...
Sidan laddas...
Sidan laddas...
Sidan laddas...
Sidan laddas...
Sidan laddas...
Sidan laddas...
Sidan laddas...
Sidan laddas...
Sidan laddas...
Sidan laddas...
Sidan laddas...
Sidan laddas...
Sidan laddas...
Sidan laddas...
Sidan laddas...
Sidan laddas...
Sidan laddas...
Sidan laddas...
Sidan laddas...
Sidan laddas...
Sidan laddas...
Sidan laddas...
Sidan laddas...
Sidan laddas...
Sidan laddas...
Sidan laddas...
Sidan laddas...
Sidan laddas...
Sidan laddas...
Sidan laddas...
Sidan laddas...
Sidan laddas...
Sidan laddas...
Sidan laddas...
Sidan laddas...
Sidan laddas...
Sidan laddas...
Sidan laddas...
Sidan laddas...
Sidan laddas...
Sidan laddas...
Sidan laddas...
Sidan laddas...
Sidan laddas...
Sidan laddas...
Sidan laddas...
Sidan laddas...
Sidan laddas...
Sidan laddas...
Sidan laddas...
Sidan laddas...
Sidan laddas...
Sidan laddas...
Sidan laddas...
Sidan laddas...
Sidan laddas...
Sidan laddas...
Sidan laddas...
Sidan laddas...
Sidan laddas...
Sidan laddas...
Sidan laddas...
Sidan laddas...
Sidan laddas...
Sidan laddas...
Sidan laddas...
Sidan laddas...
Sidan laddas...
Sidan laddas...
Sidan laddas...
Sidan laddas...
Sidan laddas...
Sidan laddas...
Sidan laddas...
Sidan laddas...
Sidan laddas...
Sidan laddas...
Sidan laddas...
Sidan laddas...
Sidan laddas...
Sidan laddas...
Sidan laddas...
Sidan laddas...
Sidan laddas...
Sidan laddas...
Sidan laddas...
Sidan laddas...
Sidan laddas...
Sidan laddas...
Sidan laddas...
Sidan laddas...
Sidan laddas...
Sidan laddas...
Sidan laddas...
Sidan laddas...
Sidan laddas...
Sidan laddas...
Sidan laddas...
Sidan laddas...
Sidan laddas...
Sidan laddas...
Sidan laddas...
Sidan laddas...
Sidan laddas...
Sidan laddas...
Sidan laddas...
Sidan laddas...
Sidan laddas...
Sidan laddas...
Sidan laddas...
Sidan laddas...
Sidan laddas...
Sidan laddas...
Sidan laddas...
Sidan laddas...
Sidan laddas...
Sidan laddas...
Sidan laddas...
Sidan laddas...
Sidan laddas...
Sidan laddas...
Sidan laddas...
Sidan laddas...
Sidan laddas...
Sidan laddas...
Sidan laddas...
Sidan laddas...
Sidan laddas...
Sidan laddas...
Sidan laddas...
Sidan laddas...
Sidan laddas...
Sidan laddas...
Sidan laddas...
Sidan laddas...
Sidan laddas...
Sidan laddas...
Sidan laddas...
Sidan laddas...
Sidan laddas...
Sidan laddas...
Sidan laddas...
Sidan laddas...
Sidan laddas...
Sidan laddas...
Sidan laddas...
Sidan laddas...
Sidan laddas...
Sidan laddas...
Sidan laddas...
Sidan laddas...
Sidan laddas...
Sidan laddas...
Sidan laddas...
Sidan laddas...
Sidan laddas...
Sidan laddas...
Sidan laddas...
Sidan laddas...
Sidan laddas...
Sidan laddas...
Sidan laddas...
Sidan laddas...
Sidan laddas...
Sidan laddas...
Sidan laddas...
Sidan laddas...
Sidan laddas...
Sidan laddas...
Sidan laddas...
Sidan laddas...
Sidan laddas...
Sidan laddas...
Sidan laddas...
Sidan laddas...
Sidan laddas...
Sidan laddas...
Sidan laddas...
Sidan laddas...
Sidan laddas...
Sidan laddas...
Sidan laddas...
Sidan laddas...
Sidan laddas...
Sidan laddas...
Sidan laddas...
Sidan laddas...
Sidan laddas...
Sidan laddas...
Sidan laddas...
Sidan laddas...
Sidan laddas...
Sidan laddas...
Sidan laddas...
Sidan laddas...
Sidan laddas...
Sidan laddas...
Sidan laddas...
Sidan laddas...
Sidan laddas...
Sidan laddas...
Sidan laddas...
Sidan laddas...
Sidan laddas...
Sidan laddas...
Sidan laddas...
Sidan laddas...
Sidan laddas...
Sidan laddas...
Sidan laddas...
Sidan laddas...
Sidan laddas...
Sidan laddas...
Sidan laddas...
Sidan laddas...
Sidan laddas...
Sidan laddas...
Sidan laddas...
Sidan laddas...
Sidan laddas...
Sidan laddas...
Sidan laddas...
Sidan laddas...
Sidan laddas...
Sidan laddas...
Sidan laddas...
Sidan laddas...
Sidan laddas...
Sidan laddas...
Sidan laddas...
Sidan laddas...
Sidan laddas...
Sidan laddas...
Sidan laddas...
Sidan laddas...
Sidan laddas...
Sidan laddas...
Sidan laddas...
Sidan laddas...
Sidan laddas...
Sidan laddas...
Sidan laddas...
Sidan laddas...
Sidan laddas...
Sidan laddas...
Sidan laddas...
-
 1
1
-
 2
2
-
 3
3
-
 4
4
-
 5
5
-
 6
6
-
 7
7
-
 8
8
-
 9
9
-
 10
10
-
 11
11
-
 12
12
-
 13
13
-
 14
14
-
 15
15
-
 16
16
-
 17
17
-
 18
18
-
 19
19
-
 20
20
-
 21
21
-
 22
22
-
 23
23
-
 24
24
-
 25
25
-
 26
26
-
 27
27
-
 28
28
-
 29
29
-
 30
30
-
 31
31
-
 32
32
-
 33
33
-
 34
34
-
 35
35
-
 36
36
-
 37
37
-
 38
38
-
 39
39
-
 40
40
-
 41
41
-
 42
42
-
 43
43
-
 44
44
-
 45
45
-
 46
46
-
 47
47
-
 48
48
-
 49
49
-
 50
50
-
 51
51
-
 52
52
-
 53
53
-
 54
54
-
 55
55
-
 56
56
-
 57
57
-
 58
58
-
 59
59
-
 60
60
-
 61
61
-
 62
62
-
 63
63
-
 64
64
-
 65
65
-
 66
66
-
 67
67
-
 68
68
-
 69
69
-
 70
70
-
 71
71
-
 72
72
-
 73
73
-
 74
74
-
 75
75
-
 76
76
-
 77
77
-
 78
78
-
 79
79
-
 80
80
-
 81
81
-
 82
82
-
 83
83
-
 84
84
-
 85
85
-
 86
86
-
 87
87
-
 88
88
-
 89
89
-
 90
90
-
 91
91
-
 92
92
-
 93
93
-
 94
94
-
 95
95
-
 96
96
-
 97
97
-
 98
98
-
 99
99
-
 100
100
-
 101
101
-
 102
102
-
 103
103
-
 104
104
-
 105
105
-
 106
106
-
 107
107
-
 108
108
-
 109
109
-
 110
110
-
 111
111
-
 112
112
-
 113
113
-
 114
114
-
 115
115
-
 116
116
-
 117
117
-
 118
118
-
 119
119
-
 120
120
-
 121
121
-
 122
122
-
 123
123
-
 124
124
-
 125
125
-
 126
126
-
 127
127
-
 128
128
-
 129
129
-
 130
130
-
 131
131
-
 132
132
-
 133
133
-
 134
134
-
 135
135
-
 136
136
-
 137
137
-
 138
138
-
 139
139
-
 140
140
-
 141
141
-
 142
142
-
 143
143
-
 144
144
-
 145
145
-
 146
146
-
 147
147
-
 148
148
-
 149
149
-
 150
150
-
 151
151
-
 152
152
-
 153
153
-
 154
154
-
 155
155
-
 156
156
-
 157
157
-
 158
158
-
 159
159
-
 160
160
-
 161
161
-
 162
162
-
 163
163
-
 164
164
-
 165
165
-
 166
166
-
 167
167
-
 168
168
-
 169
169
-
 170
170
-
 171
171
-
 172
172
-
 173
173
-
 174
174
-
 175
175
-
 176
176
-
 177
177
-
 178
178
-
 179
179
-
 180
180
-
 181
181
-
 182
182
-
 183
183
-
 184
184
-
 185
185
-
 186
186
-
 187
187
-
 188
188
-
 189
189
-
 190
190
-
 191
191
-
 192
192
-
 193
193
-
 194
194
-
 195
195
-
 196
196
-
 197
197
-
 198
198
-
 199
199
-
 200
200
-
 201
201
-
 202
202
-
 203
203
-
 204
204
-
 205
205
-
 206
206
-
 207
207
-
 208
208
-
 209
209
-
 210
210
-
 211
211
-
 212
212
-
 213
213
-
 214
214
-
 215
215
-
 216
216
-
 217
217
-
 218
218
-
 219
219
-
 220
220
-
 221
221
-
 222
222
-
 223
223
-
 224
224
-
 225
225
-
 226
226
-
 227
227
-
 228
228
-
 229
229
-
 230
230
-
 231
231
-
 232
232
-
 233
233
-
 234
234
-
 235
235
-
 236
236
-
 237
237
-
 238
238
-
 239
239
-
 240
240
-
 241
241
-
 242
242
-
 243
243
-
 244
244
-
 245
245
-
 246
246
-
 247
247
-
 248
248
-
 249
249
-
 250
250
-
 251
251
-
 252
252
-
 253
253
-
 254
254
-
 255
255
-
 256
256
-
 257
257
-
 258
258
-
 259
259
-
 260
260
-
 261
261
-
 262
262
-
 263
263
-
 264
264
-
 265
265
-
 266
266
-
 267
267
-
 268
268
-
 269
269
-
 270
270
-
 271
271
-
 272
272
-
 273
273
-
 274
274
-
 275
275
-
 276
276
-
 277
277
-
 278
278
-
 279
279
-
 280
280
-
 281
281
-
 282
282
-
 283
283
-
 284
284
-
 285
285
-
 286
286
-
 287
287
-
 288
288
-
 289
289
-
 290
290
-
 291
291
-
 292
292
-
 293
293
-
 294
294
-
 295
295
-
 296
296
-
 297
297
-
 298
298
-
 299
299
-
 300
300
-
 301
301
-
 302
302
-
 303
303
-
 304
304
-
 305
305
-
 306
306
-
 307
307
-
 308
308
-
 309
309
-
 310
310
-
 311
311
-
 312
312
-
 313
313
-
 314
314
-
 315
315
-
 316
316
-
 317
317
-
 318
318
-
 319
319
-
 320
320
-
 321
321
-
 322
322
-
 323
323
-
 324
324
-
 325
325
-
 326
326
-
 327
327
-
 328
328
-
 329
329
-
 330
330
-
 331
331
-
 332
332
-
 333
333
-
 334
334
-
 335
335
-
 336
336
-
 337
337
-
 338
338
-
 339
339
-
 340
340
-
 341
341
-
 342
342
-
 343
343
-
 344
344
-
 345
345
-
 346
346
-
 347
347
-
 348
348
-
 349
349
-
 350
350
-
 351
351
-
 352
352
-
 353
353
-
 354
354
-
 355
355
-
 356
356
-
 357
357
-
 358
358
-
 359
359
-
 360
360
-
 361
361
-
 362
362
-
 363
363
-
 364
364
-
 365
365
-
 366
366
-
 367
367
-
 368
368
-
 369
369
-
 370
370
-
 371
371
-
 372
372
-
 373
373
-
 374
374
-
 375
375
-
 376
376
-
 377
377
-
 378
378
-
 379
379
-
 380
380
-
 381
381
-
 382
382
-
 383
383
-
 384
384
-
 385
385
-
 386
386
-
 387
387
-
 388
388
-
 389
389
-
 390
390
-
 391
391
-
 392
392
-
 393
393
-
 394
394
-
 395
395
-
 396
396
-
 397
397
-
 398
398
-
 399
399
-
 400
400
-
 401
401
-
 402
402
-
 403
403
-
 404
404
-
 405
405
-
 406
406
-
 407
407
-
 408
408
-
 409
409
-
 410
410
-
 411
411
-
 412
412
-
 413
413
-
 414
414
-
 415
415
-
 416
416
-
 417
417
-
 418
418
-
 419
419
-
 420
420
-
 421
421
-
 422
422
-
 423
423
-
 424
424
-
 425
425
-
 426
426
-
 427
427
-
 428
428
-
 429
429
-
 430
430
-
 431
431
-
 432
432
-
 433
433
-
 434
434
-
 435
435
-
 436
436
-
 437
437
-
 438
438
-
 439
439
-
 440
440
-
 441
441
-
 442
442
-
 443
443
-
 444
444
-
 445
445
-
 446
446
-
 447
447
-
 448
448
-
 449
449
-
 450
450
-
 451
451
-
 452
452
-
 453
453
-
 454
454
-
 455
455
-
 456
456
-
 457
457
-
 458
458
-
 459
459
-
 460
460
-
 461
461
-
 462
462
-
 463
463
-
 464
464
-
 465
465
-
 466
466
-
 467
467
-
 468
468
-
 469
469
-
 470
470
-
 471
471
-
 472
472
-
 473
473
-
 474
474
-
 475
475
-
 476
476
-
 477
477
-
 478
478
-
 479
479
-
 480
480
-
 481
481
-
 482
482
-
 483
483
-
 484
484
-
 485
485
-
 486
486
-
 487
487
-
 488
488
-
 489
489
-
 490
490
-
 491
491
-
 492
492
-
 493
493
-
 494
494
-
 495
495
-
 496
496
-
 497
497
-
 498
498
-
 499
499
-
 500
500
-
 501
501
-
 502
502
-
 503
503
-
 504
504
-
 505
505
-
 506
506
-
 507
507
-
 508
508
-
 509
509
-
 510
510
-
 511
511
-
 512
512
-
 513
513
-
 514
514
-
 515
515
-
 516
516
-
 517
517
-
 518
518
-
 519
519
-
 520
520
-
 521
521
-
 522
522
-
 523
523
-
 524
524
-
 525
525
-
 526
526
-
 527
527
-
 528
528
-
 529
529
-
 530
530
-
 531
531
-
 532
532
-
 533
533
-
 534
534
-
 535
535
-
 536
536
-
 537
537
-
 538
538
-
 539
539
-
 540
540
-
 541
541
-
 542
542
-
 543
543
-
 544
544
-
 545
545
-
 546
546
-
 547
547
-
 548
548
-
 549
549
-
 550
550
-
 551
551
-
 552
552
-
 553
553
-
 554
554
-
 555
555
-
 556
556
-
 557
557
-
 558
558
-
 559
559
-
 560
560
-
 561
561
-
 562
562
-
 563
563
-
 564
564
-
 565
565
-
 566
566
-
 567
567
-
 568
568
-
 569
569


Abus TVVR30004 Användarmanual
- Kategori
- Digital videoinspelare (DVR)
- Typ
- Användarmanual
på andra språk
- italiano: Abus TVVR30004 Manuale utente
- español: Abus TVVR30004 Manual de usuario
- Deutsch: Abus TVVR30004 Benutzerhandbuch
- polski: Abus TVVR30004 Instrukcja obsługi
- français: Abus TVVR30004 Manuel utilisateur
- English: Abus TVVR30004 User manual
- dansk: Abus TVVR30004 Brugermanual
- русский: Abus TVVR30004 Руководство пользователя
- Nederlands: Abus TVVR30004 Handleiding
Relaterade papper
-
Abus TVVR36000 Användarguide
-
Abus TVCC34010 Användarmanual
-
Abus TVCC40010 Användarmanual
-
Abus tvac16000a/b Användarmanual
-
Abus TVIP11560 Bruksanvisningar
-
-
-
-
Andra dokument
-
Exibel D5198HT Användarmanual
-
König SEC-DVR504 Användarmanual
-
König SEC-TRCAM30 Bruksanvisning
-
Deltaco DVR-108 Användarmanual
-
König SEC-DVRMON30 Användarmanual
-
-
-
König SEC-DVRWCA10 Bruksanvisning
-
Yamaha MCX-1000 Bruksanvisning
-
Hama 00177100 Bruksanvisning