
MOUNTING INSTRUCTION
Brand
SUZUKI
Model
RG 500 GAMMA
Year
85-86
Art. No.
SU 621
Total length
311
+12
0 mm
Stroke
72
mm
Reb.click
16
Comp.click
14
Preload
16
mm
Supplementary parts
192-01
1046-01
1046-02
430-02
230-03
Sticker / Dekal (2x)
Screw / Skruv MC6S 6x16
Screw / Skruv MC6S 6x30
Loc Nut / Låsmutter M6 (2x)
Mountingrubber / Monteringsgummi (2x)
643-03
1180-01
Hose clamp / Slangklämma (2x)
Memo Sticker / Memo Dekal
Owners Manual / Instruktionsbok
Mounting instructions
1. Palla upp MC:n så att bakhjulet hänger fritt i
luften.
2. Lossa sadel, bakre sidopaneler och underkåpan.
3. Bind upp bakhjulet med ett spännband eller dyl.
( Det skall bara hålla upp hjulet när du tar bort
stötdämparen.) Lossa standarddämparens
hydraulförspännare.
4. Lossa stötdämparens fästskruvar samt skruven
som sammanbinder vipparmen och länken till
swingarmen.
5. Tag ut stötdämparen nedåt.
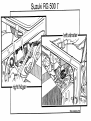
6. Montera Öhlindämparen med cylinderhuvudet
nedåt och slangen till gasbehållaren framåt.
Börja med att föra upp hydraulförspännaren och
gasbehållaren. Slangarna måste gå i mjuka böjar
utan att ta i någonstans när bakhjulet fjädrar in.
7. Montera stötdämparens fästskruvar och skruven
mellan vipparmen och swingarmslänken. Se till
att hydraulförspännarens slang ej kommer för
nära avgassystemet.
8. Fäst hydraulförspännaren på samma plats som
standardförspännaren enligt skiss. Använd
medföljande skruvar och muttrar.
9. Fäst gasbehållaren med gummin och slang-
klämmor enligt skiss.
10.Återmontera kåpor och sadel.
1. Put the motorcycle on a stand so that the rear
wheel is off the ground.
2. Loosen seat rear side panels and lower part of
the fairing.
3. Tie up the rear wheel to hold it up when you
remove the shock absorber. Loosen the standard
pre-load adjuster.
4. Loosen the mounting bolts for the shock
absorber and the bolt that connects the rocker
arm and link to the swing arm.
5. Remove the shock absorber downwards.
6. Mount the Öhlins shock absorber with the
cylinder head downwards and the hose for the
gas reservoir forwards. Start with pulling the gas
reservoir and the hydraulic pre-load adjuster
upwards. The hose routing has to be smooth .
Check that there is enough clearance to the
exhaust system and other things when the rear
wheel is moving.
7. Mount the shock mounting bolts and the bolt
that connects the rocker arm and swin
g
arm link.
8. Mount the pre-load adjuster in th estandard
bracket according to the sketch. Use attached
screws and nuts.
9. Mount the reservoir with rubbers and hose
clamps according to the sketch.
10. Mount sidecovers and seat.
Groove / Spår
Lock nut /Låsmutter
På denna modell finns en ändögla/bygel monterad
som är justerbar på längden.
Öglan/bygeln får ej skruvas ut längre än att spåret
blir helt synligt under låsmuttern. Se skiss. Se till
att låsmuttern är fastdragen efter justering.
This model has an adjustable end eye/bracket
mounted. The end eye/bracket must not be threaded
out more than that the groove is visible beneath the
lock nut. See fig. Make shure that the lock nut is
tightened after adjustment
Öhlins Racing AB frånsäger sig allt ansvar för
skada på stötdämpare, motorcykel eller person om
inte monterings- och skötsel instruktionerna har
följts till fullo. Ingen garanti kan ges på funktion
eller livslängd om dessa instruktioner inte följts
Öhlins Racing AB can not be responsible for any
damage to shock absorber, motorcycle or person if
the mounting- and maintaining instructions are not
followed exactly. Also no guarantee can be given
for the performance and reliability if these
instructions are not followed.

-
 1
1
-
 2
2


på andra språk
- English: Ohlins SU621
Relaterade papper
-
Ohlins DU302 Mounting Instruction
-
-
-
-
-
-
-
-
-