
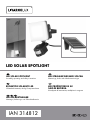
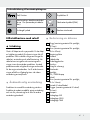
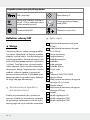
LED SOLAR SPOTLIGHT
IAN 314812
LED-SOLARSTRAHLER
Montage-, Bedienungs- und Sicherheitshinweise
LED SOLAR SPOTLIGHT
Assembly, operating and safety instructions
LED PROŽEKTORIUS SU
SA ULĖS BATERIJA
Nurodymai dėl montavimo, naudojimo ir saugumo
LED-STRÅLKASTARE MED SOLCELL
Monterings-, bruks- och säkerhetsanvisningar
REFLEKTOR SOLARNY LED
Wskazówki montażu, obsługi i bezpieczeństwa

GB Assembly, operating and safety instructions Page 5
SE Monterings-, bruks- och säkerhetsanvisningar Sidan 14
PL Wskazówki montażu, obsługi i bezpieczeństwa Strona 23
LT Nurodymai dėl montavimo, naudojimo ir saugumo Puslapis 32
DE / AT / CH Montage-, Bedienungs- und Sicherheitshinweise Seite 41

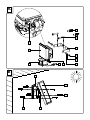
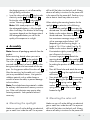
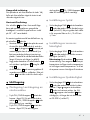
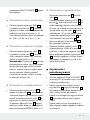
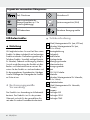
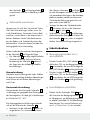
A
2
3
4
1
8
10
11
5
6
79
B
12
13
1415
16

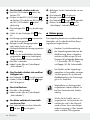
E
12m
0m1m 1m
F
DC
19 18 17

5 GB
List of pictograms used .......................................................................................... Page 6
Introduction ..................................................................................................................... Page 6
Intended use .......................................................................................................................... Page 6
Description of parts ............................................................................................................... Page 6
Included items .......................................................................................................................Page 7
Technical data ....................................................................................................................... Page 7
Safety notes ....................................................................................................................Page 7
Safety instructions for batteries / rechargeable batteries ...................................................Page 8
Functioning .......................................................................................................................Page 8
Charging the rechargeable battery ............................................................Page 8
Assembly ...........................................................................................................................Page 9
Mounting the spotlight .......................................................................................................... Page 9
Mounting the solar cell .........................................................................................................Page 9
Preparing the product for use .........................................................................Page 10
Switching the motion detector on and off ...........................................................................Page 10
Setting the lighting duration ..................................................................................................Page 10
Adjusting the sensitivity of the sensor ................................................................................... Page 10
Setting the daylight level ......................................................................................................Page 11
Orientating the motion detector ...........................................................................................Page 11
Cleaning and storage .............................................................................................Page 11
Troubleshooting ..........................................................................................................Page 11
Disposal ..............................................................................................................................Page 12
Warranty ........................................................................................................................... Page 13

6 GB
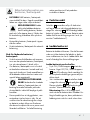
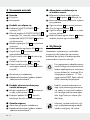
List of pictograms used
Volt, Direct current Protection class III
Motion detector detection range
approx. 12 m (weather depend-
ant) Splashproof (IP44)
LED lifespan Rotatable motion detector
LED Solar Spotlight
Introduction
We congratulate you on the purchase of your
new product. You have chosen a high quality
product. The instructions for use are part of the
product. They contain important information
concerning safety, use and disposal. Before us-
ing the product, please familiarise yourself with
all of the safety information and instructions for
use. Only use the product as described and for
the specified applications. If you pass the prod-
uct on to anyone else, please ensure that you
also pass on all the documentation with it.
Intended use
This product is suitable for outdoor use. This
product is only intended for private use and is
not suitable for commercial use or for use in
other applications.
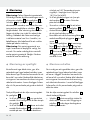
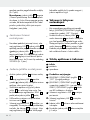
Description of parts
1 Dowels (mounting material for spotlight,
Ø 9 mm)
2 Screws (mounting material for spotlight,
Ø 6 x 40 mm)
3 Mounting bracket
4 Hinge joint
5 Spring washer
6 Flat washer
7 Fasten screws
8 Solar electricity socket
9 Motion detector
10 Spotlight
11 ON / OFF switch
12 Solar cell
13 Screws (mounting material for solar cell,
Ø 4 x 34 mm)
14 Solar cable plug
15 Dowels (mounting material for solar cell,
Ø 6mm)
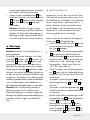
16 Compass
17 Rotary control LUX
18 Rotary control SENS
19 Rotary control TIME

7 GB
Included items
Immediately after unpacking, check that all the
items and accessories are present and that the
product is in perfect condition.
1 spotlight
1 solar cell
2 screws (mounting material for spotlight
Ø 6 x 40 mm)
4 screws (mounting material for solar cell
Ø 4 x 34 mm)
2 dowel (mounting material for spotlight
Ø 9 mm)
4 dowel (mounting material for solar cell,
Ø 6 mm)
1 operating instructions
Technical data
Operating voltage: 7.4 V
Lithium-ion battery: 7.4 V , 1800mAh
(not replaceable)
LEDs: 50 x 0.2 W
Protection class: III /
Solar cell: monocrystalline,
3.5 W / 14.5 V
Twilight switch: adjustable from approx.
5 lx–20,000 lx
Lighting duration: adjustable from 5 s
+/-2 s to 5 min +/-1 min
Spotlight:
Motion detector: range: max. 12 m,
detection angle:
approx. 180 degree
Degree of protection: IP44 (splash proof)
Weight: approx. 480 g
Dimensions: approx. 15 x 14.8 x
12.4 cm
Max projected area: max. 15 x 14.8 cm
Mounting height: max. 1.8–2.5 m
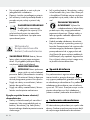
Safety notes
DANGER
TO LIFE AND ACCIDENT
HAZARD FOR TODDLERS
AND SMALL CHILDREN! Never leave
children unsupervised with the packaging
materials. The packaging material presents
a danger of suffocation. Children often un-
derestimate dangers. Always keep children
away from the product.
DANGER TO LIFE! During installation
keep children away from the area in which
you are working. A large number of screws
and other small parts are included with de-
livery. These may prove life-threatening if
swallowed or inhaled.
This product can be used by children aged
from 8 years and above and persons with
reduced physical, sensory or mental capa-
bilities or lack of experience and knowledge
if they have been given supervision or in-
struction concerning use of the product in
a safe way and understand the hazards
involved. Children shall not play with the
product. Cleaning and user maintenance shall
not be made by children without supervision.
Do not use the product if you detect any
kind of damage.
The illuminants are not replaceable.
If the illuminants fail at the end of their lifes,
the entire light must be replaced.

8 GB
0.5 m
FIRE HAZARD! Fit the product
so that it is at least 0.5 m away
from the material to be illumi-
nated. Excessive heat can result in a fire.
Safety instructions for
batteries /rechargeable
batteries
DANGER TO LIFE! Keep batteries/
rechargeable batteries out of reach of
children. If accidentally swallowed seek
immediate medical attention.
DANGER OF EXPLOSION!
Never recharge non-rechargea-
ble batteries. Do not short-circuit
batteries/rechargeable batteries and/or
open them. Overheating, fire or bursting
can be the result.
Never throw batteries/rechargeable batteries
into fire or water.
Do not exert mechanical loads to batteries/
rechargeable batteries.
Risk of leakage of batteries /
rechargeable batteries
Avoid extreme environmental conditions
and temperatures, which could affect
batteries / rechargeable batteries, e.g.
radiators / direct sunlight.
If batteries / rechargeable batteries have
leaked, avoid contact with skin, eyes and
mucous membranes with the chemicals!
Flush immediately the affected areas with
fresh water and seek medical attention!
WEAR PROTECTIVE
GLOVES! Leaked or damaged
batteries/rechargeable batteries
can cause burns on contact with the skin.
Wear suitable protective gloves at all times
if such an event occurs.
This product has a built-in rechargeable
battery which cannot be replaced by the user.
The removal or replacement of the rechargea-
ble battery may only be carried out by the
manufacturer or his customer service or by
a similarly qualified person in order to avoid
hazards. When disposing of the product, it
should be noted that this product contains a
rechargeable battery.
Functioning
When exposed to sunlight, the solar cell 12
converts the light into electrical energy and via
the connected solar electricity socket 8, stores
the electricity in the built-in rechargeable battery.
With a fully charged rechargeable battery, the
lighting duration is about 100 mins. Before
being used for the first time, the rechargeable
battery must be fully loaded (see section
“Charging the rechargeable battery”).
Charging the
rechargeable battery
Upon delivery, the rechargeable battery is fully
charged. Due to storage times, the rechargeable
battery may be partially discharged when first
used. Therefore, charge the rechargeable
battery completely before first use.
Charging the rechargeable batteries
with a solar cell
Press the ON / OFF switch 11 into the OFF
position and red LED indicator of ON / OFF
switch 11 extinguish at the same time, so

9 GB
the charging process is not influenced by
the light being switched on.
Insert the solar cable plug 14 into the solar
electricity socket 8 of the spotlight 10 .
Position the solar cell 12 as described in
section “Mounting the solar cell 12 ”.
Note: With steady exposure to sunlight,
the rechargeable battery is fully charged
after 4 to 6 days. The duration of the charg-
ing process depends on the charge state of
the rechargeable battery as well as the
quality of the exposure to sunlight.
Assembly
Note: Remove all packaging materials from the
product.
Before mounting, decide where you want to
Mount the solar cell 12 and the spotlight 10 .
The solar cell 12 and the spotlight 10 can be
mounted independently of each other, but after
being mounted must be connected with the ap-
prox. 5 m long power cable of the solar cell
12
.
After the mounting, lay the cable so it is not sub-
ject to any mechanical stresses. Use typical in-
stallation material such as cable clamps or
conduit to fasten the cable, to prevent damage
to the insulation.
Note: The included mounting material is suitable
for ordinary solid concrete or masonry construc-
tion. Other wall substrates may require other
fastening materials. Seek specialist advice if
necessary.
Mounting the spotlight
Make sure you will not be drilling into electrical,
gas or water lines inside the wall. Use a power
drill to drill the holes into the brick wall. Always
observe all safety instructions for the power drill
in the manual for the power drill. Death or injury
due to electric shock may otherwise result.
When selecting the mounting location for the
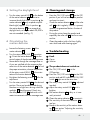
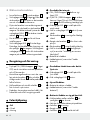
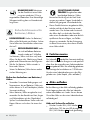
spotlight 10 , pay attention to the following:
Make sure the spotlight 10 illuminates the
desired area. You can move the spotlight
10
.
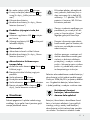
Make sure the motion detector 9 covers
the desired area. The motion detector 9
has a maximum coverage range of 12 m,
with a coverage angle of about 180°
(depending on the mounting height – a
height of 1.8–2.5 m is ideal) (see Fig. D).
Make sure the motion detector 9 is not
illuminated at night by street lighting. This
can influence its functioning.
Unscrew hinge joint 4 to detach the
mounting bracket 3 from the spotlight 10 .
Utilize the mounting bracket
3
as a template
for making the position of the two outer drill
holes.
Then drill these holes and attach the mount-
ing bracket 3 using the supplied dowels 1
and screws 2.
Now attach the spotlight 10 to the mounting
bracket 3 using the previously removed
hinge joint 4, spring washer 5 and flat
washer 6. Please make sure that the
spring washer 5 and flat washer 6 are
located as fig A.
Mounting the solar cell
Make sure you will not be drilling into electrical,
gas or water lines inside the wall. Use a power
drill to drill the holes into the brick wall. Always
observe all safety instructions for the power drill

10 GB
in the manual for the power drill. Death or injury
due to electric shock may otherwise result.
When selecting the mounting location for the
solar cell 12 , pay attention to the following:
The solar cell 12 needs to be as directly
exposed to sunlight as possible. Even partial
shading of the solar cell 12 during the day
can have a significant influence on charging.
Cardinal direction:
Orientation towards the south is optimum. Ori-
entations with slight deviations towards the west
are preferable to those with slight deviations
towards the east.
Horizontal orientation:
The horizontal orientation of the solar cell 12
depends on the geographic latitude of the
mounting location. In central Europe, and angle
of 30°–40° is ideal.
A mounting plate with 6 drill holes for screws is
located at the back of solar cell 12 .
Mount the solar cell 12 at the designated
location using the 4 small screws 13 and
dowels 15 . Depending on the topography
of the mounting location, you can freely
choose 4 of the drill holes in the mounting
plate; however, you should ideally select
2 drill holes on the right and left each (see
fig. B).
Then lay the solar cable plug 14 and con-
nect the plug to the solar electricity socket
8 of the spotlight 10 .
The solar cell 12 is connected to the mount-
ing plate via a swivel joint. Orient the solar
cell 12 in a manner that ensures maximum
exposure to sunlight.
Preparing the product
for use
Switching the motion
detector on and off
Press the ON / OFF switch 11 into the ON
position to switch on the motion detector
9 and red LED indicator of ON / OFF
switch 11 lights on at the same time.
Press the ON / OFF switch 11 into the OFF
position to switch off the motion detector
9 and red LED indicator of ON / OFF
switch 11 extinguish at the same time.
Setting the lighting duration
Turn the rotary control TIME 19 on the
bottom of the motion detector 9 clockwise
to increase the duration of the illumination
(see Fig. C). The lighting duration can be
adjusted within a time window of approx.
5s +/-2s to 5 min +/-1min.
Adjusting the sensitivity of
the sensor
Turn the rotary control SENS 18 on the
bottom of the motion detector 9 clockwise
to increase the sensitivity of the sensor (see
Fig. C).
Note: The motion detector 9 responds to
heat radiation. When outdoor temperatures
are low, it is more sensitive to body heat
than when outdoor temperatures are warm.
Be sure to regulate the sensitivity of the
sensor over the course of the year.

11 GB
Setting the daylight level
Turn the rotary control LUX 17 on the bottom
of the motion detector 9 clockwise to
increase the daylight level. In position , the
motion detector 9 only responds at pitch-
black night (approx. 5 lx). In position ,
the motion detector 9 also responds at
daylight levels, as long as about 20,000lx
are not exceeded (see Fig. C).
Orientating the
motion detector
Loosen the fastening screws 7 of the
motion detector 9.
Turn the rotary control LUX 17 to position
. Orient the motion detector 9 into the
central region of the desired coverage area.
Move about through the coverage area un-
til you are satisfied with the response char-
acteristics of the motion detector 9. To find
the proper orientation, change the position
of the rotary control SENS 18 or the orien-
tation of the motion detector 9.
Re-tighten the fastening screws 7 to fix the
adjustment.
Turn the rotary control LUX 17 to the desired
position. These can be determined during
the dawn or twilight hours during which the
spotlight 10 should respond. Slowly turn
the rotary control LUX 17 clockwise until it
reacts to movement within the coverage area.
Cleaning and storage
Press the ON / OFF switch 11 into the OFF
position if you will not be using the product
and want to store it.
Check the motion detector 9 and the solar
cell 12 for dirt regularly. If dirt or is present,
remove it to guarantee flawless function of
the product.
During the winter, keep the product and
especially the solar cell 12 free from snow
and ice.
Clean the product with a lint-free, slightly
moist cloth and mild cleaning agent.
Troubleshooting
= Fault
= Cause
= Solution
= The product does not switch on.
= The ON / OFF switch 11 is in the
OFF position.
= Press the ON / OFF switch 11 into the ON
position and red LED indicator of ON / OFF
switch 11 lights on at the same time.
= The rotary rotary control LUX 17 is adjusted
too dark.
= Adjust the rotary control LUX 17 so it is
brighter.
= The motion detector 9 is dirty or is incor-
rectly oriented.
= Clean the motion detector 9 or reorient it.
= The sensitivity of the motion detector 9 is
too low.
= Readjust the sensitivity of the motion detec-
tor 9 (see section “Adjusting the sensitivity
of the sensor”).

12 GB
= The rechargeable battery is discharged.
= Charge the rechargeable battery (see sec-
tion “Charging the rechargeable battery”).
= The product also switches on at
bright.
= The rotary control LUX 17 is adjusted too
bright
= Adjust the rotary control LUX 17 so it is
darker.
= The light flickers.
=
The rechargeable battery is almost discharged.
= Charge the rechargeable battery (see sec-
tion “Charging the rechargeable battery”).
= The rechargeable battery loses its
charge after a short time.
= The plug connection of the solar cell 12
and spot light 10 has come loose.
= Refasten the plug connection at the product.
= The solar cell 12 is dirty.
= Clean the solar cell 12 .
= The solar cell 12 is unfavourably oriented.
= Re-align the solar cell 12 (see section
“Mounting the solar cell”).
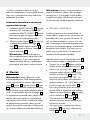
Disposal
The packaging is made entirely of recyclable
materials, which you may dispose of at local
recycling facilities.
b
a
Observe the marking of the packag-
ing materials for waste separation,
which are marked with abbreviations
(a) and numbers (b) with following
meaning: 1–7: plastics / 20–22:
paper and fibreboard / 80–98: com-
posite materials.
The product and packaging materi-
als are recyclable, dispose of it sepa-
rately for better waste treatment. The
Triman logo is valid in France only.
Contact your local refuse disposal
authority for more details of how to
dispose of your worn-out product.
To help protect the environment,
please dispose of the product prop-
erly when it has reached the end of
its useful life and not in the household
waste. Information on collection points
and their opening hours can be ob-
tained from your local authority.
Faulty or used batteries / rechargeable batteries
must be recycled in accordance with Directive
2006/66/EC and its amendments. Please return
the batteries / rechargeable batteries and / or
the product to the available collection points.
Environmental damage
through incorrect disposal of
the batteries / rechargeable
batteries!
Batteries / rechargeable batteries may not be
disposed of with the usual domestic waste. They
may contain toxic heavy metals and are subject
to hazardous waste treatment rules and regula-
tions. The chemical symbols for heavy metals
are as follows: Cd = cadmium, Hg = mercury,
Pb = lead. That is why you should dispose of
used batteries / rechargeable batteries at a lo-
cal collection point.

13 GB
Warranty
The product has been manufactured to strict
quality guidelines and meticulously examined
before delivery. In the event of product defects
you have legal rights against the retailer of this
product. Your legal rights are not limited in any
way by our warranty detailed below.
The warranty for this product is 3 years from the
date of purchase. Should this product show any
fault in materials or manufacture within 3 years
from the date of purchase, we will repair or re-
place it – at our choice – free of charge to you.
The warranty period begins on the date of pur-
chase. Please keep the original sales receipt in
a safe location. This document is required as
your proof of purchase. This warranty becomes
void if the product has been damaged, or used
or maintained improperly.
The warranty applies to defects in material or
manufacture. This warranty does not cover
product parts subject to normal wear, thus pos-
sibly considered consumables (e.g. batteries)
or for damage to fragile parts, e.g. switches,
rechargeable batteries or glass parts.

14 SE
Teckenförklaring till använda piktogram .............................................. Sidan 15
Inledning ............................................................................................................................. Sidan 15
Ändamålsenlig användning .................................................................................................. Sidan 15
Beskrivning av delarna .......................................................................................................... Sidan 15
Leveransomfattning ................................................................................................................ Sidan 16
Tekniska specifikationer ......................................................................................................... Sidan 16
Säkerhetsinformation ............................................................................................. Sidan 16
Säkerhetsinformation om batterier / batteripack .................................................................. Sidan 17
Funktionssätt ................................................................................................................... Sidan 17
Ladda batteriet ............................................................................................................. Sidan 17
Montering .......................................................................................................................... Sidan 18
Montering av spotlight ........................................................................................................... Sidan 18
Montera solcellen .................................................................................................................. Sidan 18
Idrifttagning ..................................................................................................................... Sidan 19
Påslagning / avstängning av rörelsevakten .......................................................................... Sidan 19
Inställning av lystid ................................................................................................................. Sidan 19
Inställning av sensorns känslighet ......................................................................................... Sidan 19
Inställning av ljuskänslighet ................................................................................................... Sidan 19
Rikta rörelsevakten ................................................................................................................. Sidan 20
Rengöring och förvaring ....................................................................................... Sidan 20
Felavhjälpning ............................................................................................................... Sidan 20
Avfallshantering .......................................................................................................... Sidan 21
Garanti ................................................................................................................................. Sidan 21

15 SE
Teckenförklaring till använda piktogram
Volt, likström Skyddsklass III
Rörelsevaktens detektionsräckvidd
är ca 12 m (beroende på väderle-
ken) Stänkvattenskyddad (IP44)
Livslängd lysdiod Roterbar rörelsevakt
LED-strålkastare med solcell
Inledning
Grattis till köpet av din nya produkt. Du har köpt
en högklassig produkt. Bruksanvisningen hör till
produkten. Den innehåller viktiga anvisningar för
säkerhet, användning och avfallshantering. Läs
säkerhetsanvisningarna och monteringsanvis-
ningen innan du använder produkten. Använd
produkten endast enligt beskrivningen och endast
för de angivna ändamålen. Se till att bruksanvis-
ningen alltid finns tillgänglig även vid vidare
användning av tredje man.
Ändamålsenlig användning
Produkten är avsedd för användning utomhus.
Produkten är endast avsedd för privat användning
och inte för yrkesmässigt bruk eller för andra
användningsändamål.
Beskrivning av delarna
1 Plugg (monteringsmaterial för spotlight,
Ø 9 mm)
2 Skruv (monteringsmaterial för spotlight,
Ø 6 x 40 mm)
3 Monteringsfäste
4 Vridlänk
5 Fjäderbricka
6 Underläggsbricka
7 Fästskruv
8 Uttag för solenergi
9 Rörelsevakt
10 Spotlight
11 TILL- / FRÅN-knapp
12 Solcell
13 Skruv (monteringsmaterial för spotlight,
Ø 4 x 34 mm)
14 Kontakt till solcellskabel
15 Pluggar (monteringsmaterial till solcell,
Ø 6 mm)
16 Kompass
17 Vridreglage LUX
18 Vridreglage SENS
19 Vridreglage TIME

16 SE
Leveransomfattning
Kontrollera omedelbart efter uppackningen att
alla delar finns med i leveransen och att
produkten är i felfritt skick.
1 spotlight
1 solcell
2 skruvar (monteringsmaterial för spotlight,
Ø 6 x 40 mm)
4 skruvar (monteringsmaterial för solcell,
Ø 4 x 34 mm)
2 pluggar (monteringsmaterial för spotlight,
Ø 9 mm)
4 pluggar (monteringsmaterial för solcell,
Ø 6 mm)
1 bruksanvisning
Tekniska specifikationer
Driftspänning: 7,4 V
Litiumjonbatteri: 7,4 V , 1800 mAh
(ej utbytbart)
Lysdioder: 50 x 0,2 W
Skyddsklass: III /
Solcell: monokristallin,
3,5 W / 14,5 V
Dimmer: kan ställas in från ca 5 lx
till 20 000 lx
Lystid: inställbar från 5s +/-2s
till 5 min +/-1 min
Spotlight:
Rörelsevakt: räckvidd: max. 12 m,
detektionsvinkel: ca 180 °
Kapslingsklass:
IP44 (stänkvattenskyddad)
Vikt: ca 480 g
Mått: ca 15 x 14,8 x 12,4 cm
Projektionsyta: max. 15 x 14,8 cm
Monteringshöjd: max. 1,8–2,5 m
Säkerhetsinformation
RISK FÖR
LIVSFARA OCH OLYCKOR
FÖR SMÅBARN OCH BARN!
Lämna aldrig barn utan uppsikt med för-
packningsmaterialet. Risk för kvävning på
grund av förpackningsmaterialet. Barn förstår
inte farorna som lurar. Håll alltid barn borta
från produkten.
LIVSFARA! Håll alltid barn på avstånd från
arbetsområdet under pågående montering.
Till leveransomfattningen hör en mängd
skruvar och andra smådelar. Dessa kan vara
livsfarliga om man sväljer eller inhalerar dem.
Denna produkt kan användas av barn från
och med 8 år samt av personer med nedsatt
fysisk, motorisk eller mental förmåga eller
med bristande erfarenhet och kunskap, om
de hålls under uppsikt eller instruerats om
en säker användning av produkten och om
de förstått de risker som användningen kan
medföra. Barn får inte leka med produkten.
Rengöring och användarunderhåll får inte
utföras av barn utan uppsikt av vuxen person.
Använd inte produkten om den är skadad
på något sätt.
Ljuskällorna är inte utbytbara.
Om ljuskällorna slutar att fungera på slutet av
sin livslängd, måste hela produkten ersättas.
0,5 m
BRANDRISK! Montera produk-
ten på minst 0,5 meters avstånd
från material som ljuset riktas mot.
En kraftig värmeutveckling kan medföra
brandrisk.

17 SE
Säkerhetsinformation om
batterier / batteripack
LIVSFARA! Håll batterier / batteripack
utom räckhåll för barn. Uppsök omedelbart
läkare om någon råkar svälja ett batteri!
EXPLOSIONSRISK! Ladda
aldrig icke-laddbara batterier.
Kortslut aldrig batterier / batteri-
pack och / eller öppna dem ej. Följden kan
bli överhettning, brandfara eller spruckna
batterier.
Kasta aldrig batterier / batteripack i öppen
eld eller vatten.
Utsätt inte batterier / batteripack för mekanisk
belastning.
Risk för läckande batterier /
batteripack
Undvik extrema förhållanden och tempera-
turer som kan påverka batterier / batteripack,
t.ex. på värmeelement / i direkt solljus.
Om batterier / batteripack runnit ut undvik
att kemikalierna kommer i kontakt med hud,
ögon och slemhinnor! Spola omedelbart av
de drabbade ställena med rent vatten och
uppsök läkare omgående!
ANVÄND SKYDDSHAND-
SKAR! Läckande eller skadade
batterier / batteripack kan vid
beröring förorsaka frätskador på huden.
Använd därför i detta fall lämpliga skydds-
handskar.
Denna produkt har ett inbyggt batteri, som
användaren inte kan byta ut själv. För att
undvika risker får demontering eller utbyte
av batteriet endast utföras av tillverkaren
eller dennes kundtjänst eller av en person med
liknande kvalifikation. Vid avfallshantering
måste man hänvisa till att produkten
innehåller ett batteri.
Funktionssätt
Solcellen 12 omvandlar solljus till elektricitet
och lagrar denna i det inbyggda batteriet via
uttaget för solenergi 8. Vid fullständigt laddat
batteri är lystiden ca 100 minuter. Batteriet måste
laddas före första idrifttagningen tas i bruk (se
avsnittet ”Ladda batteriet”).
Ladda batteriet
Batteriet är laddat vid leverans. Om det förvarats
under en tid kan batteriet ha laddats ur delvis
innan strålkastaren tas i bruk. Ladda därför bat-
teriet fullständigt före första idrifttagningen.
Ladda batteriet med solcellen
Tryck TILL- / FRÅN-knappen 11 så att den
hamnar i läget OFF, TILL- / FRÅN-knappens
11 röda LED-indikering släcks samtidigt, för
att inte påverka laddningen genom att pro-
dukten tänds.
Sätt i stickkontakten 14 på solcellens kabel
i uttaget för solenergi 8 på spotlighten 10 .
Placera solcellen 12 enligt beskrivningen i
avsnittet ”Montera solcellen 12 ”.
Hänvisning: Efter 4 till 6 dagar med
starkt solsken är batteriet åter fulladdat. Hur
lång tid laddningen tar, beror på batteriets
laddningsstatus och hur starkt solen skiner.

18 SE
Montering
Hänvisning: Ta bort förpackningsmaterialet
fullständigt. Bestäm dig före monteringen var du
vill montera solcellen 12 och spotlighten 10 .
Solcellen 12 och spotlighten 10 kan monteras
oberoende av varandra, men måste efter mon-
tering anslutas med hjälp av solcellens
12
ca 5 m
långa nätkabel. Efter montering ska nätkabeln
läggas så att den inte utsätts för mekanisk be-
lastning. Nätkabeln bör fästas med vanliga
installationsmaterial som finns i handeln, t.ex.
kabelklammer eller kabelkanal för att undvika
skador på kabelns isolering.
Hänvisning: Det monteringsmaterial som
ingår i leveransen är lämpligt för vanligt, fast
murverk. För andra underlag krävs eventuellt
andra monteringsmaterial. Rådgör i förekom-
mande fall med en sakkunnig.
Montering av spotlight
Kontrollera att inga dolda ström-, gas- eller
vattenledningar ligger bakom borrhålen innan
hålen borras upp. Använd en borrmaskin för att
borra hål i murverket. Beakta alltid säkerhetsan-
visningarna i borrmaskinens bruksanvisning och
säkerhetsinformation. Annars föreligger livsfara
eller risk för personskador på grund av elektrisk
stöt.
Tänk på följande när du väljer monteringsplats
för spotlighten 10 :
Se till att din spotlight 10 lyser upp önskat
område. Förvissa dig om att du kan röra på
din spotlight 10 .
Se till att rörelsevakten 9 känner av önskat
område. Rörelsevakten 9 har ett detektions-
område på max. 12 m och en detektions-
vinkel på ca 180°(beroende på monte-
ringshöjd – lämpligast är en höjd på
1,8-2,5 m) (se bild D).
Se till att gatubelysningen inte lyser på
rörelsevakten 9 på natten. Detta kan
påverka funktionen.
Skruva loss vridlänken 4, för att ta bort
monteringsfästet 3 från spotlighten 10 .
Använd monteringsfästet 3, för att markera
de två yttre borrhålens position.
Borra hålen och sätt fast monteringsfästet 3
med de medföljande pluggarna 1 skru-
varna 2.
Sätt nu fast spotlighten 10 på monterings-
fästet 3 med vridlänken 4 du tog bort
tidigare, fjäder- 5 och underläggsbrickan
6. Förvissa dig om att fjäder- 5 och un-
derläggsbrickan 6 har placerats precis
som bild A visar.
Montera solcellen
Förvissa dig om att inga dolda ström-, gas- eller
vattenledningar ligger bakom borrhålen innan
du borrar i väggen. Använd en borrmaskin för
att borra hål i murverket. Beakta alltid säkerhets-
anvisningarna i borrmaskinens bruksanvisning
och säkerhetsinformation. I annat fall förelligger
livsfara eller risk för personskador på grund av
elektriska stötar.
När du väljer monteringsplats för solcellen 12
ska du tänka på följande:
Solcellen 12 måste om möjligt utsättas för
direkt solljus. Även en tidvis skuggning av
solcellen 12 under dagen kan begränsa
laddningen avsevärt.

19 SE
Geografisk inriktning:
Det optimala är att rikta solcellen åt söder. Välj
hellre att rikta solcellen något åt väster än att
rikta den något åt öster.
Horisontell inriktning:
Hur solcellen 12 ska riktas i horisontellt läge
beror på monteringsplatsens geografiska
breddgrad. I centrala Europa anses en vinkel
på 30°–40° vara idealisk.
En monteringsplatta med 6 borrhål befinner sig
på solcellens 12 baksida.
Montera solcellen
12
på den plats du avsett.
Använd för detta ändamål de 4 små skru-
varna 13 och pluggarna 15 . Beroende på
monteringsplats kan du använda de fyra
bäst passande borrhålen på monterings-
plattan. I bästa fall är det de båda borrhålen
längst till vänster och höger (se bild B).
Lägg sedan kontakten till solcellskabeln 14
och sätt den i spotlightens 10 uttag för sole-
nergi 8.
Anslut solcellen 12 och monteringsplattan till
varandra med hjälp av vridlänken. Rikta sol-
cellen 12 så att den utsätts för direkt solljus.
Idrifttagning
Påslagning / avstängning av
rörelsevakten
Tryck TILL- / FRÅN-knappen 11 så att den
hamnar i läget ON, för att slå på rörelse-
vakten 9; TILL- / FRÅN-knappens 11 röda
LED-indikering lyser samtidigt.
Tryck TILL- / FRÅN-knappen 11 så att den
hamnar i läget OFF, för att stänga av
rörelsevakten 9; TILL- / FRÅN-knappens 11
röda LED-indikering släcks samtidigt.
Inställning av lystid
Vrid vridreglaget TIME 19 på rörelsevaktens
9 undersida medurs för att öka belysnings-
tiden (se bild C). Belysningstiden kan ställas
in för en period från ca 5s +/-2s till 5 min
+/-1min.
Inställning av sensorns
känslighet
Vrid vridreglaget SENS 18 på rörelsevaktens
9 undersida medsols för att öka sensorns
känslighet (se bild C).
Hänvisning: Rörelsevakten 9 registrerar
värmestrålning. Den reagerar snabbare på
kroppsvärme vid låga utomhustemperaturer
än vid höga utomhustemperaturer. Se till att
du anpassar sensorns känslighet till årstiderna.
Inställning av ljuskänslighet
Vrid vridreglaget LUX 17 på rörelsevaktens
9 undersida medsols för att öka ljuskäns-
ligheten. I läget reagerar rörelsevakten
9 endast vid nattsvart mörker (ca 5 lx).
I läget reagerar rörelsevakten 9 även
vid dagsljus, så länge det inte överskrider
ca 20 000 lx (se bild C).

20 SE
Rikta rörelsevakten
Lossa fästskruven 7 på rörelsevakten 9.
Vrid reglaget LUX 17 till läget . Rikta
rörelsevakten 9 mot mitten av det område
som du vill att den ska känna av.
Flytta rörelsevakten inom avkänningsområ-
det tills du är nöjd med hur rörelsevakten 9
reagerar. För detta ändamål justerar du
vridreglaget SENS 18 eller ändrar rörelse-
vaktens 9 riktning.
Dra åt fästskruven 7 igen för att fixera
inställningarna.
Vrid vridreglaget LUX 17 till önskat läge.
Detta läge ska fastställas under skymning, när
din spotlight 10 ska reagera. Vrid långsamt
vridreglaget LUX 17 medurs tills rörelsevakten
reagerar på rörelser i avkänningsområdet.
Rengöring och förvaring
Tryck på TILL- / FRÅN-knappen 11 till läget
OFF, om du inte tänker använda produkten
och vill förvara den.
Kontrollera regelbundet om smuts har sam-
lats på rörelsevakten 9 eller solcellen 12 .
Avlägsna den för att säkerställa produktens
felfria funktion.
Håll produkten och särskilt solcellen 12 fri
från snö och is på vintern.
Produkten ska rengöras med en luddfri, lätt
fuktad duk och ett milt rengöringsmedel.
Felavhjälpning
= Fel
= Orsak
= Lösning
= Produkt slås inte på.
= TILL- / FRÅN-knappen 11 befinner sig i
läget OFF.
= Tryck TILL- / FRÅN-knappen 11 så att den
hamnar i läget ON och TILL- / FRÅN-knap-
pens 11 röda LED-indikering samtidigt lyser.
= Vridreglaget LUX 17 är inställt på ett för
mörkt värde.
= Ställ in vridreglaget LUX 17 på ett ljusare
värde.
= Rörelsevakten 9 är smutsig eller felaktigt
riktad.
= Rengör rörelsevakten 9 eller rikta in den
på nytt.
= Rörelsevakten 9 är inte tillräckligt känslig.
= Ställ in rörelsevaktens 9 känslighet på
nytt (se avsnittet ”Inställning av sensorns
känslighet”)
= Batteriet är urladdat.
= Ladda batteriet (se avsnittet ”Ladda
batteriet”).
= Produkten tänds även när det är
ljust ute.
= Vridreglaget LUX 17 är inställt på ett för
ljust värde.
= Vrid vridreglaget LUX 17 moturs.
= Ljuset fladdrar.
= Batteriet är nästan urladdat.
= Ladda batteriet (se avsnittet ”Ladda
batteriet”).
= Batteriet laddar ur sig på kort tid.
= Stickkontakten mellan solcellen 12 och
spotlighten 10 har lossnat.
= Sätt åter fast stickkontakten på produkten.
= Solcellen 12 är smutsig.
= Rengör solcellen 12 .
= Solcellen 12 är inte riktad åt rätt håll.
Sidan laddas...
Sidan laddas...
Sidan laddas...
Sidan laddas...
Sidan laddas...
Sidan laddas...
Sidan laddas...
Sidan laddas...
Sidan laddas...
Sidan laddas...
Sidan laddas...
Sidan laddas...
Sidan laddas...
Sidan laddas...
Sidan laddas...
Sidan laddas...
Sidan laddas...
Sidan laddas...
Sidan laddas...
Sidan laddas...
Sidan laddas...
Sidan laddas...
Sidan laddas...
Sidan laddas...
Sidan laddas...
Sidan laddas...
Sidan laddas...
Sidan laddas...
Sidan laddas...
Sidan laddas...
-
 1
1
-
 2
2
-
 3
3
-
 4
4
-
 5
5
-
 6
6
-
 7
7
-
 8
8
-
 9
9
-
 10
10
-
 11
11
-
 12
12
-
 13
13
-
 14
14
-
 15
15
-
 16
16
-
 17
17
-
 18
18
-
 19
19
-
 20
20
-
 21
21
-
 22
22
-
 23
23
-
 24
24
-
 25
25
-
 26
26
-
 27
27
-
 28
28
-
 29
29
-
 30
30
-
 31
31
-
 32
32
-
 33
33
-
 34
34
-
 35
35
-
 36
36
-
 37
37
-
 38
38
-
 39
39
-
 40
40
-
 41
41
-
 42
42
-
 43
43
-
 44
44
-
 45
45
-
 46
46
-
 47
47
-
 48
48
-
 49
49
-
 50
50


på andra språk
- Deutsch: LIVARNO 314812 Bedienungsanleitung
- polski: LIVARNO 314812 Instrukcja obsługi
- English: LIVARNO 314812 Owner's manual
Relaterade papper
Andra dokument
-
Brennenstuhl SOL 14 Bruksanvisningar
-
 LIVARNO LUX HG00776B Assembly, Operating And Safety Instructions
-
Anslut Solar Cell LED Lamp Användarmanual
-
North Light Väggbelysning solcell Bruksanvisning
-
Anslut 018354 Användarmanual
-
-
DEXAPLAN CA 616 - 8-2006 Bruksanvisning
-
Sony DCR-TRV130E Bruksanvisning
-
SEBSON IR OUT BA IR Motion Detector Användarmanual
