
LED OUTDOOR FLOODLIGHT 22 W
LED OUTDOOR FLOODLIGHT 22 W
Assembly, operating and safety instructions
LED-STRÅLKAST ARE 22 W
Monterings-, bruks- och säkerhetsanvisningar
LED-AUSSENSTRAHLER 22 W
Montage-, Bedienungs- und Sicherheitshinweise
IAN 390363_2201
L
ED LAUKO PROŽEKTORIUS, 22 W
Nurodymai dėl montavimo, naudojimo
ir saugumo
REFLEKTOR ZEWNĘTRZNY LED 22 W
Wskazówki montażu, obsługi i bezpieczeństwa
LED-V ÄLIPROŽEKTOR 22 W
Montaaži-, käsitsemis- ja ohutusjuhised
LED ĀRTELPU PROŽEKTORS 22 W
Montāžas, lietošanas un drošības norādījumi

GB Assembly, operating and safety instructions Page 5
SE Monterings-, bruks- och säkerhetsanvisningar Sidan 16
PL Wskazówki montażu, obsługi i bezpieczeństwa Strona 27
LT Nurodymai dėl montavimo, naudojimo ir saugumo Puslapis 38
EE Montaaži-, käsitsemis- ja ohutusjuhised Lehekülg 49
LV Montāžas, lietošanas un drošības norādījumi Lpp. 60
DE/AT/CH Montage-, Bedienungs- und Sicherheitshinweise Seite 71

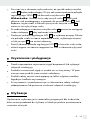
B
12
11
10
A
6
7
9
4
1 2
3
5
8

2.5 m
D
C
13
14

5 GB
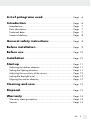
List of pictograms used .................................................. Page 6
Introduction ............................................................................. Page 6
Intended use ..................................................................................Page 7
Parts description ............................................................................Page 7
Technical data ............................................................................... Page 7
Scope of delivery ..........................................................................Page 8
General safety instructions ........................................Page 8
Before installation .............................................................Page 9
Before use .................................................................................Page 10
Installation ...............................................................................Page 10
Start-up .......................................................................................Page 11
Adjusting the motion detector.......................................................Page 11
Setting the lighting duration ..........................................................Page 11
Adjusting the sensitivity of the sensor ........................................... Page 12
Setting the daylight level ..............................................................Page 12
Aligning the motion detector ........................................................Page 12
Cleaning and care ..............................................................Page 13
Disposal ......................................................................................Page 13
Warranty ................................................................................... Page 14
Warranty claim procedure ...........................................................Page 14
Service ...........................................................................................Page 15

6 GB
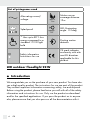
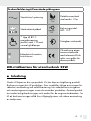
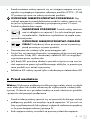
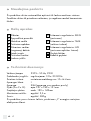
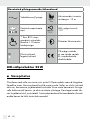
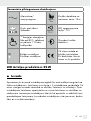
List of pictograms used
Alternating current/
voltage approx.
12m
Motion sensor
coverage distance:
12 m
Splashproof approx.
110°
LED illuminating
angle: 110 deg
* Uses up to 80 % less
energy compared to a
standard 110 W light
bulb
Pivoting motion
detector
Safety information
Instructions for use
CE mark indicates
conformity with rele-
vant EU directives
applicable for this
product.
LED outdoor floodlight 22 W
Introduction
We congratulate you on the purchase of your new product. You have cho-
sen a high quality product. The instructions for use are part of the product.
They contain important information concerning safety, use and disposal.
Before using the product, please familiarise yourself with all of the safety
information and instructions for use. Only use the product as described
and for the specified applications. If you pass the product on to anyone
else, please ensure that you also pass on all the documentation with it.

7 GB
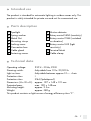
Intended use
The product is intended for automatic lighting in outdoor areas only. This
product is solely intended for private use and not for commerical use.
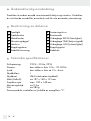
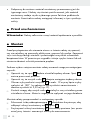
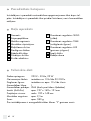
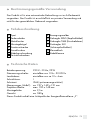
Parts description
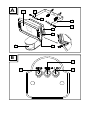
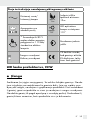
1 Spotlight
2 Spring washer
3 Metal Nut
4 Mounting stirrup
5 Locking screw
6 Connection box
7 Cable gland
8 Fastening screws
9 Motion detector
10 Rotary control SENS (sensitivity)
11 Rotary control TIME (switched
on duration)
12 Rotary control LUX (light
sensitivity)
13 Terminal block
14 Cable clamp
Technical data
Operating voltage: 230 V∼ 50 Hz, 22 W
Dimming switch: Adjustable from 10 lx–20,000 lx
Light on time: Adjustable between approx.10 s – 4 min
Protection class: I
Protection class: IP44 (Splashproof)
Dimensions (H x W x D): approx. 197 x 149 x 121 mm
Projected area: max. 190 x 149 mm
Mounting height: approx. 2.5 m
Weight: approx. 580 g
This product contains a light source of energy efficiency class “F”.

8 GB
Scope of delivery
1 LED Spotlight with motion detector
2 Wall plugs (Ø 6 mm)
2 Screws
1 Set of mounting and operating instructions
General safety instructions
BEFORE USING THE PRODUCT, PLEASE FAMILIARISE YOURSELF WITH
ALL OF THE SAFETY INFORMATION AND INSTRUCTIONS FOR USE!
WHEN PASSING THIS PRODUCT ON TO OTHERS, PLEASE ALSO IN-
CLUDE ALL THE DOCUMENTS!
DANGER TO LIFE AND ACCIDENT HAZARD FOR
TODDLERS AND SMALL CHILDREN! Never leave
children unattended with the packaging material. The
packaging material represents a danger of suffocation. Children fre-
quently underestimate the dangers. Please keep children away from
the product at all times.
This product may be used by children age 8 years and up, as well as
by persons with reduced physical, sensory or mental capacities, or
lacking experience and/or knowledge, so long as they are supervised
or instructed in the safe use of the product and understand the associ-
ated risks. Children should not be allowed to play with the product.
Cleaning and user maintenance should not be performed by children
without supervision.
Risk of electric shock
Always check product for damage before connecting it to power.
Never use the product if it shows any signs of damage.

9 GB
Prior to installation, verify that the mains voltage on site corresponds
with the operating voltage required for the product (230 V∼ 50 Hz).
Otherwise do not install the product.
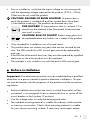
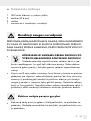
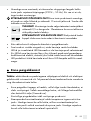
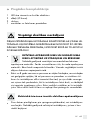
CAUTION! DANGER OF BURN INJURIES! To prevent burns,
verify the product is switched off and has cooled down for at least
15 min before touching it. The product can become very hot.
0.5 m
FIRE HAZARD! Fit the product so that it is at least 0.5 m
away from the material to be illuminated. Excessive heat
can result in a fire.
CAUTION! RISK OF INJURY! Broken lamp glass must
be replaced before any further use is made of the product.
Only intended for installations out of normal reach.
This product does not contain any parts that can be serviced by the
user. The LEDs and built-in LED control gear cannot be replaced by
end user.
If the LEDs fail at the end of their lives, they must be repaired by qualified
electrician or the entire product must be replaced.
The spotlight is only suited for use with the built-in LED control gear.
Before installation
Important: The electrical connection must be established by a qualified
electrician or a person trained to perform electrical installations. This per-
son must be familiar with the properties of the product and the connection
regulations.
Before installation ensure that the circuit, to which the product will be
connected, is not energised. To do so, remove the fuse or switch off the
circuit breaker in the fuse box (0 position).
Use the voltage tester to verify the de-energised status.
The included mounting material is suitable for ordinary solid concrete
or masonry construction. Check which mounting material is suitable
for your chosen mounting surface. If necessary, seek expert advice.

10 GB
Before use
Note: Remove all packaging materials from the product.
Installation
Make sure you will not be drilling into electrical, gas or water lines inside
the wall. Use a power drill to drill the holes into the brick wall. Always ob-
serve all safety instructions for the power drill in the manual for the power
drill. Death or injury due to electric shock may otherwise result.
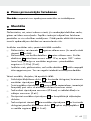
When selecting the mounting location, pay attention to the following:
Make sure that the spotlight 1 illuminates the desired area. You can
move the spotlight 1 vertically.
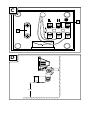
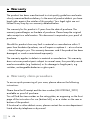
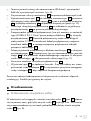
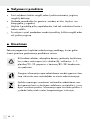
Make sure the motion detector 9 covers the desired area. The motion
detector 9 has a maximum coverage range of 12 m, with a cover-
age angle of about 180° (depending on the mounting height – a
height of 2.50 m is ideal) (Fig. D).
Make sure the motion detector 9 is not illuminated at night by street
lighting. This can influence its functioning.
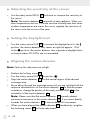
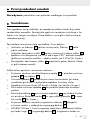
During mounting, proceed as described below:
Unscrew locking screw 5 by using a screw driver (cross type) to
detach the mounting stirrup 4 from the spotlight 1.
Hold the mounting stirrup 4 so that it is horizontal (possibly with a
spirit level) against the wall and mark the fastening holes.
Now drill the fastening holes (Ø 6 mm) and push the wall plugs into
the drill holes (Fig. A).
Secure the mounting stirrup 4 onto the wall using the screws provided.
Now use the screw driver (cross type) to attach the spotlight 1 to the
mounting stirrup 4 by using the previously removed locking screw 5,
spring washer 2, and metal nut 3 (Fig A).
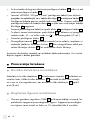
Open the connection box 6 after you have released the lid of the
connection box 6 with a cross type screwdriver.

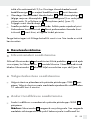
11 GB
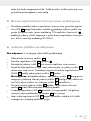
Insert the connection cable (not include in the product), type H05RN-F
3G 1.0 mm2 , through the cable gland 7 and into the connection box
6. The length for the connection cable line should not exceed 2.5 m.
Fix the connection cable with the cable clamp 14 first and then by
turning the nut of the cable gland 7.
Connect the lead of the cable with the terminal block 13 in the connec-
tion box 6. Pay attention to the markings on the terminal block 13
(L for live, N for neutral and for the earth wire) (Fig. C).
Close the connection box 6.
Align the spotlight 1 into the desired direction. For this, you may
need to slacken the fastening screws 8. After finish the alignment,
tighten the fastening screws 8 again, to ensure a secure hold.
Reinsert the fuse or switch the circuit breaker back on. Your product is now
ready to use.
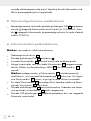
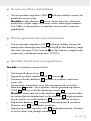
Start-up
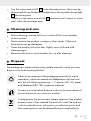
Adjusting the motion detector
Depending on the pre-adjustments of the motion detector 9, the spotlight
1 will switch itself on for a certain period of time as soon as the motion
detector 9 detects movement. These pre-adjustments are made using the
three controllers on the underside of the motion detector 9 (Fig. B).
Setting the lighting duration
Turn the rotary control TIME 11 clockwise to increase the duration of
the illumination. The lighting duration can be adjusted within a time
window of approx. 10 seconds to 4 minutes.

12 GB
Adjusting the sensitivity of the sensor
Turn the rotary control SENS 10 clockwise to increase the sensitivity of
the sensor.
Note: The motion detector 9 responds to heat radiation. When out-
door temperatures are low, it is more sensitive to body heat than when
outdoor temperatures are warm. Be sure to regulate the sensitivity of
the sensor over the course of the year.
Setting the daylight level
Turn the rotary control LUX 12 to increase the daylight level: In the
position, the motion detector only reacts at night (at approx. 10 lx).
In the position, the motion detector also responds at daylight levels,
as long as about 20,000 lx are not exceeded.
Aligning the motion detector
Note: Perform this adjustment at twilight.
Slacken the locking screw 8.
Turn the rotary control LUX 12 to position .
Align the motion detector 9 into the central region of the desired
coverage area.
Move about through the coverage area until you are satisfied with the
response characteristics of the motion detector 9. To find the proper
orientation, change the position of the rotary control SENS 10 or the
orientation of the motion detector 9.
Note: Please note that the motion detector 9 primarily detects
movements transverse to the motion detector 9. If you move directly
towards the motion detector 9, it cannot detect this movement.
When you have aligned the motion detector 9 satisfactorily, re-tighten
the fastening screws 8 to fix the adjustment.

13 GB
Turn the rotary control LUX 12 to the desired position. These can be
determined during the dawn or twilight hours during which the spotlight
1 should respond.
Slowly turn the rotary control LUX 12 clockwise until it reacts to move-
ment within the coverage area.
Cleaning and care
Before cleaning, remove the fuse or switch off the circuit breaker
at the fuse box.
Never immerse the product in water or other liquids. Otherwise
the product can be damaged.
Clean the product with a lint-free, slightly moist cloth and mild
cleaning agent.
Reconnect the fuse or circuit breaker for use after cleaning.
Disposal
The packaging is made entirely of recyclable materials, which you may
dispose of at local recycling facilities.
b
a
Observe the marking of the packaging materials for waste
separation, which are marked with abbreviations (a) and num-
bers (b) with following meaning: 1–7: plastics/20–22: paper
and fibreboard/80–98: composite materials.
Contact your local refuse disposal authority for more details of
how to dispose of your worn-out product.
To help protect the environment, please dispose of the product
properly when it has reached the end of its useful life and not
in the household waste. Information on collection points and
their opening hours can be obtained from your local authority.

14 GB
Warranty
The product has been manufactured to strict quality guidelines and metic-
ulously examined before delivery. In the event of product defects you have
legal rights against the retailer of this product. Your legal rights are not
limited in any way by our warranty detailed below.
The warranty for this product is 3 years from the d
ate of purchase. The
warranty period begins on the date of purchase. Please keep the original
sales receipt in a safe location. This document is required as your proof of
purchase.
Should this product show any fault in materials or manufacture within 3
years from the date of purchase, we will repair or replace it – at our choice
– free of charge to you. This warranty becomes void if the product has been
damaged, or used or maintained improperly.
The warranty applies to defects in material or manufacture. This warranty
does not cover product parts subject to normal wear, thus possibly consid-
ered consumables (e.g. batteries) or for damage to fragile parts, e.g.
switches, rechargeable batteries or glass parts.
Warranty claim procedure
To ensure quick processing of your case, please observe the following
instructions:
Please have the till receipt and the item number (IAN 390363_2201)
available as proof of purchase.
You will find the item number on the rating plate, an engraving on the front
page of the instructions for use (bottom left), or as a sticker on the rear or
bottom of the product.
If functional or other defects occur, please contact the service department
listed either by telephone or by e-mail.

15 GB
You can return a defective product to us free of charge to the service address
that will be provided to you. Ensure that you enclose the proof of purchase
(till receipt) and information about what the defect is and when it occurred.
Service
Service Great Britain
Tel.: 0800 0569216
E-Mail: [email protected]

16 SE
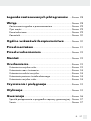
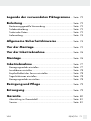
Teckenförklaring till använda piktogram ..... Sidan 17
Inledning .................................................................................. Sidan 17
Ändamålsenlig användning ....................................................... Sidan 18
Beskrivning av delarna ............................................................... Sidan 18
Tekniska specifikationer .............................................................. Sidan 18
Leveransomfattning ..................................................................... Sidan 19
Allmän säkerhetsinformation ................................ Sidan 19
Före montering ................................................................... Sidan 20
Före första användningen ........................................ Sidan 21
Montering ............................................................................... Sidan 21
Idrifttagning .......................................................................... Sidan 22
Inställning av rörelsevakten ........................................................ Sidan 22
Inställning av lystid ...................................................................... Sidan 22
Inställning av sensorns känslighet .............................................. Sidan 22
Inställning av dagsljus ................................................................. Sidan 23
Rikta rörelsevakten ...................................................................... Sidan 23
Rengöring och skötsel .................................................. Sidan 24
Avfallshantering ............................................................... Sidan 24
Garanti ...................................................................................... Sidan 25
Handläggning av garantianspråk ............................................. Sidan 25
Service ......................................................................................... Sidan 26

17 SE
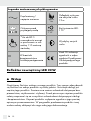
Teckenförklaring till använda piktogram
Växelström/-spänning approx.
12m
Detektionsavstånd
rörelsevakt: 12 m
Stänkvattenskyddad approx.
110°
Belysningsvinkel
LED: 110 °
* Upp till 80 %
energibesparing
jämfört med 110 watt
normal glödlampa
Svängbar rörelsevakt
Säkerhetsinformation
Instruktioner
CE-märkning anger
överensstämmelse
med relevanta EU-di-
rektiv som gäller för
denna produkt.
LED-strålkastare för utomhusbruk 22 W
Inledning
Grattis till köpet av din nya produkt. Du har köpt en högklassig produkt.
Bruksanvisningen hör till produkten. Den innehåller viktiga anvisningar för
säkerhet, användning och avfallshantering. Läs säkerhetsanvisningarna
och monteringsanvisningen innan du använder produkten. Använd produk-
ten endast enligt beskrivningen och endast för de angivna ändamålen. Se
till att bruksanvisningen alltid finns tillgänglig även vid vidare användning
av tredje man.

18 SE
Ändamålsenlig användning
Produkten är endast avsedd som automatisk belysning utomhus. Produkten
är uteslutande avsedd för privat bruk och får inte användas yrkesmässigt.
Beskrivning av delarna
1 Spotlight
2 Fjäderbricka
3 Metallmutter
4 Monteringsbygel
5 Låsskruv
6 Kopplingsdosa
7 Kabelförskruvning
8 Arreteringsskruv
9 Rörelsevakt
10 Vridreglage SENS (känslighet)
11 Vridreglage TIME (belysningstid)
12 Vridreglage LUX (ljuskänslighet)
13 Kopplingsplint
14 Kabelsko
Tekniska specifikationer
Driftspänning: 230 V∼ 50 Hz, 22 W
Dimmer: kan ställas in från 10 lx – 20.000 lx
Lystid: kan ställas in från ca 10 s–4 min
Skyddsklass: I
Skyddsart: IP44 (stänkvattenskyddad)
Mått (HxBxD): ca 197 x 149 x 121 mm
Projektionsyta: max. 190 x 149 mm
Monteringshöjd: ca 2,5 m
Vikt: ca 580 g
Denna produkt innehåller en ljuskälla av energiklass ”F“.

19 SE
Leveransomfattning
1 LED-utestrålkastare med rörelsevakt
2 pluggar (Ø 6 mm)
2 skruvar
1 monterings- och bruks anvisning
Allmän säkerhetsinformation
GÖR DIG FÖRTROGEN MED PRODUKTENS BRUKSANVISNING
OCH SÄKERHETSINFORMATION INNAN DU ANVÄNDER DEN FÖR
FÖRSTA GÅNGEN. LÄMNA ÄVEN ÖVER ALLA HANDLINGAR OM
DU ÖVERLÅTER PRODUKTEN TILL EN TREDJE PERSON!
RISK FÖR LIVSFARA OCH OLYCKOR FÖR SMÅBARN
OCH BARN! Lämna aldrig barn utan uppsikt med förpack-
ningsmaterialet. Kvävningsrisk föreligger vid hantering av för-
packningsmaterial. Barn underskattar gärna riskerna. Håll alltid barn
borta från produkten.
Denna produkt kan användas av barn från och med 8 år samt av perso-
ner
med nedsatt fysisk, motorisk eller mental förmåga eller med bristande
erfarenhet och kunskap, om de hålls under uppsikt eller instruerats om
en säker användning av produkten och om de förstått de risker som an-
vändningen kan medföra. Barn får inte leka med produkten. Rengö-
ring och underhåll får inte utföras av barn utan uppsikt av vuxen
person.
Livsfara genom elektriska stötar
Kontrollera att produkten inte är skadad före varje anslutning till nätet.
Använd aldrig produkten om den är skadad på något sätt.

20 SE
Före montering bör du förvissa dig om, att befintlig nätspänning över-
ensstämmer med den driftspänning produkten kräver (230 V∼ 50 Hz).
Montera inte produkten om detta inte stämmer.
SE UPP! RISK FÖR BRÄNNSKADOR! Se till att produkten är
avstängd och låt den svalna i minst 15 minuter innan du rör vid den.
Produkten kan bli mycket varm.
0,5 m
BRANDRISK! Montera produkten på minst 0,5 meters
avstånd från material som ljuset riktas mot. En kraftig vär-
meutveckling kan medföra brandrisk.
SE UPP! RISK FÖR PERSONSKADOR! Ett skadat
lampglas måste ersättas innan produkten får användas igen.
Endast avsedda för installation utom räckhåll för händerna.
Denna artikel innehåller inga delar som användaren själv kan under-
hålla. Lysdioderna och det inbyggda LED-driftdonet kan inte bytas ut
av användaren.
Om lysdioderna slutar att fungera på slutet av sin livslängd, måste de
repareras av en kvalificerad elektriker, annars måste hela produkten
lämnas till avfallshantering.
LED-spotlighten får endast användas med det integrerade LED-driftdonet.
Före montering
Viktigt: Låt endast behörig elektriker eller en person som instruerats på
motsvarande sätt utföra elinstallationer. Denna person måste ha kunskaper
om produktens egenskaper och anslutningsregler.
Kontrollera att ledningen, som produktens ska installeras på, är spän-
ningslös innan installationen påbörjas. Skruva ur säkringen eller slå
av dvärgbrytaren i säkringsskåpet (0-läge).
Kontrollera med spänningsprovare att ingen spänning föreligger.
Det monteringsmaterial som medföljer lämpar sig för vanligt fast mur-
verk. Informera dig också om vilket monteringsmaterial som är lämpligt
för den monteringsyta du valt. Vid behov inhämta information hos en
yrkesman.
Sidan laddas...
Sidan laddas...
Sidan laddas...
Sidan laddas...
Sidan laddas...
Sidan laddas...
Sidan laddas...
Sidan laddas...
Sidan laddas...
Sidan laddas...
Sidan laddas...
Sidan laddas...
Sidan laddas...
Sidan laddas...
Sidan laddas...
Sidan laddas...
Sidan laddas...
Sidan laddas...
Sidan laddas...
Sidan laddas...
Sidan laddas...
Sidan laddas...
Sidan laddas...
Sidan laddas...
Sidan laddas...
Sidan laddas...
Sidan laddas...
Sidan laddas...
Sidan laddas...
Sidan laddas...
Sidan laddas...
Sidan laddas...
Sidan laddas...
Sidan laddas...
Sidan laddas...
Sidan laddas...
Sidan laddas...
Sidan laddas...
Sidan laddas...
Sidan laddas...
Sidan laddas...
Sidan laddas...
Sidan laddas...
Sidan laddas...
Sidan laddas...
Sidan laddas...
Sidan laddas...
Sidan laddas...
Sidan laddas...
Sidan laddas...
Sidan laddas...
Sidan laddas...
Sidan laddas...
Sidan laddas...
Sidan laddas...
Sidan laddas...
Sidan laddas...
Sidan laddas...
Sidan laddas...
Sidan laddas...
Sidan laddas...
Sidan laddas...
-
 1
1
-
 2
2
-
 3
3
-
 4
4
-
 5
5
-
 6
6
-
 7
7
-
 8
8
-
 9
9
-
 10
10
-
 11
11
-
 12
12
-
 13
13
-
 14
14
-
 15
15
-
 16
16
-
 17
17
-
 18
18
-
 19
19
-
 20
20
-
 21
21
-
 22
22
-
 23
23
-
 24
24
-
 25
25
-
 26
26
-
 27
27
-
 28
28
-
 29
29
-
 30
30
-
 31
31
-
 32
32
-
 33
33
-
 34
34
-
 35
35
-
 36
36
-
 37
37
-
 38
38
-
 39
39
-
 40
40
-
 41
41
-
 42
42
-
 43
43
-
 44
44
-
 45
45
-
 46
46
-
 47
47
-
 48
48
-
 49
49
-
 50
50
-
 51
51
-
 52
52
-
 53
53
-
 54
54
-
 55
55
-
 56
56
-
 57
57
-
 58
58
-
 59
59
-
 60
60
-
 61
61
-
 62
62
-
 63
63
-
 64
64
-
 65
65
-
 66
66
-
 67
67
-
 68
68
-
 69
69
-
 70
70
-
 71
71
-
 72
72
-
 73
73
-
 74
74
-
 75
75
-
 76
76
-
 77
77
-
 78
78
-
 79
79
-
 80
80
-
 81
81
-
 82
82


på andra språk
- eesti: LIVARNO 390363 Omaniku manuaal
- Deutsch: LIVARNO 390363 Bedienungsanleitung
- polski: LIVARNO 390363 Instrukcja obsługi
- English: LIVARNO 390363 Owner's manual