
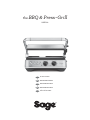
the BBQ & Press™ Grill
SGR700
EN QUICK GUIDE
DK BRUGSANVISNING
SE BRUKSANVISNING
NO BRUKSANVISNING
FI KÄYTTÖOHJEET

2
SAGE®
RECOMMENDS
SAFETY FIRST
At Sage® we are very safety
conscious. We design and
manufacture consumer
products with the safety of
you, our valued customer,
foremost in mind. In addition
we ask that you exercise a
degree of care when using
any electrical appliance
and adhere to the following
precautions.
IMPORTANT SAFEGUARDS
READ ALL INSTRUCTIONS
BEFORE USE AND SAVE
FOR FUTURE REFERENCE
• A downloadable version of this
document is also available at
sageappliances.com
• Before using the rst time
ensure your electricity supply
is the same as shown on the
label on the underside of the
appliance.
• Remove and safely discard
any packaging materials before
rst use.
• The appliance is for household
use only. Do not use the
appliance for anything other
than its intended use. Do not
use in moving vehicles or boats.
Do not use outdoors. Misuse
may cause injury.
• Fully unwind the power cord
before operating.
• Position the appliance on a
stable, heat resistant, level, dry
surface away from the edge and
do not operate on or near a heat
source such as a hot plate, oven
or gas hob.
• Do not let the power cord hang
over the edge of a bench or
table, touch hot surfaces or
become knotted.
• Position the appliance at least
20cm from walls or heat / steam
sensitive materials and provide
adequate space above and on
all sides for air circulation.
2 Sage® recommends
5 Components
7 Assembly
8 Functions
10 Care & cleaning
12 Guarantee
Contents

3
EN
• Ensure the power cord does
not become trapped between
the upper and lower hot plates
of the appliance during use or
storage.
• Do not leave the appliance
unattended when in use.
• The appliance is not intended
to be operated by the means
of an external timer or separate
remote control system
• Do not place anything on top of
the grill when lid is closed, when
in use and when stored.
The appliance is marked
with a HOT surface
symbol. The lid and other
surfaces will be hot when
the appliance is operating and for
some time after use. To prevent
burns always use insulated oven
mitts or use handles or knobs
where appropriate.
• Always ensure the appliance
is turned OFF, unplugged at
the power outlet and has been
allowed to cool before cleaning,
moving or storing.
• Do not use the appliance if the
power cord, plug, or appliance
becomes damaged in any way.
If damaged or maintenance
other than cleaning is required,
please contact Sage®
Customer Service or go to
sageappliances.com
• Any maintenance other than
cleaning should be performed
by an authorised Sage® service
centre.
• Children shall not play with
the appliance.
• The appliance can be used by
children aged 8 or older and
persons with reduced physical,
sensory or mental capabilities
or a lack of experience and
knowledge, only if they have
been given supervision or
instruction concerning use of
the appliance in a safe way
and understand the hazards
involved.
• Cleaning of the appliance
should not be carried out by
children unless they are 8 years
or older and supervised.
• The appliance and its cord
should be kept out of reach
of children aged 8 years and
younger.
• The installation of a residual
current safety switch is
recommended to provide
additional safety when using all
electrical appliances. Safety
switches with a rated operating
current not more than 30mA
are recommended. Consult
an electrician for professional
advice.

4
The symbol shown
indicates that this
appliance should
not be disposed of in
normal household waste.
It should be taken to a local
authority waste collection
centre designated for this
purpose or to a dealer
providing this service.
For more information,
please contact your
To protect against
electric shock, do not
immerse the power plug,
cord or appliance in water
or any liquid.
FOR HOUSEHOLD USE ONLY
SAVE THESE INSTRUCTIONS

5
EN
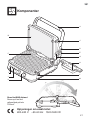
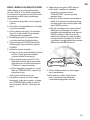
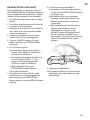
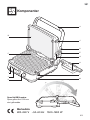
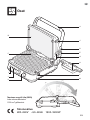
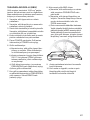
Components
Open Flat BBQ Mode
Opens at into a
1500cm2 grilling surface.
A
C
D
L
M
B
F
I
J
K
H
E
G
Rating Information
220–240V ~50–60Hz 1500–1800W

6
A. Stainless Steel Handle
With Die-Cast Arms.
B. Ceramic, Reversible Non-Stick Plates
Reversible Plates Coated in Ceramic
Fusion HR for oil-free cooking and
easy cleaning. PFOA and PTFE free.
C. Top Plate Release
Removes the top cooking plate.
Independently remove the top and
bottom cooking plates for easy cleaning
or to interchange plate positions.
D. BBQ Lock Release
E. 6 Adjustable Height Settings
Reduces the weight of the top plate on
delicate foods or can be set high enough
for open melts.
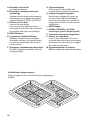
F. Removable, Dishwasher Safe Plates
Flat side for eggs and pancakes,
ribbed side to sear meats.
Belgian wae plates with premium non-stick coating -
SGR001
G. Locking Storage Clip
Locks the plates closed for upright
storage.
H. Integrated, Removable Drip Tray
Catches excess fat for healthier cooking.
In BBQ mode, the unique design drains
fat from both plates into the same drip tray.
I. POWER ON/OFF Button
J. PANINI, BURGER AND STEAK settings
K. Independent Plate Temperature
Control
L. Bottom Plate Release
Removes the bottom cooking plate.
Independently remove the top and bottom
cooking plates for easy cleaning or to
interchange plate positions.
M. Cord Storage
Located on the underside of the grill.

7
EN
Assembly
BEFORE FIRST USE
1. Remove and safely discard any packing
material and promotional labels from
the grill.
2. Wipe the cooking plates and drip tray
with a soft damp sponge. Dry thoroughly.
3. Ensure the drip tray is correctly inserted
into the grill.
4. Ensure the cooking plates are correctly
inserted and securely locked into position.
5. Place the grill on a at, dry surface.
Ensure there is a minimum distance of
20cm of space on both sides
of the appliance.
6. Unwind the power cord completely and
insert the power plug into a grounded
wall outlet.
7. The grill alert will sound and the POWER
light will go on.
8. Press the POWER button. The grill will
beep and the POWER light wil go on. The
grill is now ready for the preheating cycle.
9. Always allow the grill to completely
preheat to the selected temperature
before cooking.
10. The grill will beep twice when the plates
have reached the chosen temperature.
HOW TO USE THE GRILL
The grill features 2 x PLATE RELEASE.
These allow you to independently remove
the top and bottom cooking plates for easy
cleaning, or to interchange plate positions.
To use the PLATE RELEASE:
• Always ensure the grill is completely cool.
• Use the handle to open the top plate to
a 90 degree position.
• Use the ‘Plate Release’ on the front, right
side of the top plate to remove the top
cooking plate, and the ‘Plate Release’ on
the right side of the control panel to remove
the bottom cooking plate.
• Once released, gently slide the plates
o the grill.
• When using the grill as a contact grill
or sandwich press, release the clip and
simultaneously lift the handle.
NOTE
When the grill is turned on and heating for
the rst time, it may emit a ne smoke haze.
This is due to the protective substances
on the heating elements. It is safe and not
detrimental to the performance of the grill.
WARNING
Do not use spray-on, non-stick coatings as
these will aect the performance of the
non-stick cooking plates.
Never use metal or sharp utensils as these
can cause damage to the non-stick coating
of the cooking plates.

8
Functions
USE AS A CONTACT GRILL
OR PANINI PRESS
1. Ensure the drip tray is correctly inserted
into the grill.
2. Ensure the cooking plates are correctly
inserted and securely locked into position.
3. Place the grill on a at, dry surface. Ensure
there is a minimum distance of 20cm of
space on both sides of the appliance.
4. Unwind the power cord completely and
insert the power plug into a grounded
wall outlet.
5. Press the POWER button. The grill alert
will sound and the POWER light will go on.
6. To preheat the grill:
a) Ensure the top plate of the grill is closed.
This will ensure faster, more ecient
preheating.
b) Turn the temperature dials to 230°C
on both lower and upper plates.
Alternatively, press the PANINI or
BURGER preset buttons for fast
preheating. The grill will start to heat and
the ‘PREHEATING’ red light will go ON.
c) Allow the grill to preheat.
7. Once the grill has preheated to the
selected temperature, the grill alert will
sound and ‘PREHEATING’ will no longer
illuminate. The ‘READY’ light will go ON.
8. Place food on the bottom cooking plate.
9. Use the handle to close the top cooking
plate. The top cooking plate has two
features designed to produce optimum
cooking results:
Floating top plate. The top cooking
plate is hinged, allowing the top plate to
be positioned horizontally on the food
surface. This ensures the front of the
food is as evenly cooked as the back.
It also allows the top plate to oat above
the food surface, radiating heat to
create open sandwich style ‘melts’.
Adjustable height control. This
feature reduces the weight of the top
plate on delicate foods like sh and
accommodates varying thicknesses
of food like artisan breads. Located
on the right side of the top plate, the
clip xes the top plate to a range of
positions above the bottom plate. To
set the adjustable height control, use
the handle to lift the top plate and
simultaneously move the adjustable
height control clip to the desired
height. Then slowly lower the top plate
until it rests on the adjustable height
control clip.
10. When the food is cooked, remove from
the cooking plates using heat proof plastic
or wooden utensils.

9
EN
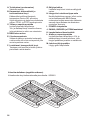
USE IN OPEN FLAT BBQ MODE
The grill opens at into a 1500cm² grilling
surface. The ribbed cooking plate is perfect
for searing meats while the at cooking plate
is ideal for eggs, pancakes and vegetables.
1. Ensure the drip tray is correctly inserted
into the grill.
2. Ensure the cooking plates are correctly
inserted and securely locked into position.
3. Place the grill on a at, dry surface. Ensure
there is a minimum distance of 20cm of
space on both sides of the appliance.
4. Unwind the power cord completely and
insert the power plug into a grounded
wall outlet.
5. Press the POWER button. The grill will
beep and the POWER light wil go on.
6. To preheat the grill:
a) Ensure the top plate of the grill is
closed. This will ensure faster, more
ecient preheating.
b) Turn the temperature dials to 230°C
on both lower and upper plates.
Alternatively, press the STEAK preset
button for fast preheating.
c) The grill will start to heat and the
‘PREHEATING’ red light will go ON.
d) Allow the grill to preheat.
7. Once the grill has preheated to the
selected temperature, the grill alert will
sound and ‘PREHEATING’ will no longer
illuminate. The ‘READY’ green light will
go ON.
8. To open the grill into BBQ mode:
a) Ensure the grill has completely
preheated and the ‘PREHEATING’ red
light is no longer illuminated.
b) Ensure the top cooking plate is closed.
The adjustable height control clip,
located on the right side of the top plate,
should be in the OPEN position
c) With your left hand, grip the handle.
With your right hand, pull the adjustable
height control clip towards you, into the
BBQ mode position. Continue to pull
the clip forward and simultaneously lift
the handle to open, then gently lower
the top plate into the horizontal BBQ
mode position.
9. Place food on either or both of the
cooking plates.
10. When the food is cooked, remove from
the cooking plates using heat proof plastic
or wooden utensils.

10
Care & Cleaning
NOTE
The drip tray can also be washed
in a dishwasher.
WARNING
Extreme caution must be used when
handling the drip tray containing hot fats
and juices.
CLEANING THE COOKING PLATES
1. Wipe the cooking plates with a soft cloth
to remove food residue.
2. Alternatively, release and remove the
cooking plates:
a) Always ensure the grill is completely
cool.
b) Use the handle to open the top plate to
a 90 degree position.
c) Use the PLATE RELEASE on the front,
right side of the top plate to remove
the top cooking plate, and the PLATE
RELEASE on the right side of the
control panel to remove the bottom
cooking plate.
d) Once released, gently slide the plates
o the grill.
3. Place the cooking plates in the
dishwasher (top shelf only).
4. Alternatively, wash the cooking plates
in hot soapy water with a soft, damp
sponge. A non-abrasive liquid cleanser
may be used to avoid build-up of stains.
Apply the cleanser to the sponge, not the
plate, before cleaning. Remove stubborn
residue with a non-abrasive plastic
scouring pad or nylon washing brush.
5. Rinse and dry thoroughly. Always
ensure the cooking plates are correctly
re-inserted and securely locked back
into position after cleaning and prior to
inserting the power plug into a wall outlet.
Ensure the grill is turned OFF by pressing
the POWER button. Remove the power
plug from the wall outlet. Allow the grill to
cool completely before disassembling and
cleaning.
Always clean the outer body, drip tray and
cooking plates after each use to prevent
a build-up of ingredients.
NOTE
Do not use abrasive cleansers or metal
scouring pads on any of the interior or
exterior surfaces of the grill. These will
scratch the surfaces and damage the
non-stick coating on the cooking plates.
WARNING
Do not immerse the body, power cord or
power plug in water or any other liquid as this
may cause electrocution.
CLEANING THE OUTER BODY
Wipe the outer body with a soft, damp
sponge. A non-abrasive liquid cleanser or
mild spray solution may be used to avoid
build-up of stains. Apply the cleanser to the
sponge, not the grill surface, before cleaning.
Rinse. Let all surfaces dry thoroughly prior to
inserting the power plug into a wall outlet.
CLEANING THE DRIP TRAY
After each use, slide out the drip tray and
discard contents. Wash the tray in warm
soapy water with a soft, damp sponge. A
non-abrasive liquid cleanser may be used to
avoid build-up of stains. Apply the cleanser
to the sponge, not the tray, before cleaning.
Rinse and dry thoroughly. Always ensure
to re-insert the drip tray into the grill after
cleaning and prior to inserting the power plug
into a wall outlet.

11
EN
NOTE
Do not use abrasive cleansers or metal
scouring pads to clean the cooking surface
of the plates. These will damage the
non-stick coating on the cooking plates.
STORAGE
• Ensure the grill is turned OFF by turning
the temperature dial to the OFF position.
Remove the power plug from the wall outlet.
• Allow the grill, cooking plates and drip tray
to cool completely.
• Ensure the grill, cooking plates and drip tray
are clean and dry.
• Ensure the drip tray is correctly re-inserted
into the grill.
• Ensure the cooking plates are correctly
re-inserted and securely locked into
position.
• Ensure the cooking plates are locked
together by sliding the adjustable height
control clip to the LOCK position.
• Wrap the power cord in the cord storage
located on the underside of grill.
• Store on a at, dry, level surface.
Alternatively, the grill may be stored in an
upright position.

12
2 YEAR LIMITED GUARANTEE
Sage Appliances guarantees this product
for domestic use in specied territories for
2 years from the date of purchase against
defects caused by faulty workmanship and
materials. During this guarantee period Sage
Appliances will repair, replace, or refund any
defective product (at the sole discretion of
Sage Appliances).
All legal warranty rights under applicable
national legislation will be respected and will
not be impaired by our guarantee. For full
terms and conditions on the guarantee, as
well as instructions on how to make a claim,
please visit www.sageappliances.com.
Guarantee

13
EN
Notes

14
SAGE®
ANBEFALER
SIKKERHED
FREM FOR ALT
Hos Sage® er vi meget
sikkerhedsbevidste.
Når vi designer og produ-
cerer forbrugerprodukter
er det først og fremmest
med brugernes sikkerhed
for øje. Derudover beder
vi om, at du udviser
varsomhed, når du bruger
et elektrisk apparat og
overholder de følgende
forholdsregler.
VIGTIGE SIKKERHEDSOP-
LYSNINGER. LÆS HELE
BRUGSANVISNINGEN,
FØR MASKINEN TAGES
I BRUG, OG GEM DEN TIL
SENERE.
• Brugsanvisningen kan også
hentes i elektronisk format
på sageappliances.com.
• Før maskinen tages i brug
første gang, skal du sikre, at din
elforsyning er den samme som
vist på mærkaten i bunden af
apparatet.
• Fjern al emballage og
indpakning, før du bruger
maskinen første gang.
• Apparatet er kun til hushold-
ningsbrug. Brug ikke maskinen
til andet end det tiltænkte brug.
Brug ikke maskinen i køretøjer
eller både i bevægelse. Brug
den ikke udendørs. Forkert brug
kan medføre skader.
• Ledningen skal være viklet helt
ud før brug.
• Placer maskinen på en stabil,
varmefast, tør ade væk fra
kanten, og brug ikke maskinen
nær en varmekilde som f.eks.
en varmeplade eller et gasblus.
• Sørg for, at ledningen ikke
hænger ud over bordkanten,
er i kontakt med varme
overader eller bliver viklet
sammen.
14 Sage® anbefaler
sikkerhed frem for alt
17 Komponenter
19 Samling
20 Funktioner
22 Pleje og rengøring
24 Garanti
Indhold

15
DK
• Placer apparatet mindst
20 cm fra vægge eller varme-/
dampfølsomme materialer og
sørg for, at der er tilstrækkelig
plads ovenover og til alle sider
af hensyn til luftcirkulationen.
• Sørg for, at strømledningen
ikke kommer i klemme mellem
den øverste og nederste
varmeplade under brug eller
opbevaring.
• Lad ikke maskinen være uden
opsyn, når den er i brug.
• Maskinen er ikke beregnet
til brug ved hjælp af en ekstern
timer eller separat fjernbetjening
• Sæt ikke noget oven på grillen,
når låget er lukket – hverken når
den er i brug, eller når den er sat
til side.
Apparatet er mærket med
et symbol for en VARM
overade. Låget og de
andre overader bliver
varme, når apparatet er i brug
og vil være det i noget tid efter.
For ikke at komme til at brænde
dig skal du bruge ovnhandsker,
håndtag eller grydelapper,
hvor det er relevant.
• Kontrollér altid, at maskinen
er slået FRA, at stikket er taget
ud, og at maskinen er kølet af,
før du rengør, ytter eller
opmagasinerer den.
• Brug ikke apparatet, hvis
strømledningen, stikket eller
apparatet på nogen måde bliver
beskadiget. Hvis apparatet eller
tilbehøret bliver beskadiget
eller der kræves anden vedli-
geholdelse end blot rengøring,
skal du kontakte Sage®
kundeservicecenter eller gå til
sageappliances.com.
• Al anden vedligeholdelse
end almindelig rengøring skal
foretages af et autoriseret
Sage®-servicecenter.
• Børn må ikke lege med
apparatet.
• Maskinen er ikke beregnet til
brug af personer med nedsatte
fysiske, sensoriske eller mentale
evner, manglende erfaring og
viden, eller af børn – medmindre
de er blevet vejledt og givet
brugsanvisninger af en person
med ansvar for deres sikkerhed.
• Rengøring af maskinen må ikke
udføres af børn, medmindre
de er over 8 år og under opsyn
af en voksen.
• Maskinen og dens ledning skal
være utilgængelige for børn
under 8 år.
• Det anbefales at have en
automatisk sikkerhedsafbryder
på sikringsboksen i hjemmet
ved brug af alle elektriske
apparater. Det anbefales at
bruge sikkerhedskontakter med
en maksimal arbejdsstrøm på
ikke over 30 mA. Kontakt en
elektriker for at få professionel
hjælp.

16
Det viste symbol
angiver, at denne
maskine ikke må bort-
lokal genbrugsstation eller
til en forhandler, som tilby-
der denne service. Kontakt
de lokale myndigheder for
at få yderligere oplysninger.
For at undgå elektrisk
stød må hverken stik,
ledning eller maskinen
sænkes i vand eller blive
udsat for fugt.
KUN TIL HUSHOLDNINGSBRUG
GEM DISSE INSTRUKTIONER

17
DK
Komponenter
Åbnes op til en ad
grilloverade på hele
1500cm2.
A
C
D
L
M
B
F
I
J
K
H
E
G
Oplysninger om elektricitet
220-240 V ~50-60 Hz 1500-1800 W

18
A. Håndtag i rustfrit stål
Med støbejernsarme.
B. Keramiske, vendbare slip-let-plader
Vendbare plader med den keramiske
belægning Fusion HR, der gør, at de kan
bruges uden olie og er nemme at rengøre.
Fri for PFOA og PTFE.
C. Toppladeudløser
Gør det muligt at fjerne den øverste
varmeplade.
Fjern den øverste og nederste varmeplade
uafhængigt af hinanden for nem rengøring
og mulighed for at skifte position.
D. BBQ-låseudløser
E. 6 Justerbare højdeindstillinger
Reducerer vægten af toppladen ved
skrøbelige madvarer eller kan sættes højt
nok til ikke at berøre maden.
F. Aftagelige plader, der kan gå
i opvaskemaskinen
Flad side til æg og pandekager,
siden med riller til grillning af kød.
Plader med slip-let-overade til at lave belgiske vaer –
SGR001
G. Anordning til fastlåsning ved
opbevaring
Låser pladerne sammen til lodret
opbevaring.
H.
Opfanger overskydende fedt, så du kan
grille sundere. I BBQ-tilstand sørger
det unikke design for at lede fedt væk
fra begge plader og ned i den samme
drypbakke.
I.
J. Indstillingerne PANINI, BURGER OG
STEAK
K. Uafhængig styring af pladetemperatur
L. Bundpladeudløser
Gør det muligt at fjerne den nederste
varmeplade. Fjern den øverste og
nederste varmeplade uafhængigt af
hinanden for nem rengøring og mulighed
for at skifte position.
M. Ledningsopbevaring
Findes på undersiden af grillen.

19
DK
Samling
FØR FØRSTE BRUG
1. Fjern eventuelt indpakningsmateriale
og reklameetiketter fra grillen.
2. Tør varmepladerne og drypbakken af med
en blød, fugtig svamp. Tør grundigt.
3. Kontrollér, at drypbakke er sat rigtigt ind
i grillen.
4. Kontrollér, at varmepladerne er sat rigtigt
i og er låst på plads.
5. Placer grillen på en plan, tør overade.
Sørg for, at der mindst 20 cm afstand
på begge sider af apparatet.
6. Rul ledningen helt ud, og sæt stikket
i en stikkontakt med jordforbindelse.
7. Grillalarmen høres, og lyset tændes
i knappen POWER.
8. Tryk på knappen POWER (tænd/sluk).
Grillen bipper, lyset tændes i knappen
POWER. Grillen er nu klar til forvarmning.
9. Lad altid grillen blive forvarmet til den
valgte temperatur, før du begynder
at grille.
10. Grillen bipper to gange, når pladerne har
nået den valgte temperatur.
SÅDAN BRUGER DU GRILLEN
Grillen har 2 PLADEUDLØSERE.
Ved at bruge dem kan du fjerne den øverste
og nederste varmeplade uafhængigt af
hinanden for nem rengøring og mulighed
for at skifte position.
Sådan bruger du PLADEUDLØSERNE:
• Sørg altid for, at grillen er helt kold.
• Brug håndtaget til at åbne den øverste
plade i en vinkel på 90 grader.
• Brug "Pladeudløseren" foran i højre side
af den øverste plade til at fjerne den øverste
varmeplade og "Pladeudløseren" på højre
side af kontrolpanelet til at fjerne den
nederste varmeplade.
• Når de er frigjorte, skal du forsigtigt tage
pladerne af grillen.
• Hvis du bruger grillen som en kontaktgrill
eller sandwichgrill, skal du udløse
anordningen samtidig med at du løfter
håndtaget.
BEMÆRK
Når grillen er tændt og varmer op for første
gang, kan den udsende en ganske tynd
røg. Dette skyldes det beskyttende lag på
varmepladerne. Det er helt ufarligt og sker
kun den første gang grillen bruges.
ADVARSEL
Brug ikke oliespray eller andet, da det ikke
er nødvendigt med grillens slip-let-plader.
Brug aldrig metalredskaber eller skarpe
redskaber, da de kan ødelægge slip-let-
overaden på pladerne.

20
Funktioner
BRUG SOM KONTAKTGRILL ELLER
PANINIPRESSER
1. Kontrollér, at drypbakke er sat rigtigt ind
i grillen.
2. Kontrollér, at varmepladerne er sat rigtigt
i og er låst på plads.
3. Placer grillen på en plan, tør overade.
Sørg for, at der mindst 20 cm afstand
på begge sider af apparatet.
4. Rul ledningen helt ud, og sæt stikket
i en stikkontakt med jordforbindelse.
5. Tryk på knappen POWER (tænd/sluk).
Grillalarmen høres, og lyset tændes
i knappen POWER.
6. Sådan forvarmer du grillen:
a) Sørg for, at den øverste plade på grillen
er lukket. Dette giver en hurtigere
og mere eektiv forvarmning.
b) Drej temperaturen op på 230 °C for
både den nederste og øverste plade.
Alternativt kan du trykke på knapperne
PANINI eller BURGER for hurtig
forvarmning. Grillen begynder at varme
op, og det røde lys "PREHEATING"
(varmer op) begynder at lyse.
c) Giv grillen tid til at varme op.
7. Når grillen er varmet op til den valgte
temperatur, lyder der en alarm, og knap-
pen "PREHEATING" holde op med at lyse.
Knappen "READY" (klar) lyser nu.
8. Læg maden på den nederste varmeplade.
9. Brug håndtaget til at lukke den øverste
varmeplade. Den øverste varmeplade
har to funktioner, der er beregnet til
at optimere grillresultatet:
Justerbar øverste plade. Den øverste
varmeplade er hængslet, så den
øverste plade kan placeres vandret
i forhold til madens overade. Derved
sikres, at oversiden af maden grilles lige
så meget som undersiden. Det betyder
også, at den øverste plade kan placeres
lidt over madens overade, så der
udstråles varme til f.eks. at smelte ost
i en åben sandwich.
Justerbar højde. Denne funktion
reducerer vægten af den øverste plade
på sarte madvarer som f.eks. sk og
kan tilpasses forskellige tykkelser på
madvarer som f.eks. hjemmelavet brød.
I højre side af den øverste plade ndes
der en anordning, som fastholder den
øverste plade i en række forskellige
positioner over den nederste plade.
For at vælge en justerbar højde skal du
bruge håndtaget til at løfte den øverste
plade og samtidig ytte den justerbare
anordning til den ønskede højde. Sænk
derefter langsomt den øverste plade,
indtil den hviler på den justerbare
højdeanordning.
10. Når maden er grillet, skal du fjerne
den fra pladerne med redskaber
i varmebestandig plastic eller træ.
Sidan laddas...
Sidan laddas...
Sidan laddas...
Sidan laddas...
Sidan laddas...
Sidan laddas...
Sidan laddas...
Sidan laddas...
Sidan laddas...
Sidan laddas...
Sidan laddas...
Sidan laddas...
Sidan laddas...
Sidan laddas...
Sidan laddas...
Sidan laddas...
Sidan laddas...
Sidan laddas...
Sidan laddas...
Sidan laddas...
Sidan laddas...
Sidan laddas...
Sidan laddas...
Sidan laddas...
Sidan laddas...
Sidan laddas...
Sidan laddas...
Sidan laddas...
Sidan laddas...
Sidan laddas...
Sidan laddas...
Sidan laddas...
Sidan laddas...
Sidan laddas...
Sidan laddas...
Sidan laddas...
Sidan laddas...
Sidan laddas...
Sidan laddas...
Sidan laddas...
Sidan laddas...
Sidan laddas...
Sidan laddas...
Sidan laddas...
-
 1
1
-
 2
2
-
 3
3
-
 4
4
-
 5
5
-
 6
6
-
 7
7
-
 8
8
-
 9
9
-
 10
10
-
 11
11
-
 12
12
-
 13
13
-
 14
14
-
 15
15
-
 16
16
-
 17
17
-
 18
18
-
 19
19
-
 20
20
-
 21
21
-
 22
22
-
 23
23
-
 24
24
-
 25
25
-
 26
26
-
 27
27
-
 28
28
-
 29
29
-
 30
30
-
 31
31
-
 32
32
-
 33
33
-
 34
34
-
 35
35
-
 36
36
-
 37
37
-
 38
38
-
 39
39
-
 40
40
-
 41
41
-
 42
42
-
 43
43
-
 44
44
-
 45
45
-
 46
46
-
 47
47
-
 48
48
-
 49
49
-
 50
50
-
 51
51
-
 52
52
-
 53
53
-
 54
54
-
 55
55
-
 56
56
-
 57
57
-
 58
58
-
 59
59
-
 60
60
-
 61
61
-
 62
62
-
 63
63
-
 64
64


på andra språk
- eesti: Sage SGR700 Kasutusjuhend
- dansk: Sage SGR700 Brugervejledning