
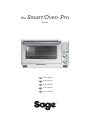
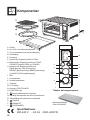
the Smart Oven® Pro
SOV820
EN QUICK GUIDE
DK QUICK GUIDE
SE QUICK GUIDE
NO QUICK GUIDE
FI KÄYTTÖOHJE

2
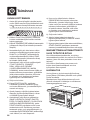
IMPORTANT
SAFEGUARDS
READ ALL INSTRUCTIONS
BEFORE USE AND SAVE
FOR FUTURE REFERENCE
• The full information
book is available at
sageappliances.com
• Before using for the rst
time please ensure that your
electricity supply is the same
as shown on the rating label on
the underside of the appliance.
• Remove and safely discard
any packing materials and
promotional labels before using
the oven for the rst time.
• To avoid choking hazard for
young children, remove and
safely dispose the protective
cover tted on the power plug.
• Do not use the appliance near
the edge of a benchtop or table.
Ensure the surface is stable,
level, heat-resistant and clean.
• A re may occur if the oven is
covered or touches ammable
material, including curtains,
draperies, walls, and the like,
when in operation.
• Do not use the appliance on
(or close to) a hot gas or electric
burner, or where it could touch
a heated oven or surface.
• Do not let the power cord hang
over the edge of a table or
counter, or touch hot surfaces.
Contents
SAGE®
RECOMMENDS
SAFETY FIRST
At Sage® we are very safety
conscious. We design and
manufacture consumer
products with the safety of
you, our valued customer,
foremost in mind. In addition
we ask that you exercise a
degree of care when using
any electrical appliance
and adhere to the following
precautions.
2 Sage® Recommends Safety First
6 Components
7 Quick Start Guide
8 Functions
10 Care & Cleaning
11 Troubleshooting
13 Guarantee

3
EN
• When operating the oven, keep
a minimum distance of 10cm
of space on both sides of the
appliance and 15cm above.
• The temperature of accessible
surfaces may be high when the
appliance is operating.
• Do not touch hot surfaces.
To avoid burns, use extreme
caution when removing pans,
dishes and accessories such
as the included grilling rack and
roasting pan, that contain hot
oil or other hot liquids.
• Do not lay cooking utensils,
roasting pans or dishes on the
glass door.
• Do not leave the door standing
open for extended periods
of time.
• Do not store any item on top
of the oven when in operation
except those described on
page 8 of this book.
• Do not place cardboard, plastic,
paper, or other ammable
materials in the oven.
• Do not cover crumb tray or any
part of the oven with metal foil.
This will cause overheating
of the oven.
• Caution should be exercised
when using pans and dishes
constructed of materials other
than metal. Ensure pans and
dishes are oven safe before
using in the oven.
• Caution should be exercised
when using lids in the oven, as
pressure build up in a covered
pan or dish may cause hot
ingredients to expel or the dish
to crack. Do not place sealed
or airtight containers in the oven.
• Oversized foods and metal
utensils must not be inserted
in the oven as they may create
re or risk of electric shock.
• The use of accessories and
attachments not recommended
or supplied with this oven may
cause injuries.
• This appliance is for household
use only. Do not use in any type
of moving vehicles. Do not use
the appliance outdoors, or for
anything other than its intended
use. Misuse can cause injury.
• If the appliance is to be: left
unattended, cleaned, moved,
assembled or stored, always
switch the unit o and unplug
the cord from the power outlet
and allow to cool completely.
• Do not clean with metal
scouring pads. Pieces can
break o the pad and touch
electrical parts, creating a risk
of electric shock.

4
• The appliance can be used
by children aged from 8 years
and above and persons with
reduced physical, sensory
or mental capabilities, or lack
of experience and knowledge,
if they have been given
supervision or instruction
concerning use of the appliance
in a safe way and understand
the hazards involved.
• Children shall not play with
the appliance.
• Cleaning and user maintenance
shall not be made by children
unless they are older than
8 and supervised.
• Keep the appliance and its cord
out of reach of children less
than 8 years.
• It is recommended to regularly
inspect the appliance. Do not
use the appliance if power
cord, power plug or appliance
becomes damaged in any way.
If damaged or maintenance
other than cleaning is
required, please contact Sage
Customer Service or go to
sageappliances.com
• The appliance is not intended
to be operated by means
of external timer or separate
remote control system.
SPECIFIC INSTRUCTIONS
FOR SOV820
• We recommend the oven
is operated on a dedicated
circuit separated from other
appliances. Consult a licensed
and qualied electrician if you
are unsure.
• To turn o the oven, press the
START/CANCEL button on
the control panel. The oven is
o when the button backlights
turns o.
• Regularly clean the crumb tray.
To clean the crumb tray:
−Turn OFF the oven,
−Allow the oven to cool
completely and then remove
the power cord from the power
outlet.
−Remove the crumb tray and
clean with warm soapy water.
−Dry the tray completely before
inserting it securely back
in place.

5
EN
WARNING
TO REDUCE THE RISK OF
FIRE, ELECTRIC SHOCK,
EXPOSURE TO EXCESSIVE
UV RADIATION, OR INJURY
TO PERSONS:
• Always unplug the oven and
let all parts (including the bulb
housing, glass cover and
enclosure) cool completely
before replacing bulb.
• Only use a 25 Watt, 220–240V,
G9 type oven bulb.
• Always use a soft cloth when
handling the bulb and do not
directly touch the surface as oil
from your skin can damage
the bulb.
• Do not look directly at
a glowing bulb.
• Do not remain in the light if skin
feels warm.
• Keep bulb away from materials
that may burn.
• The bulb gets hot quickly.
Only ever use the light button
to turn on the light.
• Do not operate the light if the
bulb housing, glass cover,
UV lter or enclosure are
missing or damaged.
The symbol shown
indicates that this appliance
should not be disposed
of in normal household waste.
It should be taken to a local
authority waste collection centre
designated for this purpose or
to a dealer providing this service.
For more information, please
contact your local council oce.
This symbol indicates,
temperature of accessible
surfaces may be high when
the appliance is operating
and for some time after use.
To avoid electric shock,
do not immerse the cord
or plug in water (or other liquids).
SAVE THESE INSTRUCTIONS

6
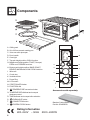
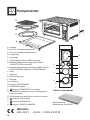
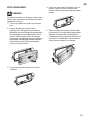
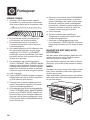
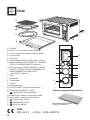
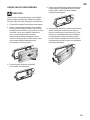
A. Grilling rack
B. 28 x 33.5cm enamel roasting pan
C. 30cm non-stick pizza pan
D. Door handle
E. Oven light
F. Top rack height position: GRILL function.
G. Middle rack height position: TOAST, Crumpet,
PIZZA and COOKIES functions.
H. Bottom rack height position: BAKE, ROAST,
REHEAT, WARM and SLOW COOK functions.
I. Wire rack
J. Crumb tray
K. Ventilation slots
L. Power Plug
M. LCD screen
N. START/CANCEL button
O. FUNCTION dial
P. TEMPERATURE conversion button
Q. TEMPERATURE dial/toast and crumpet
darkness control
R. TIME dial/toast and crumpet slice selection
S. OVEN LIGHT button
T. CONVECTION button
U. FROZEN FOODS button
M
N
S
T
U
O
P
Q
R
Bamboo Cutting Board
Part No: SOV800CB
Rating Information
220–240V ~ 50Hz 2000–2400W
Accessories sold separately:
Components

7
EN
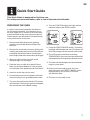
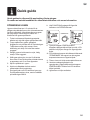
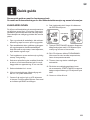
Quick Start Guide
This Quick Guide is designed for rst time use.
For safety and more information, refer to rest of the Instruction Booklet.
PREPARING THE OVEN
In order to remove any protective substances
on the heating elements, it is necessary to run
the oven empty for 15 minutes. Ensure the area
is well ventilated as the oven may emit vapours.
These vapours are safe and are not detrimental
to the performance of the oven.
1. Remove and safely discard any packing
material, promotional labels and tape from
the oven.
2. Remove the crumb tray, wire rack, grilling rack,
roasting pan and pizza pan from the polyfoam
packaging. Wash them with a soft sponge in
warm, soapy water then rinse and dry thoroughly.
3. Wipe the interior of the oven with a soft,
damp sponge. Dry thoroughly.
4. Place the oven on a at, dry surface. Ensure
there is a minimum distance of 10cm of space
on both sides of the appliance and 15cm above.
5. Insert the crumb tray into the oven.
6. Unwind the power cord completely and insert
the power plug in to a grounded power outlet.
7. The oven alert will sound and the LCD screen
will illuminate. The function options will appear
with an indicator on the BAKE setting.
8. Turn the FUNCTION dial to the right until the
indicator reaches the PIZZA function.
9. Press the START/CANCEL button. The button
backlight will illuminate red, the LCD screen will
illuminate orange and the oven alert will sound.
10. The LCD screen will indicate a blinking
‘PREHEATING.’ Once the oven has reached the
set temperature, the temperature alert will sound.
11. The timer will be displayed and automatically
begin to count down.
12. At the end of the cooking cycle, the oven
alert will sound, the START/ CANCEL button
backlight will go out and the LCD screen
will illuminate blue.
13. The oven is now ready to use.

8
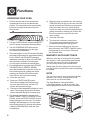
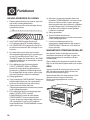
Functions
OPERATING YOUR OVEN
1. Position the wire rack so the spokes face
upward and insert it into the desired rack
position. The rack positions are conveniently
printed on the right-hand side of the oven
door window.
2. Turn the FUNCTION dial until the indicator on
the LCD screen reaches the desired setting.
3. Turn the TEMPERATURE dial to the left
to reduce the temperature or to the right
to increase the temperature.
4. The bottom gure on the LCD screen indicates
the preset cooking time for the selected setting.
For the TOAST and CRUMPET settings it
indicates the number of slices. Turn the TIME
dial to the left to reduce the cooking time
or to the right to increase the cooking time.
5. For settings without a preheat cycle (TOAST,
CRUMPET, GRILL, REHEAT, WARM),
place the food directly on the wire rack or on
the included pizza pan, grilling rack and/or
roasting pan. Ensure the food is centred
in the oven for the most even cooking.
a) Close the oven door.
b) Press the START/CANCEL button.
The button backlight will illuminate red,
the oven alert will sound, and the LCD
screen will illuminate orange.
c) The timer will be displayed and begin to count
down. The cooking temperature and time
can be adjusted during the cooking cycle.
6. For settings that feature a preheat cycle
(BAKE, ROAST, PIZZA, COOKIES, SLOW
COOK), press the START/CANCEL button
before placing food in the oven. The button
backlight will illuminate red, the oven alert
will sound and the LCD screen will indicate
a blinking ‘PREHEATING’ while the oven
is heating up.
a) When the oven is ready for use, the blinking
‘PREHEATING’ will go out, the oven alert will
sound and the timer will start counting down.
Place the food in the oven, either directly
on the wire rack or on the included pizza pan,
grilling rack and/or roasting pan. Ensure the
food is centred in the oven for the most
even cooking.
b) Close the oven door.
c) The timer will continue to count down.
The cooking temperature and time can
be adjusted during the cooking cycle.
7. At the end of the cooking cycle, the oven
alert will sound, the START/ CANCEL button
backlight will go out and the LCD screen
will illuminate blue.
MAGNETIC AUTO-EJECT RACK
When the wire rack is inserted into the middle
rack position, it will automatically eject halfway
out of the oven when the door is opened so
you can easily remove your toasted items.
Always open the door slowly when the wire rack
is in this position to prevent the rack from ejecting
too quickly.
NOTE
The top of the oven is very hot during and after
operation. As a result, storing items on top
of the oven is not recommended.
The Sage Bamboo Cutting Board ts
in the ribbed section on top of the oven. Visit
www.sageappliances.com for more information.

9
EN
Always unplug oven and let cool before replacing
bulb. Only use a 25-Watt, 220–240V, G9 type
oven bulb.
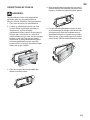
1. Remove the wire rack from the oven before
replacing the light.
2. The light is positioned on the left-hand side
of the oven cavity. Position your ngers on the
outside of the light housing and gently pull the
glass cover away from the oven wall to remove
it. If you are unable to pull the cover o, slide
a spoon into the left side of the light housing
and gently lever the glass cover o. Always
hold the glass cover with the other hand to
prevent the cover from falling and breaking.
3. Remove the used bulb by pulling it directly out
of its holder.
4. Use a soft cloth to insert the new bulb.
Do not directly touch the surface of the bulb
with your ngers as oil from your skin can
damage the bulb.
1. To reattach the glass cover, align the metal
hook with the left side of the light housing.
Slide the opposite end of the glass cover into
the metal bracket on the right side of the housing,
then push the metal hook into the left side of the
housing until it snaps securely into position.
REPLACING THE OVEN LIGHT
WARNING

10
Before cleaning, ensure the oven is turned o by
pressing the START/CANCEL button on the control
panel. The oven is o when the button backlight is
no longer illuminated.
Remove the power plug from the power outlet.
Allow the oven and all accessories to cool
completely before disassembling and cleaning.
CLEANING THE OUTER BODY
AND DOOR
1. Wipe the outer body with a soft, damp sponge.
A non-abrasive liquid cleanser or mild spray
solution may be used to avoid build-up of stains.
Apply the cleanser to the sponge, not the oven
surface, before cleaning.
2. To clean the glass door, use a glass cleaner
or mild detergent and a soft, damp sponge or
soft plastic scouring pad. Do not use an abrasive
cleanser or metal scouring pad as these will
scratch the oven surface.
3. Wipe the LCD screen with a soft damp cloth.
Apply cleanser to the cloth and not the LCD
surface. Cleaning with dry cloth or abrasive
cleaners may scratch the surface.
4. Let all surfaces dry thoroughly prior to inserting
the power plug into a power outlet and turning
the oven on.
CLEANING THE INTERIOR
1. The walls on the inside of the oven feature
a non-stick coating for easy cleaning. To clean
any spattering that may occur while cooking,
wipe the walls with a soft, damp sponge.
A non-abrasive liquid cleanser or mild spray
solution may be used to avoid build-up
of stains. Apply the cleanser to the sponge,
not the oven surface, before cleaning.
Avoid touching the quartz heating elements.
WARNING
Use extreme caution when cleaning the quartz
heating elements. Allow the oven to cool completely,
then gently rub a soft, damp sponge or cloth along
the length of the heating element. Do not use any
type of cleanser or cleaning agent. Let all surfaces
dry thoroughly prior to inserting the power plug into
a power outlet and turning the oven on.
2. Let all surfaces dry thoroughly prior to inserting
the power plug into a power outlet and turning
the oven on.
CLEANING THE CRUMB TRAY
1. After each use, slide out the crumb tray
and discard crumbs. Wipe the tray with a soft,
damp sponge. A non-abrasive liquid cleanser
may be used to avoid build-up of stains.
Apply the cleanser to the sponge, not the tray,
before cleaning. Dry thoroughly.
2. To remove baked-on grease, soak the tray
in warm soapy water then wash with a soft
sponge or soft plastic scouring pad.
Rinse and dry thoroughly.
3. Always ensure to re-insert the crumb tray into
the oven after cleaning and prior to inserting
the power plug into a power outlet and turning
the oven on.
CLEANING THE WIRE RACK,
GRILLING RACK, ROASTING PAN
AND PIZZA PAN
1. Wash all accessories in warm soapy water
with a soft sponge or soft plastic scouring pad.
Rinse and dry thoroughly. Do not use abrasive
cleansers, metal scouring pads or metal utensils
to clean any of the accessories as they may
damage the surfaces.
2. To extend the life of your accessories,
we do not recommend that these be placed
in the dishwasher.
STORAGE
1. Ensure the oven is turned o by pressing the
START/CANCEL button on the control panel.
The oven is o when the button backlight
is no longer illuminated.
2. Remove the power plug from the power outlet.
Allow the oven and all accessories to cool
completely before disassembling and cleaning
3. Ensure the oven and all accessories are clean
and dry.
4. Ensure the crumb tray is inserted into the oven;
the grilling rack is inserted into the roasting pan
and resting on the wire rack in the middle rack
height position.
5. Ensure the door is closed.
6. Store the appliance in an upright position
standing level on its support legs. Do not
store anything on top. The only exception
is the optional Sage Bamboo Cutting Board
and Serving Tray.
Care & Cleaning

11
EN
POSSIBLE PROBLEM EASY SOLUTION
Oven will not switch “ON.” • Check that the power plug is securely inserted into the outlet.
• Insert the power plug into an independent outlet.
• Insert the power plug into a dierent outlet.
• Reset the circuit breaker if necessary.
I would like to have the oven
LCD default settings back. • The oven will remember the last setting used for each function
unless you remove the plug from the power outlet.
• To restore the oven’s default settings for each function, remove
the plug from the power outlet. Wait 5 seconds, then plug back in.
The LCD display light has
gone out. • The oven goes into standby mode if not used for 10 minutes.
When in standby mode, the LCD screen will cease to illuminate,
however all function options will still be visible.
• To re-activate the oven out of standby mode, press the
START/CANCEL button on the control panel, or turn any dial.
The LCD screen will re-illuminate.
The pizza does not cook
evenly. • Some large pizzas may brown unevenly in compact ovens.
Open the oven door half way through the cooking time
and turn the pizza 90 degrees for more even darkness.
The Magnetic Auto-Rack
Eject comes out too far
when I open the door.
• Always open the door slowly and in a controlled manner when
the wire rack is inserted into the middle rack height position
to prevent the wire rack from ejecting too quickly.
I cannot select the FROZEN
FOODS button. • The FROZEN FOODS button is only selectable during the TOAST,
CRUMPET, PIZZA and COOKIES functions.
Steam is coming out from
the top of the oven door. • This is normal. The door is vented to release steam created
from high-moisture content foods such as frozen breads.
The heating elements
appear to be pulsing. • Element IQ™ accurately controls the heat inside the oven
by pulsing the power in the heating elements in short bursts.
This is normal.
Water is dripping onto the
bench top from under door. • This is normal. The condensation created from high moisture
content foods such as frozen breads will run down the inside
of the door and can drip onto the bench top.
The temperature reading
on the LCD screen doesn’t
match the temperature
measured inside the oven.
• To ensure the measurements are standardized, the oven
temperatures have been calibrated in the TOAST position (centre
of the middle rack with no tray in place). Re-check the temperature
in this position, ensuring not to open the oven door for 10 minutes
as heat will escape each time the door is opened. Note that the
‘preheat’ alert sounds at 75% of the target temperature.
Troubleshooting

12
POSSIBLE PROBLEM EASY SOLUTION
The ‘preheat’ alert sounds
at a lower temperature than
what is displayed on the
LCD screen.
• The ‘preheat’ alert sounds at 75% of the target temperature.
This provides the fastest, combined preheating and cooking time.
• This is because when the ‘preheating’ alert sounds, signalling
the user to open the oven door and insert food, there is dramatic
temperature loss inside the oven. If the alert sounded at 100%
of the target temperature, opening the door would mean a lot of
this waiting time is “wasted.” We have calculated that by sounding
the alert at 75% of the target temperature, followed by the oven
door being opened to place food inside the oven, that we still
recover to the target temperature up to 2 minutes faster. This
is why the temperature on the LCD screen does not match the
target temperature at the ‘preheat’ alert. In total, it takes the oven
approximately 8–10 minutes from start-up, including opening the
oven door when the ‘preheat’ alert sounds, to reach the target
temperature. To ensure the fastest heat up time, the Sage oven uses
the maximum allowable power from the outlet (1500W for baking,
2400W for toasting).
The LCD screen displays
‘E01.’ • The LCD screen will display ‘E01’ when there is a non-resettable
issue with the appliance. Should this occur, immediately remove the
power cord from the power outlet and call Sage Customer Service.
The LCD screen displays
‘E02.’ • The LCD screen will display ‘E02’ when there is a non-resettable
issue with the appliance. Should this occur, immediately remove the
power cord from the power outlet and call Sage Customer Service.
The LCD screen displays
‘E03.’ • The LCD screen will display ‘E03’ if the oven temperature is above
the set maximum limit. Remove the plug from the power outlet,
allow the oven to cool for 15 minutes, then plug back in.
• Call Sage Customer Service if the ‘E03’ message continues.
The LCD screen displays
‘E04.’ • The LCD screen will display ‘E04’ if the room temperature is below
the set minimum. Unplug the oven and relocate to a warmer area.
The LCD screen displays
‘E05.’ • The LCD screen will display ‘E05’ when there is a non-resettable
issue with the appliance. Should this occur, immediately remove the
power cord from the power outlet and call Sage Customer Service.

13
EN
2 YEAR LIMITED GUARANTEE
Sage Appliances guarantees this product for
domestic use in specied territories for 2 years
from the date of purchase against defects caused
by faulty workmanship and materials. During this
guarantee period Sage Appliances will repair,
replace, or refund any defective product (at the
sole discretion of Sage Appliances).
All legal warranty rights under applicable
national legislation will be respected and will
not be impaired by our guarantee. For full terms
and conditions on the guarantee, as well as
instructions on how to make a claim, please
visit www.sageappliances.com.
Guarantee

14
Notes

15
EN
Notes

16
VIGTIGE SIKKER-
HEDSOPLYSNINGER
LÆS HELE
BRUGSANVISNINGEN,
FØR APPARATET
TAGES I BRUG, OG GEM
BRUGSANVISNINGEN
• Samtlige oplysninger
om produktet ndes på
sageappliances.com
• Før apparatet tages i brug
første gang, skal du sikre, at din
elforsyning er den samme som
vist på mærkaten i bunden af
apparatet.
• Alt indpakningsmateriale og alle
reklameetiketter skal fjernes og
bortskaes, før apparatet tages
i brug.
• Bortskaf beskyttelsesind-
pakningen omkring stikket på
forsvarlig vis, da børn kan
blive kvalt, hvis de putter det
i munden.
• Anvend ikke apparatet, når
det står tæt på kanten af en
bænk eller et bord. Sørg for,
at overaden er stabil, vandret,
varmeresistent og ren.
• Der kan opstå brand, hvis ovnen
dækkes til eller kommer i kontakt
med brændbare materialer,
herunder gardiner, tekstiler,
vægge osv., mens den bruges.
• Placer ikke apparatet på (eller
tæt på) et varmt gas- eller
elektrisk komfur, eller hvor det
Indhold
SAGE®
ANBEFALER
SIKKERHED
FREM FOR ALT
Hos Sage® er vi meget
sikkerhedsbevidste. Når
vi designer og producerer
forbrugerprodukter, er det
først og fremmest med
brugernes sikkerhed for øje.
Derudover beder vi om, at du
udviser varsomhed, når du
bruger et elektrisk apparat
og overholder de følgende
forholdsregler.
16 Sage® anbefaler sikkerhed frem for alt
20 Komponenter
21 Quick guide
22 Funktioner
24 Vedligeholdelse og rengøring
26 Fejlnding
28 Garanti

17
DK
kan komme i berøring med en
opvarmet ovn eller overade.
• Sørg for, at ledningen ikke
hænger ud over kanten af et
bord eller en disk, og at den ikke
rører ved varme overader.
• Når man betjener ovnen, skal
man sørge for, at der mindst
10 cm luft på begge sider af
apparatet og 15 cm ovenover.
• Temperaturen på overader,
man kan komme i kontakt med,
kan være høj, når apparatet
er i brug.
• Rør ikke ved varme overader.
For at undgå forbrændinger skal
man udvise stor forsigtighed,
når man fjerner pander, fade og
tilbehør som den medfølgende
rist og bradepanden, der
indeholder varm olie eller
andre varme væsker.
• Læg ikke madlavningsred-
skaber, bradepander eller
fade på glasdøren.
• Efterlad ikke ovnen åben
i længere tid af gangen.
• Opbevar ikke nogen genstande
oven på ovnen, når den er
i brug, undtagen dem, der er
beskrevet på side 22 i denne
bog.
• Placer ikke pap, plastik,
papir eller andre brændbare
materialer i ovnen.
• Dæk ikke krummebakken eller
nogen del af ovnen til med
metalfolie. Det vil få ovnen til at
overophede.
• Der skal udvises forsigtighed,
når man anvender pander
og fade, der er lavet af andre
materialer end metal. Brug kun
ovnfaste at pander og fade
i ovnen.
• Der bør udvises forsigtighed ved
tildækning af pander og fade
med låg, når de bruges i ovnen,
da højt tryk i tildækkede pander
eller fade kan få indholdet til
at løbe over eller få fadet til at
revne. Placer ikke forseglede
eller lufttætte beholdere i ovnen.
• Meget store madvarer eller
metalredskaber må ikke
indføres i ovnen, da det vil
kunne forårsage brand eller
give elektrisk stød.
• Brug af tilbehør eller påmonte-
rede anordninger, der frarådes
eller ikke medfølger til ovnen,
kan forårsage skader.
• Dette apparat er kun til brug
i husstanden. Brug ikke
apparatet i noget som helst
transportmiddel i bevægelse.
Brug ikke apparatet udendørs
eller til andet end det tiltænkte
formål. Forkert brug kan
medføre skade.
• Hvis apparatet skal efterlades
uden opsyn, rengøres, yttes,
samles eller opmagasineres,
så skal enheden slukkes,
og ledningen tages ud af stikket
i væggen, for så at køle helt af.
• Brug ikke metalskuresvampe til
rengøring af apparatet. Stykker
kan falde af svampen og komme

18
i berøring med elektriske dele,
og der opstår risiko for elektrisk
stød.
• Apparatet er ikke beregnet til
brug af personer med nedsatte
fysiske, sensoriske eller
mentale evner, manglende
erfaring og viden, eller af børn –
medmindre de er blevet vejledt
og givet brugsanvisninger af en
person med ansvar for deres
sikkerhed.
• Børn må ikke lege med
apparatet.
• Rengøring og vedligeholdelse
må ikke foretages af børn,
medmindre de er over 8 år og
under opsyn.
• Apparatet og dets ledning skal
være uden for rækkevidde for
børn under 8 år.
• Det anbefales at kontrollere
apparatet regelmæssigt.
Brug ikke apparatet, hvis
strømledningen, stikket eller
selve apparatet på nogen
måde bliver beskadiget. Hvis
apparatet eller tilbehøret bliver
beskadiget, eller der kræves
anden vedligeholdelse end
blot rengøring, skal du kontakte
Sages kundeservice eller gå
ind på sageappliances.com
• Apparatet er ikke beregnet til
brug med ekstern timer eller et
separat fjernstyringssystem.
SPECIFIKKE INSTRUKTIONER
FOR SOV820
• Vi anbefaler, at ovnen anvendes
i et dedikeret kredsløb, der er
adskilt fra andre apparater.
Rådfør med en certiceret og
kvaliceret elektriker, hvis du er
usikker.
• Sluk ovnen ved at trykke på
START/CANCEL-knappen
på kontrolpanelet. Ovnen
er slukket, når knappernes
baggrundslys er slukket.
• Rengør krummebakken
regelmæssigt. Sådan rengøres
krummebakken:
−Sluk ovnen.
−Lad ovnen køle helt af,
og tag strømstikket ud af
stikkontakten.
−Fjern krummebakken,
og rengør den med varmt
sæbevand.
−Tør bakken helt af, før den
sættes sikkert tilbage på
plads.

19
DK
ADVARSEL
FOR AT MINDSKE RISIKOEN
FOR BRAND, ELEKTRISK
STØD, FOR MEGET
UV-STRÅLING ELLER
PERSONSKADER:
• Tag altid ovnen ud af
stikket, og lad alle dele
(herunder pærens hus,
glasafskærmningen og
rummet) køle helt ned, før
pæren udskiftes.
• Brug kun 25 watt, 220-240 V,
G9-type ovnpære.
• Anvend altid et blødt klæde til
at håndtere pæren, og rør ikke
direkte ved overaden, da olier
fra huden kan skade pæren.
• Se ikke direkte på en lysende
pære.
• Bliv ikke i lyset, hvis huden
føles varm.
• Hold pæren væk fra brændbare
materialer.
• Pæren bliver hurtigt varm.
Brug kun lysknappen til at
tænde lyset.
• Anvend ikke lyset, hvis pærens
hus, glasafskærmningen,
UV-lteret eller rummet mangler
eller er beskadiget.
Det viste symbol angiver,
at dette apparat ikke må
bortskaes sammen med
almindeligt husholdningsaald.
Apparatet skal aeveres på en
lokal genbrugsstation eller hos en
forhandler, som tilbyder denne
service. Kontakt de lokale
myndigheder for at få yderligere
oplysninger.
Dette symbol indikerer,
at temperaturen på overader,
man kan komme i kontakt med,
kan være høj, når apparatet er
i brug og i noget tid efter brug.
For at undgå elektrisk stød
må hverken stikket eller
ledningen nedsænkes i vand eller
andre væsker.
GEM DISSE INSTRUKTIONER

20
A. Grillrist
B. 28 x 33,5 cm emaljeret bradepande
C. 30 cm pizzapande med slip-let-belægning
D. Dørhåndtag
E. Ovnlampe
F. Øverste rille: Bruges til funktionen GRILL
G. Midterste rille: Bruges til funktionerne TOAST,
CRUMPET (tebrød), PIZZA og COOKIES.
H. Nederste rille: Bruges til funktionerne
BAKE (bagning), ROAST (stegning),
REHEAT (genopvarmning), WARM (opvarmning)
og SLOW COOK (langtidsstegning).
I. Rist
J. Krummebakke
K. Ventilationssprækker
L. Strømstik
M. LCD-display
N. Knappen START/CANCEL
O. FUNCTION-knap
P. Valg af måleenhed for temperatur
Q. Indstilling af temperatur eller farve af toast/tebrød
R. Tidsindstilling eller antal skiver toast/tebrød
S. OVNLYS
T. VARMLUFT
U. FROSTVARER
M
N
S
T
U
O
P
Q
R
Bambusskærebræt
Delnr. SOV800CB
Specikationer
220-240 V ~ 50 Hz 2000-2400 W
Tilbehør, der sælges separat:
Komponenter
Sidan laddas ...
Sidan laddas ...
Sidan laddas ...
Sidan laddas ...
Sidan laddas ...
Sidan laddas ...
Sidan laddas ...
Sidan laddas ...
Sidan laddas ...
Sidan laddas ...
Sidan laddas ...
Sidan laddas ...
Sidan laddas ...
Sidan laddas ...
Sidan laddas ...
Sidan laddas ...
Sidan laddas ...
Sidan laddas ...
Sidan laddas ...
Sidan laddas ...
Sidan laddas ...
Sidan laddas ...
Sidan laddas ...
Sidan laddas ...
Sidan laddas ...
Sidan laddas ...
Sidan laddas ...
Sidan laddas ...
Sidan laddas ...
Sidan laddas ...
Sidan laddas ...
Sidan laddas ...
Sidan laddas ...
Sidan laddas ...
Sidan laddas ...
Sidan laddas ...
Sidan laddas ...
Sidan laddas ...
Sidan laddas ...
Sidan laddas ...
Sidan laddas ...
Sidan laddas ...
Sidan laddas ...
Sidan laddas ...
Sidan laddas ...
Sidan laddas ...
Sidan laddas ...
Sidan laddas ...
Sidan laddas ...
Sidan laddas ...
Sidan laddas ...
Sidan laddas ...
-
 1
1
-
 2
2
-
 3
3
-
 4
4
-
 5
5
-
 6
6
-
 7
7
-
 8
8
-
 9
9
-
 10
10
-
 11
11
-
 12
12
-
 13
13
-
 14
14
-
 15
15
-
 16
16
-
 17
17
-
 18
18
-
 19
19
-
 20
20
-
 21
21
-
 22
22
-
 23
23
-
 24
24
-
 25
25
-
 26
26
-
 27
27
-
 28
28
-
 29
29
-
 30
30
-
 31
31
-
 32
32
-
 33
33
-
 34
34
-
 35
35
-
 36
36
-
 37
37
-
 38
38
-
 39
39
-
 40
40
-
 41
41
-
 42
42
-
 43
43
-
 44
44
-
 45
45
-
 46
46
-
 47
47
-
 48
48
-
 49
49
-
 50
50
-
 51
51
-
 52
52
-
 53
53
-
 54
54
-
 55
55
-
 56
56
-
 57
57
-
 58
58
-
 59
59
-
 60
60
-
 61
61
-
 62
62
-
 63
63
-
 64
64
-
 65
65
-
 66
66
-
 67
67
-
 68
68
-
 69
69
-
 70
70
-
 71
71
-
 72
72


på andra språk
- eesti: Sage SOV820 Kasutusjuhend
- English: Sage SOV820 User guide
- dansk: Sage SOV820 Brugervejledning
Relaterade papper
Andra dokument
-
 POINT POSM5000 3-IN-1 SANDWICHGRILL Bruksanvisning
-
Samsung NV75T8879RK Bruksanvisning
-
Samsung NV75T9979CD Bruksanvisning
-
Samsung NV68R3572RS/EE Bruksanvisning
-
-
-
-
Samsung NV70M3372BS Användarmanual
-
-
