SEVERIN INOX JG3521 7 POTS Bruksanvisning
- Kategori
- Leksaker
- Typ
- Bruksanvisning

DE Gebrauchsanweisung
GB Instructions for use
FR Mode d’emploi
NL Gebruiksaanwijzing
ES Instrucciones de uso
IT Manuale d’uso
DK Brugsanvisning
SE Bruksanvisning
FI Käyttöohje
PT Manual de instruções
PL Instrukcja obsługi
GR Oδηγίες χρήσεως
ART.-NO. JG 3521
Digitaler Joghurtbereiter 4
Digital yoghurt maker 12
Yaourtière numérique 20
Digitale yoghurtmaker 28
Yogurtera digital 36
Yogurtiera digitale 44
Digital Yoghurtmaskine 52
Digital yoghurtmaskin 59
Digitaalinen jogurttikone 66
Iogurteira digital 74
Cyfrowa jogurtownica 82
Ψηφιακός παρασκευαστής γιαουρτιού 91
104 x 142 mm

2
104 x 142 mm
Liebe Kundin, lieber Kunde,
wir wünschen Ihnen mit dem Qualitätsprodukt aus dem Hause
SEVERIN viel Freude und bedanken uns für Ihr Vertrauen.
Die Marke SEVERIN steht seit über 120 Jahren für Beständigkeit,
deutsche Qualität und Entwicklungskraft. Jedes Gerät wurde mit
Sorgfalt hergestellt und geprüft.
Mit der sprichwörtlichen Sauerländer Gründlichkeit, Genauigkeit und
Ehrlichkeit überzeugt das Familienunternehmen aus Sundern seit der
Gründung 1892 mit innovativen Produkten Kunden in aller Welt.
In den sieben Produktgruppen Kaffee, Frühstück, Küche, Grillen,
Haushalt, Personal Care und Kühlen & Gefrieren bietet SEVERIN mit
über 250 Produkten ein umfassendes Elektrokleingeräte-Sortiment.
Für jeden Anlass das richtige Produkt!
Lernen Sie die SEVERIN-Produktvielfalt kennen und besuchen Sie uns
unter www.severin.de oder www.severin.com.
Ihre
Geschäftsleitung und Mitarbeiter
der SEVERIN Elektrogeräte GmbH

104 x 142 mm
3
1
2
3
5
4
6
7

4
104 x 142 mm
Digitaler Joghurtbereiter
Liebe Kundin, lieber Kunde,
die Gebrauchsanweisung sorgfältig vor
der Benutzung des Gerätes durchlesen
und für den weiteren Gebrauch
aufbewahren. Das Gerät darf nur von
Personen benutzt werden, die mit den
Sicherheitsanweisungen vertraut sind.
Anschluss
Das Gerät nur an eine vorschriftsmäßig
installierte Schutzkontaktsteckdose
anschließen.
Die Netzspannung muss der auf dem
Typenschild des Gerätes angegebenen
Spannung entsprechen.
Das Gerät entspricht den Richtlinien, die für
die CE-Kennzeichnung verbindlich sind.
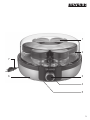
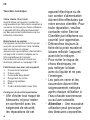
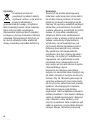
Aufbau
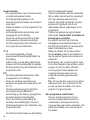
1. Gerätedeckel
2. Gläser
3. Easy Select Button
4. Kabelaufwicklung
5. Typenschild
6. Gerätebasis
7. Anschlussleitung mit Netzstecker
Sicherheitshinweise
∙ Um Gefährdungen zu
vermeiden und um
Sicherheitsbestimmungen
einzuhalten, dürfen
Reparaturen am Gerät und
an der Anschlussleitung
nur durch unseren
Kundendienst durchgeführt
werden. Daher im
Reparaturfall unseren
Kundendienst telefonisch
oder per Mail kontaktieren
(siehe Anhang).
∙ Vor jeder Reinigung den
Netzstecker ziehen und das
Gerät abkühlen lassen.
∙ Die Gerätebasis darf aus
Gründen der elektrischen
Sicherheit nicht mit
Flüssigkeiten behandelt
oder gar darin eingetaucht
werden.
∙ Die Gläser und die Deckel
nach jedem Gebrauch im
Spülwasser oder in der
DE

104 x 142 mm
5
Spülmaschine reinigen.
∙ Vorsicht! Eine
Fehlanwendung des
Gerätes kann zu
Verletzungen führen.
∙ Achtung! Das Gerät ist
während und nach dem
Betrieb warm!
∙ Das Gerät ist dazu
bestimmt, im Haushalt und
ähnlichen Anwendungen
verwendet zu werden, wie
z.B.
- in Küchen für
Mitarbeiter in Läden,
Büros und ähnlichen
Arbeitsumgebungen,
- in landwirtschaftlichen
Betrieben,
- von Kunden in
Hotels, Motels und
weiteren typischen
Wohnumgebungen,
- in Frühstückspensionen.
∙ Das Gerät kann von
Kindern ab 3 Jahren
sowie von Personen mit
reduzierten physischen,
sensorischen oder
mentalen Fähigkeiten
oder Mangel an Erfahrung
und/oder Wissen benutzt
werden, wenn sie
beaufsichtigt werden oder
bezüglich des sicheren
Gebrauchs des Gerätes
unterwiesen wurden und
die daraus resultierenden
Gefahren verstanden
haben.
∙ Kinder dürfen nicht mit dem
Gerät spielen.
∙ Reinigung und Benutzer-
Wartung dürfen nicht
durch Kinder durchgeführt
werden, es sei denn sie
sind 8 Jahre und älter und
werden beaufsichtigt.
∙ Kinder jünger als 3 Jahre
sind vom Gerät und
der Anschlussleitung
fernzuhalten.

6
104 x 142 mm
∙ Verpackungsmaterial von Kindern
fernhalten. Es besteht unter anderem
Erstickungsgefahr!
∙ Vor der Inbetriebnahme das komplette
Gerät inkl. Anschlussleitung und
eventueller Zubehörteile auf Mängel
und Beschädigungen überprüfen, die
die Funktionssicherheit des Gerätes
beeinträchtigen könnten. Falls das
Gerät z.B. zu Boden gefallen ist oder an
der Anschlussleitung gezogen wurde,
können von außen nicht erkennbare
Schäden vorliegen. In diesen Fällen das
Gerät nicht in Betrieb nehmen.
∙ Das Gerät auf eine ebene rutschfeste
und wasserunempndliche Fläche
stellen.
∙ Weder das Gehäuse noch die
Anschlussleitung dürfen einer heißen
Kochplatte oder offenem Feuer zu nahe
kommen.
∙ Den Netzstecker ziehen,
- bei Störungen während des
Betriebes,
- nach jedem Gebrauch,
- vor jeder Reinigung.
∙ Den Netzstecker nicht an der
Anschlussleitung aus der Steckdose
ziehen. Die Anschlussleitung nicht
herunterhängen lassen.
∙ Wird das Gerät falsch bedient, oder
zweckentfremdet verwendet, kann keine
Haftung für evtl. auftretende Schäden
übernommen werden.
Vor der ersten Inbetriebnahme
∙ Die Einzelteile vor der ersten
Inbetriebnahme wie unter Reinigung und
Pege angegeben reinigen.
Zutaten vorbereiten
∙ Für die Joghurt-Zubereitung sind Milch
und zum Auslösen des Fermentierungs-
Vorgangs ein frischer Naturjoghurt (nicht
wärmebehandelt und ohne Zusatz von
Obst oder Fruchtsaft) erforderlich.
∙ Anstelle des frischen Joghurts kann
auch Joghurt-Pulver verwendet werden.
∙ Grundsätzlich lässt sich jede Art von
Kuhmilch verwenden. Am besten eignet
sich ultrahocherhitzte, homogenisierte
Milch (H-Milch). Jede andere Milch
sollte kurzzeitig auf ca. 90 °C (kurz vor
dem Kochen) erhitzt und wieder auf
unter 40 °C abgekühlt werden. Höhere
Temperaturen könnten die Joghurt-
Kulturen zerstören.
∙ Veganer Joghurt kann aus Soja- oder
Kokosmilch hergestellt werden. Hafer-
und Mandelmilch eignen sich nicht.
Tipp!
∙ Joghurt aus Panzenmilch wird eher
cremig und nicht stichfest. Falls
gewünscht, empfehlen wir daher den
Zusatz von Stärke (1-2 Esslöffel pro
1 l Milch). Dazu bitte die Hinweise zur
Zubereitung im Rezeptteil beachten.
∙ Je nach persönlichem Geschmack
kann die benötigte Menge an Stärke
variieren.

104 x 142 mm
7
Portionsgläser vorbereiten
∙ Die Portionsgläser müssen sauber und
trocken sein.
∙ Pro Portionsglas werden 1 bis 2
Teelöffel Naturjoghurt benötigt.
∙ Bei der Verwendung von Joghurt-Pulver
das Pulver nach den Angaben des
Herstellers verwenden.
∙ Die Füllmenge der Portionsgläser
beträgt ca. 150 ml.
∙ Tipp!
Die Milch und die Startkultur aus
Joghurt bzw. Pulver sollten etwa
die gleiche Temperatur haben. Wir
empfehlen Zimmertemperatur.
∙ Gegebenenfalls die Milch kurzzeitig auf
90 °C erhitzen und wieder auf unter
40 °C abkühlen lassen.
∙ Die Zutaten in ein Gefäß füllen und
gründlich, aber vorsichtig verrühren.
∙ Die Mischung gleichmäßig auf die
Portionsgläser verteilen.
∙ Die Deckel aufsetzen und zuschrauben
Easy Select Button
Mithilfe des Easy Select Buttons kann
das Gerät ein- und ausgeschaltet und die
verschiedenen Programme ausgewählt
werden:
Kurz drücken: zum Einschalten &
Bestätigen eines Programms
Lang drücken: zum Abbrechen eines
Programms und um das Gerät in den Sleep
Modus zu versetzen
Drehen:
∙ zum Auswählen des Programms
∙ zum Ändern der Zubereitungszeit
∙ bei P6 zum Auswählen von Temperatur
und Zubereitungszeit
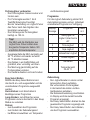
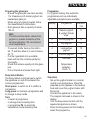
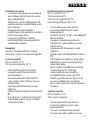
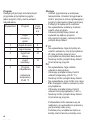
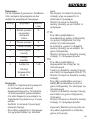
Programme
Für die Joghurt-Zubereitung stehen fünf
Automatikprogramme und ein individuell
einstellbares Programm zur Verfügung.
Display-
Anzeige
Programm Dauer
in h
1 Naturjoghurt &
Joghurt ‚Griechische
Art‘
8
2 Trink-Joghurt 8
3 Soja-Joghurt 10
4 laktosefreier Joghurt 10
5 Kokos-Joghurt 10
6 Individuell
Temperaturwahl
35-45 °C
1-24
Zubereitung
∙ Den Joghurtbereiter in einem normal
temperierten Raum aufstellen.
Die vorbereiteten Portionsgläser
in die Heizschale stellen und den
Gerätedeckel aufsetzen.
∙ Die Netzanschlussleitung anschließen.
∙ Im Display wird das zuletzt benutzte
Programm angezeigt.
∙ Den Easy Select Button drehen bis das
gewünschte Programm angezeigt wird.
∙ Den Easy Select Button kurz drücken,
um das Programm auszuwählen.

8
104 x 142 mm
P 1-5
∙ Im Display blinkt die voreingestellte
bzw. die zuletzt ausgewählte
Zubereitungszeit.
∙ Bei Bedarf den Easy Select Button
drehen und die Zubereitungszeit ändern.
∙ Den Easy Select Button kurz drücken.
Das Programm startet.
P 6
∙ Im Display blinkt die zuletzt ausgewählte
Temperatur.
∙ Den Easy Select Button drehen und die
Temperatur (35-45 °C) auswählen.
∙ Den Easy Select Button kurz drücken.
∙ Im Display blinkt kurz P6 und dann die
zuletzt ausgewählte Zubereitungszeit.
∙ Den Easy Select Button drehen und die
Zubereitungszeit (1-24 h) auswählen.
∙ Den Easy Select Button kurz drücken.
Das Programm startet.
∙ Der Leuchtring leuchtet blau und im
Display wird die Restlaufzeit angezeigt.
∙ Während der Zubereitung kann
die Restlaufzeit durch Drehen
des Easy Select Buttons jederzeit
verändert werden. Die so eingestellte
Gesamtlaufzeit wird im Programm für
zukünftige Anwendungen gespeichert.
∙ Während der Zubereitung den
Joghurtbereiter ruhig stehen lassen.
Dabei kalte Zugluft, Erschütterungen
und Bewegungen vermeiden.
∙ Der Joghurt ist nach Ablauf der oben
angegebenen Zubereitungszeit fertig.
∙ Der Leuchtring erlischt. Das Gerät ist im
Stand-by Modus.
∙ Den Netzstecker ziehen.
∙ Die Portionsgläser warm aus dem
Joghurtbereiter entnehmen und im
Kühlschrank einige Stunden nachreifen
lassen.
∙ Bei Zubereitung von Fruchtjoghurt die
Früchte gleich dem warmen Joghurt
beifügen und erst dann kalt stellen.
∙ Von dem fertigen Joghurt kann eine
entsprechende Portion für die nächste
Zubereitung aufgehoben werden.
∙ Hinweis: Wird nach mehreren
Zubereitungen aus der Kultur der
Joghurt zu dünnüssig, sollte für den
nächsten Ansatz ein neuer Frischjoghurt
oder ein neues frisches Joghurt-Pulver
verwendet werden.
Programm abbrechen
∙ Um ein laufendes Programm oder einen
Programmierungsvorgang abzubrechen,
den Easy Select Button ca. 2 Sekunden
lang drücken. Das Gerät geht dann in
den Stand-by Modus über.
Gerät ausschalten
∙ Bendet sich das Gerät im Stand-by
Modus kann es durch langes Drücken in
den Sleep Modus versetzt werden.
Automatische Abschaltung
∙ Erfolgt während einer Programmierung
30 Sekunden lang keine Eingabe,
schaltet das Gerät in den Stand-by
Modus.
∙ Nach 5 Minuten im Stand-by Modus
schaltet das Gerät in den Sleep Modus.
∙ Wird der Easy Select Button kurz
gedrückt oder gedreht, wird es wieder
eingeschaltet. Im Display wird das
zuletzt benutzte Programm angezeigt.

104 x 142 mm
9
Reinigung und Pege
∙ Vor der Reinigung den Netzstecker
ziehen und das Gerät abkühlen lassen.
∙ Die Gerätebasis darf aus Gründen
der elektrischen Sicherheit nicht mit
Flüssigkeiten behandelt oder gar darin
eingetaucht werden.
∙ Die Gerätebasis und den Gerätedeckel
nur mit einem trockenen oder leicht
angefeuchteten Tuch abwischen.
∙ Die Gläser und Deckel im Spülwasser
oder in der Spülmaschine reinigen.
Rezepte
Bei der Joghurt Zubereitung die Tipps und
Hinweise aus den vorherigen Kapiteln
beachten!
Joghurt Natur
900 ml Milch 3,5 %
140 g Naturjoghurt 3,8 %
∙ Die Zutaten in ein Gefäß füllen und
gründlich, aber vorsichtig verrühren.
∙ Die Mischung gleichmäßig auf die
Portionsgläser verteilen.
∙ Die Deckel aufsetzen und zuschrauben.
∙ Die Gläser in das Gerät stellen und den
Gerätedeckel aufsetzen.
∙ Mit dem Easy Select Button das
Programm P1 auswählen.
∙ Nach dem Ende des Programms die
Gläser entnehmen und im Kühlschrank
nachreifen lassen.
Joghurt ‚Griechischer Art‘
800 ml Milch 3,5 %
100 ml Sahne 30 %
140 g Naturjoghurt 3,8 % oder Joghurt
‚Griechischer Art‘ 10 %
∙ Die Zutaten in einen Topf füllen und
gründlich, aber vorsichtig verrühren.
∙ Die Mischung auf 37 °C erwärmen.
Die Temperatur darf nicht überschritten
werden.
∙ Die Mischung gleichmäßig auf die
Portionsgläser verteilen.
∙ Die Deckel aufsetzen und zuschrauben.
∙ Die Gläser in das Gerät stellen und den
Gerätedeckel aufsetzen.
∙ Mit dem Easy Select Button das
Programm P1 auswählen.
∙ Nach dem Ende des Programms die
Gläser entnehmen und im Kühlschrank
nachreifen lassen.
∙ Für den typischen Joghurtgenuss
nach griechischer Art kann die Molke
abgeseiht werden. Dazu ein Sieb
mit einem Baumwolltuch auslegen,
den fertigen Joghurt sofort in das
Tuch geben und im Kühlschrank
einige Stunden (je nach gewünschter
Konsistenz) abtropfen lassen.

10
104 x 142 mm
Trinkjoghurt
900 ml Milch 3,5 %
140 g Naturjoghurt
∙ Die Zutaten in ein Gefäß füllen und
gründlich, aber vorsichtig verrühren.
∙ Die Mischung gleichmäßig auf die
Portionsgläser verteilen.
∙ Die Deckel aufsetzen und zuschrauben.
∙ Die Gläser in das Gerät stellen und den
Gerätedeckel aufsetzen.
∙ Mit dem Easy Select Button das
Programm P2 auswählen.
∙ Nach dem Ende des Programms die
Gläser entnehmen und im Kühlschrank
nachreifen lassen.
Soja-Joghurt
900 ml Soja-Milch (ca. 2,3 g Fett/4 g
Protein)
140 g Soja-Naturjoghurt (ca. 2,8 g Fett/5 g
Protein)
Bei abweichendem Fett-/Protein-Gehalt
kann die Zugabe von Stärke nötig sein
(siehe Rezept Kokos-Joghurt).
∙ Die Zutaten in ein Gefäß füllen und
gründlich, aber vorsichtig verrühren.
∙ Die Mischung gleichmäßig auf die
Portionsgläser verteilen.
∙ Die Deckel aufsetzen und zuschrauben.
∙ Die Gläser in das Gerät stellen und den
Gerätedeckel aufsetzen.
∙ Mit dem Easy Select Button das
Programm P3 auswählen.
∙ Nach dem Ende des Programms die
Gläser entnehmen und im Kühlschrank
nachreifen lassen.
Laktosefreier Joghurt
900 ml laktosefreie Milch 3,5 %
140 g laktosefreier Naturjoghurt
∙ Die Zutaten in ein Gefäß füllen und
gründlich, aber vorsichtig verrühren.
∙ Die Mischung gleichmäßig auf die
Portionsgläser verteilen.
∙ Die Deckel aufsetzen und zuschrauben.
∙ Die Gläser in das Gerät stellen und den
Gerätedeckel aufsetzen.
∙ Mit dem Easy Select Button das
Programm P4 auswählen.
∙ Nach dem Ende des Programms die
Gläser entnehmen und im Kühlschrank
nachreifen lassen.
Kokos-Joghurt
900 ml Kokos-Milch (mit mindestens 85 %
Kokos-Anteil)
140 g Naturjoghurt
2 Esslöffel Speisestärke
∙ Die Stärke in einer geringen Menge
Milch einrühren. Die restliche Milch
aufkochen lassen, die Stärke einrühren
und bei schwacher Hitze ca. 2 Minuten
köcheln lassen, um einen mehligen
Geschmack zu vermeiden. Danach die
Milch auf unter 40 °C abkühlen lassen.
Die Konsistenz sollte jetzt bereits leicht
fest sein.
∙ Den Joghurt einrühren.
∙ Die Mischung gleichmäßig auf die
Portionsgläser verteilen.
∙ Die Deckel aufsetzen und zuschrauben.
∙ Die Gläser in das Gerät stellen und den
Gerätedeckel aufsetzen.

104 x 142 mm
11
∙ Mit dem Easy Select Button das
Programm P5 auswählen.
∙ Nach dem Ende des Programms die
Gläser entnehmen und im Kühlschrank
nachreifen lassen.
Ersatzteile und Zubehör
Ersatzteile oder Zubehör können bequem
im Internet auf unserer Homepage www.
severin.de unter dem Unterpunkt „Service /
Ersatzteile“ bestellt werden.
Entsorgung
Geräte, die mit diesem Symbol
gekennzeichnet sind, müssen
getrennt vom Hausmüll entsorgt
werden. Diese Geräte enthalten
wertvolle Rohstoffe, die wiederverwertet
werden können. Eine ordnungsgemäße
Entsorgung schützt die Umwelt und die
Gesundheit Ihrer Mitmenschen. Ihre
Gemeindeverwaltung bzw. Ihr Fachhändler
gibt Auskunft über die ordnungsgemäße
Entsorgung.
Garantie
Von den nachfolgenden
Garantiebedingungen bleiben die
gesetzlichen Gewährleistungsrechte
gegenüber dem Verkäufer und eventuelle
Verkäufergarantien unberührt. Wenden Sie
sich im Garantiefall daher direkt an den
Fachhändler. Zusätzlich gewährt SEVERIN
eine Herstellergarantie von zwei Jahren ab
Kaufdatum. In diesem Zeitraum beseitigen
wir kostenlos alle Mängel, die nachweislich
auf Material- oder Fertigungsfehlern
beruhen und die Funktion wesentlich
beeinträchtigen. Weitere Ansprüche
sind ausgeschlossen. Von der Garantie
ausgenommen sind: Schäden, die auf
Nichtbeachtung der Gebrauchsanweisung,
unsachgemäße Behandlung oder
normalen Verschleiß zurückzuführen sind,
ebenso leicht zerbrechliche Teile wie z.
B. Glas, Kunststoff oder Glühlampen. Die
Garantie erlischt bei Eingriff nicht von
SEVERIN autorisierter Stellen. Sollte eine
Reparatur erforderlich werden, setzen
Sie sich bitte telefonisch oder per Mail mit
unserem Kundendienst in Verbindung. Die
Kontaktdaten nden Sie im Anhang der
Anleitung.

12
104 x 142 mm
Digital yoghurt maker
Dear Customer,
Before using the appliance, read the
following instructions carefully and keep
this manual for future reference. The
appliance must only be used by persons
familiar with these instructions.
Connection to the mains supply
The appliance should only be connected to
an earthed socket installed in accordance
with the regulations.
Make sure that the supply voltage
corresponds with the voltage marked on
the rating label.
This product complies with all binding CE
labelling directives.
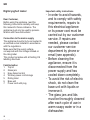
Familiarisation
1. Top lid
2. Glass jars
3. Easy-Select control
4. Wind-up power cord storage
5. Rating label
6. Base unit
7. Power cord with plug
Important safety instructions
∙ In order to avoid hazards,
and to comply with safety
requirements, repairs to
this electrical appliance
or its power cord must be
carried out by our customer
service. If repairs are
needed, please contact
our customer service
department by phone or
email (see appendix).
∙ Before cleaning the
appliance, ensure it is
disconnected from the
power supply and has
cooled down completely.
∙ To avoid the risk of electric
shock, do not clean the
base unit with liquids or
immerse it.
∙ The glass jars and lids
must be thoroughly cleaned
after each cycle of use in
warm soapy water or in a
dishwasher.
GB

104 x 142 mm
13
∙ Caution: Any misuse can
cause severe personal
injury.
∙ Caution: The appliance
heats up during operation
and will remain warm for
some time afterwards.
∙ This appliance is intended
for domestic or similar
applications, such as the
- staff kitchens in shops,
ofces and other similar
working environments,
- agricultural working
environments,
- by customers in hotels,
motels etc. and similar
accommodation,
- in bed-and breakfast type
environments.
∙ This appliance may be
used by children (at least
3 years of age) and by
persons with reduced
physical, sensory or mental
capabilities, or lacking
experience and knowledge,
provided they have been
given supervision or
instruction concerning the
use of the appliance and
fully understand all dangers
and safety precautions
involved.
∙ Children must not be
permitted to play with the
appliance.
∙ Children must not be
permitted to carry out any
cleaning or maintenance
work on the appliance
unless they are supervised
and at least 8 years of age.
∙ The appliance and its
power cord must be kept
well away from children
under 3 at all times.
∙ Caution: Keep any packaging materials
well away from children – such materials
are a potential source of danger, e.g. of
suffocation.
∙ Every time the appliance is used, the
main body including the power cord as
well as any attachment tted should

14
104 x 142 mm
be checked thoroughly for any defects.
Should the appliance, for instance, have
been dropped onto a hard surface, or if
excessive force has been used to pull
the power cord, it must no longer be
used: even invisible damage may have
adverse effects on the operational safety
of the appliance.
∙ During operation, the appliance must
be placed on a level, non-slip surface,
impervious to splashes and stains.
∙ Do not allow the appliance or its power
cord to touch hot surfaces or to come
into contact with any heat sources.
∙ Always remove the plug from the wall
socket
- in case of any malfunction,
- after use, and also
- before cleaning the appliance.
∙ When removing the plug from the wall
socket, never pull on the power cord;
always grip the plug itself. Do not let the
power cord hang free.
∙ No responsibility will be accepted if
damage results from improper use, or if
these instructions are not complied with.
Before using for the rst time
∙ Before the appliance is used for the
rst time, all parts must be cleaned as
described in Cleaning and care.
Preparing the ingredients
∙ To make yoghurt you will need milk and,
to start the fermentation process, natural
fresh yoghurt (not heat-treated and
without sugar, fruit or fruit juice).
∙ Dry culture (yoghurt powder) can be
used instead of fresh yoghurt.
∙ Generally, any sort of cow’s milk can
be used. Sterilised or U. H. T. milk will
give the best results. Any other sort of
milk should be heated up to 90 °C for a
short time before use. Allow the milk to
cool down to below 40 °C afterwards.
Higher temperatures could destroy
the yoghurt cultures.
∙ Vegan yoghurt can be made of soy or
coconut milk. Oat or almond milk are not
suitable.
Hint:
∙ Yoghurt made from plant-based milk
turns our rather creamy and less
solid. If desired, we recommend to
add starch (1-2 table spoons per 1 L
milk). Please follow the preparation
instructions in the Recipes section.
∙ The amount of starch may be varied
according to taste.

104 x 142 mm
15
Preparing the glass jars
∙ Ensure the glass jars are clean and dry.
∙ 1 to 2 teaspoons of natural yoghurt are
needed per glass jar.
∙ When using of yoghurt powder, follow
the manufacturer’s instructions.
∙ Each glass jar has a capacity of about
150 ml.
∙ Hint:
The milk and the starter culture from
yoghurt or powder should be of the
same temperature. We recommend
room temperature.
∙ If required, briey heat up the milk to
90 °C and then allow it to cool to below
40 °C.
∙ Put the ingredients into a suitable
bowl and mix the contents gently but
thoroughly.
∙ Divide the mixture equally into the glass
jars.
∙ Put on the lids and screw them tight.
Easy Select Button
The Easy-Select control serves to switch
the appliance on and off and select the
various programmes:
Short press: to switch on & to conrm a
programme
Long press: to interrupt a programme and
to change to sleep mode
Turn:
∙ to select a programme
∙ to change the processing time
∙ in programme P6, to select the
temperature and processing time
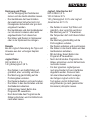
Programme
For yoghurt-making, ve automatic
programmes and one individually
adjustable programme are available.
Display Programme Duration
/ hrs
1 Natural yoghurt
& yoghurt 'Greek
style'
8
2 Drinking-yoghurt 8
3 Soy yoghurt 10
4 Lactose-free
yoghurt
10
5 Coconut yoghurt 10
6 Individual
Temperature
selection
35-45 °C
1-24
Operation
∙ Set up the yoghurt maker in a room at
normal room temperature. Place the
prepared portion glasses in the heating
bowl and cover the yoghurt maker with
the top lid.
∙ Connect the appliance to the mains.
∙ The program last used is shown in the
display.
∙ Turn the Easy-select control until the
required programme is shown.
∙ Press the Easy-select control briey to
select the programme.

16
104 x 142 mm
P 1-5
∙ The pre-set or last selected preparation
time ashes on the display.
∙ If needed, turn the Easy-select control to
change the processing time.
∙ Press the Easy-select control briey.
The programme starts.
P 6
∙ The temperature last selected ashes
on the display.
∙ Turn the Easy-select control and select
the temperature (35-45 °C).
∙ Press the Easy-select control briey.
∙ The indicator P6 ashes briey on the
display, followed by the processing time
last selected.
∙ Turn the Easy-select control and select
the processing time (1-24 h).
∙ Press the Easy-select control briey.
The programme starts.
∙ The light-ring turns blue and the display
shows the remaining running time.
∙ During processing, the remaining time
can be changed at any point by turning
the Easy-select control. The total
runtime set in this way is saved in the
programme for future applications.
∙ The yoghurt maker should then be left
undisturbed until the yoghurt has set.
Avoid cold draught, shocks and
movement.
∙ The yoghurt will be ready once the
required processing time has elapsed.
∙ The light-ring goes out. The appliance is
in stand-by mode.
∙ Remove the plug from the wall socket.
∙ Transfer the warm jars to the refrigerator
and allow the yoghurt to develop further
for a while.
∙ If you wish to make fruit yoghurt, add
the fruit to the warm yoghurt before you
transfer the jars to the refrigerator to
cool.
∙ Once you have made your rst batch of
yoghurt, reserve the required amount of
the yoghurt for your next batch.
∙ Remark: After several cycles the
yoghurt may become watery, and it is
then time to restart the process with
fresh natural yoghurt or fresh yoghurt
powder.
Interrupting a programme
∙ To interrupt an active programme
or programming procedure, press
the Easy-select control for around 2
seconds. The appliance goes into stand-
by mode.
Switching off
∙ With the appliance to stand-by mode, a
longer press sets the appliance to sleep
mode.
Automatic switch-off
∙ If no input is registered for 30 seconds
during programming, the appliance
changes into stand-by mode.
∙ After 5 minutes in stand-by mode, the
appliance automatically changes to
sleep mode.
∙ Turning or briey pressing the Easy-
select control re-activates the appliance.
The programme last used is shown in
the display.

104 x 142 mm
17
Cleaning and care
∙ Before cleaning the appliance, ensure it
is disconnected from the power supply
and has cooled down completely.
∙ To avoid the risk of electric shock, do
not clean the base unit with liquids or
immerse it.
∙ Use only a clean, dry or slightly damp
cloth to wipe the base unit and top lid.
∙ The glass jars and top lid may be
cleaned in warm soapy water or in the
dishwasher.
Recipes
Note: When preparing yoghurt, observe
the hints and instructions from the previous
chapters.
Natural yoghurt
900 ml milk 3.5 %
140 g natural yoghurt 3.8 %
∙ Put the ingredients into a suitable
bowl and mix the contents gently but
thoroughly.
∙ Divide the mixture equally into the glass
jars.
∙ Put on the lids and screw them tight.
∙ Place the glass jars into the appliance
and put on the top lid.
∙ Use the Easy-select control to select the
programme P1.
∙ Once the programme is nished,
transfer the jars to the refrigerator and
allow the yoghurt to develop further for a
while.
Greek-style yogurt
800 ml milk 3.5 %
100 ml cream 30 %
140 g natural yoghurt 3.8 or Greek-style
yogurt 10 %
∙ Put the ingredients into a suitable
bowl and mix the contents gently but
thoroughly.
∙ Heat the mixture to 37 °C, but do not
exceed this temperature.
∙ Divide the mixture equally into the glass
jars.
∙ Put on the lids and screw them tight.
∙ Place the glass jars into the appliance
and put on the top lid.
∙ Use the Easy-select control to select the
programme P1.
∙ Once the programme is nished,
transfer the jars to the refrigerator and
allow the yoghurt to develop further for a
while.
∙ For the typical ‘Greek-style’ yoghurt
enjoyment, the whey can be strained
off. Place a cotton cloth inside a suitable
strainer, pour the ready-processed
yoghurt into the cloth and allow it to
drain inside a refrigerator for a few hours
(depending on the desired consistency).

18
104 x 142 mm
Drinking-yoghurt
900 ml milk 3.5 %
140 g natural yoghurt
∙ Put the ingredients into a suitable
bowl and mix the contents gently but
thoroughly.
∙ Divide the mixture equally into the glass
jars.
∙ Put on the lids and screw them tight.
∙ Place the glass jars into the appliance
and put on the top lid.
∙ Use the Easy-select control to select the
programme P2.
∙ Once the programme is nished,
transfer the jars to the refrigerator and
allow the yoghurt to develop further for a
while.
Soy yoghurt
900 ml soy milk (ca. 2.3 g fat/4 g protein)
140 g natural soy yoghurt (ca. 2.8 g fat/5 g
protein)
With deviations in the fat/protein content, it
may be necessary to add food starch (see
Coconut yoghurt recipe).
∙ Put the ingredients into a suitable
bowl and mix the contents gently but
thoroughly.
∙ Divide the mixture equally into the glass
jars.
∙ Put on the lids and screw them tight.
∙ Place the glass jars into the appliance
and put on the top lid.
∙ Use the Easy-select control to select the
programme P3.
∙ Once the programme is nished,
transfer the jars to the refrigerator and
allow the yoghurt to develop further for a
while.
Lactose-free yoghurt
900 ml lactose-free milk 3.5 %
140 g lactose-free natural yoghurt
∙ Put the ingredients into a suitable
bowl and mix the contents gently but
thoroughly.
∙ Divide the mixture equally into the glass
jars.
∙ Put on the lids and screw them tight.
∙ Place the glass jars into the appliance
and put on the top lid.
∙ Use the Easy-select control to select the
programme P4.
∙ Once the programme is nished,
transfer the jars to the refrigerator and
allow the yoghurt to develop further for a
while.
Coconut yoghurt
900 ml coconut milk (with a coconut
content of min. 85 %)
140 g natural yoghurt
2 tbsp. tbsp. food starch
∙ Stir the starch into a small amount of
milk. Let the remaining milk reach boiling
point, stir in the starch and let it simmer
at low heat for around 2 minutes; this
will help to prevent any ‘oury’ avour.
Let the milk cool down to below 40 °C
afterwards. The consistency should now
be slightly rm already.
∙ Stir in the yoghurt.
∙ Divide the mixture equally into the glass
jars.

104 x 142 mm
19
∙ Put on the lids and screw them tight.
∙ Place the glass jars into the appliance
and put on the top lid.
∙ Use the Easy-select control to select the
programme P5.
∙ Once the programme is nished,
transfer the jars to the refrigerator and
allow the yoghurt to develop further for a
while.
Disposal
Devices marked with this symbol
must be disposed of separately
from your household waste, as
they contain valuable materials
which can be recycled. Proper disposal
protects the environment and human
health. Your local authority or retailer can
provide information on the matter.
Guarantee
This product is guaranteed against defects
in materials and workmanship for a period
of two years from the date of purchase.
Under this guarantee the manufacturer
undertakes to repair or replace any parts
found to be defective, providing the product
is returned to one of our authorised service
centres. This guarantee is only valid if the
appliance has been used in accordance
with the instructions, and provided that
it has not been modied, repaired or
interfered with by any unauthorised person,
or damaged through misuse.
This guarantee naturally does not cover
wear and tear, nor breakables such as
glass and ceramic items, bulbs etc. This
guarantee does not affect your statutory
rights, nor any legal rights you may have
as a consumer under applicable national
legislation governing the purchase of
goods. If the product fails to operate and
needs to be returned, pack it carefully,
enclosing your name and address and the
reason for return. If within the guarantee
period, please also provide the guarantee
card and proof of purchase.

20
104 x 142 mm
Yaourtière numérique
Chère cliente, Cher client,
Avant d’utiliser cet appareil, veuillez lire
soigneusement les instructions suivantes et
conserver ce manuel pour future référence.
L’appareil doit être utilisé exclusivement
par des personnes familiarisées avec les
présentes instructions.
Branchement au secteur
Cet appareil ne doit être branché que sur
une prise de courant avec terre installée
selon les normes en vigueur.
Assurez-vous que la tension d’alimentation
correspond à la tension indiquée sur la
che signalétique de l’appareil.
Ce produit est conforme à toutes les
directives relatives au marquage “CE”.
Familiarisez-vous avec votre appareil
1. Couvercle de l’appareil
2. Pots en verre
3. Commande Easy-Select
4. Rangement du cordon
5. Plaque signalétique
6. Base
7. Cordon d’alimentation avec che
Consignes de sécurité importantes
∙ An d’éviter tout risque de
blessures, et pour rester
en conformité avec les
exigences de sécurité,
les réparations de cet
appareil électrique ou de
son cordon d’alimentation
doivent être effectuées par
notre service clientèle. Pour
toute réparation, veuillez
contacter notre Service
Clientèle par téléphone ou
courriel (voir appendice.
∙ Débranchez toujours la
che de la prise murale et
laissez refroidir l’appareil
avant de le nettoyer.
∙ Pour éviter le risque de
chocs électriques, ne
pas nettoyer la base
avec du liquide et ne pas
l’immerger.
∙ Les pots en verre et les
couvercles doivent être
soigneusement nettoyés
après chaque utilisation à
l’eau chaude savonneuse
ou au lave-vaisselle.
∙ Attention : Une mauvaise
utilisation peut provoquer
des blessures corporelles
FR
Sidan laddas...
Sidan laddas...
Sidan laddas...
Sidan laddas...
Sidan laddas...
Sidan laddas...
Sidan laddas...
Sidan laddas...
Sidan laddas...
Sidan laddas...
Sidan laddas...
Sidan laddas...
Sidan laddas...
Sidan laddas...
Sidan laddas...
Sidan laddas...
Sidan laddas...
Sidan laddas...
Sidan laddas...
Sidan laddas...
Sidan laddas...
Sidan laddas...
Sidan laddas...
Sidan laddas...
Sidan laddas...
Sidan laddas...
Sidan laddas...
Sidan laddas...
Sidan laddas...
Sidan laddas...
Sidan laddas...
Sidan laddas...
Sidan laddas...
Sidan laddas...
Sidan laddas...
Sidan laddas...
Sidan laddas...
Sidan laddas...
Sidan laddas...
Sidan laddas...
Sidan laddas...
Sidan laddas...
Sidan laddas...
Sidan laddas...
Sidan laddas...
Sidan laddas...
Sidan laddas...
Sidan laddas...
Sidan laddas...
Sidan laddas...
Sidan laddas...
Sidan laddas...
Sidan laddas...
Sidan laddas...
Sidan laddas...
Sidan laddas...
Sidan laddas...
Sidan laddas...
Sidan laddas...
Sidan laddas...
Sidan laddas...
Sidan laddas...
Sidan laddas...
Sidan laddas...
Sidan laddas...
Sidan laddas...
Sidan laddas...
Sidan laddas...
Sidan laddas...
Sidan laddas...
Sidan laddas...
Sidan laddas...
Sidan laddas...
Sidan laddas...
Sidan laddas...
Sidan laddas...
Sidan laddas...
Sidan laddas...
Sidan laddas...
Sidan laddas...
Sidan laddas...
Sidan laddas...
Sidan laddas...
Sidan laddas...
-
 1
1
-
 2
2
-
 3
3
-
 4
4
-
 5
5
-
 6
6
-
 7
7
-
 8
8
-
 9
9
-
 10
10
-
 11
11
-
 12
12
-
 13
13
-
 14
14
-
 15
15
-
 16
16
-
 17
17
-
 18
18
-
 19
19
-
 20
20
-
 21
21
-
 22
22
-
 23
23
-
 24
24
-
 25
25
-
 26
26
-
 27
27
-
 28
28
-
 29
29
-
 30
30
-
 31
31
-
 32
32
-
 33
33
-
 34
34
-
 35
35
-
 36
36
-
 37
37
-
 38
38
-
 39
39
-
 40
40
-
 41
41
-
 42
42
-
 43
43
-
 44
44
-
 45
45
-
 46
46
-
 47
47
-
 48
48
-
 49
49
-
 50
50
-
 51
51
-
 52
52
-
 53
53
-
 54
54
-
 55
55
-
 56
56
-
 57
57
-
 58
58
-
 59
59
-
 60
60
-
 61
61
-
 62
62
-
 63
63
-
 64
64
-
 65
65
-
 66
66
-
 67
67
-
 68
68
-
 69
69
-
 70
70
-
 71
71
-
 72
72
-
 73
73
-
 74
74
-
 75
75
-
 76
76
-
 77
77
-
 78
78
-
 79
79
-
 80
80
-
 81
81
-
 82
82
-
 83
83
-
 84
84
-
 85
85
-
 86
86
-
 87
87
-
 88
88
-
 89
89
-
 90
90
-
 91
91
-
 92
92
-
 93
93
-
 94
94
-
 95
95
-
 96
96
-
 97
97
-
 98
98
-
 99
99
-
 100
100
-
 101
101
-
 102
102
-
 103
103
-
 104
104


SEVERIN INOX JG3521 7 POTS Bruksanvisning
- Kategori
- Leksaker
- Typ
- Bruksanvisning
på andra språk
- italiano: SEVERIN INOX JG3521 7 POTS Manuale del proprietario
- español: SEVERIN INOX JG3521 7 POTS El manual del propietario
- Deutsch: SEVERIN INOX JG3521 7 POTS Bedienungsanleitung
- polski: SEVERIN INOX JG3521 7 POTS Instrukcja obsługi
- português: SEVERIN INOX JG3521 7 POTS Manual do proprietário
- français: SEVERIN INOX JG3521 7 POTS Le manuel du propriétaire
- English: SEVERIN INOX JG3521 7 POTS Owner's manual
- dansk: SEVERIN INOX JG3521 7 POTS Brugervejledning
- suomi: SEVERIN INOX JG3521 7 POTS Omistajan opas
- Nederlands: SEVERIN INOX JG3521 7 POTS de handleiding
Relaterade papper
Andra dokument
-
 Russell Hobbs 20970-56 Användarmanual
-
Moulinex YG230131 Bruksanvisning
-
Tefal YG100111 Användarmanual
-
-
Silvercrest SJB 15 B1 Operating Instructions Manual
-
Moulinex YG2301 Bruksanvisning
-
-
-
3M Allergen Protein ELISA Kit Bruksanvisningar
-
3M Allergen Protein Rapid Kit Bruksanvisningar
