
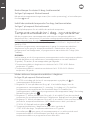
Assembly and instruction manual
Invisible & Glass
panel heaters

Thanks for buying Mill
Our company was founded in Norway in 1992 by Cato Bryn, specializing in distribution
of oil filled radiators and other types of heaters. From 1992 to 2009, we had gained
significant knowledge and expertise of different type of heaters, thus enabling us to
sell to many of the largest retailers in the Nordic countries.
In 2010, Cato’s son, Philip joined the company. Philip looked at the heating industry
with fresh new eyes and wondered why there had been so little change with the
appearance of portable heaters in the last 20 years, especially since interior design in
general had changed dramatically over the years. Philip thought consumers should
have more styles to choose from other than the typical old-fashioned, traditional
heaters.
Since heaters are part of so many homes, Philip and Cato decided to use their
extensive knowledge to re-invent the design of heaters. They wanted to create
beautiful, modern and minimalistic heaters, using the most advanced technology, that
would complement people’s homes. They launched the brand “Mill” in 2012.
Mill offers revolutionary, innovative Norwegian designs. We are continuously innovating
to complement our line of products to meet consumers’ demand.
Prospering on our success in the Nordics we decided to promote Mill at some of the
world’s largest electronic fairs and home shows, and the feedback from
retailers and distributors all over the world were amazing. We are proud to say that
consumers in over 25 countries can now keep warm with style!
@millheat
millheat.com

Content
Important safety information
Specifications
Before first use
First use
Minimum distances
Description of heater
Assembly
Temperature calibration
Resetting the heater
Memory function
“Open window” function
Instructions electronic thermostat
Power indicator for electronic thermostat
Set desired temperature for electronic thermostat
Instructions day/night thermostat
Power indicator day/night thermostat
Set desired temperature for day/night thermostat
Day- and nighttime setback
How to activate daytime setback
How to activate nighttime setback
Change setback temperature – daytime
Change setback temperature – nighttime
Change number of hours – daytime
Change number of hours – nighttime
Cancel (skip) setback period
Delete setback program
Maintenance
Warranty
Waste disposal
|
|
|
|
|
|
|
|
|
|
|
|
|
|
|
|
|
|
|
|
|
|
|
|
|
|
|
|
|

• The product is intended for home use only.
• Make sure the heater is connected to the house's regular mains
as indicated on the heater.
• New heaters will produce a specific odor when used the first time.
This will stop aer a short time and is completely harmless.
• Check for any pieces of packing foam or cardboard that may
have fallen into the heating elements of the heater. These pieces
must be removed to avoid unpleasant odors.
• Prevent the heater from overheating – do not cover.
• Always turn off the heater and unplug it when not used for a long
period of time.
• Pay special attention if the heater is used in rooms where
children, the handicapped or elderly reside.
• The heater should not be set up directly beneath an electrical
socket outlet.
• The cord must not be laid under any kind of carpet. Make sure the
cord is laid in such a way that nobody can trip on it.
• The heater must not be used if either the cord or plug is
damaged. The heater must not be used if it has been dropped
on the floor or is damaged in any other way causing it to
malfunction.
• The cord must be repaired by the manufacturer or by an expert if
it has been damaged, to avoid dangerous situations.
• Avoid using extension cords, which may overheat and could
possibly start a fire.
• Never cover the air vents on the heater. Avoid potential fire
hazards by making sure the air intakes are not blocked or
covered. The heater should be used in rooms with normal flat
floors.
Important safety information
WARNING! To avoid electric shock or damage due to
the heat, always make sure the plug is pulled out before
the heater is moved or cleaned.

millheat.com
EN
• The heater should not be installed in close proximity to
flammable materials of any kind because there can always
be a risk of fire.
• The heater must never be used in rooms where gasoline, paint
or other flammable liquids are stored, such as in a garage.
• Never touch an electric heater with wet hands. The heater
should be installed so a person showering or taking a bath
cannot come into direct contact with it.
• Some parts of this product can become very hot and cause
burns. Particular attention has to be given where children and
vulnerable people are present.
• The heater must be switched off, the plug removed and the
heater must cool down before it is moved.
• Avoid overloading the mains (the circuit) where the heater is
connected. The heater may overload the electrical circuit if
other electrical devices are plugged into the same socket outlet.
• Do not use this heater in small rooms when they are occupied
by persons not capable to leaving the room on their own, unless
constant supervision is provided.
• The product cannot be used by children under 8 years of age
and persons with reduced physical or mental abilities or lack
of experience and knowledge unless they have been given
supervision or instruction in the safe use of the product and
understand the hazards involved.
• Children should not play with the product. Cleaning and
maintenance should not be done by unsupervised children.
• Children under the age of 3 should be kept away from the
product, unless they are under constant supervision.
• Children aged 3 to 8 years are only permitted to turn the
product ON/OFF, assuming the heater is mounted according
to the assembly instructions and the children have received
instruction or supervision in the safe use of the product and
understand the hazards involved.
• Do not use this heater in the immediate surroundings of a bath,
a shower or a swimming pool.
WARNING! The heater must not be used if the glass panels
are damaged (this applies to the products with model names
starting with MB).

Aer turning on the heater for the first time or aer an extended period without use,
the heater can produce a burnt odor for a short time. This is normal.
Please read all the instructions carefully before use. Save the instruction manual for future
use.
It is also normal for the heater to make “sounds” when it warms up or cools down.
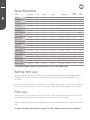
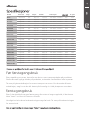
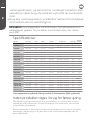
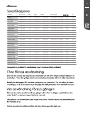
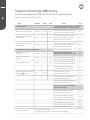
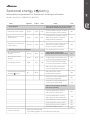
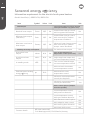
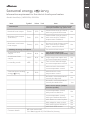
Model Thermostat Color Height Width Amperage
Power
(W) IP
rating
First use
Before first use
Specifications
The heater is approved for use in bathrooms zone 2 (IPX4 approved)
Aer unpacking the heater, check to make sure the product was not damaged during
transport. Contact the retailer or importer if you discover any visible damages to the
product.
Keep the outer packaging to transport the heater in the future. If you want to dispose
the packaging, make sure it is done properly. Keep plastic bags away from children.
Electronic White30,0 cm35,0 cm 250 IPx4
Day/Night White40,0 cm65,0 cm 600 IPx4
Day/Night White40,0 cm85,0 cm 900 IPx4
Day/Night White40,0 cm105,0 cm 1200 IPx4
Day/Night White25,0 cm105,0 cm 800 IPx4
Day/Night White25,0 cm 121,5 cm 1000 IPx4
Electronic White30,0 cm 36,5 cm 250 IPx4
Day/Night White40,0 cm 66,5 cm 600 IPx4
Day/Night White40,0 cm 86,5 cm 900 IPx4
Day/Night White40,0 cm106,5 cm 1200 IPx4
Day/Night White25,0 cm106,5 cm 800 IPx4
IB250
IB600DN
IB900DN
IB1200DN
IB800L DN
IB1000L DN
MB250
MB600DN
MB900DN
MB1200DN
Day/Night White25,0 cm123,0 cm 1000 IPx4
220-240V~, 50-60Hz
220-240V~, 50-60Hz
220-240V~, 50-60Hz
220-240V~, 50-60Hz
220-240V~, 50-60Hz
220-240V~, 50-60Hz
220-240V~, 50-60Hz
220-240V~, 50-60Hz
220-240V~, 50-60Hz
220-240V~, 50-60Hz
220-240V~, 50-60Hz
220-240V~, 50-60Hz
700 IPx4
IB700DN 220-240V~, 50-60Hz
Day/Night White40,0 cm65,0 cm
Day/Night White25,0 cm105,0 cm 850 IPx4
IB850L DN 220-240V~, 50-60Hz
IB1000DN Day/Night White40,0 cm85,0 cm 1000 IPx4220-240V~, 50-60Hz
IB1050L DN Day/Night White25,0 cm 121,5 cm 1050 IPx4220-240V~, 50-60Hz
IB1300DN
Day/Night White40,0 cm105,0 cm 1300 IPx4220-240V~, 50-60Hz
MB700DN
Day/Night White40,0 cm 66,5 cm 700 IPx4220-240V~, 50-60Hz
Day/Night White25,0 cm106,5 cm 850 IPx4220-240V~, 50-60Hz
MB1000DN
Day/Night White40,0 cm 86,5 cm 1000 IPx4220-240V~, 50-60Hz
Day/Night White25,0 cm123,0 cm 1050 IPx4220-240V~, 50-60Hz
Day/Night
MB1300DN
White40,0 cm106,5 cm 1300 IPx4220-240V~, 50-60Hz
MB800L DN
MB1000L DN
MB850L DN
MB1050L DN

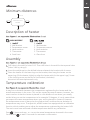
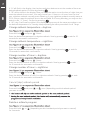
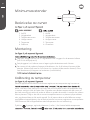
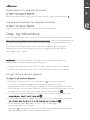
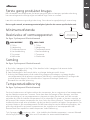
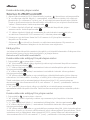
≥100 mm
≥50 mm≥50 mm
≥100 mm
≥100 mm in front
of heater
Minimum distances
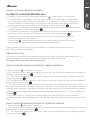
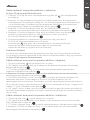
It may occur deviation between the temperature registered by the heater and the
actual temperature in the room. This can be caused by several reasons, however, the
most common is that the heater is placed in a fair distance from where you usually
reside. When you set the temperature to for example 22 degrees, it is only natural that
you expect the same temperature where your sofa is placed for instance. However,
the temperature sensor is placed on the product itself, and therefore a deviation in
temperature may occur. To adjust this, all Mill heaters are equipped with a calibration
function, which enables you to adjust the temperature registered by the heater. N.B!
The room must have achieved a stable temperature before any calibration.
Press 2 times and use + or – to set the actual temperat
Confirm with or wait 15 seconds for automatic confirmation.
ure observed in the room.
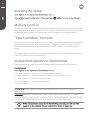
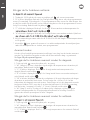
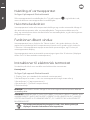
Description of heater
2. Wall bracket
3. Temperature sensor
4. Heat emission
5. Thermostat
6. Steel front
2. Wall bracket
3. Temperature sensor
4. Heat emission
5 Thermostat
6. Glass front
Assembly
Drill holes in the wall for holes 1 & 2. Then drill holes in the wall for the topmost holes
(holes 3 & 4 by using 6)
Insert the wall plugs into the drilled holes and attach the bracket with 4 screws
Place the heater on the lower lugs on the bracket, then hang the heater on the
upper lugs (li the heater slightly to align the heater with for the upper lugs). Screw
in the locking screws on the top of the bracket (clockwise)
Temperature calibration
Attention! Horizontal placement only
MILL INVISIBLE

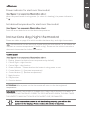
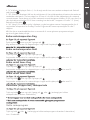
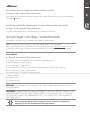
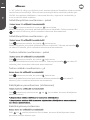
Instructions electronic thermostat
“Open window” function
Please see table on page 4 for which models that have electronic thermostats
1.Display (shows the desired room temperature by default)
2. Power indicator — shows whether the heater is using power or not
3. Control button (+) (increase temperature)
4. Control button (–) (reduce temperature)
5. Function button
The heater has an “open window” function that is activated instantly when it registers
a sudden drop in temperature with more than 2 degrees Celsius in 2 minutes. The
heater will automatically stop heating and FO will be visible in the display of the
heater.
from FO to desired room temperature).
The heater will automatically start heating again aer 10 minutes (the display switch
temperature
BEFORE THE HEATER IS TURNED ON, IT MUST BE ATTACHED TO A WALL. IF
THE HEATER IS NOT INSTALLED CORRECTLY OR IS INSTALLED ASKEW, THIS MAY CAUSE
THE HEATER TO MALFUNCTION OR IN THE WORST CASE, BE DAMAGED.
Resetting the heater
main switch.
Memory function
The heater remembers all the temperature settings and will automatically return to the
desired temperature aer a power cut. Your day- and nighttime setbacks will however
be deleted aer a power cut, and you will need to register the programs again.
ATTENTION! Aer a power cut the thermostat will return to the last registered

Power indicator for electronic thermostat
When the panel heater is using power (i.e. when it is heating), the power indicator is
lit .
Set desired temperature for electronic thermostat
Press the arrow buttons to set the desired temperature.
Instructions day/night thermostat
1.Display (shows the desired room temperature by default)
2.Control light – night function
3.Control light – day function
4. Power indicator – Shows whether the heater is using power or not
5. Control button (+) (Increase temperature)
6.Control button (–) (Reduce temperature)
7.Night function
8.Day function
9. Function button
The thermostat can be used as a regular electronic thermostat (i.e. the heater will
maintain a constant temperature 24 hours a day). Please see the section instructions
electronic thermostat for further information.
temperature.
BEFORE THE HEATER IS TURNED ON, IT MUST BE ATTACHED TO A WALL. IF
THE HEATER IS NOT INSTALLED CORRECTLY OR IS INSTALLED ASKEW, THIS MAY CAUSE
THE HEATER TO MALFUNCTION OR IN THE WORST CASE, BE DAMAGED.
Please see table on page 4 for which models that have day- and night thermostats.
ATTENTION! Aer a power cut the thermostat will return to the last registered

Power indicator for day/night thermostat
When the panel heater is using power (i.e. when it is heating), the power indicator is
lit .
Set desired temperature for day/night thermostat
Press the arrow buttons to set the desired temperature.
Day- and nighttime setback
When programming the heater for either day- or nighttime setback, the setback
period will be active from the time you register the program. Which means; if you
want to start your daytime setback at 7.30 am, you need to register the program at
7.30 am.
You only need to program the heater 1 time for daytime setback and 1 time for
nighttime setback. If you have programmed the heater, the setback programs
will be active on all 7 days (or 7 nights).
Let us say you want to program the heater for both daytime- and nighttime setback
(normally the heater is set to 23 degrees). You want the heater to do the following:
1.Daytime setback activated from 7.30 am to 2.30 pm. Desired temperature: 17
degrees
2.Nighttime setback activated from 10.00 pm to 6.00 am. Desired temperature: 18
degrees
How to activate daytime setback
1.Tuesday 7.30 am you go to the heater and press on the heater’s control panel.
2. “d” will be visible in the display. Use the + and - buttons to set what day it is today when
you are programming the heater (1= Monday, 2 = Tuesday etc.) You are not
programming the heater for the various days. This is simply to tell the heater what
day it is when you are programming the heater.
5.The daytime setback will now be active from 7.30 am to 2:30 pm every day.
Setback temperature is 17 degrees.
* Control light is green when the heater is in an active setback period. The
control light is red when the setback period is inactive but programmed.
Select 2 for Tuesday. Confirm by pressing .
for daytime setback. Confirm by pressing .
3. “C” will flash in the display. Use the + and - buttons to set 17 as the desired temperature
period (meaning it will be active from 7.30 am to 2:30 pm). Confirm by pressing .
4. “H” will flash in the display. Use the + and - buttons to set 7 hours as desired setback

How to activate nighttime setback
1.Tuesday 10.00 pm you go to the heater and press on the heater’s control panel.
2. "d" will be visible in the display. Use the + and - buttons to set what day it is today when
you are programming the heater (1=Monday), 2 = Tuesday etc.). You are not program-
ming the heater for various days. This is simply to tell the heater what day it is when you
are programming the heater. Select 2 for Tuesday. Confirm by pressing .
Advanced mode
If you want to have different temperature settings each day, you may use advanced mode. To
activate advanced mode you need to activate day and night setback first.
See figure 18 on seperate illustration sheet.
How to activate advanced mode for daytime setback:
1. Press and hold , then press + one time.
2. “d1” (day one) will be visible in the display, and you my now choose the temperature you want for
Monday. Confirm by pressing .
3. “°C” will flash in the display. Use the + and - buttons to set the temperature for daytime setback.
Confirm by pressing .
4. “H” will flash in the display. Use the + and - buttons to set the number of hours as desired setback
period. Confirm by pressing .
5. “SR” will be visible in the display. Now you have the option to set the time of day that you want
the setback time to start. You may choose from -4 hours to +4 from the time your daytime setback
normally starts. Meaning, if your daytime setback normally starts at 10:30, but you want the setback
time to be activated 08:30 every Monday, you may use the - button to set “-2” (hours). Confirm by
pressing
6. “d2” (day 2) which is Tuesday, will now be visible in the display and you may do the same
procedure to set the desired temperature for Tuesday. Keep repeating the same procedure for all 7
days.
How to activate advanced mode for nighttime setback:
1. Press and hold , then press + one time.
2. “d1” (day one) will be visible in the display, and you my now choose the temperature you want for
Monday night. Confirm by pressing .
3. “°C” will flash in the display. Use the + and - buttons to set the temperature for nighttime setback.
Confirm by pressing
5.The nighttime setback will now be active from 10.00 pm to 6.00 am every day. The
setback temperature is 18 degrees.
* Control light is green when the heater is in an active setback period. The control
light is red when the setback period is inactive but programmed.
N.B! If a power cut occurs/you turn off the heater, the programming will be lost and
you will have to do this over again.
3. “C” will flash in the display. Use the + and - buttons to set 18 as the desired temperature for
nighttime setback. Confirm by pressing .
4. “H” will flash in the display. Use the + and - buttons to set 8 hours as desired setback period
(meaning it will be active from 22.00 pm to 6.00 am). Confirm by pressing .

4. “H” will flash in the display. Use the plus and minus buttons to set the number of hours as
desired setback period. Confirm by pressing .
5. “SR” will be visible in the display. Now you have the option to set the time of night that you
want the setback time to start. You may choose from -4 hours to +4 hours from the time
your nighttime setback normally starts. Meaning, if your nighttime setback normally starts at
22:00, but you want the setback time to be activated 21:00 every Monday, you may use the -
button to set “-1” (hour). Confirm by pressing .
6. “d2” (day 2) will now be visible in the display and you may do the same procedure to set
the desired temperature for Tuesday. Keep repeating the same procedure for all 7 days.
Change setback temperature – daytime
Press and hold and press 3 times.
Enter the desired temperature for daytime setback. Save by pressing or wait for 15
Change setback temperature – nighttime
Press and hold and press 3 times.
Enter the desired temperature for nighttime setback. Save by pressing or wait for
Change number of hours – daytime
Press and hold and press 2 times.
Enter the desired number of hours for daytime setback. Save by pressing or wait
Change number of hours – nighttime
Press and hold and press 2 times.
Enter the desired number of hours for nighttime setback. Save by pressing or wait
Cancel (skip) setback period
Press and hold and press or once (depending on which setback period
you want to cancel).
Delete a setback program
Press and hold or (depending on which setback period you want to cancel)
for 3 seconds.
seconds for automatic confirmation.
15 seconds for automatic confirmation.
for 15 seconds for automatic confirmation.
for 15 seconds for automatic confirmation.

Grini Næringspark 10
1361 Østerås
Norway
Maintenance
Warranty
Waste disposal
1. For cleaning, always unplug the heater and leave it to cool.
2. Wipe the heater regularly with a damp cloth and dry the surface before turning on
the heater again.
cause a fire hazard and/or electric shock.
3. The heater must be cleaned at least once a month during the heating season.
5.The heater can be stored in a dry and clean place.
6.If the heater stops working, do not attempt to repair it yourself because it can
The warranty is valid for 2 years. The heater will be repaired or replaced during
this time should any malfunction occur. The warranty applies if the heater is used
according to these instructions and the customer can present a purchase receipt. If
the heater malfunctions in any way, please contact the store where it was purchased
or the importer.
The symbol indicates that this product is not to be disposed of together with
household waste. This product must be delivered to a recycling service or container
for electrical appliances and electronic equipment. This is done to avoid health risks
and prevent harm to the environment. Local businesses (or the environmental station
in your neighborhood) are required by law to accept and recycle such products, as a
means of environmentally sound disposal.
4. Dust etc. should be removed with a so cloth.

Innholdsfortegnelse
Viktig sikkerhetsinformasjon
Spesifikasjoner
Før førstegangsbruk
Førstegangsbruk
Minimumavstander
Beskrivelse av ovnen
Montering
Kalibrering av temperatur
Resette ovnen
Huskefunksjon
Bruksanvisning elektronisk termostat
Strømindikator for elektronisk termostat
“Åpent vindu” funksjon
Sett ønsket temperatur for elektronisk termostat
Bruksanvisning dag/natt termostat
Strømindikator for dag/natt termostat
Sett ønsket temperatur for dag/natt termostat
Dag – og nattsenking
Slik gjør du for å aktivere dagsenk
Slik gjør du for å aktivere nattsenk
Endre senketemperatur – dag
Endre senketemperatur – natt
Endre antaII timer – dag
Endre antaII timer – natt
Kansellere (hoppe over) senkeperiode
Slette senkeprogram
Vedlikehold
Garanti
Avfallshåndtering
|
|
|
|
|
|
|
|
|
|
|
|
|
|
|
|
|
|
|
|
|
|
|
|
|
|
|
|
|
NO

For å unngå elektrisk støt eller skader på
grunn av varme, pass alltid på at støpselet er trukket ut
før ovnen flyttes eller rengjøres.
Produktet er kun beregnet for hjemmebruk
Sørg for at ovnen kobles til husets vanlige strømnett slik ovnens
merke viser
Nye ovner vil avgi en egen lukt når den brukes første gang. Dette gir
seg etter en kort stund og er helt ufarlig
Sjekk at det ikke har falt rester (isopor/papp) fra innpakningen ned
ubehagelig lukt
Unngå at ovnen blir overopphetet-
over lengre tid
Vær spesielt oppmerksom hvis ovnen er i bruk i rom hvor barn,
handikappede eller eldre oppholder seg
Ovnen må ikke stilles opp rett under et elektrisk kontaktpunkt
Ledningen må ikke legges under tepper av noe slag. Påse at den
ligger på en slik måte at ingen kan snuble i den
Ovnen må ikke brukes hvis ledningen eller kontakten er skadet. Den
må ikke brukes hvis den har falt i bakken (gulvet) eller er skadet på
annen måte, slik at den ikke fungerer normalt
Hvis ledningen blir skadet må denne bli reparert av en fagperson
for å unngå farlige situasjoner
Unngå å bruke skjøteledning, da en slik ledning kan bli
overopphetet og muligens starte en brann
brukes i rom med vanlige rette gulv
Viktig sikkerhetsinformasjon
NO

Ovnen må ikke monteres rett ved brennbart materiale av noe slag
da det alltid kan være en fare for brann
Ovnen må aldri brukes i rom hvor det lagres bensin, maling eller
andre lett antennelige væsker som for eks. i en garasje
Ta aldri på en elektrisk ovn med våte hender. Ovnen monteres/
plasseres slik at en person som dusjer eller tar et bad ikke kan
komme i direkte kontakt med den
Enkelte deler av denne ovnen kan bli veldig varme og forårsake
brennmerker på huden. Vær ekstra oppmerksom når barn og
sårbare personer er tilstede
Ovnen må være skrudd av, kontakten tatt ut og ovnen være
Unngå overbelastning på strømnettet (kursen) hvor ovnen er
tilkoblet. Ta hensyn hvis andre elektriske apparater er koblet til
samme strømuttak eller kurs
Bruk aldri ovnen i små rom hvor personer som ikke er i stand til
å forlate rommet av seg selv oppholder seg, med mindre de er
under konstant tilsyn
Produktet kan ikke benyttes av barn under 8 år og personer med
og kunnskap, om de ikke får tilsyn eller instruksjoner om bruk av
produktet på en sikker måte og forstår farene som er involvert
Barn skal ikke leke med produktet. Rengjøring og vedlikehold
skal ikke utføres av barn uten tilsyn
Barn under 3 år skal holdes unna produktet med mindre de har
kontinuerlig tilsyn
Barn i alderen 3 til 8 år kan kun slå AV/PÅ produktet, forutsatt at
ovnen er montert slik monteringsanvisningen viser, og barna har
fått instruksjon eller tilsyn vedrørende bruk av produktet på en
sikker måte og forstår farene som er involvert
Bruk aldri denne varmeovnen i nærheten av badekar, dusj eller
svømmebasseng
Ovnen må ikke brukes hvis glasspanelet er skadet
(gjelder produkter som starter modellnavnet med MB).
NO

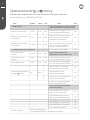
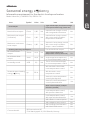
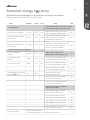
Modell Termostat Farge Høyde Bredde Strømstyrke IP-grad
NO
Før førstegangsbruk
Førstegangsbruk
Etter utpakking av ovnen, kontroller om det er noen transportskader på produktet.
Skulle det være synlige skader på produktet, ta kontakt med butikken eller importør.
Ta vare på ytteremballasjen for senere transport av ovnen. Om du ønsker å kaste
emballasjen, sørg for at den blir kastet på forsvarlig vis. Hold plastposer unna barn.
Etter å ha skrudd på varmen første gang, eller etter et lengre opphold, vil det kunne
lukte “brent” i en kort tid. Dette er normalt.
Vennligst les hele denne bruksanvisningen nøye før bruk. Ta vare på bruksanvisningen
for senere bruk.
Elektronisk Hvit
Hvit
Hvit
Hvit
Hvit
Hvit
Hvit
Hvit
Hvit
Hvit
Hvit
Hvit
Hvit
Hvit
Hvit
Hvit
Hvit
Hvit
Hvit
Hvit
Hvit
30,0 cm35,0 cm 250 IPx4
Dag/Natt 40,0 cm65,0 cm 600 IPx4
Dag/Natt 40,0 cm85,0 cm 900 IPx4
Dag/Natt 40,0 cm105,0 cm 1200 IPx4
Dag/Natt 25,0 cm105,0 cm 800 IPx4
Dag/Natt 25,0 cm 121,5 cm 1000 IPx4
Elektronisk 30,0 cm 36,5 cm 250 IPx4
Dag/Natt 40,0 cm 66,5 cm 600 IPx4
Dag/Natt 40,0 cm 86,5 cm 900 IPx4
Dag/Natt 40,0 cm106,5 cm 1200 IPx4
Dag/Natt 25,0 cm106,5 cm
800 IPx4
IB250
IB600DN
IB900DN
IB1200DN
IB800L DN
IB1000L DN
MB250
MB600DN
MB900DN
MB1200DN
Dag/Natt 25,0 cm123,0 cm
1000 IPx4
220-240V~, 50-60Hz
220-240V~, 50-60Hz
220-240V~, 50-60Hz
220-240V~, 50-60Hz
220-240V~, 50-60Hz
220-240V~, 50-60Hz
220-240V~, 50-60Hz
220-240V~, 50-60Hz
220-240V~, 50-60Hz
220-240V~, 50-60Hz
220-240V~, 50-60Hz
220-240V~, 50-60Hz
700 IPx4
IB700DN 220-240V~, 50-60Hz
Dag/Natt 40,0 cm65,0 cm
Dag/Natt 25,0 cm105,0 cm 850 IPx4
IB850L DN 220-240V~, 50-60Hz
IB1000DN Dag/Natt 40,0 cm85,0 cm 1000 IPx4220-240V~, 50-60Hz
IB1050L DN Dag/Natt 25,0 cm 121,5 cm 1050 IPx4220-240V~, 50-60Hz
IB1300DN
Dag/Natt 40,0 cm105,0 cm 1300 IPx4220-240V~, 50-60Hz
MB700DN
Dag/Natt 40,0 cm 66,5 cm 700 IPx4220-240V~, 50-60Hz
Dag/Natt 25,0 cm106,5 cm
850 IPx4
220-240V~, 50-60Hz
MB1000DN
Dag/Natt 40,0 cm 86,5 cm 1000 IPx4220-240V~, 50-60Hz
Dag/Natt 25,0 cm123,0 cm 1050 IPx4220-240V~, 50-60Hz
Hvit
MB1300DN
Dag/Natt 40,0 cm106,5 cm 1300 IPx4220-240V~, 50-60Hz
MB800L DN
MB1000L DN
MB850L DN
MB1050L DN

NO
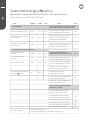
Beskrivelse av ovnen
1.Av/På
2. Veggbrakett
3.Temperatursensor
4. Utslipp varme
5.Termostat
6. Stålfront
1.Av/På
2. Veggbrakett
3.Temperatursensor
4. Utslipp varme
5.Termostat
6. Glassfront
Montering
Lag hull i veggen for hull 1 & 2. Lag detterer hull i veggen for de øverste hullene
(hull 3 & 4 ved hjelp av 6)
Sett pluggene inn i hullene som er laget og fest braketten med 4 skruer
Før ovnen på de nederste festene på brakketen, for så å hekte på ovnen på de
øverste festene (lø noe for å få ovnen inn i sporet på de øverste festene). Skru
fast låseskruene på toppen av braketten (mot klokken)
Kalibrering av temperatur
Det kan oppstå avvik mellom hva ovnen registrerer av temperatur og hva som er
dette, men den mest vanlige er at ovnen står et lite stykke fra der du oppholder deg
i rommet vanligvis. Når du setter feks 22 grader som ønsket temperatur på ovnen er
det helt naturlig og intuitivt å tenke at dette er graden du ønsker i rommet der sofaen
feks er plassert. Dog er det slik at ovnens temperatursensor er plassert på produktet
selv, og dermed kan et slikt avvik oppstå. For å justere dette er alle Millovner utstyrt
med kalibreringsmuligheter, dvs at du kan justere hva ovnen registrerer av temperatur.
OBS! Rommet må ha oppnådd en stabil temperatur før evt. kalibrering.
Trykk inn 2 ganger, og bruk piltastene (+ eller -) for å sette faktisk temperatur
MILL INVISIBLE
≥100 mm
≥50 mm≥50 mm
≥100 mm
≥100 mm foran ovnen
Minimumsavstander

Resette ovnen
Slå av ovnens hovedbryter
Trykk og hold inne mens du slår på ovnens hovedbryter.
Huskefunksjon
Ovnen husker alle temperaturinnstillinger, og vil automatisk gå til ønsket
romtemperatur etter strømbrudd. Dine dag- og nattsenkingsprogrammer vil derimot
bli slettet ved strømbrudd og du må registrere dette på nytt.
“Åpent vindu” funksjon
Ovnen har en “åpent vindu” funksjon som aktiveres straks den registrerte
romtemperaturen synker mer enn 2 grader Celsius på 2 minutter. Ovnen vil automatisk
stoppe å varme og FO vil vises i displayet til ovnen.
Ovnen vil automatisk starte å varme igjen etter 10 minutter (displayet endres fra FO til
ønsket romtemperatur).
Bruksanvisning elektronisk termostat
Vennligst se tabelloversikt side 4 for hvilke modeller som har elektronisk termostat.
1. Display (viser ønsket romtemperatur som standard)
2. Strømindikator – viser om ovnen trekker strøm eller ikke
3.Kontrollknapp (+) (Øke temperatur)
4. Kontrollknapp (-) (Senke temperatur)
5. Funksjonsknapp
FØR OVNEN TAS I BRUK MÅ DEN VÆRE FESTET TIL EN VEGG. HVIS
OVNEN IKKE ER MONTERT KORREKT ELLER SATT OPP SKJEVT, KAN DET FØRE TIL AT
DEN IKKE VIL FUNGERE ELLER I VERSTE FALL BLI ØDELAGT.
Ved strømbrudd vil termostaten gå tilbake til sist satt temperatur
NO

Strømindikator for elektronisk termostat
Når panelovnen trekker strøm (dvs når ovnen varmer) lyser strømindikatoren .
Sett ønsket temperatur for elektronisk termostat
Trykk ned en av piltastene for å stille inn ønsket romtemperatur.
Bruksanvisning dag/natt termostat
1. Display (viser ønsket romtemperatur som standard)
2.Kontrollys natt-funksjon
3.Kontrollys dag-funksjon
4. Strømindikator – viser om ovnen trekker strøm eller ikke
5.Kontrollknapp (+) (Øke temperatur)
6.Kontrollknapp (-) (Senke temperatur)
7. Natt-funksjon
8. Dag-funksjon
9. Funksjonsknapp
Termostaten kan benyttes som en vanlig elektronisk termostat (det vil si at ovnen
holder en jevn temperatur hele døgnet). Se bruksanvisning elektronisk termostat side
6 for mer informasjon.
Ved strømbrudd vil termostaten gå tilbake til sist satt temperatur
FØR OVNEN TAS I BRUK MÅ DEN VÆRE FESTET TIL EN VEGG. HVIS OVNEN
IKKE ER MONTERT KORREKT ELLER SATT OPP SKJEVT, KAN DET FØRE TIL AT DEN IKKE
VIL FUNGERE ELLER I VERSTE FALL BLI ØDELAGT.
Vennligst se tabelloversikt side 4 for hvilke modeller som har dag/natt termostat.
NO
Sidan laddas...
Sidan laddas...
Sidan laddas...
Sidan laddas...
Sidan laddas...
Sidan laddas...
Sidan laddas...
Sidan laddas...
Sidan laddas...
Sidan laddas...
Sidan laddas...
Sidan laddas...
Sidan laddas...
Sidan laddas...
Sidan laddas...
Sidan laddas...
Sidan laddas...
Sidan laddas...
Sidan laddas...
Sidan laddas...
Sidan laddas...
Sidan laddas...
Sidan laddas...
Sidan laddas...
Sidan laddas...
Sidan laddas...
Sidan laddas...
Sidan laddas...
Sidan laddas...
Sidan laddas...
Sidan laddas...
Sidan laddas...
Sidan laddas...
Sidan laddas...
Sidan laddas...
Sidan laddas...
Sidan laddas...
Sidan laddas...
Sidan laddas...
Sidan laddas...
Sidan laddas...
Sidan laddas...
Sidan laddas...
Sidan laddas...
Sidan laddas...
Sidan laddas...
Sidan laddas...
Sidan laddas...
-
 1
1
-
 2
2
-
 3
3
-
 4
4
-
 5
5
-
 6
6
-
 7
7
-
 8
8
-
 9
9
-
 10
10
-
 11
11
-
 12
12
-
 13
13
-
 14
14
-
 15
15
-
 16
16
-
 17
17
-
 18
18
-
 19
19
-
 20
20
-
 21
21
-
 22
22
-
 23
23
-
 24
24
-
 25
25
-
 26
26
-
 27
27
-
 28
28
-
 29
29
-
 30
30
-
 31
31
-
 32
32
-
 33
33
-
 34
34
-
 35
35
-
 36
36
-
 37
37
-
 38
38
-
 39
39
-
 40
40
-
 41
41
-
 42
42
-
 43
43
-
 44
44
-
 45
45
-
 46
46
-
 47
47
-
 48
48
-
 49
49
-
 50
50
-
 51
51
-
 52
52
-
 53
53
-
 54
54
-
 55
55
-
 56
56
-
 57
57
-
 58
58
-
 59
59
-
 60
60
-
 61
61
-
 62
62
-
 63
63
-
 64
64
-
 65
65
-
 66
66
-
 67
67
-
 68
68


på andra språk
Relaterade papper
-
MILL OIL PREMIUM MEC 1000W OLJEOVN Användarmanual
-
-
-
MILL Oil Premium AB-H1500DN Assembly And Instruction Manual
-
-
-
-
Andra dokument
-
 POINT POPANW800B PANELOVN, SVART Bruksanvisning
-
 POINT PRO POHF60HC 2200W VARMEVIFTE Bruksanvisning
-
puravent FRICO Användarguide
-
Onninen 2601000 Installationsguide
-
CARLO GAVAZZI BEA-TEMDIS Installationsguide
-
OJ Electronics PRH-1212 Bruksanvisningar
-
Nexans N-Comfort Kt+ Thermostat Användarmanual
-
Weller WAS 101 Operating Instructions Manual
-
-
Danfoss Timer module FH-WN, Connection box Installationsguide

