
LED OUTDOOR SPOTLIGHT 8.5 W
IAN 288404
LED-ULK OV ALO 8,5 W
Asennus-, käyttö- ja turvallisuusohjeet
LED OUTDOOR SPOTLIGHT 8.5 W
Assembly, operating and safety instructions
LED-AUSSENSTRAHLER 8,5 W
Montage-, Bedienungs- und Sicherheitshinweise
LED LAUKO PROŽEKTORIUS, 8,5 W
Nurodymai dėl montavimo, naudojimo ir saugumo
LED-UTOMHUSSTRÅLKAST ARE 8,5 W
Monterings-, bruks- och säkerhetsanvisningar
LEDOWY REFLEKTOR ZEWNĘTRZNY 8,5 W
Wskazówki montażu, obsługi i bezpieczeństwa

LED OUTDOOR SPOTLIGHT 8.5 W
GB Assembly, operating and safety instructions Page 5
FI Asennus-, käyttö- ja turvallisuusohjeet Sivu 15
SE Monterings-, bruks- och säkerhetsanvisningar Sidan 24
PL Wskazówki montażu, obsługi i bezpieczeństwa Strona 34
LT Nurodymai dėl montavimo, naudojimo ir saugumo Puslapis 45
DE / AT / CH Montage-, Bedienungs- und Sicherheitshinweise Seite 55

B
12
11
10
A
6
7
9
4
1 2
3
5
8

2.5 m
D
C
13
14

5 GB
List of pictograms used .................................................. Page 6
Introduction ............................................................................. Page 6
Intended use ..................................................................................Page 6
Parts description ............................................................................Page 6
Technical Data ..............................................................................Page 7
Scope of delivery ..........................................................................Page 7
General safety instructions ........................................Page 7
Before installation .............................................................Page 9
Before use .................................................................................Page 9
Installation ...............................................................................Page 9
Start-up .......................................................................................Page 11
Adjusting the motion detector.......................................................Page 11
Setting the lighting duration ..........................................................Page 11
Adjusting the sensitivity of the sensor ........................................... Page 11
Setting the daylight level ..............................................................Page 12
Aligning the motion detector ........................................................Page 12
Cleaning and Care .............................................................Page 13
Disposal ......................................................................................Page 13
Warranty ................................................................................... Page 13

6 GB
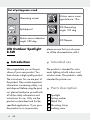
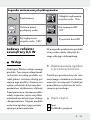
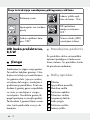
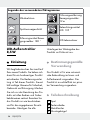
List of pictograms used
Alternating current Motion sensor cover-
age distance: 12 m
Splashproof LED illuminating
angle: 105 deg
Motion sensor detection
angle: 180 deg LED lifespan
LED Outdoor Spotlight
8.5W
Introduction
We congratulate you on the pur-
chase of your new product. You
have chosen a high quality product.
The instructions for use are part of
the product. They contain important
information concerning safety, use
and disposal. Before using the prod-
uct, please familiarise yourself with
all of the safety information and
instructions for use. Only use the
product as described and for the
specified applications. If you pass
the product on to anyone else,
please ensure that you also pass
on all the documentation with it.
Intended use
The product is intended for auto-
matic lighting in both indoor and
outdoor areas. This product is solely
intended for private use.
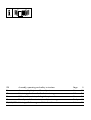
Parts description
1 Spotlight
2 Spring washer
3 Metal Nut
4 Mounting stirrup
5 Locking screw

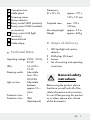
7 GB
6 Connection box
7 Cable gland
8 Fastening screws
9 Motion detector
10 Rotary control SENS (sensitivity)
11 Rotary control TIME (switched
on duration)
12 Rotary control LUX (light
sensitivity)
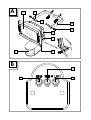
13 Terminal block
14 Cable clamp
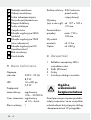
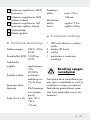
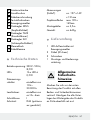
Technical Data
Operating voltage: 230 V∼ 50 Hz,
8.5 W
LEDs: 16 x LED x
0.5 W
Dimming switch: Adjustable
from 10 lx–
20,000 lx
Light on time: Adjustable
between
approx.10 s –
4 min
Protection class: I
Protection class: IP44
(Splashproof)
Dimensions
(H x W x D): approx. 197 x
149 x 121 mm
Projected area: max. 190 x
149 mm
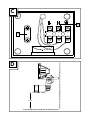
Mounting height: approx. 2.5 m
Weight: approx. 640 g
Scope of delivery
1 LED Spotlight with motion
detector
2 Wall plugs (Ø 6 mm)
2 Screws
1 Set of mounting and operating
instructions
General safety
instructions
Before using the product, please
familiarise yourself with all of the
safety information and instructions
for use! When passing this product
on to others, please also include
all the documents!

8 GB
DANGER TO LIFE
AND ACCIDENT
HAZARD FOR
TODDLERS AND SMALL
CHILDREN! Never leave chil-
dren unattended with the pack-
aging material. The packaging
material represents a danger of
suffocation. Children frequently
underestimate the dangers.
Please keep children away
from the product at all times.
This product may be used by
children age 8 years and up,
as well as by persons with re-
duced physical, sensory or
mental capacities, or lacking
experience and / or knowledge,
so long as they are supervised
or instructed in the safe use of
the product and understand
the associated risks. Children
should not be allowed to play
with the product. Cleaning and
user maintenance should not
be performed by children with-
out supervision.
Risk of electric
shock
Always check product for dam-
age before connecting it to
power. Never use the product
if it shows any signs of damage.
Prior to installation, verify that
the mains voltage on site corre-
sponds with the operating volt-
age required for the product
(230 V∼ 50 Hz). Otherwise do
not install the product.
CAUTION! DANGER OF
BURN INJURIES! To prevent
burns, verify the product is
switched off and has cooled
down for at least 15 min before
touching it. The product can
become very hot.
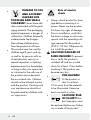
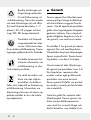
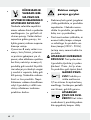
0.5 m
FIRE HAZARD!
Fit the product so
that it is at least
0.5 m away from the material
to be illuminated. Excessive
heat can result in a fire.
CAUTION! RISK
OF INJURY! Bro-
ken lamp glass must
be replaced before any further
use is made of the product.

9 GB
Only intended for installations
out of normal reach.
This product does not contain
any parts that can be serviced
by the user. The LEDs cannot
be replaced by end user.
If the LEDs fail at the end of their
lives, they must be repaired by
qualified electrician or the en-
tire product must be replaced.
The spotlight is only suited for
use with the built-in LED control
gear.
The product continues to draw
a small amount of power even
if the lamp is off as long as
product is connected to supply
mains. To switch the product
off completely, the mains switch
should be switched off.
Before installation
Important: The electrical con-
nection must be established by a
qualified electrician or a person
trained to perform electrical instal-
lations. This person must be familiar
with the properties of the product
and the connection regulations.
Before installation ensure that
the circuit, to which the product
will be connected, is not ener-
gised. To do so, remove the fuse
or switch off the circuit breaker
in the fuse box (0 position).
Use the voltage tester to verify
the de-energised status.
The included mounting material
is suitable for ordinary solid
concrete or masonry construc-
tion. Check which mounting
material is suitable for your
chosen mounting surface. If
necessary, seek expert advice.
Before use
Note: Remove all packaging
materials from the product.
Installation
Make sure you will not be drill-
ing into electrical, gas or water
lines inside the wall. Use a
power drill to drill the holes into
the brick wall. Always observe
all safety instructions for the

10 GB
power drill in the manual for
the power drill. Death or injury
due to electric shock may
otherwise result.
When selecting the mounting loca-
tion, pay attention to the following:
Make sure that the spotlight 1
illuminates the desired area.
You can move the spotlight 1
vertically.
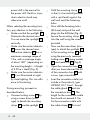
Make sure the motion detector
9 covers the desired area.
The motion detector 9 has a
maximum coverage range of
12 m, with a coverage angle
of about 180° (depending on
the mounting height – a height
of 2.50 m is ideal) (Fig. D).
Make sure the motion detector
9 is not illuminated at night
by street lighting. This can influ-
ence its functioning.
During mounting, proceed as
described below:
Unscrew locking screw 5 by
using a screw driver (cross
type) to detach the mounting
stirrup 4 from the spotlight 1.
Hold the mounting stirrup 4
so that it is horizontal (possibly
with a spirit level) against the
wall and mark the fastening
holes.
Now drill the fastening holes
(Ø 6 mm) and push the wall
plugs into the drill holes (Fig. A).
Secure the mounting stirrup 4
onto the wall using the screws
provided.
Now use the screw driver (cross
type) to attach the spotlight 1
to the mounting stirrup 4 by
using the previously removed
locking screw 5, spring washer
2, and metal nut 3 (Fig A).
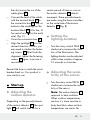
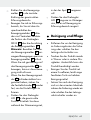
Open the connection box 6
after you have released the lid
of the connection box 6 with
a cross type screwdriver.
Insert the connection cable (not
include in the product), type
H05RN-F 3G 1.0 mm2 , through
the cable gland 7 and into
the connection box 6. The
length for the connection cable
line should not exceed 2.5 m.
Fix the connection cable with
the cable clamp 14 first and

11 GB
then by turning the nut of the
cable gland 7.
Connect the lead of the cable
with the terminal block 13 in
the connection box 6. Pay at-
tention to the markings on the
terminal block 13 (L for live, N
for neutral and for the earth
wire) (Fig. C).
Close the connection box 6.
Align the spotlight 1 into the
desired direction. For this, you
may need to slacken the fasten-
ing screws 8. After finish the
alignment, tighten the fastening
screws 8 again, to ensure a
secure hold.
Reinsert the fuse or switch the circuit
breaker back on. Your product is
now ready to use.
Start-up
Adjusting the
motion detector
Depending on the pre-adjustments
of the motion detector 9, the spot-
light 1 will switch itself on for a
certain period of time as soon as
the motion detector 9 detects
movement. These pre-adjustments
are made using the three controllers
on the underside of the motion
detector 9 (Fig. B).
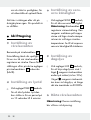
Setting the
lighting duration
Turn the rotary control TIME 11
clockwise to increase the dura-
tion of the illumination. The
lighting duration can be adjusted
within a time window of approx.
10 seconds to 4 minutes.
Adjusting the sensi-
tivity of the sensor
Turn the rotary control SENS 10
clockwise to increase the sensi-
tivity of the sensor.
Note: The motion detector 9
responds to heat radiation.
When outdoor temperatures
are low, it is more sensitive to
body heat than when outdoor
temperatures are warm. Be

12 GB
sure to regulate the sensitivity
of the sensor over the course
of the year.
Setting the
daylight level
Turn the rotary control LUX 12
to increase the daylight level:
In the position, the motion
detector only reacts at night
(at approx. 10 lx). In the
position, the motion detector
also responds at daylight levels,
as long as about 20,000 lx
are not exceeded.
Aligning the
motion detector
Note: Perform this adjustment at
twilight.
Slacken the locking screw 8.
Turn the rotary control LUX 12
to position .
Align the motion detector 9
into the central region of the
desired coverage area.
Move about through the cover-
age area until you are satisfied
with the response characteris-
tics of the motion detector 9.
To find the proper orientation,
change the position of the rotary
control SENS 10 or the orienta-
tion of the motion detector 9.
Note: Please note that the
motion detector 9 primarily
detects movements transverse
to the motion detector 9. If
you move directly towards the
motion detector 9, it cannot
detect this movement.
When you have aligned the
motion detector 9 satisfacto-
rily, re-tighten the fastening
screws 8 to fix the adjustment.
Turn the rotary control LUX 12
to the desired position. These
can be determined during the
dawn or twilight hours during
which the spotlight 1 should
respond.
Slowly turn the rotary control
LUX 12 clockwise until it reacts
to movement within the cover-
age area.

13 GB
Cleaning and Care
Before cleaning, remove the
fuse or switch off the circuit
breaker at the fuse box.
Never immerse the product in
water or other liquids. Otherwise
the product can be damaged.
Clean the product with a lint-free,
slightly moist cloth and mild
cleaning agent.
Reconnect the fuse or circuit
breaker for use after cleaning.
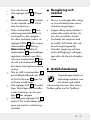
Disposal
The packaging is made
entirely of recyclable
materials, which you may
dispose of at local recycling facilities.
The Green Dot is not valid for Ger-
many.
b
a
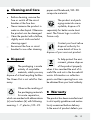
Observe the marking of
the packaging materials
for waste separation,
which are marked with abbreviations
(a) and numbers (b) with following
meaning: 1–7: plastics / 20–22:
paper and fibreboard / 80–98:
composite materials.
The product and pack-
aging materials are re-
cyclable, dispose of it
separately for better waste treat-
ment. The Triman logo is valid in
France only.
Contact your local refuse
disposal authority for
more details of how to
dispose of your worn-out product.
To help protect the envi-
ronment, please dispose
of the product properly
when it has reached the end of its
useful life and not in the household
waste. Information on collection
points and their opening hours can
be obtained from your local authority.
Warranty
The product has been manufactured
to strict quality guidelines and m
eticu-
lously examined before delivery.
In the event of product defects you

14 GB
have legal rights against the retailer
of this product. Your legal rights are
not limited in any way by our war-
ranty detailed below.
The warranty for this product is 3
years from the date of purchase.
Should this product show any fault
in materials or manufacture within
3 years from the date of purchase,
we will repair or replace it – at our
choice – free of charge to you.
The warranty period begins on the
date of purchase. Please keep the
original sales receipt in a safe loca-
tion. This document is required as
your proof of purchase. This war-
ranty becomes void if the product
has been damaged, or used or
maintained improperly.
The warranty applies to defects in
material or manufacture. This war-
ranty does not cover product parts
subject to normal wear, thus pos-
sibly considered consumables (e.g.
batteries) or for damage to fragile
parts, e.g. switches, rechargeable
batteries or glass parts.

15 FI
Merkkien selitykset ........................................................... Sivu 16
Yleistä ............................................................................................Sivu 16
Tarkoituksenmukainen käyttö ........................................................Sivu 16
Osien kuvaus ..................................................................................Sivu 16
Tekniset tiedot .................................................................................Sivu 17
Toimituksen sisältö ..........................................................................Sivu 17
Yleiset turvallisuusohjeet .............................................Sivu 17
Ennen asennusta .................................................................. Sivu 19
Toimenpiteet ennen käyttöönottoa ..................... Sivu 19
Asennus .......................................................................................Sivu 19
Käyttöönotto ........................................................................... Sivu 21
Liiketunnistimen säätäminen...........................................................Sivu 21
Valaisuajan säätäminen ................................................................Sivu 21
Anturin herkkyyden säätäminen ....................................................Sivu 21
Päivänvalon määrän säätäminen..................................................Sivu 21
Liiketunnistimen kohdistaminen ......................................................Sivu 21
Puhdistus ja hoito ................................................................Sivu 22
Hävittäminen .......................................................................... Sivu 22
Takuu .............................................................................................Sivu 23

16 FI
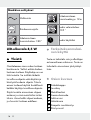
Merkkien selitykset
Vaihtovirta Liiketunnistimen
tunnistusetäisyys: 12 m
Roiskevesisuojattu Ledin valaisukulma:
105 °
Liiketunnistimen
tunnistuskulma: 180 ° Ledin käyttöikä
LED-ulkovalo 8,5 W
Yleistä
Onnittelemme sinua uuden tuotteen
hankinnasta. Valitsit erittäin korkea-
laatuisen tuotteen. Käyttöohje on osa
tätä tuotetta. Se sisältää tärkeitä
turvallisuusohjeita sekä käyttöä ja
hävitystä koskevia ohjeita. Tutustu
ennen tuotteen käyttöä huolellisesti
kaikkiin käyttöja turvallisuusohjeisiin.
Käytä tuotetta ainoastaan ohjeen
mukaan ja siinä mainittuihin tarkoi-
tuksiin. Anna kaikki ohjeet mukaan,
jos luovutat tuotteen edelleen.
Tarkoituksenmukai-
nen käyttö
Tuote on tarkoitettu sisä- ja ulkotilojen
automaattiseen valaisuun. Tuote on
tarkoitettu ainoastaan yksityiskäyt-
töön.
Osien kuvaus
1 Kohdelamppu
2 Jousilevy
3 Metallimutteri
4 Asennuskannake
5 Lukitusruuvi
6 Liitäntärasia
7 Kaapelin ruuvikiinnitys
8 Kiristysruuvit

17 FI
9 Liiketunnistin
10 Kääntösäädin SENS
(herkkyys)
11 Kääntösäädin TIME
(kytkentäaika)
12 Kääntösäädin LUX
(valoherkkyys)
13 Riviliitin
14 Kaapeliliitin
Tekniset tiedot
Käyttöjännite: 230 V∼ 50 Hz,
8,5 W
LEDit: 16 x LED à
0,5 W
Himmennyskytkin: säätöalue
10 lx – 20 000 lx
Valaisuaika: säädettävissä
n. 10 s–4 min
Suojaluokka: I
Suojaustapa: IP44 (roiskevesi-
suojattu)
Mitat (K x L x S): n. 197 x 149 x
121 mm
Heijastuspinta: maks. 190 x
149 mm
Asennuskorkeus: noin 2,5 m
Paino: noin 640 g
Toimituksen sisältö
1 LED-ulkovalaisin liiketunnisti-
mella
2 tulppaa (Ø 6 mm)
2 ruuvia
1 asennus- ja käyttöohje
Yleiset turvalli-
suusohjeet
Tutustu ennen tuotteen käyttöä
huolellisesti kaikkiin käyttö- ja
turvallisuusohjeisiin. Anna kaikki
ohjeet tuotteen mukana mahdolli-
selle uudelle omistajalle.
HENGEN- JA
TAPATURMAN-
VAARA LAPSILLE!
Älä koskaan jätä lapsia yksin
pakkausmateriaalin kanssa.
Pakkausmateriaali voi aiheuttaa
tukehtumisen. Lapset aliarvioi-
vat useimmiten vaaratilanteet.
Pidä tuote aina lasten ulottu-
mattomissa.
Tuotetta voivat käyttää 8 vuotta
täyttäneet lapset sekä henkilöt,
jotka ovat fyysisiltä tai psyykkisiltä

18 FI
kyvyiltään tai aisteiltaan rajoittu-
neita tai joilla ei ole kokemusta
tai tietoa tuotteen käytöstä, jos
he käyttävät tuotetta valvonnan
alaisina tai heitä on opastettu
tuotteen turvallisessa käytössä
ja he ovat tietoisia tuotteeseen
liittyvistä vaaroista. Lapset eivät
saa leikkiä tuotteella. Lapset ei-
vät saa puhdistaa tai huoltaa
tuotetta ilman valvontaa.
Hengenvaara
sähköiskun vuoksi
Tarkista aina ennen sähköverk-
koon liittämistä, ettei tuotteessa
ole vaurioita. Älä milloinkaan
käytä tuotetta, jos havaitset
siinä jotain vikaa.
Varmista ennen asennusta, että
käytettävissä oleva verkkojännite
on yhdenmukainen tuotteen
käyttöjännitteen kanssa
(230 V∼ 50 Hz). Ellei näin ole,
älä asenna tuotetta.
VARO! PALOVAMMAN
VAARA! Varmista, että tuote
on sammutettu ja jäähtynyt
vähintään 15 minuuttia ennen
kuin kosketat sitä. Tuote voi
tulla erittäin kuumaksi käytön
aikana.
0,5 m
TULIPALON
VAARA! Asenna
tuote vähintään
0,5 metrin etäisyydelle materi-
a
aleista, joihin säteily kohdistuu
.
Liiallinen lämmönkehitys voi sy-
tyttää tulipalon.
VARO! LOUK-
KAANTUMIS-
VAARA!
Rikkoutunut lampunlasi on uusit-
tava ennen tuotteen seuraavaa
käyttöä.
Tarkoitettu asennettavaksi kos-
ketusetäisyyden ulkopuolelle.
Tuote ei sisällä osia, jotka käyt-
täjä voisi itse huoltaa.
Ledejä ei voi vaihtaa uusiin.
Kun ledit ovat tulleet elinkaarensa
päähän, ne täytyy korjauttaa
pätevällä sähköasentajalla,
muutoin tuote täytyy hävittää.
LED-valaisinta tulee käyttää vain
valaisimeen asennetulla liitäntä-
laitteella.
Valaisin kuluttaa hieman virtaa
ollessaan kytkettynä pistorasiaan
– myös silloin kun se on kytketty
pois päältä. Tuote kytketään

19 FI
kokonaan pois päältä kytke-
mällä virtakytkin pois päältä.
Ennen asennusta
Tärkeää: Sähköliitännät saa suo-
rittaa vain pätevä sähköasentaja tai
sähköasennuksiin koulutettu henkilö.
Hänen tulee tietää tuotteen ominai-
suuksista ja liitäntämääräyksistä.
Varmista ennen asennusta, ettei
tuotteeseen liitettävässä joh-
dossa ole jännitettä. Poista tätä
varten sulake tai kytke sulake-
kotelon suojakytkin pois päältä
(0-asento).
Tarkista jännitteettömyys jänni-
temittarilla.
Toimitukseen kuuluva asennus-
materiaali soveltuu tavalliseen
kiinteään seinään. Ota selvää
myös millainen asennusmateri-
aali soveltuu valitsemaasi asen-
nuspintaan. Kysy tarvittaessa
neuvoa alan ammattilaiselta.
Toimenpiteet ennen
käyttöönottoa
Huomautus: poista tuotteesta
kaikki pakkausmateriaalit.
Asennus
Varmista, ettet seinää poratessas
i
osu sähkö-, kaasu tai vesijohtoi-
hin. Tutustu myös porakoneesi
käyttöohjeeseen ja noudata tur-
vallisuusohjeita. Muutoin seu-
rauksena voi olla kuolema tai
sähköiskun aiheuttama louk-
kaantuminen.
Huomioi seuraavat asiat asennus-
paikan valinnassa:
Varmista, että kohdelamppu 1
valaisee halutun alueen. Voit
liikuttaa kohdelamppua 1
pystysuunnassa.
Varmista, että liiketunnistin 9
ulottuu halutulle alueelle. Liike-
tunnistimen 9 tunnistusalue on
kork. 12 metriä n. 180° tunnis-
tuskulmassa (asennuskorkeud
esta
riippuen – paras korkeus on
2,50 m) (kuva D).

20 FI
Varmista, etteivät katuvalot
valaise liiketunnistinta 9 yöllä.
Tämä voi vaikuttaa liiketunnisti-
men toimintaan.
Suorita asennus seuraavasti:
Irrota lukitusruuvi 5 ristipäi-
sellä ruuvimeisselillä, niin voit
irrottaa asennuskannakkeen 4
kohdelampusta 1.
Pidä asennuskannaketta 4
vaakasuorassa asennossa
(tarvittaessa vesivaa´an avulla)
seinää vasten ja merkitse
kiinnitysreiät.
Poraa kiinnitysreiät (Ø 6 mm)
ja aseta tulpat poranreikiin
(kuva A).
Kiinnitä asennuskannake 4
toimitukseen sisältyvillä ruuveilla.
Kiinnitä kohdelamppu 1
asennuskannakkeeseen 4
kiristämällä ristipäisellä ruuvi-
meisselillä lukitusruuvi 5 sekä
jousilevy 2 ja metallimutteri 3
(kuva A).
Avaa liitäntärasia 6 sen
jälkeen, kun olet irrottanut risti-
päisellä ruuvimeisselillä liitän-
tärasian 6 kannen.
Pujota liitäntäkaapeli tyypiltään
H 05 RN-F 3G 1,0 mm2 kaa-
pelin ruuvikiinnityksen 7 läpi
liitäntärasiaan 6. Liitäntäkaa-
peli saa olla korkeintaan 2,5 m
pitkä. Kiinnitä liitäntäkaapeli
ensin kaapeliliittimellä 14 ja
sitten kääntämällä ruuvikiinni-
tyksen 7 mutteria.
Yhdistä liitäntäkaapeli riviliitti-
mellä 13 liitäntärasiaan 6.
Huomioi riviliittimen 13 merkin-
nät (L jännitteinen johdin, N
nollajohdin ja suojajohdin)
(kuva C).
Sulje liitäntärasia 6.
Kohdista kohdelamppu 1 ha-
luttuun suuntaan. Löysää tarvit-
taessa hieman kiristysruuveja 8.
Kiristä kiristysruuveja 8 koh-
distamisen jälkeen, jotta tukeva
kiinnitys on taattu.
A tke suojakytkin jälleen päälle.
Tuote on nyt käyttövalmis.
Sidan laddas...
Sidan laddas...
Sidan laddas...
Sidan laddas...
Sidan laddas...
Sidan laddas...
Sidan laddas...
Sidan laddas...
Sidan laddas...
Sidan laddas...
Sidan laddas...
Sidan laddas...
Sidan laddas...
Sidan laddas...
Sidan laddas...
Sidan laddas...
Sidan laddas...
Sidan laddas...
Sidan laddas...
Sidan laddas...
Sidan laddas...
Sidan laddas...
Sidan laddas...
Sidan laddas...
Sidan laddas...
Sidan laddas...
Sidan laddas...
Sidan laddas...
Sidan laddas...
Sidan laddas...
Sidan laddas...
Sidan laddas...
Sidan laddas...
Sidan laddas...
Sidan laddas...
Sidan laddas...
Sidan laddas...
Sidan laddas...
Sidan laddas...
Sidan laddas...
Sidan laddas...
Sidan laddas...
Sidan laddas...
Sidan laddas...
Sidan laddas...
Sidan laddas...
-
 1
1
-
 2
2
-
 3
3
-
 4
4
-
 5
5
-
 6
6
-
 7
7
-
 8
8
-
 9
9
-
 10
10
-
 11
11
-
 12
12
-
 13
13
-
 14
14
-
 15
15
-
 16
16
-
 17
17
-
 18
18
-
 19
19
-
 20
20
-
 21
21
-
 22
22
-
 23
23
-
 24
24
-
 25
25
-
 26
26
-
 27
27
-
 28
28
-
 29
29
-
 30
30
-
 31
31
-
 32
32
-
 33
33
-
 34
34
-
 35
35
-
 36
36
-
 37
37
-
 38
38
-
 39
39
-
 40
40
-
 41
41
-
 42
42
-
 43
43
-
 44
44
-
 45
45
-
 46
46
-
 47
47
-
 48
48
-
 49
49
-
 50
50
-
 51
51
-
 52
52
-
 53
53
-
 54
54
-
 55
55
-
 56
56
-
 57
57
-
 58
58
-
 59
59
-
 60
60
-
 61
61
-
 62
62
-
 63
63
-
 64
64
-
 65
65
-
 66
66


på andra språk
- eesti: LIVARNO 288404 Omaniku manuaal
- Deutsch: LIVARNO 288404 Bedienungsanleitung
- polski: LIVARNO 288404 Instrukcja obsługi
- English: LIVARNO 288404 Owner's manual