Kenwood FS 620 Bruksanvisning
- Kategori
- Mixer / matberedare tillbehör
- Typ
- Bruksanvisning
Denna manual är också lämplig för

English 2 - 7
Nederlands 8 - 13
Français 14 - 19
Deutsch 20 - 25
Italiano 26 - 31
Português 32 - 37
Español 38 - 43
Dansk 44 - 49
Svenska 50 - 55
Norsk 56 - 61
Suomi 62 - 67
Türkçe 68 - 73
Ïesky 74 - 79
Magyar 80 - 86
Polski 87 - 92
Русский 93 - 98
Ekkgmij 99 - 105
Head Office Address:
Kenwood Limited, New Lane, Havant, Hampshire PO9 2NH, UK
www.kenwoodworld.com
Designed and engineered by Kenwood in the UK
Made in China
18803/3
FS620 series
1
1
2
2
3
3
0
10
20
30
6
0
´¸∂w
601 - 011
UNFOLD

before using your Kenwood
appliance
●
Read these instructions carefully and
retain for future reference.
●
Remove all packaging and any
labels.
safety
machine safety
●
This machine produces steam which
can burn you.
●
Don't get burnt by steam coming
out of your steamer, especially when
removing the lid.
●
Be careful when handling anything: any
liquid, steamer part or condensation
will be very hot. Use oven gloves.
●
Never let the cord hang down where
a child could grab it.
●
Never use a damaged steamer. Get
it checked or repaired: see 'service
and customer care'.
●
Never put the steamer, cord or plug
in water – you could get an electric
shock. Keep the controls clean and
dry.
●
Always unplug the steamer when
not in use.
●
Never put your steamer on a cooker
or in an oven.
●
Never move your steamer if it
contains anything hot.
●
This appliance is not intended for
use by persons (including children)
with reduced physical, sensory or
mental capabilities, or lack of
experience and knowledge, unless
they have been given supervision or
instruction concerning use of the
appliance by a person responsible
for their safety.
●
Children should be supervised to
ensure that they do not play with the
appliance.
●
Only use the appliance for its
intended domestic use. Kenwood
will not accept any liability if the
appliance is subject to improper use,
or failure to comply with these
instructions.
food safety
●
Cook meat, poultry, fish and seafood
thoroughly. And never cook them
from frozen.
●
If you're using more than one
basket, put meat, poultry and fish in
the bottom basket so that its raw
juice cannot drip onto food below.
●
Do not reheat cooked rice in your
steamer.
before plugging in
●
Make sure your electricity supply is
the same as the one shown on the
underside of your steamer.
●
This appliance conforms to EC
directive 2004/108/EC on
Electromagnetic Compatibility and
EC regulation no. 1935/2004 of
27/10/2004 on materials intended
for contact with food.
before using for the first time
1 Operate the assembled steamer with
water in the tank for 5-10 minutes in
order to flush the appliance through
before use.
2Wash the parts: see 'care and
cleaning'.
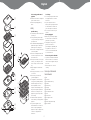
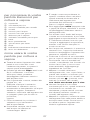
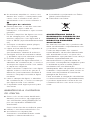
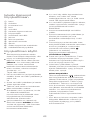
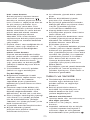
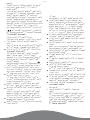
know your Kenwood
food steamer
햲 lid
햳 rice bowl
햴 removable basket tray
햵 baskets
햶 water fill tray
햷 drip tray
햸 steam diffuser
햹 removable water tank
햺 base
햻 boost button
햽 neon light for timer
햾 timer
햿 water empty indicator light
헀 reheat button
English
2
1
1
1
2
3
1
1
2
2
3
3
3
2
1
0
1
0
20
30
6
0
0
10
20
30
6
0
1
1
2
2
3
3
햲
햳
햴
햶
햷
햹
햸
햺
햻
햾
햿
햽
햵
헀

to use your steamer
●
Keep your steamer away from walls
and overhanging cupboards: the
steam could damage them.
●
Season food after cooking. If
seasoning gets into the water, it
could damage the heating element.
●
See the cooking guides on pages 6
and 7.
Fill the water tank with water, either:-
1 Lift off the water tank and fill with
cold water. Place the water tank
back onto the base unit and gently
push into place.
or
2 Fit the water tank first, then pour
cold water into the tank.
●
Always make sure the water is below
the ‘Max’ level marked.
●
Filtered water is best as it reduces
limescale prolonging the life and
efficiency of your steamer (Kenwood
water filters are widely available).
●
Don't add anything (even salt or
pepper) to the water – it could
damage the heating element.
●
To avoid the water level dropping too
low, you can top up during cooking.
Simply pull out the water fill tray and
add fresh water, taking care not to
overfill.
●
If the water tank becomes empty
during operation, the water empty
indicator light will flash and the
steamer will beep.
3 Sit the drip tray on top of the water
tank.
4 Fit the removable basket trays, rim
uppermost into the baskets (they are
interchangeable). Add the food.
5 Stack the baskets on the base,
starting with the lowest numbered
basket at the bottom and the
highest number at the top . (The
numbers are marked on the basket
handles).
using the rice bowl
●
Put water and rice in the rice bowl.
Put the rice bowl into a basket. (You
can also cook something in the
other basket(s) if required).
6 Fit the lid, plug in and set the timer.
The light will come on and steam will
soon appear.
boost button
If the boost button is pressed
immediately after switching on the
steamer, this will give an initial burst of
power which will get the steamer up
to temperature more quickly. This will
be accompanied by its light glowing.
The boost function will operate for
approximately 5 minutes and then
the steamer will automatically
continue cooking at the standard
rate. If the boost button is not
selected, the steamer will operate at
the standrd rate for the duration of
the cooking operation.
7When the time is up, a bell will ring,
the light will go out and your steamer
will switch off automatically.
reheat button
At the completion of the cooking
operation, food that has cooled
slightly can be re-heated. Providing
there is water in the tank simply
press the reheat button , its light
will glow and the steamer will
produce steam for approximately 5
minutes.
8 Unplug and clean after use.
hints
●
Condensation will drip from the
upper basket into the lower basket.
So make sure the flavours go well
together.
●
Liquid left over in the drip tray is
good for making soup or stock. But
be careful: it will be very hot.
●
You can also use the rice bowl for
cooking anything in liquid (eg
vegetables in sauces or poaching
fish in water).
●
Leave gaps between pieces of food.
3

●
Stir large amounts half way through
cooking.
●
Smaller amounts cook faster than
larger amounts.
●
Similar-sized pieces of food cook
evenly.
●
Like a conventional oven, you can
add food as you go along. If
something needs less time, add it
later.
●
If you lift the lid, steam will escape
and cooking will take longer.
●
Food will keep cooking when your
steamer switches off, so remove it
immediately.
●
The cooking times on pages 6 - 7
are guides based on using the lower
basket. The higher the food is, the
slower it cooks. So allow an extra
5 - 10 minutes for food in the next
basket above. Check that food is
thoroughly cooked before eating.
●
If your food's not cooked enough,
reset the time. You may need to top
up with water.
care and cleaning
●
Before cleaning, always switch off,
unplug and let everything cool.
●
Never put your steamer base in
water or let the cord or plug get wet.
cleaning the base
●
Wipe with a damp cloth, then dry.
all other parts
●
Wash in warm soapy water, then dry.
●
For storage, stack the baskets one
inside the other, starting with the
highest numbered basket and
finishing with basket number 1
.
descaling
●
The appliance should be de-scaled
once a month or after every 30 uses
depending upon which comes first.
1 Fit the water tank and fill with 200ml
of household appliance descaler,
then fill the water tank up to the
MAX level with water (approximately
800ml).
2 Fit the drip tray, one basket and the
lid.
3 Plug in the appliance, switch on and
allow the steamer to operate for 5
minutes.
4 Switch off and unplug the appliance
and allow to stand overnight.
5 Empty and discard the descaling
liquid.
6Wash the removable water tank, drip
tray, basket and lid in warm soapy
water, then dry.
7 Refill the water tank with fresh water,
refit the parts and allow to run for 5
minutes. Empty and discard any
remaining water.
8Wash the water tank, drip tray,
basket and lid in warm soapy water.
9 The appliance is now ready for use.
service and customer
care
●
If the cord is damaged it must, for
safety reasons, be replaced by
Kenwood or an authorised Kenwood
repairer.
If you need help with:
●
using your steamer
●
servicing or repairs
Contact the shop where you bought
your steamer.
●
Designed and engineered by
Kenwood in the UK.
●
Made in China.
4

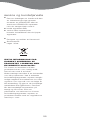
IMPORTANT INFORMATION FOR
CORRECT DISPOSAL OF THE
PRODUCT IN ACCORDANCE
WITH EC DIRECTIVE
2002/96/EC.
At the end of its working life, the product
must not be disposed of as urban
waste.
It must be taken to a special local
authority differentiated waste collection
centre or to a dealer providing this
service.
Disposing of a household appliance
separately avoids possible negative
consequences for the environment and
health deriving from inappropriate
disposal and enables the constituent
materials to be recovered to obtain
significant savings in energy and
resources. As a reminder of the need to
dispose of household appliances
separately, the product is marked with
a crossed-out wheeled dustbin.
5

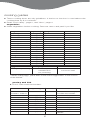
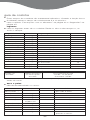
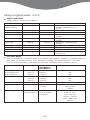
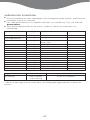
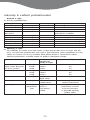
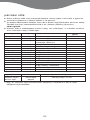
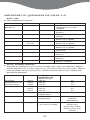
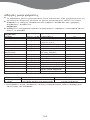
cooking guides
● These cooking times are only guidelines. If the boost function is used reduce the
cooking time by 5-10 minutes.
● Read 'food safety', page 2, and 'hints', page 4.
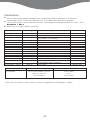
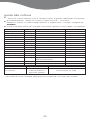
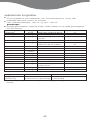
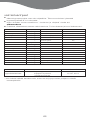
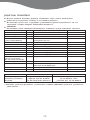
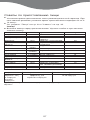
vegetables
● Clean vegetables before cooking. Remove stems and peel if you like
6
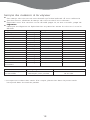
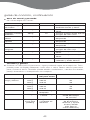
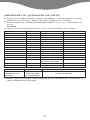
vegetable quantity preparation minutes
Asparagus 454g (1lb) Trim 15
Beans, green 454g (1lb) Trim 15-20
Beans, runner 454g (1lb) Trim and thinly slice 15-20
Broccoli 454g (1lb) Cut into florets 20
Brussels sprouts 454g (1lb) Trim and cut bases 25
Cabbage 1 small Shred 25
Carrots 454g (1lb) Thinly slice 20
Cauliflower 1 medium Cut into florets 20-25
Courgettes 454g (1lb) Thinly slice 15
Celery 1 head Thinly slice 15
Leeks 3-4 Thinly slice 15
Mange tout 227g (8oz) Trim 15
Mushrooms, button 454g (1lb) Wipe 10
Parsnips 454g (1lb) Dice or thinly slice 15
Peas 454g (1lb) Shell 15
Potatoes, new 454g (1lb) Wipe 30-40
eggs preparation minutes
Boiling* or poaching Use a cup or 10-15 for soft,
ramekin dish 15-20 for hard
for poaching
* When boiling eggs, place them in the built in egg holders in the bottom
of the basket.
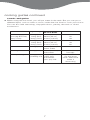
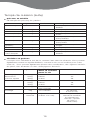
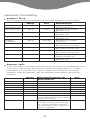
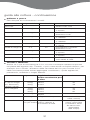
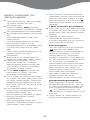
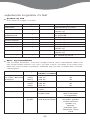
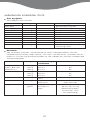
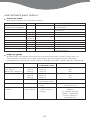
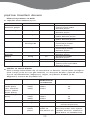
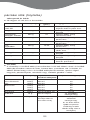
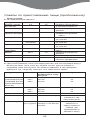
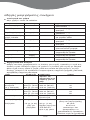
food quantity minutes comments
Chicken, 4-5 30 Steam until thoroughly
boneless breasts cooked and tender
Clams 454g (1lb) 10 Steam until open
Prawns, medium 454g (1lb) 10 Steam until pink
Fish, fillets 227g (8oz) 10-20 Steam until it flakes
Fish, steak 2.5cm (1") thick 15-20 Steam until it flakes
Fish, whole 340g (12oz) 15-20 Steam until it flakes
Lobster tails 2-4 20 Steam until red
Mussels 454g (1lb) 15 Steam until open
Oysters 6 15 Steam until open
Scallops 227g (8oz) 15 Steam until hot and
tender
poultry and fish
● Don't overcrowd the baskets.

7
cooking guides continued
cereals and grains
● When using the rice bowl, you still put water in the tank. But you can put a
different liquid, such as wine or stock, inside the rice bowl to cook your rice in.
You can also add seasoning, chopped onions, parsley, almonds or sliced
mushrooms.
food quantity liquid to add minutes
to rice bowl
White long-grain 100g (4oz) 125ml (4fl oz) 25
rice (eg Basmati, 200g (8oz) 250ml (9fl oz) 30
easy cook) 300g (12oz) 375ml (13fl oz) 35
Brown rice 100g (4oz) 125ml (4fl oz) 40
200g (8oz) 250ml (9fl oz) 45
300g (12oz) 375ml (13fl oz) 50
Couscous 200g (8oz) 150ml (5fl oz) 15-20
warm water
Porridge 75g (3oz) 450ml (16fl oz) 40 (stir half way
milk/water through)
Rice pudding 75g (3oz) 25g (1oz) caster 80 (after 60 mins,
pudding rice sugar and stir and reset
375-500ml timer. Add more
(3/4-1pt) milk water if
necessary)

voordat u uw Kenwood-
apparaat gebruikt:
●
Lees deze instructies zorgvuldig
door en bewaar ze voor toekomstig
gebruik.
●
Verwijder alle verpakking en labels.
veiligheid
veiligheid apparaat
●
Dit apparaat produceert stoom
waaraan u zich kunt verbranden.
●
Zorg dat u zich niet verbrandt aan
de stoom die uit uw stoompan komt,
vooral wanneer u de deksel
verwijdert.
●
Wees voorzichtig: alle vloeistoffen,
onderdelen of condensatie van de
stoomkoker zijn erg heet! Draag
ovenhandschoenen.
●
Laat het snoer nooit op de grond
hangen omdat kinderen het dan vast
kunnen pakken.
●
Gebruik de stoompan nooit als hij
beschadigd is. Laat de pan nakijken
of repareren: zie ‘klantenservice’.
●
Dompel de stoomkoker, het snoer of
de stekker nooit onder in water – u
zou een elektrische schok kunnen
krijgen. Houd de regelknoppen
schoon en droog.
●
Trek altijd de stekker uit het
stopcontact als de stoomkoker niet
in gebruik is.
●
Plaats uw stoompan nooit op een
fornuis of in een oven.
●
Verplaats uw stoompan nooit als er
hete etenswaren of vloeistoffen
inzitten.
●
Dit apparaat is niet bedoeld voor
gebruik door personen (inclusief
kinderen) met verminderde
lichamelijke, zintuiglijke of geestelijke
vermogens of gebrek aan ervaring
en kennis, tenzij ze toezicht of
instructies over het gebruik van het
apparaat hebben gekregen van de
persoon die verantwoordelijk is voor
hun veiligheid.
●
Op kinderen moet toezicht
gehouden worden om er zeker van
te zijn dat ze niet met het apparaat
spelen.
●
Gebruik het apparaat alleen voor het
huishoudelijke gebruik waarvoor het
is bedoeld. Kenwood kan niet
aansprakelijk worden gesteld in het
geval dat het apparaat niet correct is
gebruikt, of waar deze instructies
niet worden opgevolgd.
veiligheid voedsel
●
Kook vlees, gevogelte en vis door en
door. Prepareer geen bevroren vlees,
gevogelte of vis.
●
Als u meer dan één mandje gebruikt,
moet u vlees, gevogelte en vis in het
onderste mandje doen zodat het
ongekookte vocht hiervan niet op
het onderliggende voedsel kan
druppen.
●
Verwarm niet opnieuw gekookte rijst
in uw stoomkoker.
voordat u de stekker in het
stopcontact steekt
●
Controleer of de stroomvoorziening
overeenkomt met de gegevens op
de onderzijde van uw stoompan.
●
Dit apparaat voldoet aan de EC-
richtlijn 2004/108/EC betreffende de
elektromagnetische compatibiliteit en
EC-bepaling 1935/2004 van
27/10/2004 betreffende materialen
die bestemd zijn voor contact met
voedsel.
voordat u de stoompan voor
het eerst gaat gebruiken
1 Zet de stoompan in elkaar en
schakel hem 5-10 minuten in met
water in het reservoir om het
apparaat voor gebruik te spoelen.
2Was de onderdelen; zie ‘onderhoud
en reiniging’.
8
Nederlands
Vouw voor het lezen a.u.b. de voorpagina met illustraties uit

ken uw Kenwood
stoompan
햲 deksel
햳 rijstkom
햴 verwijderbare mandlade
햵 manden
햶 watervulbak
햷 lekbak
햸 stoomverspreider
햹 verwijderbaar waterreservoir
햺 onderstel
햻 intensiteitsknop
햽 neonlampje voor timer
햾 timer
햿 indicatielampje voor leeg reservoir
헀 opwarmknop
gebruik van uw
stoompan
●
Houd uw stoompan uit de buurt van
muren en overhangende kasten: de
stoom zou beschadigingen kunnen
veroorzaken.
●
Kruid voedsel pas na het stomen.
Als er specerijen in het water terecht
komen, kan het verwarmingselement
beschadigen.
●
Zie de richtlijnen voor bereiding op
pagina 12 -13.
Vul het waterreservoir met water:
1Til het waterreservoir van het
onderstel en vul het met koud water.
Zet het waterreservoir weer op het
onderstel en duw het voorzichtig op
zijn plaats.
of
2 Zet het waterreservoir eerst op het
onderstel en giet er vervolgens koud
water in.
●
Zorg dat het water zich altijd onder
het aangegeven maximumniveau
bevindt.
●
U kunt het best gefilterd water
gebruiken, omdat daardoor minder
kalksteen ontstaat. Dit leidt tot een
langere levensduur en hoger
rendement van de stoomkoker
(Kenwood waterfilters zijn algemeen
verkrijgbaar).
●
Voeg niets toe aan het water (ook
geen zout of peper) - het
verwarmingselement zou
beschadigd kunnen raken
●
Om te voorkomen dat het
waterniveau te laag zakt, kunt u het
tijdens het koken bijvullen. Trek de
watervulbak uit het apparaat en voeg
vers water toe; zorg dat u het
apparaat niet te vol doet.
●
Als het waterreservoir leeg raakt
tijdens het koken, gaat het
indicatielampje dat aangeeft dat het
reservoir leegraakt, knipperen en
geeft de stoompan een pieptoon.
3 Plaats de lekbak bovenop het
waterreservoir.
4 Zet de verwijderbare mandladen met
de rand omhoog in de manden (ze
zijn onderling verwisselbaar). Voeg
het voedsel toe.
5 Stapel de bakken op het onderstel
met de bak met het laagste nummer
onderaan en de bak met het
hoogste nummer bovenaan . (De
nummers staan op de handgrepen
van de bakken).
het gebruik van de rijstkom
●
Doe water en rijst in de rijstkom.
Plaats de rijstkom in een bak. (U
kunt zo nodig daarnaast iets in de
andere bak(ken) koken).
6 Plaats de deksel op de pan, steek
de stekker in het stopcontact en stel
de tijdschakelaar in. Het lampje zal
gaan branden en na korte tijd zal er
stoom zichtbaar zijn.
9

intensiteitsknop
Als de intensiteitsknop
onmiddellijk nadat u de stoompan
hebt ingeschakeld, wordt ingedrukt,
wordt extra vermogen aangewend
om de stoompan sneller op
temperatuur te krijgen. Dit wordt
aangeduid doordat het bijbehorende
lampje gaat branden. De
intensiteitsfunctie blijft ongeveer 5
minuten werken; daarna blijft de
stoompan op de standaardintensiteit
werken. Als de intensiteitsknop niet
geselecteerd wordt, blijft de
stoompan gedurende het gehele
kookproces op de
standaardintensiteit werken.
7 Als de ingestelde tijd verstreken is,
zal er een belletje rinkelen, het
lampje zal uitgaan en uw stoompan
zal automatisch worden
uitgeschakeld.
opwarmknop
Aan het eind van het kookproces
kan voedsel dat enigszins is
afgekoeld opnieuw opgewarmd
worden. Zorg dat er water in het
reservoir zit en druk op de
opwarmknop ; het lampje gaat
branden en de stoompan produceert
gedurende ongeveer 5 minuten
stoom.
8 Haal na gebruik de stekker uit het
stopcontact en reinig de pan.
tips voor gebruik
●
Er zal condensatie vanuit het
bovenste mandje in het onderste
mandje druppen. Zorg er dus voor
dat de smaken goed bij elkaar
passen.
●
Vocht dat op het druppelplateau
achterblijft is geschikt voor het
bereiden van soep of bouillon. Let
op: dit vocht is erg heet.
●
U kunt de rijstkom ook gebruiken
om gerechten in een vloeistof te
bereiden (bijv. groenten met een
saus of in water gepocheerde vis).
●
Zorg dat de stukken voedsel ruimte
niet te dicht op elkaar zitten.
●
Roer halverwege de bereiding door
grotere hoeveelheden voedsel.
●
Kleinere hoeveelheden zijn sneller
klaar dan grotere hoeveelheden.
●
Stukken voedsel die even groot zijn
tegelijk klaar.
●
U kunt, net als bij een gewone oven,
voedsel toevoegen terwijl de
stoompan al bezig is. Als een
bepaald ingrediënt een kortere
bereidingstijd heeft, kunt u het later
toevoegen.
●
Als u de deksel van de pan tilt, zal er
stoom ontsnappen en zal de
bereiding langer duren.
●
Het eten zal door blijven koken als
uw stoompan uitschakelt, dus haal
het direct uit de pan.
●
De bereidingstijden op pagina
12 - 13 zijn slechts richtlijnen
gebaseerd op gebruik van het
onderste mandje. Hoe hoger het
voedsel in de pan wordt geplaatst,
hoe langer de bereiding zal duren.
Laat voedsel in het hogere mandje
dus 5-10 minuten extra doorstomen.
●
Als het voedsel onvoldoende is
gekookt, stel dan opnieuw de tijd in.
Mogelijk moet u het reservoir
bijvullen.
onderhoud en reiniging
●
Voordat u de stoompan gaat
reinigen, moet u hem altijd
uitschakelen, de stekker uit het
stopcontact halen en alle onderdelen
laten afkoelen.
●
Dompel het onderstel van uw
stoompan nooit in water en zorg dat
het snoer en de stekker niet nat
worden.
●
Ontworpen en ontwikkeld door
Kenwood in het VK.
●
Vervaardigd in China.
10

het onderstel reinigen
●
Met een vochtige doek afvegen en
daarna drogen.
overige onderdelen
●
In warm zeepsop wassen en
vervolgens afdrogen.
●
Als u de bakken wilt opbergen,
plaats ze dan in elkaar met de bak
met het hoogste nummer onderaan
en bak nr. 1 bovenaan .
ontkalken
●
Het apparaat moet eens per maand
of nadat het 30 keer gebruikt is,
ontkalkt worden, welk van beide
situaties zich het eerst voordoet.
1Vul het waterreservoir met 200 ml
ontkalkingsmiddel voor huishoudelijk
gebruik; vul het waterreservoir
vervolgens to het MAX-niveau met
water (ongeveer 800 ml).
2 Zet de lekbak, één mandje in en de
deksel op de pan.
3 Steek de stekker in het apparaat en
schakel de stoompan 5 minuten in.
4 Schakel het apparaat uit en haal de
stekker uit het stopcontact; laat het
gedurende de nacht staan.
5 Leeg het apparaat en gooi het
ontkalkingsmiddel weg.
6Was het verwijderbare
waterreservoir, de lekbak, het
mandje en de deksel in warm
zeepsop en droog ze vervolgens af.
7Vul het waterreservoir met vers
water, plaats alle onderdelen in het
apparaat en schakel het 5 minuten
aan. Gooi de rest van het water
weg.
8Was het reservoir, de lekbak, het
mandje en de deksel in warm
zeepsop.
9 Het apparaat is nu klaar voor
gebruik.
onderhoud en
klantenservice
●
Als het snoer beschadigd is, moet
het om veiligheidsredenen door
KENWOOD of een door KENWOOD
geautoriseerd reparatiebedrijf
vervangen worden.
Als u hulp nodig hebt met:
●
het gebruik van uw apparaat of
●
onderhoud en reparatie
kunt u contact opnemen met de
winkel waar u het apparaat gekocht
hebt.
BELANGRIJKE INFORMATIE
VOOR DE CORRECTE
VERWERKING VAN HET
PRODUCT IN
OVEREENSTEMMING MET DE
EUROPESE RICHTLIJN
2002/96/EC
Aan het einde van de levensduur van
het product mag het niet samen met
het gewone huishoudelijke afval
worden verwerkt. Het moet naar een
speciaal centrum voor gescheiden
afvalinzameling van de gemeente
worden gebracht, of naar een
verkooppunt dat deze service
verschaft. Het apart verwerken van een
huishoudelijk apparaat voorkomt
mogelijke gevolgen voor het milieu en
de gezondheid die door een
ongeschikte verwerking ontstaan en
zorgt ervoor dat de materialen waaruit
het apparaat bestaat, teruggewonnen
kunnen worden om een aanmerkelijke
besparing van energie en grondstoffen
te verkrijgen. Om op de verplichting tot
gescheiden verwerking van elektrische
huishoudelijke apparatuur te wijzen, is
op het product het symbool van een
doorgekruiste vuilnisbak aangebracht.
11

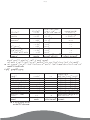
richtlijnen voor bereiding
●
Deze kooktijden zijn slechts richtlijnen. Bij het gebruik van de intensiteitsknop
kunt u de kooktijd met 5-10 minuten verkorten.
●
Lees ‘veiligheid voedsel’ op pagina 8 en ‘tips voor gebruik’ op pagina 10.
groenten
●
Maak groenten schoon voordat u ze gaat bereiden. Verwijder stengels en schil
de groenten indien gewenst.
12
groente hoeveelheid voorbereiding minuten
Asperges 454g Schillen 15
Bonen, groen 454g Schillen 15-20
Pronkbonen 454g Schillen en in plakjes 15-20
snijden
Broccoli 454g In roosjes verdelen 20
Spruiten 454g Schillen en onderkant 25
afsnijden
Kool 1 kleine Schaven 25
Wortels 454g In plakjes snijden 20
Bloemkool 1 middelmaat In roosjes verdelen 20-25
Courgettes 454g In plakjes snijden 15
Selderij 1 stronk In plakjes snijden 15
Prei 3-4 stuks In plakjes snijden 15
Peultjes 227g Schillen 15
Champignons 454g Schoonvegen 10
Pastinaak 454g In blokjes of plakjes snijden 15
Erwten 454g Doppen 15
Aardappels, nieuwe 454g Schoonvegen 30-40
eieren voorbereiding minuten
Koken* of pocheren Gebruik een kopje of zacht: 10-15
bakje voor het pocheren hard: 15-20
* Als u eieren wilt koken, leg ze dan in de ingebouwde eihouders onder in de
bak.

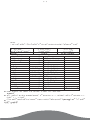
richtlijnen voor bereiding vervolg
vis en gevogelte
●
Doe de mandjes niet te vol.
graanproducten
●
Als u gebruik maakt van de rijstkom, moet u toch water in het reservoir doen. U
kunt de rijstkom echter ook met een andere vloeistof vullen, bijvoorbeeld wijn of
bouillon, om de rijst in te koken. U kunt ook specerijen, gesnipperde uien,
peterselie, amandelen of gesneden champignons toevoegen.
13
voedsel hoeveelheid minuten opmerkingen
Kip, borststukken 4-5 30 Stomen tot goed gaar en mals
zonder bot
Schelpdieren 454g 10 Stomen tot schelpen openen
Garnalen, 454g 10 Stomen tot ze roze zijn
medium
Vis, filet 227g 10-20 Stomen tot vis uiteenvalt
Vis, moot 2,5cm dik 15-20 Stomen tot vis uiteenvalt
Vis, hele 340g 15-20 Stomen tot vis uiteenvalt
Kreeftenstaartjes 2-4 20 Stomen tot ze rood zijn
Mosselen 454g 15 Stomen tot schelpen openen
Oesters 6 15 Stomen tot schelpen openen
Sint- 227g 15 Stomen tot ze heet en mals
Jakobsschelpen zijn
voedsel hoeveelheid hoev. vloeistof minuten
in rijstkom
Witte langkorrelige 100g 125ml 25
rijst (bijv. Basmati, 200g 250ml 30
snelkookrijst) 300g 375ml 35
Bruine rijst 100g 125ml 40
200g 250ml 45
300g 375ml 50
Koeskoes 200g 150ml 15-20
warm water
(Havermout) pap 75g 450ml 40 (halverwege
melk/water doorroeren)
Rijstebrij 75g rijst voor 25g griessuiker 80 (na 60 min. roeren
rijsterbrij en 375-500ml en tijdschakelaar opnieuw
melk instellen. Indien nodig
meer water toevoegen)

avant d’utiliser votre appareil
Kenwood
●
Lisez et conservez soigneusement
ces instructions pour pouvoir vous y
référer ultérieurement.
●
Retirez tous les éléments
d’emballage et les étiquettes.
sécurité
sécurité de l’appareil
●
Cet appareil produit de la vapeur qui
risque de vous brûler.
●
Lorsque vous soulevez le couvercle,
faites attention à la vapeur qui
s’échappe car vous pouvez vous
brûler.
●
Prenez soin d’utiliser des gants
lorsque vous utilisez l’appareil, car
les liquides et la vapeur ou la
condensation sont très chauds.
●
Evitez de laisser le cordon
suspendu, un enfant pourrait s’en
emparer.
●
N’utilisez jamais un appareil
endommagé. Faites-le vérifier ou
réparer: Reportez-vous à la section
“Service après-vente”.
●
Ne jamais plonger l’appareil de
cuisson à la vapeur, le cordon ou la
prise électrique dans de l’eau – vous
pourriez recevoir un choc électrique.
Gardez les commandes propres et
sèches.
●
Débranchez toujours votre appareil
de cuisson à la vapeur quand vous
ne l’utilisez pas.
●
Ne mettez jamais votre appareil sur
une plaque de cuisson ou à
l’intérieur d’un four.
●
Ne déplacez jamais votre appareil
lorsqu’il contient des aliments
chauds.
●
Cet appareil n’est pas destiné à être
utilisé par des personnes (y compris
des enfants) dont les capacités
physiques, sensorielles ou mentales
sont diminuées, ou qui ne disposent
pas des connaissances ou de
l’expérience nécessaires, à moins
qu’elles n’aient été formées et
encadrées pour l’utilisation de cet
appareil par une personne
responsable de leur sécurité.
●
Les enfants doivent être surveillés
afin qu'ils ne puissent pas jouer avec
cet appareil.
●
N’employez l’appareil qu’à la fin
domestique prévue. Kenwood
décline toute responsabilité dans les
cas où l’appareil est utilisé
incorrectement ou que les présentes
instructions ne sont pas respectées.
sécurité des aliments
●
Faites cuire la viande, la volaille, le
poisson et les fruits de mer
soigneusement. Ne faites pas cuire
ces aliments lorsqu’ils sont encore
congelés.
●
Si vous utilisez plus d’un panier,
placez la viande, la volaille et le
poisson dans le panier inférieur afin
que les liquides non cuits ne
tombent pas sur les aliments placés
en-dessous.
●
Ne réchauffez pas du riz cuit dans
votre appareil de cuisson à la vapeur.
avant de brancher l’appareil
●
Assurez-vous que le courant
électrique que vous utilisez est le
même que celui qui est indiqué sous
votre appareil.
●
Cet appareil est conforme à la
directive 2004/108/CE de la CE sur
la compatibilité électromagnétique,
et au règlement 1935/2004 de la CE
du 27/10/2004 sur les matériaux
destinés au contact alimentaire.
14
Français
Avant de lire, dépliez la première page pour voir les illustrations

avant d’utiliser votre appareil
pour la première fois
1 Faites fonctionner le cuiseur-vapeur,
avec de l’eau dans le réservoir,
pendant 5 à 10 minutes, afin de
nettoyer l’appareil avant l’utilisation.
2 Lavez les pièces : voir “entretien et
nettoyage”.
faites connaissance
avec votre appareil de
cuisson à la vapeur
Kenwood
햲 couvercle
햳 cocotte pour le riz
햴 plateau amovible
햵 paniers
햶 plateau de remplissage d’eau
햷 égouttoir
햸 diffuseur de vapeur
햹 réservoir d’eau amovible
햺 base
햻 bouton boost (amplification de
puissance)
햽 voyant néon du minuteur
햾 minuteur
햿 témoin « réservoir d’eau vide »
헀 bouton « réchauffer »
utilisation de votre appareil
de cuisson à la vapeur
●
Eloignez votre appareil des murs et
des placards de cuisine, la vapeur
pourrait les abîmer
●
Salez votre nourriture après la
cuisson. Si le sel entrait en contact
avec l’élément électrique, il pourrait
l’endommager
●
Reportez-vous aux guides de
cuisson en pages 18 - 19.
Remplissez le réservoir d’eau de
l’une des manières suivantes : -
1 Soulevez le réservoir et remplissez-le
d’eau froide. Remettez le réservoir
sur la base et poussez-le doucement
dans la bonne position.
ou
2 Installez d’abord le réservoir d’eau,
puis versez de l’eau froide dans le
réservoir.
●
Assurez-vous toujours que le niveau
d’eau est en dessous du repère
‘Max’.
●
L’eau filtrée est préférable car elle
ralentit l’entartrage et prolonge ainsi
la vie utile et l’efficacité de votre
appareil de cuisson à la vapeur (les
filtres à eau Kenwood sont en vente
partout).
●
N’ajoutez aucun condiment (ni sel
ni poivre) à l’eau, cela pourrait
endommager l’élément électrique.
●
Afin d’éviter que le niveau d’eau ne
descende trop bas, vous pouvez
compléter le réservoir pendant la
cuisson. Retirez simplement le
plateau de remplissage d’eau et
ajoutez de l’eau fraîche, en prenant
soin de ne pas trop remplir.
●
Si le réservoir d’eau se vide
totalement pendant le
fonctionnement, le témoin «
Réservoir d’eau vide » clignote et
l’appareil émet un signal sonore.
3 Posez l’égouttoir sur le dessus du
réservoir d’eau.
4 Placez les plateaux amovibles, le
bord le plus élevé dans les paniers
(ils sont interchangeables). Ajoutez
les aliments.
5 Empilez les paniers sur la base, celui
portant le plus petit numéro en bas,
et celui avec le plus grand en haut
. (Les numéros sont marqués sur
les poignées des paniers).
utilisation de la cocotte pour
le riz
●
Placez l’eau et le riz dans la cocotte
pour le riz. Placez-la ensuite dans un
panier. (Vous pouvez aussi cuire
autre chose dans un ou plusieurs
autre(s) panier(s), si vous le désirez).
6 Posez le couvercle, branchez
l’appareil et mettez le minuteur en
marche. La lumière s’allume et la
vapeur apparaît très vite.
15

bouton boost
Si vous appuyez sur bouton boost
immédiatement après avoir mis
l’appareil de cuisson à la vapeur
sous tension, la puissance est
soudainement augmentée et
l’appareil atteint la température
requise plus rapidement. Le témoin
s’allume pour indiquer que cette
fonction est sélectionnée. La
fonction boost reste activée pendant
5 minutes environ. L’appareil de
cuisson à la vapeur poursuit ensuite
automatiquement la cuisson à la
puissance standard. Si le bouton
boost n’est pas sélectionné,
l’appareil de cuisson à la vapeur
fonctionne à la puissance standard
pendant toute la durée de la
cuisson.
7 Lorsque la cuisson est finie, le
minuteur sonne, la lumière s’éteint et
l’appareil s’arrête automatiquement.
bouton « réchauffer »
Après la cuisson, il est possible de
réchauffer des aliments qui ont
refroidi. Après vous être assuré que
le réservoir contient de l’eau,
appuyez simplement sur le bouton «
Réchauffer » , son témoin
s’allume et l’appareil de cuisson à la
vapeur produit de la vapeur pendant
5 minutes environ.
8 Après la cuisson; débranchez et
nettoyez l’appareil.
conseils
●
Des gouttes de condensation
couleront du panier supérieur au
panier inférieur. Veillez à cuire des
aliments avec des goûts
compatibles.
●
Les liquides qui s’accumulent dans
l’égouttoir sont excellents pour faire
de la soupe ou du bouillon. Soyez
prudent car ils sont très chauds.
●
Vous pouvez aussi utiliser votre
cocotte pour le riz pour pocher des
aliments (par exemple, des légumes
en sauce ou du poisson poché).
●
Laissez de la place entre chaque
aliment.
●
Remuez les aliments à mi-cuisson
pour les grosses quantités.
●
La cuisson est plus rapide si vous
avez peu d’aliments à cuire.
●
Pour obtenir une cuisson uniforme,
choisissez des aliments de taille
identique.
●
Comme dans un four traditionnel,
vous pouvez ajouter des ingrédients
au fur et à mesure. Si l’un des
ingrédients nécessite une cuisson
moindre, ajoutez-le plus tard.
●
Si vous soulevez le couvercle, la
vapeur s’échappera et le temps de
cuisson sera alors plus long.
●
Les aliments continuent à cuire
quand l’appareil s’arrête, retirez-les
immédiatement.
●
Les temps de cuisson indiqués
pages 18 - 19 sont une indication
basée sur l’utilisation du panier
inférieur. Plus les éléments sont
placés en hauteur, moins leur
cuisson est rapide. Par conséquent,
ajoutez 5-10 minutes à la cuisson
des aliments du panier
immédiatement au-dessus. Vérifiez
que les aliments sont bien cuits
avant de les manger.
●
Si vos aliments ne sont pas assez
cuits, remettez le minuteur à zéro. Il
vous faudra peut-être ajouter de
l’eau.
16

entretien et nettoyage
●
Eteignez, débranchez et laissez
toujours votre appareil refroidir avant
de le nettoyer.
●
N’immergez jamais la base de votre
appareil dans de l’eau et ne mouillez
pas la prise.
nettoyage de la base
●
Essuyez avec un chiffon humide,
puis séchez.
les autres parties
●
Lavez avec de l’eau tiède
savonneuse, puis séchez.
●
Pour ranger votre appareil, empilez
les paniers les uns dans les autres,
en commençant avec celui portant le
plus grand numéro pour finir avec
celui portant le numéro 1 .
détartrage
●
L’appareil doit être détartré une fois
par mois, ou toutes les 30
utilisations.
1 Remplissez le réservoir d’eau avec
200 ml de détartrant pour appareils
électroménagers, puis complétez
avec de l’eau, jusqu’au repère MAX
(environ 800 ml).
2 Installez le bac de récupération
d’eau, un panier et le couvercle.
3 Branchez l’appareil, mettez-le en
marche puis laissez-le fonctionner
pendant 5 minutes.
4 Eteignez l’appareil, débranchez-le
puis laissez reposer toute la nuit.
5Videz et jetez le liquide détartrant.
6 Lavez le réservoir d’eau amovible,
l’égouttoir, le panier et le couvercle
dans de l’eau chaude savonneuse,
puis séchez.
7 Remplissez le réservoir d’eau fraîche,
replacez les éléments et laissez
fonctionner 5 minutes. Videz et jetez
l’eau restante.
8 Lavez le réservoir d’eau, l’égouttoir,
le panier et le couvercle dans de
l’eau chaude savonneuse.
9Vous pouvez à présent utiliser
l’appareil.
service après-vente
●
Si le cordon est endommagé, il doit
être remplacé, pour des raisons de
sécurité, par KENWOOD ou par un
réparateur agréé KENWOOD.
Si vous avez besoin d’aide
concernant :
●
l’utilisation de votre appareil
●
l’entretien ou les réparations
Contactez le magasin où vous avez
acheté votre appareil.
●
Conçu et développé par Kenwood
au Royaume-Uni.
●
Fabriqué en Chine.
AVERTISSEMENTS POUR
L'ÉLIMINATION CORRECTE DU
PRODUIT AUX TERMES DE LA
DIRECTIVE EUROPÉENNE
2002/96/EC.
Au terme de son utilisation, le produit
ne doit pas être éliminé avec les
déchets urbains.
Le produit doit être remis à l'un des
centres de collecte sélective prévus par
l'administration communale ou auprès
des revendeurs assurant ce service.
Éliminer séparément un appareil
électroménager permet d'éviter les
retombées négatives pour
l'environnement et la santé dérivant
d'une élimination incorrecte, et permet
de récupérer les matériaux qui le
composent dans le but d'une
économie importante en termes
d'énergie et de ressources.Pour
rappeler l'obligation d'éliminer
séparément les appareils
électroménagers, le produit porte le
symbole d'un caisson à ordures barré.
17

temps de cuisson à la vapeur
●
Ces temps de cuisson ne sont donnés qu’à titre indicatif. Si vous utilisez la
fonction boost, réduisez le temps de cuisson de 5 à 10 minutes.
●
Reportez-vous à la section sur la sécurité page 14, et aux conseils, page 16.
légumes
●
Nettoyez les légumes et épluchez-les et parez-les avant la cuisson si vous le
désirez.
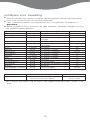
* Lorsque vous faites des oeufs à la coque, placez-les dans le porte-oeufs
incorporé dans le fond du panier.
18
légumes quantité préparation minutes
Asperges 500g épluchez 15
Haricots verts 500g épluchez 15-20
Haricots plats 500g épluchez/coupez 15-20
Broccoli 500g en bouquets 20
Choux de bruxelles 500g épluchez 25
Chou petit émincez 25
Carottes 500g tranches fines 20
Chou-fleur moyen en bouquets 20-25
Courgettes 500g tranches fines 15
Céleri 1 tête tranches fines 15
Poireaux 3-4 tranches fines 15
Pois en cosse 250g épluchez 15
Champignons 500g essuyez 10
Navets 500g en dés ou tranches 15
Pois 500g écossez 15
Pommes de terre 500g essuyez 30-40
nouvelles
oeufs préparation minutes
oeufs à la coque* Utilisez une tasse ou un 10-15 mollet
ou brouillés ramequin pour pocher 15-20 dur

Temps de cuisson (suite)
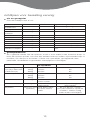
poisson et volaille
●
Ne remplissez pas trop les paniers
céréales et graines
●
Lorsque vous utiliserez le bol de riz, mettez l’eau dans le réservoir. Vous pouvez
également mettre un liquide différent, comme le vin ou un bouillon pour cuire
votre riz. Vous pouvez également ajoutez des condiments, des oignons hachés,
du persil, des amandes ou des champignons émincés.
19
aliments quantité minutes remarques
Blancs de poulet 4-5 30 Cuire jusqu’à ce qu’ils soient
tendres
Palourdes 500g 10 Cuire jusqu’à leur ouverture
Crevettes 500g 10 Cuire jusqu’à leur ouverture
Poisson (filets) 250g 10-20 Cuire jusqu’à ce qu’ils soient
roses
Poisson (tranches) 2,5cm 15-20 Cuire jusqu’à ce qu’elles soient
transparentes
Poisson (entier) 350g 15-20 Cuire jusqu’à ce qu’il soit
transparent
Langoustes 2-4 20 Cuire jusqu’à ce qu’elles soient
(queues) rouges
Moules 500g 5 Cuire jusqu’à leur ouverture
Huîtres 6 15 Cuire jusqu’à leur ouverture
Coquilles 250g 15 Cuire jusqu’à ce qu’elles soient
saint-Jacques tendres
aliments quantité liquide à ajouter minutes
dans la cocotte
pour le riz
Riz long type 100g 125ml 25
Basmati ou 200g 250ml 30
cuisson rapide 300g 375ml 35
Riz complet 100g 125ml 40
200g 250ml 45
300g 375ml 50
Couscous 200g 150ml 15-20
(eau chaude)
Porridge 75g 1/2 l eau/lait 40 (remuer
à micuisson)
Gâteau de riz 75g 25g sucre 80 (après 1h,
semoule 375ml/ 1/2 l lait). remuer et remettre
le minuteur en
marche ; ajouter
de l’eau si
nécessaire)

vor Gebrauch Ihres Kenwood-
Gerätes
●
Lesen Sie diese Anleitung sorgfältig
durch und bewahren Sie diese zur
späteren Benutzung auf.
●
Entfernen Sie jegliches
Verpackungsmaterial und alle
Aufkleber.
Wichtige
Sicherheitshinweise
Gerätesicherheit
●
Das Gerät entwickelt Dampf,
welcher zu Verbrennungen führen
kann.
●
Um Verbrennungen zu vermeiden,
achten Sie immer auf den
Dampfaustritt Ihres Dampfgarers,
insbesondere bei Abnahme des
Deckels.
●
Bitte gehen Sie beim Umgang mit
Ihrem Dampfgarer vorsichtig um:
Flüssigkeiten, Teile des Dampfgarers
und Kondensationswasser sind sehr
heiß. Ziehen Sie Ofenhandschuhe
an.
●
Halten Sie Kinder von dem Gerät
fern und lassen Sie niemals das
Kabel herunterhängen, wenn ein
Kind danach greifen könnte.
●
Verwenden Sie den Dampfgarer
niemals, wenn er beschädigt ist.
Lassen Sie ihn überprüfen oder
reparieren: siehe „Service und
Kundendienst“.
●
Legen Sie den Dampfgarer, das
Kabel oder den Stecker niemals in
Wasser – es besteht
Elektroschockgefahr. Halten Sie die
Kontrollelemente sauber und
trocken.
●
Ziehen Sie stets den Stecker aus der
Steckdose, wenn Ihr Dampfgarer
nicht im Gebrauch ist.
●
Stellen Sie Ihren Dampfgarer niemals
auf einen Herd oder in den
Backofen.
●
Bewegen Sie Ihren Dampfgarer
niemals, während sich etwas Heißes
darin befindet.
●
Dieses Gerät darf weder von
physisch noch von geistig
behinderten oder in ihrer Bewegung
eingeschränkten Personen
(einschließlich Kinder) benutzt
werden. Auch dürfen Personen die
weder Erfahrung noch Kenntnis im
Umgang mit dem Gerät haben,
dieses erst nach Anweisungen durch
eine für ihre Sicherheit zuständige
Person in Betrieb nehmen.
●
Kinder müssen überwacht werden,
damit sie mit dem Gerät nicht
spielen.
●
Verwenden Sie das Gerät nur für
seinen vorgesehenen Zweck im
Haushalt. Bei unsachgemäßer
Benutzung oder Nichteinhaltung
dieser Anweisungen übernimmt
Kenwood keinerlei Haftung.
Lebensmittelsicherheit
●
Kochen Sie Fleisch, Fisch und
Meeresfrüchte besonders sorgfältig.
Kochen Sie diese niemals in
gefrorenem Zustand.
●
Wenn Sie mehr als einen Korb
benutzen, legen Sie Fleisch, Geflügel
und Fisch in den unteren Korb,
damit der Saft der ungegarten
Lebensmittel nicht auf die darunter
liegenden Lebensmittel tropfen kann.
●
Verwenden Sie Ihren Dampfgarer
nicht zum Aufwärmen von
gekochtem Reis.
Vor dem Einstecken des
Steckers
●
Vergewissern Sie sich, dass Ihre
Stromversorgung den Angaben auf
der Unterseite des Dampfgarers
entspricht.
●
Das Gerät entspricht der EG-
Richtlinie 2004/108/EG und der EG-
Verordnung Nr. 1935/2004 vom
27/10/2004 über Materialien und
Gegenstände, die dazu bestimmt
sind, mit Lebensmitteln in Berührung
zu kommen.
20
Deutsch
Bevor Sie die Bedienungsanleitung lesen, bitte Deckblatt mit
Illustrationen auseinander klappen
Sidan laddas...
Sidan laddas...
Sidan laddas...
Sidan laddas...
Sidan laddas...
Sidan laddas...
Sidan laddas...
Sidan laddas...
Sidan laddas...
Sidan laddas...
Sidan laddas...
Sidan laddas...
Sidan laddas...
Sidan laddas...
Sidan laddas...
Sidan laddas...
Sidan laddas...
Sidan laddas...
Sidan laddas...
Sidan laddas...
Sidan laddas...
Sidan laddas...
Sidan laddas...
Sidan laddas...
Sidan laddas...
Sidan laddas...
Sidan laddas...
Sidan laddas...
Sidan laddas...
Sidan laddas...
Sidan laddas...
Sidan laddas...
Sidan laddas...
Sidan laddas...
Sidan laddas...
Sidan laddas...
Sidan laddas...
Sidan laddas...
Sidan laddas...
Sidan laddas...
Sidan laddas...
Sidan laddas...
Sidan laddas...
Sidan laddas...
Sidan laddas...
Sidan laddas...
Sidan laddas...
Sidan laddas...
Sidan laddas...
Sidan laddas...
Sidan laddas...
Sidan laddas...
Sidan laddas...
Sidan laddas...
Sidan laddas...
Sidan laddas...
Sidan laddas...
Sidan laddas...
Sidan laddas...
Sidan laddas...
Sidan laddas...
Sidan laddas...
Sidan laddas...
Sidan laddas...
Sidan laddas...
Sidan laddas...
Sidan laddas...
Sidan laddas...
Sidan laddas...
Sidan laddas...
Sidan laddas...
Sidan laddas...
Sidan laddas...
Sidan laddas...
Sidan laddas...
Sidan laddas...
Sidan laddas...
Sidan laddas...
Sidan laddas...
Sidan laddas...
Sidan laddas...
Sidan laddas...
Sidan laddas...
Sidan laddas...
Sidan laddas...
Sidan laddas...
Sidan laddas...
Sidan laddas...
Sidan laddas...
Sidan laddas...
-
 1
1
-
 2
2
-
 3
3
-
 4
4
-
 5
5
-
 6
6
-
 7
7
-
 8
8
-
 9
9
-
 10
10
-
 11
11
-
 12
12
-
 13
13
-
 14
14
-
 15
15
-
 16
16
-
 17
17
-
 18
18
-
 19
19
-
 20
20
-
 21
21
-
 22
22
-
 23
23
-
 24
24
-
 25
25
-
 26
26
-
 27
27
-
 28
28
-
 29
29
-
 30
30
-
 31
31
-
 32
32
-
 33
33
-
 34
34
-
 35
35
-
 36
36
-
 37
37
-
 38
38
-
 39
39
-
 40
40
-
 41
41
-
 42
42
-
 43
43
-
 44
44
-
 45
45
-
 46
46
-
 47
47
-
 48
48
-
 49
49
-
 50
50
-
 51
51
-
 52
52
-
 53
53
-
 54
54
-
 55
55
-
 56
56
-
 57
57
-
 58
58
-
 59
59
-
 60
60
-
 61
61
-
 62
62
-
 63
63
-
 64
64
-
 65
65
-
 66
66
-
 67
67
-
 68
68
-
 69
69
-
 70
70
-
 71
71
-
 72
72
-
 73
73
-
 74
74
-
 75
75
-
 76
76
-
 77
77
-
 78
78
-
 79
79
-
 80
80
-
 81
81
-
 82
82
-
 83
83
-
 84
84
-
 85
85
-
 86
86
-
 87
87
-
 88
88
-
 89
89
-
 90
90
-
 91
91
-
 92
92
-
 93
93
-
 94
94
-
 95
95
-
 96
96
-
 97
97
-
 98
98
-
 99
99
-
 100
100
-
 101
101
-
 102
102
-
 103
103
-
 104
104
-
 105
105
-
 106
106
-
 107
107
-
 108
108
-
 109
109
-
 110
110


Kenwood FS 620 Bruksanvisning
- Kategori
- Mixer / matberedare tillbehör
- Typ
- Bruksanvisning
- Denna manual är också lämplig för
på andra språk
- italiano: Kenwood FS 620 Manuale del proprietario
- français: Kenwood FS 620 Le manuel du propriétaire
- Türkçe: Kenwood FS 620 El kitabı
- dansk: Kenwood FS 620 Brugervejledning
- Nederlands: Kenwood FS 620 de handleiding
Relaterade papper
Andra dokument
-
Russell Hobbs 19270-56 Användarmanual
-
Russell Hobbs Food Steamer 19270-56 Användarmanual
-
-
-
Logik L90SSS11E Användarmanual
-
Carlton C96SSS09E Användarmanual
-
Braun FS 10 Bruksanvisning
-
Philips HD9190/30 Användarmanual
-
Whirlpool W6 MD520 Daily Reference Guide
-
Philips HD9150/91 Användarmanual