CONSTRUCTA Built-in oven Instructions For Use Manual
- Kategori
- Spisar
- Typ
- Instructions For Use Manual

en
Instructions for use
es
Instrucciones de uso
sv
Bruksanvisning
Built-in oven
Horno eléctrico
integrable
Inbyggnadsugn
en
es
sv

2
en
page 03–046
es
página 47 – 090
sv
sidan 91 – 134

3
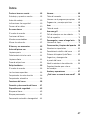
Table of contents
Important information . . . . . . . . . . 4
Packaging and old appliances . . . . . 4
Before installation . . . . . . . . . . . . . . 5
Safety information . . . . . . . . . . . . . . 5
Reasons for damage . . . . . . . . . . . . 6
Your new cooker . . . . . . . . . . . . . . 7
The control panel . . . . . . . . . . . . . . . 7
Oven temperature selector . . . . . . . 7
Press-down switches . . . . . . . . . . . 8
Slide-in levels . . . . . . . . . . . . . . . . . . 8
Accessories . . . . . . . . . . . . . . . . . . 9
Before using the appliance
for the first time . . . . . . . . . . . . . . . 10
Preliminary cleaning . . . . . . . . . . . . . 10
Initial burn-in . . . . . . . . . . . . . . . . . . 10
Cleaning out . . . . . . . . . . . . . . . . . . 10
Current time . . . . . . . . . . . . . . . . . . 10
Electronic clock . . . . . . . . . . . . . . . 11
The control panel . . . . . . . . . . . . . . . 11
Special functions . . . . . . . . . . . . . . . 11
Minute timer . . . . . . . . . . . . . . . . . . 12
Automatic timer . . . . . . . . . . . . . . . . 12
Description of Oven Features . . . . 14
Switching the Oven ON and OFF . 17
Safety features . . . . . . . . . . . . . . . . 19
Locking the oven . . . . . . . . . . . . . . . 19
Permanent lock . . . . . . . . . . . . . . . . 20
Automatic safety off function . . . . . . 20
Inhaltsverzeichnis
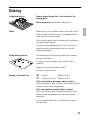
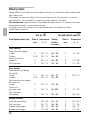
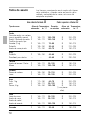
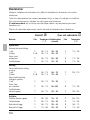
Baking . . . . . . . . . . . . . . . . . . . . . . 21
Baking table . . . . . . . . . . . . . . . . . . 22
Pizza baking . . . . . . . . . . . . . . . . . . 24
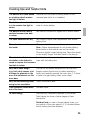
Cooking tips and helpful hints . . . 25
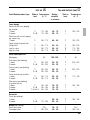
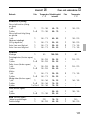
Roasting . . . . . . . . . . . . . . . . . . . . . 26
Roasting table . . . . . . . . . . . . . . . . . 28
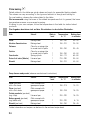
Grilling . . . . . . . . . . . . . . . . . . . . . . 29
Thermo-grilling . . . . . . . . . . . . . . . . . 30
Surface grilling . . . . . . . . . . . . . . . . . 31
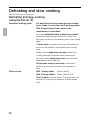
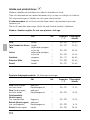
Defrosting and slow cooking . . . . 32
Steam cooking setting . . . . . . . . . . . 35
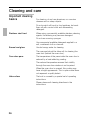
Cleaning and care . . . . . . . . . . . . . 36
Important cleaning basics . . . . . . . . 36
Catalytic oven coating . . . . . . . . . . . 38
HydroClean
®
cleaning system . . . . . 39
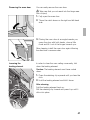
Removing/installing the oven door . 41
Lowering the heating element . . . . . 41
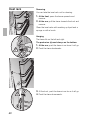
Inset rack . . . . . . . . . . . . . . . . . . . . 42
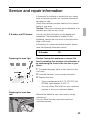
Service and repair information . . . 43
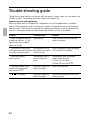
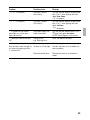
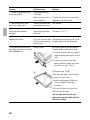
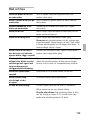
Trouble-shooting guide . . . . . . . . 44

4
Important information
Please read these instructions for use carefully. They
contain important information concerning your
personal safety as well as for the use and care of
your appliance.
The instructions for use apply to several versions.
Accordingly, you may find descriptions of individual
features which do not apply to your specific
appliance.
Please keep the operating and installation
instructions in a safe place; this important
documentation may also be of use to a subsequent
owner.
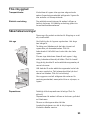
Packaging and Your new appliance was protected by suitable
old appliances
packaging while it was on its way to you. All
materials used for this purpose are environmentally
friendly and can be recycled. Please make a
contribution to protecting the environment by
disposing of the packaging appropriately.
Old appliances are not worthless rubbish.
Environmentally-conscious recycling can reclaim
valuable raw materials. Before disposing of your old
appliance, please make sure that it is unusable or
label it with a sticker stating ‘Caution – Scrap’.
This appliance is labelled according to the European
Directive 2002/96/EC concerning waste electrical
and electronic equipment – WEEE. The Directive
creates the framework for withdrawal and
reclamation of old appliances applicable throughout
the EU.
Up-to-date information on how to dispose of your
old appliance and the packaging from the new one
can be obtained from your retailer or local authority.

5
Before installation
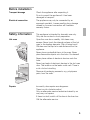
Transport damage Check the appliance after unpacking it.
Do not connect the appliance if it has been
damaged in transport.
Electrical connection The appliance may only be connected by an
approved specialist. Losses resulting from damage
caused by incorrect connection will invalidate
warranty claims.
Safety information This appliance is intended for domestic use only.
Only use the cooker for food preparation.
Hot oven Open the oven door carefully. Hot steam may
escape. Never touch the internal surfaces of the hot
oven or the heating elements. Risk of being burnt!
Children must be kept at a safe distance from the
appliance.
Never store combustible items in the oven. Never
place flammable objects onto the hobs. Fire hazard!
Never place cables of electronic devices onto the
hobs.
Never trap leads of electronic devices in the hot oven
door. The isolation on the leads could melt. There is
a risk of short-circuiting.
Remove all packaging remnants, e.g. polystyrene
parts, from the oven.
Repairs Incorrectly done repairs are dangerous.
There is a risk of electrocution!
Only an after-sales service technician trained by us
may carry out repairs.
If there is a fault, switch off the fuse in the fuse box.
Call the after-sales service.

6
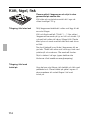
Reasons for damage
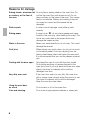
Baking sheets, aluminium foil Do not place a baking sheet on the oven floor. Do
or crockery on the floor of not line the oven floor with aluminium foil. Do not
the oven place crockery on the base of the oven. This causes
heat to accumulate. Baking and roasting times will
no longer be correct and the enamel will be
damaged.
Slide-in parts In order to avoid damage, insert slide-in parts
carefully.
Baking paper If using hot air *, do not place greaseproof paper
loosely in the oven (e.g. when heating the oven). The
hot-air fan could draw in the paper which may
damage the heater and fan.
Water in the oven Never pour water directly into a hot oven. This could
damage the enamel.
Fruit juice When baking very moist cakes, do not put too much
on the baking sheet. Fruit juice dripping from the
baking sheet leaves stains that cannot be removed.
It is recommended that you use the deeper universal
pan.
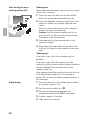
Cooling with the door open Only leave the oven to cool with the door closed.
Do not allow anything to become trapped in the
oven door. Even if you only leave the oven door open
slightly, the fronts of adjacent units could be
damaged over time.
Very dirty oven seal If the oven door seal of is very dirty, the oven door
will no longer close correctly when the oven is in use.
The fronts of adjacent units could be damaged.
Keep the oven door seal clean.
Using the oven door
as a seat Do not stand or sit on the oven door.
Care and cleaning Do not use a high-pressure cleaners or steam jets.

Electronic clockOven functions
7
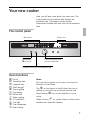
Your new cooker
Here, you will learn more about your new oven. The
control panel and its switches and displays are
explained here. The heating modes and the
accessories included with new oven will be explained
here.
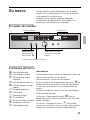
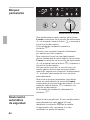
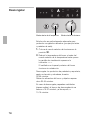
The control panel
Rapid heating for
*
hot air mode
Temperature selector with oven temperature display
Oven functions
*
Hot air
/
Top/bottom heat
(
Large grill area
)
Small area grill
,
Thermo-grilling
&
Pizza baking
.
Bottom heat
%
Steam cooking
d l
HydroClean
®
$
Oven light
;
Oven temperature
$
Rapid heating
Notes:
The oven light switches on for every oven function.
Exception: HydroClean.
The ; on the display is backlit when the oven is
heating up and lights up red during residual heat.
Rapid heating
s can only be selected in hot air
mode.
Steam cooking % for system steam cooker (option
available from specialist dealers).
Function selector with setting
for preferred temperature

8
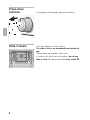
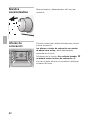
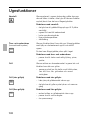
Press-down
switches
To engage and disengage, depress the switch.
Slide-in levels Your oven features 4 slide-in levels.
The slide-in levels are numbered from bottom to
top.
The numbers are marked on the oven.
In order to not block the air circulation, do not use
slide-in level ››2‹‹ when using the hot air mode *.

9
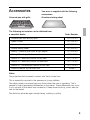
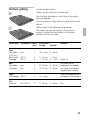
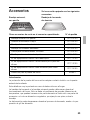
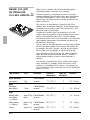
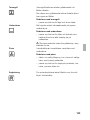
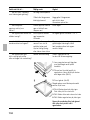
Accessories Your oven is supplied with the following
accessories:
Universal pan with grille Aluminium baking sheet
The following accessories can be obtained from
a specialist dealer: Order Number
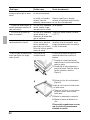
Notes:
The protective device prevents contact with the hot oven door.
This is especially important in the presence of young children.
The baking sheet or universal pan may distort when the oven is operating. This is
caused by major temperature differences on the utensil. These differences may occur
if only one part of the utensil was covered or if deep-frozen food e.g. pizza, was pla-
ced on the utensil.
The distortion subsides again during baking, roasting or grilling.
Steam cooker
Aluminium baking sheet
Enamel baking sheet
Baking / Roasting grille, bent at right angles
Baking / Roasting grille, fine meshed
Universal pan with an inlay grille CZ 1242 X0
CZ 1282 X0
CZ 1332 X0
CZ 1342 X0
CZ 1432 X0
CZ 1442 X0
Retrofit kit – telescopic pullout for two tiers CZ 1702 X0
Retrofit kit – telescopic pullout for three tiers CZ 1742 X0
Retrofit kit – full telescopic pullout for four tiers CZ 1752 X0
Protective device for the oven door 440651

10
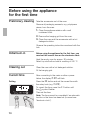
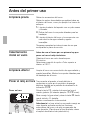
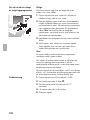
Before using the appliance
for the first time
Preliminary cleaning Take the accessories out of the oven.
Remove all packaging remnants, e.g. polystyrene
pieces, from the oven.
1. Clean the appliance exterior with a soft
moistened cloth.
2. Remove the hanging grid from the oven.
3. Clean the oven and the accessories with a hot
detergent solution.
Observe the operating instructions enclosed with the
hob.
Initial burn-in Before using the appliance for the first time, you
must set the current time on the electronic clock.
Heat the empty oven for approx. 30 minutes.
Select top and bottom heat at a setting of 240 °C.
Cleaning out Clean the oven with a hot detergent solution.
Fit the hanging grid.
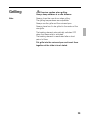
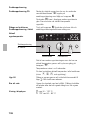
Current time After connecting to the mains or after a power
failure, the display 0:00 will flash.
Setting Press the
>
button and set the current time with
the rotary knob (e.g. 15:00).
To correct the time, press the
> button until
the
#
symbol flashes.
Then set the time.
Note: The time cannot be completed if an automatic
function or the timer has been set (to cancel see
”electronic clock”).

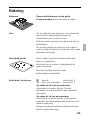
11
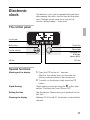
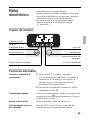
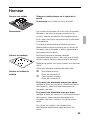
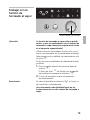
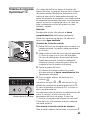
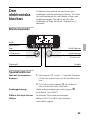
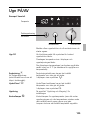
Electronic
clock
The electronic clock can be operated with one hand;
after pressing the button, set the time with the rotary
knob. Settings can be made for as long as the
function display flashes (~ 4 seconds).
The control panel
Minute timer
Current oven
temperature
ON time OFF time
Rotary knob
– to engage and
disengage,
depress gently.
Time of day
Function selector
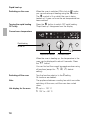
Special functions
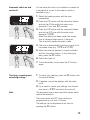
Masking out the display
1.
Press the > button for 7 seconds.
After this, the display dims, the time and the
display continue running in the background.
2. To switch on the display, briefly press the >
button.
Rapid Heating Rapid heating can be set using the s button (see
section ”Switching the Oven ON and OFF”.
Setting the time See the section ”Before using your appliance for the
first time”.
Dimming the display Between 22.00 and 6.00, the display is automatically
dimmed.

12
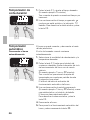
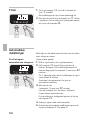
Automatic timer You can switch the oven on and off via the electronic
clock.
Automatic switch off Baking or roasting starts straight away.
1. Select the heating system and the oven
temperature.
2. Press the > button until the ? symbol flashes
and set the ON time with the rotary knob
(example. 1 hour and 30 minutes).
When the setting has been made, the current
time is displayed after approx. 4 seconds.
The ? symbol signals automatic mode.
3. When the time has elapsed, (example. 1 hour and
30 minutes), a signal is emitted and the !
symbol flashes.
The oven switches off automatically.
To stop the signal early, press the > button.
4. Switch the oven off.
5. To end automatic mode, press the > button
again.
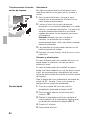
Minute timer
1.
Press the > button and set the time
(e.g. 5 minutes).
When the timer switches on, the remaining time is
displayed.
2. When the time has elapsed, a signal is emitted
and the
,
symbol flashes. To stop this signal
press the > button.

13
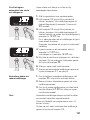
Automatic switch on and For use when the food is to be baked or roasted for
switch off a set period at a point in time later on which is
selected by you.
1. Select the heating system and the oven
temperature.
2. Press the > button until the ? symbol flashes
and set the ON time with the rotary knob
(example. 1 hour and 30 minutes).
3. Press the > button until the ! symbol flashes
and set the OFF time with the rotary knob
(example. 12:30).
When the setting has been made, the current
time is displayed after approx. 4 seconds.
The ! symbol signals automatic mode.
4. The oven is automatically switched on and off at
the preset times (e.g. 11:00 and 12:30).
5. When the time has elapsed, a signal is emitted
and the ! symbol flashes. To stop the signal
early, press the > button.
6. Switch the oven off.
7. To end automatic mode, press the > button
again.
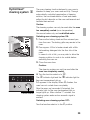
Checking, correcting and
1. To check your settings, press the > button until
cancelling settings the symbol flashes.
2. If required, correct the settings with the rotary
knob.
3. If you want to cancel your settings, turn the set
time back to 0:00 and switch the oven off.
Note The automatic timer is best used with dishes which
require little attention.
The minute timer and OFF time can be pre-
programmed up to a max. 24 hours.
The settings can be displayed at any time by
pressing the
> button.

14
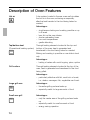
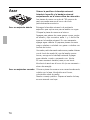
Description of Oven Features
Hot air A fan system located in the rear oven wall circulates
the hot air in the oven, achieving an especially
effective heat transfer to the food being baked or
roasted.
Advantages:
– simultaneous baking and roasting possible on up
to 3 levels
– less dirt on the oven interior
– shorter preheating times
– low oven temperatures
– gentle defrosting
Top/bottom heat Through heating elements located at the top and
(Conventional heating system) bottom of the oven, heat is generated and
transferred to the food being baked or roasted.
Baking and roasting is possible on one slide-in level
only.
Advantages:
– baking of cakes with moist topping, pizza, quiche
Grill surface Through heating elements located at the top of the
oven, heat is generated and transferred to the food
being grilled.
Advantages:
– particularly effective with flat, small cuts of meat,
i.e., steaks, sausages, fish, vegetables and toast.
Large grill area Advantages:
– the entire grilling surface heats up
–especially useful for large amounts of food
Small area grill Advantages:
– only the centre area of the grilling surface heats
up
– especially useful for small amounts of food
– energy saving operation
*
/
(
)

15
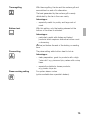
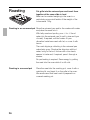
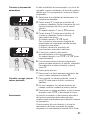
Thermogrilling With thermogrilling, the fan and the surface grill and
are switched on and off in alternation.
The heat generated by the surface grill is evenly
distributed by the fan in the oven cavity.
Advantages:
– especially useful for poultry and large cuts of
meat.
Bottom heat With this setting, only the heating element at the
bottom of the oven is activated.
Advantages:
– particularly useful with dishes and baked
products which require a distinctive bottom crust
or browning.
Use just before the end of the baking or roasting
time.
Pizza setting The pizza setting adds bottom heat to hot air.
Advantages:
–fresh preparation, good for products with a high
”juice ratio” e.g. pizza and juicy cakes with a crisp
base.
– especially suitable for frozen products,
e.g. pizzas, chips etc.
Steam cooking setting For system steam cooker
(option available from specialist dealers).
,
.
&
%

16
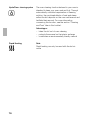
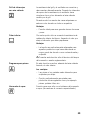
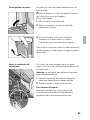
HydroClean
®
cleaning system
The oven cleaning function featured in your oven is
intended to keep your oven neat and tidy. Through
automatically controlled vaporisation of cleaning
solution, the combined effects of heat and steam
soften the dirt deposits on the oven wall enamel and
facilitate their removal. For more information
concerning this function, see the section ”Cleaning
and Care” later in this booklet.
Advantages:
– takes the toil out of oven cleaning
–protects the enamel on the interior surfaces
– constitutes an environmentally friendly method
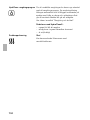
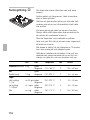
Rapid Heating Note
Rapid heating can only be used with the hot air
mode
d
s

Temperature display
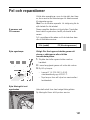
17
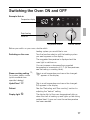
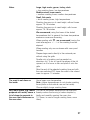
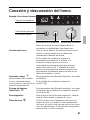
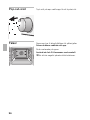
Switching the Oven ON and OFF
Example: Hot air
Before you switch on your oven, decide which
heating system you would like to use.
Switching on the oven Turn the function selector until the heating system
you want appears on the display.
The suggested temperature is displayed and the
oven light is switches on.
You can increase or decrease the suggested
temperature in increments of 5° C (for temperatures,
see the baking or roasting table).
Steam cooking setting
% This is a set temperature and cannot be changed.
For system steam cooker
2
appears in the display.
(option available from
specialist dealers)
HydroClean
®
d
This is a set temperature and cannot be changed.
l
appears in the display.
Defrost See the ”Defrosting and Slow cooking” section for
adjusting the ”defrost” setting.
Display light
; The display light of the oven temperature lights up
when the oven is heating up and lights up red during
residual heat. It goes out once the set temperature
has been reached.
Rapid heating
for hot air
Temperature selector Function selector

18
When the oven is heating up, the temperature in the
oven can be displayed for about 5 seconds. Press
the : button.
You can find out the current temperature when using
all functions (except for
%
,
d
,
$
, defrost
setting).
Switching off the oven Turn the function selector to the
{
setting.
All functions are deleted.
Note The appliance features a cooling fan which runs after
switching off the oven, until the oven has cooled
down.
Hot display for the oven
ä up to Z 120° C.
â 120° to Z 80° C.
Current oven temperature
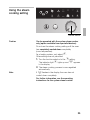
Rapid heat up
Switching on the oven When the oven is switched ON in hot air
* mode,
you can activate rapid heating using the sbutton.
The s symbol is lit up whilst the oven is being
heated up. It goes out once the set temperature has
been reached.
Turning the rapid heating Press the s button to switch OFF rapid heating.
OFF early ”Rapid heat up” disappears from the display.
Temperature selector Funktionswähler
Rapid heating
for hot air

19
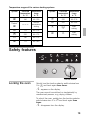
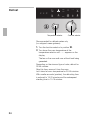
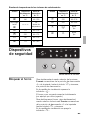
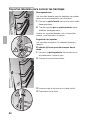
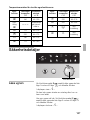
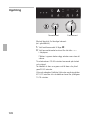
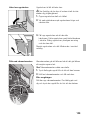
Safety features
Locking the oven Quickly turn the function selector anticlockwise from
0 to
$
and back again three times.
–
Å – appears on the display.
The oven cannot be switched on inadvertently by
unauthorised persons, e.g. playing children.
To unlock the oven, quickly turn the function selector
anticlockwise from 0 to
$
and back again three
times.
–
Å
– disappears from the display.
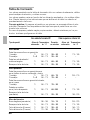
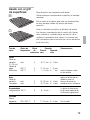
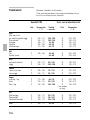
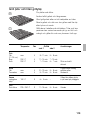
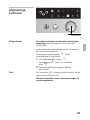
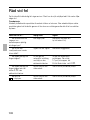
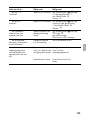
Function selector
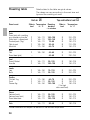
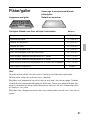
System Preferred Temperature
temperature range
in ° C in ° C
* 160 40 – 200
”Defrost”
–– –– ––
without
temperature
*
setting
/ 170 50 – 275
( 220 50 – 275
) 180 50 – 275
, 170 50 – 250
System Preferred Temperature
temperature range
in ° C in ° C
& 220 50 – 275
. 200 50 – 225
%
2
fixed
setting
d
l
fixed
setting
Temperature ranges of the various heating systems

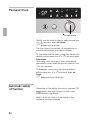
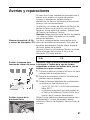
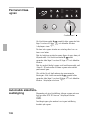
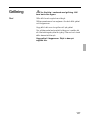
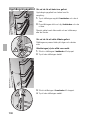
20
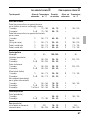
Permanent lock
Quickly turn the function selector anticlockwise from
0 to
$
and back again six times.
1
appears on the display.
The oven cannot be switched on inadvertently by
unauthorised persons, e.g. playing children.
To operate/unlock the oven, quickly turn the function
selector anticlockwise from 0 to
$
and back again
three times.
After being used, the oven is again automatically
permanently locked when the function selector is at
0 for thirty seconds.
To disengage, quickly turn the function selector
anticlockwise from 0 to
$
and back again six
times.
1
disappears from the display.
Automatic safety
off function
Depending on the setting, the oven is switched OFF
automatically after thirty minutes to thirty hours.
000
flashes in the display.
Safety off will not function if the setting on the
appliance has been changed.
Function selector
Sidan laddas...
Sidan laddas...
Sidan laddas...
Sidan laddas...
Sidan laddas...
Sidan laddas...
Sidan laddas...
Sidan laddas...
Sidan laddas...
Sidan laddas...
Sidan laddas...
Sidan laddas...
Sidan laddas...
Sidan laddas...
Sidan laddas...
Sidan laddas...
Sidan laddas...
Sidan laddas...
Sidan laddas...
Sidan laddas...
Sidan laddas...
Sidan laddas...
Sidan laddas...
Sidan laddas...
Sidan laddas...
Sidan laddas...
Sidan laddas...
Sidan laddas...
Sidan laddas...
Sidan laddas...
Sidan laddas...
Sidan laddas...
Sidan laddas...
Sidan laddas...
Sidan laddas...
Sidan laddas...
Sidan laddas...
Sidan laddas...
Sidan laddas...
Sidan laddas...
Sidan laddas...
Sidan laddas...
Sidan laddas...
Sidan laddas...
Sidan laddas...
Sidan laddas...
Sidan laddas...
Sidan laddas...
Sidan laddas...
Sidan laddas...
Sidan laddas...
Sidan laddas...
Sidan laddas...
Sidan laddas...
Sidan laddas...
Sidan laddas...
Sidan laddas...
Sidan laddas...
Sidan laddas...
Sidan laddas...
Sidan laddas...
Sidan laddas...
Sidan laddas...
Sidan laddas...
Sidan laddas...
Sidan laddas...
Sidan laddas...
Sidan laddas...
Sidan laddas...
Sidan laddas...
Sidan laddas...
Sidan laddas...
Sidan laddas...
Sidan laddas...
Sidan laddas...
Sidan laddas...
Sidan laddas...
Sidan laddas...
Sidan laddas...
Sidan laddas...
Sidan laddas...
Sidan laddas...
Sidan laddas...
Sidan laddas...
Sidan laddas...
Sidan laddas...
Sidan laddas...
Sidan laddas...
Sidan laddas...
Sidan laddas...
Sidan laddas...
Sidan laddas...
Sidan laddas...
Sidan laddas...
Sidan laddas...
Sidan laddas...
Sidan laddas...
Sidan laddas...
Sidan laddas...
Sidan laddas...
Sidan laddas...
Sidan laddas...
Sidan laddas...
Sidan laddas...
Sidan laddas...
Sidan laddas...
Sidan laddas...
Sidan laddas...
Sidan laddas...
Sidan laddas...
Sidan laddas...
Sidan laddas...
Sidan laddas...
Sidan laddas...
Sidan laddas...
Sidan laddas...
Sidan laddas...
Sidan laddas...
Sidan laddas...
Sidan laddas...
-
 1
1
-
 2
2
-
 3
3
-
 4
4
-
 5
5
-
 6
6
-
 7
7
-
 8
8
-
 9
9
-
 10
10
-
 11
11
-
 12
12
-
 13
13
-
 14
14
-
 15
15
-
 16
16
-
 17
17
-
 18
18
-
 19
19
-
 20
20
-
 21
21
-
 22
22
-
 23
23
-
 24
24
-
 25
25
-
 26
26
-
 27
27
-
 28
28
-
 29
29
-
 30
30
-
 31
31
-
 32
32
-
 33
33
-
 34
34
-
 35
35
-
 36
36
-
 37
37
-
 38
38
-
 39
39
-
 40
40
-
 41
41
-
 42
42
-
 43
43
-
 44
44
-
 45
45
-
 46
46
-
 47
47
-
 48
48
-
 49
49
-
 50
50
-
 51
51
-
 52
52
-
 53
53
-
 54
54
-
 55
55
-
 56
56
-
 57
57
-
 58
58
-
 59
59
-
 60
60
-
 61
61
-
 62
62
-
 63
63
-
 64
64
-
 65
65
-
 66
66
-
 67
67
-
 68
68
-
 69
69
-
 70
70
-
 71
71
-
 72
72
-
 73
73
-
 74
74
-
 75
75
-
 76
76
-
 77
77
-
 78
78
-
 79
79
-
 80
80
-
 81
81
-
 82
82
-
 83
83
-
 84
84
-
 85
85
-
 86
86
-
 87
87
-
 88
88
-
 89
89
-
 90
90
-
 91
91
-
 92
92
-
 93
93
-
 94
94
-
 95
95
-
 96
96
-
 97
97
-
 98
98
-
 99
99
-
 100
100
-
 101
101
-
 102
102
-
 103
103
-
 104
104
-
 105
105
-
 106
106
-
 107
107
-
 108
108
-
 109
109
-
 110
110
-
 111
111
-
 112
112
-
 113
113
-
 114
114
-
 115
115
-
 116
116
-
 117
117
-
 118
118
-
 119
119
-
 120
120
-
 121
121
-
 122
122
-
 123
123
-
 124
124
-
 125
125
-
 126
126
-
 127
127
-
 128
128
-
 129
129
-
 130
130
-
 131
131
-
 132
132
-
 133
133
-
 134
134
-
 135
135
-
 136
136
-
 137
137
-
 138
138
-
 139
139
-
 140
140


CONSTRUCTA Built-in oven Instructions For Use Manual
- Kategori
- Spisar
- Typ
- Instructions For Use Manual
på andra språk
- español: CONSTRUCTA Built-in oven
- English: CONSTRUCTA Built-in oven
Relaterade papper
Andra dokument
-
Samsung NV70H3340RS Bruksanvisning
-
-
Samsung NV75M5572RS Användarmanual
-
-
-
Whirlpool AKZM 6560/IX Användarguide
-
-
-
-
Silvercrest SGB 1380 B2 ELECTRIC OVEN WITH GRILL Bruksanvisning