
en
es
sv
en
Instructions for use
es
Instrucciones de uso
sv
Bruksanvisning
Built-in oven
Horno eléctrico
integrable
Inbyggnadsugn

2
en
page 03–32
es
página 33 – 62
sv
sidan 63 – 92

3
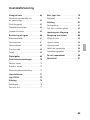
Table of contents
Important information . . . . . . . . . . 4
Packaging and old appliances . . . . . 4
Before installation . . . . . . . . . . . . . . 5
Safety information . . . . . . . . . . . . . . 5
Reasons for damage . . . . . . . . . . . . 6
Your new cooker . . . . . . . . . . . . . . 7
The control panel . . . . . . . . . . . . . . . 7
Function selector . . . . . . . . . . . . . . . 7
Temperature selector . . . . . . . . . . . . 8
Press-down switches . . . . . . . . . . . 8
Slide-in levels . . . . . . . . . . . . . . . . . . 8
Accessories . . . . . . . . . . . . . . . . . . 9
Before using the appliance
for the first time . . . . . . . . . . . . . . . 10
Preliminary cleaning . . . . . . . . . . . . . 10
Initial burn-in . . . . . . . . . . . . . . . . . . 10
Cleaning out . . . . . . . . . . . . . . . . . . 10
Heating modes . . . . . . . . . . . . . . . 11
Oven control . . . . . . . . . . . . . . . . . 13
Baking . . . . . . . . . . . . . . . . . . . . . . 14
Baking table . . . . . . . . . . . . . . . . . . 15
Cooking tips and helpful hints . . . . . 17
Inhaltsverzeichnis
Roasting . . . . . . . . . . . . . . . . . . . . . 18
Roasting table . . . . . . . . . . . . . . . . . 20
Grilling . . . . . . . . . . . . . . . . . . . . . . 21
Circo-roasting . . . . . . . . . . . . . . . . . 22
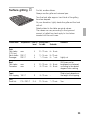
Surface grilling . . . . . . . . . . . . . . . . . 23
Defrosting and slow cooking . . . . 24
Defrosting using the hot air system . 24
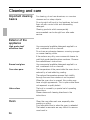
Cleaning and care . . . . . . . . . . . . . 26
Important notes . . . . . . . . . . . . . . . . 26
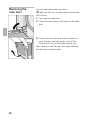
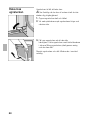
Removing/installing the oven door . 28
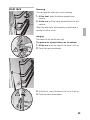
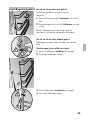
Inset rack . . . . . . . . . . . . . . . . . . . . 29
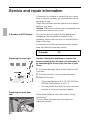
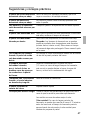
Service and repair information . . . 30
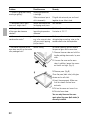
Trouble-shooting guide . . . . . . . . 31

4
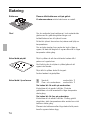
Important information
Please read these instructions for use carefully. They
contain important information concerning your
personal safety as well as for the use and care of
your appliance.
The instructions for use apply to several versions.
Accordingly, you may find descriptions of individual
features which do not apply to your specific
appliance.
Please keep the operating and installation
instructions in a safe place; this important
documentation may also be of use to a subsequent
owner.
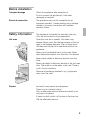
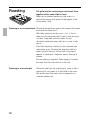
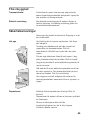
Packaging and Your new appliance was protected by suitable
old appliances
packaging while it was on its way to you. All
materials used for this purpose are environmentally
friendly and can be recycled. Please make a
contribution to protecting the environment by
disposing of the packaging appropriately.
Old appliances are not worthless rubbish.
Environmentally-conscious recycling can reclaim
valuable raw materials. Before disposing of your old
appliance, please make sure that it is unusable or
label it with a sticker stating ‘Caution – Scrap’.
This appliance is labelled according to the European
Directive 2002/96/EC concerning waste electrical
and electronic equipment – WEEE. The Directive
creates the framework for withdrawal and
reclamation of old appliances applicable throughout
the EU.
Up-to-date information on how to dispose of your
old appliance and the packaging from the new one
can be obtained from your retailer or local authority.

5
Before installation
Transport damage Check the appliance after unpacking it.
Do not connect the appliance if it has been
damaged in transport.
Electrical connection The appliance may only be connected by an
approved specialist. Losses resulting from damage
caused by incorrect connection will invalidate
warranty claims.
Safety information This appliance is intended for domestic use only.
Only use the cooker for food preparation.
Hot oven Open the oven door carefully. Hot steam may
escape. Never touch the internal surfaces of the hot
oven or the heating elements. Risk of being burnt!
Children must be kept at a safe distance from the
appliance.
Never store combustible items in the oven. Never
place flammable objects onto the hobs. Fire hazard!
Never place cables of electronic devices onto the
hobs.
Never trap leads of electronic devices in the hot oven
door. The isolation on the leads could melt. There is
a risk of short-circuiting.
Remove all packaging remnants, e.g. polystyrene
parts, from the oven.
Repairs Incorrectly done repairs are dangerous.
There is a risk of electrocution!
Only an after-sales service technician trained by us
may carry out repairs.
If there is a fault, switch off the fuse in the fuse box.
Call the after-sales service.

6
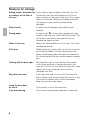
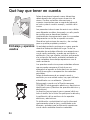
Reasons for damage
Baking sheets, aluminium foil Do not place a baking sheet on the oven floor. Do
or crockery on the floor of not line the oven floor with aluminium foil. Do not
the oven place crockery on the base of the oven. This causes
heat to accumulate. Baking and roasting times will
no longer be correct and the enamel will be
damaged.
Slide-in parts In order to avoid damage, insert slide-in parts
carefully.
Baking paper If using hot air *, do not place greaseproof paper
loosely in the oven (e.g. when heating the oven). The
hot-air fan could draw in the paper which may
damage the heater and fan.
Water in the oven Never pour water directly into a hot oven. This could
damage the enamel.
Fruit juice When baking very moist cakes, do not put too much
on the baking sheet. Fruit juice dripping from the
baking sheet leaves stains that cannot be removed.
It is recommended that you use the deeper universal
pan.
Cooling with the door open Only leave the oven to cool with the door closed.
Do not allow anything to become trapped in the
oven door. Even if you only leave the oven door open
slightly, the fronts of adjacent units could be
damaged over time.
Very dirty oven seal If the oven door seal of is very dirty, the oven door
will no longer close correctly when the oven is in use.
The fronts of adjacent units could be damaged.
Keep the oven door seal clean.
Using the oven door
as a seat Do not stand or sit on the oven door.
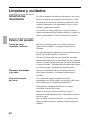
Care and cleaning Do not use a high-pressure cleaners or steam jets.

7
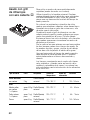
Your new cooker
Here, you will learn more about your new oven. The
control panel and its switches and displays are
explained here. The operating modes and the
accessories included with new oven will be explained
here.
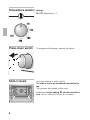
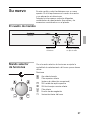
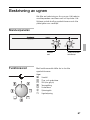
The control panel
Function
selector
Temperature selector
with indicator lamp
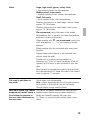
Function selector You can select the operating mode for the oven
using the function selector.
Settings
*
Hot air
/
Top/bottom heat
)
Large grill area
,
Circo-roasting
.
Bottom heat
e
Defrost setting
$
Oven light

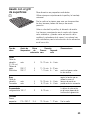
8
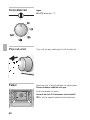
Temperature selector
Settings:
50 –275
Temperature in °C.
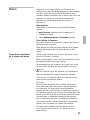
Press-down switch To engage and disengage, depress the switch.
Slide-in levels Your oven features 4 slide-in levels.
The slide-in levels are numbered from bottom to
top.
The numbers are marked on the oven.
When using hot-air baking
*, do not use slide-in
level ››2‹‹, in order not to block air circulation.

9
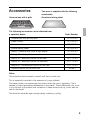
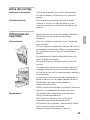
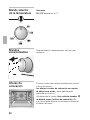
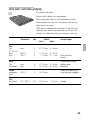
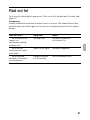
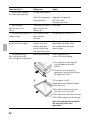
Accessories Your oven is supplied with the following
accessories:
Universal pan with a grille Aluminium baking sheet
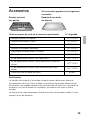
The following accessories can be obtained from
a specialist dealer: Order Number
Notes:
The protective device prevents contact with the hot oven door.
This is especially important in the presence of young children.
The baking sheet or universal pan may distort when the oven is operating. This is
caused by major temperature differences on the utensil. These differences may occur
if only one part of the utensil was covered or if deep-frozen food e.g. pizza, was pla-
ced on the utensil.
The distortion subsides again during baking, roasting or grilling.
Steam cooker
Aluminium baking sheet
Enamel baking sheet
Baking / Roasting grille, bent at right angles
Baking / Roasting grille, fine meshed
Universal pan with an inlay grille CZ 1242 X0
CZ 1282 X0
CZ 1332 X0
CZ 1342 X0
CZ 1432 X0
CZ 1442 X0
Retrofit kit – telescopic pullout for two tiers CZ 1702 X0
Retrofit kit – telescopic pullout for three tiers CZ 1742 X0
Retrofit kit – full telescopic pullout for four tiers CZ 1752 X0
Protective device for the oven door 440651

10
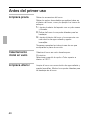
Before using the appliance
for the first time
Preliminary cleaning Take the accessories out of the oven.
Remove all packaging remnants, e.g. polystyrene
pieces, from the oven.
1. Clean the appliance exterior with a soft
moistened cloth.
2. Remove the hanging grid from the oven.
3. Clean the oven and the accessories with a hot
detergent solution.
Observe the operating instructions enclosed with the
hob.
Initial burn-in Heat the empty oven for approx. 30 minutes.
Select top and bottom heat at a setting of 240 °C.
Cleaning out Clean the oven with a hot detergent solution.
Fit the hanging grid.

11
Heating modes
Hot air Air is warmed up through heating elements arranged
at the top and bottom of the oven and is circulated
via the hot air fan system located in the rear
oven wall. Through this, heat is transferred to the
food being baked or roasted especially effectively.
Advantages:
– simultaneous baking and roasting possible on up
to 2 levels
– less dirt on the oven interior
– shorter preheating times
– low oven temperatures
– gentle defrosting
Top/bottom heat Through heating elements located at the top and
(Conventional heating system) bottom of the oven, heat is generated and
transferred to the food being baked or roasted.
Baking and roasting is possible on one slide-in level
only.
Advantages:
– baking of cakes with moist topping, pizza, quiche
Large grill area Through heating elements located at the top of the
oven, heat is generated and transferred to the food
being grilled.
Advantages:
– particularly effective with flat, small cuts of meat,
i.e., steaks, sausages, fish, vegetables and toast.
*
/
)

12
Circo-roasting With circo-roasting, the fan and the surface grill and
are switched on and off in alternation.
The heat generated by the surface grill is evenly
distributed by the fan in the oven cavity.
Advantages:
– especially useful for poultry and large cuts of
meat.
Bottom heat With this setting, only the heating element at the
bottom of the oven is activated.
Advantages:
– particularly useful with dishes and baked
products which require a distinctive bottom crust
or browning.
Use just before the end of the baking or roasting
time.
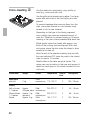
Defrost setting A ventilator in the rear wall of the oven swirls the air
in the oven around the frozen food.
The fan runs without heating.
Advantages:
– gentle defrosting
– deep frozen cuts of meat, poultry, bread and
cake defrost consistently.
,
.
e

13
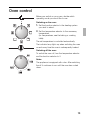
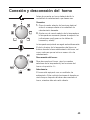
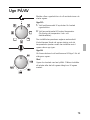
Oven control
Before you switch on your oven, decide which
operating mode you would like to use.
Switching on the oven:
1. Set the function selector to the heating system
you wish to select.
2. Set the temperature selector to the necessary
temperature.
(for temperatures, see the baking or roasting
table).
The set temperature is controlled automatically.
The indicator lamp lights up when switching the oven
on and every time the oven is subsequently heated.
Switching off the oven:
To switch the oven off, turn the temperature selector
and the function selector to 0.
Notes:
The appliance is equipped with a fan. After switching
the off it continues to run until the oven has cooled
down.

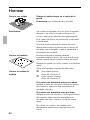
14
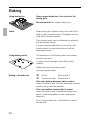
Baking
Using baking tins Always place baking tins in the centre of the
baking grille.
We recommend dark metallic baking tins.
Notes When using light-coloured baking tins made of thin
walls or glass the baking time is increased and the
cake will not brown so evenly.
The browning result can be influenced by adjusting
the temperature setting.
If a cake collapses after taking it out of the oven,
possibly select a longer baking time or set the
temperature lower.
Using baking sheets The slanted end of the baking sheet must always
face the oven door.
In order to avoid damage, insert slide-in parts
carefully.
Always fully insert the baking sheet.
Use only original sheets.
Baking in tin-plate tins
* Hot air Slide-in level 1
/ Top/bottom heat Slide-in level 1
If the cake bottom becomes dark in colour:
Check the slide-in level. Shorten the baking time and
possibly use a lower temperature.
If the cake bottom remains light in colour:
Check the slide-in level. Increase the baking time,
select a lower temperature or use a dark metal
baking tin.
Do not place baking tins or tall cakes too close to
the rear wall.

15
Hot air
*
Top and bottom heat
/
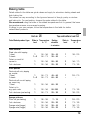
Cake/Baked product type Slide-in Temperature Baking Slide-in Temperature
level in ° C duration level in ° C
- in minutes
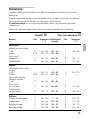
Cake mixtures
Sheet cake with topping
1 sheet 1 150 – 160 35 – 045 1 190 – 200
2 sheets 1 + 3 160 – 170 30 – 050 – –
Cake in a round tin/
square tin 1 150 – 160 50 – 080 2 160 – 170
Fruit cake base 1 150 – 160 20 – 030 2 170 – 180
Short pastries
Sheet cake with a dry topping
e.g. crumble
1 sheet 1 160 – 170 40 – 060 1 200 – 210
2 sheets 1 + 3 160 – 170 60 – 080 – –
Sheet cake with a moist topping
e.g. cream icing
1 sheet 1 150 – 160 60 – 090 – –
Cake in a tin
e.g. quark cake 1 150 – 160 50 – 100 2 170 – 180
Fruit cake base (pre-heating) 1 160 – 170 20 – 030 2 190 – 200
Sponge mixtures
Swiss roll (pre-heating) 1 180 – 190 07–015 1 200 – 220
Fruit cake base 1 150 – 160 20 – 030 2 170 – 180
Sponge cake (6 eggs) 1 150 – 160 30 – 045 2 160 – 170
Sponge cake (3 eggs) 1 150 – 160 20 – 035 2 170 – 180
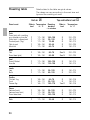
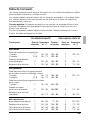
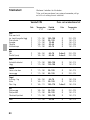
Baking table
Details stated in the table are guide values and apply for aluminium baking sheets and
dark baking tins.
The values can vary according to the type and amount of dough, pastry or mixture
and baking tin. For pre-heating, observe the notes stated in the table.
We recommend using the lower of the stated temperatures first. In general, the lower
temperature ensures a more even browning.
If baking to your own recipes, follow the temperature in the table for similar
cakes/baked products.

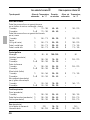
16
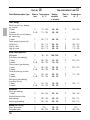
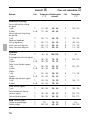
Hot air
*
Top and bottom heat
/
Cake/Baked product type Slide-in Temperature Baking Slide-in Temperature
level in ° C duration level in ° C
- in minutes
Yeast dough
Sheet cake with a dry topping
e.g. crumble
1 sheet 1 170 – 180 040 – 060 1 190 – 200
2 sheets 1 + 3 170 – 180 040 – 060 – –
Sheet cake with a moist topping
e.g. cream icing
1 sheet 1 160 – 170 050 – 090 1 190 – 200
Yeast dough ring and plait
(500g flour) 1 160 – 170 035 – 050 1 180 – 200
Low tin cake 1 160 – 170 030 – 045 2 170 – 180
High tin cake 1 160 – 170 030 – 045 2 170 – 180
Small cakes/pastries
Meringues 1 080 – 090 100 – 150 1 80
Puff pastry (pre-heating)
1 sheet 1 180 – 190 015 – 035 1 200 – 220
2 sheets 1 + 3 180 – 190 015 – 025 – –
Choux pastry (pre-heating)
1 sheet 1 180 – 190 025 – 035 1 200 – 220
2 sheets 1 + 3 180 – 190 025 – 035 – –
Cake mixture (e.g. muffins)
1 sheet 1 150 – 160 020 – 035 2 170 – 180
2 sheets 1 + 3 140 – 150 025 – 045 – –
Short pastry
(pre-heating)
(e.g. butter biscuits)
1 sheet 1 140 – 150 010 – 030 1 160 – 170
2 sheets 1 + 3 140 – 150 020 – 030 – –
Savouries
Pizza (pre-heating)
1 sheet 1 180 – 190 025 – 045 1 180 – 190
Alsatian flammkuchen
(pre-heating) 1 180 – 190 020 – 045 1 200 – 210
Quiche (pre-heating) 1 180 – 190 035 – 050 1 200 – 210
Bread (pre-heating) 1 200 – 220 10 – 15 2 220 – 240
Short-term bake 1 220 010 – 015 1 240
Complete bake 1 180 – 200 040 – 050 1 180 – 200

17
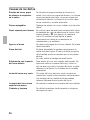
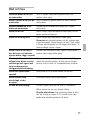
Cooking tips and helpful hints
The bottom of a cake baked Remove from the oven all baking sheets or the
on a baking sheet remains universal pan which is not needed.
too light in colour
The bottom of a cake baked Use a grille and not a baking sheet to support the
in a tin remains too light in cake tin during baking.
colour
The bottom of the cake or Set cake or cookies at a higher set of slide-in levels.
cookies becomes too dark
in colour
The cake becomes too dry Set a slightly higher oven temperature and shorter
baking time.
The cake is too moist on Choose a slightly lower oven temperature.
the inside Note.: Higher temperatures do not shorten baking
times (done on the outside, raw on the inside).
Choose a slightly longer baking time. Allow the dough
to rise slightly longer. Add less liquid to the dough.
When baked with hot air Avoid blocking the air vents at the rear wall of the
circulation, cake baked in oven with the baking tins.
round or square tins becomes
too dark in colour.
Very moist cake dough You can let the steam escape from the oven and
(e.g. fruit cake) causes a lot thereby reduce the forming of water droplets by
of steam to generate in the briefly and carefully opening the oven door (1-2 times,
oven that condenses on the in case of longer baking times, more often).
oven door
Very uneven browning when Check the slide-in level.
using hot air circulation.
Cake collapses when taken Use less liquid.
out of the oven
To save energy Pre-heat only if expressly required by the recipe.
Dark baking tins have a higher degree of heat
absorption.
Residual heat: In case of longer baking times, you
can switch off the oven approx. 5-10 minutes before
the full baking time has elapsed.

18
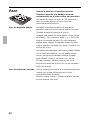
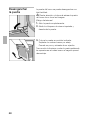
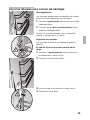
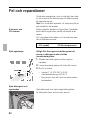
Roasting Put grille into the universal pan and insert them
together at the same slide-in level.
Meat can be roasted weighing in the oven in a
particularly economical fashion if the weight of the
cut exceeds 750g.
Roasting in an uncovered pot Rinse the universal pan and/or the roaster with water
and place the meat into it.
With fatty meat and poultry, pour
1
/
8
to
1
/
4
litre of
water into the universal pan (to suit to size and type
of roast). If required, add hot water. At your
discretion baste lean meat with fat, or cover it with
bacon.
The roast drippings collecting in the universal pan
make tasty gravy. Dissolve the drippings with hot
water, bring to the boil, thicken with corn starch,
season to taste and, if required, pass it through a
strainer.
No pre-heating is required. Save energy by putting
the roast into the oven while it is still cold.
Roasting in a covered pot Place the meat into the roasting pot, cover it with a
matching lid, and insert it on the grille in the oven.
We recommend that beef roast is prepared in a
covered roasting pot.

19
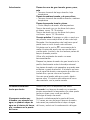
Notes Large, high roasts, goose, turkey, duck
= long roasting times, low temperatures
Medium-sized, lower roasts
= medium roasting times, medium temperatures
Small, flat roasts
= short roasting times, high temperatures
Roasting time per cm of meat height, without bones
approx. 13-15 minutes
Roasting time per cm of meat height, with bones
approx. 15-18 minutes
We recommend, using the lower of the stated
temperatures first. In general, the lower temperature
ensures a more even browning.
When roasting with
/, we recommend turning the
roast after approx.
1
/
2
-
2
/
3
of the roasting time has
elapsed.
When roasting only use cookware with oven-proof
handles.
Prepare large roasts directly in the universal pan
without using the grille.
Smaller cuts of roasting can be roasted on
aluminium foil. To do so, bend the edges of the foil
upward, as if to forms a dish and place it onto the
grille.
After the end of the selected roasting time and with
the oven switched OFF, leave the roast in the closed
oven for approx. 10 minutes.
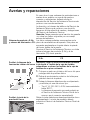
The roast is not done on Use a lower oven temperature.
the inside Note.: Higher temperatures do not shorten roasting
times (done on the outside, raw on the inside).
Choose slightly longer roasting times.
Very moist roasts (e.g. roasts You can let the steam escape from the oven and
prepared with water) cause a thereby reduce the forming of water droplets by
lot of steam to generate in briefly and carefully opening the oven door
the oven that condenses on (1-2 times, in case of longer roasting times, more
the oven door often).

20
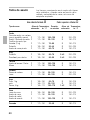
Hot air
*
Top and bottom heat
/
Roast meat Slide-in Temperature Roasting Slide-in Temperature
level in ° C duration level in ° C
- in minutes
Pork
Roast joint with crackling
e.g. shoulder or knuckle 1 170 – 180 100 – 130 2 200 – 220
Roast joint / collared pork 1 170 – 180 90 – 120 2 190 – 210
Smoked pork (1Kg) 1 170 – 180 70 – 80 2 190 – 210
Filet of pork 1 180 – 190 30 – 45 2 200 – 230
Meat loaf 1 170 – 180 60 – 75 2 190 – 210
Beef
Filet 1 180 – 190 50 – 70 2 or 3 200 – 220
Roast beef (pink) 1 180 – 190 50 – 90 2 or 3 200 – 230
Veal
Roast/ Brisket 1 170 – 180 100 – 120 2 190 – 210
Knuckle 1 170 – 180 110 – 130 2 190 – 210
Lamb
Leg 1 170 – 180 90 – 120 2 190 – 210
Back 1 170 – 180 80 – 120 2 200 – 220
Poultry
Chicken 1kg 1 180 – 190 55 – 70 2 190 – 200
Duck 1 160 – 170 90 – 120 2 190 – 210
Goose 4kg 1 160 – 170 130 – 170 1 or 2 180 – 200
Game
Venison (back) 1 180 – 190 90 – 120 2 200 – 220
Venison (roast joint) 1 170 – 180 90 – 120 2 190 – 210
Roast boar/deer 1 170 – 180 100 – 120 2 190 – 210
Fish 1 170 – 190 25 – 40 2 180 – 210
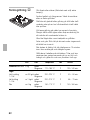
Roasting table Details stated in the table are guide values.
The values can vary according to the roast size and
type and the roasting pot used.
Sidan laddas...
Sidan laddas...
Sidan laddas...
Sidan laddas...
Sidan laddas...
Sidan laddas...
Sidan laddas...
Sidan laddas...
Sidan laddas...
Sidan laddas...
Sidan laddas...
Sidan laddas...
Sidan laddas...
Sidan laddas...
Sidan laddas...
Sidan laddas...
Sidan laddas...
Sidan laddas...
Sidan laddas...
Sidan laddas...
Sidan laddas...
Sidan laddas...
Sidan laddas...
Sidan laddas...
Sidan laddas...
Sidan laddas...
Sidan laddas...
Sidan laddas...
Sidan laddas...
Sidan laddas...
Sidan laddas...
Sidan laddas...
Sidan laddas...
Sidan laddas...
Sidan laddas...
Sidan laddas...
Sidan laddas...
Sidan laddas...
Sidan laddas...
Sidan laddas...
Sidan laddas...
Sidan laddas...
Sidan laddas...
Sidan laddas...
Sidan laddas...
Sidan laddas...
Sidan laddas...
Sidan laddas...
Sidan laddas...
Sidan laddas...
Sidan laddas...
Sidan laddas...
Sidan laddas...
Sidan laddas...
Sidan laddas...
Sidan laddas...
Sidan laddas...
Sidan laddas...
Sidan laddas...
Sidan laddas...
Sidan laddas...
Sidan laddas...
Sidan laddas...
Sidan laddas...
Sidan laddas...
Sidan laddas...
Sidan laddas...
Sidan laddas...
Sidan laddas...
Sidan laddas...
Sidan laddas...
Sidan laddas...
Sidan laddas...
Sidan laddas...
Sidan laddas...
Sidan laddas...
-
 1
1
-
 2
2
-
 3
3
-
 4
4
-
 5
5
-
 6
6
-
 7
7
-
 8
8
-
 9
9
-
 10
10
-
 11
11
-
 12
12
-
 13
13
-
 14
14
-
 15
15
-
 16
16
-
 17
17
-
 18
18
-
 19
19
-
 20
20
-
 21
21
-
 22
22
-
 23
23
-
 24
24
-
 25
25
-
 26
26
-
 27
27
-
 28
28
-
 29
29
-
 30
30
-
 31
31
-
 32
32
-
 33
33
-
 34
34
-
 35
35
-
 36
36
-
 37
37
-
 38
38
-
 39
39
-
 40
40
-
 41
41
-
 42
42
-
 43
43
-
 44
44
-
 45
45
-
 46
46
-
 47
47
-
 48
48
-
 49
49
-
 50
50
-
 51
51
-
 52
52
-
 53
53
-
 54
54
-
 55
55
-
 56
56
-
 57
57
-
 58
58
-
 59
59
-
 60
60
-
 61
61
-
 62
62
-
 63
63
-
 64
64
-
 65
65
-
 66
66
-
 67
67
-
 68
68
-
 69
69
-
 70
70
-
 71
71
-
 72
72
-
 73
73
-
 74
74
-
 75
75
-
 76
76
-
 77
77
-
 78
78
-
 79
79
-
 80
80
-
 81
81
-
 82
82
-
 83
83
-
 84
84
-
 85
85
-
 86
86
-
 87
87
-
 88
88
-
 89
89
-
 90
90
-
 91
91
-
 92
92
-
 93
93
-
 94
94
-
 95
95
-
 96
96


CONSTRUCTA CF 238 Series Instructions For Use Manual
- Typ
- Instructions For Use Manual
- Denna manual är också lämplig för
på andra språk
- español: CONSTRUCTA CF 238 Series
- English: CONSTRUCTA CF 238 Series
Relaterade papper
Andra dokument
-
Electrolux EKC6051FOW Användarmanual
-
-
Samsung NV73N9770RM Bruksanvisning
-
Samsung NV73J9770RS/EE Bruksanvisning
-
-
Samsung NV75M5572RS Användarmanual
-
-
-
-
Whirlpool AKZM 6560/IX Användarguide