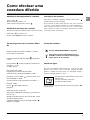
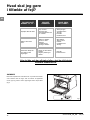
Whirlpool MSK 103 X HA S Installationsguide
- Typ
- Installationsguide

IT
Italiano
Istruzioni per l’uso
FORNO
Indice
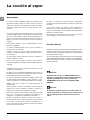
La cottura al vapore
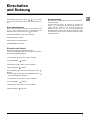
Come si presenta il forno?
Accessori
Come utilizzare il forno?
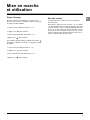
Impostazione dell’ora
Blocco del display
Stand-by del display
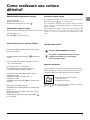
Come realizzare una cottura immediata?
Gestione dell’acqua
Come realizzare una cottura immediata?
Come utilizzare il contaminuti?
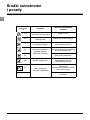
Descrizione delle funzioni
Quadro di cottura
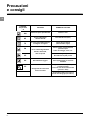
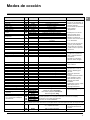
Cosa fare in caso di anomalie?
Istruzioni di sicurezza importanti.
Leggere attentamente e conservare per un utilizzo futuro.

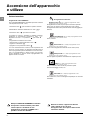
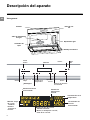
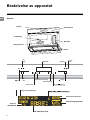
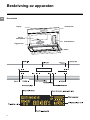
Descrizione dell’apparecchio
2
IT
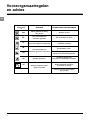
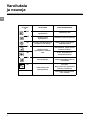
ON/OFF
Réglage
Temperature
AFFICHEUR
Touche
verrouillage commandes
Sélection du
mode Décongélation
églage
Temps
lce
a
Touche -
Touche +
lche
Haut
START/
STOP
Tasto +
Tasto bloccaggio
comandi
DISPLAY
Freccia
in Basso
Freccia
in Alto
Regolazione
della
temperatura
Impostazi
one del
tempo
Tasto –
modalità di sbrinamento
Indication du
menu sélectionné
Indication
verrouillage clavier
Indication de
Température
Mode de cuisson
sélectionnée
indique :
Heure,Durée de cuisson
indique :
Minuterie
Fin de cuisson
Indicazione del
menu selezionato
Indica la modalità di cottura
Indica inoltre:
Ora, Durata di cottura,
Fine cottura
Modalità di cottura
selezionata
Indicazione della
temperatura
Indicazione
bloccaggio
tastiera
Indica la
modalità di
cottura
Indica inoltre:
Fine cottura
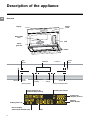
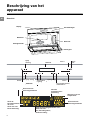
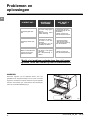
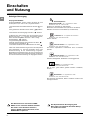
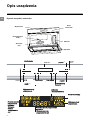
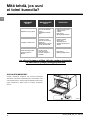
Programmatore
Serbatoio
Display
Generatore di
vapore
Tubo di arrivo
dell’acqua
Canaletto di
scolo
Veduta d’insieme

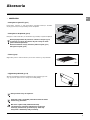
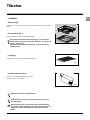
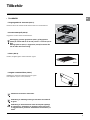
Accessori
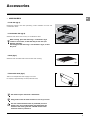
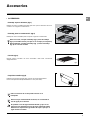
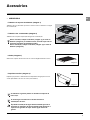
ACCESSORI
•
3
IT
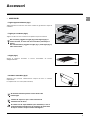
• Teglia supporto alimenti (fig.1)
Teglia perforata in acciaio inox che evita il contatto tra gli alimenti e l’acqua di
condensa
• Teglia per condensa (fig.2)
Teglia in acciaio inox che consente di recuperare l’acqua di condensa.
• Griglia (fig.3)
Griglia di supporto amovibile in acciaio inossidabile: da inserire
obbligatoriamente.
• Serbatoio amovibile (fig.4)
Serbatoio che consente l’alimentazione d’acqua del forno in maniera
indipendente.
La capienza è di circa 1 litro (livello massimo).
L’utilizzo di acqua con poco calcare faciliterà la
manutenzione del forno.
E’ vietato l’uso di acqua distillata (non alimentare). L’uso di
acqua distillata può deteriorare la superficie del generatore
di vapore. Preferire acqua minerale imbottigliata
Gli elementi estraibili possono essere lavati nella
lavastoviglie.
fig.3
fig.1
fig.2
fig.4
Per la cottura, poggiare la teglia (fig.1) sulla teglia (fig.2) in
senso contrario, in modo che non s’incastrino (schema qui a
fianco).
Per la sistemazione, poggiare la teglia (fig. 1) sulla teglia (fig. 2)
nello stesso senso.

4
IT
Il vapore serve anche per scottare, scongelare e riscaldare,
nonché a mantenere caldi gli alimenti, in particolare le salse.
Fare prima rosolare in padella con poco grasso la carne di
pollame, vitello, maiale, affinché assumano un aspetto dorato
appetitoso. Terminare quindi con la cottura al vapore.
Tagliati a tocchetti, gli alimenti cuociono più rapidamente e in
modo più omogeneo che se fossero interi.
Principio di funzionamento
L’acqua contenuta nel serbatoio giunge nel vano del forno
attraverso un tubo. Quest’acqua viene trasformata in vapore a
contatto con una superficie calda posta nella parte inferiore del
vano: si tratta del generatore di vapore.
Non è necessario aggiungere acqua nella teglia. Per garantire
UNA VERA COTTURA AL VAPORE, questo forno è munito di
teglie appositamente studiate per una cottura perfetta.
Generalità
La cottura a vapore è molto benefica se vengono rispettate le
modalità di impiego. Sana e naturale, la cucina al vapore
conserva il sapore genuino degli alimenti. Una salsa raffinata
o alle erbe aromatiche aggiunge quel tocco che fa la
differenza
Non trasmette nessun odore. E’ inutile aromatizzare l’acqua
della cottura con erbe o spezie, mentre si può profumare il
pesce ponendolo su un letto di alghe o il pollame su un po’ di
rosmarino o di dragoncello.
Cuoce contemporaneamente carne, pesce e verdura.
Riscalda con delicatezza pasta, riso e puré senza rischio che
attacchino e che secchino.
Facilita la cottura delle creme, dei budini, delle torte di riso,
ecc. Se sono ricoperti di carta stagnola, l’acqua di condensa
non vi si deposita.
Inutile salare in anticipo, neppure l’acqua di cottura.
Per dare migliore aspetto alla carne, basta farla dorare
rapidamente da ogni lato in padella, con burro caldo.
Paragonata alla cottura in acqua, quella al vapore presenta
soltanto vantaggi:
È rapida: la cottura inizia immediatamente mentre i tempi di
cottura degli alimenti in un recipiente pieno d’acqua
decorrono solo dal momento in cui inizia l’ebollizione.
È dietetica: le vitamine (quelle dette idrosolubili) e i sali minerali
sono ben preservati poiché si sciolgono appena nell’acqua
condensata che avvolge gli alimenti.
Inoltre non viene utilizzato nessun tipo di grasso per portare a
termine la cottura.
Il vapore rispetta il sapore degli alimenti. Non aggiunge odori,
né il sapore della griglia o della padella e al contempo non li
elimina poiché non vi è diluizione nell’acqua.
Qualche svantaggio: inutile cercare di cucinare in questa
maniera un pesce non più fresco, o una verdura dimenticata
nel frigorifero da una settimana. Il risultato sarebbe
catastrofico!
Il vapore non trasmette né i sapori né gli odori; quindi non
esitate a guadagnare tempo e denaro facendo cuocere per
esempio un pesce e un dessert l’uno accanto all’altro ma
senza toccarsi.
La cottura al vapore
Attenzione
Riempire OBBLIGATORIAMENTE il serbatoio d’acqua
fino al livello massimo prima della cottura. Riporre il
serbatoio nel suo alloggiamento spingendo a FONDO
fino a quando si avverte uno SCATTO.
Attenzione
Durante la cottura, l’apparecchio diventa caldo.
Quando si apre la porta dell’apparecchio, esce vapo-
re caldo. Tenere a distanza i bambini.

Accensione dell’apparecchio
e utilizzo
Primo utilizzo
Dopo aveare collegato l’apparecchio alla rete e per il primo
utilizzo, accendere il quadro comandi premendo il tasto
CONTAMINUTI Regolazione del contaminuti
ORA Impostazione dell’ora
SUONO Volume della tastiera
USCITA Uscita dal menu
Impostare l’orologio
Dopo aver collegato l’apparecchio alla presa di corrente e
averlo
messo in funzione per la prima volta, il display lampeggia
durante dieci
secondi. L’impostazione è possibile.
1. Impostare l’ora con i tasti - e +
2. Premere il tasto “ ” per confermare.
3. Impostare i minuti con i tasti - e +
4. Premere il tasto “ ” per confermare.
Per modificare l’ora, premere prima il tasto
per accendere il display e quindi
premere “ ” per accedere alle
impostazioni.
1. Impostare l’ora con i tasti - e +
2. Premere il tasto “ ” per confermare.
3. Impostare i minuti con i tasti - e +
4. Premere il tasto “ ” per confermare.
Dispositivo di sicurezza bambini
Il dispositivo di Sicurezza bambini permette di bloccare i tasti
del forno.
Per attivarlo, premere il tasto , il simbolo appare sul
display. Per disattivarlo, procedere allo stesso modo fino a
quando il simbolo scompare dal display. Il dispositivo di
sicurezza bambini può essere attivato durante il funziona-
mento del forno oppure quando è spento. Il dispositivo di
sicurezza bambini può essere disattivato quando la cottura
nel forno è terminata e in tutti i casi indicati in precedenza.
5
IT

6
IT
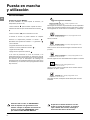
Cottura immediata
Programma di cottura MANUALE
Con la modalità MANUALE è possibile impostare la durata
e la temperatura (tra 100° e 50°).
1. Premere il tasto per accendere il quadro comandi.
2. Effettuare la selezione desiderata con i tasti .
3. Premere il tasto “ ” per iniziare la cottura.
4. Durante la cottura, è possibile in qualsiasi momento
modificare la temperatura premendo il tasto “ ”.
Regolarla con i tasti – o + e premere “ ” per confer-
mare
- programmare la durata di una cottura
- interrompere la cottura premendo il tasto “ ”;
- regolare il contaminuti ;
- spegnere il forno premendo il tasto .
5. In caso d’interruzione di corrente, se la temperatura del
forno non è scesa troppo, un dispositivo speciale avvia di
nuovo il programma a partire dall’istante in cui è stato inter-
rotto. Le programmazioni in attesa, invece, non possono
essere ripristinate e devono essere riprogrammate non
appena ritorna la corrente.
Scongelamento Automatico
Premere il tasto :
55° C, Tempo pre-programmato: 30 min
Tempo minimo: 5 min, massimo: 60 min
Scongelamento di filetti di pesce prima di essere impanati.
Frutti rossi che devono restare freddi (per torte e salse).
Scongelamento della carne prima di essere cotta alla griglia (es.:
salsicce).
Riscaldamento
100° C, Tempo pre-programmato: 25 min
Tempo minimo: 5 min, massimo: 60 min
Carne, verdura.
Pesce intero
85° C, Tempo pre-programmato: 15 min
Tempo minimo: 5 min, massimo: 60 min
Per la cottura degli alimenti delicati. Pesce intero (trota).
Piatti precotti
95° C, Tempo pre-programmato: 30 min
Tempo minimo: 5 min, massimo: 60 min
Terrine, fegatini di pollame. Riscaldamento di piatti precotti.
Budino
90° C, Tempo pre-programmato: 20 min
Tempo minimo: 5 min, massimo: 60 min
Uova in camicia; buona tenuta dei pomodori ripieni.
Tortine al formaggio, creme, ecc.
Cioccolato
80° C, Tempo pre-programmato: 15 min
Tempo minimo: 5 min, massimo: 60 min
Cioccolato fuso, burro. Frutta appena tiepida per un consumo
immediato.
Accensione dell’apparecchio
e utilizzo
Riempire OBBLIGATORIAMENTE il serbatoio
d’acqua fino al livello massimo prima della
cottura. Riporre il serbatoio nel suo
alloggiamento spingendo a FONDO fino a
quando si avverte uno SCATTO.
Durante la cottura, l’apparecchio diventa
caldo. Quando si apre la porta
dell’apparecchio, esce vapore caldo. Tenere
a distanza i bambini.

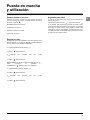
Come realizzare una cottura
differita?
Modifica della temperatura di cottura
Premere il tasto .
Regolare premendo i tasti + o -.
Confermare la scelta premendo il tasto “”.
Modifica del tempo di cottura
Durante la cottura, è possibile modificare la durata di cottura
premendo e i tasti + o -.
Premere START per avviare la cottura.
Interruzione della cottura
È possibile interrompere la cottura in qualsiasi momento
premendo il tasto “”(per 1 secondo circa).
Se la produzione di vapore non è ancora avviata (1 minuto
circa), il forno si ferma immediatamente e l’indicazione del
tempo scompare.
Se la produzione di vapore è già cominciata, l’indicatore del
tempo rimanente indica 3 minuti e inizia un conto alla
rovescia; il vapore si disperde prima dell’apertura della
porta
.
Come realizzare una cottura differita
Regolare la modalità di cottura prescelta ed eventual-
mente la temperatura,
Esempio: posizione Cottura al vapore Temperatura
a 85°C.
Premere il tasto e scegliere la durata con i tasti - e
+ per esempio 30 minuti.
Per esempio, sono le 12 e 30 minuti.
Avete programmato una cottura di 30 minuti.
L’ora di fine cottura visualizzata è 13:00.
Premere due volte il tasto l’ora di fine cottura
visualizzata è 13:00.
Regolare l’ora di fine premendo i tasti - e +.
Esempio: ora 14:00.
Convalidare premendo il tasto “ ” per avviare il pro-
gramma.
Dopo queste operazioni l’inizio del
riscaldamento viene differito affinché la cottura finisca
alle ore 14.
Quando la cottura è terminata, è udibile una serie di
bip per alcuni minuti.
L’interruzione dei bip si ottiene premendo il tasto “ ”
per un secondo.
Svuotare TASSATIVAMENTE il serbatoio.
Per garantire l’affidabilità del forno, la ventola
continua a funzionare per un certo tempo
dopo la fine della cottura.
Alla fine della cottura
In caso di problema dovuto al circuito dell’acqua durante la cottura,
appare l’indicazione “mancanza d’acqua”. Viene emesso un bip e
sul display appare il messaggio “Riempire d’acqua il serbatoio”.
Questa anomalia è dovuta soprattutto:
- al serbatoio vuoto
- al serbatoio mal inserito.
Dopo avere verificato questi due elementi, chiudere la porta e
premere “”il forno si accende di nuovo.
Gestione dell’acqua
7
IT

8
IT
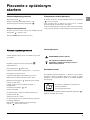
Precauzioni
e consigli
FUNZIONI
Temperatura
° C
COTTURA ESEMPI DI COTTURA
Cottura al vapore più utilizzata
Verdura e carne.
Per la cottura degli
alimenti delicati
Pesci delicati interi (trote).
La carne resta madreperlacea,
il collagene non appare
Cottura di pesci delicati
(filetti di sardine, triglie).
Per la cottura degli alimenti
delicati, della frutta,
delle composte
Uova in camicia ; buona tenuta dei
pomodori ripieni.
Tortine al formaggio, creme, ecc.
Terrine, fegatini di pollo.
Riscaldamento di piatti precotti.
Riscaldamento leggero
Cioccolato fuso, burro.
Frutta appena tiepida per consumo
immediato.
Scongelamento lento senza
rischio di cottura
Scongelamento di filetti di pesce prima
di essere impanati.
Frutti rossi che devono restare freddi
(per torte e salse).
Scongelamento della carne prima di
essere cotta alla griglia (es: salsicce).
100
85
75
90
95
80
55

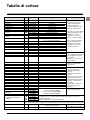
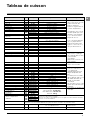
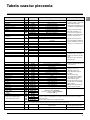
Tabella di cottura
Durata
40 - 45 min.
35 - 40 min.
18 minuti
20 - 22 min.
25 - 30 min.
15 - 20 min.
15 minuti
30 - 35 min.
30 - 35 min.
10 - 15 min.
20 minuti
35 minuti
30 minuti
22 minuti
30 - 35 min
15 - 20 min.
20 -25 min
25 minuti
25 minuti
40 - 45 min.
10 - 12 min.
20 - 25 min.
25 minuti
30 - 35 min.
10 - 15 min.
25 minuti
10 min.
13 - 15 min.
20 - 25 min.
20 minuti
15 - 20 min.
15 minuti
20 minuti
15 minuti
25 - 30 min.
15 minuti
20 minuti
15 - 20 min.
10 -12 min
20 - 25 min.
20 - 25 min.
15 - 30 min.
25 minuti
20 - 25 min.
25 minuti
20 minuti
7 minuti
5 - 6 min.
8 minuti
10 - 12 min.
30 minuti
25 minuti
Preparazione
disposti rovesciati nella teglia
per le punte, ridurre i tempi
in mazzetti
a rondelle
a fettine sottili
a cubetti
a lamelle sottili
di Bruxelles
Cavolfiori a mazzetti
a rondelle
(freschi) girare durante la cottura
(surgelati) girare durante la cottura
dopo avere tolto il torsolo e averle tagliate
in 2 nel senso della lunghezza
tagliati in due
a cubetti
tagliati in due
tagliate a rondelle
intere
con aromi
con aromi
secondo il peso
intere, sbucciate
frutta a fettine
negli stampi
tranci (180 g)*
intera (1 kg)
intera (200g)
tranci (180 g)
secondo lo spessore
intero (250 g)
filetti
intero (200 g)
grossi pezzi (tra 6 e 10 cm di lunghezza)
tranci (180/200 g)
filetti
tranci (180/200 g)
intera (200 g) 13 - 15 min.
100 g di riso lavato - 20 cl di latte
2 cucchiai di zucchero
200 g (1/4 di litro d’acqua)
Osservazioni
• Questi tempi dipendono dal
tipo, dalle dimensioni e
dalla freschezza della
verdura. Seguire le
indicazioni presenti nella
colonna
“Preparazione”
.
• La durata di cottura rimane
identica qualunque sia la
quantità da cuocere.
Esempio
: 1 o 4 carciofi:
tempo di cottura identico.
• Per controllare il grado di
cottura, bucherellare la
parte più spessa della
verdura; se è cotta, non
opporrà resistenza.
• Disporre i frutti di mare
sulla griglia del recipiente di
vetro, aggiungere le erbe
aromatiche.
• Disporre i crostacei su un
letto di alghe.
• Tempi a seconda della
maturazione.
•
*Tranci: tranci rotondi di
pesce tra 2 e 3 cm di
spessore (180/200 g) a
persona.
•
Chiedete prodotti molto
freschi.
•
Disporre i pesci interi nella
teglia così come sono o
aggiungendo foglie di alloro,
finocchio o un’altra erba
aromatica.
A fine cottura, togliere la
pelle che si staccherà
facilmente.
•
Quindi fare dorare sotto il
grill in un’altra teglia.
• Alla fine della cottura,
sgranare con la forchetta.
alla Coque: mettere direttamente sulla griglia
Al tegame: rotto in un piatto singolo messo sulla griglia e ricoperto da
pellicola alimentare.
Pentola a pressione: vedi ricette specifiche.
Disporre direttamente in una teglia, ricoprire con acqua o latte. Infatti il vapore non è sufficiente per saturare questi ali-
menti che si gonfiano. Mettere un foglio di alluminio sulla teglia per evitare che le goccioline d’acqua vi ricadano sopra.
Arrosto 800 g: 55 - 60 min.
Cosce di pollo: 35 - 40 min.
Arrosto di tacchino: 50 - 60 min.
Salsiccia di Morteau: 400 g
° C
100
100
100
100
100
100
100
100
100
100
100
100
100
100
100
100
100
100
100
100
90
95
95
95
90
95
90
85
85
85
85
80
85
75
80
80
85
85
75
100
100
100
100
100
95
90
100
100
100
100
100
100
Alimenti
Carciofi (piccoli)
Asparagi
Broccoli
Carote
Sedano rapa
Zucca gialla
Funghi
Cavoli
Zucchine (1 kg)
Spinaci
Indivia
Finocchi
Fagiolini
Navoni
Piselli freschi
Porri
Patate
Pettini di mare
Cozze/Lumache di mare
Granseole/Granchi
Astice
Mele/pesche/pere
Composta
Creme
Merluzzo/Nasello
Orata
Aringa
Nasello (nero e giallo)
Coda di rospo
Sgombro
Baccalà/Merluzzo
Razza
Triglie
Salmoncino
Salmone
Sogliola
Tonno
Trota intera (1 kg)
Manzo
Maiale (filetti)
Pollame (petti)
(involtini)
Salsicce
Con uova molto fresche e
conservate a temperatura
ambiente.
Riso, semolino
Riso al latte
Semola
9
IT

10
IT
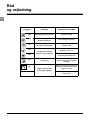
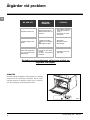
Cosa fare in caso
di anomalie?
COSA BISOGNA
FARE?
LE CAUSE
PROBABILI
Il display non si
accende.
La lampadina non
funziona.
Perdita di acqua o
vapore dallo sportello
durante la cottura.
Difetto di alimentazio-
ne del forno.
Scheda elettronica
guasta.
- Verificare l’alimenta-
zione (fusibile dell’im-
pianto elettrico).
- Chiamare il Servizio
Post Vendita.
- Sostituire la
lampadina.
- Collegare il forno.
- Sostituire il fusibile
dell’impianto elettrico.
La lampadina non
funziona.
Il forno non è
collegato.
Il fusibile dell’impian-
to elettrico è guasto.
La porta è chiusa
male.
La guarnizione della
porta è difettosa.
- Telefonare al Servizio
Post Vendita.
SE VI ACCORGETE
CHE...
In ogni caso, se l’intervento non è sufficiente,
contattare subito il Servizio Post Vendita.
INTERVENTI
Gli eventuali interventi sull’apparecchio devono essere
effettuati da personale qualificato e autorizzato dalla ditta
concessionaria del marchio. Al momento della chiamata,
indicare i riferimenti completi dell’apparecchio (modello, tipo,
numero di serie). Queste informazioni sono riportate sulla
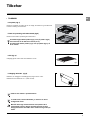
targhetta delle caratteristiche (fig.1).
BRANDT APPLIANCES SAS
7 rue Henri Becquerel
92500 RUEIL MALMAISON
230V ~ 50 Hz
MADE IN FRANCE
fig.1
CZ5701548_IT 09/12

EN
English
Instructions for use
OVEN
Contents
Steam cooking
What your oven looks like
Accessories
Using your oven
Setting the clock
Display lock
Display stand-by mode
Programming for immediate cooking
Water management
Programming cooking with a delayed start
Using the timer
Description of the functions
Cooking chart
What to do in the event of problems
Important safety instructions.
Read carefully and retain for future use.

Description of the appliance
2
EN
ON/OFF
Réglage
Temperature
AFFICHEUR
Touche
verrouillage commandes
Sélection du
mode Décongélation
églage
Temps
lce
a
Touche -
Touche +
lche
Haut
START/
STOP
DISPLAY
+ button
– button
Control locking button
Defrost mode
Time
setting
Temperature
setting
Down
arrow
Up
arrow
Food categories for
automatic programming
Locking the controls
Temperature
(degrees Celsius)
Cooking
modes display
Time
Cooking time icon
End of cooking
symbol (with delayed start)
Control
panel
Tank
Display
Steam
generator
Water intake
tube
Gutter
Overview

Accessories
ACCESSORIES
•
3
EN
• Food dish (fig.1)
Perforated stainless steel dish preventing contact between the food and
condensation water.
• Condensate dish (fig.2)
Stainless steel dish for the recovery of condensation water.
• Shelf (fig.3)
Stainless steel removable shelf: must be used when cooking.
• Removable tank (fig.4)
Tank for the independent water supply to the oven.
Its capacity is approximately one litre (maximum level).
Using softer water will make it easier to care for your oven.
The use of demineralised water is prohibited (not food
quality). The use of softened water may deteriorate the
surface of the steam generator, Bottled mineral water
should be used for preference.
The dishes may be cleaned in a dishwasher.
fig.3
fig.1
fig.2
fig.4
When cooking, place the dish in fig. 1 on the dish in fig.2
counter to each other, so that that they do not nest (see
diagram opposite).
For storage, fit the dish in fig. 1 into the dish in fig. 2, so that
they nest.

4
EN
Steam is also appropriate for blanching, defrosting and
reheating or even keeping foods warm, especially sauces.
First use a very small amount of fat to heat meats like poultry,
veal and pork so that they take on an appetising browned
appearance. Then finish cooking them using the steam
method.
Cut into pieces, food cooks faster and more evenly than if left
whole.
Operating principle
The water contained in the tank arrives in the cavity via a pipe.
This water is transformed into steam when it comes into contact
with the hot surface of the floor of the cavity: this is the steam
generator.
There is no need to add water to the cooking dish. To ensure
REAL STEAM COOKING, your oven is supplied with specially
designed cookware that will produce perfect cooking.
General
There are only advantages to steam cooking, if you follow the
instructions for use. Healthy and natural, steam cooking
preserves the full flavour of foods. A delicate sauce or
aromatic herb seasoning adds that something extra that
makes the difference.
This kind of cooking produces no cooking smells. There is no
need to season the cooking water with herbs or spices;
however, you can flavour a fish by placing it on a bed of
seaweed or make a savoury poultry dish by adding a bunch of
rosemary or tarragon.
You can cook meat, fish and vegetables simultaneously.
Steam cooking gently reheats pasta, rice and mashed
potatoes with no risk of food sticking or drying out.
It facilitates cooking custard creams and tarts, rice
pudding...covered with aluminium foil, food is not wetted by
condensation water.
There is no need to add salt before cooking, not even the
steam water.
To make meat look more appetising, quickly brown it on all
sides in a frying pan using hot butter.
Compared to boiling, steaming offers only advantages:
It is quick: cooking starts immediately whereas for food in a
water-filled dish, the cook time only begins counting down
once the water returns to a full boil.
It is healthy: vitamins (those that are water soluble) and
minerals are well preserved because they scarcely dissolve in
the condensation water that touches the food.
Moreover, no fats are used for this type of cooking.
Steam maintains the taste of food. It does not add odours, nor
the taste of the grill or the pan. Furthermore, it takes nothing
away because the food is not diluted in the water.
Words of advice: there is no point in using this cooking
method to prepare fish that is not fresh or vegetables left in
the refrigerator for a week: the results will be catastrophic!
Steam does not spread tastes or odours therefore do not
hesitate to save both time and money by cooking items side by
side, but without touching. For example, you can cook a fish
next to a dessert.
Steam cooking
Warning
You MUST fill the water tank to the max.level before
cooking. Return the tank to its housing by firmly
pushing ALL THE WAY until you feel it LOCK INTO
POSITION.
Warning
When in use, the appliance becomes hot. Hot steam
will escape when you open the door of the appliance.
Keep children at a distance.

Getting started
and using your oven
Using your oven for the first time
After connecting the oven to the mains and switching on for
the first time, activate the control panel by pressing the
button
TIMER Setting the timer
TIME Setting the clock
SOUND Touchpad volume
EXIT Exit from the menu
Setting the time
After connecting the oven to the mains and switching on
for the
first time, the display will flash for 10 s, indicating the time
can be set.
1. Set the hours using the - and +
buttons
2. Press “ ” to confirm.
3.Set the minutes using the - and + buttons
4 Press “ ” to confirm.
To change the time, first press the
button to switch on the display then press “ ” to acti-
vate the
settings.
1. Set the hours using the - and + buttons
2. Press “ ” to confirm.
3.Set the minutes using the - and + buttons
4 Press “ ” to confirm.
Child safety function
The child safety function can be used to lock the oven
controls.
To activate it, press the button, the symbol appears
in the display. To de-activate it, repeat the operation until the
symbol disappears from the display. The child safety function
may be activated whether the oven is on or off. The child
safety function may be deactivated when the oven has
finished cooking and in all situations described above.
5
EN

6
EN
Immediate cooking
MANUAL cooking programme
In MANUAL mode, it is possible to adjust the cooking time
as well as the temperature (from 100° to 50°).
1. Press the button to switch on the control panel.
2. Make your selection using the buttons:
3. Press the “ ” button to start cooking.
4. During cooking, it is possible to change the temperature
at any time, by pressing the “ ” button. Adjust using the +
and - buttons and press “
” to confirm.
- programme the cooking time;
- stop cooking by pressing the “ ” button;
- set the timer;
- switch off the oven by pressing the button.
5. In the event of a power cut, if the oven temperature is not
too low, a special facility causes the programme to restart at
the point where it was was interrupted. However, any
programmes that have not yet started must be
reprogrammed once the power returns.
Automatic defrosting
Press the button:
55°C, pre-programmed time: 30 min
Min. time: 5 min, max.: 60 min
Defrosting fish fillets before breading.
Berries that must remain cool (for pies and sauces).
Defrosting meats before grilling (e.g.: sausages).
Reheating
100°C, Pre-programmed time: 25 min
Min. time: 5 min, max.: 60 min
Meat, vegetables.
Whole fish
85°C, Pre-programmed time: 15 min
Min. time: 5 min, max.: 60 min
For cooking delicate food. Whole fish (trout).
Pre-cooked dishes
95°C, Pre-programmed time: 30 min
Min. time: 5 min, max.: 60 min
Terrines, chicken livers. Reheating cooked dishes.
Flan
90°C, Pre-programmed time: 20 min
Min. time: 5 min, max.: 60 min
Cocotte eggs; stuffed tomatoes that hold their shape.
Ramekins, custard creams, etc.
Chocolate
80°C, Pre-programmed time: 15 min
Min. time: 5 min, max.: 60 min
Melted chocolate, butter. Fruit which is just warm for immediate
consumption.
Getting started &
and using your oven
You MUST fill the water tank to the max. level
before cooking. Return the tank to its
housing by firmly pushing ALL THE WAY until
you feel it LOCK INTO POSITION.
When in use, the appliance becomes hot. Hot
steam will escape when you open the door
of the appliance. Keep children at a distance.

Setting a cooking programme
with delayed start
Changing the cooking temperature
Press the button.
Adjust by pressing the + and – buttons.
Save your selection by pressing the “”button.
Changing the cooking time
During cooking, you can adjust the cooking time by
pressing and the + and - buttons.
Press START to start cooking.
Cancelling cooking in progress
You can stop the cooking at any time by pressing “” (for
approximately 1 second).
If steam generation has not yet begun (approximately one
minute), the oven stops immediately and the time display
disappears.
If steam generation has already begun, the time changes to
3 minutes, a countdown begins and the steam escapes
before the door is opened
.
Setting a cooking programme with
delayed start
Set the desired cooking mode, the time and adjust the
temperature if necessary,
Example: position Steam Cooking Temperature
85°C.
Press the button and select the
cooking programme duration using the
- and + buttons for example 30 min.
For example the time is 12:30.
You have programmed a 30 min. cooking cycle
The displayed end of cooking time is 13:00.
Press the button twice to display the end of coo-
king time: 13:00.
Change the end time by pressing the - and + buttons.
Example 14:00
Confirm by pressing “ ” to start the
programme
After carrying out these actions, the
heating of the oven is delayed so that the cooking
cycle ends at 14:00.
When the cooking cycle is complete, a series of beeps
sounds for several
minutes.
The beeps can be stopped by pressing the “ " button
for one second..
You MUST empty the tank.
To ensure good oven reliability, the fan
continues to function for a short period after
cooking is complete.
At the end of cooking
In the event of a water circuit-related problem during cooking, the
“no water” indicator appears, a beep is emitted and a “Fill your
water tank” message appears in the display.
This error is specifically associated with:
- an empty tank.
- a poorly seated tank.
After checking these two points, close the door and press “”.
The oven restarts.
Water management
7
EN

8
EN
Precautions
and recommendations
FUNCTIONS
Temperature
°C
COOKING COOKING EXAMPLES
Steam cooking mode most
often used
Vegetables and meats.
For cooking
fragile food
Delicate whole fish (trout).
Meat has a sheen to it,
the collagen is not apparent.
Cooking delicate fish
(sardine fillets, red mullet).
For cooking
fragile food, fruit, compotes
Cocotte eggs; stuffed tomatoes
that hold their shape.
Ramekins, custard creams, etc.
Terrines, chicken livers.
Reheating cooked dishes.
Low heat
Melted chocolate, butter.
Slightly warm fruit for immediate serving.
Slow defrosting without
cooking
Defrosting fish fillets before breading.
Berries that must remain cool
(for pies and sauces).
Defrosting meats before grilling
(e.g.: sausages).
100
85
75
90
95
80
55

Cooking chart
Time
40 to 45 min.
35 to 40 min.
18 min.
20 to 22 min.
25 to 30 min.
15 to 20 min.
15 min.
30 to 35 min.
30 to 35 min.
10 to 15 min.
20 min.
35 min
30 min.
22 min.
30 to 35 min
15 to 20 min.
20 -25 min.
25 min.
25 min.
40 to 45 min.
10 to 12 min.
20 to 25 min.
25 min.
30 to 35 min.
10 to 15 min.
25 min.
10 min.
13 to 15 min.
20 to 25 min.
20 min.
15 to 20 min.
15 min.
20 min.
15 min.
25 to 30 min.
15 min.
20 min.
15 to 20 min.
10 to 12 min
20 to 25 min.
20 to 25 min.
15 to 30 min.
25 min.
20 to 25 min.
25 min.
20 min.
7 min.
5 to 6 min.
8 min.
10 to 12 min.
30 min.
25 min.
Preparations
placed upside down in the dish
for tips only, decrease cooking time
in small bunches
in thin, round slices
in thin slices
in cubes
in thin strips
Brussels sprouts
Cauliflower in small florets
in round slices
(fresh) stir while cooking
(frozen) stir while cooking
core removed and cut
in two along the length
cut in half
in cubes
cut in half
cut in round slices
whole
with seasoning
with seasoning
depending on weight
whole, peeled
fruit in strips
in ramekins
steaks (180 g)*
whole (1 kg)
whole (200g)
steaks (180 g)
depending on thickness
whole (250g)
fillets
whole (200g)
thick steaks (6 to 10 cm in length)
steaks (180/200 g)
fillets
steaks (180/200 g)
whole (200 g) 13 to 15 min.
100 g rinsed rice - 20 cl milk
2 tablespoons sugar
200 g (¼ litre water)
Notes
• These times depend on the
type, size and freshness of
the vegetables. Follow the
indications that appear in
the
“Preparations”
column.
• The cooking time remains
the same regardless of the
quantity to be cooked.
For
example
: 1 or 4 artichokes
require the same cooking
time.
• To check the level of
cooking, insert the tip of a
knife into the thickest part
of the vegetable; if it is
cooked there should be no
resistance.
• Place the shellfish on the
grid of the glass dish, add
aromatic herbs.
• Place them on a bed of
seaweed.
• Times depend on ripeness.
•
*Steaks: round slices of fish
of 2 to 3 cm in thickness
(180/200 g) per person.
•
Insist on very fresh products.
•
Place whole fish in the dish
as is or on bay leaves, fennel
or other aromatic herbs.
As soon as cooking is
complete, remove the skin,
which will detach easily.
•
Then brown under the grill
in another dish.
• Fluff with a fork when
cooking is complete.
Boiled: placed directly on the grid.
Sunny side up: broken in an individual dish placed on the shelf and covered
with cooking foil.
Cocotte: see detailed recipes.
Place directly in a dish then cover with water or milk. The steam is not sufficient to saturate these inflating
foods. Place a sheet of aluminium foil on the dish to prevent water droplets from falling on to the food.
Roast 800 g.: 55 to 60 min.
Chicken thighs: 35 to 40 min.
Roast turkey: 50 to 60 min.
Morteau sausage: 400 g
°C
100
100
100
100
100
100
100
100
100
100
100
100
100
100
100
100
100
100
100
100
90
95
95
95
90
95
90
85
85
85
85
80
85
75
80
80
85
85
75
100
100
100
100
100
95
90
100
100
100
100
100
100
Food
Artichokes (small)
Asparagus
Broccoli
Carrots
Celeriac
Pumpkin
Mushrooms
Cauliflower
Courgettes
Spinach
Chicory
Fennel
Green beans
Turnips
Fresh peas
Leeks
Potatoes
Scallops
Mussels/whelks
Crabs
Lobsters
Apples/peaches/pears
Compote
Cream desserts
Cod/hake
Sea bream
Herring
Coley, pollack
Monkfish
Mackerel
Whiting/Cod
Skate
Red mullet
Rock salmon
Salmon
Bottom heating
Tuna
Whole trout (1 kg)
Beef
Pork (tenderloin)
Poultry (breast)
(stuffed)
Sausages
Start with very fresh eggs
kept at room temperature.
Rice, pasta, semolina
Rice pudding
Semolina
9
EN

10
EN
What to do in the event
of problems
WHAT SHOULD
YOU DO?
POSSIBLE
CAUSES
Display does not light.
The bulb is not
working.
Water or steam leak
around the door
during cooking.
Oven not connected
to a power source.
Electronic board not
functioning.
- Check that the
appliance is receiving
electricity (fuse OK).
- Call the After-Sales
Service Department.
- Change the bulb.
- Connect the oven.
- Change the circuit
fuse.
Bulb has blown.
The oven is not
connected.
The fuse has blown.
The door is not
properly closed.
The door seal is
defective.
- Call the After-Sales
Service Department.
YOU NOTICE THAT
In all situations, if you cannot solve the problem yourself,
contact the After-Sales Service Department without delay.
SERVICE CALLS
Any repairs to your appliance must be made by a qualified
professional, authorised to work on the brand. When you call,
provide your appliance’s complete reference information
(model, type, serial number). This information appears on the
manufacturer’s nameplate (Fig.1).
BRANDT APPLIANCES SAS
7 rue Henri Becquerel
92500 RUEIL MALMAISON
230V ~ 50 Hz
MADE IN FRANCE
fig.1
CZ5701548_00_EN 09/12
Sidan laddas ...
Sidan laddas ...
Sidan laddas ...
Sidan laddas ...
Sidan laddas ...
Sidan laddas ...
Sidan laddas ...
Sidan laddas ...
Sidan laddas ...
Sidan laddas ...
Sidan laddas ...
Sidan laddas ...
Sidan laddas ...
Sidan laddas ...
Sidan laddas ...
Sidan laddas ...
Sidan laddas ...
Sidan laddas ...
Sidan laddas ...
Sidan laddas ...
Sidan laddas ...
Sidan laddas ...
Sidan laddas ...
Sidan laddas ...
Sidan laddas ...
Sidan laddas ...
Sidan laddas ...
Sidan laddas ...
Sidan laddas ...
Sidan laddas ...
Sidan laddas ...
Sidan laddas ...
Sidan laddas ...
Sidan laddas ...
Sidan laddas ...
Sidan laddas ...
Sidan laddas ...
Sidan laddas ...
Sidan laddas ...
Sidan laddas ...
Sidan laddas ...
Sidan laddas ...
Sidan laddas ...
Sidan laddas ...
Sidan laddas ...
Sidan laddas ...
Sidan laddas ...
Sidan laddas ...
Sidan laddas ...
Sidan laddas ...
Sidan laddas ...
Sidan laddas ...
Sidan laddas ...
Sidan laddas ...
Sidan laddas ...
Sidan laddas ...
Sidan laddas ...
Sidan laddas ...
Sidan laddas ...
Sidan laddas ...
Sidan laddas ...
Sidan laddas ...
Sidan laddas ...
Sidan laddas ...
Sidan laddas ...
Sidan laddas ...
Sidan laddas ...
Sidan laddas ...
Sidan laddas ...
Sidan laddas ...
Sidan laddas ...
Sidan laddas ...
Sidan laddas ...
Sidan laddas ...
Sidan laddas ...
Sidan laddas ...
Sidan laddas ...
Sidan laddas ...
Sidan laddas ...
Sidan laddas ...
Sidan laddas ...
Sidan laddas ...
Sidan laddas ...
Sidan laddas ...
Sidan laddas ...
Sidan laddas ...
Sidan laddas ...
Sidan laddas ...
Sidan laddas ...
Sidan laddas ...
Sidan laddas ...
Sidan laddas ...
Sidan laddas ...
Sidan laddas ...
Sidan laddas ...
Sidan laddas ...
Sidan laddas ...
Sidan laddas ...
Sidan laddas ...
Sidan laddas ...
-
 1
1
-
 2
2
-
 3
3
-
 4
4
-
 5
5
-
 6
6
-
 7
7
-
 8
8
-
 9
9
-
 10
10
-
 11
11
-
 12
12
-
 13
13
-
 14
14
-
 15
15
-
 16
16
-
 17
17
-
 18
18
-
 19
19
-
 20
20
-
 21
21
-
 22
22
-
 23
23
-
 24
24
-
 25
25
-
 26
26
-
 27
27
-
 28
28
-
 29
29
-
 30
30
-
 31
31
-
 32
32
-
 33
33
-
 34
34
-
 35
35
-
 36
36
-
 37
37
-
 38
38
-
 39
39
-
 40
40
-
 41
41
-
 42
42
-
 43
43
-
 44
44
-
 45
45
-
 46
46
-
 47
47
-
 48
48
-
 49
49
-
 50
50
-
 51
51
-
 52
52
-
 53
53
-
 54
54
-
 55
55
-
 56
56
-
 57
57
-
 58
58
-
 59
59
-
 60
60
-
 61
61
-
 62
62
-
 63
63
-
 64
64
-
 65
65
-
 66
66
-
 67
67
-
 68
68
-
 69
69
-
 70
70
-
 71
71
-
 72
72
-
 73
73
-
 74
74
-
 75
75
-
 76
76
-
 77
77
-
 78
78
-
 79
79
-
 80
80
-
 81
81
-
 82
82
-
 83
83
-
 84
84
-
 85
85
-
 86
86
-
 87
87
-
 88
88
-
 89
89
-
 90
90
-
 91
91
-
 92
92
-
 93
93
-
 94
94
-
 95
95
-
 96
96
-
 97
97
-
 98
98
-
 99
99
-
 100
100
-
 101
101
-
 102
102
-
 103
103
-
 104
104
-
 105
105
-
 106
106
-
 107
107
-
 108
108
-
 109
109
-
 110
110
-
 111
111
-
 112
112
-
 113
113
-
 114
114
-
 115
115
-
 116
116
-
 117
117
-
 118
118
-
 119
119
-
 120
120


Whirlpool MSK 103 X HA S Installationsguide
- Typ
- Installationsguide
på andra språk
- italiano: Whirlpool MSK 103 X HA S Guida d'installazione
- español: Whirlpool MSK 103 X HA S Guía de instalación
- Deutsch: Whirlpool MSK 103 X HA S Installationsanleitung
- português: Whirlpool MSK 103 X HA S Guia de instalação
- français: Whirlpool MSK 103 X HA S Guide d'installation
- dansk: Whirlpool MSK 103 X HA S Installationsvejledning
- Nederlands: Whirlpool MSK 103 X HA S Installatie gids
Relaterade papper
Andra dokument
-
Panasonic NNGD38HS Bruksanvisningar
-
SEVERIN MW 7816 Användarmanual
-
Siemens HB933R500/01 Användarmanual
-
Sandstrom SCB2510E Användarmanual
-
Panasonic NNGD34HW Bruksanvisningar
-
Sharp R861BK Bruksanvisning
-
Sharp YCMG02ES Bruksanvisning
-
Morphy Richards FOOD STEAMER 48780 Bruksanvisning
-
Samsung CS4492BUU Användarmanual