Mio Cyclo 100 Series Snabbstartsguide
- Kategori
- Cykeltillbehör
- Typ
- Snabbstartsguide

Revision: R00
(0
/2012)
Disclaimer
Specifications and documents are subject to change without notice. Mio Technology
does not warrant this document is error-free. Mio Technology assumes no liability
for damage incurred directly or indirectly from errors, omissions, or discrepancies
between the device and the documents.
Notes
Not all models are available in all regions.
Depending upon the specific model purchased, the color and look of your device and
accessories may not exactly match the graphics shown in this document.
The screenshots and other presentations shown in this document are for reference
only. They may differ from the actual screens and presentations generated by the
actual product.
Mio Technology Ltd.
No. 211, Jiang Chang San Rd.,
Zha Bei District, Shanghai, China
N R
www.mio.com/cyclo
Quick Start Guide

1
Quick Start Guide
Brugervejledning
Schnellstartanleitung
Guía de inicio rápido
Pikaopas
Guide de mise en route
Guida rapida
Snelstartgids
Hurtigoppstartsveileder
Guia Rápido de Iniciação
Användarhandbok
sv 45
pt 41
no 37
nl 33
it 29
fr 25
fi 21
es 17
de 13
da 09
en 05

2
1
a
c
b
d
3
2

3
R
L
R
L
o
p
e
n
R
L
o
p
e
n
1
4
3
2
1
a
c
b
d
3
2

4
a
b
1
2
3

5
en
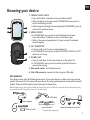
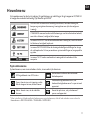
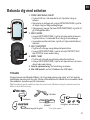
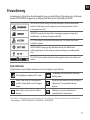
Knowing your device
1. POWER / LIGHT / BACK
• Press and hold for 2 seconds to turn your device on/off.
• When the device is turned on and in DASHBOARD menu, press to
switch the backlight on/off.
• While navigating through the menus(except DASHBOARD), press to
return to the previous screen.
2. MENU / ENTER
• In DASHBOARD menu, press to switch between the screens.
Press and hold for 2 seconds to return to the Main menu.
• While in the menu screen/option list, press to select the desired
function/option.
3. UP / START|STOP
• Press to scroll up in the menu screen/option list.
• In DASHBOARD menu, press to select CONTINUE, PAUSE, or STOP
the timer in training.
4. DOWN / LAP
• Press to scroll down in the menu screen or in the option list.
• In DASHBOARD menu, press to create a lap while the timer is
counting for training.
5. Bike mount socket: for the device mount.
6. Mini-USB connector: connects to the charger or USB cable.
1
2
3
4
5
6
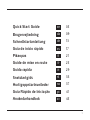
Accessories
Your device comes with the following accessories. To use your device on a bike, ensure you use the
specific bike mount kit that came with your device. Mio may provide optional accessories for specific
models. Please visit Mio website (www.mio.com) for information.
Note: Depending on the specific model purchased, the colour and look of your device and accessories may
not exactly match the graphics shown in this document.
Bike mount kit
Power adapter
USB cable
x 5
Speed and cadence sensor kit*
Heart rate belt*
x
2
* May be sold separately.

6
en
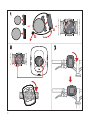
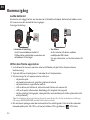
Getting started
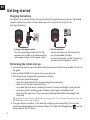
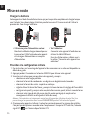
Charging the battery
Your device has an internal battery that may not be fully charged when you purchase it. You should
charge the battery for at least 3.5 hours before you start using it for the very first time.
To charge the battery:
• Via the computer
Connect your device to the computer by
using the provided USB cable.
For more information, see the "Connecting
your device to the computer" section.
• Using a mains power socket
Plug the home charger cable into the USB
connector on the back of your device and the
mains power charger into the power socket.
2
1
3
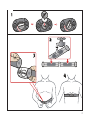
Performing the initial start-up
1. Instructions on how to mount the device and accessories on to a bike can be found at the start of
this guide.
2. Press and hold POWER for 2 seconds to turn your device on.
3. Follow the prompts to personalise your device, including:
• select your preferred language
• select the coordination format: degree or degree/minute/second
• select the units format: imperial or metric
• set up date and time format, including the correct time zone and daylight saving function
• set up your profile, including gender, birthday, weight, height, and workout level
• select your bike type (race, city, or mountain) and complete the bike's data (weight and
wheel size)
Tip: You will only have to do this the first time you use your Mio. You can change these settings from the
SETTINGS menu while using the device.
4. Once your device is turned on, it will search for satellite signals automatically. This may take
several seconds depending on the location. When GPS is fixed, the GPS signal icon ( ) on the
screen indicates the GPS status.

7
en
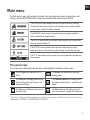
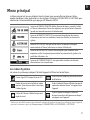
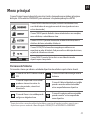
Main menu
The Main menu is your starting place for various tasks, providing quick access to applications and
settings. Use the UP/DOWN button to select the desired function and then press ENTER.
The DASHBOARD menu displays the view of various functions, including
the date and time screen, compass and navigation screen, and the workout
screens (when a workout has been selected).
The WORKOUT menu lets you set workouts by entering your conditions,
such as the distance, speed, or pace.
The HISTORY menu allows you to check the history data such as date/time,
distance, speed, altitude, etc.
The SETTINGS menu provides various options to enhance your cycling
experience. You can customise the system settings, user profiles and more.
The TO PC menu allows you to transfer your training data from the device to
the computer.
The system icons
The system icons indicating the device's status are displayed at the bottom of the screen.
The GPS signal icon indicates the GPS
status.
The Battery icon indicates the remaining
battery power.
The Timer icon will display when training
is active. When you stop the timer, the
icon will be flashing.
The Cadence/Speed icon will display when
the cadence/speed sensor* is paired with the
device.
The Alarm icon will display when you set
the alarm clock.
The Heart rate icon will display when the
heart rate monitor* is paired with the device.
* Aftering installing the cadence/speed sensor and heart rate monitor, enable the device to scan them from
Main menu > SETTINGS > ACCESSORIES > SENSORS.

8
en
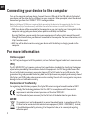
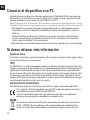
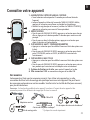
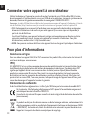
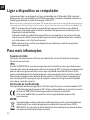
Connecting your device to the computer
Turn on the computer and your device. Connect the mini-USB end of the USB cable to the back of
your device and the other end to a USB port on your computer. When prompted, select the desired
connection type from the CONNECT TO PC message window:
Note: Installation of USB driver is required while connecting the device to the computer for the first time.
Visit MioShare (http://mioshare.com) and follow the online instructions to install the USB driver.
• YES: Your device will be connected to the computer so you can transfer your training data to the
computer and upgrade your device (when update is available) via MioShare.
By using MioShare, you can easily share your experiences with other cyclists around the world
through the Internet when your device is connected to the computer. For more information, visit:
http://mioshare.com/
• NO: You will be able to continue using your device with the battery in charging mode via the
computer.
For more information
Online support
For 24/7 help and support with Mio products, visit our Technical Support website at: www.mio.com
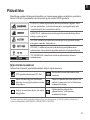
IPX7
The IEC 60529/IPX7 is a European system of test specification standards for classifying the degrees
of protection provided by the enclosures of electrical equipment. An IPX7 designation means that
the unit withstands immersion in one meter (approx 3ft) of still water for up to 30 minutes. Mio
guarantees this grade provided the battery door and all jack covers are properly and securely closed.
Mio Cyclo is not IPX8 grade; water-pressure such as washing the unit with running water may cause
damage to the unit and voids warranty.
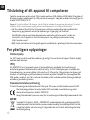
Declaration of Conformity
For regulatory identification purposes, Mio Cyclo 105 series is assigned a model number of N411.
Hereby, Mio Technology declares that this N411 is in compliance with the essential
requirements and other relevant provisions of Directive 1999/5/EC.
Visit Mio website (www.mio.com) for the full text of the declaration for your device.
WEEE
This product must not be disposed of as normal household waste, in accordance with the
EU directive for waste electrical and electronic equipment (WEEE - 2002/96/EC). Instead,
it should be disposed of by returning it to the point of sale, or to a municipal recycling
collection point.

9
da
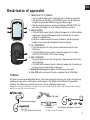
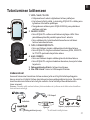
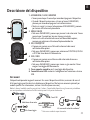
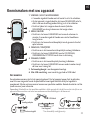
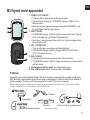
Beskrivelse af apparatet
1. TÆND/SLUK / LYS / TILBAGE
• Tryk og hold knappen nede i 2 sekunder for at tænde for apparatet.
• Når apparatet er tændt og i DASHBOARD-menu, kan du trykke på
knappen for at tænde/slukke for baggrundsbelysningen.
• Når du navigerer igennem menuerne (undtagen DASHBOARD), kan
du trykke på knappen for at gå tilbage til den forrige skærm.
2. MENU / ENTER
• I DASHBOARD-menu, kan du trykke på knappen for at skifte imellem
skærmene. Tryk og hold knappen nede i 2 sekunder for at komme
tilbage til hovedmenuen.
• Når du er i skærmmenuen/liste over funktioner, kan du trykke på
knappen for at vælge den ønskede funktion/mulighed.
3. OP / START|STOP
• Tryk på knappen for at rulle igennem skærmmenuen/listen over
funktioner.
• I DASHBOARD-menuen, kan du trykke på knappen for at vælge
FORTSÆT, PAUSE eller STOP timer i træning.
4. NED / OMGANG
• Tryk på knappen for at rulle ned igennem skærmmenuen eller listen
over funktioner.
• I DASHBOARD-menuen, kan du trykke på knappen for at markere en
omgang, mens timeren tæller i træningen.
5. Beslag til montering på en cykel: Til montering på en cykel.
6. Mini-USB-stik: Her kan du tilslutte en oplader eller et USB-kabel.
1
2
3
4
5
6
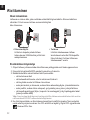
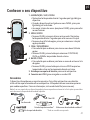
Tilbehør
Dit apparat leveres med følgende tilbehør. For at kunne bruge dit apparat på en cykel, skal du bruge
cykelmonterings-sættet, som fulgte med dit apparat. Mio tilbyder ekstratilbehør for specifikke
modeller. Gå ind på vores webside (www.mio.com) for yderligere oplysninger.
Bemærk: Afhængig af modellen stemmer farverne og udseendet af dit apparat og tilbehøret ikke nøjagtigt
med illustrationerne i dette dokument.
Cykelmonterings-sæt
Strømforsyningsadapter
USB-kabel
x 5
Hastigheds- og kadence-sensorkit*
Pulsbælte*
x
2
* Sælges eventuelt særskilt

10
da
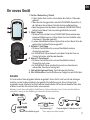
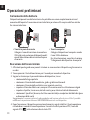
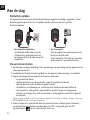
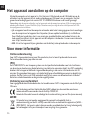
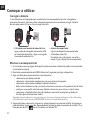
Sådan kommer du i gang
Opladning af batteriet
Dit apparat har et internt batteri, som eventuelt ikke er helt opladt, når du køber det. Du skal oplade
batteriet i mindst 3.5 timer, inden du begynder at bruge apparatet første gang.
Sådan oplades batteriet:
• Via computeren
Tilslut dit apparat til computeren med det
medfølgende USB-kabel.
For yderligere oplysninger henvises der til
afsnittet "Tilslut dit apparat til computeren".
• Tilslutning til en stikkontakt
Tilslut opladekablet til USB-stikket
på bagsiden af dit apparat og tilslut
strømadapteren til stikkontakten.
2
1
3
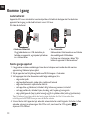
Udførelse af første opstart
1. Du kan finde instruktioner om, hvordan du monterer apparatet og tilbehøret på en cykel, i
begyndelsen af denne brugsanvisning.
2. Tryk og hold strømknappen nede i 2 sekunder for at tænde for apparatet.
3. Følg anvisningerne for at personalisere dit apparat, herunder:
• vælg dit foretrukne sprog
• vælg koordinatformat: grad eller grad/minut/sekund
• vælg enhedsformat: efter britisk standard eller metrisk
• indstil dato- og tidsformat, herunder tidszone og sommertid
• indstil din profil, herunder køn, fødselsdag, vægt, højde og træningsniveau
• vælg din cykeltype (race, city eller mountain) og indtast cyklens data (vægt og hjulstørrelse)
Tip: Du skal kun gøre dette første gang, du bruger din Mio. Du kan ændre disse indstillinger fra menuen
INDSTILLINGER mens du bruger enheden.
4. Når apparatet er tændt, søger det automatisk efter satellitsignaler. Dette kan tage flere sekunder
afhængig af stedet. Når GPS er aktiv, viser GPS signalikonet (
) på skærmen GPS status.

11
da
Hovedmenu
Via hovedmenuen har du hurtig adgang til applikationer og indstillinger. Brug knapperne OP/NED til
at vælge den ønskede funktion og tryk derefter på ENTER.
DASHBOARD-menuen viser forskellige funktioner, herunder dato og tid,
kompas og navigationsskærmen og træningsskærmen (når der vælges en
træning).
I TRÆNINGS-menuen kan du indstille træninger ved at indtaste dine forhold,
som f.eks. distance, hastighed, eller tempo.
I menuen OVERSIGT kan du kontrollere dataene i oversigten, som f.eks. dato/
tid, distance, hastighed, højde, etc.
I menuen INDSTILLINGER kan du foretage forskellige indstillinger for at øge
din cykleoplevelse. Du kan personalisere systemindstillingerne, brugerprofiler
og mere.
I menuen TIL PC kan du overføre dine træningsdata fra enheden til din
computer.
Systemikonerne
Systemikonerne, som viser enhedens status, vises nederst på skærmen.
GPS signalikonet viser GPS status.
Batteriikonet indikerer den resterende
batterikapacitet.
Timer -ikonet vises, når træning er aktiv.
Når du stopper timeren, blinker ikonet.
Kadence/hastighedsikonet vises, når
kadence/hastighedssensoren* er parret med
apparatet.
Alarm -ikonet vises, når du indstiller
alarmen.
Ikonet for puls vises, når pulsskærmen*
parres med apparatet.
* Efter installering af kadence/hastighedssensoren og pulsskærmen, skal du lade enheden scanne dem fra
Hovedmenu > INDSTILLINGER > TILBEHØR > SENSORER.

12
da
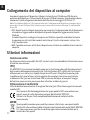
Tilslutning af dit apparat til computeren
Tænd for computeren og din enhed. Tilslut enden med mini-USB-stikket på USB-kablet til bagsiden af
dit apparat og den anden ende til en USB-port på din computer. Vælg den ønskede tilslutningstype fra
vinduet TILSLUTNING TIL PC:
Bemærk: Du skal installere USB-driveren, når du tilslutter enheden til computeren første gang. Gå ind på
MioShare (http://mioshare.com) og følg online-instruktionerne for at installere USB-driveren.
• JA: Din enhed vil blive tilsluttet til computeren, så du kan overføre dine træningsdata til din
computer og opgradere din enhed (når opdatering er tilgængelig) via MioShare.
Med MioShare kan du nemt dele dine oplevelser med andre cyklister overalt i verden via
internettet, når dit apparat er tilsluttet computeren. For yderligere information, besøg
http://mioshare.com/
•
NEJ: Du kan fortsætte med at bruge dit apparat med batteriet i opladningstilstand via computeren.
For yderligere oplysninger
Online-hjælp
For 24/7 hjælp og støtte med Mio produkter, gå venligst til vores Technical Support (Teknisk Hjælp)
websted: www.mio.com
IPX7
IEC 60529/IPX7 er et europæisk system af testspecifikations-standarder for klassificering af
beskyttelsesgraden af kabinetterne for elektrisk udstyr. En IPX7-tildeling betyder, at enheden kan
tåle nedsænkning i en meters dybde i stille vand i op til 30 minutter. Mio garanterer for denne grad
forudsat, at batterilågen og alle jack-dæksler er korrekt og sikkert lukkede. Mio Cyclo opfylder ikke
IPX8 graden; vandtryk, som f.eks. ved vask af enheden under rindende vand kan forårsage skader på
enheden og annullerer garantien.
Overensstemmelseserklaring
Til forskriftsmæssige identifikationsformål: Mio Cyclo 105 serien er tildelt modelnummeret N411.
Mio Technology erklærer herved, at dette N411 overholder essentielle krav og andre
relevante bestemmelser i direktiv 1999/5/EC.
Besog Mio webstedet (www.mio.com) for at se erklaringens fulde ordlyd vedrorende din Mio.
WEEE
I henhold til EU direktiv (WEEE - 2002/96/EC) vedrørende elektrisk og elektronisk affald
må dette produkt ikke bortskaffes sammen med almindeligt husholdningsaffald. Det skal
i stedet bortskaffes ved returnering til salgsstedet eller via et lokalt indsamlingssted med
henblik på genbrug.

13
de
Ihr neues Gerät
1. Ein/Aus / Beleuchtung / Zurück
• Halten Sie die Taste zum Ein-/Ausschalten des Gerätes 2 Sekunden
gedrückt.
• Wenn das Gerät eingeschaltet und das DASHBOARD-Menü aktiv ist,
de-/aktivieren Sie mit dieser Taste die Hintergrundbeleuchtung.
• Beim Navigieren durch die Menüs (Ausnahme: DASHBOARD-Menü)
kehren Sie mit dieser Taste zum vorherigen Bildschirm zurück.
2. Menü / Eingabe
• Mit dieser Taste schalten Sie im DASHBOARD-Menü zwischen den
einzelnen Bildschirmen um. Halten Sie die Taste zur Rückkehr in das
Hauptmenü 2 Sekunden gedrückt.
• In einem Menübildschirm/einer Optionsliste wird mit dieser Taste die
gewünschte Funktion/Option ausgewählt.
3. Aufwärts / Start|Stopp
• Mit dieser Taste blättern Sie in einem Menübildschirm/einer
Optionsliste nach oben.
• Im DASHBOARD-Menü können Sie mit dieser Taste den Timer im
Training fortsetzen, anhalten oder beenden.
4. Abwärts / Zwischenzeit
• Mit dieser Taste blättern Sie in einem Menübildschirm/einer
Optionsliste nach unten.
• Im DASHBOARD-Menü erstellen Sie hiermit eine Zwischenzeit,
während der Timer beim Training läuft.
5. Fahrrad-Montagevorrichtung: Zum Anbringen des Gerätes.
6.
Mini-USB-Anschluss: Zum Anschließen eines Ladegerätes oder USB-Kabels.
1
2
3
4
5
6
Zubehör
Ihr Gerät wird mit dem folgenden Zubehör ausgeliefert. Wenn Sie Ihr Gerät am Fahrrad anbringen
möchten, nutzen Sie dazu unbedingt das spezielle Fahrradhalterungsset, das mit Ihrem Gerät
ausgeliefert wurde. Mio bietet unterschiedliches Sonderzubehör für bestimmte Modelle. Mehr dazu
erfahren Sie auf den Mio-Internetseiten: www.mio.com
Hinweis: Je nach Ihrem individuellen Modell können Farbe und Aussehen Ihres Gerätes und des Zubehörs
eventuell ein wenig von den Abbildungen in diesem Dokument abweichen.
Fahrradhalterungsset
Netzteil
USB-Kabel
x 5
Geschwindigkeit-/Kadenzsensor-Set*
Herzfrequenzgurt*
x
2
* Kann separat erworben werden

14
de
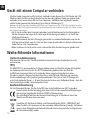
Erste Schritte
Akku laden
Ihr Gerät ist mit einem internen Akku ausgestattet, der beim Kauf eventuell nicht vollständig geladen
ist. Laden Sie den Akku mindestens 3.5 Stunden lang auf, bevor Sie das Gerät zum ersten Mal benutzen.
So laden Sie den Akku auf:
• Per Computer
Schließen Sie Ihr Gerät über das mitgelieferte
USB-Kabel an den Computer an.
Weitere Hinweise finden Sie im Abschnitt
„Gerät mit einem Computer verbinden“.
• Per Steckdose
Schließen Sie den kleinen Ladekabelstecker
an den USB-Anschluss an der Rückseite Ihres
Gerätes an, verbinden Sie das Ladegerät
(Netzteil) mit der Steckdose.
2
1
3
Zum ersten Mal einschalten
1.
Hinweise zur Montage des Gerätes und des Zubehörs am Fahrrad finden Sie am Anfang dieser Anleitung.
2. Halten Sie die Ein-/Austaste zum Einschalten des Gerätes 2 Sekunden lang gedrückt.
3. Folgen Sie den Hinweisen zur persönlichen Einstellung Ihres Gerätes; dazu zählen:
• Gewünschte Sprache auswählen
• Auswahl des Koordinatenformats: Grad oder Grad/Minute/Sekunde
• Auswahl des Maßeinheitenformats: Britisch oder metrisch
• Einstellen des Formats für Datum und Uhrzeit, inklusive der richtigen Zeitzone und
Sommerzeitfunktion
•
Einstellen Ihres Profils, beispielsweise Geschlecht, Geburtstag, Gewicht, Größe und Trainingsniveau
• Auswahl des Fahrradtyps (Rennrad, City-Rad oder Mountainbike) und Vervollständigung der
Fahrraddaten (Gewicht und Radgröße)
Tipp: Sie müssen diesen Schritt nur bei der ersten Inbetriebnahme Ihres Mio vollziehen. Sie können diese
Einstellungen bei der Nutzung des Gerätes im Menü Einstellungen ändern.
4. Nach dem Einschalten sucht das Gerät automatisch nach Satellitensignalen. Dies kann je nach
Standort einige Sekunden dauern. Nachdem GPS-Signale empfangen wurden, zeigt das GPS-
Signal-Symbol ( ) den GPS-Status auf dem Bildschirm an.

15
de
Hauptmenü
Das Hauptmenü ist Ihr Basiscamp für unterschiedliche Aufgaben; von hier aus greifen Sie schnell auf
Anwendungen und Einstellungen zu. Wählen Sie mit den Tasten Aufwärts / Abwärts die gewünschte
Funktion, drücken Sie dann Eingabe.
Das DASHBOARD-Menü enthält eine Reihe von Funktionen, inklusive
Bildschirm mit Datums- und Zeitanzeige, Kompass- und Navigationsbildschirm
sowie Trainingsbildschirmen (wenn ein Training ausgewählt wurde).
Im Menü Training können Sie durch Eingabe von Faktoren wie Strecke oder
Geschwindigkeit Trainings festlegen.
Im Menü Protokoll können Sie Daten vergangener Trainings überprüfen,
beispielsweise Datum/Uhrzeit, Strecke, Geschwindigkeit, Höhe usw.
Im Menü Einstellungen können Sie unterschiedliche Optionen zur
Verbesserung Ihres Trainingsergebnisses einstellen, beispielsweise die
Systemeinstellungen, Benutzerprofile usw.
Im Menü Zum PC können Sie Trainingsdaten vom Gerät auf den PC
übertragen.
Die Systemsymbole
Die Systemsymbole zur Anzeige des Gerätestatus sind unten am Display zu sehen.
Das GPS-Signal-Symbol zeigt den GPS-
Status.
Das Batteriesymbol verrät Ihnen die restliche
Akkukapazität.
Während des Trainings wird das Timer-
Symbol angezeigt. Sobald Sie den Timer
anhalten, blinkt das Symbol.
Das Kadenz/Geschwindigkeit-Symbol
wird angezeigt, wenn der Kadenz-/
Geschwindigkeitssensor* mit dem Gerät
gekoppelt wurde.
Das Alarm -Symbol wird angezeigt, wenn
der Alarmgeber eingestellt ist.
Das Herzfrequenz-Symbol erscheint, wenn
der Herzfrequenzsensor* mit dem Gerät
gekoppelt ist.
* Nach der Installation von Kadenz/Geschwindigkeit-Sensor und Herzfrequenzmesser aktivieren Sie die
Abfrage dieser Geräte unter Hauptmenü > Einstellungen > Zubehör > Sensoren.

16
de
Gerät mit einem Computer verbinden
Schalten Sie den Computer und Ihr Gerät ein. Verbinden Sie den kleinen Mini-USB-Stecker des USB-
Kabels mit dem Anschluss an der Rückseite Ihres Gerätes, den größeren Stecker am anderen Ende
verbinden Sie mit einem freien USB-Port Ihres Computers. Sobald Sie dazu aufgefordert werden,
wählen Sie den gewünschten Verbindungstyp im Fenster Verbindung zu PC:
Hinweis: Vor der erstmaligen Verbindung von Gerät und Computer muss ein USB-Treiber installiert werden.
Besuchen Sie die MioShare-Internetseite (http://mioshare.com) und installieren Sie den USB-Treiber anhand
der Online-Anweisungen.
• JA: Ihr Gerät wird mit dem Computer verbunden; anschließend können Sie Ihre Trainingsdaten
auf den Computer übertragen und – sofern eine Aktualisierung vorhanden ist – Ihr Gerät über
MioShare aktualisieren.
Mit MioShare können Sie Ihre Erfahrungen ganz einfach mit anderen Radfreunden rund um die
Welt per Internet teilen, wenn Ihr Gerät mit dem Computer verbunden ist. Weitere Informationen
finden Sie hier: http://mioshare.com
• Nein: Sie können Ihr Gerät weiter nutzen, während der Akku über den Computer geladen wird.
Weiterführende Informationen
Online-Kundenbetreuung
Bitte besuchen Sie zum 24/7-Service die Webseite unseres technischen Kundendienstes unter:
www.mio.com
IPX7
IEC 60529/IPX7 ist ein europäisches Prüfungsvorgabensystem zur Klassifizierung des Schutzgrades
von Gehäusen elektrischer Geräte. Die IPX7-Kennzeichnung bedeutet, dass ein Gerät bis
zu 30 Minuten lang einen Meter tief in stehendes Wasser eingetaucht werden kann, ohne
Schaden zu nehmen. Mio garantiert diese Einstufung, sofern Batterie-/Akkufach und sämtliche
Anschlussabdeckungen richtig und fest geschlossen werden. Mio Cyclo ist nicht IPX8-eingestuft;
unter Druck stehendes Wasser – z. B. beim Waschen des Gerätes unter fließendem Wasser – kann das
Gerät beschädigen und die Garantie erlöschen lassen.
Konformitätserklärung
Zur Richtlinienidentifikation: Die Mio Cyclo 105-Serie ist der Modellnummer N411 zugeordnet.
Hiermit erklärt die Mio Technology, dass dieser N411 mit den wesentlichen Anforderungen
und sonstigen Vorgaben der Richtlinie 1999/5/EG übereinstimmt.
Den vollständigen Wortlaut der Konformitätserklärung für Ihr Mio können Sie auf der
Website von Mio lesen (www.mio.com).
WEEE
Gemäß der EG-Richtlinie für Elektro- und Elektronikaltgeräte (WEEE – 2002/96/EC) darf
dieses Produkt nicht zusammen mit dem normalem Hausmüll entsorgt werden. Stattdessen
muss es durch Rückgabe an die Verkaufsstelle oder an einer Sammelstelle für Altgeräte von
der Gemeinde entsorgt werden.

17
es
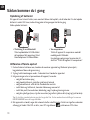
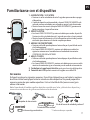
Familiarizarse con el dispositivo
1. ALIMENTACIÓN / LUZ / ATRÁS
• Presione sin soltar este botón durante 2 segundos para encender o apagar
el dispositivo.
• Cuando el dispositivo esté encendido y el menú PANEL DE MANDOS esté
activado, presione este botón para encender o apagar la retroiluminación.
• Mientras recorre los menús (excepto PANEL DE MANDOS), presione este
botón para volver a la pantalla anterior.
2. MENÚ / ACEPTAR
•
En el menú PANEL DE MANDOS, presione este botón para cambiar de pantalla.
Presione sin soltar este botón durante 2 segundos para volver al menú principal.
• Mientras la pantalla de menús o la lista de opciones está activada, presione
este botón para seleccionar la función u opción que desee.
3. ARRIBA / INICIAR|DETENER
• Presione este botón para desplazarse hacia arriba por la pantalla de menús
o la lista de opciones.
• En el menú PANEL DE MANDOS, presione este botón para realizar las
siguientes acciones con el cronómetro en el modo de entrenamiento:
CONTINUAR, PAUSAR o DETENER.
4. ABAJO / VUELTA
• Presione este botón para desplazarse hacia abajo por la pantalla de menús
o la lista de opciones.
• En el menú PANEL DE MANDOS, presione este botón para crear una vuelta
mientras el cronómetro sigue su recuento para el modo de entrenamiento.
5.
Cavidad para el soporte para bicicleta: punto para el montaje del dispositivo.
6. Conector mini-USB: permite conectar el cargador o un cable USB.
1
2
3
4
5
6
Accesorios
El dispositivo incluye los siguientes accesorios. Para utilizar el dispositivo en una bicicleta, asegúrese
de utilizar el kit de montaje para bicicletas incluido con dicho dispositivo. Mio puede proporcionar
accesorios opcionales para modelos específicos. Visite el sitio Web de Mio (www.mio.com) para
obtener información.
Nota: Dependiendo del modelo específico adquirido, es posible que el color y el diseño de su dispositivo y
accesorios no coincidan con los gráficos mostrados en este documento.
kit de montaje para bicicletas
Adaptador de alimentación
Cable USB
x 5
Kit de del sensor de velocidad y cadencia*
Cinturón de ritmo cardíaco*
x
2
* Puede venderse por separado.

18
es
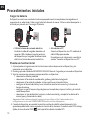
Procedimientos iniciales
Cargar la batería
El dispositivo cuenta con una batería interna que puede no estar completamente cargada en el
momento de su adquisición. Debe cargar la batería durante al menos 3.5 horas antes de empezar a
utilizarla por primera vez. Para cargar la batería:
• A través de su PC
Conecte el dispositivo a su PC mediante el
cable USB proporcionado.
Para obtener más información, consulte la
sección "Conectar el dispositivo a su PC".
• Utilizar la toma de corriente eléctrica
Enchufe el cable del cargador doméstico al
conector USB situado en la parte posterior
del dispositivo y el cargador de alimentación
eléctrica a la toma de corriente eléctrica.
2
1
3
Puesta en marcha inicial
1. Al principio de esta guía encontrará instrucciones sobre cómo montar el dispositivo y los
accesorios en una bicicleta.
2.
Mantenga pulsado el botón de ENCENDIDO/APAGADO durante 2 segundos para encender el dispositivo.
3. Siga los mensajes que aparecen para personalizar su dispositivo:
• seleccione su idioma preferido
• seleccionar el formato de coordenadas: grado o grado/minuto/segundo
• seleccionar el formato de unidades: sistema métrico o sistema británico
• configurar el formato de fecha y hora, incluida la zona horaria correcta y la función de
horario de verano
• configurar su perfil, lo que incluye el género, el cumpleaños, el peso, la altura y el nivel de
sesión de ejercicios
• seleccionar su tipo de bicicleta (carreras, ciudad o montaña) y completar los datos de la
misma (peso y tamaño de la rueda)
Sugerencia: Sólo tendrá que hacerlo la primera vez que utilice su Mio. Puede cambiar estas
configuraciones en el menú CONFIGURACIÓN mientras utiliza el dispositivo.
4. Cuando el dispositivo se encienda, buscará las señales de satélite automáticamente. Esta
operación puede tardar varios segundos en función de la ubicación. Cuando la señal GPS se haya
fijado, el icono de señal GPS (
) de la pantalla indicará el estado GPS.

19
es
Menú principal
El menú principal es el punto de inicio para varias tareas y proporciona acceso rápido a aplicaciones
y configuraciones. Utilice el botón ARRIBA/ABAJO para seleccionar la función que desea y, a
continuación, presione ACEPTAR.
El menú PANEL DE MANDOS muestra la vista de varias funciones, entre
las que se incluyen la pantalla de fecha y hora, la pantalla de brújula
y navegación, y las pantallas de sesiones de ejercicio (cuando se ha
seleccionado una sesión de ejercicios).
El menú SESIÓN DE EJERCICIOS le permite establecer sesiones de ejercicios
especificando sus condiciones, como por ejemplo la distancia, la velocidad o
el ritmo.
El menú HISTORIAL permite revisar los datos del historial, como por ejemplo
la fecha y hora, la distancia, la velocidad, la altitud, etc.
El menú CONFIGURACIÓN proporciona varias opciones para mejorar su
experiencia de ciclismo. Puede personalizar la configuración del sistema, los
perfiles de usuario, etc.
El menú A PC permite transferir los datos de entrenamiento desde el
dispositivo al equipo.
Iconos del sistema
Los iconos del sistema que indican el estado del dispositivo se muestran en la parte inferior de la pantalla.
El icono Señal GPS indica el estado del
GPS.
El icono Batería indica la carga restante en la
misma.
El icono Cronómetro aparece cuando el
modo de entrenamiento está activo. Cuando
detenga el cronómetro, el icono parpadeará.
El icono Cadencia/velocidad se mostrará
cuando el sensor de cadencia/velocidad* se
asocie con el dispositivo.
El icono Alarma aparece cuando se
establece la alarma.
El icono Ritmo cardíaco se mostrará cuando
el monitor de ritmo cardíaco* se asocie con
el dispositivo.
* Después de instalar el sensor de cadencia/velocidad y el monitor de ritmo cardíaco, habilite el dispositivo
para que los busque mediante la selección de los menús Menú principal > CONFIGURACIÓN >
ACCESORIOS > SENSORES.
Sidan laddas ...
Sidan laddas ...
Sidan laddas ...
Sidan laddas ...
Sidan laddas ...
Sidan laddas ...
Sidan laddas ...
Sidan laddas ...
Sidan laddas ...
Sidan laddas ...
Sidan laddas ...
Sidan laddas ...
Sidan laddas ...
Sidan laddas ...
Sidan laddas ...
Sidan laddas ...
Sidan laddas ...
Sidan laddas ...
Sidan laddas ...
Sidan laddas ...
Sidan laddas ...
Sidan laddas ...
Sidan laddas ...
Sidan laddas ...
Sidan laddas ...
Sidan laddas ...
Sidan laddas ...
Sidan laddas ...
Sidan laddas ...
Sidan laddas ...
-
 1
1
-
 2
2
-
 3
3
-
 4
4
-
 5
5
-
 6
6
-
 7
7
-
 8
8
-
 9
9
-
 10
10
-
 11
11
-
 12
12
-
 13
13
-
 14
14
-
 15
15
-
 16
16
-
 17
17
-
 18
18
-
 19
19
-
 20
20
-
 21
21
-
 22
22
-
 23
23
-
 24
24
-
 25
25
-
 26
26
-
 27
27
-
 28
28
-
 29
29
-
 30
30
-
 31
31
-
 32
32
-
 33
33
-
 34
34
-
 35
35
-
 36
36
-
 37
37
-
 38
38
-
 39
39
-
 40
40
-
 41
41
-
 42
42
-
 43
43
-
 44
44
-
 45
45
-
 46
46
-
 47
47
-
 48
48
-
 49
49
-
 50
50


Mio Cyclo 100 Series Snabbstartsguide
- Kategori
- Cykeltillbehör
- Typ
- Snabbstartsguide
på andra språk
- italiano: Mio Cyclo 100 Series Guida Rapida
- eesti: Mio Cyclo 100 Series Lühike juhend
- español: Mio Cyclo 100 Series Guía de inicio rápido
- Deutsch: Mio Cyclo 100 Series Schnellstartanleitung
- português: Mio Cyclo 100 Series Guia rápido
- français: Mio Cyclo 100 Series Guide de démarrage rapide
- dansk: Mio Cyclo 100 Series Hurtig start guide
- Nederlands: Mio Cyclo 100 Series Snelstartgids