Clas Ohlson runtastic D02I280 Användarmanual
- Kategori
- Sportklockor
- Typ
- Användarmanual

EnglishSvenskaNorsk
Suomi
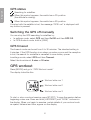
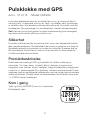
GPS & Heart Rate Monitor
Pulsklocka med GPS
Pulsklokke med GPS
Sykemittarikello jossa GPS-vastaanotin
Art.no Model
31-5115 D02I280
Ver. 201206

2 3

2 3
English
GPS & Heart Rate Monitor
Art.no 31-5115 Model D02I280
Please read the entire instruction manual before using the product and save it
for future reference. We reserve the right for any errors in text or images and
any necessary changes made to technical data. If you have any questions
regarding technical problems please contact our Customer Services.
Note! This is only a quick reference guide. The complete user manual
(English only) can be downloaded at www.runtastic.com.
Safety
This product must not be used by anyone (including children) suffering from
physical or mental impairment. This product should not be used by anyone
who does not have the proper experience or knowledge of the product unless
they have been instructed in its use by someone who takes responsibility for
their safety.
Never let children play with the product.
Product description
Pulse watch with integrated GPS and wireless chest strap. Time, timer, alarm,
lap-time, altitude, distance, compass and navigation, pulse rate, calories,
pace, speed, backlight, energy-saving mode and more. Water-resistant down
to 30 m (watch only). Transfers your results to your computer for further
analysis via the included data cable. The watch is charged via the data cable.
Chest strap battery: 1×CR2032 (included).
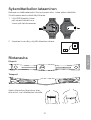
Getting started
Press and hold in [LAP/RESET] for about 5 seconds.
The time is displayed.

4
English
5
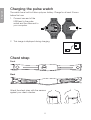
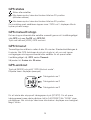
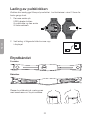
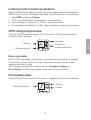
Charging the pulse watch
The watch has a built-in lithium-polymer battery. Charge for at least 3 hours
before first use.
1. Connect one end of the
USB lead to the pulse
watch and the other end to
your computer.
2. This image is displayed during charging.
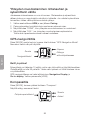
Chest strap
Front
Back
Attach the chest strap with the sensors
against your chest muscles.

4
5
English
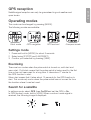
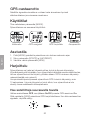
GPS reception
Satellite signal reception can only be guaranteed in good weather and
open terrain.
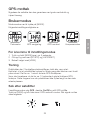
Operating modes
The mode can be changed by pressing [MODE].
The following modes are available:
Clock mode GPS navigation GPS workout Compass mode
Settings mode
1. Press and hold in [MODE] for about 3 seconds.
2. Select using [ST/STP] and [LAP/RESET].
3. Confirm your selection by pressing [VIEW].
Exercising
There are two modes when the pulse watch is turned on; cold start and
warm start. Cold start means that the pulse watch is being used for the first
time or has not been used for a long time. It takes about 1 minute for
the GPS function to start.
Warm start means that it takes about 10 seconds for the GPS function to
start. This mode only works when the pulse watch has not moved far from
the location where it was last used.
Search for a satellite
In settings mode, select GPS, then On/Off and set the GPS to On.
In GPS workout mode, hold in [VIEW]. When a workout mode signal is
received, the following image is displayed:

6
English
7
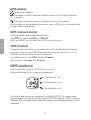
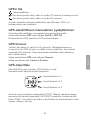
GPS status
Searching for satellites.
When this symbol appears, the watch has a 2D-position
(the altitude is missing).
When this symbol appears, the watch has a 3D-position.
If contact with the satellite is lost, the message “GPS Lost” is displayed until
any button is pressed.
Switching the GPS off manually
You can stop the GPS searching for satellites by:
• In settings mode, select GPS and then On/Off and then GPS Off.
• In GPS workout mode, hold in [VIEW].
GPS timeout
The timeout mode can be set from 5 to 30 minutes. The standard setting is
5 minutes. If the GPS function is on when you enter a room and the reception
is lost, the search for a satellite is cancelled to save battery power.
In settings mode, select GPS and then Timeout.
Select the time interval, 5 mins or 30 mins.
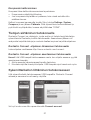
GPS workout
Press [MODE] and go to “GPS-Workout-mode”
The display looks like this:
Workout data row 1
Workout data row 2
Workout data row 3
To start or stop a workout session press [ST/STP]. To save the session before
beginning a new one: Press and hold [LAP/RESET] until ”DONE” is shown in
the display. When you begin to exercise, certain details of your workout such
as speed, distance and time, appear on the display.

6
7
English
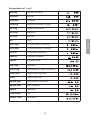
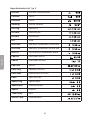
Workout data row 1 and 3
Altitude Altitude
Calories Calories
Distance Distance
Heading Heading (degree indication)
HR-Avg Average heart rate
HR-Max Maximum heart rate
HR-Min Minimum heart rate
HR Current heart rate
HRZ-Abv Time above heart rate zone
HRZ-Blw Time below heart rate zone
HRZ-In Time in heart rate zone
LapDist Lap distance
LapNo Lap number
LapTime Lap time
Pace Avg Average pace (km/min)
Pace Max Maximun pace (km/min)
Pace Current pace (km/min)
Speed Avg Average speed
Speed Max Maximun speed
Speed Current speed
TimeOfDay Time
Wkout Time Training time

8
English
9
Workout data row 2
Distance Distance
HR Heart rate
LapDist Lap distance
LatLong Latitude and Longitude
PaceAvg Average pace
SpeedAvg Average speed
Speed Speed
TimeOfDay Time
Wkout Time Training time
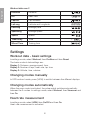
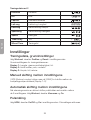
Settings
Workout data - basic settings
In settings mode, select Workout, then Profiles and then Reset.
The basic workout data settings are:
Display 1: Distance, average speed, time.
Display 2: Number of laps, heart rate, lap time.
Display 3: Altitude, time, calories.
Changing modes manually
In GPS workout mode, press [VIEW] to switch between the different displays.
Changing modes automatically
When the scan mode is activated, the pulse watch switches automatically
between the 3 modes. In settings mode, select Workout, then Viewscan and
then On.
Heart rate measurement
In settings mode, select HRM, then On/Off and then On.
Heart rate measurement is activated.

8
9
English
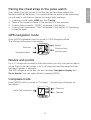
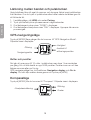
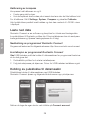
Pairing the chest strap to the pulse watch
Every chest strap has its own ID number and will have been paired with
the pulse watch at the factory. If you replace either the watch or the chest strap,
you will need to pair the two devices to prevent faulty readings.
1. In settings mode, select HRM and then Pairing.
2. Press in the contact surfaces of the sensors for a few seconds.
3. If pairing was succesful, “DONE!” will appear in the display.
4. If pairing was unsuccesful, “FAIL” will appear in the display. Try the pairing
procedure again.
GPS navigation mode
Press [MODE] repeatedly until you come to “GPS Navigation Mode”.
The following will appear in the display:
Direction
Speed
Distance from
starting point
Navigation data
Routes and points
Up to 10 routes can be saved in the pulse watch, but only one can be used at
a time. Each route can consist of up to 99 waypoints and the waypoints can
be linked together or separate.
The GPS navigation mode has two sub-functions: Navigation display and
Go-to display. You can select either by pressing [VIEW].
Compass mode
Press [MODE] until you come to “Compass” – the following will appear on
the display:
North Pole indication
Direction
Degrees

10
English
11
Compass calibration
Sometimes the compass needs to be calibrated.
• If it is to be used for the first time.
• If it is to be used in a different location from where it was last calibrated.
To calibrate: Go to Settings, System, Compass and then Calibrate.
Hold the pulse watch parallel to the ground and rotate it clockwise until
“DONE” appears on the display.
Uploading data
Runtastic Connect is a software program for uploading workout data from
your pulse watch to your personal Runtastic account. After installation you
can analyse your workout data and customize your fitness programme.
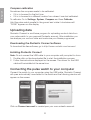
Downloading the Runtastic Connect software
To download the free software, go to http://www.runtastic.com/connect.
Installing Runtastic Connect
Note: Do not connect the USB cable to your computer until prompted to do so.
1. Double-click on the downloaded file to start the installation process.
2. Follow the instructions displayed on the screen. The drivers for the USB
cable will be installed at the same time.
Connecting the pulse watch to your computer
Connect the watch to your computer using the USB cable. Runtastic Connect
will open automatically once linked to the watch and the following window will
appear on the screen.
Click on Connect account to create/open your own runtastic account.

10
11
English
Disposal
This product should be disposed of in accordance with local regulations.
If you are unsure how to proceed, contact your local authority.
Specifications
Battery GPS watch: Lithium-polymer 3.7 V, 380 mAh
Chest strap: 1×CR2032
Frequency 2.4 GHz

12
Svenska
13
Pulsklocka med GPS
Art.nr 31-5115 Modell D02I280
Läs igenom hela bruksanvisningen före användning och spara den sedan
för framtida bruk. Vireserverar oss för ev. text- och bildfel samt ändringar av
tekniska data. Vidtekniska problem eller andra frågor, kontakta vår kundtjänst
(se adressuppgifter på baksidan).
OBS! Detta är endast en snabbguide, komplett bruksanvisning
(endast engelska) finns att ladda ner på www.runtastic.com.
Säkerhet
Produkten får ej användas av personer (inklusive barn) med begränsad fysisk
eller mental förmåga. Denfår ej heller användas av personer utan tillräcklig
erfarenhet och kunskap om de inte har fått instruktioner om användningen av
någon som ansvarar för deras säkerhet. Låt aldrig barn leka med produkten.
Produktbeskrivning
Pulsklocka med inbyggd GPS och bröstband för trådlös överföring av pulsvärden.
Tid, timer, alarm, varvtid, altitud, distans, kompass med navigation, puls,
kalorier, tempo, hastighet, bakgrundsbelysning, energisparläge m.m.
Vattenskyddad 30 m (klockan). Överförvärden smidigt till datorn med med-
följande datorkabel eller håll koll på värdena direkt iklockan. Klockanladdas
med datorkabeln. Bröstbandetdrivs med 1×CR2032-batteri (ingår).
Att komma igång
Tryck och håll ned [LAP/RESET] ica 5 sekunder.
Tidslägevisas.

12
13
Svenska
Ladda pulsklockan
Klockan har ettinbyggt litiumpolymerbatteri. Laddai minst 3 timmar före
första användning.
1. Anslut ena änden av
USB-kabeln till pulsklockan
och den andra änden till
endator.
2. Under laddningen visas följande bild idisplayen.
Bröstbandet
Framsida
Baksida
Sätt på bröstbandet på överkroppen
med sensorerna mot bröstmusklerna.

14
Svenska
15
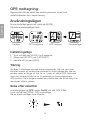
GPS mottagning
Signalstyrkan från ensatellit kan endast garanteras under klara
väderförhållanden och iöppen terräng.
Användningslägen
Du kan skifta läge genom att trycka på [MODE].
Följande användningslägen finns:
Tidsläge GPS-navigering GPS-workout Kompassläge
Inställningsläge
1. Tryck och håll ned [MODE] ica 3 sekunder.
2. Stega med [ST/STP] och [LAP/RESET].
3. Bekräfta ditt val med [VIEW].
Träning
Det finns 2 olika lägen när man startar pulsklockan, kall och varm start.
Kall start innebär att pulsklockan används för första gången eller inte har
använts under enlängre tid. Dettar ca 1 minut att starta GPS-funktionen.
Varm start innebär att det tar ca 10 sekunder att starta pulsklockans
GPS-funktion. Dettafungerar endast när pulsklockan inte flyttats långt från
den senast avlästa platsen.
Söka efter satelliter
I inställningsläge välj GPS, sedan On/Off och ställ GPS till On.
Tryck och håll ned [VIEW] iGPS-workoutläge.
Nären signal mottages visas följande:

14
15
Svenska
GPS status
Söker efter satelliter.
När denna symbol visas har klockan hittat en2D-position
(altituden saknas).
När denna symbol visas har klockan hittat en3D-position.
Om kontakten med satelliterna tappas visas ”GPS Lost” idisplayen tills du
trycker på valfriknapp.
GPS manuellt stopp
Du kan stoppa sökandet efter satelliter manuellt genom att i inställningsläget
välja GPS och sen On/Off och GPS Off.
Tryck och håll ned [VIEW] iGPS-workout.
GPS timeout
Timeoutläge kan ställas in mellan 5 eller 30 minuter. Standardinställningenär
5 minuter. NärGPS-funktionen är på och du går in iett rum och tappar
mottagningen så stoppas sökandet efter satelliter för att spara batteri.
I inställningsläget välj, GPS, sedan Timeout.
Välj sedan tid, 5 mins eller 30 mins.
GPS-workout
Tryck på [MODE] och gå till ”GPS-Workout-mode”.
Följande visas idisplayen (exempel).
Träningsdata rad 1
Träningsdata rad 2
Träningsdata rad 3
För att starta eller stoppa ett träningspass tryck [ST/STP]. För att spara
träningspasset innan nästa påbörjas: håll in [LAP/RESET] tills ”DONE” visas
på displayen. När du börjar träna visas information idisplayen som hastighet,
längd, tid etc.

16
Svenska
17
Träningsdata rad 1 och 3
Altitude Höjd över havet
Calories Kalorier
Distance Distans
Heading Riktning (indikeras i grader)
HR-Avg Medelpuls
HR-Max Maxpuls
HR-Min Minpuls
HR Puls
HRZ-Abv Tid över inställd Pulszon
HRZ-Blw Tid under inställd Pulszon
HRZ-In Tid i inställd Pulszon
LapDist Varvets distans
LapNo Varvnummer
LapTime Varvtid
Pace Avg Genomsnittligt tempo (min/km)
Pace Max Max tempo (km/min)
Pace Tempo (km/min)
Speed Avg Genomsnittlig hastighet
Speed Max Max hastighet
Speed Hastighet
TimeOfDay Tid
Wkout Time Träningstid

16
17
Svenska
Träningsdata rad 2
Distance Distans
HR Puls
LapDist Varvets distans
LatLong Latitud och Longitud
PaceAvg Genomsnittligt tempo
SpeedAvg Genomsnittlig hastighet
Speed Hastighet
TimeOfDay Tid
Wkout Time Träningstid
Inställningar
Träningsdata, grundinställningar
I inställningsläge, välj Workout, sedan Profiles och Reset.
Grundinställningar för träningsdata är:
Display 1: Längd, medelhastighet, tid.
Display 2: Antal varv, puls, varvtid.
Display 3: Höjd, tid, kalorier.
Manuellt byte mellan lägen
I GPS Workout-läge, tryck på [VIEW] för att skifta mellan displayerna.
Automatiskt byte mellan lägen
När skanningsläge är aktiverat skiftar pulsklockan automatiskt mellan
de 3 lägena. I inställningsläge, välj Workout, sedan Viewscan och On.
Pulsmätning
I inställningsläge, välj HRM, sedan On/Off och On.
Pulsmätningenaktiveras.

18
Svenska
19
Länkning mellan bandet och pulsklockan
Varje bröstband har sitt eget id-nummer och kommer länkat med pulsklockan
från fabriken. Omdu byter ut pulsklockan eller bältet måste de länkas igen för
att förhindra fel.
1. I inställningläge, välj HRM och sedan Pairing.
2. Tryck på kontaktytorna på sensorerna inågra sekunder.
3. Om länkningen lyckas visas ”DONE!” idisplayen.
4. Om länkningen misslyckas visas ”FAIL” idisplayen. Upprepadå samma
process igen.
GPS-navigeringsläge
Tryck på [MODE] flera gånger tills du kommer till ”GPS Navigation Mode”.
Följandevisas idisplayen:
Riktning
Hastighet
Avstånd till
aktiveringspunkten
Navigeringsdata
Rutter och punkter
Det går att spara upp till 10 rutter ipulsklockan men bara 1 kan användas
per gång. Enrutt kan bestå av upp till 99 punkter. Punkterinom enrutt kan
länkas samman eller var för sig.
GPS-navigeringsläget har två funktioner: Navigation display och Go-to
display. Du kan välja mellan dessa genom att trycka på [VIEW].
Kompassläge
Tryck på [MODE] tills du kommer till ”Compass”. Följande visas idisplayen:
Nordpolenindikering
Riktning
Grader

18
19
Svenska
Kalibrering av kompass
Ibland måste kompassen kalibreras.
• Om den används för första gången.
• Om kompassen ska användas på enannan plats än där den
kalibrerades senast.
För att kalibrera: Gå till Settings, System, Compass och sedan Calibrate.
Hållpulsklockan parallellt med marken och rotera den medsols tills ”DONE”
visas idisplayen.
Ladda ned data
Runtastic Connect är enmjukvara för att ladda upp träningsdata från
pulsklockan till din Runtastic profil. Efterinstallationen kan du analysera
dina träningsdata och individanpassa din träningsplan.
Ladda ned programmet Runtastic Connect
Du kan ladda ned programmet på http://www.runtastic.com/connect.
Installera programmet Runtastic Connect
Obs! Anslutinte USB-kabeln till din dator förrän programmet anger att du ska
göra det.
1. Dubbelklicka på filen för att starta installationen.
2. Följ instruktionerna på skärmen. Drivrutinerför USB-kabeln installeras också.
Ansluta pulsklockan till datorn
Anslut pulsklockan med USB-kabeln till datorn. RuntasticConnect öppnas
och följande bild visas på skärmen.
Du kan nu skapa ditt eget konto genom att klicka på Connect account.

20
Svenska
21
Avfallshantering
När du ska göra dig av med produkten ska detta ske enligt lokala föreskrifter.
Ärdu osäker på hur du ska gå tillväga, kontakta din kommun.
Specifikationer
Batteri GPS-klockan: Litiumpolymer 3,7 V, 380 mAh
Bröstbandet: 1×CR2032
Frekvens 2,4 GHz
Sidan laddas...
Sidan laddas...
Sidan laddas...
Sidan laddas...
Sidan laddas...
Sidan laddas...
Sidan laddas...
Sidan laddas...
Sidan laddas...
Sidan laddas...
Sidan laddas...
Sidan laddas...
Sidan laddas...
Sidan laddas...
Sidan laddas...
Sidan laddas...
Sidan laddas...
Sidan laddas...
Sidan laddas...
Sidan laddas...
-
 1
1
-
 2
2
-
 3
3
-
 4
4
-
 5
5
-
 6
6
-
 7
7
-
 8
8
-
 9
9
-
 10
10
-
 11
11
-
 12
12
-
 13
13
-
 14
14
-
 15
15
-
 16
16
-
 17
17
-
 18
18
-
 19
19
-
 20
20
-
 21
21
-
 22
22
-
 23
23
-
 24
24
-
 25
25
-
 26
26
-
 27
27
-
 28
28
-
 29
29
-
 30
30
-
 31
31
-
 32
32
-
 33
33
-
 34
34
-
 35
35
-
 36
36
-
 37
37
-
 38
38
-
 39
39
-
 40
40


Clas Ohlson runtastic D02I280 Användarmanual
- Kategori
- Sportklockor
- Typ
- Användarmanual
på andra språk
Andra dokument
-
North Light Värmeljus LED 3-pack Bruksanvisning
-
Bryton Rider 530 Användarmanual
-
Bryton Cardio 40 Användarmanual
-
Bryton Cardio 60 Användarmanual
-
Mio Cyclo 100 Series Snabbstartsguide
-
Widex Compass GPS 4.6 Användarguide
-
-
Huawei WATCH GT Bruksanvisning
-
Oregon Scientific Heart Rate Monitor SE300 Användarmanual
-
Mio Cyclo 305 Snabbstartsguide