
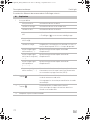
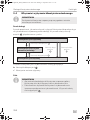
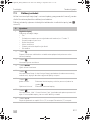
FL2200
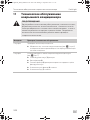
Air conditioning roof unit
Operating manual . . . . . . . . . . . . . . . . . . . . . 9
Dachklimaanlage
Bedienungsanleitung . . . . . . . . . . . . . . . . .36
Climatiseur de toit
Notice d’utilisation . . . . . . . . . . . . . . . . . . .65
Aire acondicionado de techo
Instrucciones de uso . . . . . . . . . . . . . . . . . .94
Ar condicionado para tejadilho
Manual de instruções . . . . . . . . . . . . . . . .125
Climatizzatore a tetto
Istruzioni per l’uso . . . . . . . . . . . . . . . . . . .155
Airconditioning voor dakinbouw
Gebruiksaanwijzing. . . . . . . . . . . . . . . . . .184
Klimaanlæg til tagmontering
Betjeningsvejledning . . . . . . . . . . . . . . . .212
Takmonterad klimatanläggning
Bruksanvisning. . . . . . . . . . . . . . . . . . . . . 240
Takmontert klimaanlegg
Bruksanvisning. . . . . . . . . . . . . . . . . . . . . 267
Kattooilmastointilaitteisto
Käyttöohje . . . . . . . . . . . . . . . . . . . . . . . . . 293
Накрышный кондиционер
Инструкция по эксплуатации . . . . . . . . . 320
Klimatyzator dachowy
Instrukcja obsługi . . . . . . . . . . . . . . . . . . . 350
Strešné klimatizačné zariadenie
Návod na obsluhu. . . . . . . . . . . . . . . . . . . 378
Střešní klimatizace
Návod k obsluze . . . . . . . . . . . . . . . . . . . . 406
Tető klím a-b ere nde zés
Használati utasítás. . . . . . . . . . . . . . . . . . . 433
EN
DE
FR
ES
PT
IT
NL
DA
SV
NO
FI
RU
PL
SK
CS
HU
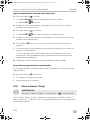
CLIMATE CONTROL
FRESHLIGHT
)UHVK/LJKWB230B(0($ERRN6HLWH0RQWDJ6HSWHPEHU

)UHVK/LJKWB230B(0($ERRN6HLWH0RQWDJ6HSWHPEHU

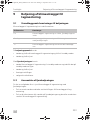
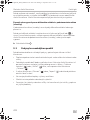
FreshLight
3
1
2
5
4
3
1
1
2
3
4
2
)UHVK/LJKWB230B(0($ERRN6HLWH0RQWDJ6HSWHPEHU

FreshLight
4
1
7
6
13
12
15
14
2
4
3
11
10
9
5
8
3
)UHVK/LJKWB230B(0($ERRN6HLWH0RQWDJ6HSWHPEHU

FreshLight
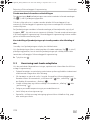
5
1
4
2
1
5
)UHVK/LJKWB230B(0($ERRN6HLWH0RQWDJ6HSWHPEHU

FreshLight
6
6
1
7
1
1
8
)UHVK/LJKWB230B(0($ERRN6HLWH0RQWDJ6HSWHPEHU

FreshLight
7
A
B
1
2
9
A
B
C
3
1
2
0
)UHVK/LJKWB230B(0($ERRN6HLWH0RQWDJ6HSWHPEHU

FreshLight
8
a
)UHVK/LJKWB230B(0($ERRN6HLWH0RQWDJ6HSWHPEHU

EN
FreshLight
9
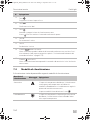
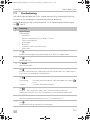
Original instructions
Please read this instruction manual carefully before first use, and store it in
a safe place. If you pass on the product to another person, hand over this
instruction manual along with it.
You find the installation manual online at:
“dometic.com/manuals”.
The instructions in the installation manual are intended for qualified
personnel in workshops who are familiar with the guidelines and
safety precautions to be applied.
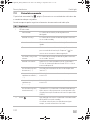
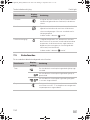
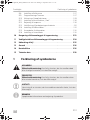
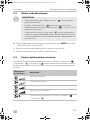
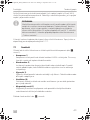
Table of contents
1 Explanation of symbols. . . . . . . . . . . . . . . . . . . . . . . . . . . . . . . . . . . . 10
2 Safety instructions . . . . . . . . . . . . . . . . . . . . . . . . . . . . . . . . . . . . . . . . 11
2.1 General safety . . . . . . . . . . . . . . . . . . . . . . . . . . . . . . . . . . . . . . . . . . . 11
2.2 Operating the device safely . . . . . . . . . . . . . . . . . . . . . . . . . . . . . . . .12
3 Target group for this manual . . . . . . . . . . . . . . . . . . . . . . . . . . . . . . . 12
4 Scope of delivery . . . . . . . . . . . . . . . . . . . . . . . . . . . . . . . . . . . . . . . . . 12
5 Optional extras . . . . . . . . . . . . . . . . . . . . . . . . . . . . . . . . . . . . . . . . . . 13
6 Intended use. . . . . . . . . . . . . . . . . . . . . . . . . . . . . . . . . . . . . . . . . . . . . 13
7 Technical description . . . . . . . . . . . . . . . . . . . . . . . . . . . . . . . . . . . . . 13
7.1 Components . . . . . . . . . . . . . . . . . . . . . . . . . . . . . . . . . . . . . . . . . . . .14
7.2 Control panel. . . . . . . . . . . . . . . . . . . . . . . . . . . . . . . . . . . . . . . . . . . .15
7.3 Remote control . . . . . . . . . . . . . . . . . . . . . . . . . . . . . . . . . . . . . . . . . .16
7.4 Air conditioning modes . . . . . . . . . . . . . . . . . . . . . . . . . . . . . . . . . . .17
7.5 Additional functions . . . . . . . . . . . . . . . . . . . . . . . . . . . . . . . . . . . . . .18
8 Before initial use . . . . . . . . . . . . . . . . . . . . . . . . . . . . . . . . . . . . . . . . . 19
9 Operating the roof air conditioner . . . . . . . . . . . . . . . . . . . . . . . . . .20
9.1 Basic notes on operation . . . . . . . . . . . . . . . . . . . . . . . . . . . . . . . . . 20
9.2 Using the remote control . . . . . . . . . . . . . . . . . . . . . . . . . . . . . . . . . 20
9.3 Hint for improved use . . . . . . . . . . . . . . . . . . . . . . . . . . . . . . . . . . . . .21
9.4 Switching the roof air conditioner on and off. . . . . . . . . . . . . . . . . . 22
9.5 Selecting the air conditioning mode . . . . . . . . . . . . . . . . . . . . . . . . 23
9.6 Selecting the blower setting manually . . . . . . . . . . . . . . . . . . . . . . . 23
)UHVK/LJKWB230B(0($ERRN6HLWH0RQWDJ6HSWHPEHU

EN
Explanation of symbols FreshLight
10
9.7 Setting the temperature . . . . . . . . . . . . . . . . . . . . . . . . . . . . . . . . . . 24
9.8 Adjusting the air nozzles . . . . . . . . . . . . . . . . . . . . . . . . . . . . . . . . . . 24
9.9 Setting the timer . . . . . . . . . . . . . . . . . . . . . . . . . . . . . . . . . . . . . . . . 24
9.10 Activating the sleep function . . . . . . . . . . . . . . . . . . . . . . . . . . . . . . 26
9.11 Activating the “I feel” function . . . . . . . . . . . . . . . . . . . . . . . . . . . . . 26
9.12 Operating the lights . . . . . . . . . . . . . . . . . . . . . . . . . . . . . . . . . . . . . 27
9.13 Replacing the remote control batteries . . . . . . . . . . . . . . . . . . . . . . 27
9.14 Setting the time . . . . . . . . . . . . . . . . . . . . . . . . . . . . . . . . . . . . . . . . . 28
9.15 Using the blinds. . . . . . . . . . . . . . . . . . . . . . . . . . . . . . . . . . . . . . . . . 28
9.16 Setting the winter mode . . . . . . . . . . . . . . . . . . . . . . . . . . . . . . . . . . 28
10 Cleaning the roof air conditioner. . . . . . . . . . . . . . . . . . . . . . . . . . . .29
11 Maintenance of the roof air conditioner . . . . . . . . . . . . . . . . . . . . . .30
12 Troubleshooting . . . . . . . . . . . . . . . . . . . . . . . . . . . . . . . . . . . . . . . . . 31
13 Warranty. . . . . . . . . . . . . . . . . . . . . . . . . . . . . . . . . . . . . . . . . . . . . . . .32
14 Disposal . . . . . . . . . . . . . . . . . . . . . . . . . . . . . . . . . . . . . . . . . . . . . . . .32
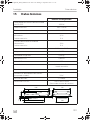
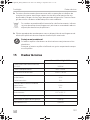
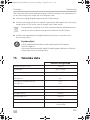
15 Technical data . . . . . . . . . . . . . . . . . . . . . . . . . . . . . . . . . . . . . . . . . . .34
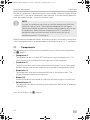
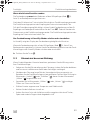
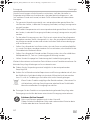
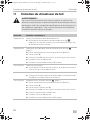
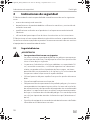
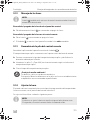
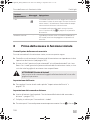
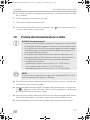
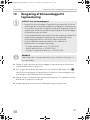
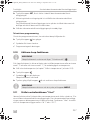
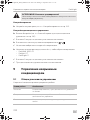
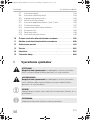
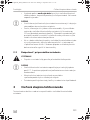
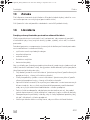
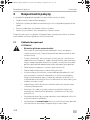
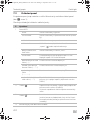
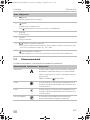
1 Explanation of symbols
!
!
A
I
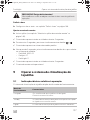
WARNING!
Safety instruction: Indicates a hazardous situation that, if not avoided,
could result in death or serious injury.
CAUTION!
Safety instruction: Indicates a hazardous situation that, if not avoided,
could result in minor or moderate injury.
NOTICE!
Indicates a situation that, if not avoided, can result in property damage.
NOTE
Supplementary information for operating the product.
)UHVK/LJKWB230B(0($ERRN6HLWH0RQWDJ6HSWHPEHU

EN
FreshLight Safety instructions
11
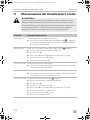
2 Safety instructions
The manufacturer accepts no liability for damage in the following cases:
• Faulty assembly or connection
• Damage to the product resulting from mechanical influences and incorrect
connection voltage
• Alterations to the product without express permission from the manufacturer
• Use for purposes other than those described in the operating manual
In particular, the manufacturer will not be liable for any consequential damage,
especially consequential damage caused by failure of the roof air conditioner.
2.1 General safety
!
WARNING!
• Electrical devices are not toys.
Keep electrical appliances out of reach of children or infirm persons.
Do not let them use the appliances without supervision.
• Persons (including children) whose physical, sensory or mental
capabilities or whose lack of experience and knowledge prevent them
from using the device safely should not use it without supervision or
instruction by a responsible person.
• Only use the device as intended.
• Do not make any alterations or conversions to the device.
• Installation, maintenance and repairs of the roof air conditioner may
only be carried out by qualified personnel who are familiar with the
risks involved and the relevant regulations. Inadequate repairs may
cause serious hazards. For repair service, please contact the service
centre in your country (addresses on the back page).
• Do not use the roof air conditioner near flammable fluids or in closed
rooms.
• Make sure no combustible objects are stored or installed near the air
outlet. A distance of at least 50 cm must be kept.
• Do not reach into air outlets or insert any foreign objects in the roof air
conditioner.
•Do not undo the upper cover of the roof air conditioner in the event of
a fire. Use approved extinguishing agents instead. Do not use water to
extinguish fires.
)UHVK/LJKWB230B(0($ERRN6HLWH0RQWDJ6HSWHPEHU

EN
Target group for this manual FreshLight
12
A
NOTICE!
• Never drive through automatic car washes when the roof air
conditioner is mounted.
• Please ask your vehicle manufacturer if a technical inspection is
required after fitting an air conditioner and whether the height entered
in your vehicle documents needs to be altered (increased height
210 mm).
• If faults occur in the roof air conditioner's refrigerant circuit, the roof air
conditioner must be checked by a specialist company and properly
repaired. The refrigerant must never be released into the air.
2.2 Operating the device safely
!
WARNING!
• Always disconnect the power supply when working on the device.
A
NOTICE!
• Do not operate the roof air conditioner if the ambient temperature is
below 0 °C. There is a risk of damage from freezing condensation.
• The roof air conditioner is not suitable for use in agricultural or
construction vehicles.
• Operate the device only if you are certain that the housing and the
cables are undamaged.
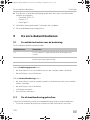
3 Target group for this manual
This operating manual is for the user of the roof air conditioner.
4Scope of delivery
• Dometic FreshLight 2200 roof air conditioner
• Installation manual
•Operation manual
)UHVK/LJKWB230B(0($ERRN6HLWH0RQWDJ6HSWHPEHU

EN
FreshLight Optional extras
13
5Optional extras
Available as an option (not included in scope of delivery):
I
6 Intended use
The Dometic FreshLight roof air conditioner with integrated roof window can
condition the interior of campers and caravans with cool or warm air.
The roof air conditioner is not suitable for installation in construction machines, agri-
cultural machines or similar equipment. It will not work properly if exposed to strong
vibrations.
The operating mode of the roof air conditioner is guaranteed for temperature up to
52 °C.
Do not operate the roof air conditioner in the “Heating” air conditioning mode if the
room temperature is above 30 °C.
Heating operation is recommended at ambient temperatures of +2 °C and above.
7 Technical description
The roof air conditioner with integrated window supplies the interior with cool or
warm dehumidified air without dust and dirt. Used air can be extracted from the
interior with a blower.
Two dimmable LED lamps integrated in the air outlet unit provide pleasant lighting.
The roof window has two blinds: the blackout roller blind lets no light through, while
the sun protection blind protects from direct sunlight.
The roof air conditioner is operated with the remote control.
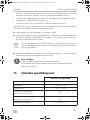
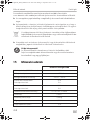
Designation Ref. number
DC extension kit DC-Kit DSP-T 12 9600007286
DC extension kit DC-Kit DSP-T 24 9600007287
NOTE
The DC extension kit (accessory) allows the Dometic FreshLight roof air
conditioner to be used while in motion.
)UHVK/LJKWB230B(0($ERRN6HLWH0RQWDJ6HSWHPEHU

EN
Technical description FreshLight
14
The roof air conditioner is protected against over-voltage. When the supply voltage
is above 265 V, the roof air conditioner stops working. It resumes normal operation
when the supply voltage is within the allowed range.
I
When the outside temperature drops, the heating capacity of the roof air conditioner
sinks. Heating operation is recommended only at temperatures of +2 °C and above.
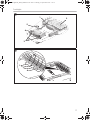
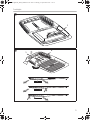
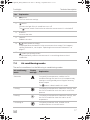
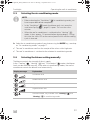
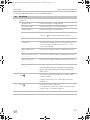
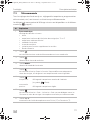
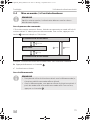
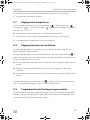
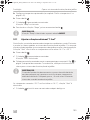
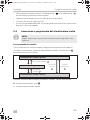
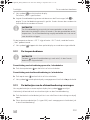
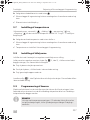
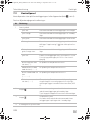
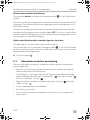
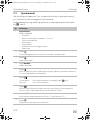
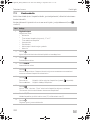
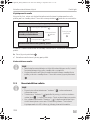
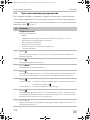
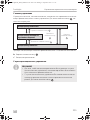
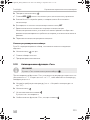
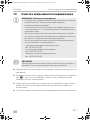
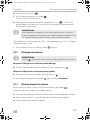
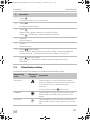
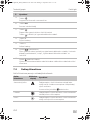
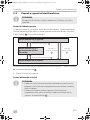
7.1 C om p o n e nt s
The refrigerant circuit of the roof air conditioner consists of five main components
(fig. 1, page 3):
• Compressor (1)
The compressor draws in the R-407c refrigerant used and compresses it. This
raises the pressure and therefore the temperature of the refrigerant.
• Condenser (2)
The built-in liquefier works like a cooler or heat exchanger. The air flowing past
absorbs the heat and the hot refrigerant gas cools down and becomes liquid.
• Evaporator (3)
The evaporators cool down and dehumidify the air flowing past them. The
refrigerant absorbs the heat and vaporises.
• Blower (4)
A blower distributes the cooled air within the vehicle through an air outlet unit.
• Solenoid valve (5)
The solenoid valve allows the cooling cycle to be reversed and the air feeding in
to be heated.
Overview of all parts: fig. a, page 8.
NOTE
The roof air conditioner can lower or raise the temperature within the
vehicle to a certain level. The temperature depends on the type of
vehicle, the ambient temperature and the cooling capacity of your roof
air conditioner. Below an outer temperature of 16 °C the roof air
conditioner does not cool anymore. In this case only use the air
conditioning mode “Circulating air”.
)UHVK/LJKWB230B(0($ERRN6HLWH0RQWDJ6HSWHPEHU

EN
FreshLight Technical description
15
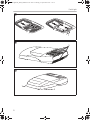
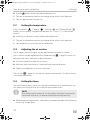
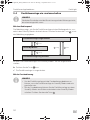
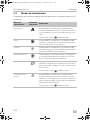
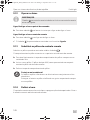
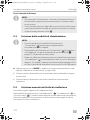
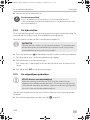
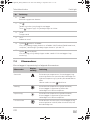
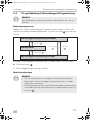
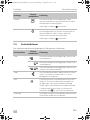
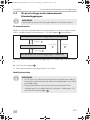
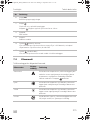
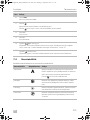
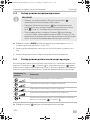
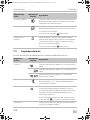
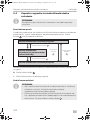
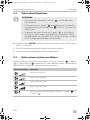
7.2 Control panel
The control panel (fig. 2, page 3) is at the air outlet unit of the roof air conditioner.
It contains the following control and display elements:
No. Explanation
1 Status LED
No light: The roof air conditioner is switched off.
Orange light: The roof air conditioner is in stand-by mode.
Green light: The roof air conditioning is switched on.
Flashing green light: The roof air conditioner is switching to the
“Heating” mode ( ) or is being defrosted.
Flashing green/orange light: The roof air conditioner is in “Winter” mode.
Red light: Only if the system is connected to 12 Vg: the
supply voltage of 230 Vw is not available.
Slowly flashing red light
(---):
Malfunction in interior temperature sensor E1
Medium quickly flashing red
light (- -- -- -):
Malfunction in exterior temperature sensor E2
Quickly flashing red light
(- - - - - - - - -):
Malfunction in exterior temperature sensor E3
Continuously flashing red
light (- - - - -):
Over-voltage: The roof air conditioner resumes
normal operation when the supply voltage is
within the allowed range (265 V).
2
Button
Switches the roof air conditioner on, off or to
stand-by mode
Pressing the button longer engages the
automatic mode.
3
Button
Switches the light on or off.
Only active when the roof air conditioner is
switched on or on stand-by.
4 Infrared receiver for the remote control
)UHVK/LJKWB230B(0($ERRN6HLWH0RQWDJ6HSWHPEHU

EN
Technical description FreshLight
16
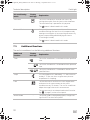
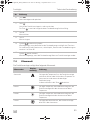
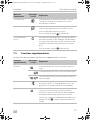
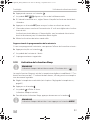
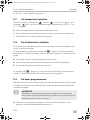
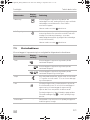
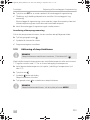
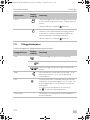
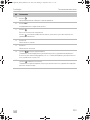
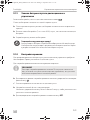
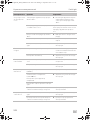
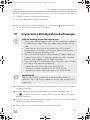
7.3 Remote control
All settings of the device (e. g. temperature settings, timer programming) are
transmitted to the roof air conditioner by remote control.
The following control and display elements are available on the remote control
(fig. 3, page 4):
No. Explanation
1 Digital display:
Displays the following:
•Time
• Selected room temperature (target value) in °C or °F
• Actual room temperature
• Air conditioning mode
• Blower level
• Symbols for active additional functions
• Battery status
2
button:
Switches the air conditioner and remote control on or to stand-by mode
3
button:
Selects the blower setting
4 MODE button:
Selects the air conditioning mode
5
button:
Activates the sleep function. The sleep function automatically modifies the target
value to provide a pleasant sleeping temperature.
6
button:
Press once:
Press again:
Displays the current interior temperature
(symbol is displayed).
Displays the set temperature.
7
button:
Activates the “I feel” function. Every 10 minutes, the “I feel” function adjusts the
target temperature to the temperature measured by the remote control.
8 °C/°F button:
Switches between temperature units Celsius (°C) and Fahrenheit (°F)
9
button:
Sets the timer and the clock
)UHVK/LJKWB230B(0($ERRN6HLWH0RQWDJ6HSWHPEHU

EN
FreshLight Technical description
17
7.4 Air conditioning modes
The roof air conditioner has the following air conditioning modes:
10 SET button:
Confirms and saves settings
11
button:
Switches the light of the air conditioner on or off.
The button remains functional even when the remote control is switched off.
12 + button:
Increases the value
13 – button:
Reduces the value
14
symbol (batteries empty):
Is displayed when the batteries in the remote control are empty. If this happens,
replace the batteries, see chapter “Replacing the remote control batteries” on
page 27.
15
symbol (transmitting values):
Is displayed briefly when the remote control is transmitting values to the air
conditioner.
Air conditioning
mode
Display
message
Explanation
Automatic You specify the temperature, and the roof air
conditioner brings the interior to this temperature by
heating or cooling and by controlling the necessary
blower output.
The button is deactivated in this mode.
Cooling You specify the temperature and blower settings, and
the roof air conditioner cools the interior to this tem-
perature.
Heating You specify the temperature and blower settings, and
the roof air conditioner heats the interior to this
temperature.
Circulating air You specify the blower level, and the roof air
conditioner blows air into the interior
.
No. Explanation
)UHVK/LJKWB230B(0($ERRN6HLWH0RQWDJ6HSWHPEHU

EN
Technical description FreshLight
18
7.5 Additional functions
The roof air conditioner has the following additional functions:
Ventilation The roof air conditioner ventilates the interior by
sucking the used air from the interior with the blower.
The ventilation flap is opened for this purpose.
The button is deactivated in this mode.
Dehumidification You specify the temperature, and the roof air
conditioner brings the interior to this temperature by
heating or cooling the air, by controlling the necessary
blower output and by dehumidifying the interior
(Circulating air mode).
The button is deactivated in this mode.
Additional
function
Display
message
Explanation
Timer The roof air conditioner is switched on at the specified
time.
The roof air conditioner is switched off at the specified
time.
The roof air conditioner is switched on and off at the
specified times.
Sleep The set temperature is reduced by 1 °C after one hour
and by 2 °C after two hours to generate a pleasant
temperature for sleeping.
I feel The remote control measures the room temperature
and transmits this measurement to the roof air
conditioner every 10 minutes. The roof air conditioner
adapts the target value to this measurement.
The remote control must be pointed at the IR receiver
(fig. 2 4, page 3) on the control panel.
Winter mode – The winter mode is displayed by green/orange flash-
ing of the LED on the control panel.
Air conditioning
mode
Display
message
Explanation
)UHVK/LJKWB230B(0($ERRN6HLWH0RQWDJ6HSWHPEHU

EN
FreshLight Before initial use
19
8 Before initial use
Inspection before starting up
Before you switch on the roof air conditioner, observe the following:
➤ Check whether the supply voltage and frequency correspond to the values
specified in the technical data, see page 34.
➤ Ensure both the air intake opening and the air nozzles are free. All ventilation
grilles must always be kept free to ensure that the roof air conditioner is able to
operate at maximum capacity.
!
Setting the time
➤ Set the current time: see chapter “Setting the time” on page 28.
Set the remote control
➤ Insert the batteries (see chapter “Replacing the remote control batteries” on
page 27).
✓ The display shows all symbols for 5 seconds.
➤ Press simultaneously the
button and the button during this 5 seconds.
✓ The display shows the default model number.
➤ Press simultaneously + and – button within 3 seconds to select the model
number:
– FreshWell 3000: 02
–FreshJet: 07
–FreshLight: 11
✓ The display shows all symbols for 5 seconds.
✓ The remote control is ready for operation.
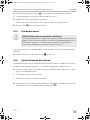
CAUTION! Beware of injury
Do not insert your fingers or objects into the air nozzles or the intake
grille.
)UHVK/LJKWB230B(0($ERRN6HLWH0RQWDJ6HSWHPEHU

EN
Operating the roof air conditioner FreshLight
20
9 Operating the roof air conditioner
9.1 Basic notes on operation
The roof air conditioner has three operating modes:
You can use the control panel to
• switch the roof air conditioner on, off or to stand-by mode
• switch the light on and off
You can use the remote control to
• switch the roof air conditioner to and from stand-by mode.
• switch the light on and off
• make the settings
• select additional functions
9.2 Using the remote control
There are two ways to control the roof air conditioner with the remote control:
• You can transmit the values directly to the roof air conditioner when you set them
• You can first specify all values on the remote control and then transmit them
collectively to the roof air conditioner
Transmitting values directly when they are set
The remote control must be pointed at the IR receiver (fig. 2 4, page 3) on the
control panel during operation.
When a button is pressed, the value is transmitted directly to the roof air conditioner.
The roof air conditioner confirms the receipt of data with a high note.
Operating mode Features
Off The roof air conditioner is switched off.
The remote control is inactive.
Stand-by The roof air conditioning is ready for operation and can be
switched on with the remote control.
On The roof air conditioner is conditioning the air in the interior.
)UHVK/LJKWB230B(0($ERRN6HLWH0RQWDJ6HSWHPEHU
Sidan laddas ...
Sidan laddas ...
Sidan laddas ...
Sidan laddas ...
Sidan laddas ...
Sidan laddas ...
Sidan laddas ...
Sidan laddas ...
Sidan laddas ...
Sidan laddas ...
Sidan laddas ...
Sidan laddas ...
Sidan laddas ...
Sidan laddas ...
Sidan laddas ...
Sidan laddas ...
Sidan laddas ...
Sidan laddas ...
Sidan laddas ...
Sidan laddas ...
Sidan laddas ...
Sidan laddas ...
Sidan laddas ...
Sidan laddas ...
Sidan laddas ...
Sidan laddas ...
Sidan laddas ...
Sidan laddas ...
Sidan laddas ...
Sidan laddas ...
Sidan laddas ...
Sidan laddas ...
Sidan laddas ...
Sidan laddas ...
Sidan laddas ...
Sidan laddas ...
Sidan laddas ...
Sidan laddas ...
Sidan laddas ...
Sidan laddas ...
Sidan laddas ...
Sidan laddas ...
Sidan laddas ...
Sidan laddas ...
Sidan laddas ...
Sidan laddas ...
Sidan laddas ...
Sidan laddas ...
Sidan laddas ...
Sidan laddas ...
Sidan laddas ...
Sidan laddas ...
Sidan laddas ...
Sidan laddas ...
Sidan laddas ...
Sidan laddas ...
Sidan laddas ...
Sidan laddas ...
Sidan laddas ...
Sidan laddas ...
Sidan laddas ...
Sidan laddas ...
Sidan laddas ...
Sidan laddas ...
Sidan laddas ...
Sidan laddas ...
Sidan laddas ...
Sidan laddas ...
Sidan laddas ...
Sidan laddas ...
Sidan laddas ...
Sidan laddas ...
Sidan laddas ...
Sidan laddas ...
Sidan laddas ...
Sidan laddas ...
Sidan laddas ...
Sidan laddas ...
Sidan laddas ...
Sidan laddas ...
Sidan laddas ...
Sidan laddas ...
Sidan laddas ...
Sidan laddas ...
Sidan laddas ...
Sidan laddas ...
Sidan laddas ...
Sidan laddas ...
Sidan laddas ...
Sidan laddas ...
Sidan laddas ...
Sidan laddas ...
Sidan laddas ...
Sidan laddas ...
Sidan laddas ...
Sidan laddas ...
Sidan laddas ...
Sidan laddas ...
Sidan laddas ...
Sidan laddas ...
Sidan laddas ...
Sidan laddas ...
Sidan laddas ...
Sidan laddas ...
Sidan laddas ...
Sidan laddas ...
Sidan laddas ...
Sidan laddas ...
Sidan laddas ...
Sidan laddas ...
Sidan laddas ...
Sidan laddas ...
Sidan laddas ...
Sidan laddas ...
Sidan laddas ...
Sidan laddas ...
Sidan laddas ...
Sidan laddas ...
Sidan laddas ...
Sidan laddas ...
Sidan laddas ...
Sidan laddas ...
Sidan laddas ...
Sidan laddas ...
Sidan laddas ...
Sidan laddas ...
Sidan laddas ...
Sidan laddas ...
Sidan laddas ...
Sidan laddas ...
Sidan laddas ...
Sidan laddas ...
Sidan laddas ...
Sidan laddas ...
Sidan laddas ...
Sidan laddas ...
Sidan laddas ...
Sidan laddas ...
Sidan laddas ...
Sidan laddas ...
Sidan laddas ...
Sidan laddas ...
Sidan laddas ...
Sidan laddas ...
Sidan laddas ...
Sidan laddas ...
Sidan laddas ...
Sidan laddas ...
Sidan laddas ...
Sidan laddas ...
Sidan laddas ...
Sidan laddas ...
Sidan laddas ...
Sidan laddas ...
Sidan laddas ...
Sidan laddas ...
Sidan laddas ...
Sidan laddas ...
Sidan laddas ...
Sidan laddas ...
Sidan laddas ...
Sidan laddas ...
Sidan laddas ...
Sidan laddas ...
Sidan laddas ...
Sidan laddas ...
Sidan laddas ...
Sidan laddas ...
Sidan laddas ...
Sidan laddas ...
Sidan laddas ...
Sidan laddas ...
Sidan laddas ...
Sidan laddas ...
Sidan laddas ...
Sidan laddas ...
Sidan laddas ...
Sidan laddas ...
Sidan laddas ...
Sidan laddas ...
Sidan laddas ...
Sidan laddas ...
Sidan laddas ...
Sidan laddas ...
Sidan laddas ...
Sidan laddas ...
Sidan laddas ...
Sidan laddas ...
Sidan laddas ...
Sidan laddas ...
Sidan laddas ...
Sidan laddas ...
Sidan laddas ...
Sidan laddas ...
Sidan laddas ...
Sidan laddas ...
Sidan laddas ...
Sidan laddas ...
Sidan laddas ...
Sidan laddas ...
Sidan laddas ...
Sidan laddas ...
Sidan laddas ...
Sidan laddas ...
Sidan laddas ...
Sidan laddas ...
Sidan laddas ...
Sidan laddas ...
Sidan laddas ...
Sidan laddas ...
Sidan laddas ...
Sidan laddas ...
Sidan laddas ...
Sidan laddas ...
Sidan laddas ...
Sidan laddas ...
Sidan laddas ...
Sidan laddas ...
Sidan laddas ...
Sidan laddas ...
Sidan laddas ...
Sidan laddas ...
Sidan laddas ...
Sidan laddas ...
Sidan laddas ...
Sidan laddas ...
Sidan laddas ...
Sidan laddas ...
Sidan laddas ...
Sidan laddas ...
Sidan laddas ...
Sidan laddas ...
Sidan laddas ...
Sidan laddas ...
Sidan laddas ...
Sidan laddas ...
Sidan laddas ...
Sidan laddas ...
Sidan laddas ...
Sidan laddas ...
Sidan laddas ...
Sidan laddas ...
Sidan laddas ...
Sidan laddas ...
Sidan laddas ...
Sidan laddas ...
Sidan laddas ...
Sidan laddas ...
Sidan laddas ...
Sidan laddas ...
Sidan laddas ...
Sidan laddas ...
Sidan laddas ...
Sidan laddas ...
Sidan laddas ...
Sidan laddas ...
Sidan laddas ...
Sidan laddas ...
Sidan laddas ...
Sidan laddas ...
Sidan laddas ...
Sidan laddas ...
Sidan laddas ...
Sidan laddas ...
Sidan laddas ...
Sidan laddas ...
Sidan laddas ...
Sidan laddas ...
Sidan laddas ...
Sidan laddas ...
Sidan laddas ...
Sidan laddas ...
Sidan laddas ...
Sidan laddas ...
Sidan laddas ...
Sidan laddas ...
Sidan laddas ...
Sidan laddas ...
Sidan laddas ...
Sidan laddas ...
Sidan laddas ...
Sidan laddas ...
Sidan laddas ...
Sidan laddas ...
Sidan laddas ...
Sidan laddas ...
Sidan laddas ...
Sidan laddas ...
Sidan laddas ...
Sidan laddas ...
Sidan laddas ...
Sidan laddas ...
Sidan laddas ...
Sidan laddas ...
Sidan laddas ...
Sidan laddas ...
Sidan laddas ...
Sidan laddas ...
Sidan laddas ...
Sidan laddas ...
Sidan laddas ...
Sidan laddas ...
Sidan laddas ...
Sidan laddas ...
Sidan laddas ...
Sidan laddas ...
Sidan laddas ...
Sidan laddas ...
Sidan laddas ...
Sidan laddas ...
Sidan laddas ...
Sidan laddas ...
Sidan laddas ...
Sidan laddas ...
Sidan laddas ...
Sidan laddas ...
Sidan laddas ...
Sidan laddas ...
Sidan laddas ...
Sidan laddas ...
Sidan laddas ...
Sidan laddas ...
Sidan laddas ...
Sidan laddas ...
Sidan laddas ...
Sidan laddas ...
Sidan laddas ...
Sidan laddas ...
Sidan laddas ...
Sidan laddas ...
Sidan laddas ...
Sidan laddas ...
Sidan laddas ...
Sidan laddas ...
Sidan laddas ...
Sidan laddas ...
Sidan laddas ...
Sidan laddas ...
Sidan laddas ...
Sidan laddas ...
Sidan laddas ...
Sidan laddas ...
Sidan laddas ...
Sidan laddas ...
Sidan laddas ...
Sidan laddas ...
Sidan laddas ...
Sidan laddas ...
Sidan laddas ...
Sidan laddas ...
Sidan laddas ...
Sidan laddas ...
Sidan laddas ...
Sidan laddas ...
Sidan laddas ...
Sidan laddas ...
Sidan laddas ...
Sidan laddas ...
Sidan laddas ...
Sidan laddas ...
Sidan laddas ...
Sidan laddas ...
Sidan laddas ...
Sidan laddas ...
Sidan laddas ...
Sidan laddas ...
Sidan laddas ...
Sidan laddas ...
Sidan laddas ...
Sidan laddas ...
Sidan laddas ...
Sidan laddas ...
Sidan laddas ...
Sidan laddas ...
Sidan laddas ...
Sidan laddas ...
Sidan laddas ...
Sidan laddas ...
Sidan laddas ...
Sidan laddas ...
Sidan laddas ...
Sidan laddas ...
Sidan laddas ...
Sidan laddas ...
Sidan laddas ...
Sidan laddas ...
Sidan laddas ...
Sidan laddas ...
Sidan laddas ...
Sidan laddas ...
Sidan laddas ...
Sidan laddas ...
Sidan laddas ...
Sidan laddas ...
Sidan laddas ...
Sidan laddas ...
Sidan laddas ...
Sidan laddas ...
Sidan laddas ...
Sidan laddas ...
Sidan laddas ...
Sidan laddas ...
Sidan laddas ...
Sidan laddas ...
Sidan laddas ...
Sidan laddas ...
Sidan laddas ...
Sidan laddas ...
Sidan laddas ...
Sidan laddas ...
Sidan laddas ...
Sidan laddas ...
Sidan laddas ...
Sidan laddas ...
Sidan laddas ...
Sidan laddas ...
Sidan laddas ...
Sidan laddas ...
Sidan laddas ...
Sidan laddas ...
Sidan laddas ...
Sidan laddas ...
Sidan laddas ...
Sidan laddas ...
Sidan laddas ...
Sidan laddas ...
Sidan laddas ...
Sidan laddas ...
Sidan laddas ...
Sidan laddas ...
Sidan laddas ...
Sidan laddas ...
Sidan laddas ...
Sidan laddas ...
Sidan laddas ...
Sidan laddas ...
Sidan laddas ...
Sidan laddas ...
Sidan laddas ...
Sidan laddas ...
-
 1
1
-
 2
2
-
 3
3
-
 4
4
-
 5
5
-
 6
6
-
 7
7
-
 8
8
-
 9
9
-
 10
10
-
 11
11
-
 12
12
-
 13
13
-
 14
14
-
 15
15
-
 16
16
-
 17
17
-
 18
18
-
 19
19
-
 20
20
-
 21
21
-
 22
22
-
 23
23
-
 24
24
-
 25
25
-
 26
26
-
 27
27
-
 28
28
-
 29
29
-
 30
30
-
 31
31
-
 32
32
-
 33
33
-
 34
34
-
 35
35
-
 36
36
-
 37
37
-
 38
38
-
 39
39
-
 40
40
-
 41
41
-
 42
42
-
 43
43
-
 44
44
-
 45
45
-
 46
46
-
 47
47
-
 48
48
-
 49
49
-
 50
50
-
 51
51
-
 52
52
-
 53
53
-
 54
54
-
 55
55
-
 56
56
-
 57
57
-
 58
58
-
 59
59
-
 60
60
-
 61
61
-
 62
62
-
 63
63
-
 64
64
-
 65
65
-
 66
66
-
 67
67
-
 68
68
-
 69
69
-
 70
70
-
 71
71
-
 72
72
-
 73
73
-
 74
74
-
 75
75
-
 76
76
-
 77
77
-
 78
78
-
 79
79
-
 80
80
-
 81
81
-
 82
82
-
 83
83
-
 84
84
-
 85
85
-
 86
86
-
 87
87
-
 88
88
-
 89
89
-
 90
90
-
 91
91
-
 92
92
-
 93
93
-
 94
94
-
 95
95
-
 96
96
-
 97
97
-
 98
98
-
 99
99
-
 100
100
-
 101
101
-
 102
102
-
 103
103
-
 104
104
-
 105
105
-
 106
106
-
 107
107
-
 108
108
-
 109
109
-
 110
110
-
 111
111
-
 112
112
-
 113
113
-
 114
114
-
 115
115
-
 116
116
-
 117
117
-
 118
118
-
 119
119
-
 120
120
-
 121
121
-
 122
122
-
 123
123
-
 124
124
-
 125
125
-
 126
126
-
 127
127
-
 128
128
-
 129
129
-
 130
130
-
 131
131
-
 132
132
-
 133
133
-
 134
134
-
 135
135
-
 136
136
-
 137
137
-
 138
138
-
 139
139
-
 140
140
-
 141
141
-
 142
142
-
 143
143
-
 144
144
-
 145
145
-
 146
146
-
 147
147
-
 148
148
-
 149
149
-
 150
150
-
 151
151
-
 152
152
-
 153
153
-
 154
154
-
 155
155
-
 156
156
-
 157
157
-
 158
158
-
 159
159
-
 160
160
-
 161
161
-
 162
162
-
 163
163
-
 164
164
-
 165
165
-
 166
166
-
 167
167
-
 168
168
-
 169
169
-
 170
170
-
 171
171
-
 172
172
-
 173
173
-
 174
174
-
 175
175
-
 176
176
-
 177
177
-
 178
178
-
 179
179
-
 180
180
-
 181
181
-
 182
182
-
 183
183
-
 184
184
-
 185
185
-
 186
186
-
 187
187
-
 188
188
-
 189
189
-
 190
190
-
 191
191
-
 192
192
-
 193
193
-
 194
194
-
 195
195
-
 196
196
-
 197
197
-
 198
198
-
 199
199
-
 200
200
-
 201
201
-
 202
202
-
 203
203
-
 204
204
-
 205
205
-
 206
206
-
 207
207
-
 208
208
-
 209
209
-
 210
210
-
 211
211
-
 212
212
-
 213
213
-
 214
214
-
 215
215
-
 216
216
-
 217
217
-
 218
218
-
 219
219
-
 220
220
-
 221
221
-
 222
222
-
 223
223
-
 224
224
-
 225
225
-
 226
226
-
 227
227
-
 228
228
-
 229
229
-
 230
230
-
 231
231
-
 232
232
-
 233
233
-
 234
234
-
 235
235
-
 236
236
-
 237
237
-
 238
238
-
 239
239
-
 240
240
-
 241
241
-
 242
242
-
 243
243
-
 244
244
-
 245
245
-
 246
246
-
 247
247
-
 248
248
-
 249
249
-
 250
250
-
 251
251
-
 252
252
-
 253
253
-
 254
254
-
 255
255
-
 256
256
-
 257
257
-
 258
258
-
 259
259
-
 260
260
-
 261
261
-
 262
262
-
 263
263
-
 264
264
-
 265
265
-
 266
266
-
 267
267
-
 268
268
-
 269
269
-
 270
270
-
 271
271
-
 272
272
-
 273
273
-
 274
274
-
 275
275
-
 276
276
-
 277
277
-
 278
278
-
 279
279
-
 280
280
-
 281
281
-
 282
282
-
 283
283
-
 284
284
-
 285
285
-
 286
286
-
 287
287
-
 288
288
-
 289
289
-
 290
290
-
 291
291
-
 292
292
-
 293
293
-
 294
294
-
 295
295
-
 296
296
-
 297
297
-
 298
298
-
 299
299
-
 300
300
-
 301
301
-
 302
302
-
 303
303
-
 304
304
-
 305
305
-
 306
306
-
 307
307
-
 308
308
-
 309
309
-
 310
310
-
 311
311
-
 312
312
-
 313
313
-
 314
314
-
 315
315
-
 316
316
-
 317
317
-
 318
318
-
 319
319
-
 320
320
-
 321
321
-
 322
322
-
 323
323
-
 324
324
-
 325
325
-
 326
326
-
 327
327
-
 328
328
-
 329
329
-
 330
330
-
 331
331
-
 332
332
-
 333
333
-
 334
334
-
 335
335
-
 336
336
-
 337
337
-
 338
338
-
 339
339
-
 340
340
-
 341
341
-
 342
342
-
 343
343
-
 344
344
-
 345
345
-
 346
346
-
 347
347
-
 348
348
-
 349
349
-
 350
350
-
 351
351
-
 352
352
-
 353
353
-
 354
354
-
 355
355
-
 356
356
-
 357
357
-
 358
358
-
 359
359
-
 360
360
-
 361
361
-
 362
362
-
 363
363
-
 364
364
-
 365
365
-
 366
366
-
 367
367
-
 368
368
-
 369
369
-
 370
370
-
 371
371
-
 372
372
-
 373
373
-
 374
374
-
 375
375
-
 376
376
-
 377
377
-
 378
378
-
 379
379
-
 380
380
-
 381
381
-
 382
382
-
 383
383
-
 384
384
-
 385
385
-
 386
386
-
 387
387
-
 388
388
-
 389
389
-
 390
390
-
 391
391
-
 392
392
-
 393
393
-
 394
394
-
 395
395
-
 396
396
-
 397
397
-
 398
398
-
 399
399
-
 400
400
-
 401
401
-
 402
402
-
 403
403
-
 404
404
-
 405
405
-
 406
406
-
 407
407
-
 408
408
-
 409
409
-
 410
410
-
 411
411
-
 412
412
-
 413
413
-
 414
414
-
 415
415
-
 416
416
-
 417
417
-
 418
418
-
 419
419
-
 420
420
-
 421
421
-
 422
422
-
 423
423
-
 424
424
-
 425
425
-
 426
426
-
 427
427
-
 428
428
-
 429
429
-
 430
430
-
 431
431
-
 432
432
-
 433
433
-
 434
434
-
 435
435
-
 436
436
-
 437
437
-
 438
438
-
 439
439
-
 440
440
-
 441
441
-
 442
442
-
 443
443
-
 444
444
-
 445
445
-
 446
446
-
 447
447
-
 448
448
-
 449
449
-
 450
450
-
 451
451
-
 452
452
-
 453
453
-
 454
454
-
 455
455
-
 456
456
-
 457
457
-
 458
458
-
 459
459
-
 460
460


Dometic FL2200 Bruksanvisningar
- Typ
- Bruksanvisningar
- Denna manual är också lämplig för
på andra språk
- italiano: Dometic FL2200 Istruzioni per l'uso
- slovenčina: Dometic FL2200 Návod na používanie
- español: Dometic FL2200 Instrucciones de operación
- Deutsch: Dometic FL2200 Bedienungsanleitung
- português: Dometic FL2200 Instruções de operação
- français: Dometic FL2200 Mode d'emploi
- dansk: Dometic FL2200 Betjeningsvejledning
Relaterade papper
-
Dometic FreshLight 2200 Bruksanvisning
-
-
-
-
-
-
-
-
Dometic B1600PLUS, B2200, B2600 Användarmanual
-