
User manual
Brugervejledning
Benutzerhandbuch
Manual del usuario
Käyttöopas
Mode d’emploi
Manuale utente
Gebruiksaanwijzing
Brukerhåndbok
Användarhandbok
8000 Series
TAE8005
Headphones
Register your product and get support at
www.philips.com/support


English
EN 1
Contents
1 Important safety instructions 2
Hearing Safety 2
General information 2
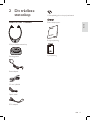
2 Your wireless stethoscope 3
What's in the box 3
Overview of the stethoscope 4
Overview of the docking station 4
3 Get started 5
Connect 5
Install the supplied batteries 6
Charge the stethoscope 6
4 Use your stethoscope 7
Auto switch on/off 7
Adjust the volume 7
Adjust the left/right balance 7
Amplify the environmental sound 7
Equalizer (EQ) 7
Store and charge the stethoscope 7
5 LED and sound indication 8
LED indication 8
Sound indication 8
6 Care and maintainence 8
Clean the stethoscope and docking
station 8
Clean the ear caps 8
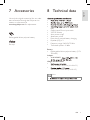
7 Accessories 9
8 Technical data 9
9 Notice 10
Declaration of conformity 10
Compliance with EMF 10
Disposal of your old product and
battery 10
10 Frequently asked questions 11
Contents
Indholdsfortegnelse

2 EN
1 Important safety
instructions
Hearing Safety
Danger
•
To avoid hearing damage, limit the time you use
headphones at high volume and set the volume to a
safe level. The louder the volume, the shorter the safe
listening time is.
Be sure to observe the following guidelines
when using your headset.
• Listen at reasonable volumes for reasonable
periods of time.
• Be careful not to adjust the volume
continuously upwards as your hearing
adapts.
• Do not turn up the volume so high that
you can’t hear what’s around you.
• You should use caution or temporarily
discontinue use in potentially hazardous
situations.
• Excessive sound pressure from earphones
and headphones can cause hearing loss.
• Using headphones with both ears covered
while driving is not recommended and may
be illegal in some areas while driving.
• For your safety, avoid distractions from
other potentially dangerous environments.
General information
Caution
•
product dry. Do not expose it to excessive heat by
heating equipment or direct sunlight.
•
be placed on the apparatus.
• Do not allow your product to be submerged in water.
•
cloth. Do not use cleansing agents containing alcohol,
spirits, ammonia or abrasives as they may harm the
product.
• Do not disassemble the product.
• Do not operate or store the product in a place where
• This product shall not be exposed to dripping or
splashing.
• The mains plug of AC/DC adapter is used as the
disconnect device, the disconnect device shall be readily
operable.
• Use only the supplied batteries.
• Other types of rechargeable or alkaline batteries cannot
be charged with this system.
• Batteries (battery pack or batteries installed) shall not
the like.
• Risk of explosion! Keep batteries away from heat,

English
EN 3
2 Your wireless
stethoscope
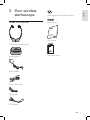
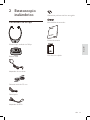
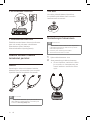
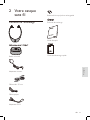
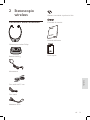
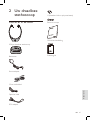
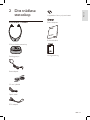
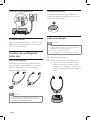
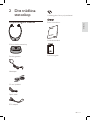
What's in the box
*Philips wireless stethoscope
Docking station
Power adapter
3.5mm audio cable
Optical cable
RCA adapter
*Rechargeable lithium-polymer battery
Spare ear caps
User manual
Quick start guide

4 EN
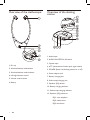
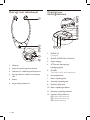
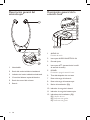
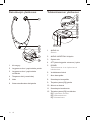
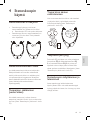
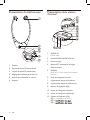
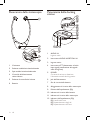
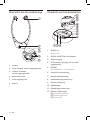
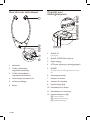
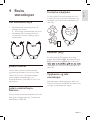
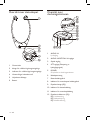
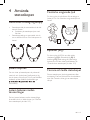
Overview of the stethoscope Overview of the docking
station
1, Ear cap
2, Wireless/ambient mode button
3, Wireless/ambient mode indicator
4, Left/right balance control
5, Volume control button
6, Battery
1, Audio input
2, AUDIO IN/OPTICAL IN switch
3, Optical input
4, ATT (Attenuation of audio input signal switch)
5, POWER (Power the docking station on or off)
6, Power adapter jack
7, Battery charging slot
8, Stethoscope charging slot
9, Equalizer (EQ) button
10, Battery charging indicator
11, Stethoscope charging indicator
12, Equalizer (EQ) indicators
EQ1: voice emphasis
EQ2: treble boost
EQ3: bass boost

English
EN 5
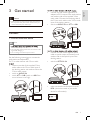
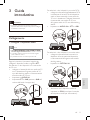
3 Get started
Caution
•
Make sure that you have read the safety instructions in
the 'Important safety instructions' section before you
connect and install your stethoscope.
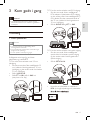
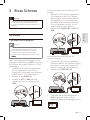
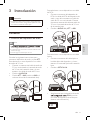
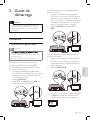
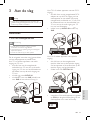
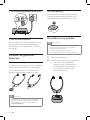
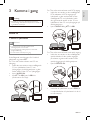
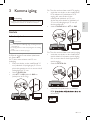
Connect
1. Connect the audio device
Note
•
station automatically turns off.
• The energizing docking station does not transmit audio
signal when charging.
• You can charge one stethoscope each time.
See the following instructions to connect the
audio device and adjust ATT.
For TV or other devices with 3.5mm audio
• connect one side of the supplied 3.5mm
audio cable to the 3.5mm audio input of
the docking station and another side to the
3.5mm audio output.
• switch to AUDIO IN.
• switch ATT to 0dB (switch to -8dB if the
sound volume is too high).
• connect one side of the supplied RCA
adapter to RCA output of the audio device,
and another side to the supplied 3.5mm
audio cable. Connect the remaining side of
the 3.5mm audio cable to the 3.5mm audio
input of the docking station.
• switch to AUDIO IN and ATT to -8dB.
• connect one side of the supplied optical
cable to optical output of the device, and
another side to the optical input of the
docking station.
• switch to OPTICAL IN.
• make sure that the audio device is set to
PCM (check the manual of your audio
device for information).
L
R
PCM

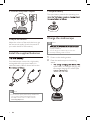
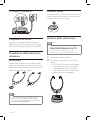
6 EN
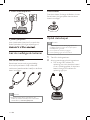
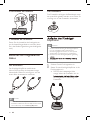
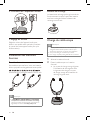
2. Connect the power adapter
3. Adjust the volume
Adjust the volume of the audio device to get
the best sound quality (check the manual of
your audio device for information).
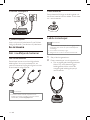
Install the supplied batteries
Your stethoscope comes with a high quality
rechargeable lithium-polymer battery to
maximize battery lifetime. Insert/remove the
Note
•
Over time the capacity of the battery will decrease.
You can order replacement batteries through
the Philips service centers or online stores at
www.shop.philips.com
The spare battery
The spare battery extends the operating time
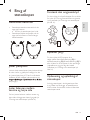
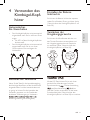
Charge the stethoscope
Note
•
the supplied battery for 5 hours for optimum battery
capacity and lifetime.
• You can charge one stethoscope per each time.
• Normally, a full charge takes 2.5 hours.
1
Power on the docking station.
2
Place the stethoscope on the docking
station.
»
spare battery is inside the charging slot,
the orange charging LED of the spare

English
EN 7
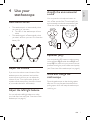
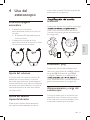
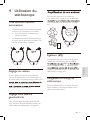
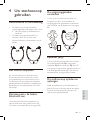
4 Use your
stethoscope
Auto switch on/off
• The stethoscope is on automatically when
you wear it on your ears.
» The LED on the stethoscope will turn
white.
• The stethoscope is off automatically when
you take it off from your ears. This saves the
battery life.
Adjust the volume
If you turn the volume control button of the
stethoscope to the maximum level and the
sound volume is still low, you can adjust the
volume of your TV to improve the quality of
wireless sound transmission (check the manual
of your audio device for information).
Adjust the left/right balance
You can adjust the left/right balance to make
your both ears hear well (see 'Overview of the
stethoscope' on page 4).
Amplify the environmental
sound
You can press the microphone button to
turn off the sound of the TV and amplify the
environmental sound and conversations (see
'Overview of the stethoscope' on page 4).
Equalizer (EQ)
You can press the EQ button to select among
voice emphasis EQ 1, treble boost EQ 2, bass
boost EQ 3 or off to suit your personal sound
preference and give you the best sound quality
(see 'Overview of the stethoscope' on page 4).
Store and charge the
stethoscope
Place the stethoscope to the docking station
after use. This can prevent the earbuds from
pulling apart, which will keep the stethoscope
switching on.

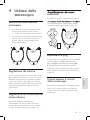
8 EN
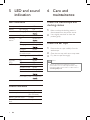
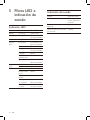
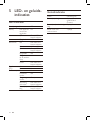
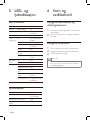
5 LED and sound
indication
LED indication
Description Status LED
Battery No charging Off
Charging Orange LED
Charged White
Docking
station
On White LED
Off Off
Charging Orange LED
Charged White
Connected to
the stethoscope
White
Searching White LED
Equalizer
(EQ)
On White
Off Off
Stethoscope Off Off
Wireless mode White
Ambient mode Orange
Connection lost White LED
Low battery level Orange LED
Sound indication
Status Sound signal
Low battery level 1 beep per minute
(for 4 minutes)
Battery goes out soon. 2 beeps
Reach max./min. volume
level.
1 beep
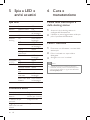
6 Care and
maintainence
Clean the stethoscope and
docking station
1
Make sure that the docking station is
disconnected from the power source.
2
Use a slightly wet cloth to clean the
product gently.
Clean the ear caps
1
Remove the ear caps carefully from the
stethoscope.
2
Clean the ear caps with warm soap water.
3
Dry the ear caps thoroughly.
Note
•
The ear caps need to be replaced for a regular
period of time. You can order replacement ear caps
through the Philips service centers or online stores at
www.shop.philips.com

English
EN 9
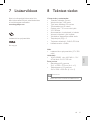
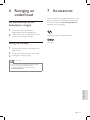
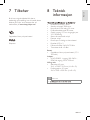
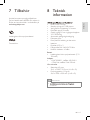
7 Accessories
Use only the original accessories. You can order
extra accessories through the Philips service
centers or online stores at
www.shop.philips.com for replacement.
Rechargeable lithium-polymer battery
Ear caps
8 Technical data
•
•
•
•
feet)
• Optical input/3.5mm input switch
• 2.4G RF solution
• Auto power on/off
• Attenuator on/off
• Extra slot for second battery charging
•
•
•
Equalizer (EQ) x 3
Battery
• Rechargeable lithium-polymer battery (3.7V
350 mAh)
Adapter
• YLJXC-050055
Weight and dimensions
•
216.1 x 158.9 x 21.5 mm (H x W x D)
•
42.0 x 120.0 x 95.0 mm (H x W x D)
Note
•
Frequency range: 2,406-2,472 MHz
Transmitter power: <9 dBm

10 EN
9 Notice
Declaration of conformity
Hereby, MMD Hong Kong Holding
Limited declares that this product is in
compliance with the essential
requirements and other relevant
provisions of Directive 2014/53/EC. You
www.p4c.philips.com.
Compliance with EMF
This product complies with all applicable
standards and regulations regarding exposure to
Disposal of your old product
and battery
Your product is designed and manufactured with
high quality materials and components, which
can be recycled and reused.
This symbol on a product means that the
product is covered by European Directive
2012/19/EU.
This symbol means that the product contains
batteries covered by European Directive
2013/56/EU which cannot be disposed of with
normal household waste.
Inform yourself about the local separate
collection system for electrical and electronic
products and batteries. Follow local rules and
never dispose of the product and batteries with
normal household waste. Correct disposal of old
products and batteries helps prevent negative
consequences for the environment and human
health.
Removing the disposable batteries
To remove the disposable batteries, see section
‘Install the supplied batteries’.
Environmental information
All unnecessary packaging has been omitted.
We have tried to make the packaging easy to
polystyrene foam (buffer) and polyethylene
(bags, protective foam sheet.)
Your system consists of materials which can
be recycled and reused if disassembled by
a specialized company. Please observe the
local regulations regarding the disposal of
packaging materials, exhausted batteries and old
equipment.

English
EN 11
10 Frequently asked
questions
I cannot hear any sound.
• Make sure that you connect the power
source and adapter correctly (see '1.
Connect the audio device' on page 5).
• Make sure that you adjust the volume to an
appropriate level.
• Make sure that the batteries are charged
and inserted properly to the battery
charging slot (see 'Install the supplied
batteries' on page 6).
• Make sure that the LED on the docking
station is white.
• Batteries are defective. Purchase new ones
• For audio devices with optical output, make
sure that the audio device is set to PCM
(check the manual of your audio device for
information).
The sound is distorted.
• The volume is too high. Turn down the
volume.
• The stethoscope is nearly out of range.
Move it closer to the docking station.
• The stethoscope receives interference from
the nearby electrical appliances. Move the
docking station away from them.
• The stethoscope is at a location with thick
walls. Move the docking station away from
them.
• Adjust the ATTsetting (see 'Overview of
the docking station' on page 4).
• Adjust the volume of the audio device.
When I move my head I hear interfering noise.
The interference can be caused by another
wireless device like Bluetooth, WiFi, router or 2.4
devices. Move the wireless device away.
The audio quality is poor.
• The stethoscope is out of range. Reduce
the distance between your stethoscope and
audio device, or remove obstacles between
them.
• Adjust the ATTsetting (see 'Overview of
the docking station' on page 4).
• Adjust the volume of the audio device.
I can hear the sound with one ear only.
Make sure that you have adjusted the left/right
balance (see 'Overview of the stethoscope' on
page 4).
50 meters (164 feet). Why is the actual range
shorter?
The operating range is limited by obstacles
like thick walls, doors or ceiling. Move the
stethoscope closer to the docking station.
For further support, visit
www.philips.com/support.

12 EN

Dansk
DA 13
Indholdsfortegnelse
1 Vigtige sikkerhedsinstruktioner 14
Høresikkerhed 14
Generelle oplysninger 14
2 Dit trådløse stetoskop 15
Hvad er der i kassen 15
Oversigt over stetoskopet 16
Oversigt over dockingstationen 16
3 Kom godt i gang 17
Tilslutning 17
Isæt de medfølgende batterier 18
Oplad stetoskopet 18
4 Brug af stetoskopet 19
Automatisk tænd/sluk 19
Juster lydstyrken 19
Juster balancen mellem venstre og
højre side 19
Forstærk den omgivende lyd 19
Equalizer (EQ) 19
Opbevaring og opladning af stetoskopet 19
5 LED- og lydindikator 20
LED-indikator 20
Lydindikator 20
6 Rengøring og vedligeholdelse 20
Rengør stetoskopet og
dockingstationen 20
Rens ørepropperne 20
7 Tilbehør 21
8 Tekniske data 21
9 Meddelelse 22
Overensstemmelseserkl æring 22
Overholdelse af EMF 22
Bortskaffelse af udtjente produkter og
batterier 22
10 Ofte stillede spørgsmål (FAQ) 23
Inhaltsangabe

14 DA
1 Vigtige sikker-
hedsinstruk-
tioner
Høresikkerhed
Fare
•
For at undgå høreskader skal du begrænse den tid,
hvor du bruger hovedtelefonerne ved høj lydstyrke
og indstille lydstyrken til et sikkert niveau. Jo højere
lydstyrke, desto kortere er den sikre lyttetid.
Sørg for, at følgende retningslinjer overholdes,
når du bruger headsettet.
• Lyt ved en fornuftig lydstyrke i kortere
tidsrum.
• Vær omhyggelig med ikke at justere
lydstyrken kontinuerligt opad, efterhånden
som din hørelse tilpasser sig lydniveauet.
• Undlad at skrue så højt op for lyden, at du
ikke kan høre, hvad der foregår omkring dig.
• Du bør være ekstra forsigtig eller slukke
midlertidigt i potentielt farlige situationer.
• Ekstremt lydtryk fra øre- og hovedtelefoner
kan forårsage hørenedsættelse.
• Brug af hovedtelefoner med begge ører
dækket under kørsel i bil kan ikke anbefales
og kan være ulovligt ved kørsel i nogle
områder.
• Af sikkerhedsmæssige grunde bør
distraktioner fra musik eller telefonopkald
andre potentielt farlige omgivelser.
Generelle oplysninger
Advarsel
•
For at undgå brand eller stød: Hold altid dette
produkt tørt. Udsæt det ikke for stærk varme fra
varmeapparater eller direkte sollys.
• Der må ikke placeres åben ild, som f.eks. tændte
stearinlys, i nærheden af apparatet.
• Undgå at nedsænke produktet i vand.
• For at rengøre produktet: Brug et let fugtigt vaskeskind.
Undgå at bruge rengøringsmidler, der indeholder
alkohol, sprit, ammoniak eller slibemidler, da de kan
beskadige produktet.
• Skil ikke produktet ad.
• Undgå at bruge eller opbevare produktet på et sted,
hvor temperaturen er under 0 °C (32 °F) eller over 40
°C (104 °F), da dette kan afkorte batterilevetiden.
• Produktet må ikke udsættes for dryp eller sprøjt.
• Strømstikket på AC/DC-adapteren bruges til at frakoble
produktet og skal derfor kunne betjenes nemt.
• Brug kun de medfølgende batterier.
• Andre typer genopladelige eller alkaline-batterier kan
ikke oplades med dette system.
• Batterier (installeret batteripakke eller batterier) må
ikke udsættes for ekstrem varme fra f.eks. sol, ild eller
lignende.
• Risiko for eksplosion! Opbevar ikke batterier i
nærheden af varmekilder, sollys eller ild. Kast aldrig
batterier i ild.

Dansk
DA 15
2 Dit trådløse
stetoskop
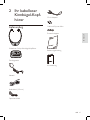
Hvad er der i kassen
*Philips trådløst stetoskop
Dockingstation
Strømadapter
3,5 mm lydkabel
Optisk kabel
RCA-adapter
*Genopladeligt litiumionpolymerbatteri
Ekstra ørepropper
Brugervejledning
Lynvejledning

16 DA
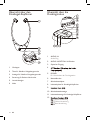
Oversigt over stetoskopet
1 Øreprop
2
Indikator for trådløs/omgivende tilstand
3
Knap til trådløs/omgivende tilstand
4 Styring af balance mellem venstre/højre
side
5 Batteri
6 Knap til lydstyrkekontrol
Oversigt over
dockingstationen
1 AUDIO IN
Lydindgang
2 AUDIO IN/OPTICAL IN-kontakt
3 Optisk indgang
4 ATT-kontakt (dæmpning af
lydindgangssignal)
5 POWER
Tænd eller sluk for dockingstationen.
6 Strømadapterstik
7 Batteri opladningsstik
8
Batteri opladningsindikator
9
Stetoskop opladningsindikator
10
Stetoskop opladningsstik
11
Equalizer (EQ) knap
12 Equalizer (EQ) indikatorer
EQ 1: Stemmeforstærkning
EQ 2: Diskantforstærkning
EQ 3: Basforstærkning

Dansk
DA 17
3 Kom godt i gang
Advarsel
•
Læs sikkerhedsinstruktionerne i afsnittet "Vigtige
sikkerhedsinstruktioner", før du tilslutter og installerer
stetoskopet.
Tilslutning
1. Tilslut lydenheden
Bemærk
•
Hvis TV'ets lydstyrke er utilstrækkelig, slukker
dockingstationen automatisk.
• Den strømførende dockingstation sender ikke noget
lydsignal under opladning.
• Du kan oplade ét stetoskop ad gangen.
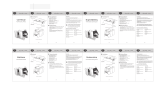
Se følgende anvisninger for at tilslutte
lydenheden og justere ATT.
Til TV'er eller andre enheder med 3,5 mm
lydudgang:
• Slut den ene ende af det medfølgende 3,5
mm lydkabel til dockingstationens 3,5 mm
lydindgang og den anden ende til enhedens
3,5 mm lydudgang.
• Skift til AUDIO IN.
• Skift ATT til 0dB (skift til -8dB, hvis
lydstyrken er for høj).
Til TV'er eller andre enheder med RCA-udgang:
• Slut den ene ende af den medfølgende
RCA-adapter til lydenhedens RCA-udgang
og den anden ende til det medfølgende 3,5
mm lydkabel. Slut den resterende ende af
det 3,5 mm lydkabel til dockingstationens
3,5 mm lydindgang.
• Skift til AUDIO IN og ATT til -8dB.
Til TV'er eller andre enheder med optisk udgang:
• Slut den ene ende af det medfølgende
optiske kabel til enhedens optiske udgang
og den anden ende til dockingstationens
optiske indgang.
• Skift til OPTICAL IN.
• Kontroller, at lydenheden er indstillet til
PCM (se brugervejledningen til lydenheden
L
R
PCM

18 DA
2. Tilslut strømadapteren
3. Juster lydstyrken
Juster lydenhedens lydstyrke for at opnå den
bedste lydkvalitet (se brugervejledningen til
Isæt de medfølgende batterier
Det første batteri
Stetoskopet leveres med et genopladeligt
litiumionpolymerbatteri af høj kvalitet, der
maksimerer batterilevetiden. Isæt/fjern det første
batteri som følger:
Bemærk
•
Batteriets kapacitet aftager med tiden. Du kan
bestille nye batterier hos Philips-servicecentre eller i
onlinebutikker på www.shop.philips.com
Ekstra batteri
Det ekstra batteri forlænger driftstiden, når det
første batteri skal genoplades. Isæt det ekstra
batteri som følger:
Oplad stetoskopet
Bemærk
•
Før stetoskopet anvendes første gang, oplades det
medfølgende batteri i 5 timer for at opnå optimal
batterikapacitet og -levetid.
• Du kan oplade ét stetoskop ad gangen.
• En fuld opladning tager normalt 2,5 timer.
1
Tænd for dockingstationen.
2
Anbring stetoskopet på dockingstationen.
» Den orange LED-indikator for
opladning lyser. Hvis det ekstra batteri
er sat i opladningsstikket, vil det ekstra
batteris orange LED-indikator for
opladning også lyse.
Sidan laddas...
Sidan laddas...
Sidan laddas...
Sidan laddas...
Sidan laddas...
Sidan laddas...
Sidan laddas...
Sidan laddas...
Sidan laddas...
Sidan laddas...
Sidan laddas...
Sidan laddas...
Sidan laddas...
Sidan laddas...
Sidan laddas...
Sidan laddas...
Sidan laddas...
Sidan laddas...
Sidan laddas...
Sidan laddas...
Sidan laddas...
Sidan laddas...
Sidan laddas...
Sidan laddas...
Sidan laddas...
Sidan laddas...
Sidan laddas...
Sidan laddas...
Sidan laddas...
Sidan laddas...
Sidan laddas...
Sidan laddas...
Sidan laddas...
Sidan laddas...
Sidan laddas...
Sidan laddas...
Sidan laddas...
Sidan laddas...
Sidan laddas...
Sidan laddas...
Sidan laddas...
Sidan laddas...
Sidan laddas...
Sidan laddas...
Sidan laddas...
Sidan laddas...
Sidan laddas...
Sidan laddas...
Sidan laddas...
Sidan laddas...
Sidan laddas...
Sidan laddas...
Sidan laddas...
Sidan laddas...
Sidan laddas...
Sidan laddas...
Sidan laddas...
Sidan laddas...
Sidan laddas...
Sidan laddas...
Sidan laddas...
Sidan laddas...
Sidan laddas...
Sidan laddas...
Sidan laddas...
Sidan laddas...
Sidan laddas...
Sidan laddas...
Sidan laddas...
Sidan laddas...
Sidan laddas...
Sidan laddas...
Sidan laddas...
Sidan laddas...
Sidan laddas...
Sidan laddas...
Sidan laddas...
Sidan laddas...
Sidan laddas...
Sidan laddas...
Sidan laddas...
Sidan laddas...
Sidan laddas...
Sidan laddas...
Sidan laddas...
Sidan laddas...
Sidan laddas...
Sidan laddas...
Sidan laddas...
Sidan laddas...
Sidan laddas...
Sidan laddas...
Sidan laddas...
Sidan laddas...
Sidan laddas...
Sidan laddas...
Sidan laddas...
Sidan laddas...
Sidan laddas...
Sidan laddas...
Sidan laddas...
Sidan laddas...
-
 1
1
-
 2
2
-
 3
3
-
 4
4
-
 5
5
-
 6
6
-
 7
7
-
 8
8
-
 9
9
-
 10
10
-
 11
11
-
 12
12
-
 13
13
-
 14
14
-
 15
15
-
 16
16
-
 17
17
-
 18
18
-
 19
19
-
 20
20
-
 21
21
-
 22
22
-
 23
23
-
 24
24
-
 25
25
-
 26
26
-
 27
27
-
 28
28
-
 29
29
-
 30
30
-
 31
31
-
 32
32
-
 33
33
-
 34
34
-
 35
35
-
 36
36
-
 37
37
-
 38
38
-
 39
39
-
 40
40
-
 41
41
-
 42
42
-
 43
43
-
 44
44
-
 45
45
-
 46
46
-
 47
47
-
 48
48
-
 49
49
-
 50
50
-
 51
51
-
 52
52
-
 53
53
-
 54
54
-
 55
55
-
 56
56
-
 57
57
-
 58
58
-
 59
59
-
 60
60
-
 61
61
-
 62
62
-
 63
63
-
 64
64
-
 65
65
-
 66
66
-
 67
67
-
 68
68
-
 69
69
-
 70
70
-
 71
71
-
 72
72
-
 73
73
-
 74
74
-
 75
75
-
 76
76
-
 77
77
-
 78
78
-
 79
79
-
 80
80
-
 81
81
-
 82
82
-
 83
83
-
 84
84
-
 85
85
-
 86
86
-
 87
87
-
 88
88
-
 89
89
-
 90
90
-
 91
91
-
 92
92
-
 93
93
-
 94
94
-
 95
95
-
 96
96
-
 97
97
-
 98
98
-
 99
99
-
 100
100
-
 101
101
-
 102
102
-
 103
103
-
 104
104
-
 105
105
-
 106
106
-
 107
107
-
 108
108
-
 109
109
-
 110
110
-
 111
111
-
 112
112
-
 113
113
-
 114
114
-
 115
115
-
 116
116
-
 117
117
-
 118
118
-
 119
119
-
 120
120
-
 121
121
-
 122
122


på andra språk
- italiano: Philips TAE8005BK/10 Manuale utente
- español: Philips TAE8005BK/10 Manual de usuario
- Deutsch: Philips TAE8005BK/10 Benutzerhandbuch
- français: Philips TAE8005BK/10 Manuel utilisateur
- English: Philips TAE8005BK/10 User manual
- dansk: Philips TAE8005BK/10 Brugermanual
- suomi: Philips TAE8005BK/10 Ohjekirja
- Nederlands: Philips TAE8005BK/10 Handleiding
Relaterade papper
Andra dokument
-
Withings BPM Core Installationsguide
-
Gima 32603 Bruksanvisning
-
 Dacota Gaming PS5 RASK DOBBEL LADESTASJON Bruksanvisning
-
Topcom BD-4601 Bruksanvisning
-
Topcom BD-4600 Användarguide
-
Denver IFI-140 Användarmanual
-
Sandstrom S1iPBTDB12E Användarmanual
-
Harman Kardon GO + PLAY Bruksanvisning
-
3M Littmann Classic II Pediatric, Infant Stethoscope Användarguide
-
P. Lindberg 9051583 Bruksanvisning
