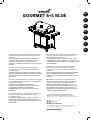
Mustang Gas grill Gourmet 4+1 Blue Bruksanvisning
- Typ
- Bruksanvisning

1
EN
FI
SV
ET
LV
LT
RU
2531-20
GOURMET 4+1 BLUE
EN. USE OUTDOORS ONLY. READ THE INSTRUCTIONS BEFORE
USING THE APPLIANCE. RETAIN THIS MANUAL FOR FUTURE
REFERENCE.
Prior to installation, ensure that the local distribution
conditions (nature of gas and gas pressure) and the
adjustment of the appliance are compatible. The
adjustment conditions for this appliance are stated on the
data plate.
FI. VAIN ULKOKÄYTTÖÖN. LUE KÄYTTÖOHJEET ENNEN
LAITTEEN KÄYTTÖÄ. SÄILYTÄ TÄMÄ OHJE MYÖHEMPÄÄ
KÄYTTÖÄ VARTEN.
Tarkista ennen laitteen asentamista, että laitteen säädöt
vastaavat paikallisia kaasuliitäntöjä koskevia vaatimuksia
(kaasun tyyppi ja paine). Laitteen säädöt on ilmoitettu
arvokilvessä.
SV. ENDAST FÖR UTOMHUSBRUK. LÄS ANVISNINGARNA INNAN
DU ANVÄNDER APPARATEN. FÖRVARA DESSA ANVISNINGAR
FÖR FRAMTIDA REFERENS.
Kontrollera före installationen att de lokala
distributionsförhållandena (typ av gas och gastryck)
och apparatens inställningar är kompatibla.
Inställningsvillkoren för den här apparaten anges på
märkskylten.
ET. KASUTAGE AINULT ÕUES. LUGEGE JUHEND ENNE SEADME
KASUTAMIST LÄBI. HOIDKE SEE JUHEND EDASPIDISEKS
KASUTAMISEKS ALLES.
Veenduge enne paigaldamist, et seadme seadistused
vastavad kohaliku gaasiühenduse tingimustele (gaasi
tüüp ja rõhk). Teadet seadme seadistuste kohta leiate selle
andmesildilt.
ko0920
LV. LIETOT TIKAI ĀRPUS TELPĀM. PIRMS IERĪCES LIETOŠANAS
JĀIZLASA LIETOŠANAS NORĀDĪJUMI.SAGLABĀJIET ŠO
INSTRUKCIJU TURPMĀKAI ATSAUCEI.
Pirms uzstādīšanas pārliecinieties, vai vietējie sadales
nosacījumi (gāzes veids un spiediens) ir saderīgi ar ierīces
iestatījumiem. Šīs ierīces iestatīšanas nosacījumi ir norādīti
uz datu plāksnītes.
LT. NAUDOTI TIK LAUKE. PRIEŠ PRADĖDAMI NAUDOTIS
PRIETAISU PERSKAITYKITE INSTRUKCIJAS.SAUGOKITE
ŠIĄ INSTRUKCIJĄ, KAD ATEITYJE PRIREIKUS GALĖTUMĖTE
PERŽIŪRĖTI.
Prieš įrengdami įsitikinkite, kad vietos inžinerinių tinklų
sąlygos (dujų kilmė ir dujų slėgis) atitinka prietaiso
parametrus. Šio prietaiso parametrai nurodyti duomenų
lentelėje.
RU. ИСПОЛЬЗУЙТЕ ТОЛЬКО НА ОТКРЫТОМ ВОЗДУХЕ.
ПРОЧИТАЙТЕ ИНСТРУКЦИЮ ПЕРЕД ИСПОЛЬЗОВАНИЕМ
ПРИБОРА. СОХРАНИТЕ РУКОВОДСТВО НА БУДУЩЕЕ.
Перед установкой прибора убедитесь, что его
регулировки соответствуют местным требованиям,
касающимся использования бытового газа (тип и
давление газа). Регулировки прибора указаны на на
табличке с техническими данными.
Country of use/Käyttömaa/Användningsland/Kasutusriik/
Izmantošanas valsts/Naudojimo šalis/Страна использования:
I3B/P(30): LU, NL, DK, FI, SE, CY, CZ, EE, LT, MT, SK, SI, BG, IS, NO, TR, HR, RO, IT, HU, LV
GD4843S-AA (601732)
Info/Tootja/Ražotājs/Gamintojas/ Изготовитель: Tammer Brands Oy,
Viinikankatu 36, 33800 Tampere, Finland/Тампере,Финляндия
www.mustang-grill.com
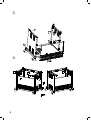
GAS GRILL ASSEMBLY, USE AND CARE MANUAL GD4843S
P.I.N code:2531-17
Do not attempt to assemble and use this grill unless you read this entire manual thoroughly.
Keep it in a handy place as it has answers for questions that may occur in your future use.
NOTE: THIS APPLIANCE IS NOT INTENDED TO INSTALL IN OR ON RECREATIONAL
VEHICLES OR BOATS.
FOR OUTDOOR
USE ONLY

2
FI KOKOAMISOHJEET
SV MONTERINGSANVISNINGARNA
EN ASSEMBLY INSTRUCTIONSET
ET KOOSTEJUHISED
LV MONTĀŽAS INSTRUKCIJU
LT SURINKIMO NURODYMAI
RU ИНСТРУКЦИИ ПО СБОРКЕ

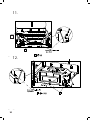
3
EN
FI
SV
ET
LV
LT
RU
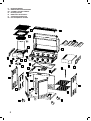
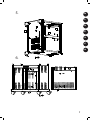
No: EN FI SV ET
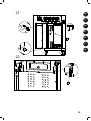
1 Body Grillin runko Grillens ram Korpus
2 Heat diuser Polttimen suoja Flamskydd Leegipiiraja
3 Warming rack Lämmitysteline Varmhållningsställ Soojendustasand
4 Wire tray Grilliritilä Grillgaller Grillimisrest
5 Wire tray Grilliritilä Grillgaller Grillimisrest
6 Wire tray Grilliritilä Grillgaller Grillimisrest
9 Side burner shelf Sivupolttimen taso Sidobrännarhylla Külgpõleti riiul
10 Side burner side panel Sivupolttimen sivulevy Sidobrännarens sidopanel Külgpõleti küljeplaat
11 Adjusting knob base Säätönupin alusta Vridreglagets bas Reguleerimisnupu alus
12 Side burner Sivupoltin Sidobrännare Külgpõleti
13 Side burner valve Sivupolttimen venttiili Sidobrännarens ventil Külgpõleti ventiil
14 Side burner tray Sivupolttimen teline Stället för sidobrännare Külgpõleti alus
15 Adjusting knob Säätönuppi Vridreglage Reguleerimisnupp
16 Cart side panel Kärryn sivulevy Vagnens sidopanel Käru külgpaneel
17 Washer Välilevy Mellanskiva Stopper
18 Drip pan Rasvapelti Fettbricka Rasvavaagen
19 Support Kannatin Stöd Tugi
20 Grease tray Rasvakuppi Fettkopp Rasvanõu
21 Support Kannatin Stöd Tugi
22 Door bracket Oven kiinnityslista Dörrkonsol Ukse toend
23 Hinge pin bracket Saranatapin kiinnike Gångjärnstappens fäste Hinge tihvti kinnitus
24 Cart back-side panel Kärryn takalevy Vagnens bakpanel Käru tagapaneel
25 Door pillar Ovipilari Dörrpelare Uksepost
26 Doorstop Ovistoppari Dörrstoppare Uksestopper
27 Cart bottom panel Kärryn alalevy Vagnens underrede Käru põhjapaneel
28 Door Ovi Dörr Uks
29 Caster Pyörä Hjul Rullik
30 Caster Pyörä Hjul Rullik
31 Tray Hylly Hylla Riiul
32 Cart side panel Kärryn sivulevy Vagnens sidopanel Käru külgpaneel
33 Matchstick holder
assembly
Sytytystikun pidike Tändstickshållare Tikuhoidik
34 Side shelf Sivutaso Sidobord Külgriiul
35 Side shelf side plate Sivutason sivulevy Sidoskivans sidoplatta Külgriiuli külgplaat
A 44 x Screw (M6 x 12) Ruuvi (M6 x 12) Skruv (M6 x 12) Kruvi (M6 x 12)
B 2 x Door axle Oven akseli Dörraxel Ukse võll
D 12 x Screw (M4 x 8) Ruuvi (M4 x 8) Skruv (M4 x 8) Kruvi (M4 x 8)

4
No: LV LT RU
1 Korpuss Korpusas Корпус
2 Liesmas sadalītājs Liepsnos sklaidytuvas Рассекатель
3 Sildīšanas paliktnis Pašildymo rėmas Нагревательная подставка
4 Cepšanas režģis Vielinis padėklas Решётка
5 Cepšanas režģis Vielinis padėklas Решётка
6 Cepšanas režģis Vielinis padėklas Решётка
9 Sānu degļa plaukts Šoninio degiklio lentyna Полка боковой горелки
10 Sānu degļa sānu panelis Šoninio degiklio šoninė plokštė Боковая панель боковой горелки
11 Regulēšanas kloķa pamatne Reguliavimo rankenėlės lizdas Гнездо для регулятора
12 Sānu deglis Šoninis degiklis Боковая горелка
13 Sānu degļa vārsts Šoninio degiklio vožtuvas Клапан боковой горелки
14 Sānu degļa restes Šoninio degiklio grotelės Опорная панель боковой горелки
15 Regulēšanas kloķis Reguliavimo rankenėlė Регулятор
16 Ratiņu sānu panelis Vežimėlio šoninė plokštė Боковая панель тележки
17 Paplāksne Poveržlė Прокладка
18 Tauku paplāte Indas riebalams surinkti Поддон
19 Balsts Atrama Опора
20 Tauku paplāte Indas riebalams surinkti Поддон
21 Balsts Atrama Опора
22 Durvju kronšteins Durų laikiklis Скоба двери
23 Viras kronšteins Šarnyro kaiščio laikiklis Фиксатор стержня петли
24 Ratiņu aizmugures panelis Vežimėlio galinė šoninė plokštė Задняя панель тележки
25 Durvju balsts Durų atrama Стойка двери
26 Durvju atdure Durų ribotuvas Ограничитель двери
27 Ratiņu apakšējais panelis Vežimėlio apatinė plokštė Нижняя панель тележки
28 Durvis Durys Дверь
29 Ritenis Ratukas Колёсико
30 Ritenis Ratukas Колёсико
31 Režģveida paplāte Padėklas Решётчатый поддон
32 Ratiņu sānu panelis Vežimėlio šoninė plokštė Боковая панель тележки
33 Garo sērkociņu turētājs Degtukų laikiklis Держатель спички в сборе
34 Sānu plaukts Šoninė lentyna Боковая полка
35 Sānu plaukta malēja plāksne Šoninės lentynos šoninė plokštelė Боковая пластина полки
A 44 x Skrūve (M6 x 12) Varžtas (M6 x 12) Винт (M6 x 12)
B 2 x Durvju ass Durų vyriai Дверные петли
D 12 x Skrūve (M4 x 8) Varžtas (M4 x 8) Винт (M4 x 8)

5
EN
FI
SV
ET
LV
LT
RU
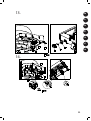
30
29
27
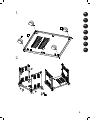
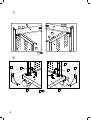
Step 2:
16
B
27
32
A
B
A
Step 3:
1.
2.

6
24
A
32
16
27
A
Step 4:
19
32
16
22
21
A
A
Step 5:
3.
4.

7
EN
FI
SV
ET
LV
LT
RU
A
22
25
27
A
Step 6:
A
A
24
17
25
A
Step 7:
5.
6.

8
A
23
23
A
A
16
32
22
22
Step 8:
A
26 A26
A
27 27
32
7.
8.

9
EN
FI
SV
ET
LV
LT
RU
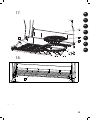
Step 9:
32
16
Step 10:
D
10
D
34
35
D
09
Step 11:
9.
10.
05
••••••••••••••••••••••••••••••••••••••••••••••••
••••••••••••••••
¡Á
••••
Step 12:
Step 13:

10
05
••••••••••••••••••••••••••••••••••••••••••••••••
••••••••••••••••
¡Á
••••
Step 12:
Step 13:
11.
12.
05
••••••••••••••••••••••••••••••••••••••••••••••••
••••••••••••••••
¡Á
••••
Step 12:
Step 13:
05
••••••••••••••••••••••••••••••••••••••••••••••••
••••••••••••••••
¡Á
••••
Step 12:
Step 13:
35
A

11
EN
FI
SV
ET
LV
LT
RU
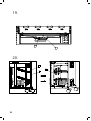
D
13
15
11
D
D
Step14:
D
13
12
D
Step15:
13.
14.

12
14
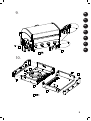
Step 16:
15.
16.

13
EN
FI
SV
ET
LV
LT
RU
Step17:
Step18:
03
Step 19:
17.
18.

14
18
20
Step20:
31
32
17
Step21:
19.
20.

15
EN
FI
SV
ET
LV
LT
RU
Step22:
Step23:
21.
22.

16
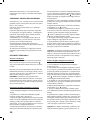
Congratulations on choosing your Mustang prod-
uct! The Mustang family of barbecuing products
was designed for cooking good food. Our line
includes a wide range of barbecuing and cooking
products. Go to www.mustang-grill.com or your
nearest licensed Mustang retailer to nd out more
about our selection of products!
We are continually developing the Mustang line and
other products it has to oer. Feedback from users
plays an important role in our product develop-
ment for quality assurance. We are always happy to
receive any feedback on our products at mustang@
mustang-grill.com.
This product was designed for ease and prob-
lem-free use. Please carefully go over the user
instructions so you will get the most out of your
grill. With careful, regular cleaning and maintenance
of your grill, you will prolong its life and safety. The
Mustang line of products also oers proper clean-
ing products and tools for its care.
For more information, go to: www.mustang-grill.
com.
Contact information on Mustang maintenance ser-
vices is available at www.mustang-grill.com.
DANGER:
If you smell gas:
1. Shut o gas supply to the appliance.
2. Extinguish any open ames, and avoid using any
electrical appliance.
3. Open the lid and ventilate the area.
4. Check the gas connections with a soap solution.
5. If the odour still exists, immediately contact your
gas supplier or re department
IMPORTANT:
Hazardous re or explosion may result if these in-
structions are ignored.
It is the user’s responsibility to ensure that the
barbecue is properly assembled, installed, and
maintained. Failure to follow the instructions in this
manual could result in serious bodily injury and/or
property damage.
Any modication or misuse of the appliance and
failure to follow the instructions may be dangerous.
WARNING:
The accessible parts may be very hot. Keep young
children away.
This appliance must be kept away from ammable
materials during use.
Please keep this manual for future reference.
TECHNICAL INFORMATION:
APPLIANCE CODE: ............................................ GD4843S-AA (601732)
TOTAL HEAT INPUT
(ALL GAS CATEGORIES): ......................................... 17.2 kW (1253 g/h)
GAS CATEGORY: ...........................................................................I3B/P(30)
TYPES OF GAS: ....G30 (Butane), G31 (Propane) or their mixtures
GAS PRESSURE: ........................................................................ 28-30 mbar
INJECTOR SIZE: .................................................Main burners: 0.91 mm
...................................................................................Side burner: 0.86 mm
USE OUTDOORS ONLY. READ THE INSTRUCTIONS BEFORE
USING THE APPLIANCE.
WARNING: ACCESSIBLE PARTS MAY BE VERY HOT. KEEP YOUNG
CHILDREN AWAY.
IMPORTANT:
Read the following instructions carefully and ensure
that your barbecue is properly installed, assembled,
and maintained. Failure to follow these instructions
may result in serious bodily injury and/or property
damage.
If you have any questions concerning the assembly
or operation of the barbecue, consult your retailer.
Make sure that the barbecue and gas cylinder are
on at, level ground when using the appliance.
Never light the appliance with the lid in the closed
position.
Never attempt to light or use the side burner with
the lid in the closed position as a hazardous con-
dition could arise and damage can occur to the
appliance.
The low pressure regulator and gas hose must be of
a type approved by the country of use.
If these parts need to be replaced, contact your
customer service or retailer.
Using unauthorised parts in the barbecue can cause
a dangerous situation and unsafe environment of
use.
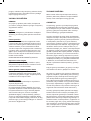
NOTE FOR CONSUMER: Retain the instructions for
future reference.
SAFETY INSTRUCTIONS
Leak test all of the connections according to the
instructions after each tank is relled or the rst use
after a long period.
Never use an gas tank with a damaged body, valve,
collar, or footing.
Do not store an gas tank under the barbecue when
using the appliance.
The use of alcohol or prescription/non-prescription
drugs may impair the ability to properly assemble
or safely operate the appliance.
Never use charcoal, lighter uid, lava rocks, gasoline,
EN

17
kerosene, or alcohol within this barbecue.
Do not store or use gasoline or other ammable
liquids or vapours within 25 feet (7.6 m) of this
appliance.
Minimum clearance from the sides and back of the
unit to combustible construction is 3 feet (1 m). Do
not use the appliance under an overhead combusti-
ble surface.
Do not use the barbecue unless it is completely
assembled and all of the parts are securely fastened
and tightened.
The barbecue should be thoroughly cleaned and
inspected on a regular basis. Clean and inspect the
gas hose before each use of the appliance. If there
is evidence of abrasion, wear, cuts, or leaks, the
hose must be replaced prior to the appliance being
operated.
Only use parts that are authorised by the manufac-
turer. The use of unauthorised parts is dangerous.
This may also void your warranty.
When cooking, re extinguishing materials should
be located nearby. In the event of an oil/grease re,
do not attempt to extinguish it with water. Use a
chemical re extinguisher or smother it with dirt/
sand or re blanket.
Operate the appliance on solid ground only, do not
install or use it in/on boats or recreational vehicles.
Do not leave a lit barbecue unattended. Keep
children and animals away from the barbecue at all
times.
Do not move the appliance during use.
Always open the barbecue lid carefully and slowly
as the heat and steam trapped within the barbecue
can severely burn you.
Move gas hoses as far away as possible from hot
surfaces and dripping hot grease.
Keep all electrical cords away from a hot barbecue.
Turn o the gas supply at the gas cylinder after use.
Never cover the entire cooking area.
Never obstruct the ventilation openings of the con-
tainer compartment.
Wear protective gloves when handling the hot
components.
HOSE AND REGULATOR
These items are not included with the barbecue.
Only use hose and regulators approved for gas at
the above pressures. The estimated life expectancy
of the regulator is 10 years. Change the regulator
within 10 years of the date of manufacture.
The use of the wrong hose or regulator is unsafe;
always check that you have the correct items before
operating the barbecue.
The hose used must conform to the relevant stan-
dard for the country of use. The length of the hose
must be 1.2 metres (maximum) and the inner
diameter 10 mm. A worn or damaged hose must be
replaced. Ensure that the hose is not bent, clogged,
or in contact with any part of the barbecue other
than at its connection.
STORAGE OF THE BARBECUE
Storing the appliance indoors is only permissible if
the gas cylinder is disconnected and removed from
the appliance. When the appliance is not to be used
for a long period of time, it should be placed in its
original packaging and stored in a dry, dust free
environment.
GAS CYLINDER
Use a 5 kg – 11 kg gas cylinder. Gas cylinder height
could not exceed 60 cm. The gas cylinder should
not be dropped or handled roughly! If the barbecue
is not in use, the cylinder must be disconnected
from the appliance. Place the protective cap on the
cylinder after disconnecting the cylinder from the
appliance.
The cylinder must be stored outdoors in an upright
position and out of the reach of children. The cylin-
der must never be stored in an environment where
temperatures can reach over 50°C. Do not store
the cylinder near ames, ignition ames, or other
sources of ignition.
DO NOT SMOKE NEAR THE GAS CYLINDER.
This barbecue is designed for use outdoors, away
from any ammable materials. It is important that
there are no overhead obstructions and that there
is a minimum distance of 1 m from the side or rear
of the appliance. It is important that the ventilation
openings of the barbecue are not obstructed. The
barbecue must be used on a level, stable surface.
The appliance should be protected from direct
airow and shall be positioned or protected against
direct penetration by any trickling water (e.g. rain).
No modications should be made to any part of this
barbecue and repairs and maintenance should only
be carried out by a registered gas service company.
CONNECTING THE GAS CYLINDER TO THE
BARBECUE
Before connection, ensure that there is no debris or
dirt caught in the head of the gas cylinder, regula-
tor, burner, and burner ports. Spiders and insects
can nest within and clog the burner and its inlet.
A clogged burner can lead to a re beneath the
barbecue.
Clean burner holes with a heavy-duty pipe cleaner.
Fit the hose to the appliance using a spanner to
EN

18
tighten it onto the connection thread. If the hose is
replaced, it must be secured to the barbecue and
regulator connections with hose clips. Disconnect
the regulator from the cylinder according to the
directions when the barbecue is not in use.
The Barbecue must be operated in a well-ventilated
area. Do not obstruct the ow of combustion air to
the burner when the barbecue is in use. ONLY USE
THIS BARBECUE OUTDOORS.
BEFORE USE, CHECK FOR LEAKS IN THE HOSE AND/
OR CONNECTION THREADS.
Never check for leaks with a naked ame, always
use a soapy water solution.
CHECKING FOR LEAKS
Make 2-3 uid ounces (6-9 dl) of leak detecting
solution by mixing one part dishwashing liquid with
3 parts water.
Ensure that the control valve is “OFF”.
Connect the regulator to the gas cylinder and ON/
OFF valve to the burner. Ensure that the connec-
tions are secure and then turn the gas ON.
Brush the soapy solution onto the hose and all
joints. If bubbles appear you have a leak, which
must be rectied before use.
Retest after xing the fault.
Turn the gas OFF at the gas cylinder after testing.
If leakage is detected and cannot be rectied, con-
sult your gas dealer in order to x the leak.
LIGHTING YOUR BARBECUE
First use
Before cooking for the rst time, operate the barbe-
cue for about 15 minutes with the lid closed and the
gas turned on to maximum . This will “heat clean”
the internal parts.
Clean your barbecue after each use. DO NOT use
abrasive or ammable cleaners, as it will damage
the parts of the product and may start a re. Clean
the barbecue with warm soapy water.
WARNING: Accessible parts may be very hot. Keep
children away from the hot barbecue at all times
(even when the appliance is cooling down!). Protec-
tive gloves (e.g. oven gloves) should be used when
handling particularly hot components.
Main burner ignition instruction
1. Open the lid of the barbecue before igniting the
burners.
2. Turn all of the knobs clockwise to the OFF posi-
tion (•).
3. Connect the pressure regulator to the liquid gas
cylinder. Turn the gas supply of the pressure regula-
tor to the ON position. Use soapy water to check for
any gas leaks between the liquid gas cylinder and
the pressure regulator.
4. Push and hold down the knob, and then turn it
counter-clockwise until you feel a spring resistance.
Keep the knob in this position for 3-5 seconds to
allow the gas to ow. Turn it counter-clockwise to
“ ” position. Check if the burner has ignited. If the
burner has not ignited, repeat the process.
5. If the burner still won’t ignite, turn the knob to
the OFF position (•), wait about 5 minutes, and
repeat step 4.
6. Move the knob between the and positions to
adjust the temperature.
7. Ignite the other burners by pushing and holding
each corresponding knob and turning the knobs
counter-clockwise to the position. The ignition
unit between the burners will ignite the burners.
Light the burners in order.
8. If the burner won’t ignite, use a match to ignite
the barbecue from the ignition hole in the side of
the barbecue.
9. Turn the barbecue o by turning the valve of the
liquid gas cylinder or the valve of the pressure reg-
ulator to the OFF position, and then turn the knobs
of the barbecue to the OFF (•) position.
Warning! If the burner won’t ignite, turn the knob
(clockwise) to the OFF position and close the valve
of the liquid gas cylinder. Wait 5 minutes before
trying to ignite the barbecue again by following the
instructions.
Side burner ignition instruction
1. Open the lid of the side burner (if delivered) be-
fore igniting.
2. Push and hold down the side burner knob, and
then turn it counter-clockwise until you feel a
spring resistance. Hold the knob in this position for
3-5 seconds to allow the gas to ow, and then turn
it counter-clockwise to “ ” position. Check if the
burner has ignited. If the burner has not ignited,
repeat the process.
3. If the burner still won’t ignite, turn the knob to
the OFF position (•), wait for about 5 minutes, and
repeat step 2.
4. Adjust the temperature by moving the knob be-
tween the and positions.
5. If the side burner won’t ignite, use a match to ig-
nite it. Contact your gas provider to x the problem.
6. Turn the side burner o by turning the knob
clockwise to the OFF position or, if you have n-
ished using the barbecue, turn the valve of the
liquid gas cylinder or the valve of the pressure regu-

19
lator to the OFF position, and then turn the knob of
the barbecue clockwise to the OFF position.
Warning! If the burner won’t ignite, turn the knob
(clockwise) to the OFF position and close the valve
of the liquid gas cylinder. Wait 5 minutes before
trying to ignite the barbecue again by following the
instructions.
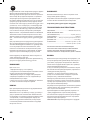
CLEANING AND MAINTENANCE
CAUTION
All cleaning and maintenance should be carried out
when the barbecue is cool and with the fuel supply
turned OFF at the gas cylinder.
Cleaning
“Burning o” the barbecue after every use (for
approx. 15 minutes) will help in cleaning excessive
food residue.
Outside surface
Use mild detergent or a solution of baking soda and
warm water. Non-abrasive scouring powder can be
used on stubborn stains, and then rinse with water.
If the inside surface of the barbecue lid has the
appearance of peeling paint, baked on grease build-
up has turned to carbon and is aking o. Clean
thoroughly with a strong hot soapy water solution.
Rinse with water and allow it to dry completely.
NEVER CLEAN WITH OVEN CLEANER.
Interior of barbecue bottom
Remove residue using a brush, scraper and/or
cleaning pad and then wash with a soapy water
solution. Rinse with water and allow it to dry.
Cast Iron Grate / Cast Iron Griddle
Wash the grate / griddle with hot water by scrub-
bing it with a spatula or a stainless steel sponge.
Lightly smear the surface with cooking oil before
storing the grate.
Cleaning the burner
Turn the gas OFF at the control knob and discon-
nect the gas cylinder.
Remove the cooling grate.
Clean the burner with a soft brush or blow clean
with compressed air and wipe with a cloth.
Clean any clogged ports with a pipe cleaner or sti
wire (such as an opened paper clip).
Inspect the burner for any damage (cracks or holes).
If damage is found, replace with a new burner. Rein-
stall the burner, check to ensure that the gas valve
orices are correctly positioned and secured inside
the burner inlet.
SERVICING
Your gas barbecue should be serviced annually.
Find the maintenance service’s telephone number
on the website mustang-grill.com.
WARRANTY
All Mustang products have been carefully manufac-
tured and quality-tested before leaving the factory.
This barbecue and its parts have a 24-month war-
ranty from the date of purchase. The warranty covers
defects in material and workmanship.
Normal wear and tear, rusting or corrosion of parts is
not covered by the warranty. For example, cracking
of ceramic surfaces, discoloration of steel surfaces
and the occurrence of rust spots are normal during
use and over time and do not aect the use of the
barbecue. Nor does the warranty cover parts that are
subjected to wear and tear or corrosion during use,
such as cast iron and stainless-steel tube burners,
heat distribution plates, cooking grates and griddles,
and warming racks. In the case of self-assembled bar-
becues, the customer must always install and replace
the parts according to the instructions. Failure to
follow these instructions will invalidate the warranty.
Always read through the user instructions carefully
and follow them. Damage or defects resulting from
improper use or neglect of maintenance are not
covered by the warranty.
Nor does the warranty apply if the product is used for
commercial manufacturing, sale or rental purposes.
If a product or part of the product becomes defec-
tive during the warranty period, please contact the
importer or the Mustang Support Service via www.
mustang-grill.com. Before submitting a warranty
claim, please re-read the user instructions thoroughly
to ensure that you have followed them. All warranty
claims will be processed by the importer. A defective
or missing part will be replaced with a new part. The
customer is responsible for installing the defective or
missing part.
The warranty is only valid upon presentation of a
copy of the purchase receipt. The purchase receipt
must include the name of the seller, the make and
model number of the barbecue and the date of pur-
chase. The warranty claim must include the following
information: the make and model number of the bar-
becue, the reason for complaint, the part number of
the defective part according to the parts list, a copy
of the purchase receipt or statement of place of pur-
chase, date of purchase, consumer’s name, telephone
number, street address, postal code and city.
EN

20
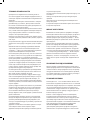
Onnittelut Mustang-tuotteen valinnasta! Mustan-
gin grillaustuoteperhe on suunniteltu hyvän ruoan
valmistamiseen. Tuoteperheeseen kuuluu kattava
valikoima grillaus- ja ruoanlaittotuotteita. Tutustu
koko valikoimaan verkossa www.mustang-grill.com
tai lähimmällä valtuutetulla Mustang-jälleenmyyjäl-
lä.
Kehitämme Mustang-tuoteperhettä ja siihen
kuuluvia tuotteita jatkuvasti. Laadun takaamiseksi
käyttäjiltä saatu palaute on tuotekehityksessämme
erityisen tärkeässä roolissa. Otamme mielellämme
vastaan tuotteisiin liittyvää palautetta osoitteeseen
Tämä tuote on suunniteltu huolettomaan ja ongel-
mattomaan käyttöön vuosiksi eteenpäin. Tutustu
huolella käyttöohjeeseen, jotta saisit laitteesta
parhaan hyödyn. Huolehtimalla grillin säännöllises-
tä puhdistuksesta ja huollosta pidennät sen käyttöi-
kää ja turvallisuutta. Mustang-tuotesarjasta löydät
myös asianmukaiset puhdistusaineet ja harjat grillin
puhdistukseen.
Lisätietoja löydät osoitteesta: www.mustang-grill.com.
Mustang-huoltopalvelun yhteystiedot löydät osoit-
teesta www.mustang-grill.com.
VAARA:
Jos haistat kaasua:
1. Katkaise kaasunsyöttö laitteeseen.
2. Tukahduta mahdollinen avotuli. Älä käytä mitään
sähkölaitteita.
3. Avaa kansi ja tuuleta alue.
4. Tarkista kaasuliitännät saippualiuoksella.
5. Jos haju ei häviä, ota heti yhteyttä kaasuntoimit-
tajaan tai palokuntaan.
TÄRKEÄÄ:
Ohjeen noudattamatta jättäminen voi johtaa vaaral-
liseen tulipaloon tai räjähdykseen.
Käyttäjän vastuulla on varmistaa, että grilli kootaan
ja asennetaan oikein ja että sitä huolletaan asian-
mukaisesti. Tämän käyttöohjeen noudattamatta
jättämisestä saattaa seurata vakavia henkilö- ja/tai
esinevahinkoja.
Laitteeseen tehdyt muutokset sekä sen virheellinen
käyttö ja ohjeiden noudattamatta jättäminen voivat
johtaa vaaratilanteisiin.
VAROITUS:
Osat voivat olla erittäin kuumia. Pidä pienet lapset
etäällä laitteesta.
Laite on pidettävä käytön aikana etäällä herkästi
syttyvistä materiaaleista.
Säilytä tämä käyttöohje myöhempää tarvetta
varten.
TEKNISET TIEDOT:
LAITTEEN KOODI: .............................................. GD4843S-AA (601732)
KOKONAISLÄMPÖTEHO
(KAIKKI KAASULUOKAT): ....................................... 17,2 kW (1253 g/h)
KAASULUOKKA: ............................................................................I3B/P(30)
KAASULAJIT: ... G30 (butaani), G31 (propaani) tai niiden seokset
KAASUNPAINE: ........................................................................28-30 mbar
SUUTTIMEN KOKO: .......................................... Pääpolttimet: 0,91 mm
......................................................................................Sivupoltin: 0,86 mm
VAIN ULKOKÄYTTÖÖN. LUE KÄYTTÖOHJEET ENNEN LAITTEEN
KÄYTTÖÄ.
VAROITUS: GRILLIN KÄSITELTÄVÄT OSAT VOIVAT OLLA HYVIN
KUUMIA. PIDÄ LAPSET POISSA GRILLIN LÄHELTÄ.
TÄRKEÄÄ:
Lue seuraavat ohjeet huolellisesti ja varmista, että
grilli kootaan ja asennetaan asianmukaisesti ja että
sitä huolletaan oikealla tavalla. Jos ohjeita ei nouda-
teta, seurauksena voi olla vakava loukkaantuminen
ja omaisuusvahinkoja.
Jos sinulla on grillin kokoamiseen tai käyttöön liitty-
viä kysymyksiä, ota yhteyttä jälleenmyyjääsi.
Varmista, että grilli ja nestekaasupullo ovat vaaka-
suoralla alustalla käytön aikana.
Grilliä ei saa koskaan sytyttää kannen ollessa kiinni.
Älä koskaan yritä sytyttää tai käyttää sivupoltinta
kannen ollessa kiinni, sillä tämä voi aiheuttaa vaara-
tilanteen ja vahingoittaa grilliä.
Käytä grillissä vain käyttömaassa hyväksyttyjä mata-
lapainesäädintä ja kaasuletkua!
Jos nämä osat on vaihdettava, ota yhteyttä asiakas-
palveluun tai jälleenmyyjääsi.
Hyväksymättömien osien käyttäminen grillissä voi
aiheuttaa vaaratilanteen ja vaarallisen käyttöympä-
ristön.
HUOMAUTUS KULUTTAJALLE: Säilytä ohjeet tulevaa
käyttöä varten.
TURVAOHJEET
Tee kaikille liitoskohdille ohjeiden mukainen vuoto-
testi aina säiliön täyttämisen tai pitkän käyttötauon
jälkeen.
Älä koskaan käytä nestekaasusäiliötä, jos sen seinä-
mät, venttiili, kaulus tai alusta ovat vahingoittuneet.
Älä säilytä nestekaasusäiliötä grillin alla grilliä käy-
tettäessä.
Alkoholin sekä resepti- ja käsikauppalääkkeiden
käyttö voi heikentää käyttäjän kykyä koota laite
oikein tai käyttää sitä turvallisesti.
FI
Sidan laddas...
Sidan laddas...
Sidan laddas...
Sidan laddas...
Sidan laddas...
Sidan laddas...
Sidan laddas...
Sidan laddas...
Sidan laddas...
Sidan laddas...
Sidan laddas...
Sidan laddas...
Sidan laddas...
Sidan laddas...
Sidan laddas...
Sidan laddas...
Sidan laddas...
Sidan laddas...
Sidan laddas...
Sidan laddas...
Sidan laddas...
Sidan laddas...
Sidan laddas...
Sidan laddas...
-
 1
1
-
 2
2
-
 3
3
-
 4
4
-
 5
5
-
 6
6
-
 7
7
-
 8
8
-
 9
9
-
 10
10
-
 11
11
-
 12
12
-
 13
13
-
 14
14
-
 15
15
-
 16
16
-
 17
17
-
 18
18
-
 19
19
-
 20
20
-
 21
21
-
 22
22
-
 23
23
-
 24
24
-
 25
25
-
 26
26
-
 27
27
-
 28
28
-
 29
29
-
 30
30
-
 31
31
-
 32
32
-
 33
33
-
 34
34
-
 35
35
-
 36
36
-
 37
37
-
 38
38
-
 39
39
-
 40
40
-
 41
41
-
 42
42
-
 43
43
-
 44
44


Mustang Gas grill Gourmet 4+1 Blue Bruksanvisning
- Typ
- Bruksanvisning
på andra språk
Relaterade papper
-
Mustang Fire pit Pavilion Bruksanvisning
-
-
-
-
-
-
-
-
-
Andra dokument
-
LANDMANN TRITON 3.0 Gas Barbecue Användarguide
-
LANDMANN 12268 Användarguide
-
Rusta 623514720101-0102 Användarmanual
-
Rusta 623514740101 Användarmanual
-
Barbecook Cebu 4.1 Bruksanvisning
-
-
-
-
Barbecook Banaba Bruksanvisning
-