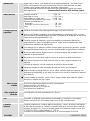
AEG PN 6000 S Bruksanvisning
- Kategori
- Roterande hammare
- Typ
- Bruksanvisning
Denna manual är också lämplig för

GB
D
F
I
E
P
NL
DK
S
FIN
TR
RUS
PNEUMATIC 6000 S
Instructions for use
Please read and save these
instructions.
Gebrauchsanleitung
Bitte lesen und aufbewahren.
Instruction d’utilisation
Prière de lire et de conserver.
Istruzioni d’uso
Si prega di leggere le istruzioni e
di conservarle.
Instrucciones de uso
Lea y conserve estas
instrucciones por favor.
Instruções de serviço
Por favor leia e conserve em seu
poder.
Gebruiksaanwijzing
Lees en let goed op deze
adviezen.
Brugsanvisning
Vær venlight at læse og
opbevare.
Bruksanvisning
Var god läs och tag tillvara dessa
instruktioner.
Käyttöohje
Lue ja säilytö
Kullanøm kølavuzu
Lütfen okuyun ve saklayin

1
ENGLISH
PNEUMATIC 6000 S
You demand the best and buy quality – quality provided by Atlas Copco.
We have built for you a reliable and lasting tool. Working effectively and without
endangering your health is only possible if these instructions for use are being read
carefully before first using this tool. We want to satisfy our customers and would like
you to buy again AEG Electric Power Tools from Atlas Copco.
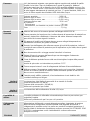
Nominal power 1020 W. . . . . . . . . . . . . . . . . . . .
No-load speed 0–550 min
-1
. . . . . . . . . . . . . . . . . . .
Speed under load max. 0–420 min
-1
. . . . . . . . . . . .
Rate of percussion under
load max. 3130 min
-1
. . . . . . . . . . . . . . . . . . . . . . . .
Drilling capacity in
Concrete 38 mm. . . . . . . . . . . . . . . . . . . . . . . . . .
concrete with core drill 150 mm. . . . . . . . . . . . .
Weight 7,9 kg. . . . . . . . . . . . . . . . . . . . . . . . . . . .
Please note safety instructions on red sheet 4000 3330 24!
Dust that arises when working on material containing asbestos or stonework
containing crystalline silicic acid is harmful to the health. Please follow accident
prevention regulations.
Appliances used at many different locations including open air must be connected
via a current surge preventing switch.
Always wear goggles when using the machine. It is recommended to wear gloves,
sturdy non slipping shoes and apron.
Sawdust and splinters must not be removed while the machine is running.
Do not pierce the motor housing as this could damage the double insulation (use
adhesives).
Always disconnect the plug from the socket before carrying out any work on the
machine.
Only plug-in when machine is switched off.
Keep mains lead clear from working range of the machine. Always lead the cable
away behind you.
Always use the additional handle, even if the machine has a safety clutch since this
safety clutch only engages when the machine blocks with a jerk.
When drilling in walls ceiling, or floor, take care to avoid electric cables and gas or
waterpipes.
Typically the A-weighted noise levels of the tool are:
Sound pressure level = 91 dB (A).
Sound power level = 104 dB (A).
Wear ear protectors!
Typically the weighted acceleration is 5,8 m/s
2
.
The pneumatic hammer can be universally used for hammer drilling and chiselling in
stone.
Do not use this product in another way as stated for normal use.
Connect only to a single-phase AC current supply and only to the mains voltage
specified on the rating plate. Connection to sockets without earth protection is
possible as the appliance features protective insulation to DIN 57 740/ VDE 0740
and CEE 20. Radio suppression complies with the European standard EN 55014.
When fitting the plug, make sure that the brown (live) wire of this appliance is
connected to the plug terminal marked L or coloured red, and the blue (neutral) wire
of this appliance is connected to the plug terminal marked N or coloured black.
Under no circumstances must the wires of this appliance be connected to the earth
terminal of the plug marked either E, with the earth symbol or coloured green or
green/yellow.
Introduction
Technical Data
Advice for your
safety
Measured sound
value
Measured
vibration value
Usage
Mains
connection

2
ENGLISH
PNEUMATIC 6000 S
The impact needed for hammer drilling in stone is created by a pneumatic hammer
striking mechanism. Similar to hitting a common chisel with a hammer, a plunger hits
the axially moving chisel. The electric motor moves the plunger back and forth crank
drive –> piston –> freely moving piston. There is a pneumatic cushion between
piston and freely moving piston (pneumatic hammer mechanism). This results in a
highly effective hammering action.
Exerting greater power does not increase the machine’s effectiveness.
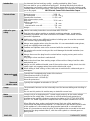
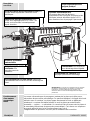
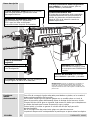
Brief description
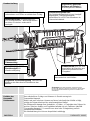
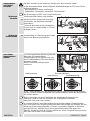
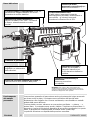
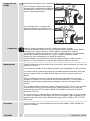
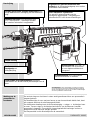
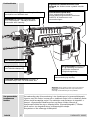
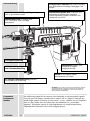
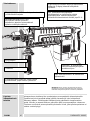
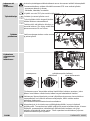
Anti–Vibration–System AVS. The drive
motor is suspended independently of the
switch handle, insulating elements absorb up
to 50 % of the vibration when hammer
drilling.
Built-in safety clutch helps prevent the machine
from rotating if the drill bit jams.
Hammer drilling chuck for bits and
accessories with SDS-max reception –
tools are locked automatically after
insertion.
Fully insulated metal gear box for long durability
and protection from electric shock.
Modifications: Text, diagrams and data are correct at the
time of printing. In the interest of continuous improvement
of our products, technical specifications are subject to
alteration without prior notice.
Ergonomically designed
housing with soft grip.
Adjustable auxiliary
handle with vibration
absorption.
Attachable depth gauge.
Switch trigger for switching the
machine on and off, and for
smooth starting and varying
speed.
Selector lever for switching between
hammer drilling and chiselling.
Function of
rotary pneumatic
hammer

3
ENGLISH
PNEUMATIC 6000 S
Always disconnect the plug from the socket before carrying out any work on the
machine.
The following tools can be inserted in the drill-hammer chuck using the SDS-max
shank:
–Hammer-drill for concrete and brickwork
–Pointed chisel, flat chisel, hollow chisel, tile chisel
–Adapter for geared drill chuck or
Only use accessories with SDS-max shank!
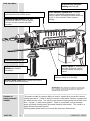
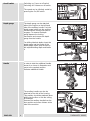
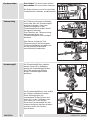
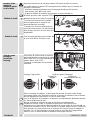
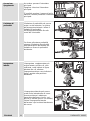
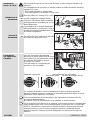
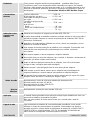
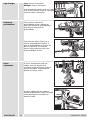
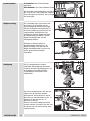
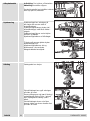
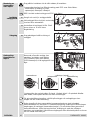
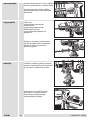
1. Clean and grease the shank of the bit.
2. Push bit into chuck turning it lightly, the
chuck locks the bit in to the chuck
automatically.
3. Check that the bit is properly locked into
place. It must be possible to move it back
and forth.
4. Pull back plastic ring in direction of arrow
and remove bit.
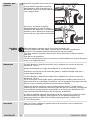
Depending on the inserted tool the machine
can be operated with additional rotation
(SDS–max–drills) or without additional
rotation (SDS–max–chisels). For additional
rotation turn the dial accordingly.
hammer drilling rotary stop (chiselling)
adjusting position spindle locking position
In ”adjusting position” the chisel can be turned by hand to the required angle.
Afterwards lock the spindle with the selector lever while turning the chisel slightly.
To help the lever lock into position twist the inserted bit slightly when switching
gears.
Do not switch when the machine is under load.
During no-load operation the pneumatic hammer mechanism is not yet activated
even if the hammer mechanism is switched on. A safety device suppress the snap
die from idle stroking on the tool used (hammer drill/chisel). To activate the
pneumatic hammer mechanism all you have to do is to firmly push the running
machine against the working material. This unlocks the snap die from the safety
device, and drilling with light pressure is now possible.
Inserting hammer
drill bit or chisel
Inserting tools
Tool removal
Switching
between
hammer drilling,
chiselling
1
2

4
ENGLISH
PNEUMATIC 6000 S
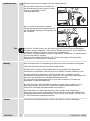
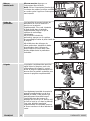
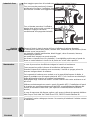
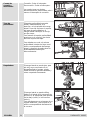
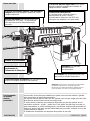
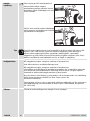
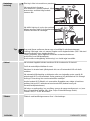
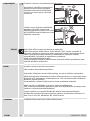
Switching on: Press on-off switch
Switching off: Release on-off switch
The speed can be infinitely varied by
pressing the On-/Off switch.
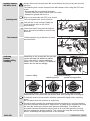
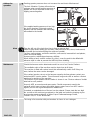
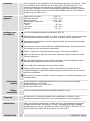
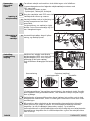
The depth gauge can be attached
either to the right or to the left hand
side of the auxiliary handle. Push the
depth gauge holder into the auxiliary
handle until the locking mechanism
engages. To remove the depth
gauge depress the locking
mechanism and remove the depth
gauge from the handle.
For drilling identical depths insert the
depth gauge into the boring of the
depth gauge holder, push it back by
the required drilling depth and fasten
it.
In order to twist the additional handle
loosen it as shown in illustration and
move to the required position.
Refasten additional handle.
The auxiliary handle can also be
attached to the side of the housing.
This position should be preferred when
drilling into the floor or into the ceiling,
for example.
Remove the auxiliary handle from the
front position and screw it down at the
side of the machine.
On-off switch
Depth gauge
Handle

5
ENGLISH
PNEUMATIC 6000 S
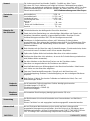
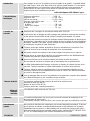
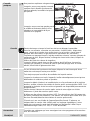
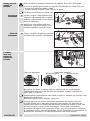
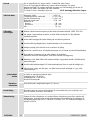
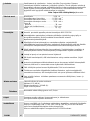
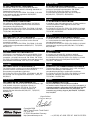
Exerting greater pressure does not increase the machine’s effectiveness!
The Anti–Vibration–System will work at an
optimum when normal working pressure is
applied; the shock absorber is then only
slightly pressed together.
If the applied working pressure is too high,
the shock absorber is strongly pushed
together and the vibrations are noticeably
transmitted to the handle.
Take the drill out of the hole from time to time to remove dust.
Switch to percussion-drilling for concrete, hard bricks and tiles, stone, hard cement,
and marble (but not when drilling the surface of marble).
For tiles, paving-stones, soft bricks and tiles, soft cement, breeze-block and plaster,
switch to normal drilling.
Use percussion carbide tipped masonry drill-bits.
When drilling a hard, smooth surface (e.g. tiles), cover the point to be drilled with
adhesive tape in order to prevent the drill bit tip from skidding.
Should the hammer action deteriorate send it to one of our Service Stations.
The ventilation slots of the machine must be kept clear at all times.
The machine is fitted with carbon brush that automatically switch it off if they are
worn, before the motor can be damaged.
If the carbon brushes cut-out or the hammer capacity declines please contact your
authorized AEG service station. This will ensure long service life as well as constant
readiness for working of the machine.
The location of your neerest service station is shown in our “Service adresses” leaflet
attached to each product.
Use only AEG accessories and spare parts. Should components need to be
replaced which have not been described, please contact one of our AEG service
agents (see our list of guarantee/service addresses).
If needed, an exploded view of the tool can be ordered. Please state the ten–digit
No. as well as the machine type printed on the label and order the drawing at your
local service agents or directly at: Atlas Copco Elektrowerkzeuge GmbH,
Postfach 320, D–71361 Winnenden.
The range of accessories with part numbers is shown in our catalogue.
Advices for
operation
Hints
Maintenance
Accessories

6
DEUTSCH
PNEUMATIC 6000 S
Sie sind anspruchsvoll und kaufen Qualität – Qualität von Atlas Copco.
Wir haben für Sie ein haltbares und möglichst sicheres Elektrowerkzeug gebaut.
Effektives und weitgehend gefahrloses Arbeiten ist aber nur möglich, wenn Sie diese
Gebrauchsanleitung lesen und danach handeln. Wir wollen, daß Sie sich auch in
Zukunft entscheiden für AEG-Elektrowerkzeuge von Atlas Copco.
Nennaufnahme 1020 W. . . . . . . . . . . . . . . . . . .
Leerlaufdrehzahl 0–550 min
-1
. . . . . . . . . . . . . . . . .
Lastdrehzahl max. 0–420 min
-1
. . . . . . . . . . . . . . . .
Lastschlagzahl max. 3130 min
-1
. . . . . . . . . . . . . . .
Bohr-ø in
Beton 38 mm. . . . . . . . . . . . . . . . . . . . . . . . . . . .
Beton mit Hohlbohrkrone 150 mm. . . . . . . . . . .
Gewicht 7,9 kg. . . . . . . . . . . . . . . . . . . . . . . . . . .
Sicherheitshinweise der beiliegenden Broschüre beachten!
Staub der bei der Bearbeitung von asbesthaltigen Materialien und Gestein mit
kristalliner Kieselsäure entsteht, ist gesundheitsschädlich. Beachten Sie die
Unfallverhütungsvorschriften VBG 119 der Berufsgenossenschaft.
Steckdosen in Außenbereichen müssen mit Fehlerstrom-Schutzschaltern
ausgerüstet sein. Das verlangt die Installationsvorschrift für Ihre Elektroanlage. Bitte
beachten Sie das bei der Verwendung unseres Gerätes – sprechen Sie mit Ihrem
Elektroinstallateur.
Beim Arbeiten mit der Maschine stets Schutzbrille tragen. Schutzhandschuhe, festes
und rutschsicheres Schuhwerk und Schürze werden empfohlen.
Späne oder Splitter dürfen bei laufender Maschine nicht entfernt werden.
Gehäuse der Maschine nicht anbohren, da sonst die Schutzisolierung unterbrochen
wird (Klebeschilder verwenden).
Vor allen Arbeiten an der Maschine Stecker aus der Steckdose ziehen.
Maschine nur ausgeschaltet an die Steckdose anschließen.
Anschlußkabel stets vom Wirkungsbereich der Maschine fernhalten. Kabel immer
nach hinten von der Maschine wegführen.
Stets den Zusatzhandgriff verwenden. Dies gilt auch bei Maschinen mit
Sicherheitskupplung, da diese Sicherheitskupplung nur bei ruckartigem Blockieren
anspricht.
Beim Bohren in Wand, Decke oder Fußboden auf elektrische Kabel, Gas- und
Wasserleitungen achten.
Der A-bewertete Geräuschpegel des Gerätes beträgt typischerweise:
Schalldruckpegel = 91 dB (A).
Schalleistungspegel = 104 dB (A).
Gehörschutz tragen!
Die bewertete Beschleunigung beträgt typischerweise 5,8 m/s
2
.
Der Bohrhammer ist universell einsetzbar zum Hammerbohren und Meißeln in
Gestein.
Dieses Gerät darf nur wie angegeben bestimmungsgemäß verwendet werden.
Nur an Einphasen-Wechselstrom und nur an die auf dem Leistungsschild
angegebene Netzspannung anschließen. Anschluß ist auch an Steckdosen ohne
Schutzkontakt möglich, da eine Schutzisolierung nach DIN 57 740/ VDE 0740 bzw.
CEE 20 vorliegt. Die Funkentstörung entspricht der Europanorm EN 55014.
Vorwort
Technische
Daten
Hinweise für
Ihre Sicherheit
Geräusch-
meßwerte
Vibrations-
meßwerte
Verwendung
Netzanschluß

7
DEUTSCH
PNEUMATIC 6000 S
Den erforderlichen Schlag zum Hämmern in Gestein erzeugt ein
Pneumatikschlagwerk.
Ähnlich wie man mit einem Hammer auf einen herkömmlichen Meißel schlägt,
schlägt ein Döpper direkt auf den axial beweglichen Meißel.
Der Elektromotor bewegt über Kurbeltrieb –> Kolben –> Flugkolben den Döpper hin
und her. Zwischen Kolben und Flugkolben befindet sich ein Luftkissen (deshalb
”Pneumatikschlagwerk”). So erreicht man eine hohe Schlagleistung und ein
rückstoßarmes Arbeiten.
Die Arbeitsleistung ist nicht vom Anpreßdruck abhängig.
Kurzbeschreibung
Antivibrationssystem AVS.
Die Getriebe-Motoreinheit ist vom Handgriff
abgekoppelt, Dämpfungselemente
absorbieren bis zu 50% der Vibrationen im
Hammerbohrbetrieb.
Eingebaute Sicherheitskupplung, verhindert ein
Mitdrehen der Maschine bei Verklemmen des
Bohrers.
Hammerbohrfutter für Werkzeuge mit
SDS-max-Aufnahme – Werkzeuge werden
nach dem Einstecken automatisch
verriegelt.
Vollisolierter Metallgetriebekasten für lange
Lebensdauer und Schutz vor elektrischem Schlag.
Änderungen: Text, Bild und Daten entsprechen dem
technischen Stand zur Zeit des Drucktermins. Änderungen
im Sinne der Weiterentwicklung unserer Produkte sind
vorbehalten.
Ergonomisch geformtes
Gehäuse mit Softgrip für
ermüdungsarmes Arbeiten.
Verdrehbarer
Zusatzhandgriff mit
Vibrationsdämpfung.
Aufsteckbarer
Tiefenanschlag.
Schalterdrücker zum Ein- und
Ausschalten der Maschine und
stufenlosem elektronischem
”Gasgeben”.
Schalthebel zum Umschalten zwischen
Hammerbohren und Meißeln.
Funktion des
Pneumatik-
Bohrhammers

8
DEUTSCH
PNEUMATIC 6000 S
Vor allen Arbeiten an der Maschine Stecker aus der Steckdose ziehen.
In das Hammerbohrfutter können folgende Arbeitswerkzeuge mit SDS-max-Schaft
eingesetzt werden:
- Hammerbohrer für Beton und Gestein
- Spitzmeißel, Flachmeißel, Hohlmeißel, Fliesenmeißel
Nur Werkzeuge mit SDS-max-Schaft verwenden!
1. Werkzeugschaft säubern und einfetten.
2. Werkzeug leicht drehend bis Anschlag
einschieben; das Bohrfutter verriegelt
automatisch.
3. Prüfen ob Werkzeug richtig verriegelt ist.
Es muß sich in Längsrichtung ca. 10 mm
bewegen lassen.
4. Kunststoffring in Pfeilrichtung nach hinten
ziehen und Werkzeug entnehmen.
Je nach eingesetztem Werkzeug kann die
Maschine mit zugeschalteter
Drehbewegung (SDS-max-Bohrer) oder
ohne Drehbewegung (SDS-max-Meißel)
betrieben werden.
Hierzu Umschalter entsprechend
verdrehen.
Hammerbohren Drehstop (Meißeln)
Justierstellung Spindelarretierung
In der ”Justierstellung” kann der Meißel von Hand im gewünschten Winkel verdreht
werden. Danach mit dem Schalthebel die Spindel arretieren, dabei den Meißel etwas
hin und her drehen.
Beim Umschalten mit dem Schalthebel das eingesetzte Werkzeug leicht
verdrehen, dadurch wird das Einrasten des Schalthebels erleichtert.
Maschine nicht unter Last schalten.
Im Leerlauf ist das Pneumatikschlagwerk trotz eingeschalteter Hammerfunktion
noch nicht aktiv; eine Fangeinrichtung vermeidet Leerschläge des Döppers auf das
Werkzeug (Hammerbohrer/Meißel). Um das Pneumatikschlagwerk zu aktivieren,
genügt ein kurzer, kräftiger Druck der eingeschalteten Maschine gegen das
Material. Hierbei löst sich der Döpper spürbar aus seiner Fangvorrichtung und man
kann jetzt mit leichtem Druck arbeiten.
Hammerbohrer
oder Meißel
einsetzen
Werkzeuge
einsetzen
Werkzeuge
herausnehmen
Umschalten:
Hammerbohren
Meißeln
1
2

9
DEUTSCH
PNEUMATIC 6000 S
Einschalten: Ein-/Ausschalter drücken
Ausschalten: Ein-/Ausschalter loslassen
Die Drehzahl kann je nach Druck auf den
Schalterdrücker stufenlos verstellt werden.
Der Tiefenanschlag kann wahlweise
rechts oder links am Zusatzhandgriff
angebracht werden. Hierzu den
Tiefenanschlaghalter in den
Zusatzhandgriff einschieben bis die
Verriegelung einrastet.
Zum Entfernen des Tiefenanschlags
Veriegelung drücken und
Tiefenanschlaghalter vom Handgriff
abziehen.
Zum Bohren auf gleiche Tiefe
Tiefenanschlag in die Bohrung des
Tiefenanschlaghalters schieben und
um die gewünschte Bohrtiefe
zurückversetzt festklemmen.
Der Zusatzhandgriff kann verdreht
werden; hierzu wie in Abbildung
gezeigt den Zusatzhandgriff lockern
und in die gewünschte Position
bringen. Zusatzhandgriff wieder
festziehen.
Der Zusatzhandgriff kann auch seitlich
am Gehäuse angebracht werden.
Diese Stellung eignet sich
vorzugsweise für das Bohren nach
unten (z.B. in den Fußboden) oder
nach oben (z.B. in die Decke).
Hierzu den Zusatzhandgriff aus der
vorderen Halterung herausschrauben
und dann seitlich im Gehäuse
einschrauben.
Ein-/Ausschalten
Tiefenanschlag
Zusatzhandgriff

10
DEUTSCH
PNEUMATIC 6000 S
Höherer Anpressdruck steigert nicht die Arbeitsleistung!
Bei normalem Anpressdruck funktioniert
das Antivibrationssystem optimal; hierbei
wird der Faltenbalg nur leicht
zusammengedrückt.
Bei zu hohem Anpressdruck wird der
Faltenbalg stark zusammengedrückt und
die Vibrationen übetragen sich spürbar auf
den Handgriff.
Von Zeit zu Zeit den Bohrer aus der Bohrung ziehen um den Staub zu beseitigen.
Bei Beton, hartem Ziegelstein, Stein, hartem Zement und Marmor auf Schlagbohren
schalten (Anbohren von Marmor jedoch ohne Schlagbohren).
Bei Fliesen, Fußbodenplatten, weichen Ziegelsteinen, Zementkalk, Schlackensteinen
und Putz auf Bohren schalten.
Beim Anbohren glatter Oberflächen (z.B. Fliesen) Bohrstelle mit Klebestreifen
bekleben um ein Abrutschen zu vermeiden.
Beim Nachlassen der Schlagleistung die Maschine dem Kundendienst übergeben.
Stets die Lüftungsschlitze der Maschine sauber halten.
Die Maschine ist mit einer Abschaltkohlebürste ausgerüstet. Bei abgenutzen
Kohlebürsten schaltet das Gerät ab bevor am Kollektor Schaden entstehen kann.
Bei Abschalten der Kohlebürsten oder Nachlassen der Schlagleistung: bitte
autorisierten Wartungsdienst von AEG aufsuchen. Dies erhöht die Lebensdauer der
Maschine und garantiert eine ständige Betriebsbereitschaft.
Die Anschrift eines Wartungsdienstes in Ihrer Nähe entnehmen Sie bitte den
beigefügten Kundendienstadressen.
Nur AEG Zubehör und Ersatzteile verwenden. Bauteile, deren Austausch nicht
beschrieben wurde, bei einer AEG Kundendienststelle auswechseln lassen
(Broschüre Garantie/Kundendienstadressen beachten).
Bei Bedarf kann eine Explosionszeichnung des Gerätes unter Angabe der
Maschinen Type und der zehnstelligen Nummer auf dem Leistungsschild bei Ihrer
Kundendienststelle oder direkt bei Atlas Copco Electric Tools GmbH, Postfach 320,
D–71361 Winnenden angefordert werden.
Das Zubehör mit Bestellnummern ersehen Sie bitte aus unseren Katalogen.
Arbeitshinweise
Tips
Wartung
Zubehör

11
FRANÇAIS
PNEUMATIC 6000 S
Vous exigez ce qu’il y a de meilleur et vous achetez de la qualité – la qualité offerte
par Atlas Copco. Vous vous êtes dotés d’un outil de qualité durable. Ce n’est qu’en
lisant attentivement ces instructions avant d’utiliser l’outil que vous assurerez un
travail efficace et sans risque. Nous tenons à satisfaire notre clientèle et nous
espérons que vous achèterez encore des
outils électriques AEG d’Atlas Copco.
Puissance absorbée 1020 W. . . . . . . . . . . . . . .
Régime à vide 0–550 min
-1
. . . . . . . . . . . . . . . . . . .
Vitesse en charge 0–420 min
-1
. . . . . . . . . . . . . . . .
Perçage à percussion max. 3130 min
-1
. . . . . . . . .
Ø de perçage dans
le béton 38 mm. . . . . . . . . . . . . . . . . . . . . . . . . . .
Béton avec trepan 150 mm. . . . . . . . . . . . . . . . .
Poids 7,9 kg. . . . . . . . . . . . . . . . . . . . . . . . . . . . .
Respecter les consignes de sécurité du feuillet 4000 3330 24!
La poussière qui se dégage lors de l’usinage des matériaux contenant de l’amiante
et des pierres contenant de l’acide silicique cristallin porte atteinte à la santé.
Les prises de courant se trouvant à l’extérieur doivent être équipées de disjoncteurs
de protection, répondant ainsi à la prescription de mise en place de votre installation
électrique. Veuillez, d’une part, en tenir compte lors de l’utilisation de notre appareil
et d’autre part, en parler à votre électricien..
Toujours porter des lunettes protectrices lorsqu’on travaille avec la machine. Des
gants de sécurité et un masque de protection sont recommandés.
Ne jamais enlever les copeaux ni les éclats lorsque la machine est en marche.
Ne pas percer le carter de la machine; ceci pourrait entraîner une détérioration de
l’isolation de protection (utiliser des autocollants).
Avant tous travaux sur la machine extraire la fiche de la prise de courant.
Ne raccorder la machine au réseau que si l’interrupteur est en position arrêt.
Le câble d’alimentation doit toujours se trouver en dehors du champ d’action de la
machine. Toujours maintenir le câble d’alimentation à l’arrière de la machine.
Toujours utiliser la poignée supplémentaire. Ceci est égelement valable pour les
machines munies d’un accouplement de sécurité car celui-ci est actioné seulement
en cas d’un blocage brusque.
Lors du perçage dans les murs, les plafonds ou les planchers, toujours faire attention
aux câbles électriques et aux conduites de gaz et d’eau.
Les mesures réelles (A) des niveaux de bruit de la machine sont:
Intensité de bruit =91 dB (A).
Niveau de bruit = 104 dB (A).
Toujours porter des casques protecteurs!
L’accélération réelle mesurée est 5,8 m/s
2
.
Le marteau performateur est conçu pour un travail universel de martelage et de
burinage dans la maçonnerie.
Comme déjà indiqué, cette machine n’est conçue que pour une utilisation normale.
Nos machines fonctionnent uniquement sur courant alternatif monophasé. S’assurer
que la tension du réseau correspond effectivement à celle indiquée sur la plaque
signalétique de la machine. Le branchement sur une prise de courant sans mise à
terre est possible du fait de la double isolation selon normes DIN 57 740/VDE 0740
et CEE 20. Antiparasitage selon normes européennes EN 55014.
Introduction
Caractéristiques
techniques
Conseils de
sécurité
Mesure de bruit
Valeur de
vibration
mesurée
Utilisation
Branchement
secteur

12
FRANÇAIS
PNEUMATIC 6000 S
La course nécessaire pour le perçage au marteau de la pierre est créée par un
mécanisme de percussion pneumatique. De manière identique à la frappe d’un burin
ordinaire avec un marteau, un piston frappe directement le burin se déplaçant
axialement. Le moteur électrique fait aller et venir le piston par entraînement
inversable ––> piston ––> masselotte. Un coussinet d’air se trouve entre le piston et
la masselotte (mécanisme de percussion pneumatique). Ceci donne une souplesse
de grande efficacité ainsi qu’un fonctionnement sans recul.
L’augmentation de puissance n’accroît pas le rendement de la machine.
Description
succincte
Système antivibration AVS.
Le moteur direct est fixé de façon
indépendante de la poignée de pistolet et les
éléments isolants absorbent jusqu’à 50 %
des vibrations lors du perçage à percussion.
Accouplement de sécurité intégré empêchant
l’entraînement de la machine en cas de blocage du
foret.
Mandrin de perçage à percussion pour
outils avec logement pour SDS–max – les
outils sont verrouillés automatiquement
après insertion.
Boîte de vitesse avant entièrement isolée pour
longue durée et protection contre les chocs
électriques.
Modifications: Les textes, les illustrations et les données
techniques correspondent à la situation au moment de
l’impression. Toutes modifications techniques sont
réservées dans le cadre du développement technique
permanent.
Corps ergonomique avec
poignée pratique
Poignée supplémentaire
orientable avec
amortissement de
vibrations
Butée de profondeur
embrochable
Commutateur marche/arrêt et
pour démarrage doux réglable
Commutateur de sélection entre
perçage à percussion et burinage.
Fonctionnement
d’un marteau
pneumatique
rotatif

13
FRANÇAIS
PNEUMATIC 6000 S
Avant tous travaux sur la machine extraire la fiche de la prise de courant.
Les outils suivants à queue SDS-max peuvent être utilisés avec le mandrin de
perçage à percussion:
- foret pour marteau-perforateur, pour le perçage du béton et de la pierre
- burin pointu, burin plat, burin creux
- Queue de fixation du mandrin de perçage à couronne dentée ou
N’utiliser que des outils à queue SDS-max!
1. Nettoyer la queue de l’outil et la graisser.
2. Pousser l’outil en butée en le faisant
tourner légèrement, le mandrin est
automatiquement verrouillé.
3. S’assurer que l’outil est effectivement
verrouillé correctement. On doit pouvoir le
faire bouger d’environ 10 mm dans le sens
longitudinal.
4. Tirer la bague plastique vers l’arrière dans
le sens de la flèche et retirer l’outil.
En fonction de l’outil monté, la machine
peut travailler avec mouvement de rotation
(foret–max–SDS) ou sans mouvement de
rotation (burin–max–SDS).
Tourner le commutateur sur la position
souhaitée.
Perçage à percussion Arrêt de rotation (Burinage)
Position de Position de
réglage verrouillage de broche
Dans la ”position de réglage”, le burin peut être tourner à la main selon l’angle
nécessaire. Après cela, verrouiller la broche au moyen du sélecteur, tout en faisant
tourner légèrement le burin dans un sens et dans l’autre.
Lors de la sélection de l’opération, le sélecteur s’encliquette plus facilement lorsque
l’on tourne légèrement le foret.
Ne pas actionner le sélecteur lorsque la machine est opérationnelle.
Pendant la marche à vide, le système de percussion n’est pas encore
opérationnel; un dispositif de retenue entrave les coups vides de la bouterolle sur
l’outil (foret à marteau / burin). Afin d’activer le système de percussion, il suffit une
forte pression de courte durée avec la machine en marche contre le matériau à
travailler. Par là, la bouterolle se dégage de façon sensible de ce dispositif de
retenue, puis, on peut travailler en exerçant une légère pression.
Insertion d’une
mèche de
marteau à percer
ou d’un burin
Fixation de l’outil
Retrait de l’outil
Sélection entre
perçage à
percussion,
burinage
1
2

14
FRANÇAIS
PNEUMATIC 6000 S
Mise en marche: Appuyer sur
l’interrupteur Marche/Arrêt
Arrêt: Lâcher l’interrupteur Marche/Arrêt
La vitesse de rotation peut être modifiée
en continu selon l’appui sur l’interrupteur
marche/arrêt.
Il est possible de monter la butée de
profondeur au choix à droite ou à
gauche sur la poignée
supplémentaire. Pour cela, introduire
le porte–butée dans la poignée
supplémentaire jusqu’à ce que le
système de verrouillage
s’encliquette.
Afin d’enlever la butée de
profondeur, appuyer sur le système
de verrouillage et retirer le porte–butée de
la poignée.
Afin d’effectuer des alésages de
même profondeur, introduire la butée
de profondeur dans l’alésage du
porte–butée et la serrer dans cette
position déplacée de la profondeur
souhaitée.
La poignée complémentaire peut être
réglée selon les besoins; pour cela,
conformément à la figure ci–contre,
lâcher la poignée complémentaire et la
tourner dans la position souhaitée, puis
reserrer la poignée complémentaire.
Il est également possible de monter la
poignée supplémentaire sur la face
latérale du carter. Cette position est
particulièrement favorable lorsqu’il
s’agit d’effectuer des travaux de
perçage vers le bas (p. ex. dans le sol)
ou vers le haut (p. ex. dans le plafond).
Pour cela, dévisser la poignée
supplémentaire de sa fixation avant et
la visser ensuite sur la face latérale du
carter.
Mise en
marche/arrêt
Butée de
profondeur
Poignée

15
FRANÇAIS
PNEUMATIC 6000 S
Une pression supérieure n’augmente pas le rendement de travail!
Lorsqu’on exerce une pression normale, le
système d’anti–vibration fonctionne de
manière optimale, le soufflet n’est que très
peu pressé.
Lorsqu’on exerce une trop grande pression,
le soufflet est fortement pressé, et les
vibrations se transmettent de façon
sensible sur la poignée.
Extraire de temps en temps le foret hors du trou et dégager la poussière.
Dans les cas suivants, commuter sur percussion, à savoir: béton, brique dure,
pierre, ciment dur et marbre (par contre et pour ce qui est des avants-trous à
pratiquer dans du marbre, ne pas brancher le mécanisme de percussion)
Commuter sur perçage lorsqu’il s’agit des matériaux suivants: carreaux, plaques de
revêtement de sols, briques tendres, mélange de ciment et de chaux, briques de
scorie et crépis.
Utiliser des forets du carbure de tungstène
Lorsqu’on fait des avants-trous sur des surfaces tout à fait lisses (comme les
carreaux par exemple), il convient de coller le point de perçage avec un ruban
adhésif, afin d’éviter le glissement du foret.
En cas de baisse de la puissance de frappe, déposer la machine auprés d’une
station de service après vente pour révision.
Tenir toujours propre les orifices de ventilation de la partie moteur.
Lorsque les charbons sont usés, l’appareil s’arrête automatiquement, avant qu’une
détérioration du collecteur puisse se produire.
Lorsque les balais (charbon) ne travaillent plus ou si la performance de la machine
diminue, veuillez contacter une station de service après–vente autorisée d’AEG. Ceci
augmente la durée de vie de la machine et garantie une disponibilité permanente de
fonctionnement.
Veuillez trouver l’adresse du service après–vente de votre région sur la liste
d’adresses ci–jointe des services après–vente.
N’utiliser que des pièces et accessoires AEG. Pour des pièces dont l’échange n’est
pas décrit, s’adresser de préférence aux stations de service après-vente AEG (voir
brochure Garantie/Adresses des stations de service après-vente).
Si besoin est, une vue éclatée de l’appareil peut être fournie. S’adresser, en
indiquant bien le numéro à dix chiffres porté sur la plaque signalétique, à votre
station de service après–vente (voir liste jointe) ou directement à Atlas Copco
Elektrowerkzeuge GmbH, B.P. 320, D–71361 Winnenden.
Consulter nos catalogues qui vous renseignent sur notre programme d’accessoires
avec leur référence.
Conseils
pratiques
Conseils
Entretien
Accessoires

16
ITALIANO
PNEUMATIC 6000 S
Lei è decisamente esigente e per questa ragione acquista solo prodotti di qualità.
Qualità che la Atlas Copco è perfettamente in grado di garantirLe. Abbiamo
realizzato proprio per Lei un utensile che sia il più possibile affidabile e sicuro. Ora
tocca a Lei. Perchè anche il Suo lavoro sia sicuro e di ottima qualità, La preghiamo
di voler leggere attentamente le istruzioni per l’uso. E’ nostro desiderio, infatti, che
anche in futuro acquisti utensili elettrici AEG della Atlas Copco.
Potenza assorbita 1020 W. . . . . . . . . . . . . . . . . . . . . . . .
Numero di giri a vuoto 0–550 min
-1
. . . . . . . . . . . . . . . . . . . .
Numero di giri a carico, max. 0–420 min
-1
. . . . . . . . . . . . . .
Colpi percussione max. 3130 min
-1
. . . . . . . . . . . . . . . . . . .
ø Foratura in
Calcestruzzo 38 mm. . . . . . . . . . . . . . . . . . . . . . . . . . . . .
Calcestruzzo, con furatura con punta a corona 150 mm
Peso 7,9 kg. . . . . . . . . . . . . . . . . . . . . . . . . . . . . . . . . . . . .
Attenersi alle norme di sicurezza riportate nell’allegato 4000 3330 24!
Tenere presente che la polvere che si solleva durante la lavorazione di materiali con
amianto, pietra silice cristallizzata, é dannosa alla salute. Attenersi sempre alle
prescrizioni di sicurezza vigenti in materia.
Gli apparecchi mobili usati all’aperto devono essere collegati interponendo un
interruttore di sicurezza per guasti di corrente.
Durante l’uso dell’apparecchio utilizzare sempre gli occhiali di protezione. Inoltre si
consiglia di usare sistemi di protezione per la respirazione e per l’udito, oltre ai guanti
di protezione.
Non rimuovere trucioli o schegge mentre l’utensile è in funzione
Evitare di forare la carcassa dell’utensile per non danneggiare l’isolamento.
(Utilizzare placchette adesive).
Prima di effettuare qualsiasi lavoro sulla macchina togliere la spina dalla presa di
corrente.
Inserire la spina solo con interruttore su posizione ”OFF”.
Tenere sempre lontano il cavo di collegamento dall’area di lavoro dell’attrezzo.
Utilizzare sempre l’impugnatura supplementare anche se la macchina è dotata di
frizione di sicurezza, poichè la frizione si attiva solamente quando la macchina si
blocca con un movimento brusco.
Forando pareti, soffitti o pavimenti, si faccia attenzione ai cavi elettrici e alle
condutture dell’acqua e del gas.
La misurazione A del livello di rumorosità di un utensile è di solito:
Livello di rumorosità = 91 dB (A).
Potenza della rumorosità = 104 dB (A).
Utilizzare le protezioni per l’udito!
La misurazione dell’accellerazione di solito è 5,8 m/s
2
.
Il martello perforatore è utilizzabile universalmente per forare a percussione, per
scalpellare la pietra
Utilizzare il prodotto solo per l’uso per cui è previsto.
Alimentazione dell’utensile: corrente alternata monofase. Importante: la tensione
della rete deve corrispondere a quella riportata sulla targhetta dell’utensile. Il
collegamento é possibile anche con prese non munite di contatto di protezione: é
previsto infatti un isolamento di protezione conforme a norme DIN 57740/VDE 0740
(CEE 20). La schermatura contro i radiodisturbi é conforme alla norma
europea EN 55014.
Premessa
Dati tecnici
Norme di
sicurezza
Livello di
rumorosità
Livello di
vibrazione
Possibilità’ di
utilizzo
Collegamento
alla rete

17
ITALIANO
PNEUMATIC 6000 S
Il meccanismo pnematico di percussione assicura la potenza del colpo necessaria
per forare anche la pietra. Il contropercussore all’interno dell’utensile batte
direttamente sullo scalpello che si muove assialmente, come farebbe un martello
guidato dalla mano dell’uomo.
Il motore elettrico muove, attraverso un meccanismo oscillante ––> pistone ––>
pistone libero, il contropercussore avanti e indietro. Tra pistone e pistone libero è
presente un cuscino d’aria (quindi: dispositivo di percussione pneumatico) In questo
modo, è garantita una notevole qualità di foratura senza contraccolpi.
La potenza di foratura non dipende dalla pressione esercitata.
Breve indicazione
Sistema antivibrazioni AVS.
L’unità motore–ingranaggi è separata
dall’impugnatura; durante il funzionamento a
percussione gli elementi smorzanti
assorbono le vibrazioni fino al 50%.
Frizione di sicurezza integrata per evitare che
l’utensile ruoti in caso di blocco della punta.
Mandrino per punte a martello per
utensili con attacco SDS–max – Gli utensili
si fissano automaticamente una volta
montati.
Carcassa metallica completamente isolata per
garantire una maggiore durata e una sicura
protezione da scosse elettriche.
Modifiche: Testo, figure e dati corrispondono allo
standard tecnico aggiornato all’epoca della stampa. Ci
riserviamo pertanto eventuali modifiche tecniche dovute
all’ulteriore sviluppo dei nostri prodotti.
Carcassa di forma
ergonomica con soft–grip per
lavori senza vibrazioni.
Impugnatura laterale
regolabile con atenuazione
delle vibrazioni
Limitatore di profondità
Interruttore principale a
grilletto per accendere e
spegnere l’utensile e per
un’accelerazione elettronica
continua.
Levetta di commutazione per
selezionare:
foratura a percussione
o scalpellare
Funzionamento
del martello
pneumatico

18
ITALIANO
PNEUMATIC 6000 S
Prima di effettuare qualsiasi lavoro sulla macchina togliere la spina dalla presa di
corrente.
Nel mandrino per punte da martello possono essere inseriti i seguenti utensili con
attacco SDS-max:
- punte da martello per forare il calcestruzzo e la pietra.
- scalpelli a punta, scalpelli piatti, scalpelli per il legno.
Utilizzare solo utensili con gambo SDS-max!
1. Pulire e ingrassare il gambo dell’utensile
2. Inserire l’utensile a fondo, ruotandolo
leggermente; la punta si fisserà
automaticamente.
3. Controllare che l’utensile sia inserito e
bloccato a dovere. L’utensile deve
muoversi di 10 mm circa in senso
longitudinale.
4. Arretrare l’anello in materiale sintetico come
indicato dalla freccia ed estrarre l’utensile.
A seconda dell’utensile la macchina può
funzionare con il movimento rotatorio
azionato (trapano SDS-max) o senza
movimento rotatorio (scalpello SDS-max).
Azionare il corrispondente interuttore.
Forare a percussione Disinserimento rotazione (scalpello)
Posizione di messa a punto Arresto mandrino
Nella posizione di messa a punto, lo scalpello può essere ruotato manualmente sino
a raggiungere l’angolo desiderato. In seguito, arrestare il mandrino agendo sulla
levetta; si ruoti leggermente avanti e indietro la punta a scalpello.
Affinché la leva di commutazione si fissi in posizione più facilmente, ruotare
leggermente l’utensile.
Non usare la leva, quando l’apparecchio è sotto carico.
Durante il funzionamento se non si esercita una pressione minima, il meccanismo
del martello pneumatico non viene ancora attivato anche se il meccanismo è
inserito. Un dispositivo di sicurezza scongiura rotture improvvise durante l’uso
dell’utensile (trapano perforatore/scalpello). Per attivare il meccanismo del martello
pneumatico bisogna esercitare una lieve pressione sulla macchina contro il
materiale su cui sta lavorando. La frizione di sicurezza garantisce tramite la
leggera pressione esercitata sul martello un funzionamento senza rotture.
Inserire le punte
per forare a
martello o le
punte da
scalpello
Installazione
dell’utensile
Rimozione
dell’utensile
Variazione:
forare a
percussione
scalpellare
1
2

19
ITALIANO
PNEUMATIC 6000 S
Accendere: premere l’interruttore
principale
Spegnere: rilasciare l’interruttore
principale.
E’ possibile regolare il numero di giri in
maniera continua premendo l’interruttore
principale.
Il limitatore di profondità puó essere
usato a scelta a destra o a sinistra
dell’impugnatura laterale. Infilare il
limitatore di profondità
nell’impugnatura laterale fino allo
scatto del chiavistello.
Per forare alla stessa profondità
spingere il limitatore di profondità
nelle perforazione dell’arresto del
limitatore e fissare la profondità
desiderata.
L’impugnatura supplementate può
essere ruotata, per lfare ciò, sarà
sufficiente, come indicato in figura,
allentare fare ciò, allentare
l’impugnatura stessa come indicato in
figura e portala nella posizione
desiderata.
L’impugnatura laterale può essere
usata anche lateralmente all cassa.
Questa posizione è adatta per
trapanature dal basso (per es. nel
terreno) o dall’alto (per es. sul soffitto).
Svitare l’impugnatura laterale
dall’arresto e poi avvitare lateralmente
alla cassa.
Accensione–
Spegnimento
Limitatore di
profondità
Impugnatura
laterale
Sidan laddas...
Sidan laddas...
Sidan laddas...
Sidan laddas...
Sidan laddas...
Sidan laddas...
Sidan laddas...
Sidan laddas...
Sidan laddas...
Sidan laddas...
Sidan laddas...
Sidan laddas...
Sidan laddas...
Sidan laddas...
Sidan laddas...
Sidan laddas...
Sidan laddas...
Sidan laddas...
Sidan laddas...
Sidan laddas...
Sidan laddas...
Sidan laddas...
Sidan laddas...
Sidan laddas...
Sidan laddas...
Sidan laddas...
Sidan laddas...
Sidan laddas...
Sidan laddas...
Sidan laddas...
Sidan laddas...
Sidan laddas...
-
 1
1
-
 2
2
-
 3
3
-
 4
4
-
 5
5
-
 6
6
-
 7
7
-
 8
8
-
 9
9
-
 10
10
-
 11
11
-
 12
12
-
 13
13
-
 14
14
-
 15
15
-
 16
16
-
 17
17
-
 18
18
-
 19
19
-
 20
20
-
 21
21
-
 22
22
-
 23
23
-
 24
24
-
 25
25
-
 26
26
-
 27
27
-
 28
28
-
 29
29
-
 30
30
-
 31
31
-
 32
32
-
 33
33
-
 34
34
-
 35
35
-
 36
36
-
 37
37
-
 38
38
-
 39
39
-
 40
40
-
 41
41
-
 42
42
-
 43
43
-
 44
44
-
 45
45
-
 46
46
-
 47
47
-
 48
48
-
 49
49
-
 50
50
-
 51
51
-
 52
52


AEG PN 6000 S Bruksanvisning
- Kategori
- Roterande hammare
- Typ
- Bruksanvisning
- Denna manual är också lämplig för
på andra språk
- italiano: AEG PN 6000 S Manuale del proprietario
- eesti: AEG PN 6000 S Omaniku manuaal
- español: AEG PN 6000 S El manual del propietario
- português: AEG PN 6000 S Manual do proprietário
- français: AEG PN 6000 S Le manuel du propriétaire
- dansk: AEG PN 6000 S Brugervejledning
- Nederlands: AEG PN 6000 S de handleiding
Relaterade papper
Andra dokument
-
Ryobi ERH710RS Användarmanual
-
-
Flex CHE 5-40 SDS-max Användarmanual
-
Makita HR5001C Användarmanual
-
KINZO 25C125 Bruksanvisning
-
-
Kress MBH 2002 Bruksanvisning
-
-
-
DeWalt D25304K Bruksanvisning