
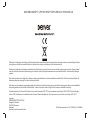
Before connecting, operating or adjusting this product,
facebook.com/denverelectronics
please read this user's manual carefully and completely.
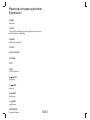
USER'S MANUAL
LED-1031
PORTABLE TV

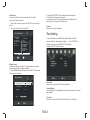
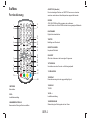
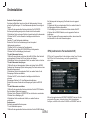
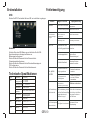
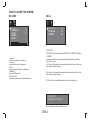
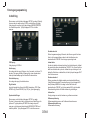
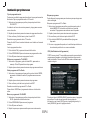
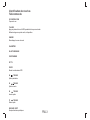
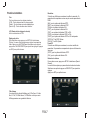
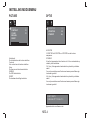
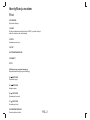
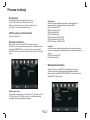
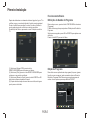
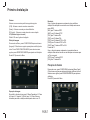
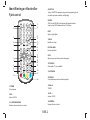
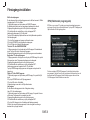
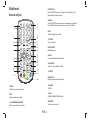
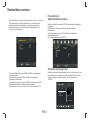
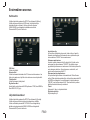
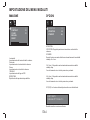
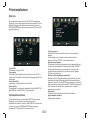
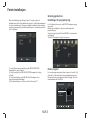
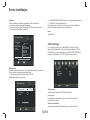
AV OUT COAXIAL OFF ON
DC IN
9-12V
HDMI ANT.
1
2
3
4
5
6
7
8
9
10
11
12
13
14
15
1.SETUP
2.ENTER
3.EXIT
4.UP
5. DOWN
6.LEFT/VOL-
7. RIGHT/VOL+
8.AV OUT
9.COAXIAL
10.Earphone Socket
11.ON/OFF
12.DC IN 9-12V
13. ANT.
14. HDMI
15.USB
Identification of Controls
Main Unit
ENG-1
Model No. ______________________________
Serial No. ______________________________
Date of Purchase_________________________

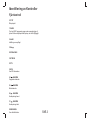
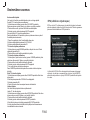
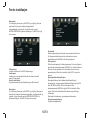
Identification of Controls
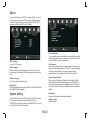
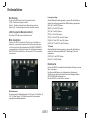
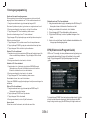
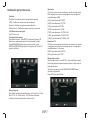
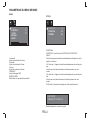
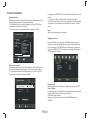
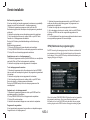
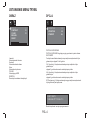
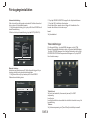
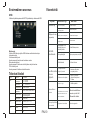
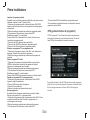
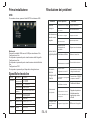
Remote control unit
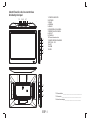
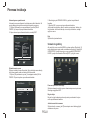
1.POWER
On/off the power supply
2.VOL -
Adjust VOLUME.
3.0-9 NUMBER BUTTON
Selects numbered items in a menu.
4.SUBTITLE
Press SUBTITLE repeatedly during playback to viwe a different
subtitle languages , if avilable.
5.ZOOM
JPEG: Use ZOOM to enlarge or shrink the picture.
Each press of the ZOOM button change the TV screen
6.REC
Record digital service.
7.ENTER
Confirm and Enter
8.
SETUP
Main Menu/Return
9.FAV
Open Favorite Programs List Menu
10.TV/RADIAO
Switch between TV and Radio source
11.EXIT
12.DISPLAY
Display the information of the current signal
13.SOURCE
DVD/USB
14.VOL +
Adjust VOLUME.
15.REPEAT
Repeat Play mp3 and video
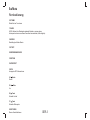
12
3
4
5
6
7
8
90
ENTER
SOURCE
MODE
MUTE
REPEAT
FAV
TV/RADIO
EXIT
VOL- VOL+
POWER
REC
TTX EPG
ZOOM
1
2
3
4
6
7
8
9
10
11
12
13
14
16
15
19
18
17
20
21
22
24
25
23
26
27
28
5
ENG-2

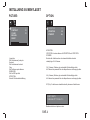
Identification of Controls
Remote control unit
16.MUTE
Mute the sound
17.AUDIO
Press AUDIO repeatedly during playback to hear a different audio
language or audio track, if avilable.
18.MODE
Mode menu setting
19.STOP
20.PLAY/PAUSE
21.RETURN
22.TTX
23.EPG
Show EPG information
24.
BUTTON
Previous option.
25.
BUTTON
Next option.
26. BUTTON
Fast forward
27.
BUTTON
Fast backward
28. RED/GREEN
Some specific function
ENG-3

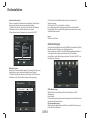
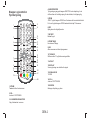
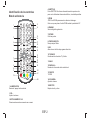
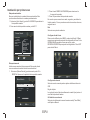
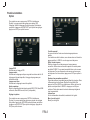
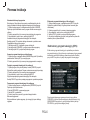
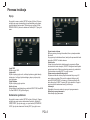
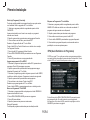
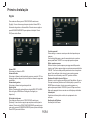
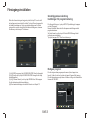
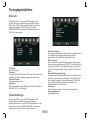
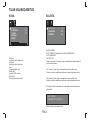
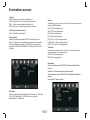
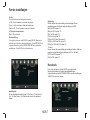
PICTURE
OPTION
STANDBY
This function makes it possible to automatically put the device into
standby mode 3 or 4 hours.
3 H (3 hours): The device will automatically go into standby mode after
3 hours have passed from the time that any button was pressed.
4 H (4 hours): The device will automatically go into standby mode after
4 hours have passed from the time that any button was pressed.
OFF (Off): The automatic standby function will be deactivated.
Brightness
Set the brightness of the screen.
Contrast
Set the Contrast of the screen.
Color
Set the colours of the screen.
ENGLISH
Set the OSD Language
RESET
Reset to default setting.
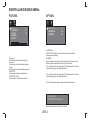
MODE MENU SETTING
HPOSITION
VPOSITION :Adjust screen hposition and vposition
PHVT-1008T2
15050524-CPT 151024-V1.0
Machine model and soft version
HPOSITION 50
VPOSITION 50
STANDBY 4H
10
10
10
BRIGHT
CONTRAST
COLOR
ENGLISH
RESET
ENG-4

Basic OperationFirst Time Installation
After all connections have been made properly, switch on TV and
make sure the receiver is connected to the Main Power. Press Power
button to switch receiver on. If you are using the receiver for the first
time or restored to Factory Default, the Main Menu will appear on
your TV screen.
(1) Select [OSD Language] and press RIGHT/LEFT key to select an
language.
(2) Select [Country] and press RIGHT/LEFT key to select your
country of residence.
(3) Select [Channel Search] and press RIGHT or OK key to begin
Automatic channel search.
(4) Once channel tuning is complete, you are now ready to watch TV.
To access the Menu, press the SETUP button and select [Program].
The Menu provides options to adjust theProgram Manage Settings.
Select an option and press OK or RIGHT to adjust that setting.
Press the EXIT button to exit the Menu.
To edit your program preferences (lock, skip, favourite, move or
delete), you will need to enter the Program Edit Menu. This Menu
requires a password to access. Enter the default password '000000'.
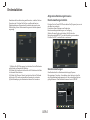
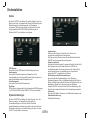
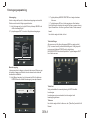
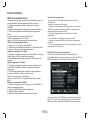
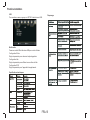
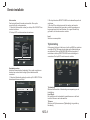
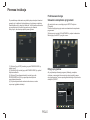
Program Edit
Program Edit
ALL TV
< >
018 The HITS
019 UKTV Br’tideas
021 TMF
022 Ideal World
01:00.01:00
17:00-19:00 StarDate
Rename
GOTO
Lock DeleteSkip FAVMove
FAV
Program Manage Settings
ENG-5

Set Favourite Program/s
You can create a shortlist of favourite programs that you can easily
access.Set Favourite TV or Radio program:
1.Select the preferred program then press the PAVOURITE button.
A heart-shaped symbol will appear and the program is marked as a
favourite.
2.Repeat the previous step to select more Favourite programs.
3.To confirm and exit the Menu,press the EXIT key.
Disable Favourite TV or Radio Program:
Press the FAV buton on the Remote Control with the heart-shaped
symbol.
View Favourite Programs:
1.Press the Fav button and the Favourite Menu will appear.
2.Press UP/DOWN to selest your Favourite Programs.
3.Press OK to select your favourite program.
Delete a TV or Radio Program/s
1.Select the Program and then press the BLUE button A message
will appear.Press OK to delete the program.
2.Repeat the previous step to select more programs to delete.
Skip TV or Radio Program/s
1.Select the program you would like to skip and press the GREEN
button A skip symbol is displayed. The program is marked as a
skip.
2.Repeat the previous step to select more programs.
3.To confirm and exit themenu,press EXIT key.
Disable a skip TV or Radio Program:
Press the GREEN button on the skip program with the skip symbol.
Move a TV or Radio Program/s
1. Select the preferred program then press the RED button. A
move symbolwill appear.
2. Press UP/DOWN to move the program.
3. Press OK to confirm.
4. Repeat the above steps to move more channels .
Lock Program/s
You can lock selected programs for restricted view.
Lock a TV or Radio Program:
1.Select the preferred program then press the YELLOW button. A
lock-shaped symbol is displayed. The program is now marked as
locked.
2. Repeat the previous step to select more programs .
3. To confirm and exit the menu, press the EXIT button.
4. Press the YELLOW button to disable the locked program.
5. To view the locked program, you will be require to enter either
the default.
First Time Installation
EPG (Electronic program guide)
The EPG is an on-screen TV guide that shows scheduled programs
seven days in advance for every tuned channel. Press the EPG
button on the Remote Control to access guide.
You can use the UP/DOWN key to select the preferred program. If
there is more than one page of information, use the BLUE button
for page up and the YELLOW button for page down.
ENG-6

Sort
Video Setting
Channel Search
LCN (Logical channel number)
Sort your channels from the following options:
[LCN] - Sort the channels in ascending order.
[Name] - Sort the channels in alphabetical order.
[Service ID] - Sort the channels according to the station.
To access the Menu, press SETUP then select [Picture]. The Menu
provides options to adjust the video settings. Press UP/DOWN to
select an option and press RIGHT/LEFT to adjust that setting. Press
EXIT to exit the menu.
To access the menu, press SETUP and select [Search Channel].
The Menu provides options to adjust the Search Channel settings.
Select an option and press RIGHT/LEFT to adjust the settings.
Press EXIT to exit the Menu.
Set LCN on or off.
Aspect Ratio
You must set the display format to either 4:3 PanScan, 4:3
Letter Box,4:3 Full, 16:9 Wide Screen , 16:9 PillarBox or Auto to
get the maximum display when watching TV.
Resolution
If the video does not appear correctly, change the setting. This setting
is to match the most common setting for HDMI.
[480i] for NTSC system TV.
[480P]: for NTSC system TV.
[576i] for PAL system TV.
[576P]: for PAL system TV.
[720P]: for NTSC or PAL system TV.
[1080I]: for NTSC or PAL system TV.
[1080P]: for NTSC or PAL system TV.
TV format
If the video does not appear correctly, you need to change the
settings. This should match the most common setting for TVs in your
country.
[NTSC]: for NTSC system TV.
[PAL]: for PAL system TV.
ENG-7

Auto Search
Search and install all channels automatically. This option
overwrites all preset channels.
1. Select [Auto Search] and press OK or RIGHT to start channel
search.
2. To cancel channel search, press EXIT.
2. Press the RIGHT/LEFT key to select the channel frequency.
3. Press OK to start searching channels.
If a channel is found, it is saved and added to the channels list. If
channels cant be found, then exit the menu.
Country
Select your country of residence.
Manual Search
Install new channels manually. This option adds new channels
without changing the current channels list.
1. Select [Manual Search] then press OK or RIGHT. The channel
search screen will appear.
To access the Menu,press MENU then select [Time]. The Menu
provides options to adjust the time settings.
elect an option and press RIGHT/LEFT to adjust the
settings.Press EXIT to exit the menu.
Time Setting
Press UP/DOWN to
s
Time offset
Country Region
Country Region is set automatically when you set the country at channel
Select auto or manual for GMT offset adjustments.
Time Zone
Select the Time Zone Offset when [Time Offset] is set to Manual.
search menu.
001 Ideal World
001 Q
002 Magic
003 The Hits Radio
004 BBC World Sv.
005 oneword
006 JAZZFM
007 Kerrang!
008 Smash Hits!
009 Kiss
002 UKTV Br’ildeas
003 TMF
004 The HITS
Channel Search
Manual Search
Progress
818.0MHz/8MHZ
DTV:004 Radio: 009
SkipExit
EXIT
MENU
Quality
Frequency channel 21
Frequency(MHZ) 474.0
Bandwidth: 8M
ENG-8

Option
To access the Menu,press SETUP and select [Option]. The menu
provides options to adjust the OSD Language, Subtitle Language
and Audio Language. Select an option and press RIGHT/LEFT to
adjust the setting.Press EXIT to exit The Menu.
System Setting
To access the Menu,press SETUP and select [System].The menu.
Provides options to adjust the system settings. Press the
UP/DOWN key to select an option and press RIGHT/LEFT to adjust
the setting.Press EXIT to exit the Menu.
OSD Language
Audio Language
Select the preferred audio language for watching TV channels.If
the language is not available, the default program language will be
used.
Subtitle Language
Select an OSD language.
Select the preferred subtitle language.
Set Password
Restore Factory Default
Information
View model, hardware and software information.
Set or change the password for Locked programs. Enter your old
You can restrict access to channels that are unsuitable for children.
To restrict/lock the channel you will need to enter either the default
password '000000' or your own password.
Password or the default password '000000'. You will then be asked
to enter your new password. To confirm re-enter your new
password. Once it is confirmed, press EXIT to exit the Menu.
Reset your Set Top Box to the Default Factory Settings.In Main
Menu select [Restore Factory Default] and press OK or RIGHT to
select. Enter your password or the default password '000000' and
press OK to confirm. This option will delete all preset channels and
settings.
Software update
Software update
Parental Guidance
Digital Audio
Set the desired audio format at the HDMI slot: PCM, Raw HDIM On,
Raw HDMI Off, Off (if available).
ENG-9

USB
To access the Menu, press the SETUP button and select USB.
Multi-Media
Switch to USB mode and plug in USB to view files.
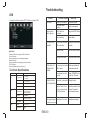
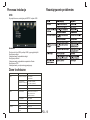
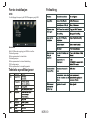
Troubleshooting
The image stopped
suddenly or mosaic
Problem Potential Reasons What to do
No picture
Power isn't connected
Connect the power
The power switch
is not on
Switch on the power
Screen shows
No Signal
DVB-T cable not
Plug in the DVB-T cable
Incorrect setting
Reset setting
No sound from
speaker
No or incorrect
connection
with audio cable
Connect the audio
correctly
Sound on mute
Turn off mute function
Incorrect sound track Try another sound track
Only sound, no
image on the
screen
No or incorrect connection
with AV cable
Make sure cables
connected correctly
The program is a radio
program
Press <TV/RADIO> key
shift into TV mode
Remote Control
is not responding
The battery is exhausted
Change battery
Remote Control is not
facing or close enough
to the Set Top Box
Adjust the position
Remote Control and
closer to the unit
The signal is too weak
Strengthen the signal
cable
are
to
of the
move
connected
Technical Specifications
Video
Decoder Format
MPEG4 AVC/H.264 HP@L4
MPEG2 MP@ML.HL
Output Port
CVBS,HDMI
Audio
Decoder Format
MPEG-1 (layer1&2 )&3
Audio output
Stereo
Power
Voltage
DC 9V (1.5 A)
Working Power
10W
Item Sub Item Parameter
Tuner
Input Frequency
170~230MHz
470~860MHz
RF Input level
-25~-80dBm (64QAM)
-10~-75dBm (256QAM)
IF Bandwidth
7MHz and 8MHz
Modulation
QPSK,16QAM,64QAM,256QAM
HEVC/H.265 HT@L4
Photo Configure
Set the parameters for viewing photographs.
Movie Configure
Set the parameters for displaying movie subtitles.
PVR Configure
Set the parameters for record device.
ENG-10

Electric and electronic equipment and included batteries contains materials, components and substances that chan be hazardous to
your health and the environment, if the waste material (discarded electric and electronic equipment and batteries) is not handled correctly.
Electric and electronic equipment and batteries is marked with the crossed out trash can symbol, seen below. This symbol signifies that electric
and electronic equipment and batteries should not be disposed of with other household waste, but should be disposed of separately.
As the end user it is important that you submit your used batteries to the approriate and designated facility. In this manner you make sure
that the batteries are recycled in accordance with legislature and will not harm the environment.
All cities have established collection points, where electric and electronic equipment and batteries can either be submitted free of charge at recycling
stations and other collection sites, or be collected from the households. Additional information is available at the technical department of
your city.
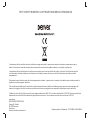
Hereby, Inter Sales A/S declares that the radio equipment type LED-1031 is in compliance with Directive 2014/53/EU. The full text of the EU declaration
of conformity is available at the following internet address: http://www.denver-electronics.com/denver-LED-1031/
Imported by:
DENVER ELECTRONICS A/S
Omega 5A, Soeften
DK-8382 Hinnerup
Denmark
facebook.com/denverelectronics
Operating Frequency Range: 170~230MHz ,470~860MHz

LED-1031
facebook.com/denverelectronics
Bitte lesen Sie diese Bedienungsanleitung sorgfältig und vollständig durch,
bevor Sie dieses Produkt anschließen, in Betrieb nehmen oder einstellen.
TRAGBARER TV-PLAYER
BEDIENUNGSANLEITUNG

AV OUT COAXIAL OFF ON
DC IN
9-12V
HDMI ANT.
1
2
3
4
5
6
7
8
9
10
11
12
13
14
15
1.EINSTELLUNGEN
2.ENTER
3.VERLASSEN
4.AUF
5.AB
6.Nach links/Lautstärke -
7.Nach rechts/Lautstärke +
8.AV OUT
9.KOAXIAL
10.Ohrhörerbuchse
11.EIN/AUS
12.DC IN 9-12V
13.ANT. (Antenne)
14.HDMI
15.USB
Aufbau
Hauptgerät
GER-1
Modell. ______________________________
Seriennummer: ________________________
Kaufdatum:_________________________

Aufbau
Fernbedienung
1.BETRIEB
Netzschalter
2.VOL -
Lautstärkeeinstellung
3.NUMMERNTASTEN 0-9
Nummerierten Eintrag im Menü auswählen.
12
3
4
5
6
7
8
90
ENTER
SOURCE
MODE
MUTE
REPEAT
FAV
TV/RADIO
EXIT
VOL- VOL+
POWER
REC
TTX EPG
ZOOM
1
2
3
4
6
7
8
9
10
11
12
13
14
16
15
19
18
17
20
21
22
24
25
23
26
27
28
5
GER-2
4.SUBTITLE (Untertitel)
Durch mehrmaliges Drücken von SUBTITLE kann wenn vorhanden
zwischen verschiedenen Untertitelsprachen umgeschaltet werden.
5.ZOOM
JPEG: Mit ZOOM das Bild vergrößern oder verkleinern.
Jedes Drücken der Taste ZOOM verändert den angezeigten Bildbereich
6.AUFNAHME
Digitale Aufnahmefunktion
7.ENTER
Bestätigen und Wechseln
8.EINSTELLUNGEN
Hauptmenü/Rückkehr
9.FAVORIT
Öffnet das Listenmenü der bevorzugten Programme
10.TV/RADIAO
Umschalten zwischen Fernseh- und Radiosignalquelle
11.VERLASSEN
12.DISPLAY
Informationsanzeige über das gegenwärtige Signal
13.QUELLE
TV/USB
14.VOL +
Lautstärkeeinstellung
15.WIEDERHOLEN
Wiederholung der Wiedergabe und des Videos

GER-3
Aufbau
Fernbedienung
16.STUMM
Stellen Sie den Ton stumm
17.AUDIO
AUDIO während der Wiedergabe wiederholt drücken, um eine andere
Audiosprache oder einen anderen Soundtrack einzuschalten (falls verfügbar).
18.MODUS
Einstellung des Modus-Menüs
19.STOPP
20.WIEDERGABE/PAUSE
21.RETURN
22.VIDEOTEXT
23.EPG
Anzeige der EPG-Informationen
24. Taste
Zurück
25. Taste
Vor
26. Taste
Schneller Vorlauf
27. Taste
Schnelles Rückspulen
28.ROT/GRÜN
Diverse Sonderfunktionen

PICTURE:
OPTION
Helligkeit
Einstellung der Bildschirmhelligkeit
Kontrast
Einstellung des Bildschirmkontrastes
Farbe
Einstellung der Farbe des Bildschirmes
ENGLISCH
Einstellung der Bildschirmsprache
RÜCKSTELLUNG
Zurücksetzen auf Werkseinstellung
EINSTELLUNG MODUS-MENÜ
PHVT-1008T2
15050524-CPT 151024-V1.0
Gerätemodellname und Softwarefunktion
HPOSITION 50
VPOSITION 50
STANDBY 4H
10
10
10
BRIGHT
CONTRAST
COLOR
ENGLISH
RESET
GER-4
HPOSITION
VPOSITION: Einstellung der horizontalen und vertikalen
Bildschirmausrichtung
STANDBY
Diese Funktion ermöglicht das automatische Wechseln in den
Standby-Modus des Geräts nach 3 oder 4 Stunden.
3 H:(3 Stunden) Das Gerät wechselt 3 Stunden nach der letzten
Tastenbetätigung in den Standby-Modus.
4 H:(4 Stunden) Das Gerät wechselt 4 Stunden nach der letzten
Tastenbetätigung in den Standby-Modus.
OFF: Deaktivierung der automatischen Standbyfunktion.

Program Edit
ALL TV
<
< >
018 The HITS
019 UKTV Br’tideas
021 TMF
022 Ideal World
01:00.01:00
17:00-19:00 StarDate
Rename
GOTO
Lock DeleteSkip FAVMove
FAV
Allgemeine Bedienungshinweise
Kanalverwaltung einstellen
Sendereinstellungen
Erstinstallation
GER-5
Nachdem alle Anschlüsse hergestellt wurden, schalten Sie den
Fernseher ein. Drücken Sie Ein/Aus zum Einschalten des
Digitalempfängers. Beim ersten Einschalten oder nach einer
Rückstellung zu den Werkseinstellungen wird das Hauptmenü
angezeigt.
Drücken Sie die Taste SETUP und wählen Sie [Program] aus, um in
das Menü zu wechseln.
Hier stehen Ihnen Optionen zum Ändern der
Kanalverwaltungseinstellungen zur Verfügung.
Wählen Sie eine Option und drücken Sie OK oder die
Navigationstaste RECHTS, um die Einstellung vorzunehmen.
Drücken Sie EXIT, um das Menü zu verlassen.
Zum Bearbeiten Ihrer Kanalvoreinstellungen (Sperren,
Überspringen, Favoriten, Verschieben oder Löschen) rufen Sie
das Programmbearbeitungsmenü auf. Hierzu benötigen Sie das
gültige Kennwort. Das Standard-Kennwort lautet „000000“.
(1)Wählen Sie [OSD Language] und drücken Sie die Pfeiltasten
rechts/links zur Auswahl der Sprache.
(2)Wählen Sie [Land] und drücken Sie die Pfeiltaste rechts/links
zur Auswahl Ihres Landes.
(3)Wählen Sie [Channel Search] und drücken Sie die Pfeiltaste
rechts oder OK, um die automatische Kanalsuche zu starten.
(4)Nach Beendigung der Kanalsuche können Sie fernsehen.

Erstinstallation
EPG (elektronische Fernsehzeitschrift)
GER-6
Sender als Favorit speichern
Sie haben die Möglichkeit, eine kurze Liste mit Lieblingssendern für einen
schnellen Zugriff anzulegen. TV- oder Radiosender speichern Sie wie folgt als
Favorit:
1.Wählen Sie den gewünschten Sender und drücken Sie FAVOURITE.
Ein Herzsymbol wird angezeigt und der Sender ist als Favorit markiert.
2.Wiederholen Sie die vorherigen Schritte zu Auswahl weiterer Favoritensender.
3.Drücken Sie EXIT, um Ihre Auswahl zu bestätigen und das Menü zu
verlassen.
Favoriten-TV- oder Radiosender deaktivieren:
Drücken Sie FAV auf der Fernbedienung mit dem Herzsymbol.
Lieblingssender anschauen:
1.Drücken Sie FAV zur Anzeige des Favoritenmenüs.
2.Wählen Sie mit den Tasten HOCH/RUNTER den Lieblingssender.
3.Drücken Sie OK zur Bestätigung Ihrer Auswahl.
TV- oder Radiosender löschen
1.Wählen Sie einen Sender und drücken Sie die BLAUE Taste. Eine Nachricht
wird eingeblendet. Drücken Sie OK zum Löschen des Senders.
2.Wiederholen Sie den vorhergehenden Schritt, um weitere Sender zu löschen.
TV- oder Radiosender überspringen
1.Wählen Sie den zu überspringenden Sender und drücken Sie die GRÜNE
Farbtaste; das Überspringen-Symbol wird angezeigt. Der Sender wird nun beim
Einschalten übersprungen.
2.Wiederholen Sie den vorhergehenden Schritt, um weitere Sender für die
Überspringen-Funktion auszuwählen.
3.Drücken Sie EXIT, um Ihre Auswahl zu bestätigen und das Menü zu
verlassen.
Überspringen-Funktion für TV- oder Radiosender deaktivieren:
Drücken Sie an einem Sender mit dem Überspringen-Symbol die GRÜNE
Taste.
TV- oder Radiosender verschieben
1.Wählen Sie den gewünschten Sender und drücken Sie die ROTE Farbtaste.
Das Verschieben-Symbol wird angezeigt.
2.Drücken Sie die Pfeiltaste HOCH/RUNTER, um den Sender zu verschieben.
3.Drücken Sie zur Bestätigung OK.
4.Wiederholen Sie die vorstehenden Schritte, um weitere Sender zu
verschieben.
Sender sperren
Sie können ausgewählte Sender sperren.
TV- oder Radiosender sperren:
1.Wählen Sie den gewünschten Sender und drücken Sie die GELBE Farbtaste.
Ein Schlosssymbol wird angezeigt. Der Sender ist nun als gesperrt
markiert.
2.Wiederholen Sie den vorhergehenden Schritt, um weitere Sender für
die Überspringen-Funktion auszuwählen.
3.Zur Bestätigung und zum Verlassen des Menüs drücken Sie EXIT.
4.Drücken Sie die GELBE Farbtaste, um den gesperrten Sender zu
deaktivieren.
5.Wenn Sie gesperrte Programme ansehen möchten, dann müssen Sie
das Standard- bzw. Ihr neues Passwort eingeben.
EPG ist ein Programmführer für die nächsten sieben Tage. Drücken
Sie EPG auf der Fernbedienung, um die Programmführung
aufzurufen.
Mit den Navigationstasten AUFWÄRTS/ABWÄRTS wählen Sie das
gewünschte Programm. Ist mehr als eine Seite Informationen
verfügbar, so blättern Sie mit der BLAUEN und GELBEN Taste um.

Sie müssen eine der Bildseitenformate 4:3 Pan Scan, 4:3 Letter Box, 4:3
Full, 16:9 Wide Screen, 16:9 Pillar Box oder Auto für das maximal
angezeigte Fernsehbild auswählen.
Lösungsvorschlag
Wird das Bild nicht korrekt angezeigt, so müssen Sie die Einstellung
ändern. Dies sollte der gewöhnlichen HDMI-Einstellung entsprechen.
[480i]: für TV mit NTSC-System.
[480P]: für TV mit NTSC-System.
[576i]: für TV mit PAL-System.
[576P]: für TV mit PAL-System.
[720P]: für TV mit NTSC- oder PAL-System.
[1080I]: für TV mit NTSC- oder PAL-System.
[1080P]: für TV mit NTSC- oder PAL-System.
TV-Format
Wird das Bild nicht korrekt angezeigt, so müssen Sie die Einstellung
ändern. Dies sollte der gewöhnlichen TV-Einstellung für Ihr Land
entsprechen.
[NTSC]: für TV mit NTSC-System.
[PAL]: für TV mit PAL-System.
Drücken Sie SETUP und wählen Sie dann [Search Channel], um in das
Menü zu wechseln.
Das Menü enthält Optionen zur Konfiguration der Sendersuche.
Wählen Sie eine Option und nehmen Sie mit den Navigationstasten
RECHTS/LINKS die Einstellungen vor.
Drücken Sie EXIT, um das Menü zu verlassen.
Bildseitenformat
Kanalsuche
Erstinstallation
GER-7
Sortierung
Sortieren Sie Ihre Kanäle nach folgenden Kriterien:
[LCN] – Kanäle aufsteigend sortieren.
[Name] – Kanäle in alphabetischer Reihenfolge sortieren.
[Service ID] – Kanäle entsprechend den Sendern sortieren.
LCN (Logische Kanalnummer)
Sie können LCN aktivieren oder deaktivieren.
Bild einstellen
Drücken Sie SETUP und danach [Picture], um in das Menü zu
wechseln. In diesem Menü nehmen Sie die Videoeinstellungen
vor. Drücken Sie die Navigationstasten AUFWÄRTS/ABWÄRTS
zur Auswahl einer Option und drücken Sie die Navigationstasten
RECHTS/LINKS zum Einstellen. Drücken Sie EXIT, um das Menü
zu verlassen.
Sidan laddas ...
Sidan laddas ...
Sidan laddas ...
Sidan laddas ...
Sidan laddas ...
Sidan laddas ...
Sidan laddas ...
Sidan laddas ...
Sidan laddas ...
Sidan laddas ...
Sidan laddas ...
Sidan laddas ...
Sidan laddas ...
Sidan laddas ...
Sidan laddas ...
Sidan laddas ...
Sidan laddas ...
Sidan laddas ...
Sidan laddas ...
Sidan laddas ...
Sidan laddas ...
Sidan laddas ...
Sidan laddas ...
Sidan laddas ...
Sidan laddas ...
Sidan laddas ...
Sidan laddas ...
Sidan laddas ...
Sidan laddas ...
Sidan laddas ...
Sidan laddas ...
Sidan laddas ...
Sidan laddas ...
Sidan laddas ...
Sidan laddas ...
Sidan laddas ...
Sidan laddas ...
Sidan laddas ...
Sidan laddas ...
Sidan laddas ...
Sidan laddas ...
Sidan laddas ...
Sidan laddas ...
Sidan laddas ...
Sidan laddas ...
Sidan laddas ...
Sidan laddas ...
Sidan laddas ...
Sidan laddas ...
Sidan laddas ...
Sidan laddas ...
Sidan laddas ...
Sidan laddas ...
Sidan laddas ...
Sidan laddas ...
Sidan laddas ...
Sidan laddas ...
Sidan laddas ...
Sidan laddas ...
Sidan laddas ...
Sidan laddas ...
Sidan laddas ...
Sidan laddas ...
Sidan laddas ...
Sidan laddas ...
Sidan laddas ...
Sidan laddas ...
Sidan laddas ...
Sidan laddas ...
Sidan laddas ...
Sidan laddas ...
Sidan laddas ...
Sidan laddas ...
Sidan laddas ...
Sidan laddas ...
Sidan laddas ...
Sidan laddas ...
Sidan laddas ...
Sidan laddas ...
Sidan laddas ...
Sidan laddas ...
Sidan laddas ...
Sidan laddas ...
Sidan laddas ...
Sidan laddas ...
Sidan laddas ...
Sidan laddas ...
Sidan laddas ...
Sidan laddas ...
Sidan laddas ...
Sidan laddas ...
Sidan laddas ...
Sidan laddas ...
Sidan laddas ...
Sidan laddas ...
Sidan laddas ...
Sidan laddas ...
Sidan laddas ...
Sidan laddas ...
Sidan laddas ...
Sidan laddas ...
Sidan laddas ...
Sidan laddas ...
Sidan laddas ...
Sidan laddas ...
Sidan laddas ...
Sidan laddas ...
Sidan laddas ...
Sidan laddas ...
Sidan laddas ...
Sidan laddas ...
Sidan laddas ...
Sidan laddas ...
Sidan laddas ...
Sidan laddas ...
Sidan laddas ...
Sidan laddas ...
Sidan laddas ...
Sidan laddas ...
Sidan laddas ...
Sidan laddas ...
Sidan laddas ...
Sidan laddas ...
Sidan laddas ...
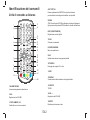
-
 1
1
-
 2
2
-
 3
3
-
 4
4
-
 5
5
-
 6
6
-
 7
7
-
 8
8
-
 9
9
-
 10
10
-
 11
11
-
 12
12
-
 13
13
-
 14
14
-
 15
15
-
 16
16
-
 17
17
-
 18
18
-
 19
19
-
 20
20
-
 21
21
-
 22
22
-
 23
23
-
 24
24
-
 25
25
-
 26
26
-
 27
27
-
 28
28
-
 29
29
-
 30
30
-
 31
31
-
 32
32
-
 33
33
-
 34
34
-
 35
35
-
 36
36
-
 37
37
-
 38
38
-
 39
39
-
 40
40
-
 41
41
-
 42
42
-
 43
43
-
 44
44
-
 45
45
-
 46
46
-
 47
47
-
 48
48
-
 49
49
-
 50
50
-
 51
51
-
 52
52
-
 53
53
-
 54
54
-
 55
55
-
 56
56
-
 57
57
-
 58
58
-
 59
59
-
 60
60
-
 61
61
-
 62
62
-
 63
63
-
 64
64
-
 65
65
-
 66
66
-
 67
67
-
 68
68
-
 69
69
-
 70
70
-
 71
71
-
 72
72
-
 73
73
-
 74
74
-
 75
75
-
 76
76
-
 77
77
-
 78
78
-
 79
79
-
 80
80
-
 81
81
-
 82
82
-
 83
83
-
 84
84
-
 85
85
-
 86
86
-
 87
87
-
 88
88
-
 89
89
-
 90
90
-
 91
91
-
 92
92
-
 93
93
-
 94
94
-
 95
95
-
 96
96
-
 97
97
-
 98
98
-
 99
99
-
 100
100
-
 101
101
-
 102
102
-
 103
103
-
 104
104
-
 105
105
-
 106
106
-
 107
107
-
 108
108
-
 109
109
-
 110
110
-
 111
111
-
 112
112
-
 113
113
-
 114
114
-
 115
115
-
 116
116
-
 117
117
-
 118
118
-
 119
119
-
 120
120
-
 121
121
-
 122
122
-
 123
123
-
 124
124
-
 125
125
-
 126
126
-
 127
127
-
 128
128
-
 129
129
-
 130
130
-
 131
131
-
 132
132
-
 133
133
-
 134
134
-
 135
135
-
 136
136
-
 137
137
-
 138
138
-
 139
139
-
 140
140
-
 141
141
-
 142
142
-
 143
143
-
 144
144


på andra språk
- italiano: Denver LED-1031 Manuale utente
- Deutsch: Denver LED-1031 Benutzerhandbuch
- português: Denver LED-1031 Manual do usuário
- dansk: Denver LED-1031 Brugermanual
- Nederlands: Denver LED-1031 Handleiding
Relaterade papper
-
Denver BTS-200SILVERMK2 Användarmanual
-
-
-
Denver DVBS-202HD Användarmanual
-
Denver LED-1032 Användarmanual
-
Denver MT-1087T2H Användarmanual
-
-
-
Denver KCA-1330 Användarmanual
-
Andra dokument
-
Caliber PDVBT101 Bruksanvisning
-
Maximum XO-110T Användarmanual
-
-
-
-
-
König DVB-T FTA21 Användarmanual
-
-
König DVB-T SCART12 Användarmanual
-
Maximum XO-4200 Hybrid Användarmanual