
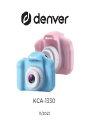
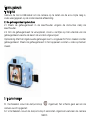
11/2021
KCA-1330


ENG 1
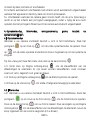
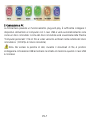
Safety information
Please read the safety instructions carefully before using the product for the first time
and keep the instructions for future reference.
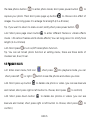
1. Warning: This product includes lithium polymer batteries.
2. Keep product out of the reach of children and pets to avoid chewing and
swallowing.
3. Product operating and storage temperature is from 0 degree Celsius to 40 degree
Celsius. Under and over this temperature might affect the function.
4. Never open the product. Touching the inside electrics can cause electric shock.
Repairs or service should only be performed by qualified personnel.
5. Do not expose to heat, water, moisture, direct sunlight!
6. The unit is not waterproof. If water or foreign objects enter the unit, it may result in
fire or electric shock. If water or a foreign object enters the unit, stop use
immediately.
7. Only charge with supplied USB cable.
8. Do not use non original accessories together with the product as this can make
the product functionality abnormal.

ENG 2
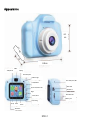
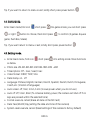
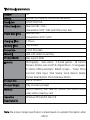
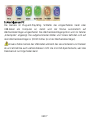
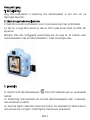
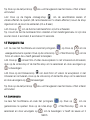
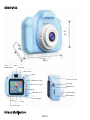
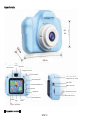
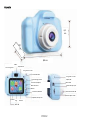
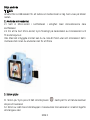
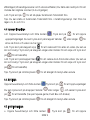
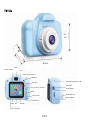
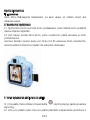
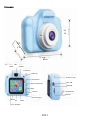
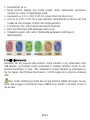
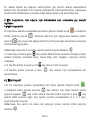
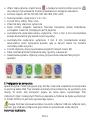
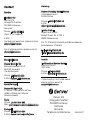
Appearance
Take picture
s
Video
Replay
One-click photo
I
ndicator light
P
ower/Return
U
p/Zoom/Filter mode
R
ight
D
own/Zoom
L
eft/Timing
S
et up
G
ame
M
usic
H
D screen
O
ne-click photo/OK
M
icro USB
R
est button
H
D camera lens
M
emory slot
8.8 cm
6.1
cm

ENG 3
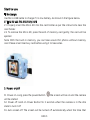
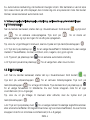
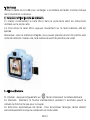
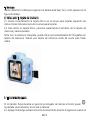
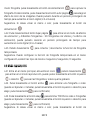
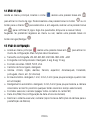
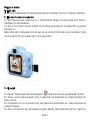
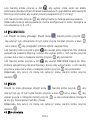
Start to use
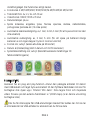
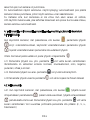
1. Recharge
Use Micro-USB cable to charge if it is low battery. As shown in the figure below.
2. How to use the memory card
2.1. Properly insert the Micro SD into the card holder as per the instructions near the
card holder.
2.2. To remove the Micro SD, press the end of memory card gently, the card will be
ejected.
Note: With the built-in memory, you can take around 50 photos without memory
card. Please insert memory card before using it to take video.
3. Power on/off
3.1. Power on: Long press the power Button the screen will be on and the camera
will be started
3.2. Power off: Hold on Power Button for 3 seconds when the camera is in the idle
state to turn it off.
3.3. Auto screen off: The screen will be turned off automatically when the time that

ENG 4
the camera is in the idle state for automatic-screen off to save power.
3.4. Power off when the camera is lacking-power. When battery power is very low, an
icon will be displayed on the LCD screen, prompting you to charge it in time. When
the icon flickers the camera will be turned off automatically.
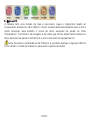
4. Recording mode,photo mode,playback mode, game, music and system
settings
4.1. Recording Mode
When you turn on your camera, you are in main menu, find icon , short press
will enter video recording mode, short press to start video recording; short
press it again to stop shooting.
Tip: If you want return menu, kindly short press power button
4.1.1. Short press page up button to choose color effect of images, there are seven
kinds of color effects, such as normal,black and white, retro, negative, red, green and
blue.
4.1.2. Short press page down button to enter the mode of Automatic breath
screen.
4.1.3 Short press left button to choose fast or slow motion.
4.2. Photo Mode
4.2.1. When you turn on your camera, you are in main menu, find icon , short press

ENG 5
the take photos button to enter photo mode, short press power button to
capture your photo. Then short press page up button to choose color effect of
images. You can long press it to enlarge focal length (2-3-4-8 times)
Tip: If you want to return to menu or exit, kindly short press power button
4.2.2. Short press page down button to enter different frames or vibrato effects
mode.(28 cartoon frames and 5 vibrato effects) You can long press it to minify focal
length. (2-3-4-8 times)
4.2.3. Short press to turn on/off timed photo function.
Tip: You can set timed photo function at setting menu, there are three kinds of
modes:2 sec, 5 sec,10 sec.
4.3. Playback mode
4.3.1. Enter main menu, find icon , short press into playback mode, you can
short press left or right button to see the photos and videos you took.
4.3.2. Short press up button to delete one photo or video. (you can see Execute
and Cancel, short press right or left button to choose, short press to confirm)
4.3.3. Short press down button to delete ALL photos or videos. (you can see
Execute and Cancel, short press right or left button to choose, short press to
confirm)

ENG 6
Tip: If you want to return to menu or exit, kindly short press power button
4.4. Game mode:
Enter main menu,find icon , short press into game mode, you can short press
or right button to choose, then short press to confirm. (3 games: Square
game, Push Box, Snake)
Tip: If you want return to menu or exit, kindly short press power button
4.5. Setting mode:
Enter main menu, find icon , short press into setting mode. More functions
as below:
Photo size: 2M~3M~5M~8M~12M~16M~18M~20M ~40M
Timed photo: Off,2 sec, 5 sec,10 sec
Video format: 1080P, 720P, VGA
Date stamp: on,off
Language: Chinese, English, German, French, Spanish, Danish, Dutch, Portuguese,
Czech, etc. (12 kinds of languages)
Auto screen: off, 1min, 2 min, 3 min (to save power when you do not use)
Auto off: off, 3 min, 5min (To conserve battery power, the camera will shut off if no
keys are pressed within the selected time)
Format: execute, cancel (Erase all data on the SD Card)
Date: Year/Month/ Day (setting the date and time of the camera)
System reset: execute, cancel (Reset settings of the camera to factory default)

ENG 7
5. Connect to PC
The camera has a plug-and-play function. Connect the powered device to the
computer with the USB cable, and the mode will automatically switch to the
removable hard disk. Removable disk icon will appear in the "My Computer" window.
The pictures and video files you shot are stored in the removable disk H: \ DCIM folder
(H is this equipment removable disk).
Note: During file downloading, it is prohibited to disconnect USB connection,
and plugging out the memory card when USB connected is also prohibited to avoid
loss of data.

ENG 8
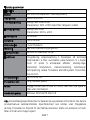
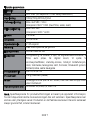
Technical parameters
Speaker 1W
Battery 600mah (full capacity +with protective board)
Resolution 1080P/720P/VGA
Video Resolution Real: 640*480(VGA)
Interpolation: 1920 * 1080 (with filters, slow, fast)
Photo Resolution Real: 640*480
Interpolation: 3000 * 4000
Charging Time 1~2hours
Working Time 1.5~2.5 hours
Screen Size 2 Inch IPS screen
Material ABS with rubber oil painting
Storage Media:Max support 32GB
Features Photography ,take videos ,3 Puzzle games ,28 Cartoon
Stickers,
6 Filters,
auto on/off,
8 x Digital Zoom ,
12 Languages,
5 Vibrato Effects,Automatic Breath Screen ,Timed Photo
Function, Date Input, Time Stamp, Voice Record, Delete,
Format, Reset System, Photo Size,Slow Motion
Product Size 8.8 x 6.1 x 4.8cm
Product Weight 176g (includes package)
Memory Built-in memory (can take 50+ photos) but cannot record
video without memory card
Operation
Requirements
Windows XP/Vista/7/8, Mac 10.8
Note: The product design specification is made based on updated information when

ENG 9
compiling this product manual. The specification is subject to change without
further notice. The product is subject to the actual camera. When the camera is
crashed from drop and please restart the camera
Please notice - All products are subject to change without any notice. We take
reservations for errors and omissions in the manual.
ALL RIGHTS RESERVED, COPYRIGHT DENVER A/S
Electric and electronic equipment and included batteries contains materials,
components and substances that can be hazardous to your health and the
environment, if the waste material (discarded electric and electronic equipment and
batteries) is not handled correctly.
www.denver.eu

ENG 10
Electric and electronic equipment and batteries is marked with the crossed out trash
can symbol, seen above. This symbol signifies that electric and electronic equipment
and batteries should not be disposed of with other household waste, but should be
disposed of separately.
As the end user it is important that you submit your used batteries to the appropriate
and designated facility. In this manner you make sure that the batteries are recycled
in accordance with legislature and will not harm the environment.
All cities have established collection points, where electric and electronic equipment
and batteries can either be submitted free of charge at recycling stations and other
collection sites, or be collected from the households. Additional information is
available at the technical department of your city.
DENVER A/S
Omega 5A, Soeften
DK-8382 Hinnerup
Denmark
www.facebook.com/denver.eu

GER 1
Sicherheitshinweise
Bitte lesen Sie die Sicherheitshinweise vor der ersten Verwendung des Produkts
aufmerksam durch und bewahren Sie die Anleitung zum späteren Nachschlagen
auf.
1. Warnung:Dieses Produkt enthält Lithium-Polymer-Akkus.
2. Bewahren Sie das Produkt außerhalb der Reichweite von Kindern und Haustieren
auf, um ein Verschlucken von Kleinteilen zu vermeiden.
3. Die Betriebs- und Lagertemperatur des Produkts liegt zwischen 0 und +40 °C.Eine
Unter- oder Überschreitung dieser Temperatur kann die Funktion
beeinträchtigen.
4. Öffnen Sie das Produkt nicht.Das Berühren der Elektronik kann zu einem
Stromschlag führen.Reparatur- und Wartungsarbeiten dürfen nur von
qualifiziertem Personal durchgeführt werden.
5. Vor Hitze, Wasser, Feuchtigkeit und direkter Sonneneinstrahlung schützen!
6. Das Gerät ist nicht wasserdicht.Wenn Wasser oder Fremdkörper in das Gerät
eindringen, kann es zu Feuer oder Stromschlag kommen.Wenn Wasser oder
Fremdkörper in das Gerät eindringen, beenden Sie sofort den Gebrauch.
7. Laden Sie nur mit dem mitgelieferten USB-Kabel.
8. Verwenden Sie nur Original-Zubehörteile zusammen mit dem Produkt;
Nichtbeachtung kann die Funktionalität des Produkts beeinträchtigen.

GER 2
Übersicht
Fot
o
Video
Wiederhol
Auslöser
K
ontrollleuchte
E
in/Aus / Zurück
N
ach oben/Zoom/Filter
N
ach rechts
N
ach unten/Zoom
N
ach
E
instell
S
piele
M
usik
H
D-Display
A
uslöser/OK
M
ikro-USB
R
ücksetztaste
H
D-Kameraobjektiv
S
peicherkarten-Steckplat
8,8 cm
6,1
cm

GER 3
Erste Schritte
1. Laden
Verwende ein Mikro-USB-Kabel zum Aufladen, wenn der Akku schwach ist, wie
nachstehend dargestellt.
2. Speicherkarte
2.1. Setze die micro SD-Speicherkarte so in den Kartenschacht ein, wie auf der
Anleitung nahe dem Kartenschacht zu sehen ist.
2.2. Drücke leicht gegen die micro SD-Speicherkarte, dann wird die Karte
freigegeben, so dass du sie anschließend entnehmen kannst.
Hinweis: Mit dem eingebauten Speicher kannst du etwa 50 Fotos ohne
Speicherkarte aufnehmen. Bitte setze die Speicherkarte ein, bevor du Videos
aufnimmst.
3. Ein- und Ausschalten
3.1. Einschalten: Wenn du die Ein/Aus-Taste lange drückst, dann schaltet sich
das Display ein und die Kamera wird gestartet.
3.2. Ausschalten: Halte im Standby-Modus die Ein/Aus-Taste für 3 Sekunden gedrückt,
um die Kamera auszuschalten.

GER 4
3.3. Automatische Bildschirmabschaltung: Um Energie zu sparen, wird der
Bildschirm im Standby-Modus automatisch ausgeschaltet.
3.4. Schalte die Kamera aus, wenn der Akku zu schwach ist. Wenn die Akkuleistung
sehr gering ist, wird ein Symbol im Display angezeigt, das dich auffordert, den Akku
rechtzeitig zu laden. Wenn das Symbol blinkt, wird die Kamera automatisch
ausgeschaltet.
4. Aufnahmemodus, Fotomodus, Wiedergabemodus, Spiel, Musik und
Systemeinstellungen
4.1. Aufnahmemodus
Wenn du deine Kamera einschaltest, befindest du dich im Hauptmenü, finde das
Symbol , drücke kurz , um den Videoaufnahmemodus aufzurufen, dann
drücke kurz/ , um die Videoaufnahme zu starten. Drücke die Taste erneut, um die
Aufnahme zu beenden.
Tipp: Wenn du in das Menü zurückkehren möchtest, drücke kurz die
Ein/Aus-Taste/ .
4.1.1. Drücke kurz die Pfeiltaste aufwärts , um den Farbeffekt der Bilder
auszuwählen. Es gibt sieben Arten von Farbeffekten: Normal, Schwarz-Weiß, Retro,
Negativ, Rot, Grün und Blau.
4.1.2. Drücke kurz die Pfeiltaste abwärts , um den automatischen Standby-Modus
aufzurufen.
4.1.3 Drücke kurz die Pfeiltaste links , um zwischen Zeitraffer und Zeitlupe
umzuschalten.
4.2. Fotomodus
4.2.1. Wenn du deine Kamera einschaltest, befindest du dich im Hauptmenü. Finde
das Symbol , drücke kurz den Auslöser , um den Fotomodus aufzurufen.

GER 5
Dann drücke kurz die Ein/Aus-Taste , um ein Foto aufzunehmen. Drücke dann
kurz die Pfeiltaste aufwärts , um den Farbeffekt für das Bild auszuwählen. Halte
die Taste gedrückt, um das Bild zu vergrößern (2-, 3-, 4-, 8-Mal).
Tipp: Wenn du in das Menü zurückkehren oder es verlassen möchtest, drücke kurz
die Ein/Aus-Taste .
4.2.2. Drücke kurz die Pfeiltaste abwärts , um verschiedene Bild- oder
Animationseffekte zu aktivieren. (28 Cartoon-Bilder und 5 Animationseffekte). Halte
die Taste gedrückt, um das Bild zu verkleinern (2-, 3-, 4-, 8-Mal).
4.2.3. Drücke kurz , um den Selbstauslöser ein- und auszuschalten.
Tipp: Du kannst den Selbstauslöser im Einstellungsmenü auf 2, 5 oder 10 Sekunden
einstellen.
4.3. Wiedergabemodus
4.3.1. Gehe in das Hauptmenü, finde das Symbol ,drücke kurz , um den
Wiedergabemodus aufzurufen und drücke kurz die Pfeiltaste links oder
rechts , um die Fotos und Videos anzuzeigen, die du aufgenommen hast.
4.3.2. Drücke kurz die Pfeiltaste aufwärts , um ein Foto oder Video zu löschen
(Ausführen und Abbrechen werden angezeigt; drücke zur Auswahl kurz die Pfeiltaste
rechts oder links und zur Bestätigung).
4.3.3. Drücke kurz die Pfeiltaste abwärts , um ALLE Fotos oder Videos zu löschen
(Ausführen und Abbrechen werden angezeigt; drücke zur Auswahl kurz die Pfeiltaste
rechts oder links und zur Bestätigung).
Tipp: Wenn du in das Menü zurückkehren oder es verlassen möchtest, drücke kurz
die Ein/Aus-Taste .
4.4. Spielmodus:

GER 6
Gehe in das Hauptmenü, finde das Symbol ,drücke kurz , um den
Spielmodus aufzurufen und drücke kurz die Pfeiltaste links oder rechts zur
Auswahl. Dann drücke kurz zur Bestätigung (3 Spiele stehen zur Auswahl:
Quadrate, Push Box, Snake).
Tipp: Wenn du in das Menü zurückkehren oder es verlassen möchtest, drücke kurz
die Ein/Aus-Taste .
4.5. Einstellmodus:
Gehe in das Hauptmenü, finde das Symbol und drücke kurz , um das
Einstellungsmenü aufzurufen. Die folgenden Einstellungen sind verfügbar:
Fotogröße: 2 MP, 3 MP, 5 MP, 8 MP, 12 MP, 16 MP, 18 MP, 20 MP, 40 MP.
Selbstauslöser: Aus, 2 Sekunden, 5 Sekunden, 10 Sekunden.
Videoformat: 1080p, 720p, VGA
Datumstempel: Ein, aus.
Sprache: Chinesisch, Englisch, Deutsch, Französisch, Spanisch, Dänisch,
Niederländisch, Portugiesisch, Tschechisch usw. (12 Sprachen).
Automatische Bildschirmabschaltung: Aus, 1 Minute, 2 Minuten, 3 Minuten (zum
Energiesparen bei Nichtgebrauch).
Automatische Abschaltung: Aus, 3 Minuten, 5 Minuten (zum Energiesparen; die
Kamera schaltet sich aus, wenn innerhalb des gewählten Zeitraums keine Taste
gedrückt wird).
Formatieren: Ausführen, Abbrechen (alle Daten auf der SD-Karte werden
gelöscht).
Datum: Jahr/Monat/Tag (eingeblendetes Datum im Bild)
Systemrücksetzung: Ausführen, Abbrechen (Kameraeinstellungen zu den
Werkseinstellungen zurücksetzen).

GER 7
5. Anschluss am PC
Die Kamera ist Plug-and-Play-fähig. Schließe das eingeschaltete Gerät über
USB-Kabel am Computer an, damit wird der Modus automatisch auf
Wechseldatenträger umgeschaltet. Das Wechseldatenträgersymbol wird im Fenster
„Arbeitsplatz“ angezeigt. Die aufgenommenen Bilder und Videos befinden sich auf
dem Wechseldatenträger H: \DCIM Ordner (H ist der Wechseldatenträger).
Hinweis: Ziehe niemals das USB-Kabel während des Herunterladens von Dateien
ab und entnehme auch währenddessen nicht die microSD-Speicherkarte, weil dies
Datenverlust zur Folge haben kann.

GER 8
Technische Daten
Lautsprecher 1 W
Akku 600 mAh (volle Kapazität + mit Schutzplatine)
Auflösung 1080p/720p/VGA
Videoauflösung Echt: 640 x 480 (VGA)
Interpolation: 1920 x 1080 (mit Filter, langsam, schnell)
Fotoauflösung Echt: 640 x 480
Interpolation: 3000 x 4000
Ladezeit 1 - 2 Stunden
Betriebszeit 1,5 - 2,5 Stunden
Displaygröße
2 Zoll IPS-Display
Material ABS mit Gummibeschichtung
Speichermedien: Max. 32 GB unterstützt
Funktionen Fotoaufnahme, Videoaufnahme, 3 Puzzlespiele, 28
Cartoon-Aufkleber, 6 Filter, automatisches Ein-/Ausschalten,
8-facher Digitalzoom, 12 Sprachen, 5 Animationseffekte,
automatischer Standby-Modus, Selbstauslöser,
Datumeingabe, Zeitstempel, Sprachaufnahme, Löschen,
Formatieren, Systemrücksetzung, Fotogröße, Zeitlupe.
Abmessungen 8,8 x 6,1 x 4,8 cm
Gewicht 176 g (einschließlich Verpackung)
Speicher Integrierter Speicher (kann 50+ Fotos aufnehmen), kann
aber ohne Speicherkarte keine Videos aufnehmen.
Betriebsanforderungen Windows XP/Vista/7/8, Mac 10.8
Hinweis: Das Produktdesign kann sich aufgrund von Verbesserungen nach
Drucklegung dieser Anleitung verändern. Die Spezifikationen können
stillschweigend geändert werden. Das Produkt ist immer die Kamera auf dem
aktuellen Entwicklungsstand. Bitte die Kamera neu starten, wenn sie durch
Herunterfallen „abgestürzt“ ist.
Sidan laddas...
Sidan laddas...
Sidan laddas...
Sidan laddas...
Sidan laddas...
Sidan laddas...
Sidan laddas...
Sidan laddas...
Sidan laddas...
Sidan laddas...
Sidan laddas...
Sidan laddas...
Sidan laddas...
Sidan laddas...
Sidan laddas...
Sidan laddas...
Sidan laddas...
Sidan laddas...
Sidan laddas...
Sidan laddas...
Sidan laddas...
Sidan laddas...
Sidan laddas...
Sidan laddas...
Sidan laddas...
Sidan laddas...
Sidan laddas...
Sidan laddas...
Sidan laddas...
Sidan laddas...
Sidan laddas...
Sidan laddas...
Sidan laddas...
Sidan laddas...
Sidan laddas...
Sidan laddas...
Sidan laddas...
Sidan laddas...
Sidan laddas...
Sidan laddas...
Sidan laddas...
Sidan laddas...
Sidan laddas...
Sidan laddas...
Sidan laddas...
Sidan laddas...
Sidan laddas...
Sidan laddas...
Sidan laddas...
Sidan laddas...
Sidan laddas...
Sidan laddas...
Sidan laddas...
Sidan laddas...
Sidan laddas...
Sidan laddas...
Sidan laddas...
Sidan laddas...
Sidan laddas...
Sidan laddas...
Sidan laddas...
Sidan laddas...
Sidan laddas...
Sidan laddas...
Sidan laddas...
Sidan laddas...
Sidan laddas...
Sidan laddas...
Sidan laddas...
Sidan laddas...
Sidan laddas...
Sidan laddas...
Sidan laddas...
Sidan laddas...
Sidan laddas...
Sidan laddas...
Sidan laddas...
Sidan laddas...
Sidan laddas...
Sidan laddas...
Sidan laddas...
Sidan laddas...
Sidan laddas...
Sidan laddas...
Sidan laddas...
Sidan laddas...
Sidan laddas...
Sidan laddas...
Sidan laddas...
Sidan laddas...
Sidan laddas...
Sidan laddas...
Sidan laddas...
Sidan laddas...
Sidan laddas...
Sidan laddas...
Sidan laddas...
Sidan laddas...
-
 1
1
-
 2
2
-
 3
3
-
 4
4
-
 5
5
-
 6
6
-
 7
7
-
 8
8
-
 9
9
-
 10
10
-
 11
11
-
 12
12
-
 13
13
-
 14
14
-
 15
15
-
 16
16
-
 17
17
-
 18
18
-
 19
19
-
 20
20
-
 21
21
-
 22
22
-
 23
23
-
 24
24
-
 25
25
-
 26
26
-
 27
27
-
 28
28
-
 29
29
-
 30
30
-
 31
31
-
 32
32
-
 33
33
-
 34
34
-
 35
35
-
 36
36
-
 37
37
-
 38
38
-
 39
39
-
 40
40
-
 41
41
-
 42
42
-
 43
43
-
 44
44
-
 45
45
-
 46
46
-
 47
47
-
 48
48
-
 49
49
-
 50
50
-
 51
51
-
 52
52
-
 53
53
-
 54
54
-
 55
55
-
 56
56
-
 57
57
-
 58
58
-
 59
59
-
 60
60
-
 61
61
-
 62
62
-
 63
63
-
 64
64
-
 65
65
-
 66
66
-
 67
67
-
 68
68
-
 69
69
-
 70
70
-
 71
71
-
 72
72
-
 73
73
-
 74
74
-
 75
75
-
 76
76
-
 77
77
-
 78
78
-
 79
79
-
 80
80
-
 81
81
-
 82
82
-
 83
83
-
 84
84
-
 85
85
-
 86
86
-
 87
87
-
 88
88
-
 89
89
-
 90
90
-
 91
91
-
 92
92
-
 93
93
-
 94
94
-
 95
95
-
 96
96
-
 97
97
-
 98
98
-
 99
99
-
 100
100
-
 101
101
-
 102
102
-
 103
103
-
 104
104
-
 105
105
-
 106
106
-
 107
107
-
 108
108
-
 109
109
-
 110
110
-
 111
111
-
 112
112
-
 113
113
-
 114
114
-
 115
115
-
 116
116
-
 117
117
-
 118
118


på andra språk
- italiano: Denver KCA-1330 Manuale utente
- español: Denver KCA-1330 Manual de usuario
- Deutsch: Denver KCA-1330 Benutzerhandbuch
- polski: Denver KCA-1330 Instrukcja obsługi
- português: Denver KCA-1330 Manual do usuário
- français: Denver KCA-1330 Manuel utilisateur
- dansk: Denver KCA-1330 Brugermanual