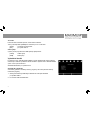
Maximum XO-110T Användarmanual
- Kategori
- TV-digitalboxar
- Typ
- Användarmanual

English User manual .........................................................3
Deutsch Gebrauchsanleitung ..........................................23
Dansk Brugervejledning ...............................................43
Svenska Bruksanvisning ..................................................63
Česky Návod k obsluze ................................................82
Polski Instrukcja obsługi ............................................101
MAXIMUM
XO-110T
Item no. 7955 / 7953

2

3
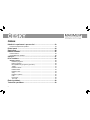
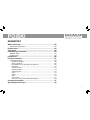
CONTENT
Important Safeguards .......................................................................... 4
Safety precautions ...................................................................................................... 4
Front panel ............................................................................................ 5
Rear panel ............................................................................................. 5
Remote control ..................................................................................... 6
Installing the batteries ................................................................................................. 7
Using the remote control ............................................................................................. 7
Connections .......................................................................................... 8
First time installation ............................................................................9
Basic operation ........................................................................................................... 9
Program Manage Settings .................................................................................... 9
Program Edit ......................................................................................................... 9
EPG (Electronic program guide .......................................................................... 11
Sort ...................................................................................................................... 12
Video Setting ...................................................................................................... 12
Channel Search .................................................................................................. 13
Time Setting ........................................................................................................ 14
Option .................................................................................................................. 15
System Setting .................................................................................................... 16
USB ..................................................................................................................... 16
PVR function ....................................................................................................... 17
Time shift ............................................................................................................. 18
Troubleshooting ................................................................................. 19
Technical Specications .................................................................... 20
ENGLISH

4
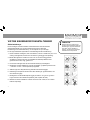
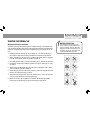
IMPORTANT SAFEGUARDS
Safety precautions
The receiver has been manufactured in accordance with international safety standards.
For your own safety you should read the notes on safety precautions carefully, and take
note of them, before operating your new receiver. For your own safety please be sure to
follow these safety precautions;
1. When installing the receiver, ensure there is a gap of approximately 5 cm around the
receiver to enable air to circulate freely and prevent overheating.
2. Do not install this equipment in a con ned space such as a book case or similar unit.
The ventilation should not be impeded by covering the ventilation openings with
items such as newspaper, table-cloths, curtains etc.
3. No naked ame sources, such as lighted candles should be placed on the apparatus.
4. The receiver shall not be exposed to dripping or splashing; No objects lled with
liquids, such as vases should be placed on the apparatus.
5. The mains plug is used as disconnect device, the disconnect device shall remain
readily operable.
6. Power cord must be placed correctly. Do not touch the power Cord and switch when
your hand is dankest.
7. The normal operating temperature of the receiver is between 5ºC and 40ºC.
Use the apparatus only in moderate climates (Not in tropical climates).
8. The batteries shall not be exposed to excessive heat such as sunshine, re etc.
Take attention to the environmental aspects of battery disposal.
CAUTION
To reduce the risk of electric
shock, do not remoce cover
(or back). No user servicable
parts inside, refer servicing to
qualied service personnel.

5
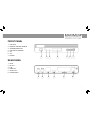
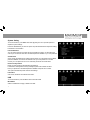
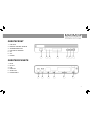
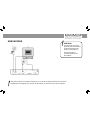
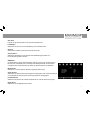
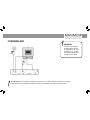
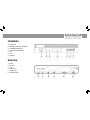
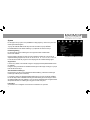
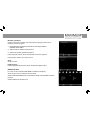
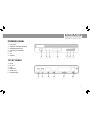
FRONT PANEL
1. USB JACK
2. REMOTE CONTROL SENSOR
3. STANDBY INDICATOR
4. LED DISPLAY WINDOW
5. CH-
6. CH+
7. POWER
REAR PANEL
1. RF IN
2. RF OUT
3. LAN
4. HDMI OUT
5. SCART OUT
6. POWER INPUT
1
1
2
2
3
3
4
4
5
5
6
6
7

6
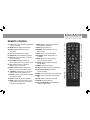
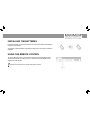
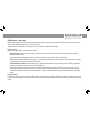
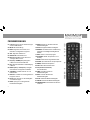
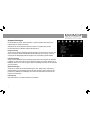
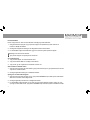
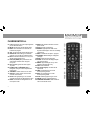
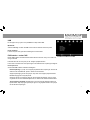
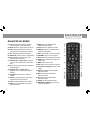
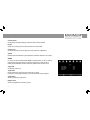
REMOTE CONTROL
01. LIST: Used to show the record program list
on the current disk.
02. MUTE: Mute or Restore Audio Output.
03. INFO: Displays additional channel
information.
04. TTX: Displays Teletext Information.
05. SUBTITLE: Selects Subtitles Language.
06. EXIT: Exits the current Menu or returns to
the previous Menu.
07. UP / DOWN: Navigates through the
Menus. Selects the next or previous mode.
08. OK: Conrms an entry or selection.
Displays the list of channels.
09. RIGHT / LEFT: Navigates through the
Menus. Increases or decreases volume.
10. TV/RADIO: Switches from TV function to
Radio function and from Radio to TV.
11. RECALL: Used to switch between the last
two viewed channels.
12. GOTO: Selects the play time of media.
13. PREV: Skips to the previous track during
playing media and skips to the previous
channel during playing DTV.
14. NEXT: Skips to the next track/channel
during playing media/DTV.
15. STOP: Stops media play.
16. REPEAT: Selects Repeat or turn off
Repeat mode.
17. REC: Used to record the program.
18. STANDBY: Switch the product to on
or standby.
19. EPG: (Electronic Program Guide)
Turns the program guide on.
20. AUDIO: Selects an Audio Language
or Audio Mode.
21. MENU: Turns on Main Menu.
22. FAV: (Favourite) Turns on Favourite Menu.
23. 0-9 (Numeric Buttons): Selects a
channel or setting.
24. FWD: Searches forwards during media play.
25. REV: Searches backwards during media
play.
26. PLAY: Starts or resumes media play.
27. PAUSE: Pauses media play.
28. COLOUR BUTTONS: Operate different
function in TEXT screen.

7
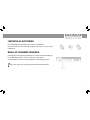
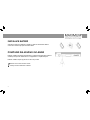
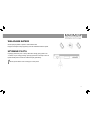
INSTALLING THE BATTERIES
Remove the battery cover from the Remote Control and put 2xAAA size batteries
inside the compartment.
The diagram inside the Battery Compartment shows the correct way to install the
batteries.
USING THE REMOTE CONTROL
To use the Remote Control, point it towards the front of the Digital Set Top Box.
The Remote Control has a range of up to 7 metres from the Set Top Box at an
angle of up to 60 degrees.
The Remote Control will not operate if its path is blocked.

8
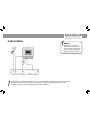
CONNECTIONS
When connecting the receiver to other equipment, e.g., TV, VCR and amplier, make sure to refer to relevant user manual
for instruction. Also, make sure you disconnect all the equipments from the mains supply before the connection.
CAUTION
Make sure to check the voltage
specication of the wall outlet
is the same rating with the
receiver.
To prevent the risk of electric
shock, do not open the cover
or the back of the receiver.

9
FIRST TIME INSTALLATION
After all connections have been made properly, switch on TV and make sure
the receiver is connected to the Main Power. Press Power button to switch the
receiver on. If you are using the receiver for the rst time or restored to Factory
Default, the Main Menu will appear on your TV screen.
1. Select [OSD Language] and press RIGHT/LEFT key to select an language
2. Select [Country] and press RIGHT/LEFT key to select your country of residence
3. Select [Channel Search] and press RIGHT or OK key to begin Automatic
channel search
4. Once channel tuning is complete, you are now ready to watch TV
BASIC OPERATION
Program Manage Settings
To access the Menu, press the MENU button and select [Program]. The Menu
provides options to adjust the Program Manage Settings. Select an option and
press OK or RIGHT to adjust that setting. Press the EXIT button to exit the
Menu.
Program Edit
To edit your program preferences (lock, skip, favourite, move or delete), you will
need to enter the Program Edit Menu. This Menu requires a password to access.
Enter the default password ‘000000’.

10
Set Favourite Program
You can create a shortlist of favourite programs that you easily can access.
Set Favourite TV or Radio program:
1. Select the preferred program then press the FAV button.
A heart-symbol will appear next to the program.
2. Repeat the previous step to select more Favourite programs.
3. To conrm and exit the Menu, press the EXIT key
Deletion of a favourite TV or Radio Program:
Press the FAV button on the Remote Control, so the heart- symbol disappear.
View Favourite Program
1. Press the Favourite button and the Favourite Menu will appear.
2. Press UP/DOWN to select your Favourite Programs.
3. Press OK to select your favourite program.
Delete a TV or Radio Program
1. Select the Program and then press the BLUE button
A message will appear. Press OK to delete the program
2. Repeat the previous step to select more programs to delete.
Skip TV or Radio Program
3. To conrm and exit the menu, press EXIT key. Activate a skip TV or Radio
program: Press the GREEN button so the skip symbol dissapear.

11
Move a TV or Radio Program
1. Select the preferred program and press the RED button. A move symbol will appear
2. Press UP/DOWN to move the program
3. Press OK to conrm
4. Repeat the above steps to move more channels
Lock a Program
You can lock selected programs for restricted view. Lock a TV or Radio Program:
1. Select the preferred program then press the YELLOW button. A padlock symbol is
displayed. The program is now marked as locked
2. Repeat the previous step to select more programs
3. To conrm and exit the menu, press the EXIT button
4. Press the YELLOW button to unlock a locked program
5. To view the locked program, you will be required to enter either the default password
‘000000’ or your last set password.
EPG (Electronic program guide)
The EPG is an on-screen TV guide that shows scheduled programs seven days in
advance for every tuned channel. Press the EPG button on the Remote Control to access
the guide.
You can use the UP/DOWN key to select the preferred program. If there is more than
one page of information, use the BLUE button for page up (next page) and the YELLOW
button for page down (previous page).

12
Sort
Sorting of the channels are done in the menu PROGRAM. Choose SORT.
The channels can be sorted after the following options:
[By LCN] Sort the channels in ascending order
[By Service Name] Sort the channels in alphabetical order
[By Service ID] Sort the channels according to the station
[By ONID]
LCN (Logical channel number)
Set LCN on or off.
Video Setting
To access the Menu, press MENU then select [Picture]. The Menu provides options to
adjust the video settings. Press UP/DOWN to select an option and press RIGHT/LEFT
to adjust that setting. Press EXIT to exit the menu.
Aspect Ratio
You must set the display format to either 4:3 Full, 4:3 Pan&Scan,4:3 Letter Box 16:9
Wide Screen or Auto to get the maximum display when watching TV.

13
Resolution
If the video does not appear correctly, change the setting. This setting is to match the most
common setting for HDMI.
[480i] for NTSC system TV
[480P] for NTSC system TV
[576i] for PAL system TV
[576P] for PAL system TV
[720P] for NTSC or PAL system TV
[1080I] for NTSC or PAL system TV
[1080P] 50 Hz
TV format
If the video does not appear correctly, you need to change the settings. This should match
the most common setting for TV’s in your country.
[NTSC] for NTSC system TV.
[PAL] for PAL system TV.
Video output
[CVBS] CVBS output.
[RGB] RGB output.
Channel Search
To access the menu,press MENU and select [Search Channel]. The Menu provides
options to adjust the Search Channel settings.
Select an option and press RIGHT/LEFT to adjust the settings.
Press EXIT to exit the Menu

14
Auto Search
Search and install all channels automatically. This option overwrites all preset channels.
1. Select [Auto Search] and press OK or RIGHT to start channel search.
2. To cancel channel search, press EXIT.
Manual Search
Install new channels manually. This option adds new channels without changing the
current channels list.
1. Select [Manual Search] then press OK or RIGHT. The channel search screen will
appear.
2. Press the RIGHT/LEFT key to select the channel frequency
3. Press OK to start searching channels
If a channel is found, it is saved and added to the channels list. If channels can’t be found,
then exit the menu.
Country
Select your country of residence.
Antenna power
Enable Antenna Power if an external active antenna is connected.
Time Setting
To access the Menu, press MENU then select [Time]. The Menu provides options to adjust
the time settings.
Press UP/DOWN to select an option and press RIGHT/LEFT to adjust the settings.
Press EXIT to exit the menu.

15
Time offset
Select auto or manual for GMT offset adjustments.
Country Region
Select the Country Region when [Time Offset] is set to Auto.
Time Zone
Select the Time Zone Offset when [Time Offset] is set to Manual.
Auto standby
If this setting is off, this function does not work. If this setting is not on, a message will pop up after 3 hours, that the device will
go in to sleep mode. This message will appear under no any operation. Press STANDBY button to exit sleep / auto-off mode.
Option
To access the Menu, press MENU and select [Option]. The menu provides options
to adjust the OSD Language, Subtitle Language and Audio Language.
Select an option and press RIGHT/LEFT to adjust the setting. Press EXIT to exit the Menu.
OSD Language
Select an OSD language.
Audio Language
Select the preferred audio language for watching TV channels.
If the language is not available, the default program language will be used.
Subtitle Language
Select the preferred subtitle language.
Digital Audio
Select digital audio output mode.

16
System Setting
To access the Menu, press MENU and select [System].The menu provides options to
adjust the system settings.
Press the UP/DOWN key to select an option and press RIGHT/LEFT to adjust the setting.
Press EXIT to exit the Menu.
Parental Guidance
You can restrict access to channels that are unsuitable for children. To restrict/lock the
channel you will need to enter either the default password ‘000000’ or your own password.
Set Password
Set or change the password for locked programs. Enter your old password or the default
password ‘000000’. You will then be asked to enter your new password. To conrm
re-enter your new password. Once it is conrmed, press EXIT to exit the Menu.
Restore Factory Default
Reset your Set Top Box to the Default Factory Settings.
In Main Menu select [Restore Factory Default] and press OK or RIGHT to select.
Enter your password or the default password ‘000000’ and press OK to conrm.
This option will delete all preset channels and settings.
Information
View model, hardware and software information.
USB
To access the Menu, press the Menu button and select USB.
Multi-Media
Switch to USB mode and plug in USB to view les.

17
PVR function - only 7955
When a USB media is connected the PVR functions will be present in the menu and shown in the menu point USB. The PVR list can
be seen when pressing the ‘list’ key on the remote control.
This list shows an overview of your recordings. From the PVR list, recordings can be edited.
How to record?
Make sure a USB media is connected to the receiver.
Direct recording: Press the ‘rec’ key on the remote control. The recording will start as soon as the message ‘enter recording’
disappear from the screen.
Stop the recording by pressing the ‘stop’ or ‘list’ keys on the remote control. Conrm stop by pressing OK.
Please note that while a recording is in progress, it is not possible to watch EPG, enter the menus, the record list etc. You can still
change channel, see teletext, or work with favourite lists.
Timer Recording from EPG: Enter the EPG menu, by pressing the EPG button on the remote control unit. Select a programme
(use arrow up and down) and press OK to book the recording.
A timer setting window will be shown, where it is possible to edit the parameters for the recording. Among other things you can
choose if the recording should be repeated once, daily or weekly. In the mode parameter you can choose if the timer should be a
‘view’ function where the receiver will show video/audio or a ‘record’ function where the programme will be recorded on the USB
media.
Play-back mode
Press the ‘list’ key on the remote control in order to see an overview of your recordings. Select the recording you wish to watch by OK
key. Play back will be shown in the small window. Press the red key (Preview/FullScreen) in order to watch the recording in full screen
mode.

18
Edit recordings
Rename le: Press the ‘green’ button on the remote control unit, and enter a new le name.
Delete recording: Press the ‘yellow’ button on the remote control unit to mark the recording/s which should be deleted.
Conrm the deletion by pressing the OK key 2 times.
Time shift
Make sure that a USB media is connected to the receiver in order to be able to use the time shift function.
In order to time shift a programme press the ’pause/button’ on the remote control. Press the ’play-button’ if you wish to resume
watching the time shifted program. It is also possible to wind in the time shifted program by pressing the ‘REV’ and ‘FWD’ buttons.
The time shift can be stopped by pressing the ‘stop-button’ and you will go back to the ongoing “real-time” programme.

19
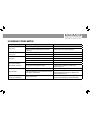
TROUBLESHOOTING
Problem Potential reason What to do
No picture
Power isn’t connected Connect the power
The power switch is not on Switch on the power
Screen shows no signal
Not connected DVB-T cable Plug in the DVB-T cable
Incorrect settings Set up the correct parameters
No sound from speaker
No or incorrect connection with audio cable Connect the audio cable correctly
Mute is on Switch on the correct volume control
Incorrect sound track Try another sound track
Only sound, no image on the screen
No or incorrect connection with audio cable Connect the audio cable correctly
The programme is a radio programme
Press ‘TV/Radio‘ key on remote to shift
into TV mode
Remote control unit is not working
The battery is exhausted Change new battery
Remote control unit is not in the right opposite
of the front panel or too far from it
Adjust the way of holding remote control
unit andnear from the panel
The image stop suddenly or mosaic The signal is too weak Strengthen the signal

20
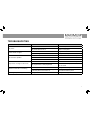
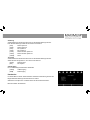
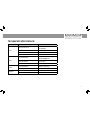
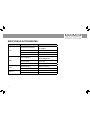
TECHNICAL SPECIFICATIONS
Item Sub item Parameter
Tuner
Input frequency
170~230MHz
470~860MHz
RF Input level -25~-78dBm
IF Bandwidth 7MHz and 8MHz
Modulation
QPSK, 16QAM, 64QAM, 256QAM
Video
Decoder Format
MPEG4 AVC/H.265 HP@L4
MPEG2 [email protected]
Output Format
576P, 720P, 1080i, 1080P,
4:3 and 16:9
Output Port HDMI, Single SCART
Audio
Decoder Format MPEG-1 (layer1&2)
Audio output
HDMI, SCART
Power
Voltage
100-240V ~ 50/60Hz
Power Max 6W
Sidan laddas...
Sidan laddas...
Sidan laddas...
Sidan laddas...
Sidan laddas...
Sidan laddas...
Sidan laddas...
Sidan laddas...
Sidan laddas...
Sidan laddas...
Sidan laddas...
Sidan laddas...
Sidan laddas...
Sidan laddas...
Sidan laddas...
Sidan laddas...
Sidan laddas...
Sidan laddas...
Sidan laddas...
Sidan laddas...
Sidan laddas...
Sidan laddas...
Sidan laddas...
Sidan laddas...
Sidan laddas...
Sidan laddas...
Sidan laddas...
Sidan laddas...
Sidan laddas...
Sidan laddas...
Sidan laddas...
Sidan laddas...
Sidan laddas...
Sidan laddas...
Sidan laddas...
Sidan laddas...
Sidan laddas...
Sidan laddas...
Sidan laddas...
Sidan laddas...
Sidan laddas...
Sidan laddas...
Sidan laddas...
Sidan laddas...
Sidan laddas...
Sidan laddas...
Sidan laddas...
Sidan laddas...
Sidan laddas...
Sidan laddas...
Sidan laddas...
Sidan laddas...
Sidan laddas...
Sidan laddas...
Sidan laddas...
Sidan laddas...
Sidan laddas...
Sidan laddas...
Sidan laddas...
Sidan laddas...
Sidan laddas...
Sidan laddas...
Sidan laddas...
Sidan laddas...
Sidan laddas...
Sidan laddas...
Sidan laddas...
Sidan laddas...
Sidan laddas...
Sidan laddas...
Sidan laddas...
Sidan laddas...
Sidan laddas...
Sidan laddas...
Sidan laddas...
Sidan laddas...
Sidan laddas...
Sidan laddas...
Sidan laddas...
Sidan laddas...
Sidan laddas...
Sidan laddas...
Sidan laddas...
Sidan laddas...
Sidan laddas...
Sidan laddas...
Sidan laddas...
Sidan laddas...
Sidan laddas...
Sidan laddas...
Sidan laddas...
Sidan laddas...
Sidan laddas...
Sidan laddas...
Sidan laddas...
Sidan laddas...
Sidan laddas...
Sidan laddas...
Sidan laddas...
Sidan laddas...
-
 1
1
-
 2
2
-
 3
3
-
 4
4
-
 5
5
-
 6
6
-
 7
7
-
 8
8
-
 9
9
-
 10
10
-
 11
11
-
 12
12
-
 13
13
-
 14
14
-
 15
15
-
 16
16
-
 17
17
-
 18
18
-
 19
19
-
 20
20
-
 21
21
-
 22
22
-
 23
23
-
 24
24
-
 25
25
-
 26
26
-
 27
27
-
 28
28
-
 29
29
-
 30
30
-
 31
31
-
 32
32
-
 33
33
-
 34
34
-
 35
35
-
 36
36
-
 37
37
-
 38
38
-
 39
39
-
 40
40
-
 41
41
-
 42
42
-
 43
43
-
 44
44
-
 45
45
-
 46
46
-
 47
47
-
 48
48
-
 49
49
-
 50
50
-
 51
51
-
 52
52
-
 53
53
-
 54
54
-
 55
55
-
 56
56
-
 57
57
-
 58
58
-
 59
59
-
 60
60
-
 61
61
-
 62
62
-
 63
63
-
 64
64
-
 65
65
-
 66
66
-
 67
67
-
 68
68
-
 69
69
-
 70
70
-
 71
71
-
 72
72
-
 73
73
-
 74
74
-
 75
75
-
 76
76
-
 77
77
-
 78
78
-
 79
79
-
 80
80
-
 81
81
-
 82
82
-
 83
83
-
 84
84
-
 85
85
-
 86
86
-
 87
87
-
 88
88
-
 89
89
-
 90
90
-
 91
91
-
 92
92
-
 93
93
-
 94
94
-
 95
95
-
 96
96
-
 97
97
-
 98
98
-
 99
99
-
 100
100
-
 101
101
-
 102
102
-
 103
103
-
 104
104
-
 105
105
-
 106
106
-
 107
107
-
 108
108
-
 109
109
-
 110
110
-
 111
111
-
 112
112
-
 113
113
-
 114
114
-
 115
115
-
 116
116
-
 117
117
-
 118
118
-
 119
119
-
 120
120


Maximum XO-110T Användarmanual
- Kategori
- TV-digitalboxar
- Typ
- Användarmanual
på andra språk
- čeština: Maximum XO-110T Uživatelský manuál
- Deutsch: Maximum XO-110T Benutzerhandbuch
- polski: Maximum XO-110T Instrukcja obsługi
- English: Maximum XO-110T User manual
- dansk: Maximum XO-110T Brugermanual
Relaterade papper
Andra dokument
-
Denver DTB-142 Användarmanual
-
Caliber PDVBT101 Bruksanvisning
-
König DVB-T FTA21 Användarmanual
-
Denver LED-1031 Användarmanual
-
Denver DVBS-202HD Användarmanual
-
-
Andersson SPB 2.3 Användarmanual
-
-
Sandstrom S1DVD12E Användarmanual
-
Triax T-HD505 VA Start