
T60
OWNER’S MANUAL P. 2 - 13
BETRIEBSANLEITUNG S. 14 - 27
MODE D’EMPLOI P. 28 - 41
HANDLEIDING P. 42 - 54
MANUALE D’USO P. 55 - 67
MANUAL DEL USUARIO P. 68 - 80
BRUKSANVISNING S. 81 - 91
KÄYTTÖOHJE S. 92 - 103
www.tunturi.com
SERIAL NUMBER
SERIENNUMMER
NUMERO DE SERIE
SERIENUMMER
NUMERO DI SERIE
NÚMERO DE SERIE
SERIENNUMMER
SARJANUMERO
T60_manual_uusi versio_j.indd 1T60_manual_uusi versio_j.indd 1 25.10.2006 13:33:4725.10.2006 13:33:47

2
OWNER’S MANUAL
•
T60
use as described in this manual. Do not
use attachments not recommended by
Tunturi.
•
Before you start using the treadmill,
make sure that it functions correctly in
every way. Do not use a faulty device.
•
Keep the cord away from heated
surfaces.
•
T60 must not be used outdoors. T60
tolerates an environment measuring
+10°C to +35°C. Air humidity must never
exceed 90 %.
•
Do not attempt any servicing or
adjustment other than those described in
this manual. The given instructions must
be followed carefully.
•
Never operate this treadmill if it has
a damaged cord or plug, if it has been
dropped or damaged, or dropped into
water. Return the treadmill to a service
center for repair.
•
Never operate the appliance with
the air opening blocked. Keep the air
openings free of lint, hair, and the like.
•
Do not operate where aerosol (spray)
products are being used or where
oxygen is being administered.
•
The device must not be used by
persons weighing over 135 kg (298 lbs).
•
T60 is designed for household use
only. The warranty of 24 months applies
only for faults in household use.
SAVE THESE INSTRUCTIONS!
WELCOME TO THE WORLD OF
TUNTURI EXERCISING!
Your choice shows that you really want to invest in your
well-being and condition; it also shows you really value
high quality and style. With Tunturi Fitness Equipment,
you’ve chosen a high-quality, safe and motivating
product as your training partner. Whatever your goal in
training, we are certain this is the training equipment to
get you there. You’ll find information about using your
exercise equipment and what makes for efficient training
at Tunturi’s website at WWW.TUNTURI.COM.
IMPORTANT SAFETY
INSTRUCTIONS
This Owner’s Manual is an essential part
of your training equipment: reading all
instructions in this manual before you
start using this appliance. The following
precautions must always be followed:
WARNING
•
Never use extension cords between
the treadmill and your wall outlet. The
device’s maximum power consumption
is 10 A. Outlets with fluctuating voltage
of more than 5 % may result in erratic
performance or cause damage to
treadmill electronics. Using electrical
power other than that, which has been
specified in this manual will ultimately
void any warranty, implied or otherwise.
WARNING:
to reduce any risk to persons:
•
Keep hands clear of any moving
parts. Never place hands, feet or any
other objects into any opening or under
the treadmill.
•
Never leave the treadmill unattended
when plugged in. Unplug from outlet
when not in use, before putting on or
taking off parts. To disconnect, turn all
controls to the off position, then remove
plug from outlet.
•
Close supervision is necessary
when the treadmill used by, on, or near
children, invalids, or disabled persons.
•
Use the treadmill only for its intended
CONTENTS
ASSEMBLY ................................................................3
BASICS ON EXERCISING .........................................4
CONSOLE .................................................................. 5
POSITION SPEED CONTROL (PSC) ........................6
CHOOSING AN EXERCISE .......................................7
MANUAL EXERCISE .................................................7
HEART RATE CONTROLLED ...................................7
EXERCISE .................................................................7
FITNESS TESTS ........................................................8
EXERCISE PROFILES ..............................................9
MEMORY FUNCTION ..............................................10
MAINTENANCE ....................................................... 11
MALFUNCTIONS .....................................................12
MOVING AND STORAGE ........................................12
TECHNICAL DATA ...................................................13
T60_manual_uusi versio_j.indd 2T60_manual_uusi versio_j.indd 2 25.10.2006 13:33:4825.10.2006 13:33:48

GB
OWNER’S MANUAL
•
T60
3
ASSEMBLY
Before assembling the device, insure all parts are present:
1. Frame
2. Handrails
3. Horizontal handlebar
4. Console
5. Power cord
6. Assembly kit (contents are marked with an * in the
spare part list): keep the assembly tools, as you may need
them e.g. for adjusting the equipment
The directions left, right, front and back are defined as
seen from the exercising position. In case of problems
contact your Tunturi dealer. Two people are needed for
the installation. Assemble the equipment as follows:
HANDRAILS
NOTE! Do not remove the fastening screws on the
handrails! Place the handrails into position at the sides
of the frame: when placing the left handrail, gently pull
the wire coming out of the handrail upward so that it
won’t be damaged between the handrail and the frame.
Do not tighten the fastening screws until the horizontal
handlebar and console have been secured.
HORIZONTAL HANDLEBAR
Place the horizontal handlebar between the handrails so
that it is curved towards the rear of the treadmill. Secure
the horizontal handlebar to the handrails on both sides
with a hex screw.
CONSOLE
Connect the wire coming out of the left handrail
with the connector in the console wire and push the
connected wire inside the handrail. Push the console
onto the handrail ends and secure with four hex screws
at the back of the console. If necessary, you can facilitate
the console securing by loosening the horizontal
handlebar; however, do not loosen the end with the
black rubber nut.
Secure now both handrails with two hex screws. Tighten
the two fastening screws by pushing the Allen key
through the hole in the handrail to the screw head.
NOTE! Tighten the fastening screws by turning them
anti-clockwise! Be careful not to over tighten. Push the
plastic end caps onto the holes in the handrails. Remove
the protective film from the display.
SAFETY KEY
The treadmill cannot be used if the key is not properly
installed on the console; if the key is removed from its
place, the treadmill will immediately stop. Insert the
safety key into the key holder at the left side of the
console. Ensure that the clip of the safety key is properly
attached to your clothing; as the cord tightens, make
sure the clip does not detach itself from your clothing
before the safety key disconnects from the user interface.
POWER CORD AND
GROUNDING INSTRUCTIONS
Plug the socket end of the power
cord into the treadmill at the left
front corner. Before connecting
the device to a power source,
make sure that local voltage
matches that indicated on the
type plate. Turn on the power
using the switch next to the
socket on the treadmill. This
treadmill must be grounded.
If it should malfunction or
breakdown, grounding provides
a path of least resistance for
electrical current to reduce
T60_manual_uusi versio_j.indd 3T60_manual_uusi versio_j.indd 3 25.10.2006 13:33:4825.10.2006 13:33:48

4
OWNER’S MANUAL
•
T60
the risk of electrical shock. This product is equipped
with a cord having an equipment-grounded conductor
and a grounding plug. The plug must be plugged
into an appropriate outlet that is properly installed
and grounded in accordance with all local codes
and ordinances. Do not use extension cables when
connecting the equipment to the power source.
DANGER! Improper connection of the equipment-
grounding conductor can result in a risk of electric
shock. Check with a qualified electrician or serviceman,
if you are in doubt as to whether the product is properly
grounded. Do not modify the plug provided with the
product - if it will not fit the outlet, have a proper outlet
installed by a qualified electrician.
BASICS ON EXERCISING
Before training on a motor-driven treadmill, you should
familiarise yourself with its functions and operation.
Working out with this equipment is excellent aerobic
exercise, the principle being that the exercise should
be suitably light but of long duration. Aerobic exercise
is based on improving the body’s maximum oxygen
uptake, which in turn improves endurance and fitness.
Aerobic exercise should above all be pleasant. You
should perspire, but your heart rate should stay at a
comfortable level. This will allow for a longer training
session. Three 30 to 60 minute sessions a week is
recommended, depending on your goals, fitness level
and schedule.
If you prefer a walking exercise, you can increase the
versatility and effort level of your workout by adjusting
the elevation. For a more versatile walking exercise, you
can also use light dumbbells to work your arm muscles.
Remember to pay attention to safety concerns, such as
maintaining your balance.
You’ll find information about using your exercise
equipment and what makes for efficient training at
Tunturi’s website at www.tunturi.com.
ABOUT THE EXERCISE ENVIRONMENT
•
Make sure the exercise environment has adequate
ventilation. To avoid catching cold, do not exercise in a
draughty place.
•
Place the treadmill on a firm, level surface. Allow
200x100 cm of clearance behind the treadmill and 100
cm on either side and in front of the treadmill. Make
sure that children and pets stay away from this area
while the treadmill is in use.
•
We recommend that the equipment is placed on a
protective base.
ABOUT USING THE EQUIPMENT
•
Always unplug the treadmill from the electrical
outlet after each training session.
•
Only one person may use the equipment at a time.
•
Keep hands clear of any moving parts. Never place
hands, feet or any other objects under the treadmill
•
Never leave the treadmill unattended when plugged
in.
•
Wear appropriate clothing and shoes when
exercising. Make sure your shoelaces are properly tied.
To avoid injury and unnecessary wear on your treadmill,
be sure your shoes are free of any debris such as gravel
and small pebbles.
BEGINNING AN EXERCISE SESSION
•
To avoid muscular pain and strain, begin and end
each workout by stretching.
•
Stand on the landing rails to the left and right of the
running belt. Do not stand on the running belt.
•
Begin each workout at a low speed, and gradually
increase your speed and/or treadmill elevation to a
comfortable level according to your condition.
•
Always hold the handrail for support when getting
on or off the treadmill and when changing the speed
during exercise. Do not jump off the running belt while
it is moving!
•
To avoid numbness and pain in the neck, shoulder
and back area, maintain an upright posture. Try to run
in the middle of the track, within comfortable reach of
the console.
•
If you encounter any operational faults during
exercise, grip the handlebar for support and stand on
the landing rails to the left and right of the running
belt. Turn the power switch off and see the instructions
under Malfunctions.
•
If you experience nausea, dizziness or other abnormal
symptoms while exercising, stop your workout at once
and consult a physician.
FINISHING AN EXERCISE SESSION
•
Finish each workout by gradually reducing the speed.
Don’t forget to stretch at the end of the workout.
•
Never leave the safety key in the treadmill.
•
Use the main power switch to turn the unit off.
•
Unplug the electrical cord from the wall outlet and
from the treadmill.
•
If necessary clean the treadmill from sweat with a
damp cloth. Do not use solvents.
•
Store the electrical cord where it is clear from all
pathways and out of childrens’ reach.
HEART RATE
No matter what your goal, you’ll get the best results by
training at the right level of effort, and the best measure
is your own heart rate. The most reliable heart rate
T60_manual_uusi versio_j.indd 4T60_manual_uusi versio_j.indd 4 25.10.2006 13:33:5125.10.2006 13:33:51

GB
OWNER’S MANUAL
•
T60
5
measurement is achieved with a telemetric device, in
which the electrodes of the transmitter fastened to the
chest transmit the pulses from the heart to the console
by means of an electromagnetic field.
NOTE! If you are fitted with a pacemaker, please consult
a physician before using a wireless heart rate monitor.
If you want to measure your heart rate this way
during your workout, moisten the grooved electrodes
on the transmitter belt with saliva or water. Fasten
the transmitter just below the chest with the elastic
belt, firmly enough so that the electrodes remain in
contact with the skin while exercising, but not so tight
that normal breathing is prevented. If you wear the
transmitter and belt over a light shirt, moisten the shirt
slightly at the points where the electrodes touch the
shirt. The transmitter automatically transmits the heart
rate reading to the console up to a distance of about 1
m.
If the electrode surfaces are not moist, the heart-rate
reading will not appear on the display. If the electrodes
are dry, they must be moistened again. Allow the
electrodes warm up properly to ensure accurate heart
rate measurement. If there are several telemetric
heart rate measurement devices next to each other,
the distance between them should be at least 1.5 m.
Similarly, if there is only one receiver and several
transmitters in use, only one person with a transmitter
should be within transmission range. The transmitter is
switched to an active state only when it is being used for
measurement. Sweat and other moisture can, however,
keep the transmitter in an active state and waste battery
energy. Therefore it is important to dry the electrodes
carefully after use.
When selecting training attire, please note that some
fibers used in clothes (e.g. polyester, polyamide) create
static electricity, which may prevent reliable heart rate
measurement.
Please note that a mobile phone, television and other
electrical appliances form an electromagnetic field
around them, which will cause problems in heart rate
measurement.
First find your maximum heart rate i.e. where the rate
doesn’t increase with added effort. If you don’t know
your maximum heart rate, please use the following
formula as a guide:
220 – AGE
These are average values and the maximum varies from
person to person. The maximum heart-rate diminishes
on average by one point per year. If you belong to a risk
group, ask a doctor to measure your maximum heart
rate for you.
We have defined three different heart-rate zones to help
you with targeted training.
BEGINNER: 50-60 % of maximum heart-rate
Also suitable for weight-watchers, convalescents
and those who haven’t exercised for a long time.
Three sessions a week of at least a half-hour each is
recommended. Regular exercise considerably improves
beginners’ respiratory and circulatory performance and
you will quickly feel your improvement.
TRAINER: 60-70 % of maximum heart-rate
Perfect for improving and maintaining fitness. Even
reasonable effort develops the heart and lungs effectively,
training for a minimum of 30 minutes at least three
times a week. To improve your condition still further,
increase either frequency or effort, but not both at the
same time!
ACTIVE TRAINER: 70-80 % of maximum heart-rate
Exercise at this level suits only the fittest and
presupposes long-endurance workouts.
CONSOLE
FUNCTION KEYS
START
Starts the selected training and activates the running
belt.
SPEED CONTROL KEYS (Rabbit / Turtle)
Rabbit key increases the belt speed in 0,1 km/h / mph
increments, the turtle key decreases it in 0,1 km/h /
mph increments. Pressing these keys longer makes the
speed change faster. Track speed ranges from 0,5-18
km/h / 0,3-11.2 mph.
ELEVATION CONTROL KEYS
Click the elevation up key to increase elevation in 0,5
% increments, and the elevation down key to decrease it
in 0,5 % increments. Pressing these keys longer makes
the speed change faster. Track elevation ranges from 0 %
(horizontal) to 10 %.
ARROW KEYS
In user settings, you can adjust the values with the arrow
keys. In HRC mode, you can set and scale the target
HR with the arrow keys. In exercise profiles, you can set
and scale the effort level with the arrow keys. Pressing
the “arrow up” key will increase the effort, and pressing
the “arrow down” key will decrease the effort.
STOP / PAUSE / RESET
Press STOP once and the treadmill stops and moves
into its waiting state for 5 minutes. You can restart the
interrupted exercise by pressing the START key within
5 minutes. Press STOP twice to end your exercise. Keep
the STOP key pressed down for 2 seconds to reset the
console. The console then switches to its initial state.
SELECT
Before you press the START key, SELECT key selects
the training modes. During training, SELECT key
selects the profile displays.
ENTER
Confirm your selections (training mode or program,
user set-ups)
T60_manual_uusi versio_j.indd 5T60_manual_uusi versio_j.indd 5 25.10.2006 13:33:5225.10.2006 13:33:52

6
OWNER’S MANUAL
•
T60
MEMORY
You can use the MEM key to save your completed
exercise in the console’s memory. To save your data, you
need to choose a user code. A total of 5 workouts can be
saved under each user code.
PSC
Position Speed Control (PSC) allows you to adjust the
track speed without touching the console by changing
your position on the track during exercise. The PSC
function requires the use of a heart rate monitor. PSC
can be used in manual exercises, HRC exercises with
elevation adjustment, the Rolling Hills profile, as well as
both fitness tests.
SET
Press the SET key to choose a user code, enter user
details, select display values, and to display the total
training distance in kilometres and the total training
time in hours.
DISPLAYS
HEART RATE
45-220 bpm. The heart rate light always blinks when
the console is receiving a heart rate signal.
KCAL (estimated energy consumption)
0-9999 kcal, 1 kcal increment
ELEVATION
0-10 %, 0,5 % increment
TIME
Exercise duration at 1 second intervals 00:00-99:59, and
at 1 minute intervals thereafter h1:40-h9:59
DISTANCE
0.00-99.99 km, 0,01 km increment
SPEED
running deck speed (0,5-18 km/h / 0,3-11.2 mph),
0,1 km / mph increment. A signal light indicates
the selected measurement unit (km/h, mph, pace =
minutes/ kilometre).
GRAPHIC / TEXT DISPLAY
T60 features a combined text and profile display that
provides instructions when you switch to an exercise
and during the exercise itself.
ENTERING USER DETAILS
We recommend that you choose a user code and save
your personal details: these details are needed e.g. for a
more accurate estimation of your energy consumption.
At the same time, you can set the units to be displayed
and check the total training values. Choosing a user
code will also allow you to save your exercise data.
1. Press SET. Use the arrow keys to select a user code (1-
4). Press ENTER to confirm your selection. NOTE! The
NO USER option displays device settings, showing e.g.
the total training time and distance.
2. Set the measurement units (Metric = metric system,
Imperial = avoirdupois). Use the arrow keys to change
the setting, and press ENTER to confirm your selection.
You will then move to the next setting.
3. Set the user weight. Use the arrow keys to change the
setting, and press ENTER to confirm your selection.
This information is needed for estimating energy
consumption. You will then move to the next setting.
4. Set gender (male, female). Use the arrow keys to
change the setting, and press ENTER to confirm your
selection. This information is needed for estimating
energy consumption. You will then move to the next
setting.
5. Set the age of the user. Use the arrow keys to change
the setting, and press ENTER to confirm your selection.
This information is needed for estimating energy
consumption. You will then move to the next setting.
6. Set the audio signal (ON = signals on, OFF = signals
off). Use the arrow keys to change the setting, and
press ENTER to confirm your selection. You will then
move to the next setting. NOTE! In profile workouts, the
console gives an audio signal in advance of any changes
in profile.
7. Set the units to be displayed (km/h, min/km, mph,
min/mile). Use the arrow keys to change the setting,
and press ENTER to confirm your selection. You will
then move to the next setting. NOTE! You can set the
units during exercise: press SET once and use the arrow
keys to change the setting, and press ENTER to confirm
your selection.
8. Set the maximum speed for PSC and HRC workouts
with the arrow keys: since PSC and HRC adjust the
speed level according to your heart rate, a maximum
speed limit is needed to keep the speed at a suitable
level. The default is 12 km/h. Use the arrow keys to
change the setting, and press ENTER to confirm your
selection. You will then move to the next setting.
9. The TOTAL TIME display shows a user specific total
training time on the treadmill. Press ENTER to move
to the next display.
10. The TOTAL DIST display shows a user specific
total training distance on the treadmill. Press ENTER
to return to user settings or press START to exit user
settings.
Once you have set the user details, you can start
exercising by selecting your own user code. The selected
user code will remain in the console’s memory until it is
replaced with a new one, the safety key is removed from
its place, or the power cord is unplugged.
POSITION SPEED CONTROL (PSC)
Position Speed Control (PSC) allows you to adjust
running track speed by changing your position on the
track. Move to the front of the track and it accelerates,
and as you move back the track itself slows down. When
you are walking or running in the middle section of the
track the speed stays steady.
NOTE! You must wear a heart rate belt when you use
PSC! A blinking square in the Heart Rate display
indicates that heart rate measurement is in operation.
NOTE! Attach the holder of the safety key carefully to
your shirt whenever you are using PSC. Adjust the
T60_manual_uusi versio_j.indd 6T60_manual_uusi versio_j.indd 6 25.10.2006 13:33:5225.10.2006 13:33:52

GB
OWNER’S MANUAL
•
T60
7
length of the safety key wire so that it will be detached
from the console, if you move too far back.
NOTE! If you are exercising with PSC, there must not
be another heart rate transmitter near the treadmill
(minimum distance 2 m); the simultaneous signals of
two transmitters endanger user safety by interfering with
the PSC.
PSC SETTINGS
PSC settings should be done with the treadmill at a
complete stop.
1. Start the use of PSC by setting the speed zone limits.
Press the PSC key.
2. Depending on the previous settings, either PSC ON
or PSC OFF will be displayed. Use the arrow keys to
change the setting to PSC ON and press ENTER.
3. PRESS ENTER TO CALIBRATE PSC OR START
TO EXIT will be displayed. Position yourself in the
middle of the track. The acceleration zone begins
approximately 10 cm ahead of the measurement point,
while the deceleration zone begins approximately 20 cm
behind the measurement point. Press ENTER and the
text PLEASE WAIT 8 will be displayed. The console
will now measure your distance on the basis of the heart
rate signal. Measurement takes 8 seconds, and after that
CALIBRATION READY PRESS START is displayed.
4. If the console cannot receive the heart rate signal
or there are problems in measuring the distance, the
console will return to the CALIBRATE display. In case
of such an error, the text CHECK TRANSMITTER
is displayed. You should then make sure that you have
properly followed the instructions on the use of the
heart rate belt.
If the speed zone limits are suitable for you, the next
time you start exercising you can start PSC just by
selecting PSC ON and pressing ENTER and START,
and then select the desired training mode. If you want
to change the speed zone limits, repeat steps 1-4 and
move to a more suitable position on the track before the
measurement.
TRAINING WITH PSC
1. Select Manual exercise, Rolling Hills profile, a
condition test or the standard heart rate exercise with
automatic elevation adjustment. In these exercises you
can adjust the track speed with PSC. The PSC signal
light indicates that the feature is in operation. T60 is
equipped with three PSC signal lights that show in
which speed zone you are currently running (Rabbit
= speed increases, - = constant speed, Turtle = speed
decreases).
2. Start the selected exercise by pressing the START
key, and adjust track speed by moving forward or back
on the track. Please note that the speed adjustment
keys (Turtle/Rabbit) are also in operation during a PSC
exercise. NOTE! If you have not tried the PSC feature
before, we recommend you start at slow speed.
CHOOSING AN EXERCISE
Press SELECT until the signal light indicates the desired
exercise. You can choose between:
1. Manual exercise in which you adjust both speed and
elevation yourself during the exercise.
2. Heart rate controlled HRC exercise in which the
treadmill adjusts the speed / elevation automatically,
so that your heart rate stays at the level set. You always
need to wear a heart rate belt while doing HRC
exercises.
3. Fitness tests feature with two test options: a 2-
kilometre walking test and a 12-minute Cooper run test.
4. Preset exercise profile in which speed/elevation or
heart rate level vary according to the preset program.
MANUAL EXERCISE
QUICK START
1. Manual exercise is the treadmill default setting. You
can start the exercise directly by pressing the START
key. The belt starts moving at 1,5 km/h / 1,0 mph.
STARTING WITH THE USER DETAILS SETUP
2. If you want to use user details or save your workout,
set your user details or select your user code (1-4). Press
START to confirm your selection.
3. Press SELECT until the signal light shows next to the
Manual text.
4. Press START. The belt starts moving at 1,5 km/h
/ 1,0 mph. Use the Rabbit/Turtle keys or the PSC
function to adjust the speed and the elevation control
keys to adjust the elevation.
5. Press START. The belt starts moving at 1,5 km/h
/ 1,0 mph. Use the Rabbit/Turtle keys or the PSC
function to adjust the speed and the elevation control
keys to adjust the elevation.
6. Press STOP and the treadmill stops and moves
into waiting state for 5 minutes. You can restart the
interrupted exercise by pressing the START key
within 5 minutes. You can use the waiting state to save
your workout in the console’s memory (see Memory
Function). Press the STOP key twice to end exercising
and display feedback on your workout. The console
then switches to its initial state.
HEART RATE CONTROLLED
EXERCISE
Heart rate controlled exercises enable training at a
selected heart rate level. Heart rate controlled exercises
always require the use of a heart rate belt. If heart rate
measurement is not working correctly, the error message
CHECK TRANSMITTER will be displayed. You
should then make sure that you have properly followed
the instructions on the use of the heart rate belt.
1. If you want to use user details or save your workout,
set your user details or select your user code (1-4). Press
START to confirm your selection.
2. Press SELECT until the signal light shows the HRC
text. Press ENTER to confirm your selection.
3. Select the HRC mode with the arrow keys:
T60_manual_uusi versio_j.indd 7T60_manual_uusi versio_j.indd 7 25.10.2006 13:33:5325.10.2006 13:33:53

8
OWNER’S MANUAL
•
T60
a) Speed = heart rate control is based on changing belt
speed. If you wish, you can change the inclination angle
of the belt during training.
b) Elevation = heart rate control is based on changing
treadmill inclination. In this mode you have to adjust
the speed by yourself using either PSC or the Turtle and
Rabbit keys.
c) Combination = automatic equal adjustment of both
the inclination angle and the speed of the belt.
4. Press ENTER to confirm your selection.
5. Set the desired heart rate (80-180) with the arrow
keys.
6. Press START to start constant heart-rate exercise. You
can adjust the heart rate level with the arrow keys during
the exercise.
7. The profile display collects the exercise details at one
minute intervals. After 20 minutes, the display will
shift to the left to show the speed details from the last
20 minutes. Pressing SELECT during the exercise will
display speed, elevation and heart rate profiles for the
exercise.
8. Press STOP and the treadmill stops and moves
into waiting state for 5 minutes. You can restart the
interrupted exercise by pressing the START key
within 5 minutes. You can use the waiting state to save
your workout in the console’s memory (see Memory
Function). Press the STOP key twice to end exercising
and display feedback on your workout. The console
then switches to its initial state.
ENTER to confirm your setting.
2. The display prompts for the user’s sex: enter your
sex with the arrow keys. Press ENTER to confirm your
setting.
3. The display prompts for user weight: enter your
weight with the arrow keys. Press ENTER to confirm
your setting.
4. The display prompts for the user’s age: enter your
age with the arrow keys. Press ENTER to confirm your
setting.
5. The display reads WARM UP to indicate you can
begin the 3-minute warm-up period. Begin the warm-
up period by pressing START.
6. The running deck elevation is adjusted at 1 % to
simulate air resistance. Adjust speed using the speed
control keys or the PSC function. We recommend that
you warm up by walking at a slightly faster pace than
normally.
7. During the warm-up period, time will count down
from three minutes. When the time displays 0:00, the
console gives an audio signal and the actual test will
begin (TEST STARTED!).
PERFORMING THE WALKING TEST:
1. The goal is to walk the 2 km distance as quickly as
possible. Adjust the speed yourself by using the speed
control keys or the PSC function. Do not run during
the test!
2. If the heart rate measurement is not working
correctly, the display will show the alert CHECK
MEN / MAXIMAL OXYGEN UPTAKE (VO2MAX)
1 = VERY POOR - 7 = EXCELLENT
AGE 1 2 3 4 5 6 7
18-19 <33 33-38 39-44 45-51 52-57 58-63 >63
20-24 <32 32-37 38-43 44-50 51-56 57-62 >62
25-29 <31 31-35 36-42 43-48 49-53 54-59 >59
30-34 <29 29-34 35-40 41-45 46-51 52-56 >56
35-39 <28 28-32 33-38 39-43 44-48 49-54 >54
40-44 <26 26-31 32-35 36-41 42-46 47-51 >51
45-49 <25 25-29 30-34 35-39 40-43 44-48 >48
50-54 <24 24-27 28-32 33-36 37-41 42-46 >46
55-59 <22 22-26 27-30 31-34 35-39 40-43 >43
60-65 <21 21-24 25-28 29-32 33-36 37-40 >40
WOMEN / MAXIMAL OXYGEN UPTAKE (VO2MAX)
1 = VERY POOR - 7 = EXCELLENT
AGE 1 2 3 4 5 6 7
18-19 <28 28-32 33-37 38-42 43-47 48-52 >52
20-24 <27 27-31 32-36 37-41 42-46 47-51 >51
25-29 <26 26-30 31-35 36-40 41-44 45-49 >49
30-34 <25 25-29 30-33 34-37 38-42 43-46 >46
35-39 <24 24-27 28-31 32-35 36-40 41-44 >44
40-44 <22 22-25 26-29 30-33 34-37 38-41 >41
45-49 <21 21-23 24-27 28-31 32-35 36-38 >38
50-54 <19 19-22 23-25 26-29 30-32 33-36 >36
55-59 <18 18-20 21-23 24-27 28-30 31-33 >33
60-65 <16 16-18 19-21 22-24 25-27 28-30 >30
FITNESS TESTS
The treadmill features two different fitness
tests. The fast-paced 2 km walking test
requires a lower level of effort, while the
12-minute Cooper run test is better suited to
those who are fit. You can use PSC to adjust
the speed during the tests.
1. Select your user code (1-4) with the arrow
keys. Press ENTER to confirm your selection.
2. Press SELECT until the signal light shows
next to the text TEST. Press ENTER to
confirm your selection..
3. Press SELECT to choose between the 2
km walking test and the Cooper test. Press
ENTER to confirm your selection.
2 KM WALKING TEST
The walking test requires the use of a heart
rate monitor. The test measures your fitness
level on the basis of your heart rate level
during the exercise and the time taken to
complete the 2 km distance. The test is
preceded by a 3-minute warm-up period.
We also recommend you continue walking
slowly after the test, so that your heart rate
returns smoothly to normal. On the basis of
your performance, the console will display
an estimate of your maximum oxygen uptake
capacity.
BEGINNING THE WALKING TEST:
1. The display prompts for user height:
enter your height with the arrow keys. Press
T60_manual_uusi versio_j.indd 8T60_manual_uusi versio_j.indd 8 25.10.2006 13:33:5325.10.2006 13:33:53

GB
OWNER’S MANUAL
•
T60
9
TRANSMITTER. You should then make sure that you
have properly followed the instructions on the use of the
heart rate belt.
3. Once the 2 km distance is covered, the console gives
an audio signal. The test is automatically followed
by a 5-minute cool-down period, after which the
treadmill will stop. The display gives the test result as
your maximum oxygen uptake capacity and shows an
estimate of your fitness level. Compare your results
to the fitness level categories for different age groups,
shown in the table.
COOPER TEST
The Cooper test is used to calculate your fitness level
on the basis of the distance you run in a period of 12
minutes: the longer the distance you cover, the better
your fitness level. The test is preceded by a 3-minute
warm-up period. We also recommend you continue
walking slowly after the test, so that your heart rate
returns smoothly to normal. On the basis of your
performance, the console will display an estimate of
your maximum oxygen uptake capacity.
BEGINNING THE COOPER TEST:
1.
The display reads COOPER SELECTED. Press
START to confirm your selection.
2. The display prompts for the user’s sex: enter your
sex with the arrow keys. Press ENTER to confirm your
setting.
3. The display prompts for the user’s age: enter your
age with the arrow keys. Press ENTER to confirm your
setting.
4. The display reads WARM UP to indicate you can
begin the 3-minute warm-up period. Begin the warm-
up period by pressing START.
5. The running deck elevation is adjusted at 1 % to
simulate air resistance. Adjust speed using the speed
control keys. We recommend that you warm up by
walking at a slightly faster pace than normally.
6. During the warm-up period, time will count down
from three minutes. When the time displays 0:00, the
console gives an audio signal and the actual test will
begin (TEST STARTED!).
PERFORMING THE COOPER TEST:
1. The goal is to run as long a distance as possible in a
period of 12 minutes. Adjust the speed yourself by using
the speed control keys or the PSC function. The display
shows the time elapsed and your estimated results
throughout the test.
2. Once the 12 minutes are up, the console gives an
audio signal. The test is automatically followed by a 5-
minute cool-down period, after which the treadmill will
stop. The display gives the test result as your maximum
oxygen uptake capacity and shows an estimate of your
fitness level. Compare your results to the fitness level
categories for different age groups, shown in the table.
EXERCISE PROFILES
Tunturi has developed different preset exercise profiles
in order to ensure versatile, pleasant and goal-oriented
training. The console gives an audio signal in advance
of changes in a profile. The profile display shows the
shape of the profile and the details of the next profile
bar. If you want to use user details or save your workout,
set your user details or select your user code (1-4). Press
ENTER to confirm your selection.
A. Combination profiles 1-3 are exercise profiles with
different effort levels and preset speed and elevation.
You can programme the speed to a desired level and set
the duration of the exercise to be displayed either in
time or distance. These profiles do not require the use a
heart rate belt, but that provides interesting additional
information about your performance.
1. Press SELECT until the signal light shows the
profile (1-3) you want. Press ENTER to confirm your
selection.
2. Set profile distance/time. Press SELECT to move to
profile duration (time / distance) setting. The previous
duration set is shown on the display. Use the SELECT
key to alternate between different setting values. You can
change the value using the arrow keys (limit 10 minutes
(10:00) – 3 hours (h3:00), adjusting at 5 minute steps /
3 km – 42 km, adjusting at 1 km steps). Press ENTER
to confirm your selection.
3. Press START. The exercise begins and the belt starts
moving. You can scale the profile speed level up and
down at 1 % steps using the arrow keys. Pressing
SELECT during the exercise will display speed,
elevation and heart rate profiles for the exercise.
4. Press STOP and the treadmill stops and moves
into waiting start for 5 minutes. You can restart the
interrupted exercise by pressing the START key within
5 minutes or you can save your workout in the console’s
memory (see Memory Function). Press the STOP key
twice to end exercising and display feedback on your
workout. The console then switches to its initial state.
5. The cool-down period will automatically start once
you have completed the profile. After the cool-down the
treadmill will stop. You can save your workout in the
console’s memory (see Memory Function).
B. Rolling Hills is an interval exercise in which you can
determine track speed yourself and set the distance to be
run or the duration of the exercise. Rolling Hills allows
you to regulate your speed using the PSC function.
Unless you use PSC, this profile does not require the
use of a heart rate belt. However, a heart rate belt will
provide you with interesting additional information
about your performance.
1. Press SELECT until the signal light shows the profile
4. Press ENTER to confirm your selection.
2. Press SELECT to move to profile duration (time /
distance) setting. The previous duration set is shown on
the display. Use the SELECT key to alternate between
different setting values. You can change the value using
the arrow keys (limit 10 minutes (10:00) – 3 hours
(h3:00), adjusting at 5 minute steps / 3 km – 42 km,
adjusting at 1 km steps).
3. Press START. The exercise begins and the belt starts
moving. Use the speed control keys or PSC to adjust the
speed. Pressing SELECT during the exercise will display
elevation and heart rate profiles for the exercise.
4. You can scale the program elevation profile up and
down using the arrow keys.
T60_manual_uusi versio_j.indd 9T60_manual_uusi versio_j.indd 9 25.10.2006 13:33:5425.10.2006 13:33:54

10
OWNER’S MANUAL
•
T60
5. Press STOP and the treadmill stops and moves
into waiting start for 5 minutes. You can restart the
interrupted exercise by pressing the START key within
5 minutes or you can save your workout in the console’s
memory (see Memory Function). Press the STOP key
twice to end exercising and display feedback on your
workout. The console then switches to its initial state.
6. The cool-down period will automatically start once
you have completed the profile. After the cool-down the
treadmill will stop. You can save your workout in the
console’s memory (see Memory Function).
C. Heart rate controlled HRC profiles (5-8) are heart
rate controlled exercise profiles with different effort
levels that allow you to set the duration of the exercise.
The heart rate controlled profiles always require the
use of a heart rate belt. If heart rate measurement is
not working correctly, the error message CHECK
TRANSMITTER will be displayed. You should
then make sure that you have properly followed the
instructions on the use of the heart rate belt.
1. Press SELECT until the signal light shows next to the
profile (5-8) you want. Press ENTER to confirm your
selection.
2. Select the HRC mode with the arrow keys. Press
ENTER to confirm your selection.
3. Press SELECT to move to profile duration (time /
distance) setting. The previous duration set is shown on
the display. Use the SELECT key to alternate between
different setting values. You can change the value using
the arrow keys (limit 10 minutes (10:00) – 3 hours
(h3:00), adjusting at 5 minute steps / 3 km – 42 km,
adjusting at 1 km steps).
4. Press START. The exercise begins and the belt starts
moving.
5. You can scale the profile speed level up and down at 1
% steps using the arrow keys.
6. Press STOP and the treadmill stops and moves
into waiting start for 5 minutes. You can restart the
interrupted exercise by pressing the START key within
5 minutes or you can save your workout in the console’s
memory (see Memory Function). Press the STOP key
twice to end exercising and display feedback on your
workout. The console then switches to its initial state.
7. The cool-down period will automatically start once
you have completed the profile. After the cool-down the
treadmill will stop. You can save your workout in the
console’s memory (see Memory Function).
PROFILES
(profile figures are at the back fold of the manual)
PROFILE 1 (Hill Walk). This profile is based on regular
changes in elevation, combined with a fairly steady,
brisk walking pace. The profile is suited to beginners
and active walkers. The default values are preset to an
average speed of 5.2 km/h and a top speed of 5.8 km/h,
with an average elevation of 2.7%.
PROFILE 2 (Hill Jog). This profile is based on irregular
changes in elevation, combined with a fairly steady, light
jogging pace. The profile is suited to beginners as well as
to those who want to maintain their fitness. The default
values are preset to an average speed of 6.9 km/h and
a top speed of 7.2 km/h, with an average elevation of
1.9%.
PROFILE 3 (Hill Run). This profile is based on a
consistent, low elevation, combined with a brisk
running pace with regular variation. The profile is suited
to active runners. The default values are preset to an
average speed of 11.6 km/h and a top speed of 12.5
km/h, with an average elevation of 1.8%.
PROFILE 4 (Rolling Hills). A distance profile where you
can set the distance to be covered in kilometres. The
profile is specifically designed for regular training, but
also allows for varied routines in fitness training. The
maximum distance is 42 km, with the default value
preset to 3 km, adjusting at 1 km steps. The profile
features interval type elevation settings, with an average
elevation of 2.4%.
PROFILE 5 (Fatburner 1). A heart rate profile with a
low level of effort, based on a regular rise and fall in the
heart rate. The profile is suited to weight control. The
default values are preset to an average heart rate of 114
bpm and a maximum heart rate of 125 bpm.
PROFILE 6 (Fatburner 2). A heart rate profile with
a medium level of effort, based on an interval type
rise and fall in the heart rate. The profile is suited to
fitness training and weight control. The default values
are preset to an average heart rate of 122 bpm and a
maximum heart rate of 136 bpm.
PROFILE 7 (Cardio). A heart rate profile with a medium
level of effort, based on a regular rise and fall in the
heart rate. The heart rate level remains at around 130-
140 bpm almost throughout the entire exercise. The
profile is ideal for fitness training. The default values
are preset to an average heart rate of 129 bpm and a
maximum heart rate of 145 bpm.
PROFILE 8 (Fit). A heart rate profile with a high level of
effort, based on a regular rise and fall in the heart rate.
The heart rate level remains at around 135-145 bpm
almost throughout the entire exercise. The profile is
suited to demanding fitness training and improvement.
The default values are preset to an average heart rate of
133 bpm and a maximum heart rate of 150 bpm.
MEMORY FUNCTION
The Memory function requires the use of a user code:
the exercise is saved under the selected user code. You
can save 5 exercises under each user code.
SAVING YOUR OWN PROFILE:
1. You can save preset profiles once the exercise is
completed, or after finishing the exercise by pressing
STOP once. If you want to save your Manual or HRC
workouts, finish the exercise by pressing STOP once.
Save your exercise by pressing MEM.
2. The display prompts for a memory slot (SAVE AS
OWN 1-5). Select the desired memory slot with the
arrow keys and press ENTER to confirm your selection:
your workout is now saved to the desired slot.
3. If there are no empty memory slots, replace a previous
T60_manual_uusi versio_j.indd 10T60_manual_uusi versio_j.indd 10 25.10.2006 13:33:5525.10.2006 13:33:55

GB
OWNER’S MANUAL
•
T60
11
profile with a new one. The display then prompts you
to confirm (REPLACE OWN 1-5). Press ENTER to
confirm your selection: your workout is now saved to
the desired slot.
4. SAVED AS OWN 1-5 is displayed to confirm your
save. The console will automatically switch to its initial
state.
NOTE! A total of 30 speed or elevation changes can
be saved in each profile. To save a profile, you need to
exercise for 10 minutes or more.
USING YOUR OWN PROFILE:
1. Select your user code.
2. Press MEM.
3. Press SELECT until the signal light indicates the
desired own profile (-1-5 MEMORY). Press ENTER
to confirm your selection. Select RERUN (to use
the profile without adjustments) or RACE (to use
the profile as a basis for the Race function) with the
SELECT key.
4. Press ENTER to confirm your selection.
5. Press START to begin the profile.
6. The RERUN function allows you to scale your own
profile and save the changes.
RACE FUNCTION
To race against a previously saved speed/elevation profile
exercise, select RACE in the Own Profile menu. The
goal is to complete the profile as fast as possible.
1. Press START. The exercise begins and the belt starts
moving.
2. Adjust the speed according to your fitness level either
manually or using the PSC function.
3. The console display shows information on profile
progress and any changes ahead, and also shows
how your performance compares to the previously
saved session: when you fall behind your previously
saved session, the display will read “YOU ARE x.xx
BEHIND”. When you are ahead of your previously
saved session, the display will read “YOU ARE x.xx
AHEAD”.
4. Once the profile has been completed, the treadmill
will automatically stop. You can save your workout in
the console’s memory (see Memory Function).
MAINTENANCE
The equipment is safe to use only when periodically
maintained and inspected for faults and wear. Do not
attempt any servicing or adjustment other than those
described in this manual. Any other servicing must
be performed by an authorized service representative.
Check the tightness of all fixing screws once a year.
Do not overtighten. Defective components must be
immediately replaced: the equipment must not be
operated with any defective components.
CLEANING AND LUBRICATING THE TREADMILL
FAILURE TO LUBRICATE YOUR TREADMILL MAY
INVALIDATE THE PRODUCT’S WARRANTY!
Wipe the treadmill surfaces, especially the handlebars
and console from dust with a damp cloth or towel.
Do not use solvents. Use a small vacuum nozzle to
carefully vacuum around all visible components (belt,
running deck, side rails etc.). Also keep the area near
the treadmill clean. While in use, the treadmill gathers
dust that may cause problems in the operation of the
equipment.
In average domestic use (a maximum of 60 minutes a
day), you should check the lubrication once a month
– however, lubricate the belt only if needed. In more
demanding use, the lubrication needs be checked at
shorter intervals. This is best done before you begin a
training session. Check the lubrication as follows:
1. Ensure the treadmill is powered off! Step on the
treadmill belt .and stand steadily where you normally
run on the belt.
2. Take hold of the horizontal handlebar and push the
belt with your feet so that it slides back and forth. The
belt should move softly and evenly, without a sound.
3. If you notice jerky movement or if the belt will not
slide check for lubrication by sliding your hand under
the belt.
Lubricate the running deck according to the following
instructions:
A) FOLDING TREADMILL
1. Attach the nozzle of the lubrication tube to the T-
Lube S container.
2. Lift the running deck and lock it.
3. Position the nozzle between the belt and the board.
Try to reach the spray as far into the center of the
running deck as possible.
4. Spray the lubricant for 2-3 seconds.
5. Lower the running deck into its normal position.
Use treadmill for your training session. Or allow the
treadmill to run for at least 5 minutes.
B) NON-FOLDING TREADMILL
1. Attach the nozzle of the lubrication tube to the T-
Lube S container.
2. Adjust the running deck to its maximum elevation.
3. Position the nozzle between the belt and the board on
the underside of the treadmill. Try to reach the spray as
far into the center of the running deck as possible.
4. Spray the lubricant for 2-3 seconds.
5. Lower the running deck into its normal position. Use
your treadmill for your training session. Or allow the
treadmill to run for at least 5 minutes.
NOTE! Lubricate your treadmill only with T-Lube S
silicon lubricant. Contact your local Tunturi distributor
for further supplies of T-Lube or further information on
lubrication and maintenance.
ALIGNING THE RUNNING BELT
Monitor belt tracking during exercise and make
adjustments as needed. The belt should run in the
center of the treadmill. Alignment is not usually needed,
provided
•
the treadmill is placed on an even, solid and
horizontal surface and the belt is correctly tensioned
T60_manual_uusi versio_j.indd 11T60_manual_uusi versio_j.indd 11 25.10.2006 13:33:5525.10.2006 13:33:55

12
OWNER’S MANUAL
•
T60
•
the alignment of the belt is correct
It is, however, possible for the belt to be pushed to one
side due to the user’s running style (e.g. more weight
on one foot). The alignment of the belt is adjusted by
turning the two bolts at the back of the treadmill.
1. Turn the power switch on and increase the treadmill’s
speed to 5 km/h (3 mph).
2. If the belt drifts to the left, turn the left adjustment
bolt ¼ turn clockwise and the right adjustment bolt 1/8
turn anti-clockwise. If the belt drifts to the right, turn
the right adjustment bolt ¼ turn clockwise and the left
adjustment bolt ¼ turn anti-clockwise.
3. If the belt remains centered the adjustment is correct.
If not, continue to make small adjustments as above
until the belt is correctly aligned. If the belt is allowed
run across to one side for long periods of time the edges
of the belt may be damaged and the treadmill may not
continue to operate correctly. Any damage to the belt
caused by the lack of necessary adjustment will not be
covered by the warranty.
ADJUSTING THE BELT TENSION
The belt must be tensioned if it begins to slip on the
rollers. In normal use, however, keep the belt as loose
as possible! The belt tension is adjusted by turning the
same screws as used for aligning the running belt. If
turning the screws will not effect the belt tension, please
contact your local Tunturi dealer.
1. Increase the treadmill’s speed to 5 km/h (3 mph).
2. Turn both adjustment screws an equal amount, ¼
turn clockwise.
3. Try to slow the belt down by holding onto the
handrails and braking as you walk (as if you were
walking downhill).
If the belt slips, turn another ¼ turn and repeat the test.
When braking heavily the belt may slip. If the belt keeps
slipping despite repeated adjustments, please contact
your local Tunturi dealer.
MALFUNCTIONS
NOTE! Despite continuous quality control, defects and
malfunctions caused by individual components may
occur in the equipment. In most cases it’s unnecessary
to take the whole device in for repair, as it’s usually
sufficient to replace the defective part. Always give
the model, serial number of your equipment and in
case of malfunctions also conditions of use, nature of
malfunction and any error code.
When you encounter unusual behavior from the
treadmill, simply turn the power switch off, wait 1
minute and turn the power switch on to reset the
treadmill. This should clear incidental errors and ready
the treadmill for normal operation again. If after you
have reset the treadmill by turning the power switch off
and on again, and the treadmill is still not operational,
contact your local Tunturi dealer for service.
If you require spare parts, always give the model, serial
number of your equipment and the spare part number
for the part you need. The spare part list is at the back
of this manual. Use only spare parts mentioned in the
spare part list.
ERROR CODES
The user interface will display information about
operational faults.
SYSTEM CHECK FAILED. Possible motor controller
fault. Turn the power switch off, wait 1 minute and
turn the power switch on again. If treadmill recovers
to normal operation, you may continue to use the
treadmill. Otherwise, call the dealer for service.
SPEED SENSOR ERROR. Call the dealer for service.
MOTOR SPEED ERROR. Ensure correct usage of
the treadmill. Do not push the belt with your feet.
Turn the power switch off, wait 1 minute and turn the
power switch on again. If treadmill recovers to normal
operation, you may continue to use the treadmill.
Otherwise, call the dealer for service.
MOTOR OVERLOAD. Ensure correct usage of the
treadmill. Do not brake the belt. Turn the power switch
off, wait 1 minute and turn the power switch on again.
If treadmill recovers to normal operation, you may
continue to use the treadmill. Ensure the lubrication
is sufficient, re-lubricate the running deck if needed.
Otherwise, call the dealer for service.
LIFT MOTOR ERROR. Call the dealer for service.
LIFT MOTOR OVERLOAD. Ensure correct usage
of the treadmill. Do not overload the lift motor by
continuously changing the elevation. Turn the power
switch off, wait 1 minute and turn the power switch on
again. The lift motor will be automatically calibrated
when the power switch is turned on. If treadmill
recovers to normal operation, you may continue to use
the treadmill. Otherwise, call the dealer for service.
MAINTENANCE CODE
CHECK LUBRICATION. Ensure the lubrication is
sufficient, re-lubricate the running deck only if needed.
Remove the code by pressing the ENTER key twice.
OVERLOAD PROTECTOR
If the treadmill’s power consumption becomes too
great, the overload protector will cut the power supply
as a safety measure. The fuse button next to the power
switch will spring up. Before you continue using the
equipment, first check the lubrication of the track, as
well as any other mechanical reason that could have
caused the overload protector to cut in. Push the fuse
button down. The treadmill is now ready for use again.
MOVING AND STORAGE
The T60 can be folded up to space saving storage
position. Always let the treadmill come to a complete
stop before lifting the running deck into the storage
T60_manual_uusi versio_j.indd 12T60_manual_uusi versio_j.indd 12 25.10.2006 13:33:5625.10.2006 13:33:56

GB
OWNER’S MANUAL
•
T60
13
position. Turn off the power switch and unplug the
power cord from the wall and the treadmill. Take hold
of the rear end of the running base and lift up until the
running base is locked in place. NOTE! The gas spring is
designed to make lifting the running base easier. Always
remember to ensure that the running base is locked
in the storage position. When in storage position, the
treadmill will automatically rest on the transportation
wheels. Push the equipment on the transportation
wheels. To release the folding lock, press the left gas
spring lightly with your foot on the sticker indicating
the folding mechanism and pull the running base down.
Lower the treadmill carefully onto the floor.
NOTE! Transport the treadmill with extreme caution
over uneven surfaces, for example over a step. The
treadmill should never be transported upstairs using
the wheels over the steps, instead it must be carried.
We recommend that you use a protective base when
transporting the equipment. The running belt needs to
be realigned and centered after moving.
To prevent malfunctioning of the treadmill, store it in a
dry place with as little temperature variation as possible,
protected against dust. Always unplug the treadmill
from the electrical outlet when not in use.
TECHNICAL DATA
Length ....................................................202 cm / 79“
(storage position ................................... 115 cm / 45”)
Height ....................................................138 cm / 54”
(storage position ................................... 175 cm / 69”)
Width ......................................................94 cm / 37”
Weight .............................................. 105 kg / 231 lbs
Running surface ......................................54 x 138 cm
Speed ..........................0,5-18,0 km/h / 0,3-11,2 mph
Elevation range ................................................0-10 %
Motor ..............................................................2,5 HP
T60 treadmill meets the requirements of the EU’s EMC
Directives on electromagnetic compatibility (89/336/
EEC) and electrical equipment designed for use within
certain voltage limits (73/23/EEC). This product
therefore carries the CE label. T60 treadmill meets EN
precision and safety standards (Class HA, EN-957, parts
1 and 6).
Due to our continuous policy of product development,
Tunturi reserves the right to change specifications
without notice.
CAUTION! The instructions must be followed carefully
in the assembly, use and maintenance of your
equipment. The warranty does not cover damage due to
negligence of the assembly, adjustment and maintenance
instructions described herein. Changes or modifications
not expressly approved by Tunturi Oy Ltd will void the
user’s authority to operate the equipment!
We wish you many enjoyable trainings with your
new Tunturi training partner!
T60_manual_uusi versio_j.indd 13T60_manual_uusi versio_j.indd 13 25.10.2006 13:33:5625.10.2006 13:33:56

14
BETRIEBSANLEITUNG
•
T60
WICHTIGE
SICHERHEITSHINWEISE
Dieses Handbuch ist ein wesentlicher
Bestandteil Ihres Trainingsgerätes.
Lesen Sie es bitte sorgfältig durch,
bevor Sie Ihr Trainingsgerät montieren,
mit ihm trainieren oder es warten. Bitte
bewahren Sie dieses Handbuch auf;
es wird Sie jetzt und zukünftig darüber
informieren, wie Sie Ihr Gerät benutzen
und warten. Befolgen Sie diese
Anweisungen immer sorgfältig.
Ihr Heimtrainer wurde für das
Heimtraining und für die leichte
kommerzielle Nutzung entwickelt.
Sowohl Tunturi, als auch seine
nationalen Vertretungen übernehmen
keine Haftung für Verletzungen oder
Geräteschäden, die sich bei Einsatz
in gewerblichen Fitnesscentern,
Sportvereinen und vergleichbaren
Einrichtungen ergeben. Für Schäden,
die durch Missachtung der in diesem
Handbuch beschriebenen Montage-
Einstellungs- und Wartungsinstruktionen
entstehen, besteht kein
Garantieanspruch!
•
Das Gerät nur an geerdete
Schukosteckdosen anschliessen und
zum Anschluss kein Verlängerungskabel
verwenden. Schwankungen in der
Netzspannung von mehr als 10 Prozent
können zu Fehlfunktionen des Gerätes
führen und die Elektronik beschädigen.
Die Leistungsaufnahme kann maximal
10 A betragen. Die Garantie erlischt,
wenn das Gerät nicht diesen Anleitungen
entsprechend angeschlossen wird.
•
Modifikationen an Steckdosen und
Netzkabel dürfen nur von Fachkräften
durchgeführt werden, die mit der
Wartung von elektromechanischen
Geräten vertraut sind und eine
gültige Genehmigung für die
Durchführung derartiger Wartungs- und
Reparaturarbeiten haben.
•
Suchen Sie vor dem Trainingsbeginn
einen Arzt auf, der Ihren
Gesundheitszustand feststellt.
•
Bei Übelkeit, Schwindelgefühl oder
anderen
ungewöhnlichen Symptomen während
des Trainings, beenden Sie Ihre Übung
und suchen Sie einen Arzt auf.
•
Keine anderen als die in dieser
Gebrauchsanweisung beschriebenen
Wartungsmassnahmen und
Einstellungen vornehmen. Vor Montage-
und Reparaturarbeiten das Gerät
ausschalten und den Netzstecker
ziehen.
•
Das Gerät darf nicht von Personen
benutzt werden, deren Gewicht über 135
kg liegt.
•
Dieses Gerät ist zugelassen für das
Training zu Hause. Die Garantie dieses
Gerätes beträgt 24 Monate für das
Heimtraining.
HERZLICH WILLKOMMEN IN DER
WELT DES TRAINIERENS MIT
TUNTURI!
Durch Ihren Kauf haben Sie bewiesen, dass Ihnen Ihre
Gesundheit und Ihre Kondition viel wert sind; auch
haben Sie gezeigt, dass Sie Qualität zu schätzen wissen.
Mit einem Tunturi-Fitnessgerät haben Sie sich für ein
hochwertiges, sicheres und motivierendes Produkt als
Trainingspartner entschieden. Welches Ziel Sie auch
immer mit Ihrem Training verfolgen, wir sind sicher,
dass Sie es mit diesem Fitnessgerät erreichen. Hinweise
zu Ihrem Trainingsgerät und zum effektiven Training
damit finden Sie auf der Internetseite von Tunturi
WWW.TUNTURI.COM.
INHALT
MONTAGE ................................................................15
ALLGEMEINES ZUM TRAINING .............................16
HERZFREQUENZ .................................................... 16
COCKPIT .................................................................17
POSITION SPEED CONTROL (PSC) ......................19
WAHL DER TRAININGSEINHEIT ............................20
MANUAL-TRAINING ................................................20
HERZFREQUENZGESTEUERTES ........................20
TRAINING ................................................................20
TRAININGSPROFILE ...............................................22
SPEICHERFUNKTION .............................................24
WARTUNG ...............................................................24
BETRIEBSSTÖRUNGEN .........................................25
TRANSPORT UND AUFBEWAHRUNG ...................26
TECHNISCHE DATEN .............................................27
T60_manual_uusi versio_j.indd 14T60_manual_uusi versio_j.indd 14 25.10.2006 13:33:5625.10.2006 13:33:56

D
BETRIEBSANLEITUNG
•
T60
15
MONTAGE
Prüfen Sie, dass folgende Teile vorhanden sind:
1. Rahmen
2. Vorderstangen
3. Querhandstütze
4. Cockpit
5. Netzkabel
6. Montagezubehör (der Inhalt steht mit * auf der
Ersatzteilliste): Bewahren Sie die Montageteile sorgfältig
auf, denn Sie können sie später u.a. zur Justierung
benötigen
Die Richtungsangaben rechts, links, vorne, hinten
gehen von der Blickrichtung beim Training aus.
In Problemfällen wenden Sie sich bitte mit der
Typenbezeichnung und der Seriennummer des Gerätes
an Ihren Händler. Der Silikatbeutel verhindert die
Feuchtigkeitsbildung während der Lagerung. Er
wird nach dem Auspacken nicht mehr benötigt. Wir
empfehlen, dass Sie das Gerät mit mindestens einer
weiteren erwachsenen Person montieren. Das Gerät wie
folgt montieren:
VORDERSTANGEN
BITTE BEACHTEN! Bitte die Befestigungsschrauben
nicht entfernen, sie befinden sich bereits an den
vorgesehenen Stellen! Bringen Sie die Vorderstangen
am vorgesehenen Platz an den Seiten des Rahmens an:
ziehen Sie gleichzeitig das aus der linken Vorderstange
kommende Kabel nach oben, damit es nicht zwischen
Vorderstange und Rahmen gerät. Ziehen Sie bitte die
Befestigungsschrauben erst dann fest an, wenn Sie die
Handstütze und das Cockpit angebracht haben.
QUERHANDSTÜTZE
Bringen Sie die quer verlaufende Handstütze so an,
dass der gewölbte Teil auf den hinteren Teil des Gerätes
zeigt. Befestigen Sie die Querhandstütze von beiden
Seiten mit jeweils einer Sechser-Hohlschraube an den
Vorderstangen.
COCKPIT
Verbinden Sie das aus der linken Vorderstange
kommende Kabel mit dem Anschluss des Cockpitkabels
und schieben Sie das verbundene Kabel zurück
in die Vorderstange. Drücken Sie das Cockpit auf
den Vorderstangen fest und befestigen Sie es mit
vier Sechser-Hohlschrauben von der Rückseite des
Cockpits. Bei Bedarf können Sie das Befestigen dadurch
erleichtern, dass Sie die quer verlaufende Handstütze
lockern: Lockern Sie die Handstütze jedoch nicht an
dem Ende, an dem die schwarze Gummimutter sitzt.
Ziehen Sie jetzt die Befestigungsschrauben der
Vorderstangen an. Sie ziehen die Befestigungsschrauben
an, indem Sie den Kopf des Sechser-Schraubenschlüssels
durch das Loch in der Vorderstange auf die
Befestigungsschraube drücken. BITTE BEACHTEN!
Drehen Sie beim Befestigen den Schraubenschlüssel
gegen den Uhrzeigersinn! Vermeiden Sie ein zu starkes
Anziehen der Schrauben. Drücken Sie die Kunststoff-
Abdeckkappen auf die Löcher in den Vorderstangen.
Entfernen Sie die Schutzfolie von der Anzeige.
SICHERHEITSSCHLÜSSEL
Der Laufbandtrainer funktioniert nur, wenn der
Sicherheitsschlüssel ordnungsgemäss im Schloss steckt.
Das Laufband bleibt automatisch stehen, sobald sich
der Sicherheitsschlüssel nicht mehr im Schloss links am
Cockpit befindet. Die Schnur des Sicherheitsschlüssels
mit Hilfe des Clips an der Kleidung befestigen und den
Sicherheitsschlüssel ins Schloss stecken. Sicherstellen,
dass der Clip an der Schnur des Sicherheitsschlüssels
gut an Ihrer Kleidung befestigt ist. Bei Zug sollte sich
der Clip nicht von Ihrer Kleidung lösen, sondern der
Sicherheitsschlüssel aus dem Schloss gezogen werden.
Zum Auf- und Absteigen und bei der Bedienung der
Tastatur immer an den Handläufen festhalten. Nie vom
laufenden Laufband abspringen!
NETZKABEL
Das Netzkabel am Laufbandtrainer neben dem
Netzschalter befindliche Buchse einstecken. Bevor
T60_manual_uusi versio_j.indd 15T60_manual_uusi versio_j.indd 15 25.10.2006 13:33:5725.10.2006 13:33:57

16
BETRIEBSANLEITUNG
•
T60
Sie das Gerät an das Stromnetz anschliessen, stellen
Sie sicher, dass die Voltzahl Ihres Stromnetzes mit der
auf dem Typenschild übereinstimmt. Schalten Sie
den Strom für das Gerät mit dem neben dem Stecker
befindlichen Stromschalter ein.
BITTE BEACHTEN! Das
Gerät darf nur an eine geerdete Steckdose angeschlossen
werden. Verwenden Sie keine Verlängerungsschnur, um
das Gerät mit einer Steckdose zu verbinden.
ALLGEMEINES ZUM TRAINING
Vor Beginn des Trainings sollte man sich sorgfältig mit
den Funktionen und der Handhabung des motorisierten
Laufbandes vertraut gemacht haben.
Trainieren mit einem Laufband ist eine ausgezeichnete
aerobe Trainingsform, d.h. das Training ist zwar leicht,
erfordert aber eine längere Trainingsdauer. Das aerobe
Training basiert auf einer Verbesserung der max.
Sauerstoffaufnahmefähigkeit, was zu einer Steigerung
von Kondition und Ausdauer führt. Die Fähigkeit
des Körpers, Fett zu verbrennen, hängt direkt von der
Fähigkeit des Körpers ab, Sauerstoff zu transportieren.
Aerobes Training ist vor allem angenehm. Man sollte
zwar schwitzen, aber der Puls darf nicht unangemessen
ansteigen. Auf diese Weise hält man länger durch. Die
empfohlene Trainingslänge beträgt drei Mal die Woche
30–60 Minuten – je nach Zielen, Kondition und
Möglichkeiten.
Falls Sie auf dem Gehgeschwindigkeitsniveau
trainieren möchten, können Sie den Abwechslungs-
und Beanspruchungsgrad Ihrer Leistungen durch
Veränderung des Anstiegswinkels Ihrer Laufunterlage
steigern. Sie können Ihr Gehtraining auch dadurch
vielseitiger gestalten, indem Sie gleichzeitig Ihre
Armmuskeln mit kleinen Hanteln trainieren. Denken
Sie dabei bitte an Ihr Gleichgewicht und an andere
Sicherheitsfaktoren.
Hinweise zu Ihrem Trainingsgerät und zum effektiven
Training damit finden Sie auf der Internetseite von
Tunturi www.tunturi.com.
FÜR IHRE GESUNDHEIT
•
Dieses Gerät darf nur in Innenräumen benutzt
werden; es ist nicht für den Einsatz in Feuchträumen
vorgesehen.
•
Stellen Sie das Gerät auf einen sicheren, ebenen
Untergrund. Darauf achten, dass der Bereich neben
und vor (mindestens 100 cm) und hinter (mindestens
100x200 cm) dem Laufbandtrainer frei ist. Sorgen Sie
auch dafür, dass keine Kinder oder Haustiere in diesen
Bereich kommen können, solange das Gerät in Betrieb
ist.
FÜR DIE TRAININGSUMGEBUNG
•
Es wird empfohlen, das Gerät auf eine Schutzmatte
zu stellen.
•
Vergewissern Sie sich, dass der Trainingsraum
ausreichend belüftet ist. Um Erkältungen zu vermeiden,
trainieren Sie nicht an einem zugigen Ort.
FÜR DEN GEBRAUCH
•
Falls Sie Kinder an das Trainingsgerät lassen,
müssen Sie deren geistige und körperliche Entwicklung
und vor allem deren Temperament berücksichtigen, sie
gegebenenfalls beaufsichtigen und sie vor allem auf die
richtige Benutzung des Gerätes hinweisen.
•
Das Gerät kann immer nur von einer Person
benutzt werden.
•
Lassen Sie ein laufendes Laufband nie
unbeaufsichtigt.
•
Tragen Sie während des Trainings angemessene
Kleidung und Schuhe.
•
Das Gerät darf nicht benutzt werden, falls es nicht
völlig funktionstauglich ist.
TRAINING BEGINNEN
•
Zur Vermeidung von Muskelkater Aufwärmtraining
(langsames Joggen oder Gehen) und Dehnübungen
nicht vergessen.
•
Mit gegrätschten Beinen auf die Seitenränder
des Laufbandtrainers stellen. Das Gerät nie auf dem
Laufband stehend in Bewegung setzen.
•
Beginnen Sie Ihr Training mit einer langsamen
Geschwindigkeit und steigern Sie dann Geschwindigkeit
bzw. Steigungswinkel gradweise je nach Ihrer Kondition
und wie Sie sich gerade fühlen.
•
Zum Auf- und Absteigen und bei der Bedienung
der Tastatur immer an den Handläufen festhalten. Nie
vom laufenden Laufband abspringen!
•
Halten Sie Rücken und Nacken gerade, so
vermeiden Sie Verspannungen und Schmerzen in
Nacken, Schultern und Rücken. Laufen Sie möglichst
immer in der Mitte des Laufbandes und halten Sie einen
solchen Abstand zum Cockpit, dass dieses Ihr Laufen
nicht stört, Sie es aber trotzdem leicht erreichen.
•
Sollten während Ihres Trainings
Funktionsstörungen am Gerät auftreten, halten Sie sich
bitte an den Handstützen fest und stellen sich sofort
breitbeinig auf die Seitenplatten der Laufunterlage.
Stellen Sie das Laufband ab und sehen Sie in der
Anleitung unter „Funktionsstörungen“ nach.
•
Bei Übelkeit, Schwindelgefühl oder anderen
ungewöhnlichen Symptomen während des Trainings,
beenden Sie Ihre Übung und suchen Sie einen Arzt auf.
TRAINING BEENDEN
•
Beenden Sie nicht abrupt Ihr Training, sondern
fahren Sie schrittweise Ihre Geschwindigkeit
zurück. Bitte vergessen Sie nicht das Stretching nach
Beendigung des Trainings.
•
Den Sicherheitsschlüssel immer abziehen.
•
Das Gerät ausschalten.
•
Das Netzkabel sowohl aus der Steckdose als
auch aus der Buchse am Laufbandtrainer ziehen und
an einem sicheren Ort, vor Kinderhand geschützt,
aufbewahren.
•
Das Gerät mit einem leicht angefeuchteten
Wischtuch von eventueller Feuchtigkeit befreien. Keine
Lösungsmittel verwenden!
HERZFREQUENZ
Egal, welches Ziel Sie erreichen wollen, die besten
Resultate erzielen Sie mit einem Training auf dem
T60_manual_uusi versio_j.indd 16T60_manual_uusi versio_j.indd 16 25.10.2006 13:33:5925.10.2006 13:33:59

D
BETRIEBSANLEITUNG
•
T60
17
richtigen Leistungsniveau, und das beste Mass ist
dabei Ihre eigene Herzfrequenz. Als zuverlässigste
Art der Herzfrequenzmessung hat sich die drahtlose
Herzfrequenzabnahme erwiesen, bei der die Herzschläge
mit einem Elektrodengurt von der Brust abgenommen
werden. Vom Gurt werden die Impulse danach über
ein elektromagnetisches Feld an den Empfänger in der
Elektronikanzeige übertragen.
BITTE BEACHTEN! Falls Sie einen Herzschrittmacher
tragen, lassen Sie sich von Ihrem Arzt bestätigen, dass
Sie die drahtlose Herzfrequenzmessung benutzen
können.
Zur drahtlosen Herzfrequenzmessung während des
Trainings die gegen die Haut kommenden Elektroden
am Elektrodengurt sorgfältig mit Wasser oder Speichel
anfeuchten. Wird der Elektrodengurt über einem
dünnen Hemd getragen, sind die gegen die Elektroden
gerichteten Flächen ebenfalls zu befeuchten. Den Sender
mit Hilfe des Gurtes fest unterhalb der Brustmuskulatur
befestigen und darauf achten, dass der Gurt beim
Training nicht verrutscht. Den Elektrodengurt
jedoch nicht so festziehen, dass z. B. die Atmung
erschwert wird. Der Sender kann den Pulswert bis zu
einer Entfernung von zirka 1 m an den Empfänger
übertragen.
Bei trockenen Elektroden wird kein Herzfrequenzwert
angezeigt. Ggf. Elektroden wieder anfeuchten. Für
eine zuverlässige Herzfrequenzmessung müssen die
Elektroden auf Körpertemperatur angewärmt sein. Sind
mehrere drahtlose Herzfrequenzmessgeräte gleichzeitig
eingesetzt, sollten sie mindestens 1,5 m voneinander
entfernt sein. Werden nur ein Herzfrequenzempfänger,
aber mehrere Sender eingesetzt, darf sich nur eine
Person, die einen Herzfrequenzsender trägt, während
der Herzfrequenz-messung innerhalb der Reichweite
des Senders befinden. Der Sender schaltet sich aus,
wenn der Elektrodengurt abgenommen wird. Er kann
jedoch durch Feuchtigkeit neu aktiviert werden, was
die Lebensdauer der Batterie verkürzt. Deswegen ist es
wichtig, den Sender nach dem Training sorgfältig zu
trocknen.
Achten Sie bei Ihrer Trainingskleidung darauf, dass
bestimmte für Kleidungsstücke verwendete Fasern (z.B.
Polyester, Polyamid) statische elektrische Ladungen
verursachen, die ein Hindernis für eine zuverlässige
Herzfrequenzmessung sein können. Beachten Sie
auch, dass durch Handys, Fernsehgeräte und andere
elektrische Geräte elektromagnetische Felder entstehen,
die Probleme bei der Herzfrequenzmessung verursachen
können.
Ermitteln Sie zuerst Ihre maximale Herzfrequenz. Wenn
Sie diese nicht kennen, orientieren Sie sich bitte an der
nachfolgenden Formel:
220 – ALTER
Das Maximum unterscheidet sich von Mensch zu
Mensch. Die maximale Herzfrequenz verringert sich
pro Jahr durchschnittlich um einen Punkt. Wenn Sie
zu einer der bereits genannten Risikogruppen zählen,
bitten Sie den Arzt, Ihre maximale Herzfrequenz
festzustellen.
Wir haben drei Herzfrequenzbereiche definiert, die Sie
bei Ihrem zielgerichteten Training unterstützen.
ANFÄNGER: 50-60 % der maximalen Herzfrequenz
Sie ist ausserdem für Übergewichtige und
Rekonvaleszenten geeignet sowie für diejenigen,
die seit langem nicht mehr trainiert haben. Drei
Trainingseinheiten pro Woche von jeweils einer halben
Stunde Dauer sind angemessen. Regelmässiges Training
verbessert die Leistungsfähigkeit der Atmungs- und
Kreislauforgane ganz entscheidend.
FORTGESCHRITTENE: 60-70 % der maximalen
Herzfrequenz
Perfekt geeignet zur Verbesserung und Erhaltung der
Fitness. Damit stärken Sie Ihr Herz und Ihre Lungen
mehr, als auf dem Anfängerniveau. Wir empfehlen
mindestens 3 Trainingseinheiten pro Woche mit jeweils
mindestens 30 Minuten. Wenn Sie Ihr Fitnessniveau
noch weiter erhöhen möchten, trainieren Sie häufiger
oder intensiver, aber nicht beides zugleich.
AKTIVE SPORTLER: 70-80 % der maximalen
Herzfrequenz
Das Training auf diesem Niveau ist nur für
durchtrainierte Sportler geeignet und setzt ein Langzeit-
Ausdauertraining voraus.
COCKPIT
FUNKTIONSTASTEN
START
Beginnen Sie mit der gewählten Trainingseinheit.
TASTEN ZUR NEIGUNGSKONTROLLE
(HASE / SCHILDKRÖTE)
Mit der Hasentaste wird die Laufgeschwindigkeit in 0,1
km/h-Intervallen erhöht, mit der Schildkrötentaste in
0,1 km/h-Intervallen reduziert. Längeres Drücken der
Tasten beschleunigt die Geschwindigkeitsänderung. Der
Geschwindigkeitsbereich liegt zwischen 0,5-18,0 km/h /
0,3- 11,2 mph.
TASTEN ZUR NEIGUNGSKONTROLLE
Durch Drücken der Taste zum Anheben der Neigung
können Sie den Neigungswinkel des
Laufbandes in Stufen von 0,5 % erhöhen, durch
Drücken der Taste zum Verringern der Neigung
wiederum verringern Sie die Neigung in Stufen von
0,5 %. Der Neigungswinkel kann zwischen 0 %
(horizontal) und 10 % eingestellt werden.
PFEILTASTEN
Bei den Benutzereinstellungen verändern Sie
Einstellwerte mithilfe der Pfeiltasten. Im HRC-Modus
können Sie den eingegebenen Pulswert während des
Trainings mithilfe der Pfeiltasten verändern. In den
Trainingsprogrammen können Sie das Anspruchsniveau
T60_manual_uusi versio_j.indd 17T60_manual_uusi versio_j.indd 17 25.10.2006 13:34:0025.10.2006 13:34:00

18
BETRIEBSANLEITUNG
•
T60
mithilfe der Pfeiltasten skalieren. Durch Druck auf die
“Pfeil oben” erhöhen Sie das Anspruchsniveau, durch
Druck auf die “Pfeil unten” verringern Sie es.
STOP / PAUSE / RESET
Durch einmaliges Drücken der STOP-Taste bleibt
das Laufband stehen und geht in einen 5 Minuten
dauernden Wartemodus über. Vor Ablauf von 5
Minuten können Sie die unterbrochene Trainingseinheit
durch Drücken der START-Taste wieder aufnehmen.
Durch erneutes Drücken der STOP-Taste beenden Sie
das Training. Ein Druck von 2 Sekunden auf die STOP-
Taste setzt die Anzeige auf Null zurück, worauf die
Anzeige in den Startzustand und das Laufband in die
Startposition zurückkehrt.
SELECT
Vor Betätigung der START-Taste können Sie mit der
SELECT-Taste einen Trainingsmodus wählen. Während
des Trainings können Sie mit der SELECT-Taste die
gewünschte Profilanzeige wählen.
ENTER
Bestätigen Sie Ihre Wahl (Trainingsmodus oder
–programm, Benutzereinstellungen).
MEMORY
Mit Hilfe der MEM-Taste können Sie das beendete
Training im Speicher des Cockpits abspeichern. Das
Abspeichern setzt die Wahl eines Benutzercodes voraus.
Für jeden Benutzercode stehen fünf Speicherplätze zur
Verfügung.
PSC
In der PSC-Funktion regeln Sie die Geschwindigkeit
des Laufbandes während des Trainings und ohne das
Cockpit zu berühren, indem Sie Ihre Position auf
dem Laufband verändern. Die PSC-Funktion setzt die
Verwendung eines Herzfrequenz-Messgurts voraus. Sie
können die PSC-Funktion beim Manual-Training, beim
winkelgesteuerten HRC-Training, beim Rolling Hills-
Profil und bei beiden Konditionstests benutzen.
SET
Durch Drücken der SET-Taste können Sie Ihren
Benutzercode wählen, die benutzerspezifischen
Einstellungen programmieren, die gewünschten
Maßeinheiten wählen und die Gesamtlaufstrecke bzw.
–zeit des Geräts kontrollieren.
ANZEIGEN
HEART RATE (Herzfrequenz)
45-220 bpm. Die Herzfrequenzlampe blinkt stets, wenn
das Messgerät ein Frequenzsignal empfängt.
KCAL (Energieverbrauch)
0-9999 kcal, in Intervallen von 1 kcal
ELEVATION (Steigungswinkel)
0-10 %, in Intervallen von 0,5 %
TIME (Trainingszeit)
Anzeige mit Sekundengenauigkeit 00:00-99:59, danach
mit Minutengenauigkeit h1:40 - h9:59.
DISTANCE (Strecke)
0.00-99.99 km, in Intervallen von 0,01 km
SPEED (Laufbandgeschwindigkeit)
0,5-18,0 km/h / 11,2 mph in Intervallen von 0,1 km/h.
Die Signallampe bezeichnet die gewählte Maßeinheit
(km/h, mph (miles per hour), pace (Schritt), bzw.
Minuten/Kilometer).
GRAFIK/TEXTANZEIGE
Das T60-Modell ist mit einer kombinierten Text- und
Profilanzeige ausgestattet, die den Benutzer auf Englisch
durch den Trainingsablauf führt und während des
Trainings anleitet.
EINGABE DER BENUTZERANGABEN
Wir empfehlen Ihnen einen Benutzercode zu
wählen und Ihre persönlichen Daten abzuspeichern.
Diese Informationen werden u.a. bei der präziseren
Einschätzung des Energieverbrauchs benötigt.
Gleichzeitig können Sie auch die bei dem Laufband
verwendeten Maßeinheiten eingeben sowie die
Gebrauchsgesamtwerte des Laufbands ablesen. Durch
Wählen eines Benutzercodes können Sie auch ein
durchgeführtes Training abspeichern.
1. Bestätigen Sie die SET-Taste. Wählen Sie mit Hilfe
der Pfeiltasten einen Benutzercode (1-4). Bestätigen Sie
den eingegebenen Wert mit der ENTER-Taste. BITTE
BEACHTEN! Die Alternative NO USER bezieht sich auf
die Geräteinstellungen und unterhalb dieser finden Sie
die Gesamtlaufzeit bzw. –strecke des Geräts.
2. Stellen Sie die Masseinheiten ein (Metric = metrisches
System, Imperial = englische Masseinheiten); verändern
Sie die Einstellungen mit den Pfeiltasten. Bestätigen Sie
den eingegebenen Wert mit der ENTER-Taste, wonach
Sie zur nächsten Einstellung gelangen.
3. Geben Sie Ihr Gewicht ein. Ändern Sie die
Einstellungen mit der Pfeiltaste, bestätigen Sie den
eingegebenen Wert mit der ENTER-Taste, worauf Sie
zur nächsten Einstellung gelangen: Die Angaben werden
zur Einschätzung des Energieverbrauchs benötigt.
4. Eingabe des Geschlechts (Male = Mann, Female =
Frau). Ändern Sie die Einstellungen mit der Pfeiltaste,
bestätigen Sie den eingegebenen Wert mit der
ENTER-Taste, worauf Sie zur nächsten Einstellung
gelangen: Die Angaben werden zur Einschätzung des
Energieverbrauchs benötigt.
5. Geben Sie das Alter des Benutzers ein; verändern Sie
die Einstellungen mit den Pfeiltasten, bestätigen Sie den
eingestellten Wert mit der ENTER-Taste, worauf Sie
zur nächsten Einstellung gelangen: Die Angaben werden
zur Einschätzung des Energieverbrauchs benötigt.
6. Schalten Sie die Verwendung der Tonsignale
ein (ON = Tonsignale werden verwendet, OFF =
Tonsignale werden nicht verwendet); verändern Sie die
Einstellungen mit den Pfeiltasten, bestätigen Sie den
eingestellten Wert mit der ENTER-Taste, worauf Sie
zur nächsten Einstellung gelangen.
BITTE BEACHTEN!
Bei den Trainingsprofilen zeigt das Cockpit mit einem
Signalton im Voraus die Änderungen im Profil an.
7. Geben Sie die für die Anzeige gewünschte Maßeinheit
ein (km/h, min/km, mph, min/mile). Ändern Sie die
Einstellungen mit der Pfeiltaste, bestätigen Sie den
eingegebenen Wert mit der ENTER-Taste, worauf Sie
T60_manual_uusi versio_j.indd 18T60_manual_uusi versio_j.indd 18 25.10.2006 13:34:0025.10.2006 13:34:00

D
BETRIEBSANLEITUNG
•
T60
19
zur nächsten Einstellung gelangen: Die Angaben werden
zur Einschätzung des Energieverbrauchs benötigt. BITTE
BEACHTEN! Die jeweilige Maßeinheit können Sie auch
während des Trainings bestimmen: bestätigen Sie die
SET-Taste einmal und ändern Sie die Einstellungen mit
der Pfeiltaste, bestätigen Sie den eingegebenen Wert
mit der ENTER-Taste, worauf Sie zurück zum Training
gelangen.
8. Mit Hilfe der Pfeiltasten geben Sie die
Spitzengeschwindigkeit des Laufbands für die PSC-
und herzfrequenzgesteuerten Trainingsphasen ein: in
diesen Phasen wird die Geschwindigkeit auf Grund der
Herzfrequenz des Benutzers geregelt und kann ohne
eine vorgegebene Spitzengeschwindigkeit zu schnell
für das Training werden. Der vorgegebene Wert für die
Spitzengeschwindigkeit beträgt 12 km/h. Ändern Sie die
Einstellungen mit der Pfeiltaste. Mit der ENTER-Taste
gelangen Sie zur nächsten Anzeige.
9. Aus der Anzeige TOTAL TIME ersehen Sie die
benutzerspezifische Gesamtlaufzeit des Laufbandes. Mit
der ENTER-Taste gelangen Sie zur nächsten Anzeige.
10. Aus der Anzeige TOTAL DISTANCE ersehen
Sie die benutzerspezifische Gesamtlaufstrecke des
Laufbandes. Mit der ENTER-Taste gelangen Sie
zurück zur Eingabe der Benutzerangaben, die
Benutzereinstellungen verlassen Sie mit der START-
Taste.
Wenn einmal Sie ihre Benutzerdaten eingegeben haben,
haben Sie im Weiteren davon den Vorteil, dass Sie
Ihr Training nach Eingabe Ihres Benutzercodes gleich
beginnen können. Ein gewählter Benutzercode bleibt
im Speicher des Cockpits so lange gespeichert, bis Sie
einen anderen Code verwenden, der Sicherheitsschlüssel
abgezogen oder das Netzkabel des Geräts gezogen wird.
POSITION SPEED CONTROL (PSC)
In der Funktion Position Speed Control (PSC)
regulieren Sie die Geschwindigkleit des Laufbandes
durch Veränderung Ihrer Position auf dem Laufband.
Die Laufbandgeschwindigkeit nimmt zu, wenn Sie sich
auf dem vorderen Teil des Laufbandes befinden, nimmt
ab, wenn Sie sich auf dem hinteren Teil des Laufbandes
befinden, und bleibt unverändert, wenn sie sich im
mittleren Teil des Laufbandes befinden.
BITTE BEACHTEN! Die Verwendung der PSC-
Funktion setzt die Verwendung des Herzfrequenz-
Messgurts voraus! Als Zeichen der aktivierten
Herzfrequenzmessung blinkt in der Heart-Rate-Anzeige
ein Quadrat.
BITTE BEACHTEN! Befestigen Sie stets, wenn
Sie die PSC-Funktion eingestellt haben, den
Sicherheitsschlüssel sorgfältig an Ihrem Hemd. Stellen
Sie die Länge des Bandes des Sicherheitsschlüssels so
ein, dass er sich vom Anzeigegerät löst, wenn Sie sich zu
weit hinten befinden.
BITTE BEACHTEN! Wenn Sie mit der PSC-Funktion
trainieren, darf sich in der Nähe des Laufbandes
(Mindestabstand 2 m) kein anderer Herzfrequenzsender
befinden; die gleichzeitigen Signale von zwei Sendern
gefährden die Benutzersicherheit, indem sie die
Steuerung der PSC-Funktion stören!
Sie können die PSC-Funktion nur eingeben, wenn das
Laufband steht.
1. Beginnen Sie mit dem Gebrauch der PSC-Funktion,
indem Sie die Grenzwerte der Geschwindigkeitsbereiche
festlegen. Betätigen Sie die PSC-Taste des Messgeräts.
2. Auf der Basis der zuletzt eingegebenen Einstellung
erscheint in der Anzeige der Text PSC ON (Funktion
an) oder PSC OFF (Funktion aus). Geben Sie mit den
Pfeiltasten PSC ON ein und drücken Sie die ENTER-
Taste.
3. In der Anzeige erscheint der Text PRESS ENTER TO
CALIBRATE PSC OR START TO EXIT (Betätigen
Sie die Enter Taste um zu den PSC-Einstellungen
zu kommen; mit der START-Taste verlassen sie das
Einstellungsmenü). Stellen Sie sich auf den mittleren
Abschnitt des Laufbandes. Die Beschleunigungszone
beginnt ca. 10 cm vom Messpunkt aus gesehen weiter
vorne, die Verlangsamungszone ihrerseits 20 cm
weiter hinten. Drücken Sie die ENTER-Taste, worauf
in der Anzeige der Text PLEASE WAIT 8 erscheint
und das Messgerät Ihre Entfernung aufgrund des
Herzfrequenzsignals misst. Nach Ablauf der Messung
von 8 Sekunden erscheint in der Anzeige der Text
CALIBRATION READY PRESS START (Einstellung
fertig, starten Sie die Funktion mit der START-Taste).
4. Wenn das Messgerät das Herzfrequenzsignal nicht
empfängt oder bei der Entfernungsmessung ein
Problem auftaucht, kehrt der Messgerät in die Anzeige
CALIBRATE zurück. In diesen Störfällen erscheint
für 5 Sekunden in der Anzeige der Text CHECK
TRANSMITTER. Vergewissern Sie sich dann, dass
Sie die Hinweise zum Gebrauch des Messgurts befolgt
haben. Wenn die Grenzen der Geschwindigkeitsbereiche
Ihrer Ansicht nach passend sind, können Sie in Zukunft
die PSC-Funktion starten, indem Sie PSC ON wählen,
die ENTER-und START-Tasten drücken und die
gewünschte Trainigsform wählen. Falls Sie die Grenzen
der Geschwindigkeitszonen ändern wollen, wiederholen
Sie bitte die Schritte 1-3 und platzieren Sie sich in
der Messphase an einer geeigneteren Stelle auf dem
Laufband.
5. Wählen Sie die Trainingsweise manuell, Rolling
Hills, eine auf der Einstellung des Winkels basierende
Trainingsweise mit unveränderter Herzfrequenz
oder einen Konditionstest. Dabei können Sie die
Laufbandgeschwindigkeit mit Hilfe der PSC-Funktion
steuern. Die Aktivierung der PSC-Funktion wird
durch die leuchtende PSC Signallampe in der Anzeige
signalisiert. Die Aktivierung der PSC-Funktion wird
durch die Balken auf der Anzeige angezeigt. Die Balken
zeigen an, in welchem Geschwindigkeitsbereich Sie sich
gerade befinden (Hase = die Geschwindigkeit nimmt zu,
- = die Geschwindigkeit bleibt gleich, Schildkröte = die
Geschwindigkeit nimmt ab).
6. Starten Sie das gewählte Trainingsprogramm durch
Betätigung der START-Taste und stellen Sie die
Laufbandgeschwindigkeit ein, indem Sie auf dem
Laufband weiter vorn oder hinten stehen. Beachten Sie,
dass während er aktivierten PSC-Funktion auch die
Tasten zur Geschwindigkeitsregulierung (Schildkröte/
Hase) funktionieren. BITTE BEACHTEN! Falls Ihnen
die PSC-Funktion nicht schon von früher bekannt
ist, empfehlen wir das Kennenlernen der Funktion bei
langsamem Trainingstempo.
T60_manual_uusi versio_j.indd 19T60_manual_uusi versio_j.indd 19 25.10.2006 13:34:0125.10.2006 13:34:01

20
BETRIEBSANLEITUNG
•
T60
7. Die Nutzung der PSC-Funktion beenden Sie, indem
Sie zum Ende des Trainings zweimal die STOP-Taste
betätigen.
WAHL DER TRAININGSEINHEIT
Drücken Sie die SELECT-Taste bis die Signallampe bei
der gewünschten Trainingseinheit leuchtet. Es stehen
zur Auswahl:
1. Das Manual-Training, bei dem Sie während
des Trainings selbst die Geschwindigkeit und den
Neigungswinkel wählen.
2. Das herzfrequenzgesteuerte HRC-Training, bei
dem das Laufband die Geschwindigkeit / Neigung
in der Weise steuert, dass Sie ständig auf dem von
Ihnen gewählten Herzfrequenzniveau trainieren;
herzfrequenzgesteuerte Profile erfordern stets die
Verwendung eines Herzfrequenzmessgurts.
3. Konditionstest: Das Laufband bietet Ihnen
zwei alternative Tests, den 2-km-Gehtest oder den
zwölfminütigen Cooper-Lauftest.
4. Ein fertiges Trainingsprofil, bei dem Geschwindigkeit
/ Neigungswinkel oder Frequenzniveau in einer im
voraus festgelegten Weise wechseln.
das unterbrochene Training durch Betätigung der
START-Taste fortsetzen. Im Wartezustand können Sie
ebenfalls Ihr Training im Cockpit abspeichern (siehe
Speicherfunktion). Durch zweimaliges Drücken der
STOP-Taste beenden Sie das Trainingsprogramm,
worauf das Cockpit Ihre absolvierte Leistung anzeigt
und auf die Startposition zurück springt.
HERZFREQUENZGESTEUERTES
TRAINING
Trainingseinheiten mit konstanter Herzfrequenz
ermöglichen das Training mit einem zuvor gewählten
Frequenzniveau. Herzfrequenzgesteuerte Profile setzen
stets die Verwendung eines Herzfrequenzmessgurts.
Wenn die Herzfrequenzmessung nicht gelingt,
erscheint im Textfeld die Fehleranzeige CHECK
TRANSMITTER. Vergewissern Sie sich dann, dass
Sie die Hinweise zum Gebrauch des Messgurts befolgt
haben.
1. Falls Sie Ihre Benutzerdaten nutzen wollen oder
Ihre Trainingsphase abspeichern, geben Sie bitte Ihre
Benutzerdaten bzw. Ihren Benutzercode (1-4) ein.
Drücken Sie die START-Taste zur Bestätigung Ihrer
Wahl.
2.Drücken Sie die SELECT-Taste, bis die HRC-
Signallampe aufleuchtet. Drücken Sie die ENTER-Taste
HERREN / MAXIMALE SAUERSTOFF-AUFNAHMEKAPAZITÄT
(VO2MAX)
1 = SEHR SCHLECHT - 7 = SEHR GUT
ALTER 1 2 3 4 5 6 7
18-19 <33 33-38 39-44 45-51 52-57 58-63 >63
20-24 <32 32-37 38-43 44-50 51-56 57-62 >62
25-29 <31 31-35 36-42 43-48 49-53 54-59 >59
30-34 <29 29-34 35-40 41-45 46-51 52-56 >56
35-39 <28 28-32 33-38 39-43 44-48 49-54 >54
40-44 <26 26-31 32-35 36-41 42-46 47-51 >51
45-49 <25 25-29 30-34 35-39 40-43 44-48 >48
50-54 <24 24-27 28-32 33-36 37-41 42-46 >46
55-59 <22 22-26 27-30 31-34 35-39 40-43 >43
60-65 <21 21-24 25-28 29-32 33-36 37-40 >40
DAMEN / MAXIMALE SAUERSTOFF-AUFNAHMEKAPAZITÄT
(VO2MAX)
1 = SEHR SCHLECHT - 7 = SEHR GUT
ALTER 1 2 3 4 5 6 7
18-19 <28 28-32 33-37 38-42 43-47 48-52 >52
20-24 <27 27-31 32-36 37-41 42-46 47-51 >51
25-29 <26 26-30 31-35 36-40 41-44 45-49 >49
30-34 <25 25-29 30-33 34-37 38-42 43-46 >46
35-39 <24 24-27 28-31 32-35 36-40 41-44 >44
40-44 <22 22-25 26-29 30-33 34-37 38-41 >41
45-49 <21 21-23 24-27 28-31 32-35 36-38 >38
50-54 <19 19-22 23-25 26-29 30-32 33-36 >36
55-59 <18 18-20 21-23 24-27 28-30 31-33 >33
60-65 <16 16-18 19-21 22-24 25-27 28-30 >30
MANUAL-TRAINING
SCHNELLSTART:
1.Das Manual-Training ist die Voreinstellung
des Laufbandes. Sie können das Training
direkt durch Druck auf die Start-Taste
beginnen.
BENUTZERSPEZIFISCHER START:
2.
Falls Sie Ihre Benutzerdaten nutzen wollen
oder Ihre Trainingsphase abspeichern, geben
Sie bitte Ihre Benutzerdaten bzw. Ihren
Benutzercode (1-4)
ein. Drücken Sie die
START-Taste zur Bestätigung Ihrer Wahl.
3. Drücken Sie die SELECT-Taste, bis die
Manual-Signallampe aufleuchtet.
4. Drücken Sie die START-Taste;
das Laufband setzt sich mit einer
Geschwindigkeit von 1,5 km/h in Bewegung.
Sie können die Geschwindigkeit mit den
Hase-/Schildkrötetasten und mit der
PSC-Funktion verändern. Sie können
die Laufbandneigung mit den Tasten zur
Neigungskontrolle verändern.
5.Die Profilanzeige speichert im
Minutenabstand die Geschwindigkeitsdaten
des Trainings. Nach 20 Minuten verschiebt
sich die Anzeige in der Weise nach links,
dass jeweils die Geschwindigkeitsdaten der
letzten 20 Minuten angezeigt werden. Bei
Drücken der SELECT-Taste während des
Trainings zeigt das Cockpit die gesammelten
Geschwindigkeits-, Steigungs- und
Pulsprofile an.
6.Durch einmalige Betätigung der STOP-
Taste bleibt das Laufband stehen und geht in
einen 5 Minuten dauernden Wartezustand
über. Während dieser Zeit können Sie
T60_manual_uusi versio_j.indd 20T60_manual_uusi versio_j.indd 20 25.10.2006 13:34:0225.10.2006 13:34:02
Sidan laddas...
Sidan laddas...
Sidan laddas...
Sidan laddas...
Sidan laddas...
Sidan laddas...
Sidan laddas...
Sidan laddas...
Sidan laddas...
Sidan laddas...
Sidan laddas...
Sidan laddas...
Sidan laddas...
Sidan laddas...
Sidan laddas...
Sidan laddas...
Sidan laddas...
Sidan laddas...
Sidan laddas...
Sidan laddas...
Sidan laddas...
Sidan laddas...
Sidan laddas...
Sidan laddas...
Sidan laddas...
Sidan laddas...
Sidan laddas...
Sidan laddas...
Sidan laddas...
Sidan laddas...
Sidan laddas...
Sidan laddas...
Sidan laddas...
Sidan laddas...
Sidan laddas...
Sidan laddas...
Sidan laddas...
Sidan laddas...
Sidan laddas...
Sidan laddas...
Sidan laddas...
Sidan laddas...
Sidan laddas...
Sidan laddas...
Sidan laddas...
Sidan laddas...
Sidan laddas...
Sidan laddas...
Sidan laddas...
Sidan laddas...
Sidan laddas...
Sidan laddas...
Sidan laddas...
Sidan laddas...
Sidan laddas...
Sidan laddas...
Sidan laddas...
Sidan laddas...
Sidan laddas...
Sidan laddas...
Sidan laddas...
Sidan laddas...
Sidan laddas...
Sidan laddas...
Sidan laddas...
Sidan laddas...
Sidan laddas...
Sidan laddas...
Sidan laddas...
Sidan laddas...
Sidan laddas...
Sidan laddas...
Sidan laddas...
Sidan laddas...
Sidan laddas...
Sidan laddas...
Sidan laddas...
Sidan laddas...
Sidan laddas...
Sidan laddas...
Sidan laddas...
Sidan laddas...
Sidan laddas...
Sidan laddas...
Sidan laddas...
Sidan laddas...
Sidan laddas...
Sidan laddas...
-
 1
1
-
 2
2
-
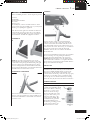 3
3
-
 4
4
-
 5
5
-
 6
6
-
 7
7
-
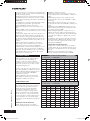 8
8
-
 9
9
-
 10
10
-
 11
11
-
 12
12
-
 13
13
-
 14
14
-
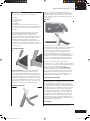 15
15
-
 16
16
-
 17
17
-
 18
18
-
 19
19
-
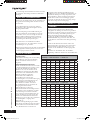 20
20
-
 21
21
-
 22
22
-
 23
23
-
 24
24
-
 25
25
-
 26
26
-
 27
27
-
 28
28
-
 29
29
-
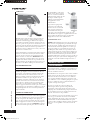 30
30
-
 31
31
-
 32
32
-
 33
33
-
 34
34
-
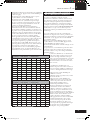 35
35
-
 36
36
-
 37
37
-
 38
38
-
 39
39
-
 40
40
-
 41
41
-
 42
42
-
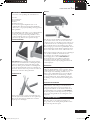 43
43
-
 44
44
-
 45
45
-
 46
46
-
 47
47
-
 48
48
-
 49
49
-
 50
50
-
 51
51
-
 52
52
-
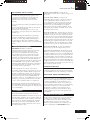 53
53
-
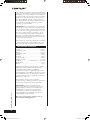 54
54
-
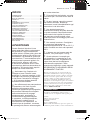 55
55
-
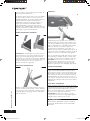 56
56
-
 57
57
-
 58
58
-
 59
59
-
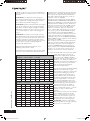 60
60
-
 61
61
-
 62
62
-
 63
63
-
 64
64
-
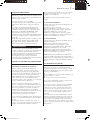 65
65
-
 66
66
-
 67
67
-
 68
68
-
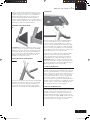 69
69
-
 70
70
-
 71
71
-
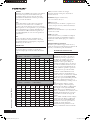 72
72
-
 73
73
-
 74
74
-
 75
75
-
 76
76
-
 77
77
-
 78
78
-
 79
79
-
 80
80
-
 81
81
-
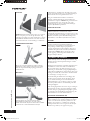 82
82
-
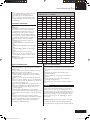 83
83
-
 84
84
-
 85
85
-
 86
86
-
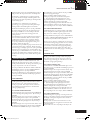 87
87
-
 88
88
-
 89
89
-
 90
90
-
 91
91
-
 92
92
-
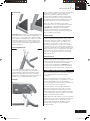 93
93
-
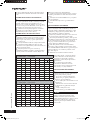 94
94
-
 95
95
-
 96
96
-
 97
97
-
 98
98
-
 99
99
-
 100
100
-
 101
101
-
 102
102
-
 103
103
-
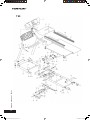 104
104
-
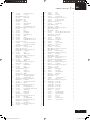 105
105
-
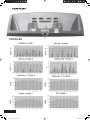 106
106
-
 107
107
-
 108
108


på andra språk
- italiano: Tunturi T60 Manuale utente
- eesti: Tunturi T60 Kasutusjuhend
- español: Tunturi T60 Manual de usuario
- Deutsch: Tunturi T60 Benutzerhandbuch
- français: Tunturi T60 Manuel utilisateur
- Nederlands: Tunturi T60 Handleiding