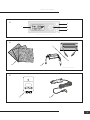
Ozone Generator
Revision date: 2020-07-10Wood’s Airmaster WOZ100/3000/6000
OPERATING INSTRUCTIONS FOR:
Operating Instructions
GB
Betjeningsvejledning
DK
Bedienungsanleitung
DE
Bruksanvisning
SE
Guide d’instructions
FR
Käyttöohjeet
FI
Bruksanvisning
NO
Notendahandbók
IS
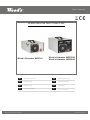
Wood’s Airmaster WOZ100
Wood’s Airmaster WOZ3000
Wood’s Airmaster WOZ6000

2


4
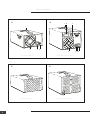
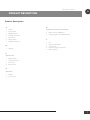
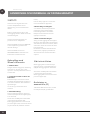
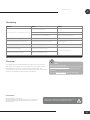
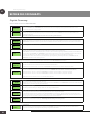
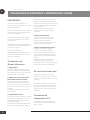
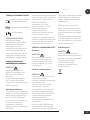
PRODUCT DESCRIPTION
A.
B.
Wood’s Airmaster WOZ3000/6000Wood’s Airmaster WOZ100
Wood’s Airmaster WOZ3000/6000Wood’s Airmaster WOZ100
A.
B.
1
432
1
3 42
1
5
6 7

5
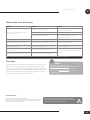
PRODUCT DESCRIPTION
C.
E.
1
1
3
2
4
Wood’s Airmaster WOZ3000/6000
SET
OZONE MONITOR
2
Extra Accessories (Not included)
Consumable Parts
D.
1
2
Actual product may vary

6
EN
Operating Instructions
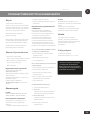
PRODUCT DESCRIPTION
134
2
Wood’s Airmaster WOZ3000/6000
Wood’s Airmaster WOZ100
F.
F.
5
134
52

7
EN
Operating Instructions
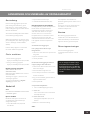
PRODUCT DESCRIPTION
C.
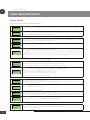
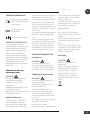
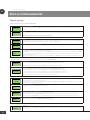
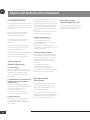
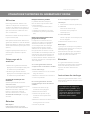
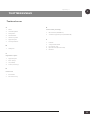
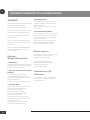
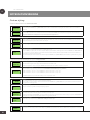
Digital control
1. Digital display
2. Forward (increase)
3. Set (menu)
4. Back (reduce)
E.
Additional accessories (not included)
1. Ozone meter (not WOZ100)
2. Cigarette lighter cable (WOZ100 only)
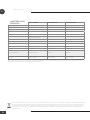
F.
1. Fan
2. High-voltage module
3. Ceramic plate
4. Hole for hanging up (keyhole)
5. Quick coupling
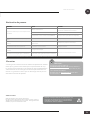
A.
1. Handle
2. Filter holder
3. ON/OFF button
4. Network connection
5. Fuse holder
6. Digital display
7. Adjustment buttons
B.
1. USB port
D.
Wear parts
1. Prelter
2. Ceramic plate
Product description

8
EN
Operating Instructions
THANK YOU FOR CHOOSING THE WOOD’S
AIRMASTER AN EFFICIENT, SWEDISH QUALITY
OZONE GENERATOR
The Wood’s Airmaster is an odour control device made
in Sweden, with stainless steel parts that are able to
withstand harsh operating conditions year after year. This
ozone device rapidly and eciently eliminates bacteria,
viruses and odours from damp, mould, refuse, waste,
smoke and pets.
The Wood’s Airmaster WOZ100 is ideal for eliminating
odours in the home, oce, car, boat, caravan and
hygiene areas. Anywhere you’d like to restore a fresh,
clean smell.
The ozone also penetrates into textiles and sits on the
surface of ttings and wallpapers.
The Wood’s Airmaster WOZ3000/6000 is ideal for
extreme decontamination following re damage and
water damage.
WOOD’S FOR CLEAN, HEALTHY INDOOR AIR
Wood’s has been characterised by top quality, reliability,
high capacity and minimal energy consumption for more
than 60 years. Today, Wood’s is distributed to more than
19 countries from the company’s head oce in Alingsås.
MEMBER OF THE EUROPEAN OZONE TRADE
ASSOCIATION EUOTA AND COOWNER OF THE
EUOTA OZONE DOSSIER FOR ACTIVE BIOCIDAL
PRODUCTS.
This futureproofs the Wood’s Airmaster, preparing it for
future legislation and biocidal products regulations.
HOW DOES AN OZONE GENERATOR WORK?
Ozon is a special kind of oxygen known as active oxygen,
and it’s formed by passing electrical energy into an
ozone generator. The ozone works by oxidising organic
substances, thereby eectively eliminating foreign
odours, bacteria and viruses. In the majority of cases, the
only end products are carbon dioxide and water.
The concentration of ozone in outdoor air varies from
0.001 to 0.040 parts per million (ppm). The National
Board of Occupational Safety and Health has set the
threshold value to 0.1 ppm of ozone over 8 hours of
exposure when working. The gas is perceived as clean,
fresh air (like after a thunderstorm) at concentrations
of around 0.015-0.020 ppm. The gas starts to take on
a pungent odour at 0.050 ppm, and at 0.1 ppm it may
cause irritation of the eyes and throat.
IMPORTANT!
Locate and eliminate whatever is causing the
odour problem before running the ozone control
device, otherwise the odour will return.
Ozone is harmful when inhaled, so ozone
devices must be used with care.
Wood’s Airmaster WOZ100/500
Not to be used for any length of time in areas
where humans or animals are present. Short
exposure (less than 5 minutes) is harmless.
Wood’s Airmaster WOZ3000/6000
The area must not be entered while treatment is
in progress.
Read the instructions carefully before use.

9
EN
Operating Instructions
storage rooms or similar, is
non-hazardous (WOZ100).
Do not rinse the equipment
with water, and do not
position it anywhere where
it will come into contact with
water.
Observe the recommended
room areas when using the
device on premises occupied
by people.
The power supply to the
equipment must be switched
o for all servicing and repair
work. All use of the equipment
must be in accordance with
this manual. No liability is
accepted for any other use.
SAFETY AND SECURITY
REGULATIONS
Installation
WARNING
Remove all packaging and
check that the product is not
damaged. Do not use/install
the product if it is damaged.
Connection to the power
supply
WARNING
Risk of re and electric shocks
if used incorrectly.
The device must be connected
to an earthed socket.
Make sure that the electrical
information on the rating plate
matches the power supply. If
not, contact an electrician.
Always use a correctly
installed, shockproof socket.
SAFETY WARNINGS
See these instructions
for safety information.
Read the technical
manual
Read the instructions.
SAFETY INFORMATION
Read carefully through the
instructions supplied before
installing and using the device.
The manufacturer accepts no
liability for incorrect instal-
lation resulting in injury and
damage to property. Always
keep the instructions together
with the device for future
reference.
Safety for children and
vulnerable people
WARNING
Risk of injury or permanent
disability.
Do not allow children to play
with the device.
Keep all packaging out of the
reach of children.
Children must not clean or
maintain the device.
General safety
Ozone devices must be used
with caution and not for any
length of time in environ-
ments occupied by people,
such as homes or oces Brief
exposure, such as in refuse
Never use a damaged branch
socket or extension cable.
Make sure that the electrical
components are not damaged
(e.g. plug, mains cable).
Contact the authorised service
centre or an electrician if
electrical components need to
be replaced.
Only connect the plug to the
power socket when installa-
tion is complete.
Make sure that accessing the
plug is easy after installation.
Do not pull on the cable when
disconnecting the device.
Always hold onto the plug
when pulling it out.
Disposal
WARNING
Disconnect the device from
the mains.
Please use the return and
collection systems to recycle
your device. Get in touch
with your municipality for
information on how to dispose
of the device correctly.

10
EN
Operating Instructions
USING AND MAINTAINING YOUR OZONE DEVICE
4. Duration of treatment:
2 to 72 hours, depending on the
intensity of the odour. The average
treatment time is 24 hours.
Ideally, start o with 4-8 hours and
repeat as necessary.
5. After the ozone treatment:
Switch o the ozone device and open
the windows. There will be ozone in
the air after the treatment, it smells
like chlorine. Air the rest of the room
to remove the remaining ozone.
Check the room. If there are still
unwanted odours in there, repeat the
procedure. All aected rooms must be
treated separately.
Permanent installation
The ozone device can be
wall-mounted by means of a “keyhole
solution” (F4) on the underside of the
ozone device.
Connect the mains cable supplied
to the mains socket (A4). The ozone
device can now be started by pressing
the on-o button (A3).
Connecting the ozone
meter (E1)
The ozone meter accessory (E1) is
connected to the USB port (B1) on the
back.
IMPORTANT!
Locate and eliminate whatever is
causing the odour problem before
running the ozone control device,
otherwise the odour will return.
Ozone is harmful when inhaled, so the
ozone device must be used with care.
Do not use the ozone device when
there are people present in the room.
For the Wood’s Airmaster WOZ100/5,
brief exposure (less than 5 minutes) is
non-hazardous.
For the Wood’s Airmaster
WOZ3000/6000, the area must not be
entered at all.
Treatment with the
Wood’s Airmaster
1. Preparation:
Clean the room thoroughly, vacuum
and wipe down all surfaces and/or
repair/eliminate the problem causing
the odour.
2. Make sure that the area is safe to
treat:
Remove pets and plants. Remove
valuable high-tech equipment such as
laptops and valuable oil paintings.
Make sure that there are no people in
the room.
3. Ozone treatment:
Position the ozone device in the
middle of the room (ideally on a
slightly raised surface such as a table).
Connect the mains cable supplied
to the mains socket (A4). The ozone
device can now be started by pressing
the on-o button (A3), and you set
the timer (C) to the preferred time
(models with a timer).
It can take up to about 5 minutes to
achieve the full eect.

11
EN
Operating Instructions
Use
Position the ozone device in a dry
place that is ventilated well, ideally
high up and approx. 1.5 m above the
oor. It is important to ensure that
nothing prevents the air entering the
fan.
Connect the mains cable supplied to
the mains socket (A4).
The ozone device can now be started
by pressing the on-o button (A3).
The ozone device starts in operating
mode, with full power (100%).
It can take up to about 5 minutes to
achieve the full eect.
Starting the machine
1. Start the ozone device.
Press the switch (A3) to ON
2. Switch o the ozone device
Press the power switch (A3) to OFF
Digital control with timer
(Applicable to Wood’s Airmaster
WOZ3000/6000)
The ozone quantity/output can be
varied between 0 and 100%.
Timer modes: daily, interval and
shut-o timer.
See “Digital control” instructions on
the next page for further information.
Maintenance
NOTE!
Always unplug the device before
carrying out servicing/maintenance.
Replacing the prelter
The prelter has to be replaced every
two to four months, depending on
the ambient environment.
1. Undo the lter holder (A2) by
hand.
2. Replace the lter with a new one.
3. Put back the lter holder (A2).
Cleaning/replacing the ceramic
plate
Ozone is formed when a high-voltage
power supply is passed into the ozone
pipe. The ceramic plate should be
cleaned regularly using methylated
spirit or similar. Wipe down all
surfaces using a dry cloth. Make sure
that all components are fully dry
before restarting the machine. The
ceramic plate must be replaced if
the ozone concentration declines or
ceases entirely.
A. If your ozone device has visible
chassis screws on the long sides
1. Undo all the screws on the long
sides of the chassis.
2. Lift the cover o the machine.
3. Go to point C.
B. If your ozone device has no
visible chassis screws:
1. Undo the two screws that hold the
handle in place.
2. Turn the machine upside down.
3. Undo the four screws that hold the
machine’s feet in place.
4. Remove the chassis cover by
pulling/pushing the cover forwards.
5. Go to point C.
C. Replace the ceramic plate:
1. Undo the quick couplings (F5)
2a. WOZ100 Undo the two screws
holding the ceramic plate in
position (F3)
2b. WOZ3000/6000
Move the ceramic plate (F3) out of
its holder.
3. Assemble in reverse order.
NOTE:
The ceramic plate and prelter are
wear parts and are not covered by the
warranty.
All servicing other than that
described here must be performed
by the manufacturer or an authorised
partner.
Servicing
You must contact your local dealer
if your ozone device requires
maintenance. Receipts must be
presented for all warranty claims.
Storage instructions
Store your ozone device at room
temperature between +1 °C and
+35°C.
USING AND MAINTAINING YOUR OZONE DEVICE
It is important to replace the
prelter at regular intervals and
to replace the ceramic plate
regularly Failing to do this may
impair the capacity of the ozone
device and possibly harm the
device.
USING AND MAINTAINING YOUR OZONE DEVICE

12
EN
Operating Instructions
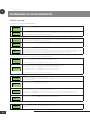
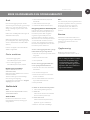
Pwr 100%
TimerOff
Normal operating mode
Use the forward (C2) and back (C4) buttons to set ozone production to the preferred level, 1-100%. The timer is switched o.
Menu
Menu
Press set (C3) to access the menu. Then use the forward button (C2) to scroll until you arrive at the function you want to change.
(You can always leave the menu by holding down the set button.)
Timer
Settings
Timer
Press set (C3), the set timer mode is displayed. Press set (C3), again, the text starts to ash. Use the forward button (C2) to scroll until
you nd the preferred timer function. Press set (C3) to select a function.
Mode
Off
Timer o (factory default)
Mode
Once
Shut-o timer
The Wood’s Airmaster operates for the preferred time and then shuts o.
Press forward (C2), “Set Timer” appears in the display. Press set (C3), the text ashes, set the preferred time by pressing forward
(C2) / back (C4) (e.g. 15 min 00:15). Press set (C3) to conrm the time (the timer stops ashing). Hold down set (C3) start the timer and
leave the menu.
“TimedOut” is displayed when the timer has reached the end. Hold down forward (C2) and back (C4) at the same time to restart the
timer.
Set the time in the following timer modes in the same way as described in Shut-o timer.
Mode
Interval
Interval timer
The Wood’s Airmaster switches between operating mode and shutdown mode at set times.
First, set the operating time: “Step on”. Press forward (C4). Then set the shut-down time: “Step o”.
Mode
Daytimer
Daily timer
The Wood’s Airmaster operates according to set times of day. NOTE: Set the clock rst! (see Clock)
Set the “on” time 1: “Step on 1”. Press forward (C2), set “o” time 1: “Step o 1”.
Set “on” time 2: “Step on 2”. Press forward (C2), set “o” time 2: “Step o 2”.
Set “on” time 3: “Step on 3”. Press forward (C2), set “o” time 3: “Step o 3”.
If a mode (e.g. 3) is left blank, i.e. 00:00, that mode is disabled.
SetClock
00:00
Clock
This is where you set the clock used by the daily timer.
Press set (C3): the digits ash. Set the required time using forward (C2) and back (C4). Press set to conrm your setting. (24-hour
backup in the event of a power outage)
B.light
On
Backlight
The display backlight can be switched on or o.
ExtInput
settings
Connection for external devices (USB)
The input for external devices (e.g. ozone meter) can be enabled or disabled.
Operating mode can be selected: Ozone Control – A connected ozone meter can control the ozone generator to maintain a constant
ozone concentration. Ozone Alarm – If a connected ozone meter discovers a leak, the machine shuts down and alerts the operator.
Factory
reset
Factory default
Restores the device to the factory defaults. NOTE: All settings will be deleted.
KEYS
LOCKED
Key lock
The buttons are locked by holding down set (C3) and forward (C2) at the same time until “KEYS LOCKED” appears in the display. The
buttons are unlocked in the same way.
Digital control
(Applicable to Wood’s Airmaster WOZ3000/6000)
USING THE OZONE DEVICE

13
EN
Operating Instructions
PROBLEM CAUSE REMEDY
The device does not switch on and the power
switch does not light up.
Power supply problem.
Connect the device to a functioning power
socket and switch it on.
The fuse is broken (WOZ3000/6000). Replace the fuse.
The power adapter is broken (WOZ100).
Try a dierent power adapter (making sure that
the adapter is to the correct specication).
The device operates, but its performance is
poor
The ceramic plate is dirty. Clean the ceramic plate:
The device is operating but not producing
ozone.
The ceramic plate has reached the end of its life
or is broken.
Replace the ceramic plate:
Loud fan noise. The prelter is dirty/clogged. Replace the lter.
The machine is behaving strangely. The software has hanged.
Perform a factory reset..
The machine settings (e.g. timer) are incorrect The machine has been set accidentally.
Contact your local dealer after you have worked through the above troubleshooting list or if your project requires a service.
NOTE:
Register your product at www.warranty-
woods.com to benet from the special Wood’s
oers available for your product.
Take a look at www.woods.se for more information.
Warranties
2- year factory warranty covering workmanship. Please note, the
warranty is valid only on presentation of a receipt. The warranty is
valid only if the product is used in accordance with the instructions
and safety warnings in this manual. The warranty does not cover
damage caused by incorrect use of the product.
CUSTOMER SERVICE
Always use original parts.
Make sure you have the following to hand when you
contact our customer service team: Model designation,
receipt and serial number.
Note that all information, safety instructions and
technical data in this manual may be amended.
Troubleshooting

14
EN
Operating Instructions
*This label means that this product must not be disposed of with household waste anywhere in the EU. Please recycle this product responsibly
to promote sustainable reuse of resources and prevent damage to the environment or human health as a consequence of uncontrolled waste
disposal. To recycle your device, please use the return and collection systems contact the dealer where you purchased your product. They can
submit this product for environmentally safe recycling.
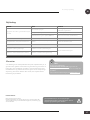
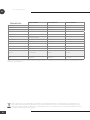
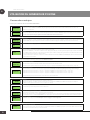
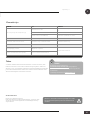
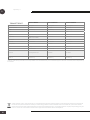
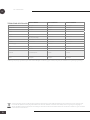
Airmaster WOZ100 Airmaster WOZ3000 Airmaster WOZ6000
Ozon production 100–500 mg/hour 0–500 mg/hour 0–500 mg/hour
Fan capacity 40 m
3
/hour 116 m
3
/hour 116 m
3
/hour
Technology Ceramic plate Ceramic plate Ceramic plate
Timer - Yes Yes
USB port - Yes Yes
Energy consumption
8 W/12 V DC
(100-240 V mains adapter supplied)
34 W/100-230 V 38 W/100-230 V
Temperature range +1 °C – +35°C +1 °C – +35°C +1 °C – +35°C
Dimensions (LxWxH) 196x113x85 mm 270x180x160 mm 270x180x160 mm
Fuse parameter - 630mAT 250v 630mAT 250v
Weight 0.79 kg 2.2 kg 2.3 kg
Finish Stainless steel Stainless steel Stainless steel
Extra accessories Cigarette lighter cable Ozone meters Ozone meters
Wear parts
Prefilter
Ceramic plate
Prefilter
Ceramic plate
Prefilter
Ceramic plate
TECHNICAL DATA
*Technical modications and improvements may be made. All values are approximate and may vary depending on external circumstances such as
temperature and humidity.

SE
15
Bruksanvisning
PRODUKTBESKRIVNING
C.
Digital styrning
1. Digitaldisplay
2. Framåt (öka)
3. Set (meny)
4. Bakåt (minska)
E.
Extra tillbehör (Ingår ej)
1. Ozonmätare (Ej WOZ100)
2. Cigarettändarkabel (Endast WOZ100)
F.
1. Fläkt
2. Högspänningsmodul
3. Keramplatta
4. Hål för upphängning (Nyckelhål)
5. Snabbkoppling
A.
1. Handtag
2. Filterhållare
3. PÅ/AV-knapp
4. Nätanslutning
5. Säkringshållare
6. Digitaldisplay
7. Inställningsknappar
B.
1. USB-port
D.
Förslitningsdetaljer
1. Förlter
2. Keramplatta
Produktbeskrivning

SE
16
Bruksanvisning
TACK FÖR DITT VAL AV WOOD’S AIRMASTER
EN EFFEKTIV OZONGENERATOR MED SVENSK
KVALITET
Wood’s Airmaster är ett svensktillverkat
luktsaneringsaggregat med rostfria detaljer som tål tua
driftsförhållanden år efter år. Ozonaggregatet eliminerar
snabbt och eektivt bakterier, virus och lukter från t.ex.
fukt, mögel, sopor, avlopp, rök och husdjur.
Wood’s Airmaster WOZ100 lämpar sig för
luktborttagning i bostaden, kontor, bilen, båten,
husvagnen och i hygienutrymmen. Överallt där du vill
återställa en frisk och fräsch miljö.
Ozonet tränger även in i textilier samt ytligt i inredning
och tapeter.
Wood’s Airmaster WOZ3000/6000 lämpar sig för
extremsanering efter brand- och vattenskador.
WOOD’S FÖR REN OCH HÄLSOSAM INOMHUSLUFT
I över 60 år har Wood’s kännetecknats av bästa
kvalitet, pålitlighet, hög kapacitet och lägsta möjliga
energiförbrukning. Idag distribueras Wood’s i mer än 19
länder från huvudkontoret i Alingsås.
MEDLEM I EUOROPEAN OZONE TRADE
ASSOCIATION EUOTA OCH DELÄGARE I EUOTAS
OZONEDOSSIER FÖR VERKSAMMA BIOCIDÄMNEN.
Detta gör Wood’s Airmaster framtids säker och förbered
för framtida lagstiftning och biocidreglering.
HUR FUNGERAR EN OZONGENERATOR?
Ozon är en specialform av syre, s.k. aktivt syre, och
bildas genom tillförsel av elektrisk energi inne i en
ozongenerator. Ozonet verkar genom att oxidera
organiska ämnen och tar därmed på ett eektivt sätt
bort främmande luktämnen samt bakterier och virus. I de
allra esta fall blir slutprodukterna enbart koldioxid och
vatten.
I utomhusluft varierar koncentrationen av
ozon från 0.001-0.040 parts per million (ppm).
Arbetarskyddsstyrelsen har satt gränsvärdet till 0.1 ppm
ozon vid 8 timmars exponering i samband med arbete.
Vid koncentrationer omkring 0.015-0.020 ppm upplevs
gasen som ren frisk luft (som efter ett åskregn). Vid 0.050
ppm börjar gasen bli frän i lukten och vid 0.1 ppm kan
man få irritation i ögon och svalg.
VIKTIGT!
Lokalisera och åtgärda det som orsakar
luktproblemet innan luktsanering, annars
återkommer lukten.
Ozon är skadligt att andas in och
ozonaggregat ska därför användas med
försiktighet.
Wood’s Airmaster WOZ100
Ska ej användas under längre tid där människor
eller djur vistas. Kort exponering (mindre än 5
minuter) är ofarlig.
Wood’s Airmaster WOZ3000/6000
Under behandling ska utrymmet ej beträdas.
Läs bruksanvisningen noggrant innan
användning.

SE
17
Bruksanvisning
exempelvis i soprum eller
liknande (WOZ100).
Spola inte utrustningen med
vatten och placera den inte
heller på ett sådant sätt att
den kommer i kontakt med
vatten.
Iakttag rekommenderade
rumsarealer vid användning i
lokaler där folk vistas.
Vid all service och reparation
skall spänningen till ut-
rustningen vara bruten. All
användning av utrustning-
en skall ske i enlighet med
denna manual. För all annan
användning ansvaras ej.
SÄKERHETSFÖRESKRIFTER
Installation
VARNING
Ta bort allt emballage och
kontrollera att produkten inte
är skadad. Använd/installera ej
produkten om den är skadad.
Anslutning till elnätet
VARNING
Risk för brand och elstötar vid
felanvändning.
Apparaten måste anslutas till
ett jordat uttag.
Se till att den elektriska in-
formationen på märkskylten
överensstämmer med strömfö-
rsörjningen. Om inte, kontakta
en elektriker.
Använd alltid ett korrekt
installerat, stötsäkert uttag.
Använd aldrig ett skadat
grenuttag eller förlängnings-
kabel.
SÄKERHETSVARNINGAR
Se denna
bruksanvisning för sä-
kerhetsinformation.
Läs den tekniska
manualen
Läs bruksanvisningen.
SÄKERHETSINFORMATION
Läs igenom de medföljande
instruktionerna noggrant före
installation och användning
av apparaten. Tillverkaren tar
inget ansvar för felaktig in-
stallation som orsakar person-
skador och materiella skador.
Förvara alltid instruktionerna
tillsammans med apparaten
för framtida referens.
Barn och utsatta personers
säkerhet
VARNING
Risk för personskada eller
permanent invaliditet.
Låt inte barn leka med
apparaten.
Förvara allt emballage utom
räckhåll för barn.
Rengöring och underhåll får
inte utföras av barn.
Allmän säkerhet
Ozonaggregat ska användas
med försiktighet och ej
under längre tid i miljöer
där människor vistas till
exempel i hem eller på kontor.
Kort exponering är ofarlig
Se till att de elektriska kompo-
nenterna inte är skadade (t.ex.
stickkontakt, nätsladd).
Kontakta det auktorisera-
de servicecentret eller en
elektriker för att byta ut
elektriska komponenter.
Anslut stickkontakten till
eluttaget först när installatio-
nen är klar.
Se till att det är enkelt att
komma åt stickkontakten efter
installationen.
Dra inte i sladden när du ska
koppla från apparaten. Håll
alltid i stickkontakten när du
ska dra ut sladden.
Bortskaning
VARNING
Koppla bort apparaten från
elnätet.
För att återvinna din enhet,
vänligen använd retur- och
insamlingssystemen. Kontakta
din kommun för information
om hur du kasserar apparaten
korrekt.

SE
18
Bruksanvisning
ANVÄNDNING OCH UNDERHÅLL AV OZONAGGREGATET
timer).
Det kan dröja upp till ca 5 minuter
innan full eekt är uppnådd.
4. Behandlingsvaraktighet:
2-72 timmar, beroende på luktens
intensitet. Den genomsnittliga
behandlingstiden är 24 timmar.
Börja helst med 4-8 timmar och
upprepa vid behov.
5. Efter ozonbehandlingen:
Stäng av ozonaggregatet och öppna
fönstren. Efter behandlingen kommer
det att nnas ozon kvar i luften, luktar
som klorin. Vädra ut resterande ozon
från utrymmet.
Kontrollera rummet. Om oönskade
lukt kvarstår, upprepa proceduren.
Alla berörda rum måste behandlas
separat.
Vid fastinstallation
Ozonaggregatet kan monteras på
vägg genom en ”nyckelhålslösning”
(F4) på ozonaggregatets undersida.
Anslut den medföljande nät sladden
i nätanslutningsuttaget (A4).
Ozonaggregatet kan nu startas med
på/av-knappen (A3).
Anslutning av
ozonmätare (E1)
Tillbehöret Ozonmätare (E1) ansluts
till USB-porten (B1) på baksidan.
VIKTIGT!
Lokalisera och åtgärda det som
orsakar luktproblemet innan
luktsanering, annars återkommer
lukten.
Ozon är skadligt att andas in och
ozonaggregatet ska därför användas
med försiktighet.
Använd ej ozonaggregatet när
personer vistas i utrymmet.
Gällande Wood’s Airmaster WOZ100
är kort exponering mindre än 5
minuter ofarligt.
Gällande Wood’s Airmaster
WOZ3000/6000 får området som
behandlas inte beträdas alls.
Behandling med
Wood’s Airmaster
1. Förberedelse:
Rengör rummet noggrant, dammsug
och torka av alla ytor och / eller
reparera / ta bort problemet som har
orsakat lukt.
2. Se till att området är säkert att
behandlas:
Ta bort husdjur och växter. Ta bort
värdefull högteknologisk utrustning,
t.ex. bärbara datorer och värdefulla
oljemålningar.
Se till att inga människor nns i
rummet.
3. Ozonbehandling:
Placera ozonaggregatet i mitten av
rummet (helst på en lätt upphöjd yta,
t.ex. ett bord).
Anslut den medföljande nät sladden
i nätanslutningsuttaget (A4).
Ozonaggregatet kan nu startas med
på/av-knappen (A3) och ställ in timern
(C) på önskad tid (modeller med en

SE
19
Bruksanvisning
Användning
Placera ozonaggregatet på en torr
plats med god ventilation, gärna
högt upp ca 1,5 m ovanför golvet.
Det är viktigt att inget hindrar luftens
tillträde till äkten.
Anslut den medföljande nätsladden i
nätanslutningsuttaget (A4).
Ozonaggregatet kan nu startas med
på/av knappen (A3). Ozonaggregatet
startar i driftläge med full eekt
(100%) .
Det kan dröja upp till ca 5 minuter
innan full eekt är uppnådd.
Starta maskinen
1. Starta ozonaggregatet.
Tryck på strömbrytaren (A3) till ON
2. Stäng av ozonaggregatet
Tryck på strömbrytaren (A3) till OFF
Digital styrning med timer
(Gäller Wood’s Airmaster
WOZ3000/6000)
Ozonmängden/eekten kan varieras
mellan 0-100%.
Timerlägen: Dygns-, intervall- och
avstängningstimer.
Se vidare instruktioner ”Digital
styrning” på nästa sida.
Underhåll
OBS!
Dra alltid ur nätsladden innan service
/ underhåll göres.
Byte av förlter
Förltret skall bytas varannan till
var ärde månad beroende på
omgivande miljö.
1. Lossa lterhållaren (A2) med
handkraft.
2. Byt ut ltret mot ett nytt.
3. Sätt tillbaka lterhållaren (A2).
Rengöring/Byte av keramplatta
Då högspänning tillförs keramplattan
bildas ozon. Keramplattan bör
regelbundet rengöras med t-röd
eller liknande. Torka av alla ytor
med en torr trasa. Se till att alla
komponenterna är helt torra innan
maskineen startas på nytt. Om
ozonkoncentrationen minskar eller
helt upphör måste keramplattan
bytas.
A. Om ditt ozonaggregat
har synliga chassiskruvar på
långsidorna:
1. Skuva loss alla skruvarna på chassits
långsidor.
2. Lyft av maskinens lock.
3. Gå till punkt C.
B. Om ditt ozonaggregat inte har
några synliga chassiskruvar:
1. Skruva loss dom två skruvarna som
håller handtaget.
2. Vänd maskinen upp och ner.
3. Lossa de fyra skruvarna som håller
maskinens fötter.
4. Tag av chassilocket genom att dra/
skjuta locket framåt.
5. Gå till punkt C.
C. Byt ut keramplattan:
1. Lossa snabbkopplingarna (F5).
2a. WOZ100
Lossa de två skruvarna som håller
keramplattan (F3).
2b. WOZ3000/6000
För upp keramplattan (F3) ur sin
hållare.
3. Montera i omvänd ordning.
OBS!
Keramplattan och förltret är
förslitningsdetaljer och täcks inte av
garantin.
All annan service än här beskriven
ska utföras av tillverkaren eller
auktoriserad partner.
Service
Om ozonaggregatet behöver
underhållas, ska du kontakta din
lokala återförsäljare. Kvitto måste
uppvisas för alla garantianspråk.
Förvaringsanvisningar
Förvara ozonaggregatet i
rumstemperatur mellan +1°C till
+35°C.
ANVÄNDNING OCH UNDERHÅLL AV OZONAGGREGATET
Det är viktigt att förltret byts
med jämna intervaller och att
keramplattan byts regelbundet.
Ozonaggregatets kapacitet kan
annars försämras och eventuellt
skadas.
ANVÄNDNING OCH UNDERHÅLL AV OZONAGGREGATET

SE
20
Bruksanvisning
Normalt driftläge
Använd framåt (C2) och bakåt (C4) knapparna för att ställa in ozonproduktionen till önskat värde 1-100%. Timern är avstängd.
Meny
Tryck på set (C3) för att gå in i menyn. Bläddra sedan med knappen framåt (C2) tills du kommer till den funktion du vill ändra.
(Du kan alltid lämna menyn genom att hålla inne set knappen.)
Timer
Tryck på set (C3), inställt timer läge visas. Tryck en gång till på set (C3), texten börjar blinka. Bläddra med framåt (C2) tills du hittar
önskad timerfunktion. Tryck på set (C3) för att välja funktion.
Timern avstängd (fabriksinställning)
Avstängnings-Timer
Wood’s Airmaster arbetar i önskad tid och stänger sedan av.
Tryck framåt (C2), ”Set Timer” visas i displayen. Tryck set (C3), texten blinkar, ställ in önskad tid med framåt (C2) / bakåt (C4) (Tex 15
min 00:15). Tryck set (C3) för att bekräfta tiden (slutar blinka). Håll inne set (C3) för att påbörja timern och lämna menyn.
Efter avslutad timer visas ”TimedOut” Håll inne framåt (C2) och bakåt (C4) samtidigt så startar timern igen.
Ställ in tiden i nedanstående timerlägen på samma sätt som beskrivet i Avstängnings-Timer.
Intervall-Timer
Wood’s Airmaster växlar mellan ett drift respektiv ett avstängt tidsintervall.
Ställ först in drifttid ”Step on”. Tryck framåt (C4). Ställ in avstängd-tid ”Step o”.
Dygns-Timer
Wood’s Airmaster arbetar enligt inställda klockslag. OBS! Ställ in klockan först! (se Klocka)
Ställ in tillslagstid 1 ”Step on 1”. Tryck framåt (C2), ställ in frånslagstid 1 ”Step o 1”.
Ställ in tillslagstid 2 ”Step on 2”. Tryck framåt (C2), ställ in frånslagstid 2 ”Step o 2”.
Ställ in tillslagstid 3 ”Step on 3”. Tryck framåt (C2), ställ in frånslagstid 3 ”Step o 3”.
Om ett läge (tex 3) lämnas tomt dvs. 00:00, så är läget avaktiverat.
Klocka
Här ställer du in klockan som används av Dygns-timern.
Tryck set (C3), sirorna blinkar. Ställ in önskat klockslag med framåt (C2) och bakåt (C4). Tryck set för att bekräfta. (24 timmars
backup vid strömavbrott)
Bakgrundsbelysning
Bakgrundsbelysningen till displayen kan slås av eller på.
Anlsutning för externa enheter (USB)
Ingången för externa enheter (t ex ozonmätare), kan slås av eller på.
Driftläge kan väljas: Ozone Control - En ansluten Ozongenerator kan styra ozongeneratorn för att erhålla en konstant
ozonkoncentration. Ozone Alarm - Om en ansluten ozonmätare upptäcker ett läckage så stänger maskinen av och larmar.
Fabriksinställning
Återställer till fabriksinställningar. OBS! Alla inställningar kommer att raderas.
Knapplås
Knapparna låses genom att hålla inne set (C3) och framåt (C2) samtidigt tills det visas ”KEYS LOCKED” i displayen. Låses upp på
samma sätt.
Digital styrning
Gäller Wood’s Airmaster WOZ3000/6000
ANVÄNDNING AV OZONAGGREGATET
Pwr 100%
TimerOff
Menu
Timer
Settings
Mode
Off
Mode
Once
Mode
Interval
Mode
Daytimer
SetClock
00:00
B.light
On
ExtInput
settings
Factory
reset
KEYS
LOCKED
Sidan laddas...
Sidan laddas...
Sidan laddas...
Sidan laddas...
Sidan laddas...
Sidan laddas...
Sidan laddas...
Sidan laddas...
Sidan laddas...
Sidan laddas...
Sidan laddas...
Sidan laddas...
Sidan laddas...
Sidan laddas...
Sidan laddas...
Sidan laddas...
Sidan laddas...
Sidan laddas...
Sidan laddas...
Sidan laddas...
Sidan laddas...
Sidan laddas...
Sidan laddas...
Sidan laddas...
Sidan laddas...
Sidan laddas...
Sidan laddas...
Sidan laddas...
Sidan laddas...
Sidan laddas...
Sidan laddas...
Sidan laddas...
Sidan laddas...
Sidan laddas...
Sidan laddas...
Sidan laddas...
Sidan laddas...
Sidan laddas...
Sidan laddas...
Sidan laddas...
Sidan laddas...
Sidan laddas...
Sidan laddas...
Sidan laddas...
Sidan laddas...
Sidan laddas...
Sidan laddas...
Sidan laddas...
Sidan laddas...
Sidan laddas...
Sidan laddas...
-
 1
1
-
 2
2
-
 3
3
-
 4
4
-
 5
5
-
 6
6
-
 7
7
-
 8
8
-
 9
9
-
 10
10
-
 11
11
-
 12
12
-
 13
13
-
 14
14
-
 15
15
-
 16
16
-
 17
17
-
 18
18
-
 19
19
-
 20
20
-
 21
21
-
 22
22
-
 23
23
-
 24
24
-
 25
25
-
 26
26
-
 27
27
-
 28
28
-
 29
29
-
 30
30
-
 31
31
-
 32
32
-
 33
33
-
 34
34
-
 35
35
-
 36
36
-
 37
37
-
 38
38
-
 39
39
-
 40
40
-
 41
41
-
 42
42
-
 43
43
-
 44
44
-
 45
45
-
 46
46
-
 47
47
-
 48
48
-
 49
49
-
 50
50
-
 51
51
-
 52
52
-
 53
53
-
 54
54
-
 55
55
-
 56
56
-
 57
57
-
 58
58
-
 59
59
-
 60
60
-
 61
61
-
 62
62
-
 63
63
-
 64
64
-
 65
65
-
 66
66
-
 67
67
-
 68
68
-
 69
69
-
 70
70
-
 71
71


Woods Airmaster WOZ3000 Operating Instructions Manual
- Typ
- Operating Instructions Manual
- Denna manual är också lämplig för
på andra språk
- Deutsch: Woods Airmaster WOZ3000
- français: Woods Airmaster WOZ3000
- English: Woods Airmaster WOZ3000
- dansk: Woods Airmaster WOZ3000
- suomi: Woods Airmaster WOZ3000