Stadler Form JACK Bruksanvisningar
- Kategori
- Luftfuktare
- Typ
- Bruksanvisningar


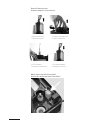
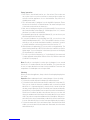
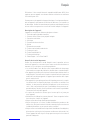
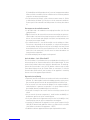
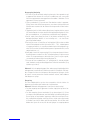
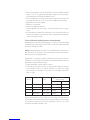
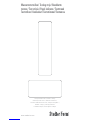
How to fill the water tank
Comment remplire le reservoir d’eau
1. Remove water tank 2. Screw out the tank cover
1. Enlevez le reservoir 2. Dévissez le bouchon
3. Fill in the water 4. Put water tank back
3. Remplissez avec de l’eau 4. Remettez le reservoir
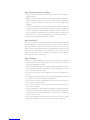
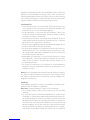
Where to place the Ionic Silver Cube™
Position du cube d’argent Ionic Silver Cube™
12


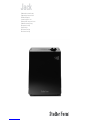
Gratulation! Sie haben soeben den aussergewöhnlichen Luftbefeuchter
JACK erworben. Er wird Ihnen viel Freude machen und die Raumluft für Sie
verbessern.
Wie bei allen elektrischen Haushaltsgeräten wird auch bei diesem Gerät zur
Vermeidung von Verletzungen, Brand- oder Geräteschäden besondere Sorg-
falt verlangt. Bitte studieren Sie die vorliegende Betriebsanleitung vor der
Inbetriebnahme und beachten Sie die Sicherheitshinweise auf dem Gerät.
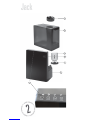
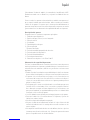
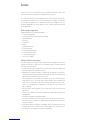
Gerätebeschreibung
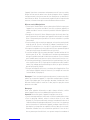
Das Gerät besteht aus den folgenden Komponenten:
1. Zwei-Wege-Nebelauslass
2. Wassertank (5 Liter) mit integriertem Tragegriff
3. Antikalkkartusche
4. Display
5. Tankdeckel
6. Gehäuse
7. Bedienelement
8. Ein/Aus/Nacht-Modus-Taste
9. Taste für Leistungsstufe
10. Taste für Luftfeuchtigkeit
11. Taste für Vorheizung
12. Silber Würfel – Ionic Silver Cube ™
Wichtige Sicherheitshinweise
Bitte lesen Sie die Gebrauchsanleitung genau durch, bevor Sie das Gerät
das erste Mal in Betrieb nehmen und bewahren Sie sie zum späteren Nach-
schlagen gut auf, geben Sie sie ggf. an den Nachbesitzer weiter.
•Für Schäden, die durch Nichtbeachten dieser Gebrauchsanleitung entste-
hen, lehnt Stadler Form jegliche Haftung ab.
•Das Gerät ist nur im Haushalt für die in dieser Gebrauchsanweisung
beschriebenen Zwecke zu benutzen. Ein nicht bestimmungsgemässer
Gebrauch sowie technische Veränderungen am Gerät können zu Gefahren
für Gesundheit und Leben führen.
•Dieses Gerät ist nicht dafür bestimmt durch Personen (einschliesslich
Kinder), mit eingeschränkten physischen, sensorischen oder geistigen
Fähigkeiten oder mangels Erfahrung und/oder mangels Wissen benutzt zu
werden, es sei denn sie werden durch eine für ihre Sicherheit zuständige
Person beaufsichtigt oder erhielten von ihr Anweisungen wie das Gerät
zu benutzen ist.
•Kinder sollten beaufsichtigt werden, um sicherzustellen, dass sie nicht
mit dem Gerät spielen.
•Schliessen Sie das Kabel nur an Wechselstrom an. Achten Sie auf die
Spannungsangaben auf dem Gerät.
•Keine beschädigten Verlängerungskabel verwenden.
•Das Netzkabel nicht über scharfe Kanten ziehen oder einklemmen. Den
Stecker nie am Netzkabel oder mit nassen Händen aus der Steckdose
ziehen.
•Diesen Luftbefeuchter nicht in unmittelbarer Nähe einer Badewanne,
einer Dusche oder eines Schwimmbeckens benutzen (Mindestabstand
von 3 m einhalten). Gerät so aufstellen, dass Personen das Gerät von der
Badewanne aus nicht berühren können.
Deutsch

•Gerät nicht in der Nähe einer Wärmequelle aufstellen. Das Netzkabel
keiner direkten Hitzeeinwirkung (wie z.B. heisse Herdplatten, offene
Flammen, heisse Bügeleisen oder Heizöfen) aussetzen. Netzkabel vor Öl
schützen.
•Darauf achten, dass das Gerät beim Betrieb eine gute Standfestigkeit be-
sitzt und nicht über das Netzkabel gestolpert werden kann.
•Das Gerät ist nicht spritzwassergeschützt.
•Das Gerät ist nur zur Verwendung in Innenräumen geeignet.
•Das Gerät nicht im Freien aufbewahren.
•Das Gerät an einem trockenen und für Kinder unzugänglichen Ort aufbe-
wahren (einpacken).
•Wenn das Netzkabel beschädigt ist, muss es vom Hersteller oder in einer
vom Hersteller zugelassenen Werkstatt oder von ähnlich qualifizierten
Personen ersetzt werden, um Schäden zu vermeiden.
Vor der Inbetriebnahme: Antikalkkartusche und Wasserhärte
Die Antikalkkartusche vermindert den Kalkgehalt im Wasser und somit den
unerwünschten Ausstoss von Kalkpartikeln in die Umgebung. Wirkt je nach
Wasserhärte ein bis drei Monate (siehe Tabelle).
Wichtig: Legen Sie die Antikalkkartusche vor der ersten Verwendung 24
Stunden in Wasser ein (nicht im Wassertank!). Das Granulat muss zuerst
Wasser aufnehmen, um die volle Leistungsfähigkeit zu erreichen.
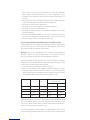
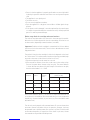
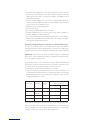
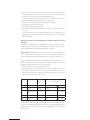
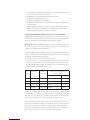
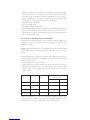
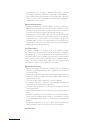
Die Wirkungsdauer der Kartusche hängt von der Wasserhärte ab. Mit dem
mitgelieferten Teststreifen kann diese getestet werden (Teststreifen klebt
auf der Rückseite dieser Bedienungsanleitung).
1. Teststreifen eine Sekunde lang ins Wasser tauchen.
2. Nach ca. einer Minute ist das Ergebnis auf dem Teststreifen sichtbar.
Einige der grünen Felder wechseln ihre Farbe zu rosa. Die Wasserhärte
wird durch die Anzahl rosafarbener Felder angezeigt. Beispiel: Bei drei
rosafarbigen Feldern hat das Wasser den Härtegrad > 14°dH.
Rosa Felder Wasserhärte Härtegrad
(°dH) Kartusche reicht für
(bei 6 Liter/Tag)
Tage Liter
0/1 Weich Ab 4°dH 60 Tage ca. 360 L
2Mittelhart Ab 7°dH 30 Tage ca. 180 L
3 Eher hart Ab 14°dH 20 Tage ca. 120 L
4 Sehr hart Ab 21°dH 10 Tage ca. 60 L
Ab einer Wasserhärte von über 21 °dH können wir Ihnen den Betrieb eines
Ultraschall Luftbefeuchters nicht mehr empfehlen. Wir empfehlen Ihnen
Ihre Luft mit einem Luftbefeuchter nach dem Verdunsterprinzip zu befeuch-
ten (z.B. Oskar Verdunster von Stadler Form).
Das Gerät funktioniert nur einwandfrei mit unbehandeltem Wasser. Nicht
einsetzen bei Enthärtungsanlagen und Ionenaustauschern. Jack darf jedoch

mit Wasser aus einem Tischwasserfiltersystem betrieben werden (z.B.
Brita). Sind Sie unsicher über die Qualität oder Zusammenstellung Ihres
Wassers, nehmen Sie mit dem Hauswart oder dem Trinkwasserversorger
Kontakt auf.
Inbetriebnahme/Bedienung
1. Stellen Sie Jack an den gewünschten Platz auf einen flachen Boden. Ach-
ten Sie darauf, dass das Gerät nicht auf einem wasserempfindlichen Bo-
den steht und dass keine feuchtigkeitsempfindlichen Geräte oder Möbel
in der Nähe stehen. Schliessen Sie das Gerät am Stromnetz an.
2. Füllen Sie nun den Wassertank (2) mit Wasser. Platzieren Sie anschlie-
ssend den Tank im Gerät. Wichtig: Bitte transportieren Sie Jack nicht,
solange dieser mit Wasser gefüllt ist. Das Wasser könnte über die innere
Wanne in die Elektronik laufen.
3. Nehmen Sie anschliessend Jack in Betrieb, indem Sie die Ein/Aus/Nacht-
Modus-Taste (8) drücken. Danach wird im Display (4) die aktuelle Luft-
feuchtigkeit angezeigt. Leuchtet im Display die Angabe „no“, ist kein
Wasser im Gerät.
4. Durch mehrmaliges Drücken der Taste für die Leistungsstufe (9) können
Sie die Befeuchtungsleistung nach Ihrem Wohlempfinden in drei ver-
schiedenen Stufen verändern.
5. Durch Drücken der Taste für die Luftfeuchtigkeit (10) können Sie die ge-
wünschte relative Luftfeuchtigkeit zwischen 40% - 70% einstellen. Der
Luftbefeuchter schaltet automatisch ab, sobald die gewünschte relative
Luftfeuchtigkeit erreicht ist. Möchten Sie den Luftbefeuchter im Dauer-
betrieb einstellen, können Sie die Funktion „co“ auswählen.
6. Mit der Taste für die Vorheizung (11) können Sie die Vorheizung zuschal-
ten. Dabei wird das Wasser auf ca. 80°C erwärmt und der Luftbefeuchter
erreicht eine höhere Leistung. Ob die Vorheizung aktiviert ist oder nicht,
erkennen Sie am Punkt, welcher am unteren rechten Rand im Display (4)
leuchtet.
7. Sobald im Display (4) die Anzeige „no“ erscheint, muss Wasser nachge-
füllt werden. Schalten Sie das Gerät aus, entfernen Sie den Wassertank
(2) und füllen Sie diesen am Wasserhahn mit Leitungswasser auf (siehe
Seite 3).
Hinweis: Sollten Sie Tropfen (oder andere Spuren von Feuchtigkeit) auf
dem oder um das Gerät feststellen, handelt es sich um kondensiertes Was-
ser aus dem Luftbefeuchter. Das heisst, dass die Luft die Feuchtigkeit vom
Luftbefeuchter nicht mehr aufnehmen kann. Bitte regeln Sie den Output
entsprechend nach unten, bis keine Tropfen mehr sichtbar sind.
Reinigung
Vor jeder Wartung und nach jedem Gebrauch das Gerät ausschalten und den
Netzstecker von der Steckdose trennen.
Achtung: Das Gerät nie ins Wasser tauchen (Kurzschlussgefahr).
•Zur äusseren Reinigung mit einem feuchten Lappen abreiben und danach
gut trocknen.
•Zur internen Reinigung den Wassertank (2) und den Silberwürfel (12)
entfernen. Sie können nun die Ultraschallmembrane mit einem her-
kömmlichen Haushaltentkalker reinigen. Wichtig ist, dass dabei der

Wasserstand im Geräteinneren nicht höher als 45 mm ist. Sollte der
Wasserstand irrtümlicherweise die 45 mm übertreffen, wenden Sie sich
sofort an Stadler Form oder einen spezialisierten Techniker. Sollten nicht
alle Rückstände entfernbar sein, können sie mit Hilfe des Reinigungs-
pinsels (Vorder- oder Rückseite) die Ultraschallmembrane reinigen. Bitte
versuchen Sie nicht die Membrane mit einem harten Gegenstand freizu-
kratzen. Bei hartnäckigen Verkalkungen empfehlen wir Ihnen das Gerät
mehrmals nacheinander zu entkalken. Nach dem Entkalken den Unterteil
nachspülen und danach gründlich trocknen.
•Um den Wassertank zu reinigen, spülen Sie diesen mit warmem Wasser
aus. Sollten Kalkablagerungen sichtbar sein, können Sie auch den Was-
sertank entkalken. Danach spülen Sie den Wassertank mit Leitungswas-
ser aus und trocknen diesen danach.
Wechsel der Antikalkkartusche
•Die empfohlenen Wechselintervalle finden Sie in der Tabelle (siehe «Vor
der Inbetriebnahme»).
•Tipp: Die Funktion der Kartusche kann mit einem einfachen Test über-
prüft werden: Halten Sie einen kleinen Spiegel für ein paar Sekunden in
den Nebel. Falls sich auf dem Spiegel anschliessend weisser (Kalk-) Nie-
derschlag befindet, muss die Kartusche ersetzt werden.
•Die Kartusche befindet sich auf der Innenseite des Tankdeckels. Schrau-
ben Sie zuerst den Tankdeckel vom Wassertank und dann die Kartusche
vom Tankdeckel. Entsorgen Sie die Kartusche im Hausmüll. Bevor Sie die
neue Antikalkkartusche auf die Innenseite des Tankdeckels schrauben,
legen Sie sie 24h in Wasser ein (nicht im Wassertank!).
•Werfen Sie den Tankdeckel beim Kartuschenwechsel nicht weg!
Silber Würfel – Ionic Silver Cube ™
Der Silber Würfel (12) verhindert durch stetige Abgabe von Silberionen das
Keim- und Bakterienwachstum im Luftbefeuchter. Der Einsatz des Silber
Würfels führt zu einem hygienischen Raumklima. Die Wirkzeit des Silber
Würfels ist ein Jahr. Wir empfehlen deshalb, jede neue Befeuchtungssaison
den Silber Würfel zu ersetzen. Der Ionische Silber Würfel wirkt, sobald er
mit dem Wasser im Gerät in Berührung kommt und auch wenn das Gerät
ausgeschaltet ist.
Reparaturen/Entsorgung
•Reparaturen an Elektrogeräten (Wechseln des Netzkabels) dürfen nur
von instruierten Fachkräften durchgeführt werden. Bei unsachgemässen
Reparaturen erlischt die Garantie und jegliche Haftung wird abgelehnt.
•Nehmen Sie das Gerät nie in Betrieb, wenn ein Kabel oder Stecker be-
schädigt ist, nach Fehlfunktionen des Gerätes, wenn dieses herunterge-
fallen ist oder auf eine andere Art beschädigt wurde (Risse/Brüche am
Gehäuse).
•Nicht mit irgendwelchen Gegenständen in das Gerät eindringen.
•Ausgedientes Gerät sofort unbrauchbar machen (Netzkabel durchtren-
nen) und bei der dafür vorgesehenen Sammelstelle abgeben.
•Entsorgen Sie elektrische Geräte nicht im Hausmüll, nutzen Sie die
Sammelstellen der Gemeinde.

•Fragen Sie Ihre Gemeindeverwaltung nach den Standorten der Sammel-
stellen.
•Wenn elektrische Geräte unkontrolliert entsorgt werden, können wäh-
rend der Verwitterung gefährliche Stoffe ins Grundwasser und damit in
die Nahrungskette gelangen, oder die Flora und Fauna auf Jahre vergiftet
werden.
•Wenn Sie das Gerät durch ein neues ersetzen, ist der Verkäufer gesetzlich
verpflichtet, das alte mindestens kostenlos zur Entsorgung entgegenzu-
nehmen.
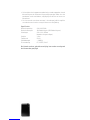
Technische Daten
Nennspannung 220-240 V, 50 Hz
Nennleistung 38 W Heizung aus (135 W Heizung ein)
Abmessungen 230 x 316 x 165 mm
(Breite x Höhe x Tiefe)
Gewicht 3.2 kg
Tankinhalt 5 Liter
Schalldruckpegel < 29 dB(A)
Erfüllt EU-Vorschrift CE / WEEE / RoHS
Technische Änderungen vorbehalten

Congratulations! You have just purchased the exceptional humidifier JACK.
It will give you great pleasure and improve the indoor air for you.
As with all domestic electrical appliances, particular care is needed with
this model also, in order to avoid injury, fire damage or damage to the appli-
ance. Please study these operating instructions carefully before using the
appliance for the first time and follow the safety advice on the appliance
itself.
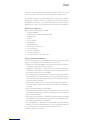
Description of the appliance
The appliance consists of the following main components:
1. Two way mist outlet
2. Water tank (5 liter) with integrated handle
3. Anticalc cartridge
4. Display
5. Tank cover
6. Housing
7. Touch element
8. On/off/night mode
9. Button for output level
10. Button for humidity level
11. Button for preheating
12. Ionic Silver Cube ™
Important safety instructions
Please read through the operating instructions carefully before you use the
appliance for the first time and keep them safely for later reference; if nec-
essary pass them on to the next owner.
•Stadler Form refuses all liability for loss or damage which arises as a
result of failure to follow these operating instructions.
•The appliance is only to be used in the home for the purposes described in
these instructions. Unauthorised use and technical modifications to the
appliance can lead to danger to life and health.
•This appliance is not intended for use by person (including children) with
reduced physical, sensory or mental capabilities, or lack of experience
and knowledge, unless they have been given supervision or instruction
concerning use of the appliance by a person responsible for their safety.
•Children should be supervised to ensure that they do not play with the
appliance.
•Only connect the cable to alternating current. Observe the voltage infor-
mation given on the appliance.
•Do not use damaged extension cords.
•Do not run the power cord over sharp edges and make sure that it does
not get trapped. Do not pull the plug from the socket with wet hands or by
holding on to the power cord.
•Do not use this air humidifier in immediate vicinity of a bath tub, a shower
or a swimming pool (observe a minimum distance of 3 m). Place the ap-
pliance such that a person in the bath tub cannot touch the appliance.
•Do not place the appliance near a heat source. Do not subject the power
cord to direct heat (such as a heated hotplate, open flames, hot iron sole
plates or heaters for example). Protect power cords from oil.
English

•See to it that the appliance is properly positioned to ensure a high stabil-
ity during its operation and make sure that no one can trip over the power
cord.
•The appliance is not splash-proof.
•For indoor use only.
•Do not store the appliance outdoors.
•Store the appliance in a dry place inaccessible to children (pack the ap-
pliance).
•If the power cord is damaged, it must be replaced by the manufacturer
or a repair shop authorized by the manufacturer or by similarly qualified
persons in order to prevent damage.
Before setup: Anticalc cartridge and water hardness
The anticalc cartridge reduces the limescale in the water and the undesir-
able emission of limescale particles into the surroundings. Effective for one
to three months, depending on water hardness (see table).
Important: Soak the anticalc cartridge in a water bath for 24 hours before
the first use (not in the water tank!). The resin has to absorb water to reach
high performance.
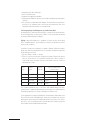
The period of time that the cartridge is effective for depends on the hard-
ness of the water. This can be tested using the testing strips provided (strips
are stuck to the reverse side of these instructions for use).
1. Dip the testing strips into the water for a second.
2. After around one minute, the results can be seen on the testing strips.
Some of the green boxes change colour into pink. The water hardness
is shown by how many boxes turn pink.Example: If three boxes are pink,
then the water hardness is > 14°dH.
Number of
pink boxes Water
hardness Degree of
hardness
(°dH)
Cartridge will last for
(with 6 liter/day)
Days Liter
0/1 Soft From 4°dH 60 days approx. 360 L
2Moderately
hard From 7°dH 30 days approx. 180 L
3Hard From 14°dH 20 days approx. 120 L
4 Very hard From 21°dH 10 days approx. 60 L
With a water hardness above 21 °dH, we can no longer recommend the use
of an ultrasonic air humidifier. We recommend that you use an evaporative
humidifier to increase humidity in your house (e.g. Oskar humidifier made
by Stadler Form).
The unit only works properly with untreated water. Do not use where there
are water softeners and water ionisers in operation. However, Jack may
be operated from a drinking water filter system (e.g. Brita). Should you be
unsure about the quality or composition of the water in your area, contact
the caretaker or the provider of drinking water.

Setup / operation
1. Place Jack in the desired location on a flat surface. Please take care
not to place Jack on a surface sensitive to water and do not place any
moisture-sensitive appliances close to the humidifier. Plug Jack into a
suitable power socket.
2. Fill in the water tank (2) and place it on the humidifier. Important: Please
do not move Jack when it is filled with water. The water could splash out
of the interior tank and into the electronics.
3. Next, turn on Jack by pressing the on/off/night mode (8). You can now see
the current humidity on the display (4). If the display shows “no”, it means
that there is no water in the humidifier.
4. By repeatedly pressing the output level button (9), you can choose your
desired output level from little to high.
5. If you push the button for the humidity level (10), you can choose the
relative humidity between 40% - 70%. The humidifier switches off auto-
matically as soon as the desired relative humidity is reached. If you wish
to run the humidifier continuously, please choose the function “co”.
6. With the button for preheating (11) you can switch on the preheating. The
water is being heated up to 80°C which allows the humidifier to reach a
higher output. If you see the point in the lower right corner of the display
(4), the preheating is switched on.
7. As soon as you see the information „no“ in the display (4), the water tank
is empty and needs to be refilled. Switch off the unit, take the water tank
(2) and refill it (see page 3).
Note: Should you see droplets (or other signs of dampness) on or around
the unit, this is condensed water from the humidifier. This means that the
air can no longer absorb the moisture from the humidifier. Please turn the
output down so that droplets are no longer visible.
Cleaning
Before you clean the appliance, always switch off and unplug the plug from
the socket.
Attention: Never submerge the unit in water (danger of short circuiting).
•To clean the outside, wipe with a damp cloth and then dry well.
•To clean the inside, remove the water tank (2) and the ionic silver cube (12).
Then you can clean the ultrasonic membrane with a normal household
decalcifier. It is important during this that the level of water inside the
unit does not go higher than 45 mm. Should the level of water accidentally
exceed 45 mm, contact Stadler Form or a specialist technician immediately.
Should not all residues be able to be removed, then you can clean the
ultrasonic membrane with the help of the cleaning brush (front or reverse
side). Please do not scrape the membrane with a hard object. With persis-
tent calcification, we recommend that you decalcify the unit several times
in a row. After decalcifying, rinse the lower part and then dry thoroughly.
•To clean the water tank, rinse it with warm water. Should calcification be
visible, you can also decalcify the water tank. Afterwards, rinse the water
tank and then dry it.

Replacement of the anticalc cartridge
•Please find the recommended replacement intervals in the table (see
«Before setup»).
•Tip: The efficiency of the cartridge can be inspected with a simple test.
Hold a small mirror in the mist for a few seconds. If there are then white
deposits (calcium carbonate) on the mirror, then the cartridge needs
changing.
•The anticalc cartridge is located on the inner side of the tank cap. First
screw the tank cap off the water tank and then screw the cartridge from
the tank cap. Dispose of the cartridge in the domestic waste. Soak the an-
ticalc cartridge in a water bath for 24 hours before the first use (not in the
water tank!). The resin has to absorb water to reach high performance.
•Keep the tank cap when replacing the cartridge!
Ionic Silver Cube ™
The ionic silver cube (12) prevents the growth of germs and bacteria in the
humidifier due to the continuous release of silver ions. The use of an ionic
silver cube leads to a hygienic room climate. The lifetime of the ionic silver
cube is around one year. We therefore recommend that you replace the ionic
silver cube at the beginning of every humidifying season. The ionic silver
cube starts working as soon as it comes into contact with water, and also
works when the unit is switched off.
Repairs/disposal
•Repairs to electrical appliances must only be carried out by a qualified
electrical technician. If improper repairs are carried out, the warranty
lapses and all liability is refused.
•Never operate the appliance if the adaptor or plug is damaged, after it has
malfunctioned, if it has been dropped or has been damaged in any other
way (cracks/breaks in the casing).
•Do not push any object into the appliance. Do not disassemble the ap-
pliance.
•If the appliance is beyond repair, make it unusable immediately and hand
it in at the collection point provided for the purpose.
•Do not dispose of electrical appliances in the domestic waste. Please use
the communal collection points.
•Ask your local authority if you do not know where the communal collec-
tion points are located.
•If electrical appliances are disposed of thoughtlessly, exposure to the ele-
ments may cause hazardous substances to find their way into the ground-
water and from there into the food chain, or to poison the flora and fauna
for many years to come.
•If you are replacing the appliance with a new one, the seller is legally
obliged to take back the old one at least free of charge for disposal.

Specifications
Rated voltage 220-240 V, 50 Hz
Power output 38 W heater off (135 W heater on)
Dimensions: 230 x 316 x 165 mm
(width x height x depth)
Weight: 3.2 kg
Tank capacity 5 Liter
Sound level < 29 dB(A)
Complies with EU
regulations CE / WEEE / RoHS
All rights for any technical modifications are reserved

Français
Félicitations ! Vous venez d‘acheter le superbe humidificateur JACK. Nous
espérons que cet appareil vous donnera entière satisfaction et améliorera
l‘air intérieur pour vous.
Comme pour tous les appareils ménagers électriques, il est important d‘entre-
tenir cet appareil correctement afin d’éviter les blessures, les incendies ou
les dommages. Veuillez lire attentivement le présent mode d‘emploi avant la
mise en service et respecter les conseils de sécurité indiqués sur l’appareil.
Description de l’appareil
L’appareil est composé des éléments principaux suivants:
1. Sortie de vapeur à double orientation
2. Réservoir d’eau (5 litres) avec poignée intégrée
3. Cartouche anticalcaire
4. Affichage
5. Couvercle du réservoir d’eau
6. Boîtier
7. Elément de commande
8. Touche marche/arrêt/mode de nuit
9. Touche puissance
10. Touche humidité de l’air
11. Touche préchauf fage
12. Cube d‘argent – Ionic Silver Cube ™
Conseils de sécurité importants
Veuillez lire attentivement le mode d‘emploi avant la première mise en
service de l’appareil et conservez-le pour toute consultation ultérieure ou
remettez-le, le cas échéant, au nouveau propriétaire.
•La société Stadler Form décline toute responsabilité des dommages
résultant du non-respect des indications données dans ce mode d‘emploi.
•Cet appareil ne doit être utilisé qu’aux fins domestiques décrites dans ce
mode d‘emploi. Toute utilisation contraire à sa destination ainsi que toute
modification technique apportée à l‘appareil peut entraîner des risques
pour la santé et la vie.
•Cet appareil n’est pas prévu pour être utilisé par des personnes (y compris
les enfants) dont les capacités physiques, sensorielles ou mentales sont
réduites, ou des personnes dénuées d’expérience ou de connaissance,
sauf si elles ont pu bénéficier, par l’intermédiaire d’une personne res-
ponsable de leur sécurité, d’une surveillance ou d’instructions préalables
concernant l’utilisation de l’appareil.
•Il convient de surveiller les enfants pour s‘assurer qu‘ils ne jouent pas
avec l‘appareil.
•Ne branchez le câble qu’au courant alternatif. Tenez compte des indica-
tions de tension situées sur l‘appareil.
•Ne pas utiliser de rallonge électrique endommagée.
•Ne pas faire passer ou coincer le câble d’alimentation par-dessus des
arêtes vives. Ne jamais retirer la fiche de courant de la prise en tirant sur
le câble d’alimentation ou en ayant les mains mouillées.
•Ne pas utiliser cet humidificateur à proximité immédiate d’une baignoire,
d’une douche ou d’une piscine (respecter une distance minimum de 3 m).
Placer l’appareil de telle façon à ce que personne ne puisse le toucher à
partir de la baignoire.

•Ne pas placer l’appareil à proximité directe d‘ une source de chaleur. Ne
pas exposer le câble d’alimentation à la chaleur (comme p. ex. une plaque
chaude de cuisinière, flammes nues, semelle chaude de fer à repasser ou
poêles). Protéger le câble d’alimentation de tout contact avec de l‘huile.
•Veiller à ce que l’appareil ait une bonne stabilité lors de son fonction-
nement et que l’on ne puisse pas trébucher sur le câble d’alimentation.
•Cet appareil n’est pas protégé contre les projections d’eau.
•Pour usage intérieur uniquement.
•L'appareil ne doit pas être conservé à l'extérieur.
•Conserver l’appareil à un endroit sec et hors de portée des enfants (l’em-
baller).
•Si le cordon d’alimentation est endommagé, le faire remplacer par le
fabricant ou par un atelier agréé par le fabricant ou des personnes quali-
fiées en conséquence, afin d’éviter tout dommage.
Avant la mise en marche : Cartouche anticalcaire et dureté de l‘eau
La cartouche anticalcaire adoucit l’eau dure et évite ainsi la libération indé-
sirable de particules de calcaire dans l’espace environnant. Elle fonctionne
1 à 3 mois selon la dureté de l’eau (voyez le tableau).
Important: Veuillez svp mettre la cartouche anticalcaire dans un bain d’eau
pour 24 heures avant la première utilisation (ne pas dans le réservoir d'eau!).
Ceci permet les granulés d’absorber de l’eau pour atteindre la capacité
maximale.
La durée d‘efficacité de la cartouche dépend de la dureté de l‘eau. Vous
pouvez la tester à l‘aide de la bandelette test fournie (la bandelette test est
collée au dos de ce mode d‘emploi).
1. Plongez la bandelette test une seconde dans l‘eau.
2. Le résultat est visible sur la bandelette au bout d‘une minute environ.
Certains champs verts virent au rose. La dureté de l‘eau est indiquée par
le nombre de champs de couleur rose. Exemple : Trois champs de couleur
rose indiquent que l‘eau a un degré de dureté de > 14°dH.
Champs
de couleur
rose
Dureté de
l'eau Degré de
dureté (°dH) Cartouche suffisante pour
(avec 6 litres/jour)
Jours Litres
0/1 Douce à partir de 4°dH 60 jours env. 360 L
2Moyennement
dure à partir de 7°dH 30 jours env. 180 L
3Plutôt dure à partir de 14°dH 20 jours env. 120 L
4Très dure à partir de 21°dH 10 jours env. 60 L
À partir d‘une dureté supérieure à 21°dH, nous ne pouvons plus vous recom-
mander d‘utiliser un humidificateur à ultrasons. Nous vous recommandons
d‘humidifier votre air à l‘aide d‘un humidificateur d‘air conforme au principe
de l‘évaporateur (ex. l‘humidificateur évaporateur Oskar de Stadler Form).

L‘appareil fonctionne correctement uniquement avec de l‘eau non traitée.
Ne pas l‘utiliser avec des adoucisseurs et des échangeurs d‘ions. L‘appareil
Jack peut toutefois fonctionner avec de l‘eau filtrée par un système de fil-
tration d‘eau (ex. Brita). Si vous doutez de la qualité ou de la composition de
votre eau, contactez votre régie ou votre distributeur d‘eau courante.
Mise en marche/Manipulation
1. Placez Jack à l’endroit désiré sur une surface plane. Veillez à ne pas poser
l’appareil sur une surface sensible à l’eau et à ce qu’aucun appareil ou
meuble sensible à l’eau ne se trouve à proximité. Branchez l’appareil au
secteur.
2. Remplissez le réservoir (2) d’eau. Mettez en place le réservoir dans l’ap-
pareil. Important: Ne transportez pas l‘appareil Jack tant qu‘il est rempli
d‘eau. L‘eau pourrait passer par dessus la cuve et couler dans le système
électronique.
3. Ensuite, mettez Jack en marche en appuyant sur la touche marche/arrêt/
mode de nuit (8). Ensuite, l’affichage (4) indique l’humidité de l’air ac-
tuelle. Si l’écran affiche «no», c’est qu’il n’y a pas d’eau dans l’appareil.
4. Une pression répétée sur la touche puissance (9) vous permet de régler à
votre guise la puissance d’humidification sur 3 positions.
5. La touche humidité (10) vous permet de régler l’humidité relative de l’air
désirée entre 40 et 70%. L’humidificateur s’arrêtera automatiquement
dès que l’humidité relative de l’air désirée sera atteinte. Si vous souhaitez
que l’humidificateur fonctionne en continu, sélectionnez la fonction «co».
6. La touche préchauffage (11) permet d’activer le préchauffage. L’eau est
alors chauffée à env. 80°C, ce qui optimise la performance de l’humidifi-
cateur. Pour indiquer que le préchauffage est activé, un point s'allume en
bas de l'affichage (4) à droite.
7. Dès que l’affichage (4) affiche «no», vous devez faire l’appoint d’eau. Pour
cela, éteignez l'appareil, retirez le réservoir (2) et remplissez-le avec de
l’eau du robinet (voyez page 3).
Remarque : Si vous constatez la présence de gouttes (ou autre traces d‘hu-
midité) sur ou autour de l‘appareil, il s‘agit d‘eau condensée due à l‘humidi-
ficateur. Cela indique que l‘air ne peut plus absorber l‘humidité de l‘humi-
dificateur. Veuillez régler la sortie vers le bas jusqu‘à ce que plus aucune
goutte ne soit visible.
Nettoyage
Avant toute opération d’entretien et après chaque utilisation, veuillez
mettre l’appareil hors tension et débrancher la prise du secteur.
Attention: Ne mouillez jamais l‘appareil (risque de court-circuit).
•Pour le nettoyage extérieur, frottez avec un chiffon humide et bien sécher.
•Pour le nettoyage intérieur, retirez le réservoir d‘eau (2) et le cube
d‘argent (12). Vous pouvez désormais nettoyer la membrane à ultrasons à
l‘aide d‘un détartrant ménager traditionnel. Pour ce faire, il est important
que le niveau d‘eau à l‘intérieur de l‘appareil ne dépasse pas 45 mm. Si,
par méprise, le niveau d‘eau est supérieur à 45 mm, adressez-vous immé-
diatement à Stadler Form ou à un technicien spécialisé. Si tous les rési-
dus ne peuvent pas être éliminés, vous pouvez nettoyer la membrane à

ultrasons à l‘aide du pinceau de nettoyage (recto et verso). N‘essayez pas
de gratter la membrane avec un objet dur. En cas de dépôts de calcaire
récalcitrants, nous vous recommandons de détartrer l‘appareil à plusieurs
reprises. Après le détartrage, rincez la partie inférieure et séchez-la soi-
gneusement.
•Pour nettoyer le réservoir d‘eau, lavez-le à l‘eau chaude. Si des dépôts de
calcaire sont encore visibles, vous pouvez également détartrer le réser-
voir d‘eau. Lavez-le ensuite à l‘eau courante et séchez-le.
Changement de cartouche anticalcaire
•Dans le tableau (voyez « Avant la mise en marche ») sont indiquées les
durées d'utilisation des cartouches.
•Conseil: Le fonctionnement de la cartouche peut être vérifié par un test
simple : tenez un petit miroir dans la brume quelques secondes. Si le
miroir présente un dépôt (de calcaire) blanc, il faut changer la cartouche.
•La cartouche anticalcaire se trouve à l'intérieur du couvercle du réservoir
d'eau. Dévissez le couvercle, puis dévissez la cartouche du couvercle. La
cartouche peut être jetée avec les ordures ménagères. Avant la première
utilisation, laissez tremper la cartouche anticalcaire dans un récipient
contenant de l'eau pendant 24h (mais pas dans le réservoir). La résine
doit se gorger d'eau pour développer toutes ses performances.
•Ne pas jeter le bouchon du réservoir lors du changement de cartouche!
Cube d‘argent – Ionic Silver Cube ™
Le cube d‘argent (12) empêche la croissance des bactéries et des germes
dans l‘humidificateur en libérant constamment des ions d‘argent. L‘uti-
lisation du cube d‘argent garantit un climat ambiant hygiénique. Le cube
d‘argent est efficace pendant un an. C‘est pourquoi nous recommandons de
changer le cube d‘argent à chaque nouvelle saison humide. Le cube d‘argent
ionique est efficace dès qu‘il est en contact avec de l‘eau dans l‘appareil et
même lorsque l‘appareil est éteint.
Réparations/élimination
•Les réparations sur les appareils électriques ne doivent être effectuées
que par des électriciens qualifiés. La garantie s’éteint et toute responsa-
bilité est exclue en cas de réparations non conformes aux règles de l‘art .
•Ne mettez jamais l‘appareil en service en cas d’endommagement d’un
cordon ou d’une fiche, après un dysfonctionnement de l’appareil causé
par une chute ou par une autre détérioration de l’appareil (boîtier fissuré/
cassé).
•Ne pas pénétrer avec des objets quelconques dans l’appareil.
•Arrivé au bout de sa durée de vie, l’appareil doit immédiatement être ren-
du inutilisable (sectionner le cordon d’alimentation) et être déposé dans
une déchetterie prévue à cet effet.
•Ne jetez pas vos appareils électriques avec les ordures ménagères, utili-
sez les points de collecte municipaux.
•Veuillez consulter vos services municipaux pour connaître les points de
collecte.

•La mise au rebut incontrôlée des appareils électriques peut entraîner,
lors de précipitations, la filtration de matières dangereuses dans les eaux
souterraines pouvant contaminer la chaîne alimentaire ou intoxiquer
durablement la flore et la faune.
•Si vous remplacez un vieil appareil par un neuf, le vendeur a l‘obligation
légale de reprendre votre vieil appareil, au mieux gratuitement.
Caractéristiques techniques
Tension nominale 220-240 V, 50 Hz
Puissance nominale 38 W chauffauge éteint
(135 W chauffage allumé)
Dimensions 230 x 316 x 165 mm
(largeur x hauteur x profondeur)
Poids 3,2 kg
Contenance du reservoir 5 Litres
Niveau de bruit < 29 dB(A)
Conforme à la
réglementation UE CE / WEEE / RoHS
Sous réserve de modifications techniques

Congratulazioni! Avete appena acquistato il fantastico umidificatore JACK.
Sarà estremamente piacevole e migliorerà l'aria nell'ambiente per voi.
Come con tutte le apparecchiature elettriche domestiche, è necessaria par-
ticolare attenzione anche con questo modello, al fine di evitare infortuni,
danni da incendio o danni al dispositivo. Studiare con attenzione queste
istruzioni per l’uso prima di utilizzare il dispositivo per la prima volta e segui-
re tutte le istruzioni di sicurezza fornite con esso.
Descrizione dell’apparecchio
L’apparecchio consiste delle seguenti componenti principali:
1. Uscita nebbia a due vie
2. Serbatoio (5 litri) con maniglia integrata
3. Cartuccia anticalcare
4. Display
5. Coperchio serbatoio
6. Corpo principale
7. Elemento touch screen
8. Tasto on/off/modalità notturna
9. Tasto per uscita
10. Tasto per l‘umidità
11. Tasto per il pre riscaldamento
12. Ionic Silver Cube ™
Importanti istruzioni di sicurezza
Prima di utilizzare l'apparecchio leggere attentamente le istruzioni per l’uso.
Dopo aver letto le istruzioni per l’uso, conservarle con cura per la futura
consultazione.
•La Stadler Form respinge ogni responsabilità per la perdita o danni che
incorrano come risultato di un mancato rispetto di queste istruzioni d’uso.
•L’apparecchio dev’essere usato solo in casa e per gli scopi descritti in
queste istruzioni. L’uso non autorizzato e le modifiche tecniche all’appa-
recchio possono portare a pericoli per la vita e la salute.
•Quest‘apparecchio non è inteso per l‘uso da parte di persone (compresi
bambini) con capacità fisiche, sensoriali o mentali ridotte, prive di espe
rienza o di conoscenza, a meno che non vi sia supervisione od istruzioni
riguardo al suo utilizzo da parte di una persona responsabile per la loro
sicurezza.
•I bambini dovrebbero essere sempre supervisionati per assicurarsi che
non giochino con l‘apparecchio.
•Collegate il cavo solo alla corrente alternata. Rispettate le informazioni
sul voltaggio riportate sull’apparecchio.
•Non utilizzate prolunghe.
•Non fate scorrere il cavo su bordi taglienti ed assicuratevi che non riman-
ga incastrato. Non tirate il cavo dalla presa con mani umide o afferrando
il cavo stesso.
•Non utilizzate quest‘apparecchio nelle immediate vicinanze di una vasca,
una doccia o una piscina (rispettate una distanza minima di 3 m). Posizio-
nate l’apparecchio in modo che una persona dentro la vasca non possa
toccare l’apparecchio.
Italiano
Sidan laddas...
Sidan laddas...
Sidan laddas...
Sidan laddas...
Sidan laddas...
Sidan laddas...
Sidan laddas...
Sidan laddas...
Sidan laddas...
Sidan laddas...
Sidan laddas...
Sidan laddas...
Sidan laddas...
Sidan laddas...
Sidan laddas...
Sidan laddas...
Sidan laddas...
Sidan laddas...
Sidan laddas...
Sidan laddas...
Sidan laddas...
Sidan laddas...
Sidan laddas...
Sidan laddas...
Sidan laddas...
Sidan laddas...
Sidan laddas...
Sidan laddas...
Sidan laddas...
Sidan laddas...
Sidan laddas...
Sidan laddas...
Sidan laddas...
Sidan laddas...
Sidan laddas...
Sidan laddas...
-
 1
1
-
 2
2
-
 3
3
-
 4
4
-
 5
5
-
 6
6
-
 7
7
-
 8
8
-
 9
9
-
 10
10
-
 11
11
-
 12
12
-
 13
13
-
 14
14
-
 15
15
-
 16
16
-
 17
17
-
 18
18
-
 19
19
-
 20
20
-
 21
21
-
 22
22
-
 23
23
-
 24
24
-
 25
25
-
 26
26
-
 27
27
-
 28
28
-
 29
29
-
 30
30
-
 31
31
-
 32
32
-
 33
33
-
 34
34
-
 35
35
-
 36
36
-
 37
37
-
 38
38
-
 39
39
-
 40
40
-
 41
41
-
 42
42
-
 43
43
-
 44
44
-
 45
45
-
 46
46
-
 47
47
-
 48
48
-
 49
49
-
 50
50
-
 51
51
-
 52
52
-
 53
53
-
 54
54
-
 55
55
-
 56
56


Stadler Form JACK Bruksanvisningar
- Kategori
- Luftfuktare
- Typ
- Bruksanvisningar
på andra språk
- español: Stadler Form JACK Instrucciones de operación
- Deutsch: Stadler Form JACK Bedienungsanleitung
- français: Stadler Form JACK Mode d'emploi
- dansk: Stadler Form JACK Betjeningsvejledning
- Nederlands: Stadler Form JACK Handleiding
