
BBCE12-3_M
BBCE12-3
English .........................Page 02
Deutsch ....................... Seite 14
Español ....................Página 27
Français ...................... Page 39
Italiano .......................Pagina 51
Nederlands ..........Pagina 63
Svenska ..................... Sidan 75
Suomi .............................. Sivu 86
Türkçe ...........................Sayfa 98
Ελληνικά
................
Σελίδα
110
Polski ........................ Strona 123
Русский
............
Страница
136

• 2 •
ENGLISH Original instructions
Model: BBCE12-3
Automatic Battery Charger
OWNER’S MANUAL
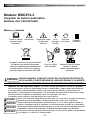
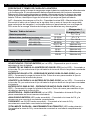
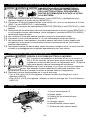
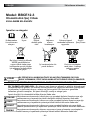
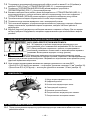
Markings and symbols
Use in a
well-ventilated
area.
Keep away from
sparks and ame –
battery could emit
explosive gases.
Read manual
before using.
For indoor
use only.
Do not
expose
to rain.
Caution,
risk of electric
shock.
Warning
Class II
Charger
Contact the equipment
supplier for details on
how to properly dispose
of this product within
a specic country, per
WEEE requirements.
WARNING
READ THE ENTIRE MANUAL BEFORE USING THIS PRODUCT.
FAILURE TO DO SO COULD RESULT IN SERIOUS INJURY OR DEATH.
IMPORTANT: READ AND SAVE THIS SAFETY AND INSTRUCTION MANUAL.
SAVE THESE INSTRUCTIONS – This manual will show you how to use your charger safely
and effectively. Please read, understand and follow these instructions and precautions
carefully, as this manual contains important safety and operating instructions. The safety
messages used throughout this manual contain a signal word, a message and an icon.
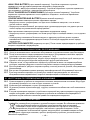
The signal word indicates the level of the hazard in a situation.
Indicates an imminently hazardous situation which, if not avoided, will result in
death or serious injury to the operator or bystanders.
Indicates a potentially hazardous situation which, if not avoided, could result in
death or serious injury to the operator or bystanders.
Indicates a potentially hazardous situation which, if not avoided, could result in
moderate or minor injury to the operator or bystanders.
Indicates a potentially hazardous situation which, if not avoided, could result in
damage to the equipment or vehicle or property damage.
DANGER
WARNING
CAUTION
IMPORTANT

• 3 •
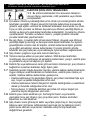
1. IMPORTANT SAFETY INSTRUCTIONS – SAVE THESE INSTRUCTIONS.
This manual contains important safety and operating instructions.
RISK OF ELECTRIC SHOCK OR FIRE.
1.1 Read the entire manual before using this product.
Failure to do so could result in serious injury or death.
1.2 Children should be supervised to ensure that they
do not play with the appliance. This appliance can be used by children aged
from 8 years and above and persons with reduced physical, sensory or
mental capabilities or lack of experience and knowledge if they have been
given supervision or instruction concerning use of the appliance in a safe
way and understand the hazards involved. Children shall not play with the
appliance. Cleaning and user maintenance shall not be made by children
without supervision.
1.3 This charger is not intended for use by persons (including children) with
reduced physical, sensory or mental capabilities, or lack of experience
and knowledge, unless they have been given supervision or instruction
concerning the use of the charger by a person responsible for their safety.
Children should be supervised to ensure they do not play with the charger.
1.4 Do not expose the charger to rain or snow.
1.5 Use only recommended attachments. Use of an attachment not
recommended or sold by SNA Europe may result in a risk of re, electric
shock or injury to persons or damage to property.
1.6 To reduce the risk of damage to the electric plug or cord, pull by the plug
rather than the cord when disconnecting the charger.
1.7 An extension cord should not be used unless absolutely necessary. Use of an
improper extension cord could result in a risk of re and electric shock. If an
extension cord must be used, make sure:
• That the pins on the plug of the extension cord are the same number, size
and shape as those of the plug on the charger.
• That the extension cord is properly wired and in good electrical condition.
• That the wire size is large enough for the AC ampere rating of the charger
as specied in section 8.
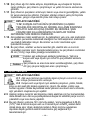
1.8 To reduce the risk of electric shock, unplug the charger from the outlet before
attempting any maintenance or cleaning. Simply turning off the controls will
not reduce this risk.
1.9 Do not operate the charger with a damaged cord or plug. If the supply cord
is damaged, it must be replaced by the manufacturer, its service agent or
similarly qualied persons in order to avoid a hazard.
1.10 Do not operate the charger if it has received a sharp blow, been dropped or
otherwise damaged in any way; take it to a qualied service person.
WARNING
WARNING

• 4 •
1.11 Do not disassemble the charger; take it to a qualied service person when
service or repair is required. Incorrect reassembly may result in a risk of re
or electric shock.
RISK OF EXPLOSIVE GASES.
1.13 To reduce the risk of a battery explosion, follow these instructions and those
published by the battery manufacturer and the manufacturer of any equipment
you intend to use in the vicinity of the battery. Review the cautionary markings
on these products and on the engine.
1.14 This charger employs parts, such as switches and circuit breakers, that tend
to produce arcs and sparks. If used in a garage, locate this charger 46 cm
(18 inches) or more above oor level.
WARNING
Do not use with non-rechargeable batteries. Use only with
lead-acid or lithium ion LiFePO
4
rechargeable batteries.
IMPORTANT
Do not start the vehicle with the charger connected to the AC
outlet, or it may damage the charger and your vehicle.
2. PERSONAL PRECAUTIONS
RISK OF EXPLOSIVE GASES.
2.1 NEVER smoke or allow a spark or ame in the vicinity of a
battery or engine.
2.2 Remove personal metal items such as rings, bracelets,
necklaces and watches when working with a lead-acid or lithium ion battery.
These batteries can produce a short-circuit current high enough to weld a ring
or the like to metal, causing a severe burn.
2.3 Be extra cautious, to reduce the risk of dropping a metal tool onto the battery.
It might spark or short-circuit the battery or other electrical part that may
cause an explosion.
2.4 Use this charger for charging only 12V automotive/power sport batteries, including
6-celled lead-acid and 4-celled lithium LiFePO
4
batteries, with rated capacities of
6-58 Ah (12V)*. It is not intended to supply power to a low voltage electrical
system other than in a starter-motor application. Do not use this battery
charger for charging dry-cell batteries that are commonly used with home
appliances or lithium ion batteries used in cell phones, laptops, power tools, etc.
These batteries may burst and cause injury to persons and damage to property.
*The BBCE12-3 has been tested and approved to charge the ChaoBaLi
LiFePO
4
battery, model number TDS-1220AH-1. Before charging any
other LiFePO
4
battery, we recommend contacting the battery supplier.
WARNING
1.12 WORKING IN THE VICINITY OF A LEAD-ACID BATTERY
IS DANGEROUS. BATTERIES GENERATE EXPLOSIVE GASES
DURING NORMAL BATTERY OPERATION. FOR THIS REASON, IT
IS OF UTMOST IMPORTANCE THAT YOU FOLLOW THE INSTRUCTIONS
EACH TIME YOU USE THE CHARGER.
WARNING

• 5 •
2.5 NEVER charge a frozen battery.
2.6 Consider having someone nearby to come to your aid when you work near a
lead-acid battery.
2.7 Have plenty of fresh water and soap nearby, in case battery acid contacts
your skin, clothing or eyes.
2.8 Wear complete eye and body protection, including safety goggles and
protective clothing. Avoid touching your eyes while working near the battery.
2.9 If battery acid contacts your skin or clothing, immediately wash the area with
soap and water. If acid enters your eye, immediately ood the eye with cold
running water for at least 10 minutes and get medical attention right away.
2.10 If battery acid is accidentally swallowed, drink milk, the whites of eggs or
water. DO NOT induce vomiting. Seek medical attention immediately.
3. PREPARING TO CHARGE
RISK OF CONTACT WITH BATTERY ACID. BATTERY ACID IS A
HIGHLY CORROSIVE SULFURIC ACID.
3.1 If it is necessary to remove the battery from the vehicle to
charge it, always remove the grounded terminal rst. Make sure all
of the accessories in the vehicle are off, to prevent arcing.
3.2
Be sure the area around the battery is well ventilated while the battery is being charged.
3.3 Clean the battery terminals before charging the battery. During cleaning, keep airborne
corrosion from coming into contact with your eyes, nose and mouth. Use baking soda and
water to neutralize the battery acid and help eliminate airborne corrosion. Do not touch
your eyes, nose or mouth.
3.4 Add distilled water to each cell until the battery acid reaches the level specied by the
battery manufacturer. Do not overll. For a battery without removable cell caps, such as
valve regulated lead acid batteries (VRLA), carefully follow the manufacturer’s recharging
instructions.
3.5 Read, understand and follow all instructions for the charger, battery, vehicle and any
equipment used near the battery and charger. Study all of the battery manufacturer’s
specic precautions while charging and recommended rates of charge.
3.6 Determine the voltage of the battery by referring to the vehicle owner’s manual and make
sure that the output voltage selector switch is set to the correct voltage. If the charger has
an adjustable charge rate, charge the battery in the lowest rate rst.
3.7 Make sure that the charger cable clips make tight connections.
4. CHARGER LOCATION
RISK OF EXPLOSION AND CONTACT WITH
BATTERY ACID.
4.1 Locate the charger as far away from the battery as
the DC cables permit.
4.2 NEVER place the charger directly above the
battery being charged; gases from the battery will corrode and damage the charger.
4.3 Do not set the battery on top of the charger.
4.4 NEVER allow battery acid to drip onto the charger when reading the electrolyte specic
gravity or lling the battery.
4.5 Do not operate the charger in a closed-in area or restrict the ventilation in any way.
WARNINGWARNING
WARNINGWARNING
WARNING

• 6 •
5. DC CONNECTION PRECAUTIONS
5.1 Connect and disconnect the DC output connectors only after removing the AC plug from
the electrical outlet. NEVER allow the connectors to touch each other.
5.2 Attach the connectors to the battery and chassis, as indicated in sections 6 and 7.
6. FOLLOW THESE STEPS WHEN BATTERY IS INSTALLED IN THE VEHICLE
A SPARK NEAR THE BATTERY MAY CAUSE A
BATTERY EXPLOSION. TO REDUCE THE RISK OF
A SPARK NEAR THE BATTERY:
IMPORTANT
Do not start the vehicle with the charger connected to the AC outlet, or it
may damage the charger and your vehicle.
6.1 Position the AC and DC cables to reduce the risk of damage by the hood, door and moving
or hot engine parts. NOTE: If it is necessary to close the hood during the charging process,
ensure that the hood does not touch the metal part of the battery connectors or cut the
insulation of the cables.
6.2 Stay clear of fan blades, belts, pulleys and other parts that can cause injury.
6.3 Check the polarity of the battery posts. The POSITIVE (POS, P, +) battery post usually has
a larger diameter than the NEGATIVE (NEG, N, -) post.
6.4 Determine which post of the battery is grounded (connected) to the chassis.
The battery
terminal not connected to the chassis has to be connected rst. The other connection is to
be made to the chassis, remote from the battery and fuel line. The battery charger is then
to be connected to the supply mains. See steps 6.5 and 6.6.
6.5 For a negative-grounded vehicle, connect the POSITIVE (RED) connector from the
battery charger to the POSITIVE (POS, P, +) ungrounded post of the battery. Connect
the NEGATIVE (BLACK) connector to the vehicle chassis or engine block away from the
battery. Do not connect the connector to the carburetor, fuel lines or sheet-metal body
parts. Connect to a heavy gauge metal part of the frame or engine block.
6.6 For a positive-grounded vehicle, connect the NEGATIVE (BLACK) connector from the
battery charger to the NEGATIVE (NEG, N, -) ungrounded post of the battery. Connect the
POSITIVE (RED) connector to the vehicle chassis or engine block away from the battery.
Do not connect the connector to the carburetor, fuel lines or sheet-metal body parts.
Connect to a heavy gauge metal part of the frame or engine block.
6.7 Connect charger AC supply cord to electrical outlet.
6.8
After charging, disconnect the battery charger from the supply mains. Then remove the
chassis connection and then the battery connection.
6.9 See Calculating Charge Time for length of charge information.
7. FOLLOW THESE STEPS WHEN BATTERY IS OUTSIDE OF THE VEHICLE
A SPARK NEAR THE BATTERY MAY CAUSE A
BATTERY EXPLOSION. TO REDUCE THE RISK OF
A SPARK NEAR THE BATTERY:
7.1 Check the polarity of the battery posts. The
POSITIVE (POS, P, +) battery post usually has a larger
diameter than the NEGATIVE (NEG, N, -) post.
7.2 Attach at least a 61 cm (24-inch) long 7 AWG (10 mm
2
) insulated battery cable to the
NEGATIVE (NEG, N, -) battery post.
7.3 Connect the POSITIVE (RED) charger connector to the POSITIVE (POS, P, +) post of the
battery.
7.4 Position yourself and the free end of the cable you previously attached to the NEGATIVE
(NEG, N, -) battery post as far away from the battery as possible – then connect the
NEGATIVE (BLACK) charger connector to the free end of the cable.
WARNINGWARNING
WARNING
WARNINGWARNING
WARNING

• 7 •
7.5 Do not face the battery when making the nal connection.
7.6 Connect charger AC supply cord to electrical outlet.
7.7 When disconnecting the charger, always do so in the reverse order of the connecting
procedure and break the rst connection while as far away from the battery as practical.
7.8 A marine (boat) battery must be removed and charged on shore. To charge it onboard
requires equipment specially designed for marine use.
8. AC POWER CORD CONNECTIONS
RISK OF ELECTRIC SHOCK OR FIRE.
8.1 This battery charger is for use on a nominal 230V, 50Hz circuit.
The plug must be plugged into an outlet that is properly installed in
accordance with all local codes and ordinances. The plug pins must
t the receptacle (outlet).
8.2
DANGER
NEVER alter the AC cord or plug provided – if it does not t the outlet, have
a proper outlet installed by a qualied electrician. An improper connection can result in a
risk of an electric shock or electrocution.
8.3 Recommended minimum AWG size for extension cord:
• 30.5 meters (100 feet) long or less – use an 1.0 mm
2
(18 gauge) extension cord.
• Over 30.5 meters (100 feet) long – use a 1.25 mm
2
(16 gauge) extension cord.
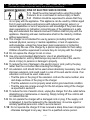
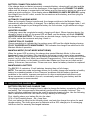
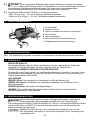
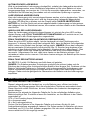
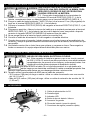
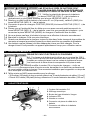
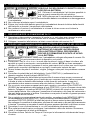
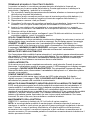
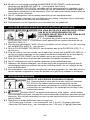
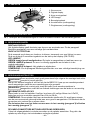
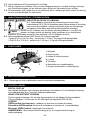
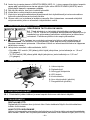
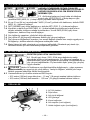
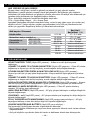
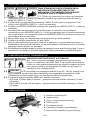
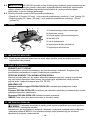
9. FEATURES
1. AC Power cord
2. Digital display
3. Battery type/language button
4. LED indicator
5. Hook attachment
6. Battery clamps (quick-connect)
7. Ring terminals (quick-connect)
4
5
1
7
2
6
3
10. ASSEMBLY INSTRUCTIONS
10.1 Remove all cord wraps and uncoil the cables prior to using the battery charger.
11. CONTROL PANEL
DIGITAL DISPLAY
The digital display indicates the status of the battery and charger. See Display Messages
for a complete list of messages.
BATTERY TYPE/LANGUAGE BUTTON
Press the button once to select lead-acid; twice for a lithium ion battery. To select the
language on the display, press and hold the button for 5 seconds (EN-FR-ES).
LED INDICATOR
GREEN LED solid: The charger is connected and is charging a battery.
GREEN LED pulsing: The battery is fully charged and the charger is in Maintain Mode.
GREEN LED ashing: The charge has aborted.
NOTE: See Operating Instructions for a complete description of the charger modes.
WARNING
WARNING

• 8 •
12. OPERATING INSTRUCTIONS
WARNING
This battery charger must be properly assembled in accordance with the
assembly instructions before it is used.
The charger does not have an ON/OFF switch. The On and Off commands are controlled
by plugging the BBCE12-3 into an AC electrical wall outlet only after the battery
connections have been made.
IMPORTANT
Do not start the vehicle with the charger connected to the AC outlet, or it
may damage the charger and your vehicle.
BATTERY INFORMATION
This charger can charge 6-celled, lead-acid or 4-celled lithium ion LiFePO
4
batteries with
rated capacities of 6 Ah to 58 Ah.
NOTE: This charger is equipped with an auto-start feature. Current will not be supplied
to the battery clamps until a battery is properly connected. The clamps will not spark if
touched together.
See instructions for charging a battery inside a vehicle (Section 6) or outside of the
vehicle (Section 7).
USING THE QUICK-CONNECT CABLE CONNECTORS
Connect any of the output cable assemblies to the charger in a matter of seconds. Make
sure to place the charger on a dry, non-ammable surface.
IMPORTANT
NEVER connect the clip and ring terminal connectors together for use in other
applications, such as external battery or other power source charging, or to
extend the output cable length, as reverse polarity and/or overcharge conditions will occur.
BATTERY CLAMP QUICK-CONNECT
1. Connect the end of the charger output cable to the end of the battery clamp quick-
connect.
2. Follow the steps in sections 6 and 7 to connect the clamps to the battery.
3. After a good electrical connection is made to the battery, plug the power cord into
an AC electrical wall outlet. Make sure to place the charger on a dry, non-ammable
surface.
4. Select the battery type.
5. When charging is complete, disconnect the AC cord from the supply mains, remove the
negative clamp, and nally the positive clamp.
RING TERMINAL QUICK-CONNECT
The ring connectors permanently attach to the battery, providing easy access to quickly
charge your battery. This application is appropriate for motorcycles, lawn tractors, ATVs
and snowmobiles.
1. To permanently attach to a battery, loosen and remove each nut from the bolts at the
battery terminals.
2. Connect the red positive connector ring to the positive (POS, P, +) battery terminal.
3. Connect the negative connector ring to the negative (NEG, N, -) battery terminal.
4. Replace and tighten the nuts to secure them.
5. Connect the ring connector cable assembly to the charger. Take care to keep both
wires and plug away from hot and moving parts.
6. Plug the charger power cord into an AC electrical wall outlet. Make sure to place the
charger on a dry, non-ammable surface.
7. Select the battery type.
8. When charging is complete, disconnect the AC cord from the supply mains, remove the
negative connector, and nally the positive connector.

• 9 •
BATTERY CONNECTION INDICATOR
If the charger does not detect a properly connected battery, charging will not start and the
digital display will show one of two messages. If the display shows CONNECT CLAMPS,
make sure the charger is connected to the battery and the connection points are clean and
making a good connection. If the display shows WARNING-CLAMPS REVERSED, unplug
the charger from the AC outlet, reverse the connections at the battery, and then plug the
charger back in.
AUTOMATIC CHARGING MODE
When an Automatic Charge is performed, the charger switches to the Maintain Mode
automatically after the battery is charged. For a battery with a starting voltage under 1 volt,
use a manual charger to pre-charge the battery for ve minutes, to get additional voltage
into the battery.
ABORTED CHARGE
If charging cannot be completed normally, charging will abort. When charging aborts, the
charger’s output is shut off, the green LED will ash, and the display will show CHARGE
ABORTED-BAD BATTERY. To reset after an aborted charge, unplug the charger from the
AC outlet, wait a few moments and plug it back in.
COMPLETION OF CHARGE
Charge completion is indicated by the pulsing green LED and the digital display showing
FULLY CHARGED-AUTO MAINTAINING. This indicates the charger has switched to the
Maintain Mode of operation.
MAINTAIN MODE (FLOAT-MODE MONITORING)
When the green LED is pulsing, the charger has started Maintain Mode. In this mode,
the charger keeps the battery fully charged by delivering a small current when necessary.
NOTE: If the charger has to provide its maximum maintain current for a continuous 12 hour
period, it will go into Abort Mode (see Aborted Charge section). This is usually caused by
a drain on the battery, or the battery could be bad. Make sure there are no loads on the
battery. If there are, remove them. If there are none, have the battery checked or replaced.
MAINTAINING A BATTERY
The BBCE12-3 maintains 12 volt batteries, keeping them at full charge.
NOTE: The maintain mode technology allows you to safely charge and maintain a healthy
battery for extended periods of time. However, problems with the battery, electrical
problems in the vehicle, improper connections or other unanticipated conditions could
cause excessive current draws. As such, occasionally monitoring your battery and the
charging process is recommended.
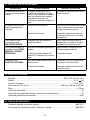
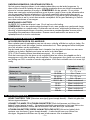
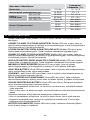
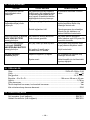
13. CALCULATING CHARGE TIME
BATTERY PERCENT AND CHARGE TIME
This charger adjusts the charging time in order to charge the battery completely, efciently
and safely. The microprocessor automatically performs the necessary functions. This
section includes guidelines that can be used to estimate charging times. Use the following
table to determine the time it will take to bring a battery to full charge.
First, identify where your battery ts into the chart.
CCA = Cold Cranking Amps Ah = Amp Hour
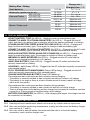
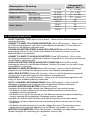
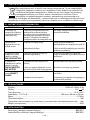
Find your battery’s rating on the following chart, and note the charge time given for each
charger setting. The times given are for batteries with a 50% charge prior to recharging.
Add more time for severely discharged batteries.

• 10 •
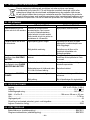
Battery Size / Rating
Charge rate /
Charging time (3 A)
Small batteries
6-12 Ah 1
1
/2 - 2
1
/2 h
Motorcycle, garden tractor, etc.
12-32 Ah 2
1
/2 - 7 h
Cars and Trucks
200-315 CCA 36-46 Ah 7
1
/2 - 9
1
/2 h
315-550 CCA 46-58 Ah 9
1
/2 - 12 h
550-1000 CCA 58-111 Ah Maintain only
Marine / Deep-cycle
56 Ah Maintain only
86 Ah Maintain only
96 Ah Maintain only
106 Ah Maintain only
14. DISPLAY MESSAGES
SELECT BATTERY TYPE (No LED lit) – Waiting for user to select battery type.
CONNECT CLAMPS TO LITHIUM ION BATTERY (No LED lit) – Plugged into the AC
outlet, and lithium-ion battery type is selected, without the clamps connected to a battery.
LITHIUM ION BATTERY-PRESS AGAIN FOR LEAD ACID (No LED lit) –Charging will
begin for lithium-ion battery type. Press again to change to lead-acid battery type.
CONNECT CLAMPS TO LEAD-ACID BATTERY (No LED lit) – Plugged into the AC outlet,
and lead-acid battery type is selected, without the clamps connected to a battery.
LEAD-ACID BATTERY-PRESS AGAIN FOR LITHIUM ION (No LED lit) – Charging will
begin for lead-acid battery type. Press again to change to lithium ion battery type.
WARNING-CLAMPS REVERSED (No LED lit) – Plugged into the AC outlet and the
clamps are connected backwards to a 12V battery.
ANALYZING BATTERY (Green LED lit) – Plugged into the AC outlet, and when rst
correctly connected to a battery.
CHARGING – xx% (Green LED lit) – Plugged into the AC outlet and correctly connected to
a discharged battery.
FULLY CHARGED-AUTO MAINTAINING (Green LED pulsing) – Plugged into the AC
outlet and correctly connected to a fully charged battery.
CHARGE ABORTED-BAD BATTERY (Green LED ashing) –
Circumstances that could cause an Abort situation during charging:
• The battery is severely sulfated or has a shorted cell and can’t reach a full charge.
• The battery is too large or there is a bank of batteries and it doesn’t reach full charge
within a set time period.
Circumstances that could cause an Abort situation during maintain:
• The battery is severely sulfated or has a weak cell and will not hold a charge.
• There is a large draw on the battery and the charger has to supply its maximum maintain
current for a 12 hour period to keep the battery at full charge.
BATTERY DISCONNECTED (No LED lit) – After charging has begun, the charger has lost
its connection to the battery.
15. MAINTENANCE INSTRUCTIONS
15.1 Cleaning and user maintenance should not be done by children without supervision.
15.2 After use and before performing maintenance, unplug and disconnect the battery charger
(see sections 6, 7 and 8).
15.3 Use a dry cloth to wipe all battery corrosion and other dirt or oil from the battery
connectors, cords, and the charger case.

• 11 •
15.4 Ensure that all of the charger components are in place and in good working condition, for
example, the plastic boots on the battery clips.
15.5 Servicing does not require opening the unit, as there are no user-serviceable parts.
15.6 All other servicing should be performed by qualied service personnel.
15.7 If the supply cord is damaged, it must be replaced by the manufacturer, its service agent
or similarly qualied persons, in order to avoid a hazard.
16. MOVING AND STORAGE INSTRUCTIONS
16.1 Store the charger unplugged, in an upright position. The cord will still conduct electricity
until it is unplugged from the outlet.
16.2 Store inside, in a cool, dry place.
16.3 Do not store the connectors clipped together, on or around metal, or clipped to cables.
16.4 If the charger is moved around the shop or transported to another location, take care to
avoid/prevent damage to the cords, connectors and charger. Failure to do so could result
in personal injury or property damage.
17. DISPOSAL INFORMATION
Do not dispose of this product with other household waste. To prevent possible
harm to the environment or human health from uncontrolled waste disposal, and
to promote the sustainable reuse of material resources, recycle it responsibly. To
discard your used device, please use the return and collection systems or contact
the retailer where the product was purchased, for environmentally-safe recycling
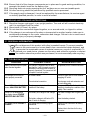
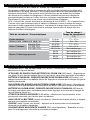
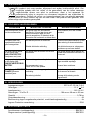
18. TROUBLESHOOTING
PROBLEM POSSIBLE CAUSE REASON/SOLUTION
Battery connectors do not spark
when touched together.
The charger is equipped with an auto-
start feature. It will not supply current to
the battery connectors until a battery is
properly connected. The connectors will
not spark if touched together.
No problem; this is a normal condition.
The charger will not turn on
when properly connected.
AC outlet is dead.
Poor electrical connection.
Check for open fuse or circuit breaker
supplying AC outlet.
Check power cord and extension cord
for loose tting plug.
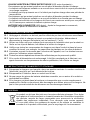
Green LED is lit and the display
shows ANALYZING BATTERY.
The charger needs to check the
condition of the battery.
The green LED will be lit when the
charger is checking the condition of the
battery. This is normal.
Green LED is ashing and
the display shows CHARGE
ABORTED-BAD BATTERY.
The battery is too large for the charger.
The battery voltage is still below 10V
after 2 hours of charging.
You need a charger with a higher amp
rate.
Have the battery checked.
The display shows CONNECT
CLAMPS.
The clamps are not making a good
connection.
The fuse is bad.
Check for poor connection at battery
and frame.
Replace the in-line fuse for the ring
connector.

• 12 •
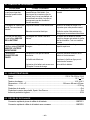
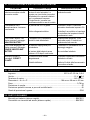
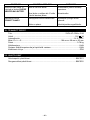
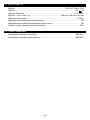
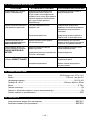
19. SPECIFICATIONS
Input .................................................................................................. 230V AC~50Hz, 0.6A
Output ................................................................................................................. 12V
3A
Charging voltage ................................................................................................14.2-14.4V
Dimensions – H x W x D ...........................................................194 mm x 89 mm x 83 mm
Weight ..................................................................................................................... 0.78 kg
Output protection .......................................................................................................... Yes
Reverse polarity protection, spark/arc-proof ................................................................. Yes
Ingress Protection rating ..............................................................................................IP64
20. REPLACEMENT PARTS
Battery clamps (quick-connect).............................................................................BBCEC1
Ring connectors (quick-connect) ..........................................................................BBCER1

• 13 •
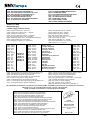
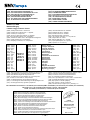
(ENG) EC DECLARATION OF CONFORMITY
(FRA) DÉCLARATION DE CONFORMITÉ CE
(SPA) DECLARACIÓN DE CONFORMIDAD DE LA CE
(POR) DECLARAÇÃO DE CONFORMIDADE EC
(ITA) DICHIARAZIONE DI CONFORMITA’ CE
(GER) EG-KONFORMITÄTSERKLÄRUNG
(NLD) EG- VERKLARING VAN OVEREENSTEMMING
(POL) EC DEKLARACJA ZGODNOŚCI
(ENG) Hereby declares that: / The device:
(FRA) Déclare par la présente que : /
L
’appareil :
(SPA) Declaro que: / El aparato:
(POR) Vimos por este meio declarar: / O aparelho:
(ITA) Con la presente dichiaro che: / Dispositivo:
(GER) Hiermit wird erklärt, dass: / Die folgenden Erzeugnisse:
(NLD) Hierbij verklaart dat: / Het apperaat:
(POL) Niniejszym oświadcza, że: / Urządzenia:
(ENG) Was manufactured in conformity with the provisions in the:
(FRA) A été fabriqué en conformité avec les dispositions des :
(SPA) Está fabricada según las disposiciones de:
(POR) Foi fabricado em conformidade com os pressupostos:
(ITA) Prodotto in conformità con le disposizioni:
(GER) In Übereinstimmung mit den Bestimmungen der:
(NLD) Is vervaardigd in overeenstemming met de bepalingen in de:
(POL) Został wyprodukowany zgodnie z przepisami:
LVD: 2006/95/EC until 04/19/2016 + 2014/35/EC (from 04/20/2016) EMC: 2004/108/EC (until 04/19/2016) +2014/30/EC (from 04/20/2016)
EN 60335-1:2012 + A11:2014 EN 60335-2-29:2004 + A2:2010 EN 62233:2008
ROHS: 2011/65/EC (from 06/08/2011) + 2005/618/EC (from 08/18/2005)
(SWE) Producerats enligt bestämmelserna i följande direktiv:
(DAN) Produsert i samsvar med bestemmelsene i:
(NOR) Produsert i samsvar med bestemmelsene i:
(FIN) On valmistettu noudattaen säännöksiä:
(RUS) Было произведено в соответствии с положениями:
(TUR) Aşağıdaki Standartlara uygun üretilmiştir:
(CZE) Byl vyroben ve shodě s předpisy:
(SLO) Bol vyrobený v zhode s predpismi:
(GRE) Κατασκευάστηκε σύμφωνα με τις διατάξεις του:
(ENG) Type(s):
(FRA) Type(s) :
(SPA) Tipo(s):
(POR) Tipo:
(ITA) Tipo:
(GER) Type(s):
(NLD) Typen:
(POL) Typ:
(SWE) Typ:
(DAN) Typ:
(NOR) Typ:
(FIN) Tyyppi:
(RUS) Тип:
(TUR) Tip:
(CZE) Typ:
(SLO) Typ:
(GRE) Τύπος:
(ENG) Person authorized to compile the technical le:
(FRA) Personne autorisée à constituer le dossier technique :
(SPA) Persona facultada para elaborar el expediente técnico:
(POR) Pessoa autorizada para elaborar o dossier técnico:
(ITA) Persona autorizzata a compilare la pratica tecnica:
(GER) Bevollmächtigte(r) zum Zusammenstellen technischer Unterlagen:
(NLD) Persoon die is gemachtigd het technisch dossier samen te stellen:
(POL) Osoba odpowiedzialna za zestawianie pliku technicznego:
(SWE) Person som är behörig att sammanställa den tekniska dokumentationen:
(DAN) Person bemyndiget til at udarbejde tekniske beskrivelser:
(NOR) Autorisert person for utarbeidelse av den tekniske len:
(FIN) Henkilö on valtuutettu kokoamaan teknisen tiedoston:
(TUR) Teknik dosyayı düzenlemeye yetkili kişi:
(RUS) Лицо, уполномоченное на составление технической документации:
(CZE) Autorizovaná osoba pro sestavení technického spisu:
(SLO) Osoba zodpovedná za vypracovanie technickej dokumentácie:
(GRE) Άτομο εξουσιοδοτημένο να καταρτίσει τον τεχνικό φάκελο:
(ENG) Year:
(FRA) Année :
(SPA) Año:
(POR) Ano:
(ITA) Anno:
(GER) Baujahr:
(NLD) Jaar:
(POL) Rok:
(SWE) År:
(DAN) År:
(NOR) År:
(FIN) Vuosi
(RUS) Год :
(TUR) Sene:
(CZE) Rok:
(SLO) Rok:
(GRE) Χρόνος:
(ENG) Product:
(FRA) Produit :
(SPA) Producto:
(POR) Produto:
(ITA) Prodotto:
(GER) Produkt:
(NLD) Product:
(POL) Produkt:
(SWE) Produkten:
(DAN) Produktet:
(NOR) Produktet:
(FIN) Tuotteen:
(RUS) Изделие:
(TUR) Ürün:
(CZE) Výrobek
(SLO) Výrobok:
(GRE) Προιόν:
Battery charger
Chargeur de batteries
Cargador de baterías
Carregador de bateria
Caricabatterie
Batterieladegerät
Batterijlader
Prostowniki do akumulatorów
Batteriladdare
Batterioplader
Batteriopplader
Akkulaturi
Зарядное
Akü Şarj
Nabíječka akumulátorů
Na bíjačka akumulátorov
Φορτιστής μπαταρίας
BBCE612-2
BBCE12-3
BBCE12-6
BBCE12-10
BBCE12-15
BBCE24-10
SERGIO
CALVO
Quality manager
SNA Europe SAS
BP 20104 Eragny
F-95613 Cergy Pontoise-
France
Date: /11/2015
2016
(SWE) Härmed deklareras att: / Enheten:
(DAN) Erklærer herved at: / enheten:
(NOR) Erklærer herved at: / enheten:
(FIN) Vakuutamme täten: / Että tuote:
(RUS) Настоящим заявляем, что: / Устройство:
(TUR) Beyan ederiz ki: / Cihaz:
(CZE) Níže prohlašujeme, že: / výrobek:
(SLO) Týmto prehlasujeme, že: / Výrobok:
(GRE) Δηλώνει ότι: / Η συσκευή:
SNA Europe SAS
BP 20104 Eragny
F-95613 Cergy Pontoise- France
(SWE) CE DEKLARATION
(DAN) EF-VERENSSTEMMELSESERKLÆRING
(NOR) ECSAMSVERKLARING
(FIN) EY-VAATIMUSTENMUKAISUUSVAKUUTUS
(RUS) Декларация о соответствии EC
(TUR) CE STANDARDİZASYON BEYANI
(CZE) PROHLÁŠENÍ O SHODĚ
(SLO) PREHLÁSENIE O ZHODE
(GRE) ΔΗΛΩΣΗ ΣΥΜΜΟΡΦΩΣΗΣ ΜΕ ΕΕ

• 14 •
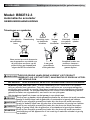
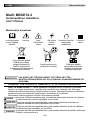
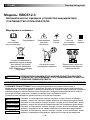
DEUTSCH Übersetzung der ursprünglichen Anweisungen
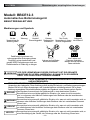
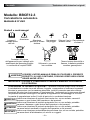
Modell: BBCE12-3
Automatisches Batterieladegerät
BENUTZERANLEITUNG
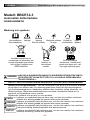
Markierungen und Symbole
In einem gut belüfteten
Bereich verwenden.
Von Funken und
Flammen fernhalten.
Batterie könnte explosive
Gase emittieren.
Vor der
Verwendung die
Anleitung lesen.
Nur für die
Verwendung in Innen-
räumen vorgesehen.
Keinem
Niederschlag
aussetzen.
Vorsicht!
Stromschlaggefahr!
Warnung
Lade gerät
der Klasse II
Detaillierte Informationen zur
ordnungsgemäßen Entsorgung dieses
Produkts in einem bestimmten Land
gemäß WEEE-Anforderungen sind vom
Gerätehersteller in Erfahrung zu bringen.
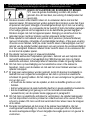
WARNUNG
VOR DER VERWENDUNG DIESES PRODUKTS IST DIE GESAMTE
ANLEITUNG ZU LESEN. ANDERNFALLS KANN ES ZU SCHWEREN
ODER TÖDLICHEN VERLETZUNGEN KOMMEN.
WICHTIGER HINWEIS: DIESE SICHERHEITS- UND BEDIENUNGSANLEITUNGLESEN
UND AUFBEWAHREN.
BEWAHREN SIE DIESE ANLEITUNG AUF – Diese Anleitung schildert die sichere und effektive
Verwendung des Ladegeräts. Diese Anleitung enthält wichtige Sicherheits- und Bedienungsanweisungen.
Machen Sie sich mit diesen Anweisungen und Vorsichtshinweisen vollständig vertraut. Die in dieser
Anleitung verwendeten Sicherheitshinweise enthalten ein Signalwort, einen Hinweis und ein Symbol.
Das Signalwort kennzeichnet die Gefahrenstufe in einer bestimmten Situation.
Kennzeichnet eine unmittelbar gefährliche Situation, die, wenn sie nicht vermieden
wird, zu schweren oder tödlichen Verletzungen beim Bediener oder bei umstehenden
Personen führen kann.
Kennzeichnet eine potenziell gefährliche Situation, die, wenn sie nicht vermieden wird, zu
schweren oder tödlichen Verletzungen beim Bediener oder bei umstehenden Personen
führen kann.
Kennzeichnet eine potenziell gefährliche Situation, die, wenn sie nicht vermieden wird,
zu mittelschweren oder leichteren Verletzungen beim Bediener oder bei umstehenden
Personen führen kann.
Kennzeichnet eine potenziell gefährliche Situation, die, wenn sie nicht vermieden wird, zu
einer Beschädigung der Geräte, der Fahrzeuge oder der Einrichtung führen kann.
GEFAHR
WARNUNG
VORSICHT
WICHTIG

• 15 •
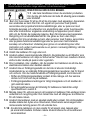
1. WICHTIGE SICHERHEITSHINWEISE – DIESE ANLEITUNG AUFBEWAHREN.
Diese Anleitung enthält wichtige Sicherheits- und Bedienungsanweisungen.
STROMSCHLAG- ODER BRANDGEFAHR
1.1 Vor der Verwendung dieses Produkts ist die gesamte
Anleitung zu lesen. Andernfalls kann es zu schweren oder
tödlichen Verletzungen kommen.
1.2 Kinder müssen beaufsichtigt werden, um sicherzustellen, dass sie nicht mit dem
Gerät spielen. Dieses Gerät kann von Kindern ab 8 Jahren und Personen mit
eingeschränkten physischen, sensorischen und geistigen Fähigkeiten oder einem
Mangel an Erfahrung und Wissen bedient werden, wenn diese eine Aufsicht oder
eine Einweisung bezüglich der sicheren Verwendung des Geräts erhalten und die
damit verbundenen Gefahren verstehen. Kinder dürfen nicht mit dem Gerät spielen.
Reinigung und Wartung dürfen von Kindern nur unter Aufsicht durchgeführt werden.
1.3 Dieses Ladegerät ist nicht für die Verwendung durch Personen (einschließlich
Kinder) mit beeinträchtigen körperlichen, sensorischen oder geistigen Fähigkeiten
bzw. mangelnder Erfahrung und unzureichenden Kenntnissen vorgesehen, außer
sie wurden in der Verwendung des Ladegeräts durch eine für ihre Sicherheit
verantwortliche Person geschult bzw. dabei beaufsichtigt. Kinder sind zu
beaufsichtigen, um zu gewährleisten, dass sie nicht mit dem Ladegerät spielen.
1.4 Das Ladegerät nicht Regen oder Schnee aussetzen.
1.5 Nur empfohlenes Zubehör verwenden. Die Verwendung von Zubehör, das nicht von
SNA Europe empfohlen oder verkauft wurde, kann zu Brandgefahr, Stromschlag,
Verletzungen oder Sachschaden führen.
1.6 Um die Gefahr von Schäden am Stecker oder Kabel zu reduzieren, beim Trennen
des Ladegeräts stets am Stecker selbst und nicht am Kabel ziehen.
1.7 Nur ein Verlängerungskabel verwenden, wenn dies absolut notwendig ist. Die
Verwendung eines ungeeigneten Verlängerungskabels kann die Gefahr eines
Brandes oder Stromschlags zur Folge haben. Muss ein Verlängerungskabel
verwendet werden, ist Folgendes zu gewährleisten:
• Die Kontakte am Stecker des Verlängerungskabels entsprechen in Anzahl, Größe
und Form denen am Stecker des Ladegeräts.
• Das Verlängerungskabel ist ordnungsgemäß verdrahtet und in einem guten
Zustand.
• Die Größe des Leiters reicht für die in Abschnitt 8 angegebene Amperezahl des
Ladegeräts aus.
1.8 Um das Risiko eines Stromschlags zu reduzieren, das Ladegerät stets vom
Netzstrom trennen, bevor Wartungs- oder Reinigungsarbeiten daran vorgenommen
werden. Dieses Risiko wird allein durch Abschalten der Steuerelemente nicht
reduziert.
1.9 Das Ladegerät nicht verwenden, wenn das Kabel oder der Stecker beschädigt
ist. Wenn das Stromkabel beschädigt ist, muss es vom Hersteller oder dem
Kundendienst oder ähnlich qualizierten Personen ausgetauscht werden, um
Gefahren zu vermeiden.
WARNUNG
WARNUNG

• 16 •
WARNUNG
1.10 Das Ladegerät nicht verwenden, wenn es einem schweren Schlag
ausgesetzt, fallen gelassen oder auf sonstige Weise beschädigt
wurde. Bringen Sie es in diesem Fall zu einem qualizierten
Servicetechniker.
1.11 Das Ladegerät nicht zerlegen. Bei Wartungs- oder Reparaturbedarf
zu einem qualizierten Servicetechniker bringen. Durch
nicht ordnungsgemäßes Zerlegen besteht Brand- oder
Stromschlaggefahr.
GEFAHR EXPLOSIVER GASE.
1.13 Um das Risiko einer Batterieexplosion zu reduzieren, den
folgenden Anweisungen und den Anleitungen vom Batteriehersteller
sowie Hersteller anderer Geräte, die in der Nähe der Batterie
eingesetzt werden, folgen. Die Vorsichtshinweise an diesen
Produkten und am Motor überprüfen.
1.14 Dieses Ladegerät benutzt Teile wie Tasten und Trennschalter, die
Bögen und Funken bilden können. Bei Verwendung in einer Garage
das Ladegerät mindestens 45 cm über dem Boden aufstellen.
WARNUNG
Nicht mit Batterien verwenden, die nicht
wiederaufgeladen werden können. Nur mit
wiederauadbaren Bleisäure- oder Lithium-Ionen-LiFePO
4
-Akkus.
WICHTIG
Starten Sie das Fahrzeug nicht, solange das Ladegerät
noch mit der AC-Steckdose verbunden ist, damit das
Ladegerät und Ihr Fahrzeug nicht beschädigt wird.
2. HINWEISE ZUM SCHUTZ VOR VERLETZUNGEN
GEFAHR EXPLOSIVER GASE
2.1 NIEMALS in der Nähe einer Batterie oder eines Motors rauchen
oder einen Funken bzw. eine Flamme in deren Nähe bringen.
2.2 Legen Sie persönliche Gegenstände aus Metall wie Ringe,
Armbänder, Halsketten und Uhren beim Arbeiten mit Bleisäure- oder
Lithium-Ionen-Batterien ab. Diese Batterien können einen Kurzschlussstrom
erzeugen, der stark genug ist, um einen Ring oder Ähnliches aus Metall zu
schmelzen und so schwere Verbrennungen zu verursachen.
2.3 Insbesondere ist darauf zu achten, dass keine Metallwerkzeuge auf die
Batterie fallen. Dadurch entstehende Funkenbildung oder ein Kurzschluss der
Batterie oder anderer Elektroteile kann zur Explosion führen.
1.12
DAS ARBEITEN IN UNMITTELBARER NÄHE VON
BLEI-SÄURE-BATTERIEN IST GEFÄHRLICH. BATTERIEN
ERZEUGEN WÄHREND DES NORMALEN BETRIEBS
EXPLOSIVE GASE. AUS DIESEM GRUND MÜSSEN BEI
JEDER VERWENDUNG DES LADEGERÄTS UNBEDINGT ALLE
ANWEISUNGEN BEFOLGT WERDEN.
WARNUNG

• 17 •
2.4 Mit diesem Ladegerät zum Laden nur 12V Kfz-/ Leistungssport-Batterien,
darunter 6 Zellen Blei-Säure-und 4 Zellen Lithium-LiFePO
4
-Batterien und
Nennkapazitäten von 6-58 Ah (12V)*. Es ist nicht dafür vorgesehen, ein
elektrisches Niederspannungssystem außer einer Starter-Motor-Anwendung
mit Strom zu versorgen. Verwenden Sie nicht dieses Ladegerät zum Laden
von Trockenzellen -Batterien, die häug mit Hausgeräte-oder Lithium-Ionen-
Batterien in Mobiltelefonen verwendet werden, Laptops, Elektrowerkzeuge,
usw. Solche Batterien können bersten und dadurch Körperverletzungen oder
Sachbeschädigungen verursachen.
* Die BBCE12-3 wurde geprüft und genehmigt, um die Batterie zu laden
ChaoBaLi LiFePO
4
, TDS-1220AH-1 Modellnummer. Wir empfehlen,
Kontakt mit dem Batterielieferanten vor dem Laden eine andere LiFePO
4
Batterie.
2.5 NIEMALS eine eingefrorene Batterie auaden.
2.6 Ziehen Sie in Erwägung, Ihre Arbeiten in der Nähe einer Blei-Säure-Batterie
zu verrichten, während sich eine andere Person in der Nähe aufhält.
2.7 Für den Fall, dass Batteriesäure mit Haut, Kleidung oder Augen in Kontakt
kommt, viel frisches Wasser und Seife bereit halten.
2.8 Augen- und Körperschutz tragen. Dies umfasst eine Schutzbrille und
Schutzkleidung. Während der Arbeit in der Nähe der Batterie das Berühren
der Augen vermeiden.
2.9 Falls Batteriesäure mit Ihrer Haut oder Kleidung in Kontakt kommt, den
betroffenen Bereich sofort mit Seife und Wasser waschen. Falls Säure in das
Auge gelangt, das Auge mindestens 10 Minuten lang mit ießendem kalten
Wasser spülen und sofort einen Arzt heranziehen.
2.10 Wird Batteriesäure versehentlich verschluckt, Milch, Eiweiß oder Wasser
trinken. NICHT zum Erbrechen bringen. Sofort einen Arzt heranziehen.
3. VORBEREITEN AUF DAS LADEN
RISIKO DES KONTAKTS MIT BATTERIESÄURE.
BEI BATTERIESÄURE HANDELT ES SICH UM STARK
KORROSIVE SCHWEFELSÄURE.
3.1 Falls die Batterie zum Auaden aus dem Fahrzeug entfernt
werden muss, stets den geerdeten Anschluss zuerst abtrennen.
Alle Zubehörteile im Fahrzeug müssen abgeschaltet sein, um eine Bogenbildung zu
verhindern.
3.2
Gewährleisten, dass der Bereich um die Batterie während des Auadens gut belüftet wird.
3.3 Batterieanschlüsse vor dem Auaden reinigen. Während des Reinigens verhindern, dass
Korrosionspartikel in der Luft in Kontakt mit Augen, Nase oder Mund kommen. Batteriesäure
mit Backnatron und Wasser neutralisieren, um ein Freisetzen von Korrosionspartikeln in die
Luft zu verhindern. Augen, Nase oder Mund nicht berühren.
3.4 Destilliertes Wasser in jede Zelle füllen, bis die Batteriesäure den vom Batteriehersteller
vorgegebenen Pegel erreicht. Nicht überfüllen. Bei einer Batterie ohne abnehmbare
Zellkappen, wie z. B. einer ventilregulierten Blei-Säure Batterie, sind die Anleitungen des
Herstellers zum Auaden einzuhalten.
WARNUNGWARNUNG

• 18 •
3.5 Machen Sie sich mit allen Anleitungen zum Ladegerät, zur Batterie, zum Fahrzeug und
zu anderen Geräten vertraut, die in der Nähe der Batterie bzw. des Ladegeräts verwendet
werden, und halten Sie sich an alle Anweisungen. Machen Sie sich mit allen spezischen
Vorsichtshinweisen zum Wiederauaden und den empfohlenen Auadegeschwindigkeiten
des Batterieherstellers vertraut.
3.6 Bestimmen Sie die Batteriespannung anhand des Handbuchs für Fahrzeuginhaber und
gewährleisten Sie, dass der Wählschalter für die Ausgangsspannung auf die korrekte
Spannung eingestellt ist. Kann die Auadegeschwindigkeit des Ladegeräts angepasst
werden, laden Sie die Batterie zunächst mit der niedrigsten Geschwindigkeit auf.
3.7 Die Kabelclips des Ladegeräts müssen fest angeschlossen sein.
4. POSITION DES LADEGERÄTS
EXPLOSIONSGEFAHR UND GEFAHR DES
KONTAKTS MIT BATTERIESÄURE
4.1 Das Ladegerät so weit wie durch die Länge der
Gleichstromkabel möglich von der Batterie entfernt
aufstellen.
4.2 Das Ladegerät nie direkt über der zu ladenden Batterie aufstellen. Gase aus der Batterie
führen zu Korrosion und damit zur Beschädigung des Ladegeräts.
4.3 Die Batterie nicht auf das Ladegerät stellen.
4.4 Batteriesäure nicht auf das Ladegerät tropfen lassen, wenn die Elektrolytdichte gemessen
oder die Batterie gefüllt wird.
4.5 Das Ladegerät nicht in einem geschlossenen Innenbereich oder bei auf irgendeine Weise
beschränkter Belüftung verwenden.
5. VORSICHTSHINWEISE ZUM GLEICHSTROMANSCHLUSS
5.1 Die Gleichstromausgangsanschlüsse nur verbinden bzw. abtrennen, nachdem der Netzstecker
von der Steckdose abgetrennt wurde. Die Anschlüsse dürfen sich nicht berühren.
5.2 Die Anschlüsse an Batterie und Chassis anschließen, wie in den Abschnitten 6 und 7
angegeben.
6. FOLGENDE SCHRITTE DURCHFÜHREN, WENN DIE BATTERIE IM FAHRZEUG
INSTALLIERT IST
EIN FUNKEN IN DER NÄHE DER BATTERIE
KANN EINE BATTERIEEXPLOSION VERURSACHEN.
SO WIRD DAS RISIKO EINES FUNKENS IN DER
NÄHE DER BATTERIE REDUZIERT:
WICHTIG
Starten Sie das Fahrzeug nicht, solange das Ladegerät noch mit der AC-Steckdose
verbunden ist, damit das Ladegerät und Ihr Fahrzeug nicht beschädigt wird.
6.1 Die Wechsel- und Gleichstromkabel so positionieren, dass das Risiko einer Beschädigung
durch Motorhaube, Tür und angetriebene oder heiße Motorteile reduziert wird. HINWEIS:
Falls die Motorhaube während des Ladevorgangs geschlossen werden muss, muss
gewährleistet werden, dass sie keine Metallteile der Batterieanschlüsse berührt und die
Kabelisolierung nicht beschädigt.
6.2 Von Lüfterügeln, Riemen, Scheiben und anderen Teilen, die Verletzungen verursachen
können, fernhalten.
6.3 Die Polarität der Batteriekontakte prüfen. Der POSITIVE (POS, P, +) Batteriekontakt weist
in der Regel einen größeren Durchmesser auf als der NEGATIVE (NEG, N, -).
6.4 Bestimmen, welcher Batteriekontakt über das Chassis geerdet (mit dem Chassis
verbunden) ist.
Die Batterieklemme, die nicht mit dem Chassis verbunden ist, muss zuerst
verbunden werden. Die andere Verbindung muss mit der Chassis hergestellt werden,
entfernt von der Batterie und der Kraftstofeitung. Das Batterieladegerät muss dann mit
der Netzversorgung verbunden werden. Siehe Schritte 6.5 und 6.6.
WARNUNGWARNUNG
WARNUNG
WARNUNGWARNUNG
WARNUNG

• 19 •
6.5 Bei einem über den negativen Kontakt geerdeten Fahrzeug den POSITIVEN (ROTEN)
Anschluss des Batterieladegeräts mit dem ungeerdeten POSITIVEN (POS, P, +) Kontakt
der Batterie verbinden. Den NEGATIVEN (SCHWARZEN) Anschluss von der Batterie
entfernt mit dem Fahrzeugchassis oder Motorblock verbinden. Den Anschluss nicht mit
dem Vergaser, den Kraftstofeitungen oder den Blechteilen verbinden. Vielmehr mit einem
schweren, dicken Metallteil, das zum Rahmen oder Motorblock gehört, verbinden.
6.6 Bei einem über den positiven Kontakt geerdeten Fahrzeug den NEGATIVEN
(SCHWARZEN) Anschluss des Batterieladegeräts mit dem nicht geerdeten NEGATIVEN
(NEG, N, -) Kontakt der Batterie verbinden. Den POSITIVEN (ROTEN) Anschluss von der
Batterie entfernt mit dem Fahrzeugchassis oder Motorblock verbinden. Den Anschluss
nicht mit dem Vergaser, den Kraftstofeitungen oder den Blechteilen verbinden. Vielmehr
mit einem schweren, dicken Metallteil, das zum Rahmen oder Motorblock gehört,
verbinden.
6.7 Netzstromkabel des Ladegeräts an der Steckdose anschließen.
6.8
Trennen Sie nach dem Laden das Batterieladegerät von der Netzversorgung. Trennen Sie
die Chassisverbindung und dann die Batterieverbindung.
6.9 Informationen zur Ladezeit nden Sie unter Berechnen der Ladezeit.
7. FOLGENDE SCHRITTE DURCHFÜHREN, WENN DIE BATTERIE NICHT IM
FAHRZEUG INSTALLIERT IST
EIN FUNKEN IN DER NÄHE DER BATTERIE KANN
EINE BATTERIEEXPLOSION VERURSACHEN. SO
WIRD DAS RISIKO EINES FUNKENS IN DER NÄHE
DER BATTERIE REDUZIERT:
7.1 Die Polarität der Batteriekontakte prüfen. Der
POSITIVE (POS, P, +) Batteriekontakt weist in der Regel einen größeren Durchmesser auf
als der NEGATIVE (NEG, N, -) Kontakt.
7.2 Ein mindestens 61 cm langes, isoliertes 7 AWG (10 mm
2
)-Batteriekabel mit dem
NEGATIVEN (NEG, N, -) Batteriekontakt verbinden.
7.3 Den POSITIVEN (ROTEN) Anschluss des Ladegeräts mit dem POSITIVEN (POS, P, +)
Batteriekontakt verbinden.
7.4 Sich selbst und das freie Ende des zuvor mit dem NEGATIVEN (NEG, N, -) Batteriekontakt
verbundenen Kabels so weit wie möglich von der Batterie entfernt positionieren und dann
den NEGATIVEN (SCHWARZEN) Anschluss des Ladegeräts mit dem freien Ende des
Kabels verbinden.
7.5 Beim Herstellen der letzten Verbindung nicht der Batterie zuwenden. Wie unter 7.4 angegeben
beim Verbinden des negativen Anschlusses mit dem Kabel sich von der Batterie wegdrehen.
7.6 Netzstromkabel des Ladegeräts an der Steckdose anschließen.
7.7 Wenn das Ladegerät abgetrennt wird, stets in umgekehrter Reihenfolge des Anschließens
vorgehen und die erste Verbindung trennen, wobei Sie sich so weit wie möglich und
praktikabel von der Batterie entfernt positionieren.
7.8 Bootsbatterien müssen ausgebaut und an Land aufgeladen werden. Um sie an Bord
aufzuladen, ist eine speziell für die Anwendung auf Booten vorgesehene Ausrüstung
erforderlich.
8. NETZSTROMKABELANSCHLÜSSE
STROMSCHLAG- ODER BRANDGEFAHR.
8.1 Dieses Batterieladegerät ist für die Verwendung mit einem
Schaltkreis mit einer Nennspannung von 230 V, 50 Hz vorgesehen.
Der Stecker muss an eine korrekt installierte und allen örtlichen
Vorschriften entsprechende Steckdose angeschlossen sein. Die
Steckerkontakte müssen richtig in die Steckdose passen.
WARNUNG
WARNUNG
WARNUNGWARNUNG
WARNUNG

• 20 •
8.2
GEFAHR
Das mitgelieferte Netzkabel bzw. dessen Stecker auf keinen Fall ändern.
Passt der Stecker nicht in die Steckdose, von einem qualizierten Elektriker
eine passende Steckdose installieren lassen. Bei einem nicht ordnungsgemäßen
Anschluss besteht das Risiko eines Stromschlags oder Elektroschocks.
8.3 Empfohlene Mindest-AWG-Größe für Verlängerungskabel:
• Max. 30,5 m lang – 1,0 mm
2
-Verlängerungskabel verwenden.
• Mehr als 30,5 m lang – 1,25 mm
2
-Verlängerungskabel verwenden.
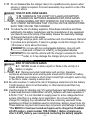
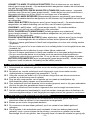
9. FUNKTIONSMERKMALE
1. AC-Netzkabel
2. Digitales Display
3. Taste zur Auswahl der Akkutyp und Sprache
4. LED-Anzeige
5. Hakenbefestigung
6. Batterieklemmen (Schnellverbindung)
7. Ringkabelschuh (Schnellverbindung)
4
5
1
7
2
6
3
10. MONTAGEANLEITUNG
10.1 Alle Kabelhüllen enfernen und Kabel vor Verwendung des Batterieladegeräts abwickeln.
11. BEDIENFELD
DIGITALES DISPLAY
Das digitale Display zeigt den Status der Batterie und des Ladegeräts an. Siehe den
Abschnitt für Displaynachrichten für eine komplette Liste der Nachrichten.
TASTE ZUR AUSWAHL DER AKKUTYP UND SPRACHE
Drücken Sie diese Taste einmal, um eine Bleisäure-Batterie und zweimal, um eine Lithium-
Ionen-Batterie auszuwählen. Drücken Sie die Taste für 5 Sekunden, um die Sprache am
Display auszuwählen (EN-FR-ES).
LED-ANZEIGE
GRÜNE LED an: Das Ladegerät ist verbunden und lädt die Batterie auf.
GRÜNE LED Impuls: Die Batterie ist vollständig aufgeladen und die Batterie ist im
Erhaltungsmodus.
GRÜNE LED blinkt: Das Laden ist fehlgeschlagen.
HINWEIS: Eine vollständige Beschreibung der Ladegerätmodi ist dem Abschnitt
„Bedienungsanleitung“ zu entnehmen.
12. BEDIENUNGSANLEITUNG
WARNUNG
Dieses Batterieladegerät muss den Montageanweisungen entsprechend
ordnungsgemäß zusammengebaut werden, bevor es verwendet wird.
Das Ladegerät weist keinen EIN/AUS-Schalter auf. Die Ein- und Ausschalt-Befehle werden
durch Anschließen des BBCE12-3 an eine Wandsteckdose nach der Herstellung der
Batterieverbindungen gesteuert.
WICHTIG
Starten Sie das Fahrzeug nicht, solange das Ladegerät noch mit der
AC-Steckdose verbunden ist, damit das Ladegerät und Ihr Fahrzeug nicht
beschädigt wird.
Sidan laddas ...
Sidan laddas ...
Sidan laddas ...
Sidan laddas ...
Sidan laddas ...
Sidan laddas ...
Sidan laddas ...
Sidan laddas ...
Sidan laddas ...
Sidan laddas ...
Sidan laddas ...
Sidan laddas ...
Sidan laddas ...
Sidan laddas ...
Sidan laddas ...
Sidan laddas ...
Sidan laddas ...
Sidan laddas ...
Sidan laddas ...
Sidan laddas ...
Sidan laddas ...
Sidan laddas ...
Sidan laddas ...
Sidan laddas ...
Sidan laddas ...
Sidan laddas ...
Sidan laddas ...
Sidan laddas ...
Sidan laddas ...
Sidan laddas ...
Sidan laddas ...
Sidan laddas ...
Sidan laddas ...
Sidan laddas ...
Sidan laddas ...
Sidan laddas ...
Sidan laddas ...
Sidan laddas ...
Sidan laddas ...
Sidan laddas ...
Sidan laddas ...
Sidan laddas ...
Sidan laddas ...
Sidan laddas ...
Sidan laddas ...
Sidan laddas ...
Sidan laddas ...
Sidan laddas ...
Sidan laddas ...
Sidan laddas ...
Sidan laddas ...
Sidan laddas ...
Sidan laddas ...
Sidan laddas ...
Sidan laddas ...
Sidan laddas ...
Sidan laddas ...
Sidan laddas ...
Sidan laddas ...
Sidan laddas ...
Sidan laddas ...
Sidan laddas ...
Sidan laddas ...
Sidan laddas ...
Sidan laddas ...
Sidan laddas ...
Sidan laddas ...
Sidan laddas ...
Sidan laddas ...
Sidan laddas ...
Sidan laddas ...
Sidan laddas ...
Sidan laddas ...
Sidan laddas ...
Sidan laddas ...
Sidan laddas ...
Sidan laddas ...
Sidan laddas ...
Sidan laddas ...
Sidan laddas ...
Sidan laddas ...
Sidan laddas ...
Sidan laddas ...
Sidan laddas ...
Sidan laddas ...
Sidan laddas ...
Sidan laddas ...
Sidan laddas ...
Sidan laddas ...
Sidan laddas ...
Sidan laddas ...
Sidan laddas ...
Sidan laddas ...
Sidan laddas ...
Sidan laddas ...
Sidan laddas ...
Sidan laddas ...
Sidan laddas ...
Sidan laddas ...
Sidan laddas ...
Sidan laddas ...
Sidan laddas ...
Sidan laddas ...
Sidan laddas ...
Sidan laddas ...
Sidan laddas ...
Sidan laddas ...
Sidan laddas ...
Sidan laddas ...
Sidan laddas ...
Sidan laddas ...
Sidan laddas ...
Sidan laddas ...
Sidan laddas ...
Sidan laddas ...
Sidan laddas ...
Sidan laddas ...
Sidan laddas ...
Sidan laddas ...
Sidan laddas ...
Sidan laddas ...
Sidan laddas ...
Sidan laddas ...
Sidan laddas ...
Sidan laddas ...
Sidan laddas ...
Sidan laddas ...
Sidan laddas ...
Sidan laddas ...
-
 1
1
-
 2
2
-
 3
3
-
 4
4
-
 5
5
-
 6
6
-
 7
7
-
 8
8
-
 9
9
-
 10
10
-
 11
11
-
 12
12
-
 13
13
-
 14
14
-
 15
15
-
 16
16
-
 17
17
-
 18
18
-
 19
19
-
 20
20
-
 21
21
-
 22
22
-
 23
23
-
 24
24
-
 25
25
-
 26
26
-
 27
27
-
 28
28
-
 29
29
-
 30
30
-
 31
31
-
 32
32
-
 33
33
-
 34
34
-
 35
35
-
 36
36
-
 37
37
-
 38
38
-
 39
39
-
 40
40
-
 41
41
-
 42
42
-
 43
43
-
 44
44
-
 45
45
-
 46
46
-
 47
47
-
 48
48
-
 49
49
-
 50
50
-
 51
51
-
 52
52
-
 53
53
-
 54
54
-
 55
55
-
 56
56
-
 57
57
-
 58
58
-
 59
59
-
 60
60
-
 61
61
-
 62
62
-
 63
63
-
 64
64
-
 65
65
-
 66
66
-
 67
67
-
 68
68
-
 69
69
-
 70
70
-
 71
71
-
 72
72
-
 73
73
-
 74
74
-
 75
75
-
 76
76
-
 77
77
-
 78
78
-
 79
79
-
 80
80
-
 81
81
-
 82
82
-
 83
83
-
 84
84
-
 85
85
-
 86
86
-
 87
87
-
 88
88
-
 89
89
-
 90
90
-
 91
91
-
 92
92
-
 93
93
-
 94
94
-
 95
95
-
 96
96
-
 97
97
-
 98
98
-
 99
99
-
 100
100
-
 101
101
-
 102
102
-
 103
103
-
 104
104
-
 105
105
-
 106
106
-
 107
107
-
 108
108
-
 109
109
-
 110
110
-
 111
111
-
 112
112
-
 113
113
-
 114
114
-
 115
115
-
 116
116
-
 117
117
-
 118
118
-
 119
119
-
 120
120
-
 121
121
-
 122
122
-
 123
123
-
 124
124
-
 125
125
-
 126
126
-
 127
127
-
 128
128
-
 129
129
-
 130
130
-
 131
131
-
 132
132
-
 133
133
-
 134
134
-
 135
135
-
 136
136
-
 137
137
-
 138
138
-
 139
139
-
 140
140
-
 141
141
-
 142
142
-
 143
143
-
 144
144
-
 145
145
-
 146
146
-
 147
147
-
 148
148
-
 149
149


på andra språk
- italiano: Bahco BBCE12-3 Manuale utente
- español: Bahco BBCE12-3 Manual de usuario
- Deutsch: Bahco BBCE12-3 Benutzerhandbuch
- polski: Bahco BBCE12-3 Instrukcja obsługi
- français: Bahco BBCE12-3 Manuel utilisateur
- Türkçe: Bahco BBCE12-3 Kullanım kılavuzu
- English: Bahco BBCE12-3 User manual
- русский: Bahco BBCE12-3 Руководство пользователя
- suomi: Bahco BBCE12-3 Ohjekirja
- Nederlands: Bahco BBCE12-3 Handleiding
Relaterade papper
Andra dokument
-
Schumacher SPI6 Automatic Battery Charger Bruksanvisning
-
-
Sealey SPI1S Användarmanual
-
-
Sealey SPI2S Bruksanvisning
-
-
-
-
-