Topcom 5000 Användarmanual
- Kategori
- Tvåvägsradio
- Typ
- Användarmanual
Denna manual är också lämplig för

USER MANUAL
HANDLEIDING
GEBRAUCHSANWEISUNG
MANUEL D’UTILISATEUR
BRUKSANVISNING
BRUGERMANUAL
KÄYTTÖOHJE
HL_TT5000.book Page 1 Tuesday, May 13, 2003 10:18 AM

This product is in compliance with the essential requirements and other relevant provisions of the R&TTE directive 1999/5/EC.
The Declaration of conformity can be found on :
http://www.topcom.net/support/declarations/
HL_TT5000.book Page 2 Tuesday, May 13, 2003 10:18 AM

Topcom Twintalker 5000 3
ENGLISH
1. DESCRIPTION 4
2. INSTALLATION 4
2.1. Removing/Installing the Belt Clip 4
2.2. Battery Installation 4
3. LCD SCREEN 5
4.GETTING STARTED 5
4.1. Turning the Unit ON/OFF 5
4.2. Adjusting Speaker Volume 5
4.3. Receiving a Signal 5
4.4. Transmitting a Signal 5
5. OPERATION 6
5.1. Changing Channels 6
5.2. CTCSS (Continuous Tone Coded Squelch System) 6
5.3. Monitor 6
5.4. Menu Lock 7
5.5. VOX Selection 7
5.6. Channel Scan 7
5.7. Battery Charge Level/Low Battery Indication 7
5.8. Using rechargeable batteries 8
5.9. Headset use 8
5.10. Sending Call Tones 8
6. SPECIFICATIONS 8
7. SAFETY INSTRUCTIONS 9
7.1. Damage antenna 9
7.2. Batteries 9
7.3. For vehicles with air bag 9
7.4. Potentially Explosive Atmospheres 9
7.5. Blasting caps and areas 9
7.6. Electromagnetic Interference/Compatibility 10
8. CARE AND MAINTENANCE 10
9. WARRANTY 11
HL_TT5000.book Page 3 Tuesday, May 13, 2003 10:18 AM

4 Topcom Twintalker 5000
ENGLISH
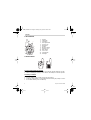
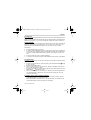
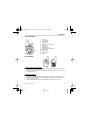
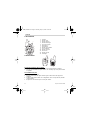
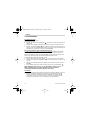
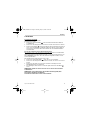
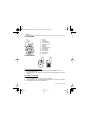
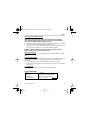
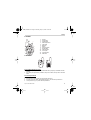
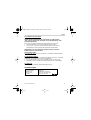
1. DESCRIPTION
1. Antenna
2. Talk Button
3. Call Button
4. Flash light button
5. Charger Jack
6. Microphone
7. Speaker
8. Navigator button
9. Earphone Jack
10. Menu button
11. LCD screen
12. On/Off button
13. Flashlight
2. INSTALLATION
2.1.
Removing/Installing the Belt Clip
1. To remove the clip from the unit, push up on the belt clip while pulling the clip tab.
2. When re-installing the belt clip, a click indicates the BeltClip is locked into position.
2.2.
Battery Installation
1. Remove the belt clip.
2. Push the battery cover and slide it away from the antenna
3. Install four ‘AAA’ alkaline or rechargeable batteries following the polarity as shown.
4. Re-install the Battery Cover and Belt Clip
1
2
3
1
13
12
11
10
9
8
7
6
5
4
3
2
HL_TT5000.book Page 4 Tuesday, May 13, 2003 10:18 AM

Topcom Twintalker 5000 5
ENGLISH
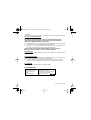
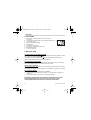
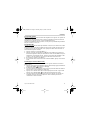
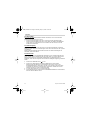
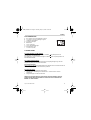
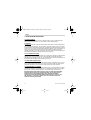
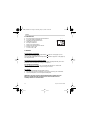
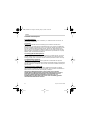
3. LCD SCREEN
A RX icon. Displayed when receiving a signal.
B TX icon. Displayed when transmitting a signal.
C Speaker volume level
D Menu lock symbol
E Battery level
FDisplayed during VOX mode.
GDisplayed during CHANNEL SCAN mode.
H Channel number (1-8)
I CTCSS code (1-38)
4.GETTING STARTED
4.1.
Turning the Unit ON/OFF
To activate; press and hold the POWER button . The unit will “beep” and the LCD
Screen will display the current channel.
To switch off; press and hold the POWER button again. The unit will “beep” and the
LCD Screen will turn blank.
4.2.
Adjusting Speaker Volume
The Speaker Volume can be adjusted by pushing the navigator up or down. The Speaker
Volume level is displayed on the LCD.
4.3.
Receiving a Signal
The unit is continuously in the RECEIVE mode when the unit is ON and not transmitting.
When you receive a signal on the current channel, the RX icon is displayed
4.4.
Transmitting a Signal
1. Press and hold the TALK button to TRANSMIT.
2. Hold the unit in a vertical position with the MICROPHONE 5 cm from the mouth and
speak into the microphone.
3. Release the TALK button when you have finished talking.
IMPORTANT: In order for other people to receive your transmission, they
must also be on the same channel and have set the CTCSS code you are
currently using. Refer to the ‘Changing Channels’
B
C
D
E
F
A
G
H
VOX
SCAN
I
HL_TT5000.book Page 5 Tuesday, May 13, 2003 10:18 AM

6 Topcom Twintalker 5000
ENGLISH
5. OPERATION
5.1.
Changing Channels
The PMR has 8 available channels.
To change channels:
1. Press the MENU button once, the current channel number flashes on the
LCD Screen.
2. Push the navigator up or down to change the channel.
3. Press the MENU button to confirm the channel selection and go to CTCSS
SUB-CHANNEL SELECTION mode, or press the TALK button to select the desired
channel and return to NORMAL mode.
5.2.
CTCSS (Continuous Tone Coded Squelch System)
The 2 digit CTCSS code corresponds to a specific tone frequency the radio emits. Two
users, with the same channel and CTCSS set can hear one another.They will
not
be
able to hear anyone else on the channel unless the other radios have the same exact
CTCSS code enabled.
The Twintalker 5000 has 38 CTCSS codes available.
1. Press the MENU button twice, the CTCSS code will flash
2. Push the Navigator up or down to change the CTCSS code.
3. Press the TALK button to confirm your selection and return to the NORMAL mode.
4. To confirm and shift to the next option, press the MENU button.
NOTE: Set the CTCSS code to “0” to disable the CTCSS function.
NOTE: Any PMR set on the same channel can receive and listen to the
conversation, also when the other use a CTCSS code.
5.3.
Monitor
You can use the MONITOR feature to check for weaker signals in the current channel.
• Press the Navigator button to the right for normal monitoring .
• Press and hold the Navigator button to the right. After 3 seconds you can release
the button. You are now continuous monitoring the channel until you push the TALK
button.
HL_TT5000.book Page 6 Tuesday, May 13, 2003 10:18 AM

Topcom Twintalker 5000 7
ENGLISH
5.4.
Menu Lock
Press and hold the Navigator button to the left. The menu lock symbol will appear on the
display. Press and hold the Navigator button again to the left until the symbol disappears.
When the menu lock is on, you can not change the settings like volume, channel, etc ...
5.5.
VOX Selection
The PMR is capable of voice activated (VOX) transmission. In VOX mode, the radio will
transmit a signal when it is activated by your voice or other sound around you. VOX
operation is not recommended If you plan to use your radio in a noisy or windy
environment.
1. Press the MENU button 3 times.
2. Press the navigator button UP to turn the VOX feature ON. Press the navigator up
to select the VOX sensitivity level which is indicated in the right corner of the display.
Press the navigator button DOWN until OF appears on the display, to turn VOX
OFF.
3. In the VOX mode, the VOX icon will be displayed.
4. To confirm your selection and return to the NORMAL mode, press the TALK button.
5.6.
Channel Scan
CHANNEL SCAN performs searches for active signals in an endless loop from channel
1 to 8.
1. Press the navigator button UP. At the same time, press the MENU button briefly
to start scanning.
2. Release the Navigator button.
3. When an active signal (one of 8 channels) is detected, CHANNEL SCAN pauses
and you will hear the active signal.
4. Press the TALK button to communicate through the active signal channel. Press the
MENU button to deactivate SCAN.
5. When an active signal (one of 8 channels) is detected, press the navigator button
UP or DOWN button to bypass the current channel and continue to search for
another active channel
5.7.
Battery Charge Level/Low Battery Indication
• The BATTERY CHARGE LEVEL is indicated by the number of squares present
inside the BATTERY icon on the LCD Screen.
•When the BATTERY CHARGE LEVEL is low, the BATTERY icon will flash to indi-
cate that the batteries need to be replaced or recharged.
HL_TT5000.book Page 7 Tuesday, May 13, 2003 10:18 AM

8 Topcom Twintalker 5000
ENGLISH
5.8.
Using rechargeable batteries
Important: Do not charge this unit using an AC/DC ADAPTER with regular
“AAA” alkaline batteries installed. Only use the optional AC/DC ADAPTER
with “AAA” rechargeable batteries (not included).
To use the PMR with an AC/DC ADAPTER and rechargeable batteries do the following:
1. Insert four (4) “AAA” rechargeable batteries (not included).
2. Plug the 12 V DC / 100 mA ADAPTER (not included) into the CHARGER JACK at
side of the unit and turn it ON by pressing the POWER button.
NOTE: The unit cannot transmit while the batteries are being charged. It
takes approximately 8 to 10 hours to fully charge the batteries.
5.9.
Headset use
You can operate the PMR using a headset (not included).Plug the headset into the EAR/
MIC jack
5.10.
Sending Call Tones
You can use Call Tones to alert the other user to identify yourself. You can also use Call
Tones to signal the beginning or the end of a transmission.
1. Press and release the CALL button. The CALL TONE continues for 3 seconds.
2. Your CALL TONES will transmit to nearby receivers set to the same channel.
5.11.
Flashlight
Press and hold the Flashlight button to activate the light.
6. SPECIFICATIONS
Channels
CTCSS Sub-channel
Output Power (TX)
Range
Charging adaptor
8 Channels
38 for each Channel
Output Power: 0.5W (Maximum)
Up to 3 Km (open field)
12 V DC / 100 m A
HL_TT5000.book Page 8 Tuesday, May 13, 2003 10:18 AM

Topcom Twintalker 5000 9
ENGLISH
7. SAFETY INSTRUCTIONS
7.1.
Damage antenna
Do not use any communicator that has a damaged Antenna. If a damaged antenna
comes in contact with the skin, a minor burn may result.
7.2.
Batteries
As batteries can cause property damage and/or bodily injury such as burns if conductive
material such as jewelry, keys or beaded chains touches exposed terminals. The
material may complete an electrical circuit (short circuit) and become quite hot. Exercise
care in handling any charged battery, particularly when placing it inside a pocket, purse
or other container with metal objects.Do not replace or charge batteries in a potentially
explosive atmosphere. Contact sparking may occur while installing or removing batteries
and cause an explosion.
7.3.
For vehicles with air bag
Do not place your Communicator in the area over an air bag or in the air bad deployment
area. Air bags inflate with great force. If a communicator is placed in the bag deployment
area and the air bag inflates, the communicator may be propelled with great force and
cause serious injury to the occupants of vehicle.
7.4.
Potentially Explosive Atmospheres
Turn your communicator off when in any area with a potentially explosive atmosphere,
unless it is a type specifically qualified for such use. Sparks in such areas could cause
an explosion or fire resulting in bodily injury or even death.
7.5.
Blasting caps and areas
To avoid possible interference with blasting operation, turn your communicator off near
electrical blasting caps or in a ‘blasting area’ or in areas posted : ‘Turn off two way radio’.
Obey all signs and instructions.
Note : Areas with potentially explosive atmospheres are often, but not
always, clearly marked. They include fueling areas such as below deck on
boats, fuel or chemical transfer or storage facilities; areas where the air
contains chemicals or particles, such as grain, dust or metal powders; and
any other area where you would normally be advised to turn off your vehicle
engine.
HL_TT5000.book Page 9 Tuesday, May 13, 2003 10:18 AM

10 Topcom Twintalker 5000
ENGLISH
7.6.
Electromagnetic Interference/Compatibility
Nearly every electronic device is susceptible to electromagnetic interference (EMI) if
inadequately shielded, designed or otherwise configured for electromagnetic
compatibility.
Turn your unit OFF in any facilities where posted notices instruct you to do so. Hospitals
or health care facilities may be using equipment that is sensitive to external RF energy.
Turn your unit OFF when on board an aircraft when instructed to do so. Any use of the
unit must be accordance with airline regulations or crew instructions.
8. CARE AND MAINTENANCE
To clean the unit, wipe with a soft cloth dampened with water. Don’t use a cleaner or
solvents on the unit; they can harm the case and leak inside, causing permanent
damage. Battery contacts may be wiped with a dry lint-free cloth. If the unit gets wet, turn
it off and remove the batteries immediately. Dry the BATTERY COMPARTMENT with a
solf cloth to minimize potential water damage. Leave the cover off the BATTERY
COMPARTMENT overnight or until completely dry. Do not use the unit until completely
dry.
HL_TT5000.book Page 10 Tuesday, May 13, 2003 10:18 AM

Topcom Twintalker 5000 11
ENGLISH
9. WARRANTY
This equipment comes with a 24-month warranty. The warranty will be honoured on
presentation of the original or a copy bill or receipt, provided the date of purchase and
the unit type are indicated.
During the time of the warranty Topcom will repair free of charge any defects caused by
material or manufacturing faults. Topcom will at its own discretion fulfil its warranty
obligations by either repairing or exchanging the faulty equipment.
Any warranty claims will be invalidated as a result of intervention by the buyer or
unqualified third parties.
Damage caused by inexpert treatment or operation, and damage resulting from the use
of non-original parts or accessories not recommended by Topcom is not covered by the
warranty.
The warranty does not cover damage caused by outside factors, such as lightning, water
and fire, nor does it apply if the unit numbers on the equipment have been changed,
removed or rendered illegible.
Note: Please do not forget to enclose your receipt if you return the equipment.
HL_TT5000.book Page 11 Tuesday, May 13, 2003 10:18 AM

12 Topcom Twintalker 5000
NEDERLANDS
1. BESCHRIJVING 13
2. INSTALLATIE 13
2.1. De riemclip afnemen/monteren 13
2.2. Batterijen plaatsen 13
3. LCD-SCHERM 14
4. VAN START GAAN 14
4.1. Het toestel in- en uitschakelen (On/Off) 14
4.2. Luidsprekervolume instellen 14
4.3. Een signaal ontvangen 14
4.4. Een signaal zenden 14
5. BEDIENING 15
5.1. Van kanaal veranderen 15
5.2. CTCSS (Continuous Tone Coded Squelch System) 15
5.3. Monitor 15
5.4. Menuvergrendeling 16
5.5. SPRAAK-keuze 16
5.6. Kanaal scannen 16
5.7. Laadniveau batterij /Indicatie zwakke batterij 17
5.8. Oplaadbare batterijen gebruiken 17
5.9. Koptelefoon gebruiken 17
5.10. Oproeptonen zenden 17
6. SPECIFICATIES 18
7. VEILIGHEIDSINSTRUCTIES 18
7.1. Beschadigde antenne 18
7.2. Batterijen 18
7.3. Voertuigen met airbags 18
7.4. Mogelijk explosieve omgevingen 18
7.5. Ontstekers en ontploffingszones 19
7.6. Elektromagnetische interferentie 19
8. REINIGING EN ONDERHOUD 19
9. GARANTIE 20
HL_TT5000.book Page 12 Tuesday, May 13, 2003 10:18 AM

Topcom Twintalker 5000 13
NEDERLANDS
1. BESCHRIJVING
1. Antenne
2. Spreek-knop
3. Oproep-knop
4. Lamp-knop
5. Aansluiting voor oplader
6. Microfoon
7. Luidspreker
8. Navigator-knop
9. Aansluiting oortelefoontje
10. Menu-knop
11. LCD-scherm
12. Aan/uit-knop
13. Lamp
2. INSTALLATIE
2.1. De riemclip afnemen/monteren
1. Om de clip van het toestel te verwijderen, drukt u de riemclip naar boven en trekt u
tegelijkertijd aan het lipje van de clip.
2. Wanneer u de riemclip opnieuw op het toestel aanbrengt, klikt de riemclip hoorbaar
op de juiste plaats.
2.2.
Batterijen plaatsen
1. Verwijder de riemclip.
2. Druk op het afdekplaatje van het batterijvak en schuif het weg van de antenne
3. Plaats vier ’AAA’ alkalinebatterijen of oplaadbare batterijen in het batterijvak en let
op de polariteit (zie Afb.).
4. Plaats het afdekplaatje terug over het batterijvak en monteer de riemclip.
1
13
12
11
10
9
8
7
6
5
4
3
2
1
2
3
HL_TT5000.book Page 13 Tuesday, May 13, 2003 10:18 AM

14 Topcom Twintalker 1000
NEDERLANDS
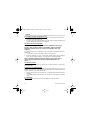
3. LCD-SCHERM
A RX-symbool. Verschijnt wanneer een signaal wordt
ontvangen.
B TX-symbool. Verschijnt wanneer een signaal wordt gestuurd.
C Volume luidspreker
D Symbool menuvergrendeling
E Batterijniveau
F Verschijnt in VOX-modus.
G Verschijnt in CHANNEL SCAN-modus.
H Kanaalnummer (1-8)
I CTCSS-code (1-38)
4. VAN START GAAN
4.1.
Het toestel in- en uitschakelen (On/Off)
Activeren: Houd de POWER-knop ingedrukt. Het toestel geeft een pieptoon en op het
LCD-scherm verschijnt het huidige kanaal.
Uitschakelen: Houd de POWER-knop opnieuw ingedrukt. Het toestel geeft een
pieptoon en de informatie op het LCD-scherm verdwijnt.
4.2.
Luidsprekervolume instellen
Het luidsprekervolume kan worden ingesteld door de navigator omhoog of omlaag te
duwen. Het luidsprekervolume verschijnt op het LCD-scherm.
4.3.
Een signaal ontvangen
Het toestel staat altijd in ONTVANGST-modus wanneer het AAN staat en niet zendt. Als
u een signaal ontvangt op het huidige kanaal, verschijnt het RX-symbool op het scherm
4.4. Een signaal zenden
1. Houd de SPREEK-knop ingedrukt om te ZENDEN.
2. Houd het toestel verticaal met de microfoon 5 cm van de mond en spreek in de
microfoon.
3. Laat de SPREEK-knop los wanneer u klaar bent met praten.
BELANGRIJK: Andere mensen die uw transmissie willen ontvangen, moeten
ook op hetzelfde kanaal zitten en moeten de CTCSS-code die u op dat
moment gebruikt, hebben ingesteld. Zie ook ’Van kanaal veranderen’
B
C
D
E
F
A
G
H
VOX
SCAN
I
HL_TT5000.book Page 14 Tuesday, May 13, 2003 10:18 AM

Topcom Twintalker 5000 15
NEDERLANDS
5. BEDIENING
5.1.
Van kanaal veranderen
De PMR heeft 8 beschikbare kanalen.
Van kanaal veranderen:
1. Druk één keer op de MENU -knop. Het ingestelde kanaal begint te knipperen op
het LCD-scherm.
2. Duw de navigator omhoog of omlaag om van kanaal te veranderen.
3. Druk op de MENU -knop om de kanaalkeuze te bevestigen en naar de modus
CTCSS SUBKANAALKEUZE te gaan, of druk op de SPREEK-knop om het
gewenste kanaal te selecteren en terug te keren naar de NORMALE modus.
5.2.
CTCSS (Continuous Tone Coded Squelch System)
De 2 tekens tellende CTCSS-code komt overeen met een specifieke toonfrequentie die
de radio uitzendt. Twee gebruikers die hetzelfde kanaal en dezelfde CTCSS hebben
ingesteld, kunnen elkaar horen.Ze zullen
niemand
anders op het kanaal kunnen horen
tenzij de andere radio’s exact dezelfde CTCSS-code hebben ingesteld.
De Twintalker 5000 heeft 38 CTCSS-codes.
1. Druk twee keer op de MENU -knop. De CTCSS-code begint te flikkeren.
2. Duw de navigator omhoog of omlaag om de CTCSS-code te veranderen.
3. Druk op de SPREEK-knop om uw keuze te bevestigen en terug te keren naar de
NORMALE modus.
4. Om te bevestigen en over te gaan naar de volgende optie, drukt u op de MENU -
knop.
OPMERKING: Stel de CTCSS-code in op "0" om de CTCSS-functie uit te
schakelen.
OPMERKING: Elke PMR die is afgestemd op hetzelfde kanaal kan het
gesprek ontvangen en horen, ook wanneer de andere radio een CTCSS
gebruikt.
5.3.
Monitor
U kunt de MONITOR-functie gebruiken om te zoeken naar zwakkere signalen in het
huidige kanaal.
•Druk de Navigator-knop naar rechts voor een normale monitoring. .
• Houd de Navigator-knop naar rechts geduwd. Na 3 seconden kunt u de knop los-
laten. Nu wordt het kanaal continu bewaakt, tot u op de SPREEK-knop drukt.
HL_TT5000.book Page 15 Tuesday, May 13, 2003 10:18 AM

16 Topcom Twintalker 1000
NEDERLANDS
5.4.
Menuvergrendeling
Houd de Navigator-knop naar links geduwd. Het menuvergrendelingssymbool verschijnt
op het scherm. Houd de Navigator-knop opnieuw naar links geduwd tot het symbool
verdwijnt.
Als de menuvergrendeling aan staat, kunt u de instellingen zoals volume, kanaal, enz ...
niet wijzigen.
5.5.
SPRAAK-keuze
De PMR kan spraakgestuurd (VOX) zenden. In VOX-modus zendt de PMR een signaal
wanneer deze geactiveerd door uw stem of een ander geluid rond u. De VOX-modus
wordt niet aangeraden als u van plan bent om uw radio te gebruiken in een lawaaierige
of winderige omgeving.
1. Druk 3 keer op de MENU-knop .
2. Druk de navigator-knop OMHOOG om de VOX-functie in te schakelen. Druk de
navigator omhoog om het VOX-gevoeligheidsniveau te selecteren dat wordt
weergegeven in de rechter hoek van het scherm. Druk de navigator-knop OMLAAG
tot OF op het scherm verschijnt om VOX uit te schakelen.
3. In de VOX-modus verschijnt het VOX-pictogram op het scherm.
4. Druk op de SPREEK-knop om uw keuze te bevestigen en terug te keren naar de
SPREEK- modus.
5.6.
Kanaal scannen
Met deze functie zoekt u naar actieve signalen in een eindeloze lus van kanaal 1 tot 8.
1. Druk de navigator-knop OMHOOG. Druk tegelijkertijd kort op de MENU-knop
om het scannen te starten.
2. Laat de Navigator-knop los.
3. Als een actief signaal (één van 8 kanalen) wordt gedetecteerd, pauzeert het
scannen en krijgt u het actieve signaal te horen.
4. Druk op de SPREEK-knop om te communiceren op het kanaal met het actieve
signaal. Druk op de MENU-knop om het scannen te deactiveren.
5. Als een actief signaal (één van 8 kanalen) wordt gedetecteerd, drukt u de navigator-
knop OMHOOG of OMLAAG om het huidige kanaal te omzeilen en verder te
zoeken naar andere actieve kanalen.
HL_TT5000.book Page 16 Tuesday, May 13, 2003 10:18 AM

Topcom Twintalker 5000 17
NEDERLANDS
5.7.
Laadniveau batterij /Indicatie zwakke batterij
• Het LAADNIVEAU VAN DE BATTERIJ wordt weergegeven door het aantal vier-
kantjes in het BATTERIJ-pictogram op het LCD-scherm.
•Als het LAADNIVEAU VAN DE BATTERIJ laag is, begint het BATTERIJ-pictogram
te flikkeren, wat erop wijst dat de batterijen moeten worden vervangen of opge-
laden.
5.8.
Oplaadbare batterijen gebruiken
Belangrijk: Laad het toestel niet op met een AC/DC-ADAPTER wanneer u
gewone "AAA"- alkalinebatterijen gebruikt. Gebruik alleen de optionele
AC/DC-ADAPTER bij "AAA" oplaadbare batterijen (niet inbegrepen).
Om de PMR te gebruiken met een AC/DC-ADAPTER en oplaadbare batterijen gaat u
als volgt te werk:
1. Plaats vier (4) "AAA" oplaadbare batterijen in het batterijvak (niet inbegrepen).
2. Steek de 12 V DC / 100 mA-ADAPTER (niet inbegrepen) in de aansluiting voor de
oplader aan de zijkant van het toestel en schakel het toestel AAN door op de
POWER-knop te drukken.
OPMERKING: Het toestel kan niet zenden terwijl de batterijen worden
opgeladen. Het duurt ongeveer 8 tot 10 uur om de batterijen volledig op te
laden.
5.9.
Koptelefoon gebruiken
U kunt de PMR gebruiken met een koptelefoon (niet inbegrepen). Steek de koptelefoon
in de EAR/MIC-aansluiting.
5.10.
Oproeptonen zenden
U kunt oproeptonen gebruiken om u aan de andere gebruiker kenbaar te maken. U kunt
ook oproeptonen gebruiken om het begin of het einde van een transmissie te signaleren.
1. Druk op de OPROEP-knop en laat los. De OPROEPTOON is 3 seconden hoorbaar.
2. Uw OPROEPTONEN worden naar dichtbij gelegen ontvangers gestuurd die op
hetzelfde kanaal zijn ingesteld.
5.11.
Lamp
Houd de Lamp-knop ingedrukt om het licht te activeren.
HL_TT5000.book Page 17 Tuesday, May 13, 2003 10:18 AM

18 Topcom Twintalker 1000
NEDERLANDS
6. SPECIFICATIES
7. VEILIGHEIDSINSTRUCTIES
7.1.
Beschadigde antenne
Gebruik geen communicatietoestellen met beschadigde antenne. Als een beschadigde
antenne in aanraking komt met de huid, kan dit leiden tot lichte brandwonden.
7.2.
Batterijen
Batterijen kunnen materiële schade en/of lichamelijk letsels (zoals brandwonden)
veroorzaken als juwelen, sleutels of kettingen in aanraking komen met blootliggende
aansluitpunten. Het materiaal in kwestie kan een elektrische kring sluiten (kortsluiting)
en als gevolg hiervan redelijk warm worden. Wees steeds voorzichtig in de omgang met
geladen batterijen, vooral wanneer u batterijen in de zak van een kledingstuk, een
beugel of op andere plaatsen bij metalen voorwerpen stopt. Waar mogelijk
explosiegevaar heerst, mogen geen batterijen worden vervangen of opgeladen. Bij het
installeren of verwijderen van batterijen kunnen immers vonken overspringen die dan
een explosie zouden kunnen veroorzaken.
7.3.
Voertuigen met airbags
Plaats uw toestel niet in de zone boven een airbag of in de zone waar de airbag wordt
opgeblazen. Airbags worden met zeer grote kracht opgeblazen. Als een toestel in de
opblaaszone van een airbag wordt geplaatst en de airbag wordt geactiveerd, kan het
toestel met grote kracht worden weggeslingerd en op deze manier ernstige letsels
toebrengen aan de inzittenden van het voertuig.
7.4.
Mogelijk explosieve omgevingen
Schakel uw communicatietoestel uit in alle zones waar explosiegevaar heerst, tenzij uw
toestel speciaal hiervoor werd ontworpen. In dergelijke zones kunnen vonken explosies
of brand veroorzaken, met lichamelijk letsel of zelfs de dood tot gevolg.
Kanalen
CTCSS Subkanaal
Uitgangsvermogen (TX)
Bereik
Laadadapter
8 kanalen
38 voor elk kanaal
Uitgangsvermogen 0,5W (maximum)
Tot 3 km (open veld)
12 V DC / 100 m A
HL_TT5000.book Page 18 Tuesday, May 13, 2003 10:18 AM

Topcom Twintalker 5000 19
NEDERLANDS
7.5.
Ontstekers en ontploffingszones
Om eventuele interferentie met ontstekingsmechanismen te voorkomen, moet u uw
toestel uitschakelen in de buurt van elektrische ontstekers, ontploffingszones of zones
gemarkeerd met borden die het gebruik van PMR verbieden. Respecteer alle
waarschuwingsborden en instructies.
Opmerking: Gebieden waar mogelijk explosiegevaar heerst, zijn vaak - maar
niet altijd - duidelijk gemarkeerd. Tot dergelijke gevaarlijke zones behoren
onder meer brandstofvulinstallaties (zoals bv. benedendekse
brandstofinstallaties op boten), brandstofpompen en -opslagruimten,
chemische pomp- en opslaginstallaties, zones waarin de lucht chemische
stoffen of kleine deeltjes (zoals granen, stof of metaalpoeder) bevat, en alle
andere zones waar men normaal de motor van zijn voertuig moet afzetten.
7.6.
Elektromagnetische interferentie
Bijna alle elektronische toestellen zijn gevoelig voor elektromagnetische interferentie
(EMI) als ze onvoldoende zijn afgeschermd, niet goed zijn ontworpen of wanneer bij het
ontwerp geen rekening werd gehouden met de elektromagnetische bescherming.
Schakel uw toestel uit op plaatsen waar borden of instructies u hierom verzoeken. In
ziekenhuizen of andere gezondheidsinfrastructuur wordt soms apparatuur gebruikt die
gevoelig is voor externe energie afkomstig van radiofrequente bronnen.
Schakel uw toestel uit aan boord van vliegtuigen als u hierom wordt verzocht. Elk gebruik
van de PMR mag plaatsvinden met inachtname van de regels van de
luchtvaartmaatschappij en van de instructies van de bemanning.
8. REINIGING EN ONDERHOUD.
Voor het reinigen van het toestel gebruikt u een zachte, lichtjes met water bevochtigde
doek. Gebruik geen reinigings- of oplosmiddelen om het toestel te reinigen. Deze
producten kunnen de behuizing beschadigen en in het toestel terechtkomen, waar ze
onherstelbare schade kunnen aanrichten. De batterijcontacten mogen worden gereinigd
met een droge en pluisvrije doek.
Als een toestel nat wordt, schakel het dan uit en verwijder onmiddellijk de batterijen.
Droog het batterijvak met een zachte doek om eventuele waterschade tot een minimum
te beperken. Laat het batterijvak 's nachts open staan en laat het in elk geval open tot
het volledig droog is. Het toestel niet gebruiken tot het helemaal droog is
HL_TT5000.book Page 19 Tuesday, May 13, 2003 10:18 AM

20 Topcom Twintalker 1000
NEDERLANDS
9. GARANTIE
De garantieperiode bedraagt 24 maanden. De garantie wordt verleend na voorlegging
van de originele factuur of betalingsbevestiging waarop de datum van aankoop en het
toesteltype staan vermeld.
Gedurende de garantieperiode verhelpt Topcom kostenloos alle defecten die te wijten
zijn aan materiaal- of productiefouten. Topcom kan, naar keuze, het defecte toestel
ofwel herstellen ofwel vervangen.
De garantieclaim vervalt bij ingrepen door de koper of onbevoegde derden.
Schade te wijten aan onoordeelkundige behandeling of bediening of aan het gebruik van
wisselstukken en accessoires die niet origineel of door Topcom aanbevolen zijn, valt niet
onder de garantie.
Niet gedekt door de garantie is schade ten gevolge van externe invloedfactoren:
bliksem, water, brand e.d. of wanneer het toestelnummer op het toestel werd gewijzigd,
verwijderd of onleesbaar gemaakt.
Opgelet: Als u uw toestel terugstuurt, vergeet uw aankoopbewijs niet mee te
sturen.
HL_TT5000.book Page 20 Tuesday, May 13, 2003 10:18 AM
Sidan laddas...
Sidan laddas...
Sidan laddas...
Sidan laddas...
Sidan laddas...
Sidan laddas...
Sidan laddas...
Sidan laddas...
Sidan laddas...
Sidan laddas...
Sidan laddas...
Sidan laddas...
Sidan laddas...
Sidan laddas...
Sidan laddas...
Sidan laddas...
Sidan laddas...
Sidan laddas...
Sidan laddas...
Sidan laddas...
Sidan laddas...
Sidan laddas...
Sidan laddas...
Sidan laddas...
Sidan laddas...
Sidan laddas...
Sidan laddas...
Sidan laddas...
Sidan laddas...
Sidan laddas...
Sidan laddas...
Sidan laddas...
Sidan laddas...
Sidan laddas...
Sidan laddas...
Sidan laddas...
Sidan laddas...
Sidan laddas...
Sidan laddas...
Sidan laddas...
Sidan laddas...
Sidan laddas...
Sidan laddas...
Sidan laddas...
Sidan laddas...
Sidan laddas...
Sidan laddas...
Sidan laddas...
-
 1
1
-
 2
2
-
 3
3
-
 4
4
-
 5
5
-
 6
6
-
 7
7
-
 8
8
-
 9
9
-
 10
10
-
 11
11
-
 12
12
-
 13
13
-
 14
14
-
 15
15
-
 16
16
-
 17
17
-
 18
18
-
 19
19
-
 20
20
-
 21
21
-
 22
22
-
 23
23
-
 24
24
-
 25
25
-
 26
26
-
 27
27
-
 28
28
-
 29
29
-
 30
30
-
 31
31
-
 32
32
-
 33
33
-
 34
34
-
 35
35
-
 36
36
-
 37
37
-
 38
38
-
 39
39
-
 40
40
-
 41
41
-
 42
42
-
 43
43
-
 44
44
-
 45
45
-
 46
46
-
 47
47
-
 48
48
-
 49
49
-
 50
50
-
 51
51
-
 52
52
-
 53
53
-
 54
54
-
 55
55
-
 56
56
-
 57
57
-
 58
58
-
 59
59
-
 60
60
-
 61
61
-
 62
62
-
 63
63
-
 64
64
-
 65
65
-
 66
66
-
 67
67
-
 68
68


Topcom 5000 Användarmanual
- Kategori
- Tvåvägsradio
- Typ
- Användarmanual
- Denna manual är också lämplig för
på andra språk
- eesti: Topcom 5000 Kasutusjuhend
- Deutsch: Topcom 5000 Benutzerhandbuch
- français: Topcom 5000 Manuel utilisateur
- dansk: Topcom 5000 Brugermanual
- Nederlands: Topcom 5000 Handleiding
Relaterade papper
-
Topcom TwinTalker 3300 Användarmanual
-
Topcom Twintalker 6800 Professional Box Bruksanvisning
-
-
-
Topcom Twintalker 9100 Bruksanvisning
-
-
Topcom Twintalker 5010 - RC 6402 Bruksanvisning
-
Topcom 3800 Användarmanual
-
Topcom 3600 Användarmanual
-
Topcom Twintalker 9500 Användarguide
