
FREETALK PRO
PROFESSIONAL LICENSE FREE 446/444 MHZ RADIO
User’s Manual
English / Swedish / Norwegian
Version6:05.02.18


User Guide ENG

Introduction
Thank
you for purchasing Zodiac Freetalk Pro. Zodiac
Freetalk Pro is a PMR-product (Private Mobile Radio)
that lets you talk to as many people you wish, as often
as you like, with no need for a license, subscription or
tax payment. It is very easy to use so even children can
handle it.
Please read through this manual carefully for many
features of this model.
This user guide is also available on our web site
www.zodiac.se.
2
hsilgnEZodiac Freetalk Pro

Table of contents
Radio controls/functions page 4
5egapediuG snocI
6egapediuG noitarepO
6egapFFO/NO rewoP
Transmitting/Receiving page 6
Volume adjustment page 6
Channel selection page 6
7egapslennahc nacS
CTCSS ON/OFF page 7
8egapthgil kcab DCL
8egapgnirotinoM
Keypad lock/unlock page 8
Function settings page 9
9egapllac enoT
Power Save Modus page 9
01egapFO/NO XOV
VOX sensitivity page 10
TX/RX Different Channels page 10
11egapenoT dapyeK
11egaprewoP-otuA
Time-Out Timér page 11
21egaphcleuqS
21egapretaepeR
21egapllaC enoT
21egapFFO/NO XOV
Memory Channel page 13
Hazard (Emergency) Channel page 13
Dual Channel Watch page 14
Memory and Hazard Channel page 14
Restore to factory default settings page 15
page 15
page 16
page 17
page 17
page 18
page 18
91egap
page 20
Installing/removing of Battery
Pack Battery Charging
PMR Channel Frequency Table
CTCSS Frequency Table Optional
Accessories
Safety Informations Specifications
Warranty
Declaration of conformity
3
Zodiac Freetalk ProhsilgnE

4
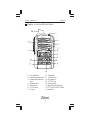
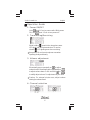
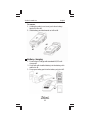
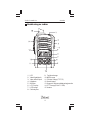
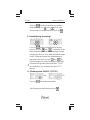
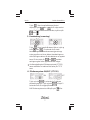
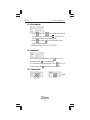
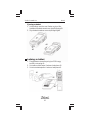
Radio controls/functions
1. LED indicator
2. External speaker jack
3. External microphone
jack
4. Speaker area
5. Microphone
6. LCD screen
7. UP key
8. Power key
9. Function key
10. DOWN key
11. CTCSS key
12. Channel key
13. Monitor/back light key
14. PTT key (Push-To-Talk)
15. Antenna
hsilgnEZodiac Freetalk Pro

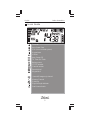
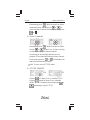
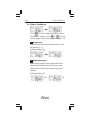
Icons Guide
Tone call
Auto-Power Save
V
OX (Voice-activate system)
Keypad tone
Volume
Auto-Power-Off
TX Time-Out-Timér
Battery power
CTCSS number
Channel number
Squelch level
Keypad lock
Hazard (Emergency) channel
Memory Channel
Scanning
Signal strength indicator
Dual channel watch
5
Zodiac Freetalk ProhsilgnE

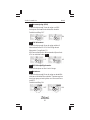
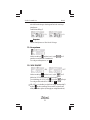
While holding , speak to the microphone area.
LED glows red during transmission. To receive,
release . LED glows green when receiving.
Keep about 10 cm from microphone area when
speaking slowly and clearly.
Momentarily press repeatedly on to adjust
volume louder. Momentarily press repeatedly on
to adjust volume lower. Press and hold or
to swiftly adjust volume. Do adjustment as you need.
6
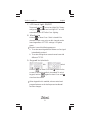
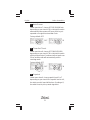
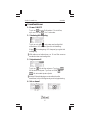
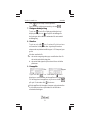
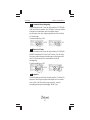
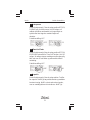
Operation Guide
Hold about 0.5 sec to power radio. While power
ON, hold about 1.5 sec to turn power off.
2. Transmitting/Receiving
1. Power ON/OFF
3. Volume adjustment
Caution: For external mic/ear user, adjust volume
starting from lowest level.
4. Channel selection
hsilgnEZodiac Freetalk Pro

Momentarily press . While channel icon blinks,
temporarily press repeatedly on or to
select channel. To preset channel, temporarily press
or .
7
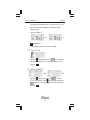
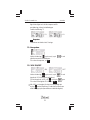
5. Scan Channel
Momentarily press . While channel icon blinks,
hold on or about 2 sec. to start scanning
of channel. Jumping of channel numbers
increasingly or decreasingly indicates scan in
progress. Scan stops when it detect a busy channel.
Temporarily press on or will disable scan
and select the final busy channel.
Note: To scan, turn off CTCSS codes.
6. CTCSS ON/OFF
FFONO
Hold on for about 2 sec. to enable CTCSS.
Hold on again for about 2 sec. to disable.
While CTCSS is enabled, press temporarily or
repeatedly to select CTCSS.
Zodiac Freetalk ProhsilgnE

7. LCD back light ON/OFF
Temporarily press to turn back light ON. Tempo-
rarily press again to turn back light OFF or it will
automatically turn OFF after 5 sec. lighting.
8. Monitoring
Hold on for about 1 sec. Static is heard if the
channel is clear or any voice on this channel can be
heard regardless of CTCSS settings. LED glows
green.
Monotor is used for following purposes
a. To receive weak signal due to distance or for signal
intermittently received.
b. To receive all signals on same channel even with
different CTCSS.
9. Keypad lock/unlock
Hold on for about 3 sec until shows on the
screen to confirm keypad lock is enabled. To unlock
keypad, hold on again for about 3 sec until
clear from the screen.
When keypad lock is enabled, volume control and
program features are locked to prevent accidental
function changes.
lock unlock
8
hsilgnEZodiac Freetalk Pro

9
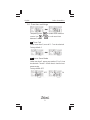
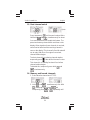
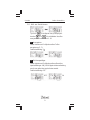
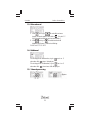
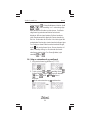
10. Function settings
Temporarily press to enable menu mode on
screen. Use or to scrol menu item
between 1 and 9 .
F1
Tone Call
Under menu item 1, tone call 1 - 7 can be selected.
Factory default: 1
F2
Power Save Mode
Under meu item 2, power save modes 1-1 to 1-4 can
be selected. Choose 1-4 if talk time is short for best
power saving.
Factory default: OFF
OFF 1-4
Zodiac Freetalk ProhsilgnE

VOX ON/OFF
Under menu item 3, VOX ON/OFF can be selected.
Factory default: OFF
OFF ON
8L3L
TX/RX Different Channels
This feature is not in use for this model.
Keypad Tone
Under menu item 6, select ON/OFF. The beep
sounds very weakly at OFF.
Factory default: ON
OFF ON
10
F5
F6
F4 VOX sensitivity
Under menu item 4, VOX sensitivity levels 1 - 9
can be selected. L9 is least sensitive.
Note: If VOX is disabled in F 3 , this feature is
automatically disabled.
hsilgnEZodiac Freetalk Pro
F3

F7 Auto-Power
Under menu item 7, choose OFF/03/10/30/60 min.
depending on your need. If 03 is selected, the radio
automatically turns power off if none of the keys is
operated or no signal received after 3 min.
Factory default: OFF
OFF 03
Time-Out Timér
Under menu item 8, choose OFF/30/60/120/180
depending on your need. If 30 is selected, the radio
will stop transmission if continous talk exceeds over
30 sec and the radio will automatically swift to
receiving mode.
Factory default: OFF
11
OFF 30
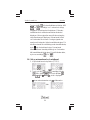
F9 Squelch
Under menu item
9, choose squelch level 1 to 7
depending on your need. If the squelch level is at 0,
the static sound is heard all the time. If setting at 1,
the radio is best to pick up weak signal but
F8
Zodiac Freetalk ProhsilgnE

12
s
usceptible to interferences. Squelch level 7 is the
least sensitive and suited for use against high
interferences.
Factory default: 3
9L3L
11. Tone Call
Holding temporarily press to send tone
call to other receivers. (For selection of tone call,
refer to .
12. VOX ON/OFF
FFONO
Holding , temporarily press to enable
VOX. To disable it, hold and temporarily press
again. For programming of VOX sensitivity,
refer to .
F4
Repeater
This feature is not in use for this model.
F1
hsilgnEZodiac Freetalk Pro
F10

13
13. Memory Channel
1. Holding , temporarily press to select
memory channel. The memory channel is marked
with a . (Refer to 16 for setting of memory
channel.)
2. Holding , temporarily press to restore
to preset channel.
Factory default: CH01 and CTCSS OFF
14. Hazard (Emergency) Channel
Hold for about 3 sec to enable hazard channel
until shows on the display. To disable hazard
channel, hold for about 3 sec until
disappears.
Factory default: CH01 and CTCSS OFF
While VOX is enabled, press of is no longer
required during transmission. Just talk into the
microphone area with appropriate sound (depending
on VOX sensitivity).
Zodiac Freetalk ProhsilgnE

14
15. Dual channel watch
Press temporarily until channel number blinks.
Hold both and simultaneously for about
1 sec and release them to enable this feature. The
preset and memory channel blink each time on the
display. When signal on these channels is received,
sound can be heard and the receiving channel is
seen on the display. This channel is fixed for about 8
sec to reply. After 8 sec if no signal is received,
channel rotation begins.
To select channel for use during channel rotation,
temporarily press if the desired channel is seen.
This channel is on standby for about 8 sec before
channel rotation begins.
To disable this, temporarily press both and
simultaneously.
Open
16. Memory and hazard channels
1. Select favorite channel and CTCSS.
hsilgnEZodiac Freetalk Pro
2. Hold and simultaneously first. With
still being hold, release and
temporarily press or repeatedly until

15
or
3. When favorite channel shows, temporarily press
to select it.
4. After memorization, release to jump out of
memorization mode.
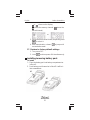
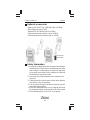
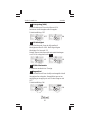
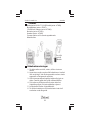
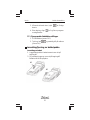
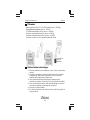
Installing/removing battery pack
To install
1. Place the battery pack into battery compartment as
in illus #1.
2. Push battery pack forward as in illus #2. It will lock
into compartment.
#1
#2
( shows the memory channel. shows the
hazard channel).
or shows on the display.
Zodiac Freetalk ProhsilgnE
17. Restore to factory default settings
1. Turn power OFF.
2. Hold and turn power ON simultaneously.

16
To remove
1. Holding the radio in one hand, push down battery
latch as in illus #3.
2. Slide battery pack backwards as in illus #4.
#3
#4
Battery charging
1. Power drop-in charger with standard AC/DC wall
charger #1.
2. Drop radio with installed battery into the battery-with-
radio slot #2.
3. Drop spare battey pack into the battery-only slot #3.
#1
#2
#3
hsilgnEZodiac Freetalk Pro

17
Single or dual charging is possible. Each LED light
individually indicates charging slot in process. LED
turns off when battery in slot is fully charged.
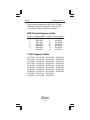
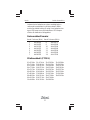
PMR Channel frequency table
Channel Frequency (MHz) Channel Frequency (MHz)
1 446.00625 8
9
10
11
12
13
14
446.09375
444.60000
444.65000
444.80000
444.82500
444.85000
444.97500
2 446.01875
3 446.03125
4
5
6
7
446.04375
446.05625
446.06875
446.08125
CTCSS frequency table
01=67.0Hz 11= 97.4Hz 21=136.5Hz 31=192.8Hz
02=71.9Hz 12=100.0Hz 22=141.3Hz 32=203.5Hz
03=74.4Hz 13=103.5Hz 23=146.2Hz 33=210.7Hz
04=77.0Hz 14=107.2Hz 24=151.4Hz 34=218.1Hz
05=79.7Hz 15=110.9Hz 25=156.7Hz 35=225.7Hz
06=82.5Hz 16=114.8Hz 26=162.2Hz 36=233.6Hz
07=85.4Hz 17=118.8Hz 27=167.9Hz 37=241.8Hz
08=88.5Hz 18=123.0Hz 28=173.8Hz 38=250.3Hz
09=91.5Hz 19=127.3Hz 29=179.9Hz
10=94.8Hz 20=131.8Hz 30=186.2Hz
English Zodiac Freetalk Pro

18
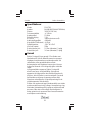
Optional accessories
B
attery pack NI-MH 7,2V /1350 mAh (art.nr 47308)
Desk charger (art.nr. 47307)
Adapter ADA 12V/600mA (art.nr. 47306)
External speaker/microphone (art.nr. 47301)
External earphone/microphone (art.nr. 47302)
Accessory
jack cover
Safety information
1. Use only the supplied antenna. Unauthorized antennas,
modifications or attachments could damage the radio
and changes or modifications not expressly approved
by the party responsible for the compliance could void
the authority to operate the radio.
2. Avoid storing in high temperature or humid place for
long time
3. If strange smell or smoke comes off the radio, dispatch
it to service center immediately
4. Turn to lowest volume if external mic/speaker is used,
then adjust appropriately
5. Never use other power sources for charging other than
the standard charger set designed for this radio model
6. Take off battery pack if out of use for long time
hsilgnEZodiac Freetalk Pro
Sidan laddas...
Sidan laddas...
Sidan laddas...
Sidan laddas...
Sidan laddas...
Sidan laddas...
Sidan laddas...
Sidan laddas...
Sidan laddas...
Sidan laddas...
Sidan laddas...
Sidan laddas...
Sidan laddas...
Sidan laddas...
Sidan laddas...
Sidan laddas...
Sidan laddas...
Sidan laddas...
Sidan laddas...
Sidan laddas...
Sidan laddas...
Sidan laddas...
Sidan laddas...
Sidan laddas...
Sidan laddas...
Sidan laddas...
Sidan laddas...
Sidan laddas...
Sidan laddas...
Sidan laddas...
Sidan laddas...
Sidan laddas...
Sidan laddas...
Sidan laddas...
Sidan laddas...
Sidan laddas...
Sidan laddas...
Sidan laddas...
Sidan laddas...
Sidan laddas...
Sidan laddas...
Sidan laddas...
Sidan laddas...
Sidan laddas...
-
 1
1
-
 2
2
-
 3
3
-
 4
4
-
 5
5
-
 6
6
-
 7
7
-
 8
8
-
 9
9
-
 10
10
-
 11
11
-
 12
12
-
 13
13
-
 14
14
-
 15
15
-
 16
16
-
 17
17
-
 18
18
-
 19
19
-
 20
20
-
 21
21
-
 22
22
-
 23
23
-
 24
24
-
 25
25
-
 26
26
-
 27
27
-
 28
28
-
 29
29
-
 30
30
-
 31
31
-
 32
32
-
 33
33
-
 34
34
-
 35
35
-
 36
36
-
 37
37
-
 38
38
-
 39
39
-
 40
40
-
 41
41
-
 42
42
-
 43
43
-
 44
44
-
 45
45
-
 46
46
-
 47
47
-
 48
48
-
 49
49
-
 50
50
-
 51
51
-
 52
52
-
 53
53
-
 54
54
-
 55
55
-
 56
56
-
 57
57
-
 58
58
-
 59
59
-
 60
60
-
 61
61
-
 62
62
-
 63
63
-
 64
64


på andra språk
Relaterade papper
Andra dokument
-
Exibel FX-33 PMR Användarmanual
-
Motorola CLK446 Användarmanual
-
Topcom 5000 Användarmanual
-
Midland M48-S, Paar, B-WARE Bruksanvisning
-
Motorola XT460 Bruksanvisningar
-
Topcom Twintalker 6800 Professional Box Bruksanvisning
-
-
Topcom Twintalker 9100 Bruksanvisning
-
Topcom Twintalker 9500 Användarguide
-
SwissVoice CH01 ePure Mobile Corded Handset Användarmanual