Mammut Airbag Technology 3.0 Användarmanual
- Typ
- Användarmanual

PROTECTION AIRBAG SYSTEM 3.0
User Manual
DE Benutzerhandbuch
EN User Manual
FR Manuel de l’utilisateur
IT Istruzioni per l’uso
ES Instrucciones de uso
NO Brukerhåndbok
SE Användarhandbok


D
E
1
Inhalt
1. Einleitung und Funktionsweise 2
2. Warnung 2
3. Funktionsweise 2
4. Lieferumfang 2
5. Anleitung 3
5.1 Airbag in Betrieb nehmen,
richtig anziehen und auslösen 3
5.2 Erneuter Gebrauch (Falten) 4
5.3 Airbag-System einbauen 6
5.4 Airbag-System ausbauen 6
5.5 Trainingsauslösung 7
5.6 Befestigung Material am Rucksack 7
6. Kartuschen 7
6.1 Allgemein 7
6.2 Typen und Wiederbefüllung 7
6.3 Hinweise 8
7. Fliegen mit Lawinenairbags 8
8. Kartuschen Verleihstationen 8
9. Pflege und Wartung 8
9.1 Reinigung 8
9.2 Wartung und Entsorgung 8
9.3 Wartung nach einem Lawineneinsatz 8
9.4 Lagerung 8
9.5 Lebensdauer 8
9.6 Spezifikationen 9
9.7 Kennzeichnung am Produkt 9

D
E
2
Protection Airbag System 3.0
sämtliche Risiken und akzeptiert die gesamte Verant-
wortung für alle Schäden und Verletzungen, welche
während der Benützung von Mammut-Artikeln vor-
kommen können. Hersteller und Fachhandel lehnen
jede Haftung im Falle von Missbrauch und unsach-
gemässem Einsatz und/oder Handhabung ab. Diese
Richtlinien sind hilfreich für die richtige Anwendung
des Produktes. Da jedoch nicht alle Falschanwendun-
gen und Fehlermöglichkeiten aufgeführt werden kön-
nen, ersetzen sie niemals eigenes Wissen, Schulung,
Erfahrung und Eigenverantwortung.
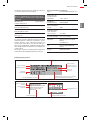
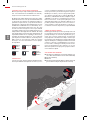
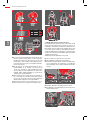
3. Funktionsweise
Der Lawinenairbag macht sich das physikalische Ge-
setz der inversen Segregation (Sortiereffekt) zunutze.
Dieser bewirkt, dass in einer sich gleichmässig bewe-
genden Masse von Teilchen (z. B. Schnee) die kleine-
ren Partikel nach unten rutschen, und die grösseren
Partikel oben aufschwimmen. Der Lawinenairbag ver-
grössert durch Ziehen des Auslösegriffs das Volumen
und verstärkt diesen Effekt erheblich. Damit kann der
Lawinenairbag aktiv einer Verschüttung bzw. Teilver-
schüttung vorbeugen und ermöglicht im Idealfall die
Selbstrettung oder eine schnelle Ortung.
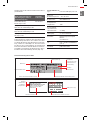
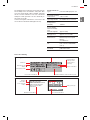
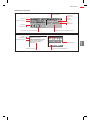
4. Lieferumfang
01 Rucksack (falls Sie das Airbag-System einzeln
gekauft haben, müssen Sie den dazu passenden
Rucksack separat beziehen)
02 Airbag-System
03 Handbuch
04 Trigger Test Tool (zum Ausführen einer Testaus-
lösung ohne Kartusche)
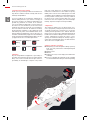
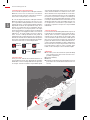
1. Einleitung und Funktionsweise
Vielen Dank, dass Sie sich für den Kauf eines Mammut
Lawinenairbags entschieden haben. Lesen Sie die-
ses Handbuch sorgfältig durch und beachten Sie die
Warnhinweise und Richtlinien.
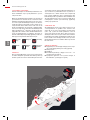
Der Mammut Lawinenairbag erhöht bei einem Lawi-
nenabgang die Chance, an der Oberfläche der La-
wine zu bleiben. Der Lawinenairbag bietet allerdings
keine Überlebensgarantie, denn die Effektivität des
Lawinenairbags während des Lawinenabgangs hängt
stark von der Schneemenge, Schneedichte und ins-
besondere von der Geländebeschaffenheit ab. Gehen
Sie daher niemals ein erhöhtes Risiko ein. Eine Lawine
ist immer lebensbedrohlich, unabhängig von der ver-
wendeten Ausrüstung. Der Lawinenairbag sollte wie
Barryvox
®
, Sonde, Schaufel und Erste Hilfe-Set zur
Standardsicherheitsausrüstung für Skitourengeher
und Freerider gehören. Eine fundierte Risikomanage-
ment-Ausbildung und das Training mit dem Sicher-
heitsequipment ist darüber hinaus unabdingbar.
Avalanche
Airbag
Schaufel
Barryvox
®
Handy
Sonde
Erste Hilfe-
Set
2. Warnung
Jede Person, die Mammut Material benutzt, ist per-
sönlich verantwortlich für das Erlernen der richtigen
Anwendung und Technik. Jeder Benutzer übernimmt

D
E
Benutzerhandbuch
3
05 Druckkartusche (die für das System notwendige
Kartusche ist nicht im Lieferumfang enthalten und
muss separat bezogen werden)
i
01
03
05
04
02
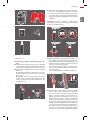
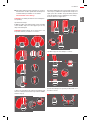
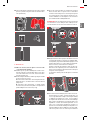
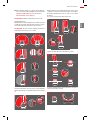
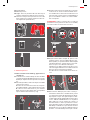
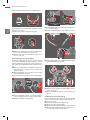
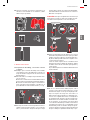
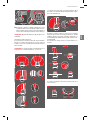
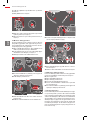
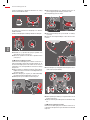
5. Anleitung
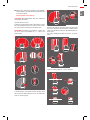
5.1 Airbag in Betrieb nehmen, richtig anziehen
und auslösen
01 Überprüfen Sie, ob das Airbag-System korrekt ein-
gebaut wurde, bevor Sie sich in lawinengefährdete
Gebiete begeben. Folgen Sie dazu den Anweisun-
gen in Kapitel 5.3.
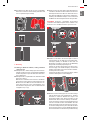
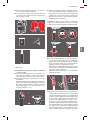
02 Überprüfen Sie vor jedem Einsatz, ob der Druck der
Kartusche stimmt.
A Kartusche mit Manometer: Pfeil muss bei Raum-
temperatur von 20 °C/68 °F im grünen Bereich sein.
B Kartusche ohne Manometer: Tatsächliches Ge-
wicht der Kartusche (ohne Schutzkappe) muss
dem Gewicht entsprechen, das auf der Kartusche
angegeben ist (+/–5g).
0
+/– 5g
02
A B
03 Kartusche bis zum Anschlag in den Mechanismus
schrauben, mit Klettverschluss in Kartuschentasche
befestigen und Tasche schliessen. Stellen Sie sicher,
dass keine Fremdkörper in der Tasche sind. Die Ver-
wendung des Mammut Airbags ist ausschliesslich
mit Mammut oder Snowpulse Kartuschen gestattet.
ACHTUNG: Kartusche vollständig einschrauben
(schwarze Gummidichtung darf nicht sichtbar sein).
Kartusche muss mit Klettverschluss gesichert sein.
03
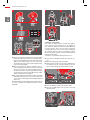
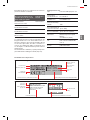
04 Stellen Sie die Höhe des Auslösegriffs im linken
Schulterträger ein. Es gibt drei verschiedene Ein-
stellungen (S/M/L). Im Idealfall ist der Griff auf
Brusthöhe. Der Haken sollte wie in der Abbildung
dargestellt vollständig eingehängt sein.
Schliessen Sie den oberen Reissverschlussschie-
ber bis knapp unter die Befestigung. Verwenden
Sie den unteren Reissverschlussschieber zum Ein-
und Auspacken des Griffs.
Sie können den Reissverschluss blockieren, indem
Sie den Schiebegriff nach oben klappen.
S
M
L
04
locked
unlocked
05 Beim Protection Airbag System 3.0 ist der richtige
Sitz des Rucksacks entscheidend, da er darüber
bestimmt, in welchem Winkel zum Körper sich
der Airbag entfaltet. Aus diesem Grund muss die
Rückenhöhe aller Protection Airbags auf den Be-
nutzer angepasst werden. Die Rückenlänge kann
stufenlos verstellt werden. Grundsätzlich sitzt der
Rucksack richtig, wenn Ihre Schultern auf einer Li-
nie mit der Airbag-Öffnung sind. Die Tabelle dient
ihnen zur Orientierung. Je nach Wohlbefinden kann
der ermittelte Wert von der bevorzugten Einstellung

D
E
4
Protection Airbag System 3.0
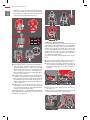
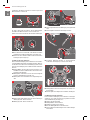
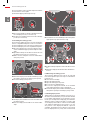
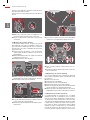
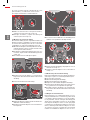
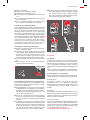
06
08
07
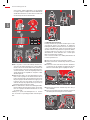
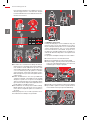
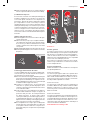
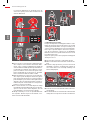
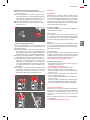
5.2 Erneuter Gebrauch (Falten)
Der Lawinenairbag kann nach einer Auslösung erneut
verwendet werden. Allerdings muss Ihr Lawinenair-
bag nach einem Einsatz in einer Lawine vom Mammut
Kundenservice überprüft werden. Nur so kann eine
erneute einwandfreie Auslösung garantiert werden.
Wenden Sie sich in diesem Fall an Ihren Mammut
Händler. Von einer Verwendung ohne vorheriger Kon-
trolle wird dringend abgeraten.
So machen Sie Ihren Lawinenairbag erneut einsatz-
bereit:
01 Kartusche abschrauben und vom System trennen
02 Reissverschluss Airbag-System-Tasche öffnen
03 Anheben der Schutzkappe, Deflation-Knopf drü-
cken und Luft aus Airbag drücken. Je weniger Luft
im Airbag ist, desto einfacher ist das anschliessen-
de Falten.
02 03
04 Reissverschluss der Airbag-System-Tasche wie-
der schliessen
05 Reissverschlussschieber der Airbag-Öffnung vom
linken Schulterträger zum rechten bringen
04 05
abweichen. Achten Sie jedoch darauf, dass der Air-
bag, wie beschrieben, nicht zu tief sitzt. Stellen Sie
den Hüftgurt mit Hilfe des Klettverschlusses auf
der Rückseite der Hüftgurtpolsterung ein.
05
cm inch size
51,0 20 XL
48,5 19 L
46,0 18 M
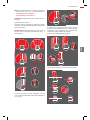
06 Zum richtigen Anziehen des Lawinenairbags Bein-
gurt in Hüftgurt einhängen; Hüftgurt schliessen
(die Mitte des Hüftgurtes sollte in etwa mit dem
Hüftknochen abschliessen); Schulterträger fest-
ziehen; Brustgurt schliessen. Die Beinschlaufe
kann ebenfalls in der Länge verstellt werden. Bein-
schlaufe sollte eng sitzen.
07 Vor Betreten eines möglichen Lawinengebiets Aus-
lösegriff aus Tasche ziehen und in T-Form drehen.
Zum Verstauen des Auslösegriffs Knopf unterhalb
des Griffs drücken und in vertikale Position drehen.
Griff in Schulterträgertasche stecken und Reissver-
schluss schliessen.
08 Sollten Sie in eine Lawine geraten sein, lösen Sie
den Airbag sofort aus. Lösen Sie lieber einmal zu
viel, als einmal zu wenig aus. Ziehen Sie dazu kraft-
voll und ruckartig am Auslösegriff.
Der Airbag wird sich in ca. drei Sekunden selbständig
füllen. Während dem Füllvorgang vernehmen Sie ein
signifikantes Füllgeräusch.

D
E
Benutzerhandbuch
5
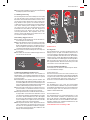
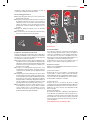
c)
d) Raffen des Airbags über dem linken Schulterträger
wie rechts. Auch hier Schulterträger und Ballon-Ma-
terial unter den Rucksack bzw. das Mittelteil des Air-
bags legen.
Hier steht allerdings kein Reissverschluss zur Verfü-
gung.
d)
e) Oberen Teil des Airbags 3- bis 4-mal falten
e)
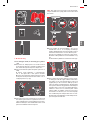
06 Airbag flach ausbreiten und falten nach Bebilde-
rung. Sie finden eine Videoanleitung zum Falten auf
unserer Homepage
www.mammut.swiss/airbags
ACHTUNG: Der Airbag-Ballon darf zum Verpacken
nicht eingerollt werden.
a) Falten der Innenseiten
b) Rechter Schulterträger: Raffen des Ballons. Breite
des Schulterträgers beachten. Schliessen des Reis-
verschlusses bis zur Oberkante des Rucksacks
ACHTUNG: Den Ballon nicht einrollen, sondern fal-
ten. Es ist nicht entscheidend ob 3-, 4- oder 5-mal
gefaltet wird.
a)
b)
c) Schulterträger unter den Rucksack und das obere
überschüssige Ballon-Material unter die Mittenfal-
tung von Schritt a) legen.

D
E
6
Protection Airbag System 3.0
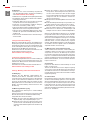
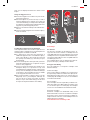
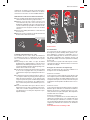
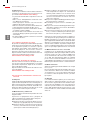
04 05
06 Auslösegriff darf nicht um Airbag-System gewickelt
sein.
07 Auslösegriff in linken Schulterträger stecken
07
08 4-farbige Airbag-Schnallen in entsprechende
Schlau fen einhängen (von unten nach oben)
BLUE
GREEN
GREY
YELLOW
08
09 Airbag-Ballon falten und einpacken wie in Kap. 5.2
beschrieben
10 Auslösegriff wie in Kap 5.1 beschrieben einhängen
5.4 Airbag-System ausbauen
Das Protection Airbag System 3.0 kann in wenigen
Schritten aus dem Rucksack ausgebaut werden.
Siehe Bebilderung aus Kap. 5.3
01 Kartusche abschrauben
02 Airbag-Ballon-Tasche öffnen
03 Airbag-System-Tasche öffnen
04 Die vier Airbag-Ballon-Schnallen lösen
05 Auslösegriff in Schulterträger lösen und ins Haupt-
fach führen
f) Airbag in die dafür vorgesehene Tasche legen und
Klettverschluss schliessen
f)
g) Zuerst den Reissverschluss des Schulterträgers
und dann den Klettverschluss erneut schliessen.
h) Reissverschlussschieber in die Schlaufe einhängen.
g/h)
07 Neue Kartusche verwenden oder Kartusche füllen
und Kartuschendruck überprüfen (siehe Kap. 5.1)
08 Kartusche einschrauben und in Kartuschentasche
befestigen (siehe Kap. 5.1)
5.3 Airbag-System einbauen
Das Protection Airbag System 3.0 kann in verschiede-
ne kompatible Rucksäcke eingebaut werden. Beach-
ten Sie, dass Sie das Protection Airbag System 3.0 nur
in Protection Airbag System 3.0-Rucksäcke einbauen
können.
01 Airbag-Ballon-Tasche öffnen: Reissverschluss von
der Mitte aus öffnen und Schieber auf rechte Schul-
terträger Seite bringen.
02 Airbag flach ausbreiten. Lassen Sie wenn nötig alle
Luft aus dem Airbag (siehe Kap. 5.2)
03 Airbag darf nicht verdreht herum eingehängt wer-
den
03
DO NOT
TWIST
04 Auslösegriff und Airbag-System durch Öffnung in
Airbag-System-Tasche stecken
05 Airbag-System-Tasche schliessen

D
E
Benutzerhandbuch
7
01
04
03
6 Kartuschen
6.1 Allgemein
Die Druckkartuschen sind der Energiespeicher des
Airbag-Systems. Es gibt verschiedene Kartuschen in
unserem Sortiment, die mit dem Protection Airbag-Sys-
tem 3.0 kompatibel sind. Alle Kartuschen, die mit dem
Inflation System 2.0 (ab 2011/2012) kompatibel waren,
sind auch mit dem neuen Airbag System 3.0 kompatibel.
Mit einer Kartusche kann immer nur eine Auslösung
durchgeführt werden. Nach einer Auslösung muss die
leere Kartusche erneut befüllt werden.
6.2 Typen und Wiederbefüllung
Verwenden Sie nur Mammut oder Snowpulse Kartu-
schen mit Mammut Airbags:
Carbon-Kartusche
Die leichteste Kartusche in unserem Sortiment muss
nach einer Verwendung durch einen Mammut Händler
ausgetauscht werden. Viele Mammut Händler bieten
einen kostengünstigen Austausch gegen eine neue
Kartusche an. Nicht erhältlich in USA und Kanada.
Stahlkartusche
Die Stahlkartusche muss nach einer Verwendung
durch einen Mammut Händler ausgetauscht werden.
Viele Mammut Händler bieten einen kostengünstigen
Austausch gegen eine neue Kartusche an. Nicht er-
hältlich in USA und Kanada.
Aluminiumkartusche
Die Aluminiumkartusche wird hauptsächlich in den
USA und Kanada vertrieben. Die Kartusche kann
durch den Kunden selbständig wiederbefüllt wer-
den. Bitte beachten Sie unser Handbuch zum Selbst-
befüllen und die Liste offizieller Befüllstationen der
207-Bar-Aluminiumkartusche:
www.mammut.swiss/cartridge-refill
06 Auslösegriff und Airbag-System durch die Öffnung
in Airbag-System-Tasche führen
5.5 Trainingsauslösung
Das Training mit Ihrem Lawinenairbag ist notwendig,
um sich mit dem System vertraut zu machen und im
Ernstfall schnell und intuitiv handeln zu können. Trai-
nieren Sie besonders das Auslösen Ihres Lawinenair-
bags, damit Sie auch spüren, wie stark Sie am Auslö-
segriff ziehen müssen. Damit Sie Ihren Lawinenairbag
nach einem Training nicht ständig neu falten müs-
sen, können Sie auch eine Trockenauslösung ohne
Druckkartusche durchführen. Mit dem Trigger Test
Tool können Sie sehr einfach eine solche Trocken-
auslösung durchführen. Wir empfehlen Ihnen, min-
destens einmal zum Beginn einer Wintersaison eine
Trockenauslösung durchzuführen.
Verwendung Trigger Test Tool
01 Schrauben Sie das Trigger Test Tool in die Auslöse-
mechanik (bis zum Anschlag).
02 Ziehen Sie den Rucksack an (siehe Kap. 5.1). Wir emp-
fehlen Ihnen auch bei einer Trockenauslösung Ihre
Funktionsbekleidung zu tragen, um die Auslösung so
real wie möglich zu gestalten. Besonders das Auslö
-
sen mit Ihren Handschuhen ist eine gute Übung.
03 Lösen Sie Ihren Lawinenairbag aus wie in Kap. 5.1
beschrieben.
04 Schrauben Sie anschliessend das Trigger Test Tool
von der Auslösemechanik.
01
5.6 Befestigung Material am Rucksack
Unsere Rucksackmodelle bieten eine Vielzahl an
Möglichkeiten verschiedenste Materialien am Ruck-
sack zu befestigen. Folgende Punkte müssen speziell
beachtet werden:
01 Grundsätzlich muss darauf geachtet werden, bei
der Befestigung die Airbag Entfaltung durch das
zusätzliche Material nicht zu beeinträchtigen. Das
heisst: Die Öffnung des Airbags darf nicht blockiert
werden (z.B. Befestigung Seil am Rucksack).
02 Schaufel und Sonde können im Rucksack trans-
portiert werden. Je nach Rucksack hat es meist ein
separates Fach für die Sicherheitsausrüstung.
03 Der Eispickel kann ausserhalb des Rucksacks be-
festigt werden. Verwenden Sie dabei aber immer
eine Pickelschutzkappe wie die Mammut Ice Spike
Protection. Damit verhindern Sie, dass die Spitze
des Pickels im Ernstfall den Lawinen-Airbag-Bal-
lon beschädigt. Die Ice Spike Protection ist für die
gängigsten Hochtouren-Pickel geeignet.
04 Wir empfehlen die Ski immer diagonal am Ruck-
sack zu befestigen. Die A-Fixierung ist zwar mög-
lich aber nur im ungefährlichen Gebiet zu empfeh-
len. Bei der A-Fixierung kann das Aufblasen des
Airbags beeinträchtigt werden.

D
E
8
Protection Airbag System 3.0
03 Führen Sie einmal pro Saison eine Trainingsaus-
lösung durch. Die Trainingsauslösung kann auch
mit einer leeren Kartusche oder mit dem Trigger
Test Tool durchgeführt werden. Die Auslösung war
erfolgreich, wenn Sie ein deutliches «Klack»-Ge-
räusch hören (Kap 5.6).
04 Überprüfen Sie den Airbag-Ballon auf Löcher oder
Risse.
05 Sollte der Airbag übermässig nass geworden sein,
breiten Sie ihn flach aus und lassen ihn trocknen.
06 Überprüfen Sie das Airbag-System auf Schäden
(Risse im Gehäuse, Dellen, sichtbare Gewinde, etc.).
07 Untersuchen Sie Rucksack, Schulterträger und
Hüftgurt auf Löcher, Risse und beschädigte Nähte.
Wenn bei der Überprüfung Anzeichen von Schäden
festgestellt werden oder sonstige Zweifel an der Zu-
verlässigkeit bestehen, wenden Sie sich an den Kun-
denservice. Beschädigte Ausrüstung muss entweder
ordnungsgemäss entsorgt oder vor dem erneuten
Gebrauch durch unseren Kundenservice repariert
werden. Selbständige Reparaturen oder Änderungen
am Produkt, die nicht explizit in diesem Handbuch
aufgeführt werden, sind untersagt.
9.3 Wartung nach einem Lawineneinsatz
Jeder Lawineneinsatz kann den Lawinenairbag be-
schädigen, da dieser in der Lawine enormen Kräften
ausgesetzt ist. Daher ist die Wartung des Systems
nach einem Lawineneinsatz unerlässlich. Diese War-
tung muss vom Mammut Kundendienst durchgeführt
werden. Kontaktieren Sie Ihren Fachhändler oder den
Mammut Kundendienst, um eine Kontrolle oder War-
tung zu veranlassen.
9.4 Lagerung
Lagern Sie den Mammut Lawinenairbag an einem
kühlen, trockenen Ort.
Trennen Sie die Kartusche für eine längere Lagerung
vom System. Lagern Sie die Kartuschen ebenfalls an
einem kühlen trockenen Ort. Verwenden Sie zur Lage-
rung der Kartuschen den Kartuschendeckel und die
Originalverpackung.
9.5 Lebensdauer
Bei optimaler Lagerung und seltener Nutzung sollten
Sie Ihren Lawinenairbag spätestens nach 10 Jahren
(ab Herstellungsdatum) oder spätestens nach 40 Aus-
lösungen (mit oder ohne Kartusche) austauschen. Die
Lebensdauer kann im Voraus nicht genau berechnet
werden, denn sie wird von zahlreichen Faktoren wie
Gebrauchshäufigkeit, Behandlung, klimatischen Ein-
flüssen, etc. beeinflusst.
6.3 Hinweise
– Kartusche muss nach Verwendung ausgetauscht
oder wiederbefüllt werden. Anleitung zur Befüllung
siehe www.mammut.swiss/airbags
– Fülldruck muss vor jeder Benutzung überprüft werden
– Nur Mammut oder Snowpulse Kartuschen mit Mam-
mut Airbag verwenden
– Kartuschen dürfen nie zu grosser Hitze ausgesetzt
sein (direkte Sonneneinstrahlung/Ofen/etc.)
– Kartuschen nur innerhalb des erlaubten Tempara-
turbereichs verwenden (–30 bis +40 °C)
– Kartuschen dürfen nicht beschädigt werden. Beschä-
digte Kartuschen müssen ausgetauscht werden
– Kartusche muss vollständig in Airbag System einge-
schraubt sein (Schwarze Gummidichtung darf nicht
sichtbar sein)
– Kartusche muss mit Klettverschluss im Rucksack ge-
sichert werden
7. Fliegen mit Lawinenairbags
Mammut Lawinenairbags können grundsätzlich per
Flugzeug transportiert werden (Achtung Sonderrege-
lung USA). Druckkartuschen für Lawinenairbags gel-
ten als Gefahrgüter. Daher gibt es für diese spezielle
Regelungen für die Mitnahme im Flugzeug.
Finden Sie immer die aktuellsten Informationen zum
Thema Fliegen mit Kartuschen hier:
www.mammut.swiss/airbags-travel
8. Kartuschen-Verleihstationen
Eine einfach Möglichkeit mit Ihrem Lawinenairbag zu
verreisen, bieten unsere zahlreichen Kartuschen-Ver-
leihstationen. Mieten Sie sich einfach Ihre Lawinenair-
bagkartusche vor Ort.
Hier finden Sie eine Übersicht aller Verleihstationen:
www.mammut.swiss/airbags-travel
9. Pflege, Wartung und weitere Informationen
9.1 Reinigung
Reinigen Sie den Mammut Lawinenairbag aus-
schliesslich mit Wasser. Verwenden Sie keine Lö-
sungsmittel. Nach der Reinigung muss der Airbag für
einen erneuten Gebrauch vollkommen trocken sein.
Trocknen Sie den Airbag an der Luft. Breiten Sie den
Airbag dazu flach aus. Vermeiden Sie zum Trocknen
direkte Sonneneinstrahlung, Wäschetrockner oder
die Heizung.
9.2 Wartung und Entsorgung
Eine regelmässige Wartung Ihres Lawinenairbags
wird empfohlen.
Untersuchen Sie Ihre Ausrüstung vor und nach jedem
Einsatz auf Zeichen von Schäden und Abnutzung.
Folgende Punkte sind zu beachten:
01 Stellen Sie sicher, dass das Airbag-System richtig
eingebaut (Kap. 5.3) und gefaltet (Kap. 5.2) ist.
02 Stellen Sie sicher, dass Ihre Kartusche den richti-
gen Druck hat und vollständig eingeschraubt ist.
(schwarze Gummidichtung darf nicht sichtbar sein)
(Kap. 5.1).

D
E
Benutzerhandbuch
9
Anhaltspunkte für die Gebrauchsdauer liefert die fol-
gende Tabelle:
Verwendungshäufigkeit in
Einsatztagen pro Jahr bei
optimaler Lagerung
Ungefähre
Lebensdauer
Seltene Benutzung
Bis 10-mal pro Jahr
bis 10 Jahre
Gelegentliche Benutzung
Zwischen 10- und 40-mal pro Jahr
5–7 Jahre
Häufige Benutzung
Zwischen 40- und 80-mal pro Jahr
3–5 Jahre
Ständige Benutzung
80-mal pro Jahr
1–3 Jahre
Folgende Faktoren verkürzen die Lebensdauer eines
Lawinenairbags: Einsätze in einer Lawine, harte Stür-
ze, Abrieb, Abnutzung, lange direkte Sonneneinstrah-
lung, Salzwasser, salzhaltige Luft, Korrosionsmittel.
Der Einsatz eines Lawinenairbags im Verleihbetrieb
kann die Lebensdauer ebenfalls drastisch verkürzen.
Sorgfältige und regelmässige Wartung kann die Le-
bensdauer des Lawinenairbags erhöhen (Kap. 9.2).
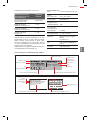
9.6 Spezifikationen
Typ: Protection Airbag-System 3.0
Zulässige
Betriebstemperatur: – 30 °C bis 40 °C
Betriebshöhe: 0 bis 6000 m.ü.M.
Airbagvolumen
aufgeblasen: 150 l
Systemgewicht
ohne Kartusche
ohne Rucksack: ca. 920 g
Füllvorgang: ca. 3 bis 5 Sekunden
Hersteller: Mammut Sports Group AG
Birren 5
CH-5703 Seon
CE: PPE – Guideline 89/686/EWG
(Cat. 2)
Standard: prEN 16716: 2015
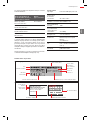
Batch No.
Serial No.
Standard
YYWW
xxxxxxxxx
prEN167116:2015
Batch No.
Serial No.
Standard
YYWW
xxxxxxxxx
prEN167116:2015
Batch No.
Serial No.
Standard
YYWW
xxxxxxxxx
prEN167116:2015
Batch No.
Serial No.
Standard
YYWW
xxxxxxxxx
prEN167116:2015
Highmark Ination System 3.0:
Mammut Ination System 3.0:
Markenlogo
Airbag-System Typ
Hinweis das Benutzerhandbuch zu lesen
Hersteller und Adresse Hinweis das Benutzerhandbuch zu lesen
geltender Standard für Lawinenairbagsysteme
Produktions-
chargennummer Jahr
und Kalender woche
der Herstellung
Einmalige
Seriennummer
Produktions-
chargennummer
Airbag-System-Typ
Mammut
Artikelnummer
CE Konfirmitätszeichen
9.7 Kennzeichnung am Produkt
01 Airbag-System
02 Rucksack
Paper lables for SMS Wi 1415
date: 18.09.2013
prepared: AFipage: 1
this design is protected by copyright © Mammut Sports Group
Style No.: xxxx-xxxxx
Batch# & Prod.Date: xxx-xxxx
Mammut Sports Group AG
Birren 5, CH-5703 Seon
Switzerland
Style No.: xxxx-xxxxx-xxxx-xxx
Batch No.: xxx-xxxx-xxxxx
Mammut Sports Group AG
Birren 5, CH-5703 Seon
Switzerland
RAS (Dong In)PAS, Highmark (Pungkook)
this design is protected by copyright © Mammut Sports Group
Style:
Date:
Season:
D&D:
Producer:
Protection Airbag Woven Label
26.05.2015
Wi1617
AFi
Smoke
Pantone: 18-5105 TPX
White
Pantone: 11-0601 TPX
Fire
Pantone: 18-1763 TPX
(bright red)
Nilorn
Name:
Mam-Airbag-Protection

D
E
10
Protection Airbag System 3.0

E
N
11
Contents
1. Introduction and operation 12
2. Warning 12
3. Operation 12
4. Parts needed for operation 12
5. Instructions 13
5.1 Preparing, putting on and deploying
the airbag 13
5.2 Further use (folding) 14
5.3 Installing the airbag system 16
5.4 Removing the airbag system 16
5.5 Training deployment 16
5.6 Attaching equipment to the backpack 17
6 Cartridges 17
6.1. General 17
6.2 Types and refilling 17
6.3 Notes 18
7. Flying with an avalanche airbag 18
8. Cartridge rental stations 18
9. Care, maintenance and additional
information 18
9.1 Cleaning 18
9.2 Maintenance and disposal 18
9.3 Maintenance after use in an avalanche 18
9.4 Storage 18
9.5 Service life 18
9.6 Specifications 19
9.7 Product labeling 19

E
N
12
Protection Airbag System 3.0
1. Introduction and operation
Thank you for purchasing a Mammut avalanche air-
bag. Please read this manual carefully and note the
warnings and guidelines.
If you are caught up in an avalanche, a Mammut av-
alanche airbag increases your chance of staying on
the surface. However, an avalanche airbag does not
provide any guarantee of survival, as its effective-
ness in the avalanche depends to a great extent on
the volume of snow, the density of the snow and, in
particular, the nature of the terrain. You should there-
fore never take the extra risk. An avalanche is always
life-threatening, regardless of the equipment used.
Like a Barryvox
®
, probe, shovel and first aid set, an av-
alanche airbag should be part of every ski tourer’s or
freerider’s standard safety equipment. Sound training
in risk management and familiarization with your safe-
ty equipment are also essential requirements.
Avalanche
Airbag
Shovel
Barryvox
®
Cell phone
Probe
First aid set
2. Warning
Anyone using Mammut equipment is personally re-
sponsible for learning the proper use and technique.
Every user assumes all risks and accepts entire re-
sponsibility for all damages or injuries of any nature
that may result during use of Mammut products.
Neither the manufacturer nor the retailer accept any
liability in the event of misuse and improper use and/
or handling. These guidelines are intended to help you
use the product correctly. Since it is not possible to
list all incorrect usages and possible errors, these
instructions can never replace your own knowledge,
training, experience and personal responsibility.
3. Operation
The avalanche airbag uses the physical law of in-
verse segregation (sorting effect). This means that in
an equally moving mass of particles (e.g. snow), the
smaller particles gravitate to the bottom while the
larger ones rise to the surface. Pulling the deployment
handle of the avalanche airbag increases the wearer’s
volume, significantly boosting this effect. Conse-
quently, the avalanche airbag can actively help pre-
vent burial or partial burial and, in an ideal situation,
allow self-rescue or rapid location.
4. Parts needed for operation
01 Backpack (if you have bought the airbag system by
itself, you must purchase the matching backpack
separately)
02 Airbag system
03 Manual
04 Trigger test tool (for a test deployment without the
cartridge)
05 Pressure cartridge (the required system cartridge
is not included and must be purchased separately)

E
N
User Manual
13
i
01
03
05
04
02
5. Instructions
5.1 Preparing, putting on and deploying the air-
bag
01 Check that the airbag system has been installed
correctly before entering terrain with a potential av-
alanche risk. Follow the instructions in Section 5.3.
02 Always check the filling pressure of the cartridge
before use.
A Cartridge with pressure gauge: At a room tem-
perature of 20 °C / 68 °F, the arrow must be in the
green area.
B Cartridge without pressure gauge: the actual
weight of the cartridge (without protective cap)
must correspond to the weight indicated on the
cartridge (+/-5 g).
0
+/– 5g
02
A B
03 Screw the cartridge all the way into the mechanism,
secure it in the cartridge pocket using the Velcro
closure and close the pocket. Make sure there are
no foreign objects in the pocket. The Mammut air-
bag may be used only with Mammut or Snowpulse
cartridges.
CAUTION: Screw the cartridge in completely (the
black rubber seal must not be visible). The cartridge
must be secured using velcro.
03
04 Adjust the height of the deployment handle on the
left shoulder strap. There are three different set-
tings (S/M/L). The handle should ideally be at chest
height. The hook should be pushed securely into
the loop, as shown in the graphic.
Close the upper zipper until it is just below the at-
tachment. Use the lower zipper to install and re-
move the handle.
You can lock the zipper by folding the handle up.
S
M
L
04
locked
unlocked
05 It is important to ensure that the Protection Airbag
System 3.0 is sitting correctly, since this deter-
mines the angle to the body at which the airbag
deploys. The back height of all Protection air-
bags must therefore be adjusted to the user. The
length of the back can be continuously adjusted.
In general, the backpack is sitting correctly if your
shoulders are in line with the airbag opening. The
diagram is provided for guidance. For comfort rea-
sons, the position may vary from the preferred set-
ting. However, make sure that the airbag does not
sit too low, as shown. Adjust the hip belt using the
Velcro closure on the back of the hip belt padding.

E
N
14
Protection Airbag System 3.0
06
08
07
5.2 Further use (folding)
The avalanche airbag can be reused after deploy-
ment. However, after deployment in an avalanche,
your avalanche airbag must be checked by Mammut
Customer Service. This is the only way to guarantee
smooth deployment. If you have used your airbag in
an avalanche, please contact your Mammut retailer.
We strongly advise against using your airbag without
having it checked first.
To prepare your avalanche airbag for further use:
01 Unscrew the cartridge and remove it from the sys-
tem.
02 Open the airbag system pocket zipper.
03 Remove the protective cap, press the deflation but-
ton and press the air out of the airbag. The less air
there is in the airbag, the easier it will be to fold.
02 03
04 Close the airbag system pocket zipper again.
05 Open the airbag zipper from the left to the right
shoulder strap.
04 05
05
cm inch size
51.0 20 XL
48.5 19 L
46.0 18 M
06 To put on the avalanche airbag correctly, thread the
hip belt through the leg strap; close the hip belt (the
hip belt should sit approximately on the hip bone);
tighten the shoulder straps; close the chest strap.
The length of the leg loop can also be adjusted. The
leg loop should fit tightly.
07 Before entering areas with an avalanche risk, re-
move the deployment handle from the pocket and
turn into a T position. To stow the deployment han-
dle, press the button under the grip and twist it into
a vertical position. Place the handle in the shoulder
strap pocket and close the zipper.
08 If you get caught in an avalanche, deploy the airbag
immediately. It is better to use it once too often than
once too little. Pull the deployment handle hard and
decisively.
The airbag will automatically fill in approximately three
seconds. You will hear a relatively loud noise as the
airbag fills.

E
N
User Manual
15
d) Fold the airbag above the left shoulder strap, in the
same way as you did for the right shoulder strap. Once
again, place the shoulder strap and airbag material
under the backpack or the middle part of the airbag.
However, there is no zipper here.
d)
e) Fold the top part of the airbag 3 or 4 times.
e)
f) Place the airbag in the pocket provided and close
the Velcro closure.
f)
06 Spread the airbag out flat and fold it as shown in
the illustration. A video guide demonstrating how
to fold the airbag is available on our website
www.mammut.swiss/airbags
CAUTION: The airbag should never be rolled up be-
fore packing.
a) Fold the inner flaps.
b) Right shoulder strap: airbag folds. Check the width
of the shoulder strap. Close the zipper up to the top
edge of the backpack.
CAUTION: Fold the airbag, do not roll it up. It is not
important whether you fold it 3, 4 or 5 times.
a)
b)
c) Place the shoulder strap under the backpack and
the excess airbag material at the top under the middle
fold from step a).
c)

E
N
16
Protection Airbag System 3.0
07
08 Thread the four colored airbag buckles through the
appropriate loops (from bottom to top).
BLUE
GREEN
GREY
YELLOW
08
09 Fold the airbag and pack it as described in Section
5.2.
10 Attach the deployment handle as described in Sec-
tion 5.1.
5.4 Removing the airbag system
The Protection Airbag System 3.0 can be removed
from the backpack in just a few steps. See illustration
in Section 5.3.
01 Unscrew the cartridge.
02 Open the airbag pocket.
03 Open the airbag system pocket.
04 Loosen the four airbag buckles.
05 Loosen the deployment handle in the shoulder
strap and feed it into the main compartment.
06 Thread the deployment handle and airbag system
through the opening in the airbag system pocket.
5.5 Training deployment
Training with your avalanche airbag is necessary in or-
der to become familiar with your system and to be able
to act quickly and intuitively in an emergency. In par-
ticular, you should practice deploying your avalanche
airbag in order to realize how hard you need to pull
on the deployment handle. In order to avoid refolding
your avalanche airbag after every practice, you can
also perform a test deployment without a pressure
cartridge. The Trigger Test tool allows you to perform
this test deployment very easily. We recommend at
g) Close the zipper on the shoulder strap first and then
close the Velcro closure again.
h) Thread the zipper pull through the loop.
g/h)
07 Use a new cartridge or refill the cartridge and check
the cartridge pressure (see Section 5.1).
08 Screw in the cartridge and secure it in the cartridge
pocket (see Section 5.1).
5.3 Installing the airbag system
The Protection Airbag System 3.0 can be installed in
various compatible backpacks. Please note that the
Protection Airbag System 3.0 can be installed only in
Protection Airbag System 3.0 compatible backpacks.
01 Open the airbag pocket: open the zipper from the
center and slide the zipper pull to the right shoulder
strap.
02 Spread the airbag out flat. Remove all the air from
the airbag, if necessary (see Section 5.2).
03 Make sure the airbag has not been attached the
wrong way round.
03
DO NOT
TWIST
04 Thread the deployment handle and airbag system
through the opening in the airbag system pocket.
05 Close the airbag system pocket.
04 05
06 The deployment handle must not be wound around
the airbag system.
07 Place the deployment handle in the left shoulder
strap.

E
N
User Manual
17
01
04
03
6 Cartridges
6.1. General
The pressure cartridges are the airbag system’s en-
ergy store. We stock a number of cartridges that are
compatible with the Protection Airbag System 3.0. All
cartridges that were compatible with the Inflation Sys-
tem 2.0 (from 2011/2012) are also compatible with the
new Airbag System 3.0.
One cartridge allows only one deployment. After de-
ployment the empty cartridge must be refilled.
6.2 Types and refilling
Use only Mammut or Snowpulse cartridges with
Mammut airbags:
Carbon cartridges
These are the lightest cartridges we stock and must
be replaced by a Mammut retailer after deployment.
Many Mammut retailers offer a cost-effective price for
exchanging old cartridges for new ones. Not available
in the USA and Canada.
Steel cartridges
Steel cartridges must be replaced by a Mammut re-
tailer after deployment. Many Mammut retailers offer
a cost-effective price for exchanging old cartridges
for new ones. Not available in the USA and Canada.
Aluminum cartridges
Aluminum cartridges are distributed mainly in the
USA and Canada. Customers can refill the cartridges
themselves. Please read our manual for refilling car-
tridges and refer to the list of official filling stations for
207 bar aluminum cartridges:
www.mammut.swiss/cartridge-refill
least one test deployment before the winter season
begins.
Using the Trigger Test tool
01 Screw the Trigger Test tool all the way into the de-
ployment mechanism.
02 Put the backpack on (see Section 5.1). In order to
make the deployment as realistic as possible, we
recommend wearing your skiing clothes during the
test deployment. Deploying the airbag while wear-
ing gloves is particularly good practice.
03 Deploy your avalanche airbag as described in Sec-
tion 5.1.
04 Then unscrew the Trigger Test tool from the deploy-
ment mechanism.
01
5.6 Attaching equipment to the backpack
Our backpack models offer a number of options for at-
taching a variety of equipment to your backpack. The
following points should be considered:
01 It is important to ensure that any attachment of
additional equipment does not inhibit the deploy-
ment of the airbag. In other words: Do not block
the opening of the airbag (e.g. attaching a rope to
the backpack).
02 Your shovel and probe can be placed in your back-
pack. Most backpacks have a separate compart-
ment for safety equipment.
03 Your ice ax can be attached to the outside of your
backpack. Always use a protective ax cap, such
as the Mammut Ice Spike Protection. This prevents
the tip of the ax damaging the avalanche airbag in
an emergency. The Ice Spike Protection is suitable
for most popular mountain tour ice axes.
04 We recommend that you always attach your skis
diagonally across your backpack. Although fix-
ing your skis in a A-shape is possible, we advise
doing so only in safe terrain. Fixing your skis in an
A-shape can impair the inflation of the airbag.

E
N
18
Protection Airbag System 3.0
04 Check the airbag for holes or tears.
05 If the airbag is wet, spread it out flat and leave it
to dry.
06 Check the airbag system for damage (cracks in the
housing, dents, threading, etc.).
07 Check your backpack, shoulder straps and hip belt
for holes, tears and damaged seams.
If you discover signs of damage or have other doubts
about reliability, please contact Customer Service.
Damaged equipment must either be properly dis-
posed of or repaired by our customer services before
use. It is forbidden to make any repairs and changes to
the product, which are not explicitly described in this
manual, by yourself.
9.3 Maintenance after use in an avalanche
Any use in an avalanche can damage the avalanche
airbag due to the enormous forces it is subjected to.
Maintenance of the system after use in an avalanche
is therefore essential. This maintenance must be per-
formed by Mammut Customer Service. Contact your
retailer or Mammut Customer Service to arrange a
check or maintenance for your airbag.
9.4 Storage
Store your Mammut avalanche airbag in a cool, dry
place.
Remove the cartridge if you intend to store the sys-
tem for a long time. Store your cartridges in a cool, dry
place. Use the cartridge cover and original packaging
to store cartridges.
9.5 Service life
Given optimum storage and rare use, you should
replace your avalanche airbag after a maximum of
10 years (from the date of manufacture) or after a max-
imum of 40 deployments (with or without cartridge).
The product’s service life depends on many factors,
such as frequency of use, handling, climatic influenc-
es, etc., and cannot be determined precisely in ad-
vance.
The following table provides guidelines concerning
the service life:
Frequency of use in days of
use per year (given optimum
storage)
Approximate
service life
Rare use
Up to 10 times per year
Up to 10 years
Occasional use
Between 10 and 40 times per year
5–7 years
Frequent use
Between 40 and 80 times per year
3–5 years
Constant use
80 times per year
1–3 years
6.3 Notes
– Cartridges must be replaced or refilled after use. For
filling instructions, see
www.mammut.swiss/airbags
– The filling pressure must be checked before each
use.
– Use only Mammut or Snowpulse cartridges with
Mammut airbags
– Cartridges must never be exposed to excessive heat
(direct sunlight, oven, etc.)
– Cartridges may be used only within the permitted
temperature range (-30 to +40 °C)
– Cartridges must not be damaged. Damaged car-
tridges must be replaced.
– The cartridge must be screwed all the way into the air-
bag system (the black rubber seal must not be visible)
– The cartridge must be secured in the backpack using
velcro
7. Flying with an avalanche airbag
In general, it is possible to transport Mammut ava-
lanche airbags by air (please note, a special regulation
applies for the USA). The pressure cartridges used in
avalanche airbags are classed as hazardous goods.
Special regulations therefore apply if you wish to carry
them with you on a flight.
The latest updated information on flying with cartridg-
es can be found here:
www.mammut.swiss/airbags-travel
8. Cartridge rental stations
Our numerous cartridge rental stations offer a simple
solution for traveling with your avalanche airbag. Sim-
ply rent your avalanche airbag cartridge locally.
A list of cartridge rental stations can be found here:
www.mammut.swiss/airbags-travel
9. Care, maintenance and additional information
9.1 Cleaning
Only clean your Mammut avalanche airbag with water.
Do not use solvents. After cleaning, the airbag must
be completely dry before reuse. Dry the airbag in the
open air. Spread the airbag out flat. Do not dry in direct
sunlight or using a tumble dryer or heater.
9.2 Maintenance and disposal
We recommend regular maintenance of your ava-
lanche airbag.
Check your equipment for signs of damage and wear
before and after each use.
The following points should be noted:
01 Make sure that the airbag system is installed (Sec-
tion 5.3) and folded correctly (Section 5.2).
02 Make sure that your cartridge has the correct pres-
sure and is completely screwed in. (The black rub-
ber seal must not be visible) (Section 5.1).
03 Perform at least one training deployment each sea-
son. A training deployment can also be performed
with an empty cartridge or using the Trigger Test
tool. If the deployment is successful, you will hear a
clear “click” sound (Section 5.6).
Sidan laddas...
Sidan laddas...
Sidan laddas...
Sidan laddas...
Sidan laddas...
Sidan laddas...
Sidan laddas...
Sidan laddas...
Sidan laddas...
Sidan laddas...
Sidan laddas...
Sidan laddas...
Sidan laddas...
Sidan laddas...
Sidan laddas...
Sidan laddas...
Sidan laddas...
Sidan laddas...
Sidan laddas...
Sidan laddas...
Sidan laddas...
Sidan laddas...
Sidan laddas...
Sidan laddas...
Sidan laddas...
Sidan laddas...
Sidan laddas...
Sidan laddas...
Sidan laddas...
Sidan laddas...
Sidan laddas...
Sidan laddas...
Sidan laddas...
Sidan laddas...
Sidan laddas...
Sidan laddas...
Sidan laddas...
Sidan laddas...
Sidan laddas...
Sidan laddas...
Sidan laddas...
Sidan laddas...
Sidan laddas...
Sidan laddas...
Sidan laddas...
Sidan laddas...
Sidan laddas...
Sidan laddas...
Sidan laddas...
Sidan laddas...
Sidan laddas...
Sidan laddas...
Sidan laddas...
Sidan laddas...
-
 1
1
-
 2
2
-
 3
3
-
 4
4
-
 5
5
-
 6
6
-
 7
7
-
 8
8
-
 9
9
-
 10
10
-
 11
11
-
 12
12
-
 13
13
-
 14
14
-
 15
15
-
 16
16
-
 17
17
-
 18
18
-
 19
19
-
 20
20
-
 21
21
-
 22
22
-
 23
23
-
 24
24
-
 25
25
-
 26
26
-
 27
27
-
 28
28
-
 29
29
-
 30
30
-
 31
31
-
 32
32
-
 33
33
-
 34
34
-
 35
35
-
 36
36
-
 37
37
-
 38
38
-
 39
39
-
 40
40
-
 41
41
-
 42
42
-
 43
43
-
 44
44
-
 45
45
-
 46
46
-
 47
47
-
 48
48
-
 49
49
-
 50
50
-
 51
51
-
 52
52
-
 53
53
-
 54
54
-
 55
55
-
 56
56
-
 57
57
-
 58
58
-
 59
59
-
 60
60
-
 61
61
-
 62
62
-
 63
63
-
 64
64
-
 65
65
-
 66
66
-
 67
67
-
 68
68
-
 69
69
-
 70
70
-
 71
71
-
 72
72
-
 73
73
-
 74
74


Mammut Airbag Technology 3.0 Användarmanual
- Typ
- Användarmanual
på andra språk
Andra dokument
-
MSI VR One (7th Gen) (GEFORCE GTX 1060) Bruksanvisning
-
Sony LCS-BP3 Viktig information
-
Topcom 5000 Användarmanual
-
Panasonic CAFN50N Användarmanual
-
-
Axkid Modukid Användarmanual
-
Waeco PerfectView M35L Bruksanvisningar
-
-
-