POINT POAP4010 LUFTRENSER Användarmanual
- Kategori
- Luftrenare
- Typ
- Användarmanual

Air Purifier
POAP4010
User Manual

2
GB
Thank you for purchasing your new POINT Air Purifier. We recommend that you spend some time reading this
instruction manual in order to fully understand all the operational features it offers.
Read all the safety instructions carefully before use and keep this instruction manual for future reference.
NO
Takk for at du kjøpte din nye luftrenser fra POINT. Vi anbefaler at du tar deg tid til å lese gjennom
helebruksanvisningen for å forstå fullt ut alle funksjonene som tilbys.
Les alle sikkerhetsanvisningene nøye før bruk, og oppbevar bruksanvisningen for fremtidig referanse.
FI
Kiitos, kun valitsit uuden POINT-ilmanpuhdistimen. Suosittelemme, että käytät aikaa tämän
käyttöoppaanlukemiseen, jotta ymmärrät täysin, mitä toiminnallisia ominaisuuksia tuote tarjoaa.
Lue kaikki turvallisuusohjeet huolellisesti ennen laitteen käyttöä ja säilytä käyttöopas myöhempää käyttöä
varten.
DK
Tak fordi du har købt din nye luftrenser fra POINT. Vi anbefaler at du læser denne brugsanvisning, så du får
enfuld forståelse af hvordan alle betjeningsfunktionerne virker.
Læs alle sikkerhedsinstruktioner nøje før brug, og behold denne brugsanvisning til senere reference.
SE
Tack för att du har köpt din nya luftrenare från POINT. Vi rekommenderar dig att du tar din tid att läsa
igenomdenna bruksanvisning för att till fullo förstå alla funktioner.
Läs noga igenom alla säkerhetsinstruktioner före användning och spara bruksanvisningen för framtida bruk.

3
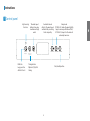
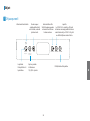
Instruction manual - English Page 4 - 18
Bruksanvisning - Norsk Side 19 - 33
Ohjekirja - Suomi Sivut 34 - 48
Brugervejledning - Dansk Side 49 - 63
Bruksanvisning - Svenska Sido 64 - 78
GBNO
FI
DK
SE


6
Attention
The pictures contained in this Manual are for reference only. Your physical product may vary slightly from the pictures.
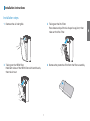
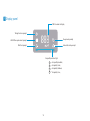
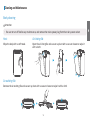
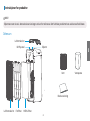
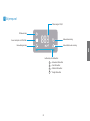
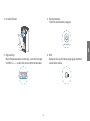
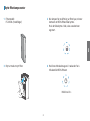
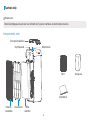
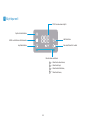
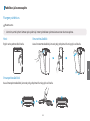
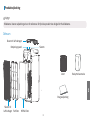
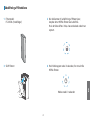
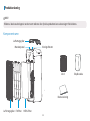
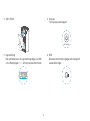
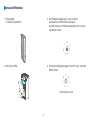
Component name
12
Air outlet grille
Operation panel Display screen
Air inlet grille Pre-Filter HEPA Filter
Host
Manual
Protective bag
12
Product Instruction

7
GB
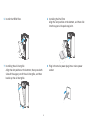
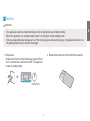
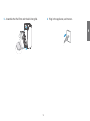
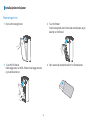
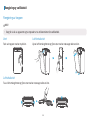
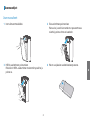
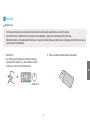
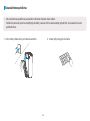
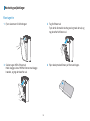
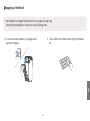
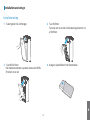
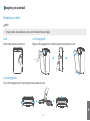
Installation steps
1 Remove the air inlet grille. 2 Taking out the Pre-Filter
Press down and pull the U-shaped snap joint, then
take out the Pre-Filter.
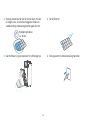
3 Taking out the HEPA filter
Hold both sides of the HEPA filter with both hands,
then take it out.
4 Remove the protective film from the filter assembly.
Installation Instructions

8
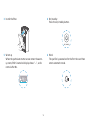
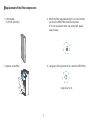
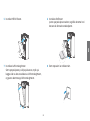
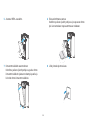
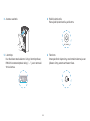
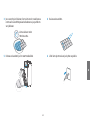
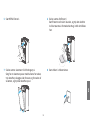
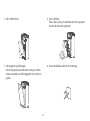
5 Install the HEPA filter. 6 Installing the Pre-Filter
Align the slot position at the bottom, and then click
into the upper U-shaped snap joint.
7 Installing the air inlet grille
Align the slot position at the bottom, then press both
sides of the upper part of the air inlet grille, and then
buckle up the air inlet grille.
8 Plug in the mains power plug into a mains power
socket.

9
GB
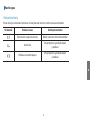
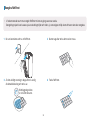
1 Control panel
Light sensing
function
CHILD LOCK
(Long press 3s)
AUTO MODETIMER
(Long press 3s to
reset the filter)
SLEEP MODESPEED ON/STANDBY
Child lock
Long press the
child lock for 3s
Timing button
Optional 1/2/4/8h
timing
On/standby button
The wind speed
buttons have low,
medium and high
wind.
Automatic mode
Adjusts the wind speed
automatically according
to the air quality.
Sleep mode
If PM2.5>50, make the wind slightly
larger to ensure purification eect;
If PM2.5<50, keep it in the mode of
extremely low noise.
Instructions

10
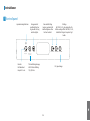
2 Display panel
ÿÿ
ÿÿ
ÿÿ
ÿÿ
PM2.5 numerical display
Timing function prompt
HEPA filter replacement prompt
Child lock prompt
Sleep mode prompt
Automatic mode prompt
Air quality indicator light
Air quality Excellent;
Blue
Green
Orange
Red
Air quality Good;
Air quality Medium;
Air quality Poor;

11
GB
3 Test Run
Attention
Ţ This appliance cannot be started normally until all air inlet grilles are installed correctly.
Ţ When this appliance is in standby mode, restart it, it will return to last working mode.
Ţ After an unexpected power outage such as if the mains plug was removed during use, the appliance will return to
the working mode it was in prior to the outage.
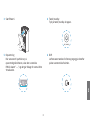
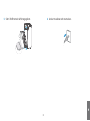
1 Preparation
Power on for the first time, the display panel will flash
for 1s, and then the screen will turn off. The appliance
is now in standby mode.
2 Remove the protective film of the filter assembly.
Flash for 1s

12
3 Install the filter. 4 On/standby
Press the on/standby button.
On/standby
5 Warm up
When the particulate matter sensor enters the warm-
up state, PM2.5 numerical display shows "---", and is
normal after 10s.
6 Work
The purifier is powered on for the first time and then
enters automatic mode.

13
GB
Body cleaning
Attention
Ţ Be sure to turn off before any maintenance, and remove the mains power plug from the mains power socket.
Host
Wipe the body with a soft towel.
Air inlet grille
Open the air inlet grille and vacuum up dust with a vacuum cleaner or wipe it
with a cloth.
Air outlet grille
Remove the air outlet grille and vacuum up dust with a vacuum cleaner or wipe it with a cloth.
Cleaning and Maintenance

14
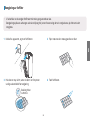
Ţ It is recommended to clean the Pre-Filter at least once every two weeks.
The cleaning cycle can be based on the usage environment and time, the more polluted the environment then it
should be cleaned more frequently.
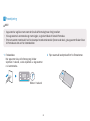
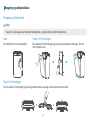
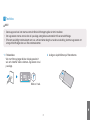
1 Unplug the appliance, and take out the Pre-Filter. 2 Vacuum up the dust or wipe it with a cloth.
3 If there is a lot of dirt, first soak in a diluted common
kitchen detergent and then do the cleaning.
4 Dry the Pre-Filter.
Soaking time is
about 10min.
Cleaning of Pre-Filter

15
GB
5 Assemble the Pre-Filter and the Air inlet grille. 6 Plug in the appliance, and turn on.

16
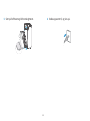
1 Filter model:
FC-35S1A (include 1)
2 When the filter replacement light is on, this reminds
you that the HEPA filter should be replaced.
If it is not replaced in time, the prompt will appear
every startup.
3 Replace a new filter 4 Long press timing button for 3s, reset the HEPA filter.
Long press for 3s
Replacement of the filter components

17
GB
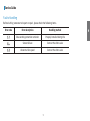
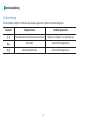
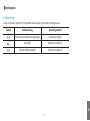
Service Guide
Faults Handling
Before inviting someone to inspect or repair, please check the following items.
Error code Error description Handling method
Disassembly protection reminder Properly installed inlet grille
Sensor failure Contact the after-sales
Abnormal fan speed Contact the after-sales

18
SPECIFICATION:
This symbol on the product or in the instructions means that your electrical and electronic
equipment should be disposed at the end of its life separately from your household waste.
There are separate collection systems for recycling in the EU.
For more information, please contact the local authority or your retailer where you purchased
Imported and Exclusively marketed by:
Power International AS,
PO Box 523, N-1471 Lørenskog, Norway
Power Norge:
https://www.power.no/kundeservice/
T: 21 00 40 00
Expert Danmark:
https://www.expert.dk/kundeservice/
T: 70 70 17 07
Power Danmark:
https://www.power.dk/kundeservice/
T: 70 33 80 80
the product.
Model: PO112CFN
Rated power: 50W
GB
Rated voltage: 220-240V~ 50Hz
Punkt 1 Danmark:
https://www.punkt1.dk/kundeservice/
T: 70 70 17 07
Expert Finland:
https://www.expert.fi/tuki/asiakaspalvelu/
T: 020 7100 670
Power Finland:
https://www.power.fi/tuki/asiakaspalvelu/
T: 0305 0305
Power Sverige:
https://www.power.se/kundservice/
T: 08 517 66 000
11


Sidan laddas...
Sidan laddas...
Sidan laddas...
Sidan laddas...
Sidan laddas...
Sidan laddas...
Sidan laddas...
Sidan laddas...
Sidan laddas...
Sidan laddas...
Sidan laddas...
Sidan laddas...
Sidan laddas...
Sidan laddas...
Sidan laddas...
Sidan laddas...
Sidan laddas...
Sidan laddas...
Sidan laddas...
Sidan laddas...
Sidan laddas...
Sidan laddas...
Sidan laddas...
Sidan laddas...
Sidan laddas...
Sidan laddas...
Sidan laddas...
Sidan laddas...
Sidan laddas...
Sidan laddas...
Sidan laddas...
Sidan laddas...
Sidan laddas...
Sidan laddas...
Sidan laddas...
Sidan laddas...
Sidan laddas...
Sidan laddas...
Sidan laddas...
Sidan laddas...
Sidan laddas...
Sidan laddas...
Sidan laddas...
Sidan laddas...
Sidan laddas...
Sidan laddas...
Sidan laddas...
Sidan laddas...
Sidan laddas...
Sidan laddas...
Sidan laddas...
Sidan laddas...
Sidan laddas...
Sidan laddas...
Sidan laddas...
Sidan laddas...
Sidan laddas...
Sidan laddas...
-
 1
1
-
 2
2
-
 3
3
-
 4
4
-
 5
5
-
 6
6
-
 7
7
-
 8
8
-
 9
9
-
 10
10
-
 11
11
-
 12
12
-
 13
13
-
 14
14
-
 15
15
-
 16
16
-
 17
17
-
 18
18
-
 19
19
-
 20
20
-
 21
21
-
 22
22
-
 23
23
-
 24
24
-
 25
25
-
 26
26
-
 27
27
-
 28
28
-
 29
29
-
 30
30
-
 31
31
-
 32
32
-
 33
33
-
 34
34
-
 35
35
-
 36
36
-
 37
37
-
 38
38
-
 39
39
-
 40
40
-
 41
41
-
 42
42
-
 43
43
-
 44
44
-
 45
45
-
 46
46
-
 47
47
-
 48
48
-
 49
49
-
 50
50
-
 51
51
-
 52
52
-
 53
53
-
 54
54
-
 55
55
-
 56
56
-
 57
57
-
 58
58
-
 59
59
-
 60
60
-
 61
61
-
 62
62
-
 63
63
-
 64
64
-
 65
65
-
 66
66
-
 67
67
-
 68
68
-
 69
69
-
 70
70
-
 71
71
-
 72
72
-
 73
73
-
 74
74
-
 75
75
-
 76
76
-
 77
77
-
 78
78


POINT POAP4010 LUFTRENSER Användarmanual
- Kategori
- Luftrenare
- Typ
- Användarmanual