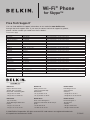
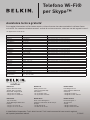
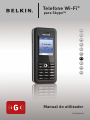
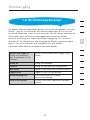
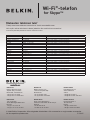
Belkin SKYPEPHONE #F1PP000GNFR Bruksanvisning
- Kategori
- Mobiltelefoner
- Typ
- Bruksanvisning


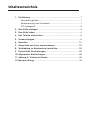
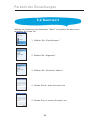
Table of Contents
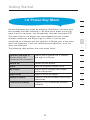
1. Introduction . . . . . . . . . . . . . . . . . . . . . . . . . . . . . . . . . . . . . 1
Package Checklist . . . . . . . . . . . . . . . . . . . . . . . . . . . . . . . .
1
Hardware Description . . . . . . . . . . . . . . . . . . . . . . . . . . . . . .
1
AC Power Charger . . . . . . . . . . . . . . . . . . . . . . . . . . . . . . . .
2
2. Installing the Battery. . . . . . . . . . . . . . . . . . . . . . . . . . . . . . 3
3. Charging the Battery . . . . . . . . . . . . . . . . . . . . . . . . . . . . . . 4
4. Powering On the Phone . . . . . . . . . . . . . . . . . . . . . . . . . . . .
5
5. Getting Started . . . . . . . . . . . . . . . . . . . . . . . . . . . . . . . . . .
6
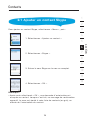
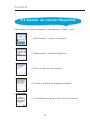
6. Contacts . . . . . . . . . . . . . . . . . . . . . . . . . . . . . . . . . . . . . . . 15
7. Make and Receive Calls . . . . . . . . . . . . . . . . . . . . . . . . . . . 20
8. Connect to Networks . . . . . . . . . . . . . . . . . . . . . . . . . . . . . 28
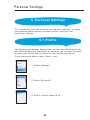
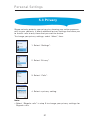
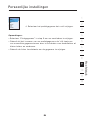
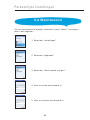
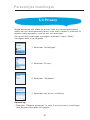
9. Personal Settings . . . . . . . . . . . . . . . . . . . . . . . . . . . . . . . 33
10. General Settings . . . . . . . . . . . . . . . . . . . . . . . . . . . . . . . . 38
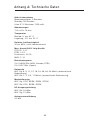
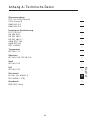
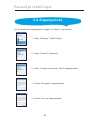
11. Appendix A: Specifications. . . . . . . . . . . . . . . . . . . . . . . . . 43
12. Compliances. . . . . . . . . . . . . . . . . . . . . . . . . . . . . . . . . . . . 45
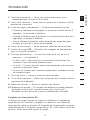
Table of Contents

2
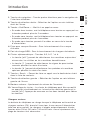
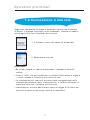
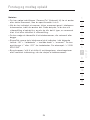
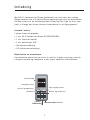
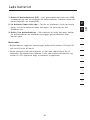
Introduction
1
2
1
The Wi-Fi Phone for Skype (the phone) enables you to use your normal
Skype account to make Skype calls without using a computer. This
affords you complete mobility, allowing you to talk from any location
from which you have an Internet connection through an access point.
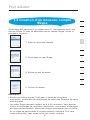
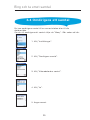
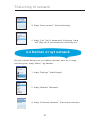
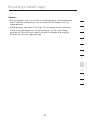
Package Checklist
The phone package includes these items:
• One Wi-Fi Phone for Skype (F1PP000GN-SK)
• One Lithium-Ion Battery
• One AC Power Charger
• Quick Start Guide
• User Guide CD
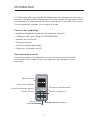
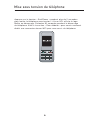
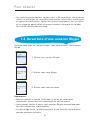
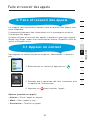
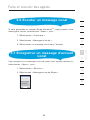
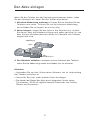
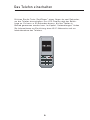
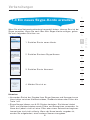
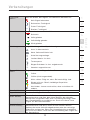
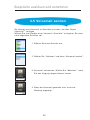
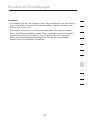
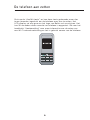
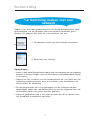
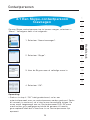
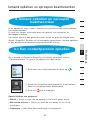
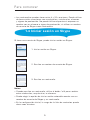
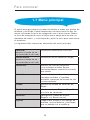
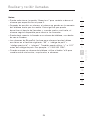
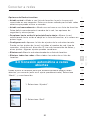
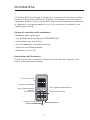
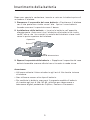
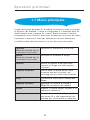
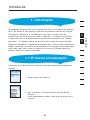
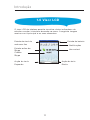
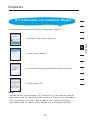
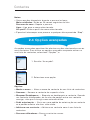
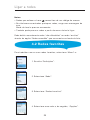
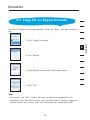
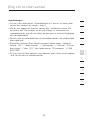
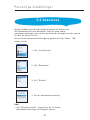
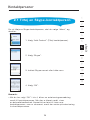
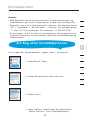
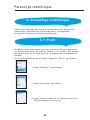
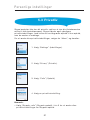
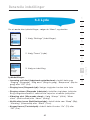
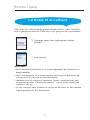
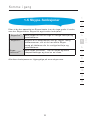
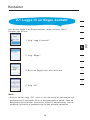
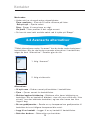
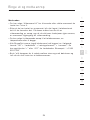
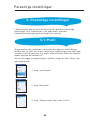
Hardware Description
Before preparing the phone for use, first become familiar with its main
keys, buttons, and other hardware features.
Volume Button
Navigation Key
Left Soft Key
Send Key
Charge Port
USB/Power
Right Soft Key
End/Power Key
Headset Jack

2
11
12
13
Introduction
2
2
1
3
4
5
6
7
8
9
10
section
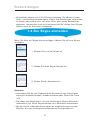
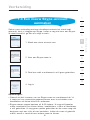
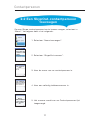
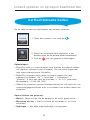
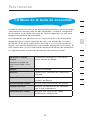
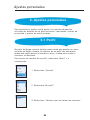
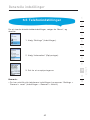
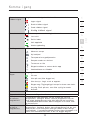
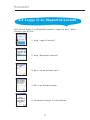
1. Navigation Key—Four-direction user-interface navigation key.
2. Right Soft Key—Selects the option at the bottom right corner of
the screen.
3. End/Power Key—Ends an active call.
• In OFF mode, turns the power on when held more than 2
seconds.
• In ON mode, turns the phone off when held for more than 4
seconds.
• In ON, press for two seconds to access the power-key menu.
4. Headset Jack—Jack for a headset connection.
5. USB/Power Charge Port—Power-charger connection for charging
the battery.
6. Alphanumeric Keypad—Includes 0–9, A–Z, *, and # keys.
• The [a/A *] key selects upper- or lowercase characters, numbers,
or hexadecimal characters.
• The [ 1 ] key selects common punctuation marks during text
input.
•
The [ # ] key selects special characters and symbols during text
input.
7. Send Key—Calls a selected contact.
8. Left Soft Key—Selects the option at the bottom left corner of the
screen.
9. Volume Button—Adjusts volume of the speaker.
10. Keypad Lock—The phone keypad can be locked by pressing the
left soft key together with the [a/A*] key. Pressing the two keys
again unlocks the keypad.
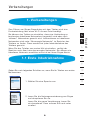
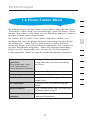
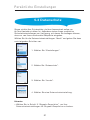
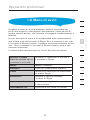
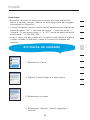
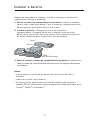
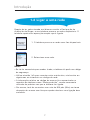
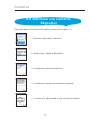
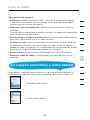
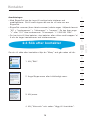
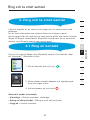
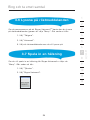
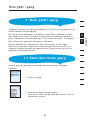
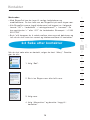
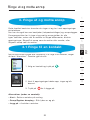
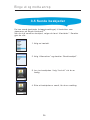
AC Power Charger
The phone charges its installed battery when connected to the AC
power charger, when the charger is connected to a power source
such as a wall outlet. The power charger automatically adjusts to any
voltage between 100–240 volts at 50 or 60 hertz. No voltage-range
settings are required.

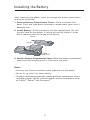
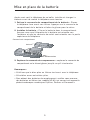
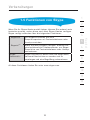
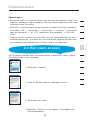
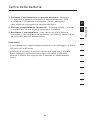
After unpacking the phone, install and charge the battery pack before
turning on the phone.
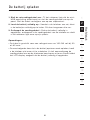
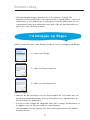
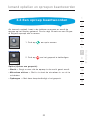
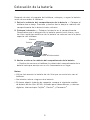
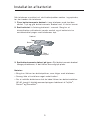
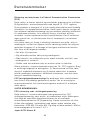
1. Remove Battery-Compartment Cover—Place the phone face
down. Push and slide down the battery-compartment cover until it
becomes free.
2.
Install Battery—Place the battery into the compartment. Be sure
the text label on the battery is facing out and the battery’s three
metal contacts point to the top of the phone.
3.
Replace Battery-Compartment Cover—Slide the battery-compartment
cover back onto the phone until it clicks firmly into place.
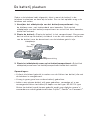
Notes:
• Use only the lithium-ion battery pack supplied with the phone.
• Do not try to install any other battery.
• To obtain replacement batteries, please purchase replacement lithium-
ion battery model: NP-60, used for digital cameras/camcorders made
by Fujifilm
®
, Pentax
®
, and Panasonic
®
.
3
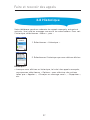
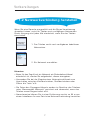
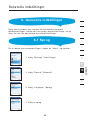
Installing the Battery
Cover
Battery
Power Port

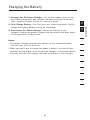
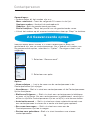
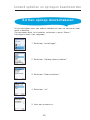
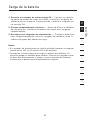
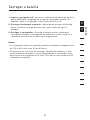
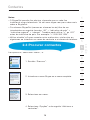
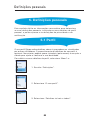
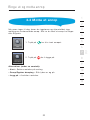
1. Connect the AC Power Charger—Lift up the rubber cover on the
mini-USB charger port and connect the power charger to the port.
Then, plug the charger into an AC electrical outlet.
2. Fully Charge Battery—For first-time use, allow three hours to fully
charge the battery before turning on the phone.
3.
Disconnect the Power Charger—When the battery is fully
charged, remove the power charger from the phone and push down
the charger port’s rubber cover.
Notes:
•
The power charger automatically adjusts to any voltage between
100–240 volts at 50 or 60 hertz.
• When you next have to charge the phone’s battery, you do not have
to power off the phone. Just connect the charger as described above
and wait until the LCD display indicates the battery is fully charged.
4
11
12
Charging the Battery
4
section
2
1
3
4
5
6
7
8
9
10
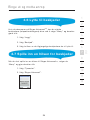
2

5
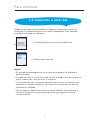
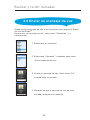
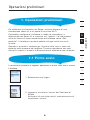
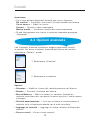
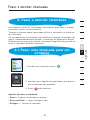
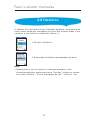
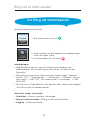
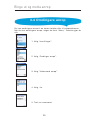
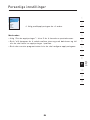
Powering On the Phone
Push and hold “End/Power” for more than two seconds to power on
the phone. The LCD display turns on showing the Belkin logo. Allow
30 seconds for the phone to start up. Go to the “Getting Started”
section to learn how to set up a Wi-Fi-network connection and start
using the phone.
5 6

11
12
13
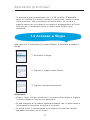
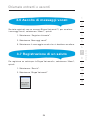
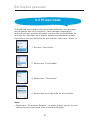
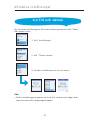
Getting Started
6
section
2
1
3
4
5
6
7
8
9
10
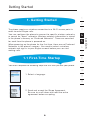
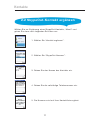
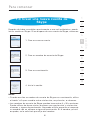
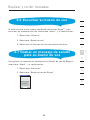
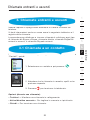
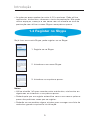
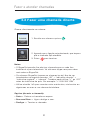
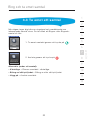
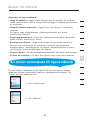
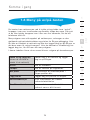
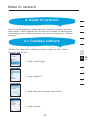
The phone requires a wireless connection to a Wi-Fi access point in
order to make Skype calls.
You can configure the phone to connect to specific wireless networks
or search for “open” networks. Wireless-network information is stored
in the phone’s memory as “Preferred Networks”. These are searched
for each time the phone is powered on.
When powering on the phone for the first time, there are no Preferred
Networks in the phone’s memory. You need to select a wireless
network and sign in to your Skype account before you can start
making calls.
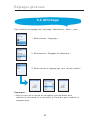
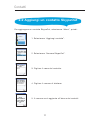
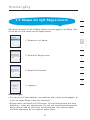
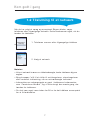
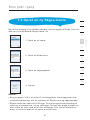
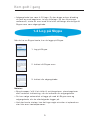
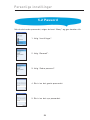
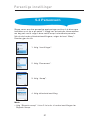
You must complete the following steps the first time you use your phone.
1. Select a language.
2. Read and accept the Skype Agreement.
Be sure to scroll down and read the entire
agreement before accepting.
6
4
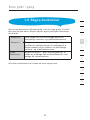
1. Getting Started
1.1 First-Time Startup

87
Getting Started
87
Getting Started
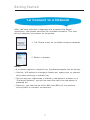
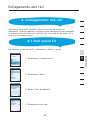
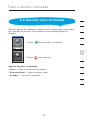
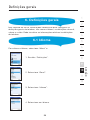
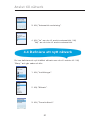
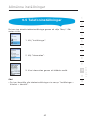
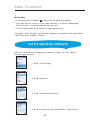
After you have selected a language and accepted the Skype
agreement, your phone searches for available networks. This also
occurs whenever you power on the phone.
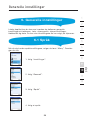
1. The Phone scans for available wireless networks.
2. Select a network.
Notes:
• If a network requires a security key, the phone prompts you for the key.
• Use the *a/A button to change to lowercase, uppercase, or numeric
entry when entering a network key.
• The access-key information is stored in the phone’s memory as a
“Preferred Network” and will be used the next time the phone is
powered on.
• Normally, you need to be within 300 feet (90m) of the wireless
access point to connect successfully.
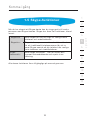
1.2 Connect to a Network

8
11
12
13
Getting Started
8
section
2
1
3
4
5
6
7
8
9
10
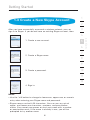
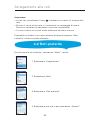
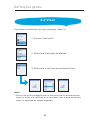
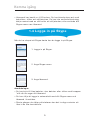
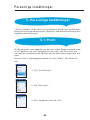
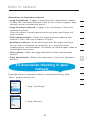
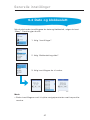
After you have successfully accessed a wireless network, you can
sign in to Skype. If you do not have an existing Skype account, then:
1. Create a new account.
2. Create a Skype name.
3. Create a password.
4. Sign in.
Notes:
• Use the *a/A button to change to lowercase, uppercase, or numeric
entry when entering your Skype name and password.
• Skype names can be 6–30 characters. You can use any mix of
upper- and lowercase characters, numbers, and punctuation
marks. You cannot use spaces or start your name with a number
or punctuation mark. If the name is already in use, you will be
prompted to try another name.
1.3 Create a New Skype Account

109
Getting Started
109
Getting Started
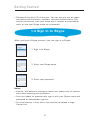
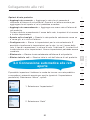
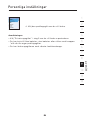
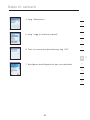
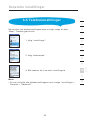
When you have a Skype account, you can sign in to Skype.
1. Sign in to Skype.
2. Enter your Skype name.
3. Enter your password.
Notes:
• Use the *a/A button to change to lowercase, uppercase, or numeric
entry when entering your password.
• You can choose to automatically sign in with your Skype name and
password on subsequent sign-ins.
• On initial startup, it may take a few minutes to upload a large
Contact list.
1.4 Sign In to Skype
• Passwords can be 4–20 characters. You can use any mix of upper-
and lowercase characters, numbers, and punctuation marks. You
cannot use spaces, start your name with a number or punctuation
mark, or use your Skype name as a password.

10
11
12
13
Getting Started
10
section
2
1
3
4
5
6
7
8
9
10
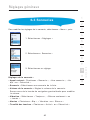
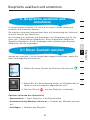
After you have created your Skype account, you can call other people
with Skype accounts for free. Skype also offers additional features,
including:
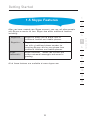
SkypeOut
TM
SkypeOut allows you to place calls to
traditional landline and mobile phones.
SkypeIn
TM
SkypeIn is a subscription feature that provides
you with a traditional phone number for
receiving Skype calls on your phone from
traditional landlines and mobile phones.
Skype
Voicemail
TM
Skype Voicemail
TM
allows you to send and
receive voicemail messages and record a
greeting.
All of these features are available at www.skype.com.
1.5 Skype Features

1211
Getting Started
1211
Getting Started
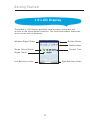
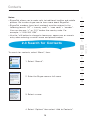
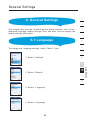
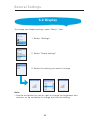
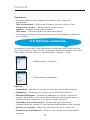
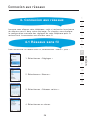
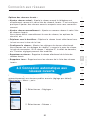
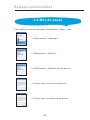
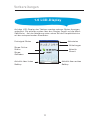
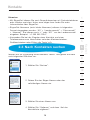
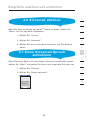
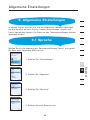
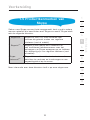
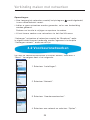
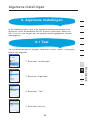
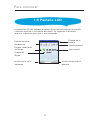
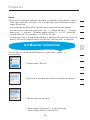
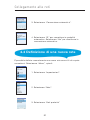
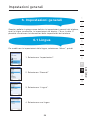
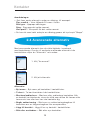
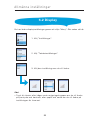
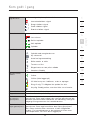
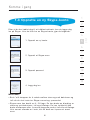
The phone’s LCD display provides various status indicators and
access to the menu-based interface. The illustration below shows the
main screen and its elements.
1.6 LCD Display
Left Soft Key Action
Skype Credit
Skype Online Status
Wireless-Signal Status
Current Time
Right Soft Key Action
Battery Status
Notifications

12
11
12
13
Getting Started
12
section
2
1
3
4
5
6
7
8
9
10
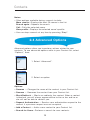
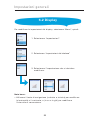
Wireless-Signal
Status
Indicates the strength of the wireless-network signal.
No detectable signal
Weak wireless signal
Good wireless signal
Strong wireless signal
Battery Status Indicates the status of the battery.
Low level
Partially charged
Fully charged
Charging
Notifications Displays notification icons.
Missed call
New voicemail
Authorization request
Silent mode is active
Keypad locked
Skype credit is close to expiry
Headset attached
Skype Online
Status
Indicates your current Skype online status.
Online
Offline (not signed in)
Do not Disturb. Indicates you are busy.
Skype Me. Available for calls from anyone.
Invisible. Still online, but unseen by others.
Current Time The currently set time.
Skype Credit Your current Skype-credit balance.
Left Soft Key
Action
The action that happens when you press the left soft key.
Typically, the left soft key selects the current menu item
or confirms a setting. From the main screen, it provides
access to the user menu.
Right Soft Key
Action
The action that happens when you press the right soft
key. Typically, the right soft key cancels the last action or
returns to the previous screen. From the main screen, it
provides access to your list of contacts once signed in.

1413
Getting Started
1413
Getting Started
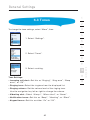
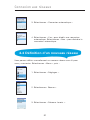
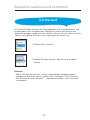
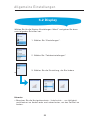
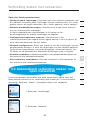
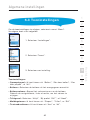
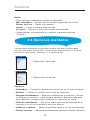
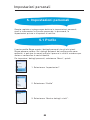
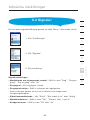
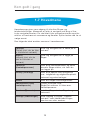
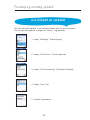
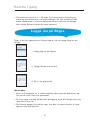
The main menu provides easy access to all of your Skype and phone
settings. The menus are easy to navigate using the 4-way navigation
key. Just move the navigation key up or down to highlight a menu
item, then push down on the key to select the item.
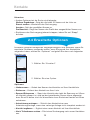
The following table outlines the main-menu items.
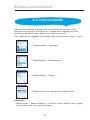
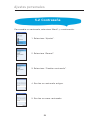
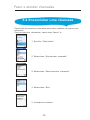
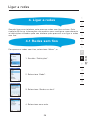
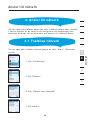
Connect
(Shown when not
connected to a network)
Allows you to connect to a network.
Sign In
(Shown when not
connected to a network)
Allows you to sign in to Skype.
Contacts Lists your contacts and their current
Skype status once you are signed in.
History Lists your missed calls, incoming
and outgoing calls, voicemail, and
authorizations.
Status Displays your Skype connection
status.
Add contact Adds a Skype or SkypeOut number to
your Contact list.
Services Sets up Skype credit, SkypeIn, and
voicemail.
Settings Provides access to Skype, wireless
network, and phone settings that can
be viewed or changed.
1.7 Main Menu

14
11
12
13
Getting Started
14
section
2
1
3
4
5
6
7
8
9
10
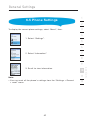
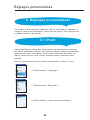
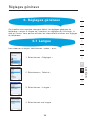
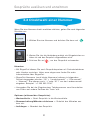
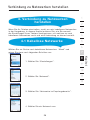
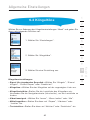
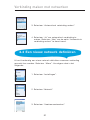
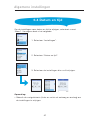
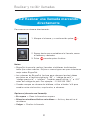
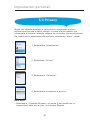
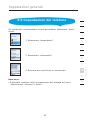
Access the power-key menu by pressing “End/Power” for more than
two seconds and then releasing it. Be sure not to press the key for
more than four seconds—this immediately switches the phone OFF.
The items listed in the power-key menu depend on your current
network connection and Skype sign-in status. If you are not
connected to a network and not signed in to Skype, only a few menu
items are displayed. If you are connected and signed in, all of the
items are displayed.
The following table outlines the main-menu items.
Connect and Sign In
(Shown when not
connected to a network)
Allows you to connect to a network
and sign in to Skype.
Switch off Powers off the phone.
Silent Sets the ringtone volume to off.
My Profile Allows you to change your Skype-
profile information.
Sign In/Out Signs in or out of Skype.
Network Details Displays wireless-network-connection
information.
Find/View Networks Displays a list of detected wireless
networks.
1.8 Power-Key Menu

1615
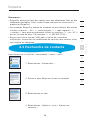
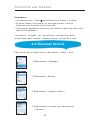
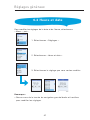
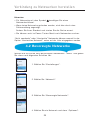
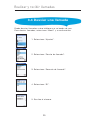
Contacts
1615
Contacts
Your Contact list displays all of the names to which you can make
calls. If you have an existing Skype account, your Contact list is
automatically downloaded when you sign in. If you are new to Skype
and have just created an account, your Contact list will be empty.
You will need to add contacts to your list.
Skype protects the privacy of users by requiring authorization on
names that you wish to add to your Contact list. When you add a
name to your list, an authorization request is sent to the user. The
user can accept or deny the request. When a request is accepted,
you can see when the contact is online and make calls to him or her.
You can also view his or her personal-profile details.
2. Contacts

16
11
12
13
Contacts
16
section
2
1
3
4
5
6
7
8
9
10
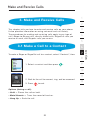
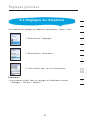
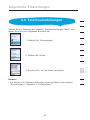
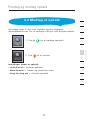
To add a Skype contact, select “Menu”, then:
1. Select “Add Contact”.
2. Select “Skype”.
3. Enter the Skype name or full name.
4. Select “OK”.
Note:
• After you select “OK” in step 4, an authorization request is sent
to the contact. When it has been sent, a confirmation message is
displayed. The name is added to your Contact list, but is grayed
out, pending authorization by the contact.
2.1 Add a Skype Contact

17
Contacts
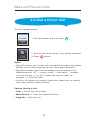
To add a SkypeOut contact, select “Menu”, then:
1. Select “Add Contact”.
2. Select “SkypeOut number”.
3. Enter contact’s name.
4. Enter full phone number.
5. The number is added to your contact list.
2.2 Add a SkypeOut Contact

11
12
13
Contacts
18
section
2
1
3
4
5
6
7
8
9
10
To search for contacts, select “Menu”, then:
1. Select “Search”.
2. Enter the Skype name or full name.
3. Select a name.
4. Select “Options” then select “Add to Contacts”.
2.3 Search for Contacts
Notes:
• SkypeOut allows you to make calls to traditional landline and mobile
phones. Go to www.skype.com to learn more about SkypeOut.
• SkypeOut numbers (even local numbers) must be entered in the
following format: “00” + “country code” + “area code” + “number”.
You can also use “+” or “011” before the country code. For
example: “+1 555 555 1234”.
• Use the *a/A button to change to lowercase, uppercase, or numeric
entry when entering a contact name and phone number.
Sidan laddas...
Sidan laddas...
Sidan laddas...
Sidan laddas...
Sidan laddas...
Sidan laddas...
Sidan laddas...
Sidan laddas...
Sidan laddas...
Sidan laddas...
Sidan laddas...
Sidan laddas...
Sidan laddas...
Sidan laddas...
Sidan laddas...
Sidan laddas...
Sidan laddas...
Sidan laddas...
Sidan laddas...
Sidan laddas...
Sidan laddas...
Sidan laddas...
Sidan laddas...
Sidan laddas...
Sidan laddas...
Sidan laddas...
Sidan laddas...
Sidan laddas...
Sidan laddas...
Sidan laddas...
Sidan laddas...
Sidan laddas...
Sidan laddas...
Sidan laddas...
Sidan laddas...
Sidan laddas...
Sidan laddas...
Sidan laddas...
Sidan laddas...
Sidan laddas...
Sidan laddas...
Sidan laddas...
Sidan laddas...
Sidan laddas...
Sidan laddas...
Sidan laddas...
Sidan laddas...
Sidan laddas...
Sidan laddas...
Sidan laddas...
Sidan laddas...
Sidan laddas...
Sidan laddas...
Sidan laddas...
Sidan laddas...
Sidan laddas...
Sidan laddas...
Sidan laddas...
Sidan laddas...
Sidan laddas...
Sidan laddas...
Sidan laddas...
Sidan laddas...
Sidan laddas...
Sidan laddas...
Sidan laddas...
Sidan laddas...
Sidan laddas...
Sidan laddas...
Sidan laddas...
Sidan laddas...
Sidan laddas...
Sidan laddas...
Sidan laddas...
Sidan laddas...
Sidan laddas...
Sidan laddas...
Sidan laddas...
Sidan laddas...
Sidan laddas...
Sidan laddas...
Sidan laddas...
Sidan laddas...
Sidan laddas...
Sidan laddas...
Sidan laddas...
Sidan laddas...
Sidan laddas...
Sidan laddas...
Sidan laddas...
Sidan laddas...
Sidan laddas...
Sidan laddas...
Sidan laddas...
Sidan laddas...
Sidan laddas...
Sidan laddas...
Sidan laddas...
Sidan laddas...
Sidan laddas...
Sidan laddas...
Sidan laddas...
Sidan laddas...
Sidan laddas...
Sidan laddas...
Sidan laddas...
Sidan laddas...
Sidan laddas...
Sidan laddas...
Sidan laddas...
Sidan laddas...
Sidan laddas...
Sidan laddas...
Sidan laddas...
Sidan laddas...
Sidan laddas...
Sidan laddas...
Sidan laddas...
Sidan laddas...
Sidan laddas...
Sidan laddas...
Sidan laddas...
Sidan laddas...
Sidan laddas...
Sidan laddas...
Sidan laddas...
Sidan laddas...
Sidan laddas...
Sidan laddas...
Sidan laddas...
Sidan laddas...
Sidan laddas...
Sidan laddas...
Sidan laddas...
Sidan laddas...
Sidan laddas...
Sidan laddas...
Sidan laddas...
Sidan laddas...
Sidan laddas...
Sidan laddas...
Sidan laddas...
Sidan laddas...
Sidan laddas...
Sidan laddas...
Sidan laddas...
Sidan laddas...
Sidan laddas...
Sidan laddas...
Sidan laddas...
Sidan laddas...
Sidan laddas...
Sidan laddas...
Sidan laddas...
Sidan laddas...
Sidan laddas...
Sidan laddas...
Sidan laddas...
Sidan laddas...
Sidan laddas...
Sidan laddas...
Sidan laddas...
Sidan laddas...
Sidan laddas...
Sidan laddas...
Sidan laddas...
Sidan laddas...
Sidan laddas...
Sidan laddas...
Sidan laddas...
Sidan laddas...
Sidan laddas...
Sidan laddas...
Sidan laddas...
Sidan laddas...
Sidan laddas...
Sidan laddas...
Sidan laddas...
Sidan laddas...
Sidan laddas...
Sidan laddas...
Sidan laddas...
Sidan laddas...
Sidan laddas...
Sidan laddas...
Sidan laddas...
Sidan laddas...
Sidan laddas...
Sidan laddas...
Sidan laddas...
Sidan laddas...
Sidan laddas...
Sidan laddas...
Sidan laddas...
Sidan laddas...
Sidan laddas...
Sidan laddas...
Sidan laddas...
Sidan laddas...
Sidan laddas...
Sidan laddas...
Sidan laddas...
Sidan laddas...
Sidan laddas...
Sidan laddas...
Sidan laddas...
Sidan laddas...
Sidan laddas...
Sidan laddas...
Sidan laddas...
Sidan laddas...
Sidan laddas...
Sidan laddas...
Sidan laddas...
Sidan laddas...
Sidan laddas...
Sidan laddas...
Sidan laddas...
Sidan laddas...
Sidan laddas...
Sidan laddas...
Sidan laddas...
Sidan laddas...
Sidan laddas...
Sidan laddas...
Sidan laddas...
Sidan laddas...
Sidan laddas...
Sidan laddas...
Sidan laddas...
Sidan laddas...
Sidan laddas...
Sidan laddas...
Sidan laddas...
Sidan laddas...
Sidan laddas...
Sidan laddas...
Sidan laddas...
Sidan laddas...
Sidan laddas...
Sidan laddas...
Sidan laddas...
Sidan laddas...
Sidan laddas...
Sidan laddas...
Sidan laddas...
Sidan laddas...
Sidan laddas...
Sidan laddas...
Sidan laddas...
Sidan laddas...
Sidan laddas...
Sidan laddas...
Sidan laddas...
Sidan laddas...
Sidan laddas...
Sidan laddas...
Sidan laddas...
Sidan laddas...
Sidan laddas...
Sidan laddas...
Sidan laddas...
Sidan laddas...
Sidan laddas...
Sidan laddas...
Sidan laddas...
Sidan laddas...
Sidan laddas...
Sidan laddas...
Sidan laddas...
Sidan laddas...
Sidan laddas...
Sidan laddas...
Sidan laddas...
Sidan laddas...
Sidan laddas...
Sidan laddas...
Sidan laddas...
Sidan laddas...
Sidan laddas...
Sidan laddas...
Sidan laddas...
Sidan laddas...
Sidan laddas...
Sidan laddas...
Sidan laddas...
Sidan laddas...
Sidan laddas...
Sidan laddas...
Sidan laddas...
Sidan laddas...
Sidan laddas...
Sidan laddas...
Sidan laddas...
Sidan laddas...
Sidan laddas...
Sidan laddas...
Sidan laddas...
Sidan laddas...
Sidan laddas...
Sidan laddas...
Sidan laddas...
Sidan laddas...
Sidan laddas...
Sidan laddas...
Sidan laddas...
Sidan laddas...
Sidan laddas...
Sidan laddas...
Sidan laddas...
Sidan laddas...
Sidan laddas...
Sidan laddas...
Sidan laddas...
Sidan laddas...
Sidan laddas...
Sidan laddas...
Sidan laddas...
Sidan laddas...
Sidan laddas...
Sidan laddas...
Sidan laddas...
Sidan laddas...
Sidan laddas...
Sidan laddas...
Sidan laddas...
Sidan laddas...
Sidan laddas...
Sidan laddas...
Sidan laddas...
Sidan laddas...
Sidan laddas...
Sidan laddas...
Sidan laddas...
Sidan laddas...
Sidan laddas...
Sidan laddas...
Sidan laddas...
Sidan laddas...
Sidan laddas...
Sidan laddas...
Sidan laddas...
Sidan laddas...
Sidan laddas...
Sidan laddas...
Sidan laddas...
Sidan laddas...
Sidan laddas...
Sidan laddas...
Sidan laddas...
Sidan laddas...
Sidan laddas...
Sidan laddas...
Sidan laddas...
Sidan laddas...
Sidan laddas...
Sidan laddas...
Sidan laddas...
Sidan laddas...
Sidan laddas...
Sidan laddas...
Sidan laddas...
Sidan laddas...
Sidan laddas...
Sidan laddas...
Sidan laddas...
Sidan laddas...
Sidan laddas...
Sidan laddas...
Sidan laddas...
Sidan laddas...
Sidan laddas...
Sidan laddas...
Sidan laddas...
Sidan laddas...
Sidan laddas...
Sidan laddas...
Sidan laddas...
Sidan laddas...
Sidan laddas...
Sidan laddas...
Sidan laddas...
Sidan laddas...
Sidan laddas...
Sidan laddas...
Sidan laddas...
Sidan laddas...
Sidan laddas...
Sidan laddas...
Sidan laddas...
Sidan laddas...
Sidan laddas...
Sidan laddas...
Sidan laddas...
Sidan laddas...
Sidan laddas...
Sidan laddas...
Sidan laddas...
Sidan laddas...
Sidan laddas...
Sidan laddas...
Sidan laddas...
Sidan laddas...
Sidan laddas...
Sidan laddas...
Sidan laddas...
Sidan laddas...
Sidan laddas...
Sidan laddas...
Sidan laddas...
Sidan laddas...
Sidan laddas...
Sidan laddas...
Sidan laddas...
Sidan laddas...
Sidan laddas...
Sidan laddas...
Sidan laddas...
Sidan laddas...
Sidan laddas...
Sidan laddas...
Sidan laddas...
Sidan laddas...
Sidan laddas...
Sidan laddas...
Sidan laddas...
Sidan laddas...
Sidan laddas...
Sidan laddas...
Sidan laddas...
Sidan laddas...
Sidan laddas...
Sidan laddas...
Sidan laddas...
Sidan laddas...
Sidan laddas...
Sidan laddas...
Sidan laddas...
Sidan laddas...
Sidan laddas...
Sidan laddas...
Sidan laddas...
Sidan laddas...
Sidan laddas...
Sidan laddas...
Sidan laddas...
Sidan laddas...
Sidan laddas...
Sidan laddas...
Sidan laddas...
Sidan laddas...
Sidan laddas...
Sidan laddas...
Sidan laddas...
Sidan laddas...
Sidan laddas...
Sidan laddas...
Sidan laddas...
Sidan laddas...
Sidan laddas...
Sidan laddas...
Sidan laddas...
Sidan laddas...
Sidan laddas...
Sidan laddas...
Sidan laddas...
Sidan laddas...
Sidan laddas...
Sidan laddas...
Sidan laddas...
-
 1
1
-
 2
2
-
 3
3
-
 4
4
-
 5
5
-
 6
6
-
 7
7
-
 8
8
-
 9
9
-
 10
10
-
 11
11
-
 12
12
-
 13
13
-
 14
14
-
 15
15
-
 16
16
-
 17
17
-
 18
18
-
 19
19
-
 20
20
-
 21
21
-
 22
22
-
 23
23
-
 24
24
-
 25
25
-
 26
26
-
 27
27
-
 28
28
-
 29
29
-
 30
30
-
 31
31
-
 32
32
-
 33
33
-
 34
34
-
 35
35
-
 36
36
-
 37
37
-
 38
38
-
 39
39
-
 40
40
-
 41
41
-
 42
42
-
 43
43
-
 44
44
-
 45
45
-
 46
46
-
 47
47
-
 48
48
-
 49
49
-
 50
50
-
 51
51
-
 52
52
-
 53
53
-
 54
54
-
 55
55
-
 56
56
-
 57
57
-
 58
58
-
 59
59
-
 60
60
-
 61
61
-
 62
62
-
 63
63
-
 64
64
-
 65
65
-
 66
66
-
 67
67
-
 68
68
-
 69
69
-
 70
70
-
 71
71
-
 72
72
-
 73
73
-
 74
74
-
 75
75
-
 76
76
-
 77
77
-
 78
78
-
 79
79
-
 80
80
-
 81
81
-
 82
82
-
 83
83
-
 84
84
-
 85
85
-
 86
86
-
 87
87
-
 88
88
-
 89
89
-
 90
90
-
 91
91
-
 92
92
-
 93
93
-
 94
94
-
 95
95
-
 96
96
-
 97
97
-
 98
98
-
 99
99
-
 100
100
-
 101
101
-
 102
102
-
 103
103
-
 104
104
-
 105
105
-
 106
106
-
 107
107
-
 108
108
-
 109
109
-
 110
110
-
 111
111
-
 112
112
-
 113
113
-
 114
114
-
 115
115
-
 116
116
-
 117
117
-
 118
118
-
 119
119
-
 120
120
-
 121
121
-
 122
122
-
 123
123
-
 124
124
-
 125
125
-
 126
126
-
 127
127
-
 128
128
-
 129
129
-
 130
130
-
 131
131
-
 132
132
-
 133
133
-
 134
134
-
 135
135
-
 136
136
-
 137
137
-
 138
138
-
 139
139
-
 140
140
-
 141
141
-
 142
142
-
 143
143
-
 144
144
-
 145
145
-
 146
146
-
 147
147
-
 148
148
-
 149
149
-
 150
150
-
 151
151
-
 152
152
-
 153
153
-
 154
154
-
 155
155
-
 156
156
-
 157
157
-
 158
158
-
 159
159
-
 160
160
-
 161
161
-
 162
162
-
 163
163
-
 164
164
-
 165
165
-
 166
166
-
 167
167
-
 168
168
-
 169
169
-
 170
170
-
 171
171
-
 172
172
-
 173
173
-
 174
174
-
 175
175
-
 176
176
-
 177
177
-
 178
178
-
 179
179
-
 180
180
-
 181
181
-
 182
182
-
 183
183
-
 184
184
-
 185
185
-
 186
186
-
 187
187
-
 188
188
-
 189
189
-
 190
190
-
 191
191
-
 192
192
-
 193
193
-
 194
194
-
 195
195
-
 196
196
-
 197
197
-
 198
198
-
 199
199
-
 200
200
-
 201
201
-
 202
202
-
 203
203
-
 204
204
-
 205
205
-
 206
206
-
 207
207
-
 208
208
-
 209
209
-
 210
210
-
 211
211
-
 212
212
-
 213
213
-
 214
214
-
 215
215
-
 216
216
-
 217
217
-
 218
218
-
 219
219
-
 220
220
-
 221
221
-
 222
222
-
 223
223
-
 224
224
-
 225
225
-
 226
226
-
 227
227
-
 228
228
-
 229
229
-
 230
230
-
 231
231
-
 232
232
-
 233
233
-
 234
234
-
 235
235
-
 236
236
-
 237
237
-
 238
238
-
 239
239
-
 240
240
-
 241
241
-
 242
242
-
 243
243
-
 244
244
-
 245
245
-
 246
246
-
 247
247
-
 248
248
-
 249
249
-
 250
250
-
 251
251
-
 252
252
-
 253
253
-
 254
254
-
 255
255
-
 256
256
-
 257
257
-
 258
258
-
 259
259
-
 260
260
-
 261
261
-
 262
262
-
 263
263
-
 264
264
-
 265
265
-
 266
266
-
 267
267
-
 268
268
-
 269
269
-
 270
270
-
 271
271
-
 272
272
-
 273
273
-
 274
274
-
 275
275
-
 276
276
-
 277
277
-
 278
278
-
 279
279
-
 280
280
-
 281
281
-
 282
282
-
 283
283
-
 284
284
-
 285
285
-
 286
286
-
 287
287
-
 288
288
-
 289
289
-
 290
290
-
 291
291
-
 292
292
-
 293
293
-
 294
294
-
 295
295
-
 296
296
-
 297
297
-
 298
298
-
 299
299
-
 300
300
-
 301
301
-
 302
302
-
 303
303
-
 304
304
-
 305
305
-
 306
306
-
 307
307
-
 308
308
-
 309
309
-
 310
310
-
 311
311
-
 312
312
-
 313
313
-
 314
314
-
 315
315
-
 316
316
-
 317
317
-
 318
318
-
 319
319
-
 320
320
-
 321
321
-
 322
322
-
 323
323
-
 324
324
-
 325
325
-
 326
326
-
 327
327
-
 328
328
-
 329
329
-
 330
330
-
 331
331
-
 332
332
-
 333
333
-
 334
334
-
 335
335
-
 336
336
-
 337
337
-
 338
338
-
 339
339
-
 340
340
-
 341
341
-
 342
342
-
 343
343
-
 344
344
-
 345
345
-
 346
346
-
 347
347
-
 348
348
-
 349
349
-
 350
350
-
 351
351
-
 352
352
-
 353
353
-
 354
354
-
 355
355
-
 356
356
-
 357
357
-
 358
358
-
 359
359
-
 360
360
-
 361
361
-
 362
362
-
 363
363
-
 364
364
-
 365
365
-
 366
366
-
 367
367
-
 368
368
-
 369
369
-
 370
370
-
 371
371
-
 372
372
-
 373
373
-
 374
374
-
 375
375
-
 376
376
-
 377
377
-
 378
378
-
 379
379
-
 380
380
-
 381
381
-
 382
382
-
 383
383
-
 384
384
-
 385
385
-
 386
386
-
 387
387
-
 388
388
-
 389
389
-
 390
390
-
 391
391
-
 392
392
-
 393
393
-
 394
394
-
 395
395
-
 396
396
-
 397
397
-
 398
398
-
 399
399
-
 400
400
-
 401
401
-
 402
402
-
 403
403
-
 404
404
-
 405
405
-
 406
406
-
 407
407
-
 408
408
-
 409
409
-
 410
410
-
 411
411
-
 412
412
-
 413
413
-
 414
414
-
 415
415
-
 416
416
-
 417
417
-
 418
418
-
 419
419
-
 420
420
-
 421
421
-
 422
422
-
 423
423
-
 424
424
-
 425
425
-
 426
426
-
 427
427
-
 428
428
-
 429
429
-
 430
430
-
 431
431
-
 432
432
-
 433
433
-
 434
434
-
 435
435
-
 436
436
-
 437
437
-
 438
438
-
 439
439
-
 440
440
-
 441
441
-
 442
442
-
 443
443
-
 444
444
-
 445
445
-
 446
446
-
 447
447
-
 448
448
-
 449
449
-
 450
450
-
 451
451
-
 452
452
-
 453
453
-
 454
454
-
 455
455
-
 456
456
-
 457
457
-
 458
458
-
 459
459
-
 460
460
-
 461
461
-
 462
462
-
 463
463
-
 464
464
-
 465
465
-
 466
466
-
 467
467
-
 468
468
-
 469
469
-
 470
470
-
 471
471
-
 472
472
-
 473
473
-
 474
474
-
 475
475
-
 476
476
-
 477
477
-
 478
478
-
 479
479
-
 480
480
-
 481
481
-
 482
482
-
 483
483
-
 484
484
-
 485
485
-
 486
486
-
 487
487
-
 488
488
-
 489
489
-
 490
490


Belkin SKYPEPHONE #F1PP000GNFR Bruksanvisning
- Kategori
- Mobiltelefoner
- Typ
- Bruksanvisning
på andra språk
- italiano: Belkin SKYPEPHONE #F1PP000GNFR Manuale del proprietario
- español: Belkin SKYPEPHONE #F1PP000GNFR El manual del propietario
- Deutsch: Belkin SKYPEPHONE #F1PP000GNFR Bedienungsanleitung
- português: Belkin SKYPEPHONE #F1PP000GNFR Manual do proprietário
- français: Belkin SKYPEPHONE #F1PP000GNFR Le manuel du propriétaire
- English: Belkin SKYPEPHONE #F1PP000GNFR Owner's manual
- dansk: Belkin SKYPEPHONE #F1PP000GNFR Brugervejledning
- Nederlands: Belkin SKYPEPHONE #F1PP000GNFR de handleiding
Relaterade papper
Andra dokument
-
Topcom Cell Phone 6000 Användarmanual
-
Sony CMU-BR100 Användarmanual
-
Philips VOIP0801B/10 Användarmanual
-
-
Philips VOIP1211S/01 Användarmanual
-
LG KS20.AHKEBK Användarmanual
-
Philips VOIP8411B/01 Snabbstartsguide
-
Hyundai HDT-H15 Användarmanual
-
Doro 341gsm Datablad
-