Hyundai HDT-H15 Användarmanual
- Kategori
- Telefoner
- Typ
- Användarmanual

Users Manual
Bruksanvisning
Hyundai HDT-H15
English
Svenska

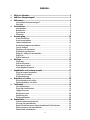
Table of Content
Svensk manual, se sidan 35
1 Environment and Safety............................................................................... 4
2 What’s in the Box?........................................................................................ 6
3 Welcome......................................................................................................... 6
How to use this user guide?........................................................................ 6
Need more help? ........................................................................................ 6
4 About your phone..........................................................................................8
The handset ................................................................................................ 8
The base ..................................................................................................... 9
The icons..................................................................................................... 9
The menus .................................................................................................. 9
5 Getting Started.............................................................................................11
Connecting your phone............................................................................. 11
Connecting your chargers......................................................................... 11
Charging your handset.............................................................................. 11
Checking the battery level......................................................................... 12
What is standby mode? ............................................................................ 12
Setting Your Phone’s Country .................................................................. 12
Registering your handset.......................................................................... 12
Checking the signal strength..................................................................... 13
Switching your handset on/off................................................................... 13
Setting the Time ........................................................................................ 14
Setting the Time Format ........................................................................... 14
6 Call................................................................................................................. 15
Making a call ............................................................................................. 15
Ending a call.............................................................................................. 16
Answering a call........................................................................................ 16
During a call .............................................................................................. 17
7 Intercom and Conference Calls................................................................. 19
Calling another handset............................................................................ 19
Transferring a call...................................................................................... 19
Making a conference call .......................................................................... 19
8 Text and Numbers....................................................................................... 20
Entering text and numbers........................................................................ 20
Erasing text and numbers......................................................................... 20
9 Phonebook...................................................................................................22
Viewing the phonebook ............................................................................ 22
Calling from the phonebook...................................................................... 22
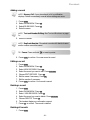
Adding a record......................................................................................... 23
Editing a record......................................................................................... 23
Deleting a record....................................................................................... 23
Deleting all records ................................................................................... 23
10 Call Log......................................................................................................... 25
Viewing the call records ............................................................................ 25
Making a call ............................................................................................. 25
Saving a call record to your phonebook ................................................... 25
Deleting a call record ................................................................................ 25
Deleting all records ................................................................................... 25
-2-

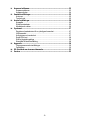
11 Custom Options........................................................................................... 27
Personalizing your phone’s display .......................................................... 27
Personalizing your handset’s sounds....................................................... 28
12 Calling Features........................................................................................... 29
Auto answer .............................................................................................. 29
Dial mode .................................................................................................. 29
Recall selection ......................................................................................... 29
13 Extra Features.............................................................................................. 30
Keypad lock............................................................................................... 30
Missing handset(s).................................................................................... 30
Voicemail indication .................................................................................. 30
14 The System...................................................................................................31
Registering your handset with additional base......................................... 31
Selecting a base unit................................................................................. 31
Deleting a handset .................................................................................... 31
Changing the system PIN......................................................................... 32
Setting low radiation mode........................................................................ 32
Resetting to default settings...................................................................... 32
15 Appendix ......................................................................................................34
Default (pre-programmed) settings........................................................... 34
Troubleshooting ........................................................................................ 34
16 Conformance to regulation........................................................................ 35
17 Service..........................................................................................................35
-3-

ENVIRONMENT AND SAFETY
IMPORTANT
This product is not designed for making emergency telephone calls when the power fails.
Alternative arrangements should be made for access to emergency services.
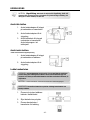
Power requirements
This product requires an electrical supply of 220-240 volts, single-phase alternating current,
excluding IT installations defined in standard EN 60950.
CAUTION: The electrical network is classified as dangerous according to
criteria in the standard EN 60950. The only way to power down this product is by
unplugging the power supply from the electrical outlet. Ensure the electrical
outlet is located close to the apparatus and is always easily accessible.
Handset Charger Adapter
Input: 230VAC 50Hz
Output: 6VDC 150mA
Base Unit Adapter
Input: 230VAC 50Hz
Output: 6VDC 300mA
CAUTION: Use only the mains adapter supplied with this equipment. Incorrect
adapter polarity or voltage can seriously damage the unit.
Battery requirements
The handset requires power source of two rechargeable NiMH batteries, size AAA 1.2V 750mAh
(HR10/44).
WARNING: RISK OF EXPLOSION IF BATTERY IS REPLACED BY AN
INCORRECT TYPE. Never use non-rechargeable batteries. Use recommended
type supplied with this product. NiMH batteries must be disposed of in
accordance with the a
pp
licable waste dis
p
osal re
g
ulations.
Telephone connections
The voltage on the network is classified as TNV-3 (Telecommunication Network Voltages, as
defined in the standard EN 60950). Following a power cut, the call in progress as well as the date
and time settings is lost.
Hearing aid
Please note that this telephone works by sending radio signals between the base unit and
the handset. These signals may interfere with some hearing aids, causing a humming noise.
Safety precautions
• Do not allow the handset to come into contact with liquids or moisture.
• Do not open the handset, base unit or charger. This could expose you to high voltages.
• Do not allow the charging contacts or the battery to come into contact with conductive
materials.
• There is a slight chance that your product could be damaged by an electrical storm. We
recommend that you unplug the product from the power supply and telephone socket during
a storm.
• Do not use the handset in an explosive hazard area such as where there is gas leaking.
• It is recommended that this product is not used near intensive care medical equipments or
by persons with pacemakers.
-4-

Environment and Safety
• This product can interfere with electrical equipment such as answering machine,
television, radio, and computers if placed too close. We recommend that you position the
base unit at least one meter from such appliances.
Environmental
Remember to observe the local regulations regarding the disposal of your packaging
materials, exhausted batteries, and old equipments. Promote their recycling where possible.
- 5 -

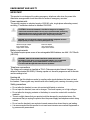
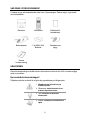
WHAT’S IN THE BOX?
Make sure you have all these items in the box. For missing item(s), contact your dealer.
Base Unit Handset x 1 Handset Battery
Cover x 1
Base Power
Adapter
NiMH AAA Battery
x 2
Telephone Line
Cord x 1
This User Guide
WELCOME
This user guide provides you with information and instruction you need to get the most from
your phone.
How to use this user guide?
The following symbols are used to alert you on important information.
•
Warning: Critical information for
preventing personal injury.
• Caution: Critical information for
preventing damage on the product.
• Tip: Information for easier
operation.
•
Note: Explanatory or critical
information for carrying out an
operation correctly.
Need more help?
• See the Troubleshooting section in this user guide on page 34.
-6-

• Call the Helpline at +46 31 260021
• Visit our online help www.ondico.se
- 7 -

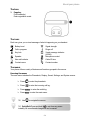
ABOUT YOUR PHONE
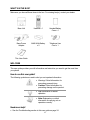
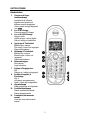
The handset
1 Left & Right Soft keys
Use to perform function displayed
above the key. It is displayed as
text in a shaded box (i.e. MENU) in
this user guide.
2 Talk key & Recall key
Make and receive calls
Send a flash signal
3 End & On/Off key
End current call
Exit menu / operation
Turn handset on/ off
4 Up Navigation & Phonebook
key
Scroll up menu items
Increase ringer and receiver
volume
Enter phonebook record review
5 Down Navigation &
Phonebook key
Scroll down menu items
Reduce ringer and receiver
volume.
Enter phonebook record review
6 Digit keys
Dial digits
Enter characters
7 Star & Ringer Off key
Dial *
Turn ringer on / off
8 Pound, Keylock, & Pause key
Dial #
Enter a pause
Lock / unlock keypad
9 Speaker key
Turn the speaker on / off
1
0
Intercom key
Make intercom call
Start conference call
1
1
Call Log key
Enter incoming call log
-8-

About your phone
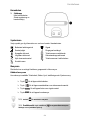
The base
1 Page key
Find handset(s)
Enter registration mode
The icons
Each icon gives you a visual message of what is happening on your handset.
Battery level Signal strength
Call in progress
Ringer off
Key lock Visual message indicator
(VMWI)
Speaker Microphone muted
New call indicator
Caller ID time
Contact name
Contact number
The menus
Your phone offers a variety of features and functions grouped in the menus.
Browsing the menus
The main menu includes the Phonebook, Display, Sound, Settings, and System menus.
¾ Press to enter the phonebook.
¾ Press
to enter the incoming call log.
¾ Press REDIAL to enter the redial log.
¾ Press MENU to enter the main menu.
TIP: Use to navi
g
ate the menus.
TIP: Quick Exit. Press and hold to exit from any menu
instantl
y
. All unconfirmed chan
g
es will not be saved.
- 9 -

About your phone
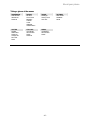
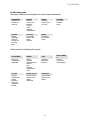
Taking a glance at the menus
PHONEBOOK DISPLAY SOUND SETTINGS
View Records
Add Record
Delete All
Set Time
Time Format
Backlight*
Contrast
Colour
Wallpaper
Handset Name
HS Ringer
HS Key Tones
HS Tones
Auto Answer
Dial Mode
Recall
SYSTEM CALL LOG REDIAL
Register
Select Base
Delete HS
Change PIN
RF Power
Reset
Use Number
Save Number
Delete
Delete All
Use Number
Save Number
Delete
- 10 -

GETTING STARTED
NOTE: Low Radiation Mode. Your phone is designed with a low-
radiation mechanism; therefore the antenna switches off
automatically in standby mode and will not emit any radiation. To
turn on this feature
,
see
p
a
g
e 31.
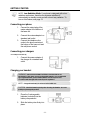
Connecting your phone
1.
2.
3.
Connect the output plug of the
mains adapter to the bottom of
the base unit.
Connect the mains adapter to a
standard wall outlet.
Connect the telephone line
cords to the phone sockets at
the bottom of the base unit and
the wall phone socket.
Connecting your chargers
* For multi-pack customer only
1. Connect the power adapter of
the charger to a standard wall
outlet.
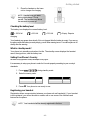
Charging your handset
WARNING: RISK OF EXPLOSION IF BATTERY IS REPLACED BY AN
INCORRECT TYPE. Never use non-rechargeable batteries. Use recommended
type supplied with this product. NiMH batteries must be disposed of in
accordance with the a
pp
licable waste dis
p
osal re
g
ulations.
NOTE: Charge the handset(s) for 14 hours before initial use!
CAUTION: Check the batteries polarity when inserting the batteries. Incorrect
polarity may damage the product.
1.
2.
Place the 2 rechargeable
batteries (included) into the
battery compartment.
Slide the battery door firmly into
place.
-11-

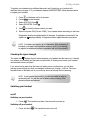
Getting started
3 se . Place the handset on the ba
unit or charger for charging.
l
icon displays the current battery level.
NOTE: Handset may get warm
during initial charge. This is
ay take a normal. The handset m
few seconds to
p
ower u
p
.
Checking the battery evel
The battery
= 100% full = 60% full = 30% full = Empty. Require
charging.
Your handset may power down
the phone while the battery is ne
shortly if it is not charged after the battery is empty. If you are on
arly empty, you will hear warning tones. Your call maybe cut off
it is idle. The standby screen displays the handset
nly applicable to model(s) with multiple-country support.
It is necessa ur phone in ly according to your country’s
standards.
shortly after the warning.
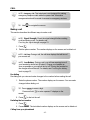
What is standby mode?
Your phone is in standby mode when
name, the signal icon, and the battery icon.
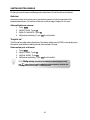
Setting Your Phone’s Country
This feature is o
ry to setup yo order for it to work proper
1. NU Press ME during andby
2. country code.
st mode.
Enter the
Country Code Country Code
3. Press OK. Your phone is now ready to use.
Registering your handset
Registration allows communication between your base unit and handset(s). If your handset
is not registered, y nctions and
feature
ou will not be able to make a call or use some of the
n the phone.
fu
s o
NOTE: Your handset shall be already registered in the box.
- 12 -

Getting started
To register nd Registering your handset with
additional b
EGISTERED, follow the steps below
to register y
1.
your ha set to an additional base unit, see
et displays
UNR
ase on page 31. If your hands
our handset.
Press
on the base unit for 4 seconds.
2. Press MENU on the handset.
3. Select SYSTEM. Press OK.
4. Select REGISTER. Press OK.
5. Use to select the base number you want.
Enter the sy (Pre-set: 0000). Your handset starts searching for the base.
6. stem PIN
ccessful, the
Registration shall be completed within 30 seconds. If registration is su
signal icon
displays steadily. If registration failed, repeat the above procedure.
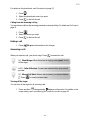
th
hecking the signal streng
NOTE: Your base can register up to 4 handsets. After registering 4
registration memory is full. If you attempt
handsets, your base unit
to register an additional handset, registration will not be successful.
C
The signal icon displays the link status between your handset and the base unit. A s
icon means your handset and the base unit are linked. A flashing icon means your handset
and the base unit are not linked.
teady
If you move too far a will hear
warning to . Take your
handset cl arning.
way from the base unit while you are on the phone, you
nes notifying you that your handset is almost out of range – lost link
oser to the base unit or your call may be cut off shortly after the w
Switch
ing your handset
on/off
1. Press
NOTE:
receive any call. You
If your handset has lost link, you will not be able to make or
will also not be able to carry out many of the
phone functions and features.
Switching on your handset
. The handset may take a few seconds to power up.
Switching
. ld
off your handset
Press and ho 1 . The handset’s screen turns off.
- 13 -

Getting started
NOTE: Your handset cannot receive any call if the power is
switched off.
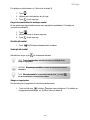
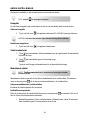
Setting the Time
1. Press MENU.
2. Select DISPLAY. Press OK.
3. Select S
4.
ET TIME. Press OK.
Use to adjust the hour.
Press NEXTT
5.
to edit the minute.
Use to adjust the minute.
If the clock is in 12-hour format, press NEXT to edit AM/PM.
hour format, go to step 6.
6.
If the clock is in 24-
Use
to adju tting. st the AM/PM se
7.
Setting th
Press OK. The clock is updated.
e Time Format
1. Press MENU.
2. Select DISPLAY. Press OK.
3. Select TIME FORMAT. Press OK.
4. Select the new setting. Press OK. The new setting is saved.
- 14 -

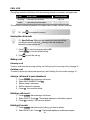
CALL
NOTE: Emergency Call. This telephone is not designed for making
emergency telephone calls when the power fails. Alternative
arran
g
ements should be made for access to emer
g
enc
y
services.
TIP: Use to navi
g
ate the menus.
Making a call
This section describes the different ways to make a call.
NOTE: Signal Strength. Check the signal strength before making
a call and during a call. For details, see
Checkin
g
the si
g
nal stren
g
th on
p
a
g
e 1
3
.
1. Press .
2. Dial the phone number. The number displays on the screen and is dialed out.
NOTE: Call Timer. During a call, the call timer displays the talk time of
y
our current call.
-15-
Pre-dialing
NOTE: Low Battery. During a call, you will hear warning tones if
your handset is almost out of battery. Charge your handset as
soon as possible or your call will be cut off. Placing the handset on
the charger will end the call. For details, see Checking the battery
level
on
p
a
g
e 1
2
.
Pre-dialing lets you view and make changes to the number before making the call.
1. Enter the phone number. The number displays on the screen. You can make
changes before dialing out.
TIP: Press CLEAR to erase a digit.
Press and hold to enter a pause. P displays on the
screen.
2. Press to dial out the call.
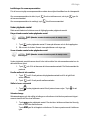
Redialing the last number
1. Press
.
2. Press REDIAL. The last dialed number displays on the screen and is dialed out.
Calling from your phonebook

Call
For details on the phonebook, see Phonebook on page 22.
1. Press
.
2.
3. Press
Select the phonebook record you want.
to dial out the call.
Calling from the incoming call log
You can return a call from the incoming (received or missed) call log. For details, see Call Log on
page
25.
1. Press .
2.
3. Press
Select the record you want.
to dial out the call.
Ending a call
1. Press OR place the handset on the charger.
Answering a call
When you receive a call, your phone rings. Press
to answer the call.
TIP: Silent Ringer. When the phone is ringing, press SILENT to turn
off the rin
g
e
r
.
NOTE: Caller ID Service. Consult and subscribe from your service
p
rovider.
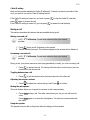
TIP: Missed Call Alert. When a call is missed, your phone displays
. Press to view the missed calls.
Turning off the ringer
You can turn off the ringer for all incoming calls.
Press and hold
during standby. displays on the screen. For details on the
ringer setting, see
Personalizing your handset’s sounds on page 28.
1.
- 16 -

Call
Caller ID setting
Each service provider handles the Caller ID differently. Consult your service provider to find
out if you need to turn on the Caller ID setting feature.
If the Caller ID setting is turned on, you have to press to view the Caller ID, and then
press
again to answer the call.
If the Caller ID setting is turned off, you can press to answer the call instantly.
During a call
This section describes the features that are available during a call.
Making a second call
NOTE: 2
n
d
Call Service. Consult and subscribe from your service
p
rovider.
1. Press
during a call. R displays on the screen.
2. Dial the number you want. The number displays on the screen and is dialed out.
Answering a second call
NOTE: 2
n
d
Call Service. Consult and subscribe from your service
p
rovider.
During a call, your phone sounds a short beep periodically to notify you of an incoming call.
1. Press to answer the call. You have put the first call on hold, and you are now
connected to the second call.
Toggling between two calls
1. Press
to put the current call on hold and connect to the other call.
Adjusting the earpiece volume
1. Press to adjust the volume during a call. Press OK to confirm.
Muting the microphone
The mute feature allows you to speak to someone in the house privately.
1. Press MUTE during a call. The caller cannot hear you, but you can still hear his
voice.
Press MUTE again to un-mute the microphone. You can now communicate with
the caller.
Using the speaker
The speaker lets you talk on the phone without holding onto the handset.
- 17 -

Call
1. Press during a call to turn the speaker on. Press again to turn it off.
- 18 -

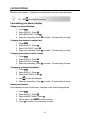
INTERCOM AND CONFERENCE CALLS
An intercom call is a call to another handset that shares the same base unit. A conference
call involves conversation between another handset and outside caller(s).
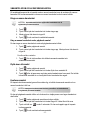
Calling another handset
NOTE: An intercom call can only involve 2 handsets that share the
same base unit.
1. Press .
2.
3.
4. Press
Press the target handset number.
Wait for the other party to answer your call.
to cancel or end the intercom call.
While you are on the phone
While talking on the phone, you can call another handset.
1. Press during the call.
2.
1. Press
Press the target handset number. Wait for the other party to answer your call.
To toggle between the calls
to switch between the outside call and the intercom call.
Transferring a call
1. Press during a call.
2.
3. Press
Press the target handset number.
after the other party answers your call. The outside call is now
transferred to the other handset.
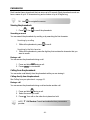
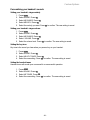
Making a conference call
A 3-way conference call is a call between you, an outside caller, and another handset user in
your house.
NOTE: A 3-way conference call requires 2 handsets that share the
same base unit.
You are talking on the phone with an outside caller, and you want to involve another handset
user in this conversation.
1. Press during your call with the outside caller.
2.
3.
Press the target handset number. Wait for the other party to answer your call.
Press and hold
for 2 seconds. You are now on a 3-way conference call.
4. Press
to exit from the conference call.
-19-

TEXT AND NUMBERS
You can enter text and numbers for handset name, phonebook record, services record, text
messaging, and others.
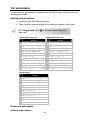
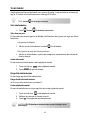
Entering text and numbers
1.
2.
Find the key with the character you want.
Press it as many times as needed for the character to display on the screen.
NOTE: Change Case. Press to alternate between upper and
lower case.
English keypad (upper case) English keypad (lower case)
Ke
y
Character Key Character
0 0 $ < > = ~ ^ % ¡ ¿ 0 0 $<>=~^%¡¿
1
S
P
1 . , ? ! @ ' - ° 1
S
P
1. ,?!@' -°
2 A B C 2 Á Ä Å Æ Ç 2 a b c 2 Á Ä Å Æ Ç
3 D E F 3 É È Δ Φ 3 d e f 3 É È Δ Φ
4 G H I 4 Ì Γ 4 g h i 4 Ì Γ
5 J K L 5 Λ 5 j k l 5 Λ
6 M N O 6 ÑÒÖØΩ 6 m no6ÑÒÖØΩ
7 P Q R S 7 ß Π Ψ Σ 7 p q r s 7 ß Π Ψ Σ
8 T U V 8 Ù Ü Θ 8 t u v 8 Ù Ü Θ
9 W X Y Z 9 Ξ 9 w x y z 9 Ξ
* * # ( ) / : _ ; + & * * # ( ) / : _ ; + &
Russian keypad
Ke
y
Character
0 0 $ < > = ~ ^ % ¡ ¿
1 SP 1 . , ? ! @ ' - °
2 A Б B Γ 2
3 Д E Ж З 3
4 И Й К Л 4
5 M H O Π 5
6 P C T У 6
7 Φ X Ц Ч 7
8 Ш Щ Ъ Ы 8
9 Ь Э Ю Я 9
* * # ( ) / : _ ; + &
Erasing text and numbers
Erasing a single character
-20-
Sidan laddas ...
Sidan laddas ...
Sidan laddas ...
Sidan laddas ...
Sidan laddas ...
Sidan laddas ...
Sidan laddas ...
Sidan laddas ...
Sidan laddas ...
Sidan laddas ...
Sidan laddas ...
Sidan laddas ...
Sidan laddas ...
Sidan laddas ...
Sidan laddas ...
Sidan laddas ...
Sidan laddas ...
Sidan laddas ...
Sidan laddas ...
Sidan laddas ...
Sidan laddas ...
Sidan laddas ...
Sidan laddas ...
Sidan laddas ...
Sidan laddas ...
Sidan laddas ...
Sidan laddas ...
Sidan laddas ...
Sidan laddas ...
Sidan laddas ...
Sidan laddas ...
Sidan laddas ...
Sidan laddas ...
Sidan laddas ...
Sidan laddas ...
Sidan laddas ...
Sidan laddas ...
Sidan laddas ...
Sidan laddas ...
Sidan laddas ...
Sidan laddas ...
Sidan laddas ...
Sidan laddas ...
Sidan laddas ...
Sidan laddas ...
Sidan laddas ...
-
 1
1
-
 2
2
-
 3
3
-
 4
4
-
 5
5
-
 6
6
-
 7
7
-
 8
8
-
 9
9
-
 10
10
-
 11
11
-
 12
12
-
 13
13
-
 14
14
-
 15
15
-
 16
16
-
 17
17
-
 18
18
-
 19
19
-
 20
20
-
 21
21
-
 22
22
-
 23
23
-
 24
24
-
 25
25
-
 26
26
-
 27
27
-
 28
28
-
 29
29
-
 30
30
-
 31
31
-
 32
32
-
 33
33
-
 34
34
-
 35
35
-
 36
36
-
 37
37
-
 38
38
-
 39
39
-
 40
40
-
 41
41
-
 42
42
-
 43
43
-
 44
44
-
 45
45
-
 46
46
-
 47
47
-
 48
48
-
 49
49
-
 50
50
-
 51
51
-
 52
52
-
 53
53
-
 54
54
-
 55
55
-
 56
56
-
 57
57
-
 58
58
-
 59
59
-
 60
60
-
 61
61
-
 62
62
-
 63
63
-
 64
64
-
 65
65
-
 66
66


Hyundai HDT-H15 Användarmanual
- Kategori
- Telefoner
- Typ
- Användarmanual
på andra språk
- English: Hyundai HDT-H15 User manual
Relaterade papper
Andra dokument
-
Doro 750X Användarmanual
-
Topcom BUTLER M1250 Användarmanual
-
Topcom Butler E751 Användarguide
-
Topcom Butler 930 Användarguide
-
Topcom E350 Användarmanual
-
-
Topcom Sologic B935 Användarguide
-
AEG Voxtel D210 Bruksanvisning
-
-
Huawei B890-66 Användarmanual