Kenwood BM256 Bruksanvisning
- Kategori
- Maskiner för brödtillverkning
- Typ
- Bruksanvisning

BM250 series
TYPE BM25
instructions
istruzioni
instrucciones
Bedienungsanleitungen
gebruiksaanwijzing

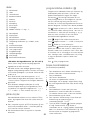
English 2 - 12
Nederlands 13 - 25
French 26 - 39
Deutsch 40 - 51
Italiano 52 - 64
Dansk 65 - 75
Svenska 76 - 86
Norsk 87 - 97
Suomi 98 - 108

햴
햷
햸
헁
헀
헆
햵
햶
햲
햳
햺
햽
햾
햿
헂
헃
헄
헅
햻
햹
헀

1 2 3
7 8 9
13 14 15
19 20

4 5 6
10 11 12
16 17 18
1
11
500g 750g
1kg

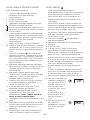
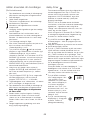
safety
l
Read these instructions carefully and retain for future reference.
l
Remove all packaging and any labels.
l
Do not touch hot surfaces. Accessible surfaces are liable to get
hot during use. Always use oven gloves to remove the hot bread
pan.
l
To prevent spillages inside the oven chamber, always remove the
bread pan from the machine before adding the ingredients.
Ingredients that splash onto the heating element can burn and
cause smoke.
l
Do not use this appliance if there is any visible sign of damage to
the supply cord or if it has been accidentally dropped.
l
Do not immerse this appliance, the supply cord or the plug in
water or any other liquid.
l
Always unplug this appliance after use, before fitting or removing
parts or before cleaning.
l
Do not let the electrical supply cord hang over the edge of a work
surface or allow it to touch hot surfaces such as a gas or electric
hob.
l
This appliance should only be used on a flat heat resistant surface.
l
Do not place your hand inside the oven chamber after the bread
pan has been removed as it will be very hot.
l
Do not touch moving parts within the Bread Maker.
l
Do not exceed the maximum flour and raising agent quantities
specified in the recipes supplied.
l
Do not place the Bread Maker in direct sun light, near hot
appliances or in a draught. All these things can affect the internal
temperature of the oven, which could spoil the results.
l
Do not use this appliance outdoors.
l
Do not operate the Bread Maker when it is empty as this could
cause it serious damage.
l
Do not use the oven chamber for any type of storage.
l
Do not cover the steam vents in the lid and ensure there is
adequate ventilation around the bread maker during operation.
2

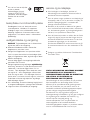
l
This appliance is not intended to be operated by means of an
external timer or separate remote-control system.
l
Do not immerse either the bread maker body or the outside
base of the bread pan in water.
l
Children from 8 years and above can use, clean and perform
user maintenance on this appliance in accordance with the
User Instructions provided they are supervised by a person
responsible for their safety and have been given instruction
concerning the use of the appliance and are aware of the
hazards.
l
Persons with reduced physical, sensory or mental capabilities
or lack of knowledge using this appliance must have been
given supervision or instruction on its safe use and are aware
of the hazards.
l
Children must not play with the appliance and both appliance
and cord must be out of reach of children less than 8 years.
l
Unplug the bread maker and allow to cool completely before
cleaning.
l
Only use the appliance for its intended domestic use.
Kenwood will not accept any liability if the appliance is
subject to improper use, or failure to comply with these
instructions.
3
before plugging in
l
Make sure your electricity supply is the same as
the one shown on the underside of your Bread
Maker.
l
WARNING: THIS APPLIANCE MUST BE
EARTHED.
l
This appliance conforms to EC Regulation
1935/2004 on materials and articles intended to
come into contact with food.
before using your bread maker for the
first time
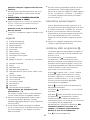
l
Wash all parts (see care and cleaning).

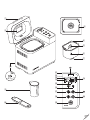
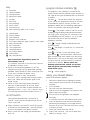
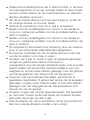
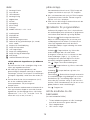
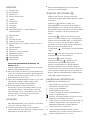
key
lid handle
viewing window
heating element
bread pan handle
kneader
drive shaft
drive coupling
on/off switch
measuring cup
dual measuring spoon 1tsp & 1tbsp
control panel
display window
timer indicator
program status indicator
crust colour indicators (light, medium, dark, rapid)
delay timer buttons
loaf size button
start/stop button
rapid bake button
crust colour button
menu button
loaf size indicators
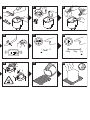
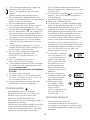
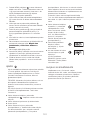
how to measure ingredients (refer to
illustrations 3 to 7)
It is extremely important to use the exact measure
of ingredients for best results.
l
Always measure liquid ingredients in the see-
through measuring cup with graduated markings
provided. Liquid should just reach marking on cup
at eye level, not above or below (see 3).
l
Always use liquids at room temperature,
20ºC/68ºF, unless making bread using the rapid 1
hour cycle. Follow the instructions given in the
recipe section.
l
Always use the measuring spoon provided to
measure smaller quantities of dry and liquid
ingredients. Use the slider to select between the
following measure -
1
⁄2 tsp, 1 tsp,
1
⁄2 tbsp or 1 tbsp.
Fill to the top and level off the spoon (see 6 & 7).
on/off switch
Your Kenwood breadmaker is fitted with an
ON/OFF switch and will not operate until the “on”
switch is pressed.
l
Plug in and press the ON/OFF switch situated
at the back of the breadmaker - the unit will beep
and 3:25 will appear in the display window.
l
Always switch off and unplug your breadmaker
after use.
program status indicator
T
he program status indicator is situated in the
display window and the indicator arrow will point to
t
he stage of the cycle the breadmaker has reached
a
s follows: -
P
re-heat – The pre-heat feature only operates
at the start of the wholewheat setting (30 minutes)
and wholemeal rapid (5 minutes) to warm the
ingredients before the first kneading stage begins.
There is no kneader action during this period.
Knead – The dough is either in the first or 2nd
kneading stage or being knocked back between
the rising cycles. During the last 10minutes of the
2nd Kneading cycle on setting (1), (3), (4) an alert
will sound to tell you to add any additional
ingredients manually.
Rest – dough is being rested between the
kneading cycles.
Rise – the dough is in either the 1st, 2nd or 3rd
rising cycle.
Bake – The loaf is in the final baking cycle.
Keep Warm – The bread maker automatically
goes into the Keep warm mode at the end of the
baking cycle. It will stay on the keep warm mode
for up to 1hour or until the machine is turned off,
which ever is soonest. Please note: the
heating element will switch on and off
and will glow intermittently during the
keep warm cycle.
End – end of program.
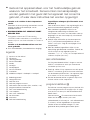
using your Bread Maker
(refer to illustration panel)
1 Remove the bread pan by holding the handle
and turning the pan to the back of the baking
chamber.
2 Fit the kneader.
3 Pour the water into the bread pan.
4 Add the rest of the ingredients to the pan in the
order listed in the recipes.
Ensure that all the ingredients are weighed
accurately
7 as incorrect measures will produce poor results.
8 Insert the bread pan into the oven chamber by
positioning the bread pan at an angle towards
the back of the unit. Then lock the pan by turning
it towards the front.
9 Lower the handle and close the lid.
10 Plug in and switch on - the unit will beep and
default to setting 1 (3:25).
4

1
1 Press the MENU button until the required
program is selected. The breadmaker will default
to 1Kg & medium crust colour. Note: If using the
“
RAPID BAKE” , just press the button and the
program will start automatically.
12 Select the loaf size by pressing the LOAF SIZE
b
utton until the indicator moves to the
required loaf size.
13 Select the crust colour by pressing the CRUST
button until the indicator moves to the
required crust colour (light, medium or dark).
14 Press the START button . To stop or cancel
the program press the START/STOP button for 2
– 3 seconds.
15 At the end of the baking cycle unplug the
breadmaker
16 Remove the bread pan by holding the handle
and turning the pan to the back of the baking
chamber. Always use oven gloves as the
pan handle will be hot.
17 Then turn out onto a wire rack to cool.
18 Leave the bread to cool for at least 30 minutes
before slicing, to allow the steam to escape. The
bread will be difficult to slice if hot.
19 Clean the bread pan and kneader immediately
after use (see care and cleaning).
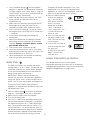
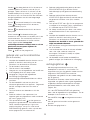
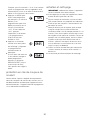
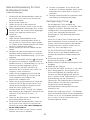
delay timer
The Delay timer allows you to delay the bread
making process up to 15 hours. The delayed start
cannot be used with the “RAPID BAKE” program
and is not recommended for use with either the
dough, jam or gluten free settings.
IMPORTANT: When using this delayed start
function you must not use perishable ingredients –
things that ‘go off’ easily at room temperature or
above, such as milk, egg, cheese and yoghurt etc.
To use the DELAY TIMER simply place the
ingredients in the bread pan and lock the pan into
the bread maker. Then:
l
Press the MENU pad to choose the required
program – the program cycle time is displayed.
l
Select the crust colour and size required.
l
Then set the delay timer.
l
Press the (+) TIMER pad and keep pressing until
the total time required is displayed. If you go past
the required time press the (-) TIMER pad to go
back. The timer pad when pressed, moves in 10
minute increments. You do not need to work out
the difference between the program time selected
and the total hours required as the bread maker
will automatically include the setting cycle time.
E
xample:
F
inished loaf required at 7am. If the
breadmaker is set up with the required recipe
ingredients at 10pm the evening before, total time
t
o be set on the delayed timer is 9 hours.
l
P
ress the MENU pad to
choose your program
e.g. 1 and use the (+)
t
imer pad to scroll the
time in 10 minute
increments to display
‘9:05’. If you go past
‘9:05’, simply press the
(-) timer pad until you
return to ‘9:05’.
l
Press the start pad and
the display colon (:) will
flash. The timer will start
to count down.
l
If you make a mistake or
wish to change the time
set, press the
START/STOP pad until it
beeps. You can then
reset the time.
power interruption protection
Your Bread Maker has an 8 minute power
interruption protection in case the unit is accidentally
unplugged during operation. The unit will continue the
program if plugged back in straight away.
5

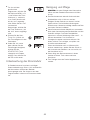
care and cleaning
I
MPORTANT: unplug the Bread Maker and allow
to cool before cleaning.
l
D
o not immerse either the Bread Maker body or
t
he outside base of the bread pan in water.
l
Do not use a dishwasher to clean bread pan.
D
ishwashing can damage the non-stick properties
of the bread pan allowing bread to stick during
baking.
l
Do not use abrasive scouring pads or metal
implements.
l
Clean the bread pan and the kneader
immediately after each use by partially filling the
pan with warm soapy water. Leave to soak for 5 to
10 minutes. To remove the kneader, turn
clockwise and lift off. Finish cleaning with a soft
cloth, rinse and dry.
If the kneader cannot be removed after 10
minutes, hold the shaft from underneath the pan
and twist back and forth until the kneader is
released.
l
Use a soft damp cloth to clean the outside and
inside surfaces of the Bread Maker if necessary.
l
The lid can be lifted off for cleaning.
service and customer care
l
If the cord is damaged it must, for safety reasons,
be replaced by KENWOOD or an authorised
KENWOOD repairer.
l
If you experience any problems with the operation
of your appliance, before requesting assistance
refer to the “troubleshooting guide” section in the
manual or visit www.kenwoodworld.com.
l
Please note that your product is covered by a
warranty, which complies with all legal provisions
concerning any existing warranty and consumer
rights in the country where the product was
purchased.
l
If your Kenwood product malfunctions or you find
any defects, please send it or bring it to an
authorised KENWOOD Service Centre. To find up
to date details of your nearest authorised
KENWOOD Service centre visit
www.kenwoodworld.com or the website specific to
your Country.
l
Designed and engineered by Kenwood in the UK.
l
Made in China.
IMPORTANT INFORMATION FOR CORRECT
D
ISPOSAL OF THE PRODUCT IN
ACCORDANCE WITH THE EUROPEAN
DIRECTIVE ON WASTE ELECTRICAL AND
ELECTRONIC EQUIPMENT (WEEE)
At the end of its working life, the product must not be
disposed of as urban waste.
It must be taken to a special local authority
differentiated waste collection centre or to a dealer
providing this service.
Disposing of a household appliance separately avoids
possible negative consequences for the environment
and health deriving from inappropriate disposal and
enables the constituent materials to be recovered to
obtain significant savings in energy and resources. As
a reminder of the need to dispose of household
appliances separately, the product is marked with a
crossed-out wheeled dustbin.
6

7
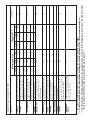
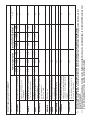
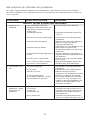
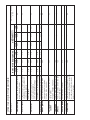
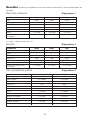
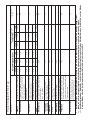
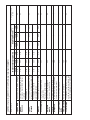
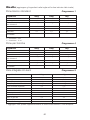
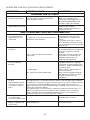
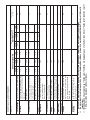
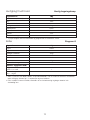
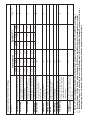
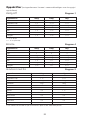
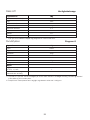
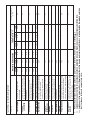
L To select the rapid loaf program press the crust colour pad until the indicator points to ( ).
LL An alert will sound before the end of the 2nd kneading cycle to add ingredients if the recipe recommends doing so.
LLL The Bread maker will automatically go in to the keep warm mode at the end of the baking cycle. It will stay in the keep warm mode
for up to 1hour or until the machine is turned off, which ever is soonest.
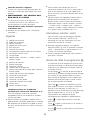
bread/dough program chart
program Alert For Adding Keep Warm
Total Program Time Ingredients LL LLL
500g 750g 1Kg 500g 750g 1Kg
1 basic White or Brown Bread Flour recipes 3:13 3:18 3:25 2:51 2:56 3:03 60
2 french Produces a crisper crust and suited 3:30 3:32 3:35 - - - 60
to loaves low in fat and sugar
Rapid Loaves L 2:30 2:32 2:35 - - -
3 wholewheat Wholewheat or wholemeal flour 3:43 3:45 3:48 2:56 2:58 3:01 60
recipes: 30 minute preheat
Rapid Loaves: 5 minute preheat L 2:28 2:30 2:33 - - -
4 sweet High sugar bread recipes 3:17 3:22 3:27 2:55 3:00 3:05 60
5 gluten free For use with gluten free flours 2:24 - 60
and gluten free bread mixes.
Max 500g flour wt
6 packet mix For ready prepared bread mixes 2:24 - 60
Max 500g mix
7 cake Non-yeast batter breads and cakes 1:43 - -
8 dough Dough for hand shaping and 1:30 - -
baking in your own oven.
9 pasta dough Pasta dough recipes 0:14 - -
10 jam For making jams 1:05 - -
11 bake Bake only feature. Can also be 1:00 - 60
used to rewarm or crisp loaves
already baked and cooled.
rapid bake Produces loaves of bread in under 0:58 - 60
button 1 hour. Loaves require warm water,
extra yeast and less salt.

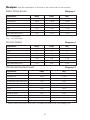
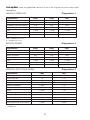
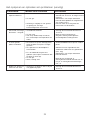
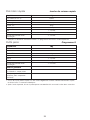
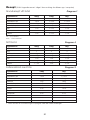
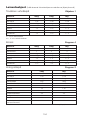
Basic White Bread Program 1
tsp = 5 ml teaspoon
tbsp = 15ml tablespoon
Brioche Bread Program 4
Wholemeal Seeded Bread Program 3
1. Add the seeds when the machine makes an audible sound during the 2nd kneading cycle.
Ingredients 500g 750g 1Kg
Water 245ml 290ml 380ml
Vegetable oil 1tbsp 1
1
⁄2tbsp 1
1
⁄2tbsp
Unbleached white bread flour 350g 450g 600g
Skimmed milk powder 1tbsp 4tsp 2tbsp
Salt 1tsp 1
1
⁄2tsp 1
1
⁄2tsp
Sugar 2tsp 1tbsp 4tsp
Easy blend dried yeast 1tsp
1
1
⁄2
tsp 1
1
⁄2
tsp
Ingredients 500g 750g 1Kg
Milk 130ml 220ml 260ml
Eggs 12 2
Butter, melted 80g 140g 180g
Unbleached white bread flour 350g 500g 600g
Salt 1tsp 1tsp 1
1
⁄2tsp
Sugar 30g 60g 80g
Easy blend dried yeast 1
1
⁄2tsp 2tsp 2
1
⁄2tsp
Ingredients 750g 1Kg
Water 300mls 380mls
Vegetable Oil 1tbsp 1
1
⁄2tbsp
Wholemeal bread flour 400g 500g
Unbleached white bread flour 50g 100g
Skimmed milk powder 4tsp 2tbsp
Salt 1tsp 1
1
⁄2tsp
Sugar 2tsp 1tbsp
Easy blend dried yeast 1tsp 1tsp
Pumpkin Seeds 3tsp 3tsp
Sunflower seeds 3tsp 3tsp
Poppy seeds 2tsp 3tsp
Lightly toasted sesame seeds 2tsp 3tsp
8
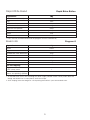
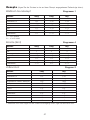
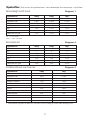
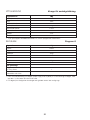
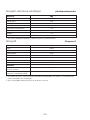
Recipes (add the ingredients to the pan in the order listed in the recipes)

Rapid White Bread Rapid Bake Button
1 Press the RAPID BAKE button and the program will start automatically.
Bread rolls Program 8
1 At the end of the cycle, turn the dough out onto a lightly floured surface. Gently knock back the
dough and divide into 12 equal pieces and hand shape.
2 After shaping, leave the dough for a final proving then bake in your conventional oven.
Ingredients 1Kg
Milk, lukewarm (32-35°C) 350ml
Egg 50ml
Vegetable oil 1tbsp
Unbleached white bread flour 600g
Skimmed milk powder 2tbsp
Salt 1tsp
Sugar 4tsp
Easy blend dried yeast 4tsp
Ingredients 1Kg
Water 240ml
Egg 1
Unbleached white bread flour 450g
Salt 1tsp
Sugar 2tsp
Butter 25g
Easy blend dried yeast 1
1
⁄2tsp
For the topping:
Egg yolk beaten with
15ml (1tbsp) water 1
Sesame seeds and poppy
seeds, for sprinkling, optional
9

10
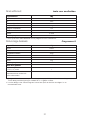
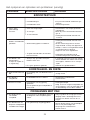
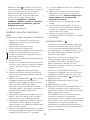
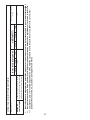
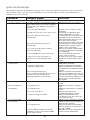
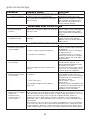
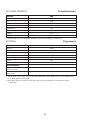
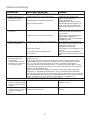
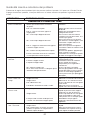
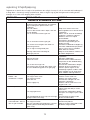
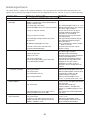
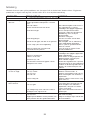
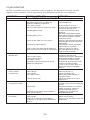
PROBLEM POSSIBLE CAUSE SOLUTION
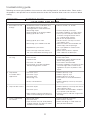
1. Bread does not rise
enough
2. Flat loaves,
no rising.
3. Top inflated -
mushroom-like in
appearance.
4. Top and sides cave in.
5. Gnarly, knotted top -
not smooth.
• Wholemeal breads will be lower than
white breads due to less gluten
forming protein in whole wheat flour.
• Not enough liquid.
• Sugar omitted or not enough added.
• Wrong type of flour used.
• Wrong type of yeast used.
• Not enough yeast added or too old.
• Rapid bread cycle chosen.
• Yeast and sugar came into contact
with each other before kneading cycle.
• Yeast omitted.
• Yeast too old.
• Liquid too hot.
• Too much salt added.
• If using timer, yeast got wet before
bread making process started.
• Too much yeast.
• Too much sugar.
• Too much flour.
• Not enough salt.
• Warm, humid weather.
• Too much liquid.
• Too much yeast.
• High humidity and warm weather may
have caused the dough to rise too fast.
• Not enough liquid.
• Too much flour.
• Tops of loaves may not all be perfectly
shaped, however, this does not affect
wonderful flavour of bread.
• Normal situation, no solution.
• Increase liquid by 15ml/3tsp.
•
Assemble ingredients as listed in recipe.
• You may have used plain white flour
instead of strong bread flour which
has a higher gluten content.
• Do not use all-purpose flour.
• For best results use only fast action
“easy blend” yeast.
• Measure amount recommended and
check expiry date on package.
• This cycle produces shorter loaves.
This is normal.
• Make sure they remain separate
when added to the bread pan.
• Assemble ingredients as listed in recipe.
• Check expiry date.
• Use liquid at correct temperature for
bread setting being used.
• Use amount recommended.
• Place dry ingredients into corners of pan
and make slight well in centre of dry
ingredients for yeast to protect it from
liquids.
• Reduce yeast by
1
/4tsp.
• Reduce sugar by 1tsp.
• Reduce flour by 6 to 9tsp.
• Use amount of salt recommended in
recipe.
• Reduce liquid by 15ml/3 tsp and yeast
by
1
/4 tsp.
• Reduce liquid by 15ml/3tsp next time or
add a little extra flour.
• Use amount recommended in recipe or
try a quicker cycle next time.
• Chill the water or add milk straight from
the fridge
• Increase liquid by 15ml/3tsp.
• Measure flour acurately.
• Make sure dough is made under the
best possible conditions.
troubleshooting guide
F
ollowing are some typical problems that can occur when making bread in your bread maker. Please review
the problems, their possible cause and the corrective action that should be taken to ensure successful bread
making.
LOAF SIZE AND SHAPE

11
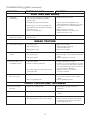
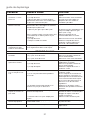
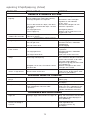
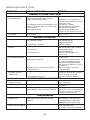
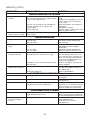
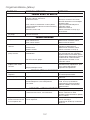
troubleshooting guide
(continued)
PROBLEM POSSIBLE CAUSE SOLUTION
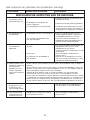
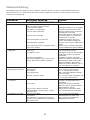
6. Collapsed
while baking.
7. Loaves uneven
shorter on one end.
8. Heavy dense texture.
9. Open, course, holey
texture.
10. Centre of loaf is raw,
not baked enough.
11. Bread doesn’t slice
well, very sticky.
12. Dark crust colour/
too thick.
13. Loaf of bread is burnt.
14. Crust too light.
• Machine was placed in a draught or
may have been knocked or jolted
during rising.
•
Exceeding capacity of bread pan.
• Not enough salt used or omitted. (salt
h
elps prevent the dough over proving)
• Too much yeast.
• Warm, humid weather.
• Dough too dry and not allowed to rise
evenly in pan.
• Too much flour.
• Not enough yeast.
• Not enough sugar.
• Salt omitted.
• Too much yeast.
• Too much liquid.
• Too much liquid.
• Power cut during operation.
• Quantities were too large and machine
could not cope.
• Sliced while too hot.
• Not using proper knife.
• DARK crust setting used.
• Bread maker malfunctioning.
• Bread not baked long enough.
• No milk powder or fresh milk in recipe.
• Reposition bread maker.
•
Do not use more ingredients than
recommended for large loaf (max. 1Kg).
• Use amount of salt recommended in
r
ecipe.
• Measure yeast acurately.
• Reduce liquid by 15ml/3tsp and
reduce yeast by
1
/4tsp.
• Increase liquid by 15ml/3 tsp.
• Measure accurately.
• Measure right amount of
recommended yeast.
• Measure accurately.
• Assemble ingredients as listed in recipe.
• Measure right amount of recommended
yeast.
• Reduce liquid by 15ml/3tsp.
• Reduce liquid by 15ml/3tsp.
• If power is cut during operation for more
than 8 minutes you will need to remove
the unbaked loaf from the pan and start
again with fresh ingredients.
• Reduce amounts to maximum
quantities allowed.
• Allow bread to cool on rack at least
30 minutes to release steam, before
slicing.
• Use a good bread knife.
• Use medium or light setting the
next time.
• Refer to “Service and customer care”
section.
• Extend baking time.
• Add 15ml/3tsp skimmed milk powder
or replace 50% of water with milk to
encourage browning.
BREAD TEXTURE
CRUST COLOUR AND THICKNESS
LOAF SIZE AND SHAPE

12
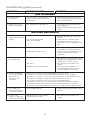
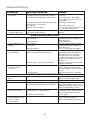
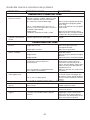
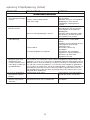
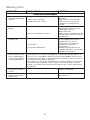
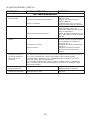
troubleshooting guide
(continued)
PROBLEM POSSIBLE CAUSE SOLUTION
1
5. Kneader cannot
b
e removed.
16. Bread sticks to pan/
d
ifficult to shake out.
17. Breadmaker not
operating/Kneader not
moving.
18. Ingredients not mixed.
19. Burning odour noted
during operation.
20. Machine unplugged
by mistake or power
lost during use.
How can I save
the bread?.
21. E:01 appears on
display and machine
cannot be turned on.
22. H:HH & E:EE
appears in display and
machine does not operate.
• You must add water to bread pan and
allow kneader to soak before it can
be removed.
• Can happen over prolonged use.
• Breadmaker not switched on
• Pan not correctly located.
• Delay timer selected.
• Did not start bread maker.
• Forgot to put kneader in pan.
• Ingredients spilled inside oven.
• Pan leaks.
• Exceeding capacity of bread pan.
• Oven chamber too hot.
• Bread machine is malfunctioning.
Temperature sensor error
• Follow cleaning instructions after use.
You may need to twist kneader slightly
after soaking to loosen.
• Lightly wipe the inside of bread pan
with vegetable oil.
•
Refer to “Service and customer care”
section.
• Check on/off switch is in the ON
position.
• Check the pan is locked in place.
• Breadmaker will not start until the
countdown reaches the program start
time.
• After programming control panel, press
start button to turn bread maker on.
• Always make sure kneader is on shaft
in bottom of pan before adding
ingredients.
• Be careful not to spill ingredients when
adding to pan. Ingredients can burn on
heating unit and cause smoke.
• See “Service and Customer care”
section.
• Do not use more ingredients than
recommended in recipe and always
measure ingredients accurately
.
• Unplug and allow to cool down for 30
minutes.
• See “Service and Customer care”
section.
PAN PROBLEMS
MACHINE MECHANICS
• If machine is in knead cycle, discard ingredients and start again.
• If machine is in rise cycle, remove dough from bread pan, shape and place in
greased 23 x 12.5cm/9 x 5 in. loaf tin, cover and allow to rise until doubled in size.
Use bake only setting 11 or bake in pre-heated conventional oven at
200ºC/400ºF/Gas mark 6 for 30-35 minutes or until golden brown.
• If machine is in bake cycle, use the bake only setting 11 or bake in pre-heated
conventional oven at 200ºC/400ºF/Gas mark 6 and remove top rack. Carefully
remove pan from machine and place on bottom rack in oven. Bake until golden brown.

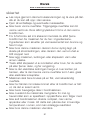
veiligheid
l
Lees deze instructies zorgvuldig door en bewaar ze voor
toekomstig gebruik.
l
Verwijder de verpakking en alle labels.
l
De hete oppervlakken nooit aanraken. De toegankelijke
oppervlakken kunnen tijdens het gebruik erg warm worden.
Gebruik altijd ovenhandschoenen om de hete broodpan te
verwijderen.
l
Om te voorkomen dat er gemorst wordt in de oven, dient u
het brood altijd uit het broodblik te verwijderen voor u
ingrediënten toevoegt. Ingrediënten die op het
verhittingselement komen, kunnen verbranden en rook
veroorzaken.
l
Gebruik dit apparaat niet, als het snoer zichtbaar beschadigd
is of als hij per ongeluk op de grond is gevallen.
l
Dompel dit apparaat, het snoer of de stekker nooit in water of
in een andere vloeistof.
l
Haal de stekker van het apparaat na gebruik uit het
stopcontact,en ook voor u onderdelen monteert of verwijdert
of voordat u het apparaat reinigt.
l
Laat het snoer nooit over de rand van een werkoppervlak
hangen en zorg dat het niet in aanraking komt met hete
oppervlakken zoals een gasfornuis of elektrische kookplaat.
l
Dit apparaat dient uitsluitend op een vlak hittebestendig
oppervlak gebruikt te worden.
l
Steek geen hand in de ovenkamer, nadat de broodpan is
verwijderd.
l
Raak geen bewegende delen in de broodbakmachine aan.
l
U dient de aangegeven maximumhoeveelheid bloem en
rijsmiddel die in de recepten wordt aangegeven, niet te
overschrijden.
Nederlands
V
ouw voor het lezen a.u.b. de voorpagina met illustraties uit
13

l
Plaats de broodbakmachine niet in direct zonlicht, in de buurt
van hete apparaten of op een tochtige plaats. Al deze dingen
kunnen invloed hebben op de oventemperatuur en daardoor
slechte resultaten opleveren.
l
Zet de broodbakmachine nooit aan als hij leeg is, omdat dit
tot ernstige schade zou kunnen leiden.
l
Gebruik de ovenkamer nooit om er iets in te bewaren.
l
Bedek nooit de ventilatiegaten voor stoom in het deksel en
zorg voor voldoende ventilatie rond de broodbakmachine, als
deze in bedrijf is.
l
Bedek nooit de ventilatiegaten voor stoom in het deksel en
zorg voor voldoende ventilatie rond de broodbakmachine, als
deze in bedrijf is.
l
Dit apparaat is niet bedoeld voor bediening door een externe
timer of een afzonderlijk afstandsbedieningssysteem.
l
Dompel het hoofddeel van de broodbakmachine of de voet
van de broodpan nooit onder in water.
l
Kinderen van 8 jaar en ouder mogen dit apparaat gebruiken,
reinigen en gebruikersonderhoud uitvoeren in
overeenstemming met de gebruikersinstructies, mits ze onder
toezicht staan van iemand die verantwoordelijk is voor hun
veiligheid en ze instructies hebben gekregen over het gebruik
van het apparaat en zich bewust zijn van de gevaren.
l
Personen met verminderde lichamelijke, sensorische of
geestelijke capaciteiten of gebrek aan kennis die dit apparaat
gebruiken, moeten onder toezicht staan of instructie hebben
gekregen over het veilig gebruik van het apparaat en zich
bewust zijn van de gevaren.
l
Kinderen mogen niet met het apparaat spelen. Het apparaat
en het snoer moeten buiten het bereik van kinderen worden
gehouden die jonger zijn dan 8 jaar.
l
Haal de stekker van de broodmachine uit het stopcontact en
laat hem volledig afkoelen voordat u hem reinigt.
14

v
oordat u de stekker in het stopcontact
steekt
l
Controleer of de netspanning overeenkomt met de
waarde vermeld op de onderzijde van de
broodbakmachine.
l
WAARSCHUWING: DIT APPARAAT MOET
GEAARD ZIJN.
l
Dit apparaat voldoet aan EG Verordening
1935/2004 inzake materialen en voorwerpen die
bestemd zijn om met levensmiddelen in contact te
komen.
voordat u de broodbakmachine voor het
eerst gebruikt
l
Was alle onderdelen (zie onderhoud en reiniging).
legenda
handvat van het deksel
kijkvenster
verhittingselement
handvat broodblik
kneder
aandrijfas
aandrijfkoppel
aan/uitschakelaar
maatbeker
dubbele maatlepel 1 theelepel & 1 eetlepel
bedieningspaneel
weergavevenster
indicator timer
indicator programmastatus
indicatoren voor korstkleur (licht, medium, snel)
programmeerbare timertoetsen
toets voor broodafmeting
start/stoptoets
toets voor snelbakken
korstkleurtoets
menutoets
indicator broodafmeting
i
ngrediënten afwegen (zie illustratie 3 tot
en met 7)
Voor de beste resultaten is het erg belangrijk dat u
de exacte hoeveelheid ingrediënten afweegt.
l
Meet vloeibare ingrediënten altijd af in de
meegeleverde doorzichtige maatbeker met
maatstrepen. Het niveau van vloeistoffen moet op
ooghoogte van een maatstreep zijn, niet erboven
of eronder (zie 3).
l
Gebruik altijd vloeistoffen op kamertemperatuur
(20°C), tenzij brood wordt gebakken met een
snelle 1-uurscyclus. Volg de aanwijzingen in het
receptenboek.
l
Meet de vloeibare ingrediënten altijd af in de
doorzichtige gekalibreerde maatbeker. Gebruik de
schuif om een van de volgende maten te
selecteren:
1
/2 tl, 1 tl,
1
/2 el of 1 el. De lepel helemaal
vullen en afstrijken (zie 6 en7).
aan/uitschakelaar
Uw Kenwood-broodmachine is uitgerust met een
AAN/UIT-schakelaar en werkt pas wanneer de
schakelaar op Aan staat.
l
Steek de stekker in het stopcontact en druk op de
AAN/UIT-schakelaar die zich aan de achterkant
van de broodmachine bevindt – het apparaat piept
en er wordt 3:25 in het venster weergegeven
l
Schakel de broodmachine na gebruik altijd uit en
haal de stekker uit het stopcontact.
programmastatus
De indicator voor de programmastatus bevindt zich
in het weergavevenster en het pijltje wijst als volgt
naar de fase van de cyclus die de broodmachine
bereikt heeft: -
Voorverwarmen De voorverwarmfunctie werkt
alleen aan het begin van de cyclus voor
volkorenbrood (30 minuten) en snel volkorenbrood
(5 minuten ) om de ingrediënten te verwarmen
voordat de eerste kneedfase begint. Er vindt
gedurende deze periode geen kneden plaats.
15
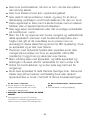
l
Gebruik het apparaat alleen voor het huishoudelijke gebruik
waarvoor het is bedoeld. Kenwood kan niet aansprakelijk
worden gesteld in het geval dat het apparaat niet correct is
gebruikt, of waar deze instructies niet worden opgevolgd.

Kneden Het deeg bevindt zich in the eerste of
t
weede kneedfase of wordt tussen de rijscycli
geslagen. Tijdens de laatste 10 minuten van de
tweede kneedcyclus op stand (1), (3) of (4) gaat
e
en alarm af om u te waarschuwen dat eventuele
o
verige ingrediënten met de hand toegevoegd
k
unnen worden.
Rusten tussen de kneedcycli rust het deeg.
Rijzen het deeg bevindt zich in de eerste,
tweede of derde rijscyclus.
Bakken Het brood bevindt zich in de laatste
bakcyclus.
Warm houden De broodmachine gaat
automatisch aan het einde van de bakcyclus in de
warmhoudmodus. De machine blijft maximaal 1
uur in de warmhoudmodus of tot de machine
wordt uitgeschakeld. Let op: het
verhittingselement schakelt aan en uit en
gloeit met tussenpozen tijdens de
warmhoudcyclus.
Einde einde van het programma.
gebruik van uw broodmachine
(zie de illustraties)
1 Verwijder het broodblik door het handvat vast te
pakken en het blik in de richting van de
achterkant van de bakruimte te draaien.
2 Zet de kneder in de machine.
3 Giet het water in het broodblik
4 Voeg de rest van de ingrediënten aan het blik toe
in de volgorde die in het recept wordt
aangegeven. Zorg dat alle ingrediënten
nauwkeurig zijn afgewogen;
onnauwkeurige hoeveelheden leiden tot slechte
7 resultaten.
8 Zet het broodblik in de oven en plaats het
achterover gekanteld in het apparaat. Vergrendel
het blik vervolgens door het naar voren te
draaien.
9 Duw het handvat naar beneden en sluit het
deksel.
10 Steek de stekker in het stopcontact; het
apparaat geeft een pieptoon en wordt standaard
op stand 1 gezet (3:25).
11 Druk op de MENU-toets tot het gewenste
programma geselecteerd is. De broodmachine
wordt standaard ingesteld op 1 kg en een
medium korstkleur. Let op: Als u de functie
SNELBAKKEN gebruikt, drukt u op de toets
en het programma start automatisch.
1
2 Selecteer de broodafmeting door op de toets
BROODAFMETING te drukken tot het
indicatielampje op de gewenste broodafmeting
s
taat.
13 Selecteer de korstkleur door op de toets
KORSTKLEUR te drukken tot de indicator op
d
e gewenste korstkleur staat (licht, medium,
donker).
14 Druk op de START-toets . Om het programma
te stoppen of te annuleren, drukt u gedurende 2
à 3 seconden op de START/STOP-toets.
15 Na afloop van de bakcyclus dient u de stekker
van de broodmachine uit het stopcontact te
halen.
16 Verwijder het broodblik door het handvat vast te
pakken en het blik in de richting van de
achterkant van de bakruimte te draaien. Het
handvat van het blik is heet: gebruik dus
altijd ovenhandschoenen.
17 Keer het blik om en leg het brood op een rooster
om af te koelen.
18 Laat het brood ten minste 30 minuten afkoelen
voor u het snijdt, zodat de stoom kan
ontsnappen. Het brood is moeilijk te snijden
wanneer het warm is.
19 Het broodblik en de kneder onmiddellijk na
gebruik reinigen (zie Onderhoud en verzorging)
vertragingstimer
Met de programmeerbare timer kunt u het
broodproces maximaal 15 uur uitstellen. De
uitgestelde start kan niet gebruikt worden met het
programma SNELBAKKEN en wordt niet
aangeraden voor gebruik met de standen deeg,
jam of glutenvrij.
BELANGRIJK: Wanneer u deze functie voor een
uitgestelde start gebruikt, dient u geen ingrediënten
te gebruiken die op kamertemperatuur of hoger
gemakkelijk bederven, zoals melk, eieren, kaas,
yoghurt, enz.
Als u de VERTRAGINGSTIMER wilt gebruiken,
doet u alle de ingrediënten in de broodpan. Zet de
broodpan in de machine vast. Dan:
l
Kies de MENU-knop om de gewenste stand te
kiezen.
l
Kies de gewenste korstkleur en het gewenste
gewicht.
l
Stel de vertragingstimer in.
16
Sidan laddas...
Sidan laddas...
Sidan laddas...
Sidan laddas...
Sidan laddas...
Sidan laddas...
Sidan laddas...
Sidan laddas...
Sidan laddas...
Sidan laddas...
Sidan laddas...
Sidan laddas...
Sidan laddas...
Sidan laddas...
Sidan laddas...
Sidan laddas...
Sidan laddas...
Sidan laddas...
Sidan laddas...
Sidan laddas...
Sidan laddas...
Sidan laddas...
Sidan laddas...
Sidan laddas...
Sidan laddas...
Sidan laddas...
Sidan laddas...
Sidan laddas...
Sidan laddas...
Sidan laddas...
Sidan laddas...
Sidan laddas...
Sidan laddas...
Sidan laddas...
Sidan laddas...
Sidan laddas...
Sidan laddas...
Sidan laddas...
Sidan laddas...
Sidan laddas...
Sidan laddas...
Sidan laddas...
Sidan laddas...
Sidan laddas...
Sidan laddas...
Sidan laddas...
Sidan laddas...
Sidan laddas...
Sidan laddas...
Sidan laddas...
Sidan laddas...
Sidan laddas...
Sidan laddas...
Sidan laddas...
Sidan laddas...
Sidan laddas...
Sidan laddas...
Sidan laddas...
Sidan laddas...
Sidan laddas...
Sidan laddas...
Sidan laddas...
Sidan laddas...
Sidan laddas...
Sidan laddas...
Sidan laddas...
Sidan laddas...
Sidan laddas...
Sidan laddas...
Sidan laddas...
Sidan laddas...
Sidan laddas...
Sidan laddas...
Sidan laddas...
Sidan laddas...
Sidan laddas...
Sidan laddas...
Sidan laddas...
Sidan laddas...
Sidan laddas...
Sidan laddas...
Sidan laddas...
Sidan laddas...
Sidan laddas...
Sidan laddas...
Sidan laddas...
Sidan laddas...
Sidan laddas...
Sidan laddas...
Sidan laddas...
Sidan laddas...
Sidan laddas...
Sidan laddas...
Sidan laddas...
-
 1
1
-
 2
2
-
 3
3
-
 4
4
-
 5
5
-
 6
6
-
 7
7
-
 8
8
-
 9
9
-
 10
10
-
 11
11
-
 12
12
-
 13
13
-
 14
14
-
 15
15
-
 16
16
-
 17
17
-
 18
18
-
 19
19
-
 20
20
-
 21
21
-
 22
22
-
 23
23
-
 24
24
-
 25
25
-
 26
26
-
 27
27
-
 28
28
-
 29
29
-
 30
30
-
 31
31
-
 32
32
-
 33
33
-
 34
34
-
 35
35
-
 36
36
-
 37
37
-
 38
38
-
 39
39
-
 40
40
-
 41
41
-
 42
42
-
 43
43
-
 44
44
-
 45
45
-
 46
46
-
 47
47
-
 48
48
-
 49
49
-
 50
50
-
 51
51
-
 52
52
-
 53
53
-
 54
54
-
 55
55
-
 56
56
-
 57
57
-
 58
58
-
 59
59
-
 60
60
-
 61
61
-
 62
62
-
 63
63
-
 64
64
-
 65
65
-
 66
66
-
 67
67
-
 68
68
-
 69
69
-
 70
70
-
 71
71
-
 72
72
-
 73
73
-
 74
74
-
 75
75
-
 76
76
-
 77
77
-
 78
78
-
 79
79
-
 80
80
-
 81
81
-
 82
82
-
 83
83
-
 84
84
-
 85
85
-
 86
86
-
 87
87
-
 88
88
-
 89
89
-
 90
90
-
 91
91
-
 92
92
-
 93
93
-
 94
94
-
 95
95
-
 96
96
-
 97
97
-
 98
98
-
 99
99
-
 100
100
-
 101
101
-
 102
102
-
 103
103
-
 104
104
-
 105
105
-
 106
106
-
 107
107
-
 108
108
-
 109
109
-
 110
110
-
 111
111
-
 112
112
-
 113
113
-
 114
114


Kenwood BM256 Bruksanvisning
- Kategori
- Maskiner för brödtillverkning
- Typ
- Bruksanvisning
på andra språk
- italiano: Kenwood BM256 Manuale del proprietario
- eesti: Kenwood BM256 Omaniku manuaal
- Deutsch: Kenwood BM256 Bedienungsanleitung
- français: Kenwood BM256 Le manuel du propriétaire
- dansk: Kenwood BM256 Brugervejledning
- Nederlands: Kenwood BM256 de handleiding
Relaterade papper
-
Kenwood BM350 Bruksanvisning
-
-
Kenwood BM250 Bruksanvisning
-
Kenwood RAPID BAKE Användarmanual
-
Kenwood BM260 Användarmanual
-
Kenwood BM366 Bruksanvisning
-
-
Kenwood BM450 Bruksanvisning
-
-
Andra dokument
-
Redmond RBM-M1907-E Bruksanvisning
-
Melissa 643-032 Användarmanual
-
Electrolux EBM8000N Användarmanual
-
Philips HD9040/90 Bruksanvisning
-
-
Philips HR2355/07 Användarmanual
-
-
Russell Hobbs 19811-56 Användarmanual
-