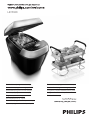
Philips HD9040/90 Bruksanvisning
- Kategori
- Maskiner för brödtillverkning
- Typ
- Bruksanvisning

HD9040
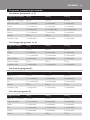
Standard bread programs and recipes
Standardbrødprogrammer og -opskrifter
Standardbrotprogramme und -rezepte
Βασικά προγράμματα και συνταγές
Programas y recetas de pan estándar
Perusleipäohjelmat ja -ohjeet
Recettes et programmes de pain classiques
Ricette e programmi standard per il pane
Standaardbroodprogramma’s en -recepten
Standard brødprogrammer og oppskrifter
Programe şi reţete standard pentru pâine
Programas e receitas de pão convencionais
Standardbrödrecept
Standart ekmek programları ve tarieri

2

3
1 2 3 4
5 6 7 8
9 10 11
1 Hr.
12
13
14 15 16
17
18
19
20

4

6
25
44
66
89
110
129
151
172
192
211
233
252
288
304

6
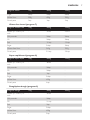
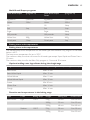
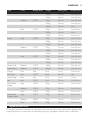
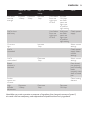
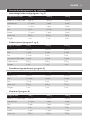
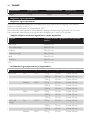
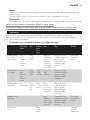
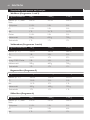
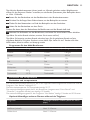
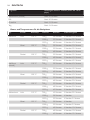
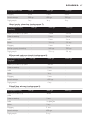
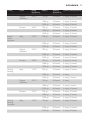
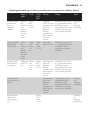
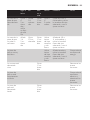
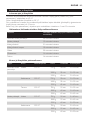
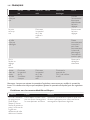
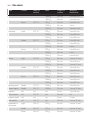
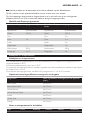
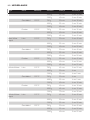
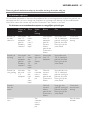
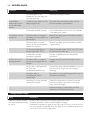
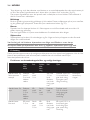
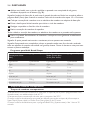
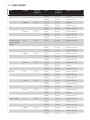
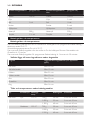
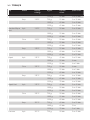
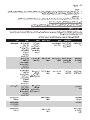
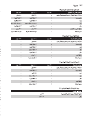
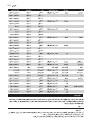
program: Basic White 750g 1000g 1250g
Water (27°C/80°F) or
milk
290ml 350ml 450ml
Milk powder 1½tbsp 2tbsp 3tbsp
Oil 1½tbsp 2tbsp 3tbsp
Salt 1tsp 1½tsp 1½tsp
Sugar 1½tbsp 2tbsp 3tbsp
White our 500g 600g 750g
Dried yeast 1tsp 1tsp 1tsp
program: Whole Wheat 750g 1000g 1250g
Water (27°C/80°F) 320ml 380ml 480ml
Oil 1tbsp 2tbsp 2tbsp
Salt 1½tsp 2tsp 2tsp
Honey OR sugar 2tbsp 2tbsp 3tbsp
Wholewheat our 500g 600g 750g
Dried yeast 1tsp 1tsp 1tsp
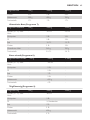
program: French 750g 1000g 1250g
Water (27°C/80°F) 290ml 350ml 450ml
Oil 1½tbsp 2tbsp 2tbsp
Salt 1½tsp 2tsp 3tsp
White our 500g 600g 750g
Dried yeast 1tsp 1tsp 1tsp
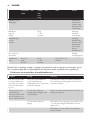
program: Sweet 750g 1000g 1250g
Water (27°C/80°F) or
milk
270ml 330ml 390ml
Milk powder 1½tbsp 2tbsp 3tbsp
Oil 2tbsp 3tbsp 4tbsp
Salt 1tsp 1tsp 1tsp

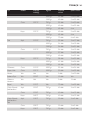
program: Sweet 750g 1000g 1250g
Sugar 4tbsp 5tbsp 6tbsp
White our 500g 600g 700g
Dried yeast 1tsp 1tsp 1tsp
program: Gluten Free 750g 1000g 1250g
Water (27°C/80°F) or
milk
- 330ml 410ml
Milk powder - 2tbsp 2tbsp
Oil - 2tbsp 3tbsp
Salt - 1½tsp 1½tsp
Sugar - 2tbsp 3tbsp
Gluten-free our - 560g 700g
Dried yeast - 2¼tsp 3¼tsp
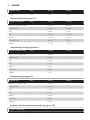
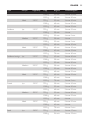
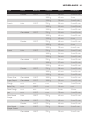
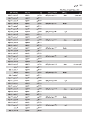
program: Super Rapid 750g 1000g 1250g
Water (27°C/80°F) or
milk
- 380ml -
Milk powder - 2tbsp -
Oil - 2tbsp -
Salt - 1tsp -
Sugar - 2tbsp -
White our - 600g -
Dried yeast - 4tsp -
program: Dough 750g 1000g 1000g
Water (27°C/80°F) or
milk
- 340ml
Milk powder - 2tbsp
Oil - ¼ cup
Salt - 2tsp
Sugar - 2tbsp
White our - 600g
Dried yeast - 2tsp
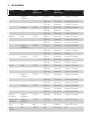
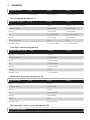
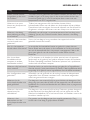
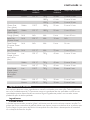
7

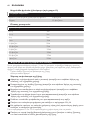
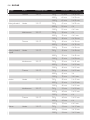
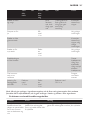
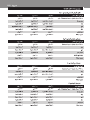
Program: Jam
Fresh or frozen (thawed) fruit 2 cups
Sugar 1.5 cups
tsp/tbsp/cup ml
¼tsp 1ml
½tsp 2ml
1tsp 5ml
1tbsp 15ml
¼ cup 50ml
1/3 cup 75ml
½ cup 125ml
2/3 cup 150ml
3/4 cup 175ml
1 cup 250ml
The Multi Bread Shaper programs (13 and 14) enable you to make your own variety of bread
shapes. From small and big buns to baguettes and free shapes. These programs have two stages:
- First stage: kneading and rising of the dough
- Second stage: baking
1 Remove the bread pan from the appliance (see chapter ‘Using the appliance’ in the user
manual).
2 Assemble the kneading blades (see chapter ‘Using the appliance’ in the user manual).
3 Measure and put the ingredients in the bread pan (see chapter ‘Using the appliance’ in the
user manual).
4 Put the bread pan back in the breadmaker (see chapter ‘Using the appliance’ in the user
manual).
5 Plug in the breadmaker.
6 Press the program selector and select program 13 or 14.
7 If desired, press the crust colour selector one or more times to select the appropriate crust
colour.
For programs 13 and 14, the preset crust colour is medium.
8 Press the start/stop/cancel button to start the dough kneading cycle, which is followed by the
rising cycle.
9 When the rst stage of the program is nished, the appliance goes into standby.
8

, The appliance beeps to tell you that the kneading and rising of the dough is nished.
Note: The two cycles (kneading and rising of the dough) take place automatically and last 1 hour and 21
minutes, i.e. 26 minutes of kneading followed 55 minutes of rising.
Note: It is normal for the dough not to be evenly blended during kneading.
When the rst stage of the program is nished, the dough must be baked within one hour. After
one hour, the appliance resets itself and the Multi Bread Shaper program is lost.
1 Shape your bread as desired and put it in the baking trays (see section ‘Multi Bread Shaper
recipes’ below).
2 Set up the baking rack (see section ‘Setting up the baking rack’ below).
3 Put the baking rack with the baking trays in the breadmaker.
Note: You have to remove the bread pan before you can use the baking rack.
4 Close the lid and press the stop/start/cancel button to start the baking cycle.
The breadmaker comes with a baking rack specially intended for Multi Bread Shaper recipes
(programs 13 and 14). The baking rack comes with two baking trays. With the two long separators
and the four short separators you can divide the baking trays to bake baguettes, rolls, buns or free-
shape bread.
1 To bake two long baguettes or other breads, place the long separator in the baking tray. Press
the separator down to x it.
2 To bake short baguettes or other short breads, place two short separators across the baking
tray and push them into place.
3 To bake rolls or buns, rst place the long separator and then t the slots in the short
separators into the slots in the long separator.
4 To bake free-shape bread, leave out all separators.
For these recipes you need the baking rack, the baking trays, the separators for the baking trays, the
slitter and the brush.
This recipe makes 4 baguettes of 100g each.
The required crust colour setting is medium.
Ingredients:
- 170 ml water
- 1tsp salt
- 280g bread our
- 1tsp dry yeast
Note: To give your baguettes a springier texture, add 1 tbsp oil to the ingredients. If you want to give the
4 baguettes more colour, add 2 tsp sugar to the ingredients.
To shape the baguettes:
1 Sprinkle some our on the work surface.
2 Remove the bread pan from the appliance and take the dough out of the bread pan.
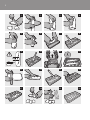
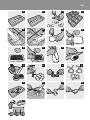
3 Roll the dough into a ball and divide the ball into four lumps with a knife (Fig. 1).
9

Note: Make sure the lumps have the same weight.
Tip: To make the baguettes lighter and more airy, leave the dough balls to rest for 5 minutes before you
shape them.
4 Flatten each dough lump on the oured work surface with the palm of your hand or by
gently rolling it with a rolling pin (Fig. 2).
5 Grasp the long side of the sheet of dough and fold it inwards. Then grasp the other long side
of the sheet and fold it inwards on top of the folded-in side (Fig. 3).
6 Push your ngers into the centre of the folded dough across its entire length to create a long
cavity (Fig. 4).
7 Close the cavity by pulling the front half of the dough up and across the cavity and place it on
top of the other half of the dough. Then seal the seam (Fig. 5).
8 Put the dough on the work surface with the seam pointing down and roll it back and forth
with your hands. Start in the centre and move your hands outwards along the length of the
dough while rolling it in order to stretch it to the desired length. (Fig. 6)
9 Roll the dough with your hands without pressing too much to get a regular shape. The
thickness and width of the dough must remain even.
Note: The dough must have the same length as the baking tray (approx. 18cm).
Tip: To vary the avour of the baguettes, you can add ingredients such as sesame or poppy seeds during
this stage.
10 Assemble the long separators in the two baking trays and place the dough shapes in
each section of the baking trays (Fig. 7).
11 For optimal results, make diagonal 1cm long slits in the top of the shaped dough with the
slitter supplied or with a serrated knife (Fig. 8).
Note: Make sure the slits are not more than 1cm deep and 2cm apart (Fig. 9).
12 Use the brush to dampen the top of the dough shapes with water (Fig. 10).
Note: Make sure no water is left behind in the baking tray.
13 Put the baking rack with the baking trays in the breadmaker.
14 Press the stop/start/cancel button to start the baking cycle.
15 Unplug the appliance at the end of the baking cycle.
16 Lift the baking rack out of the appliance (Fig. 11).
Be careful, the baking rack, the baking trays and the breads are hot.
17 Take the baguettes from the baking trays and leave them to cool on a wire cooling
rack (Fig. 12).
Bloomer refers to a bread shape that is cylindrical, but at on the bottom with several diagonal
slashes across the top.
1 Use the ingredients and follow steps 1 to 3 under ‘Baguettes’ above.
2 Roll out each of the four dough lumps with a rolling pin into a 18cm-long and approx.
1.5cm-thick rectangular sheets with round corners (Fig. 13).
3 Grasp the long side of each sheet of dough and roll it up into a 5cm wide roll. Tuck in the
ends and smooth them (Fig. 14).
10

4 Place the long separators in the baking trays and place the dough shapes in each section.
5 Cut diagonal slashes across the top approx. 1.5cm apart (usually about 6 slashes per dough
shape) with the slitter supplied or a serrated knife (Fig. 15).
6 Use the brush to dampen the top of the dough shapes with water.
Note: Make sure no water is left behind in the baking tray.
7 Put the baking rack with the baking trays in the breadmaker.
8 Press the stop/start/cancel button to start the baking cycle.
9 Unplug the appliance at the end of the baking cycle.
10 Lift the baking rack out of the appliance.
Be careful, the baking rack, the baking trays and the breads are hot.
11 Take the bloomers from the baking trays and leave them to cool on a wire cooling rack.
Epi French bread is a French bread made of baguette dough and shaped like an ear of corn (‘epi’ is
French for ear of corn).
1 Use the ingredients under ‘Baguettes’ above and shape the baguettes by following steps 1 to
9.
2 Place the long separators in the baking trays and place the dough shapes in each section.
3 Use a pair of scissors to slash the top of the dough shape at 2 to 2.5cm intervals across its
full length to create aps in the top of the dough shape (Fig. 16).
Note: The length of the cuts has to be about two-thirds of the height of the dough shape.
4 Put the aps of dough to the right and to the left in turns (Fig. 17).
5 Use the brush to dampen the top of the dough shapes with water.
Note: Make sure no water is left behind in the baking tray.
6 Put the baking rack with the baking trays in the breadmaker.
7 Press the stop/start/cancel button to start the baking cycle.
8 Unplug the appliance at the end of the baking cycle.
9 Lift the baking rack out of the appliance.
Be careful, the baking rack, the baking trays and the breads are hot.
10 Take the epi French breads from the baking trays and leave them to cool on a wire cooling
rack.
Tip: The aps of the baked epi French breads can be easily broken off as individual serving.
This is a recipe for one of the most common type of braided bread, i.e. three-strand braided bread.
Ingredients:
- ¼ cup milk
- ½ large egg
- 1 1/6 cup our
- 1tbsp sugar
- ¼ tsp salt
- 1/8 cup butter
11

- ¾tsp dry yeast
To shape the braided bread:
1 Sprinkle some our on the work surface.
2 Remove the bread pan from the appliance and take the dough out of the bread pan.
3 Roll the dough into a ball and divide the ball into six lumps with a knife (Fig. 18).
Note: Make sure the lumps have the same weight.
4 Place three lumps on the oured work surface and roll each lump back and forth with your
hands. Start in the centre and move your hands outwards along the length of the dough while
rolling it in order to stretch it to the desired length (Fig. 19).
Note: Make sure the dough strands keep a consistent diameter. The dough strands must be rolled until
they have the same length as the baking tray (approx. 18cm).
5 Place the three dough strands next to each other on the baking tray (Fig. 20).
6 Start braiding the dough strands in the centre. Lift the right strand and pass it over the
centre strand. Then pass the left strand over the right strand, the centre strand over the left
strand. Continue braiding until you reach the end of the strands. Then braid from the centre
towards the other end (Fig. 21).
7 Wet the ends, pinch them together and tuck them under (Fig. 22).
8 Use the brush to dampen the top of the dough shapes with water.
Note: Make sure no water is left behind in the baking tray.
9 Follow steps 4 to 8 for the other three strands.
10 Put the baking rack with the baking trays in the breadmaker.
11 Press the stop/start/cancel button to start the baking cycle.
12 Unplug the appliance at the end of the baking cycle.
13 Lift the baking rack out of the appliance.
Be careful, the baking rack, the baking trays and the breads are hot.
14 Take the braided breads from the baking trays and leave them to cool on a wire cooling rack.
This recipe makes 12 rolls.
Ingredients:
- 170ml water
- 1tsp salt
- 280g bread our
- 1tsp dry yeast
To shape the rolls:
1 Sprinkle some our on the work surface.
2 Remove the bread pan from the appliance and take the dough out of the bread pan.
3 Roll the dough into a ball and divide the ball into 12 lumps with a knife (Fig. 23).
Note: Make sure the lumps have the same weight.
4 Shape each lump into a roll and place the shaped dough on the baking tray (Fig. 24).
12

5 Slash the dough down the centre with the slitter to create a deep score that divides the
dough into halves (Fig. 25).
6 Slash the dough again perpendicular to the rst score to divide the dough into
quarters (Fig. 26).
7 Use a brush to dampen the top of the dough shapes with water.
Note: Make sure no water is left behind in the baking tray.
8 Put the baking rack with the baking trays in the breadmaker.
9 Press the stop/start/cancel button to start the baking cycle.
10 Unplug the appliance at the end of the baking cycle.
11 Lift the baking rack out of the appliance.
Be careful, the baking rack, the baking trays and the rolls are hot.
12 Take the rolls from the baking trays and leave them to cool on a wire cooling rack.
Ingredients:
- ¼ cup milk
- ½ large egg
- 1 1/6 cup bread our
- 1tbsp sugar
- ¼tsp salt
- 1/8 cup butter
- ¾tsp dry yeast
Filling:
- 1tbsp granulated sugar
- ½tsp cinnamon
- 1/8 cup raisins
- Mix the lling ingredients well before adding them to the dough.
Glazing:
- ½ large egg, beaten
- 2tsp water
To shape the cinnamon buns:
1 Sprinkle some our on the work surface.
2 Remove the bread pan from the appliance and take the dough out of the bread pan.
3 Roll the dough into a ball with your hands and cut the ball in two equal halves (Fig. 27).
4 Roll the half dough balls out into rectangular shapes (Fig. 28).
5 Place an equal amount of lling on ¾ of each shape (Fig. 29).
6 Roll up the dough shapes and seal the end rmly (Fig. 30).
Note: Seal the top seam and both ends properly to prevent the roll from unravelling when you start to
slice it (Fig. 31).
7 Slice the rolled dough into two equal pieces (Fig. 32).
8 Put the pieces of rolled dough on the baking tray with the sliced side facing upwards.
9 Apply egg glazing to the top of the dough with the brush (Fig. 33).
10 Put the baking rack with the baking trays in the breadmaker.
13

11 Press the stop/start/cancel button to start the baking cycle.
12 Unplug the appliance at the end of the baking cycle.
13 Lift the baking rack out of the appliance.
Be careful, the baking rack, the baking trays and the buns are hot.
14 Take the buns from the baking trays and leave them to cool on a wire cooling rack.
This recipe makes 32 pretzels.
Ingredients:
- 1 cup beer
- 2½ cups all-purpose our
- 2tbsp sugar
- 1tsp salt
- 1tbsp butter
- 1tsp dry yeast
To shape the pretzels:
1 Sprinkle some our on the work surface.
2 Remove the bread pan from the appliance and take the dough out of the bread pan.
3 Roll the dough into a ball and divide the ball into four equally sized lumps with a knife.
4 Cut each lump into 8 equally sized lumps.
5 Roll each lump into an approx. 50cm-long and 1cm-thin strand (Fig. 34).
6 Pick the ends of each strand and pull them towards each other until they cross each
other. (Fig. 35)
7 Then twist one end round the other and place the twisted ends across the other side of the
circle to shape the pretzel (Fig. 36).
8 Place the pretzels upside down with the twisted ends underneath 2cm apart on the baking
tray. (Fig. 37)
9 Apply beaten egg with the brush and sprinkle the pretzels lightly with coarse salt, poppy
seeds or sesame seeds (Fig. 38).
Tip: The breadmaker can only bake 6 pretzels at a time. You may need to use the Bake program to
continue baking. Each baking cycle lasts approx. 10-12 minutes.
10 Put the baking rack with the baking trays in the breadmaker.
11 Press the stop/start/cancel button to start the baking cycle.
12 Unplug the appliance at the end of the baking cycle.
13 Lift the baking rack out of the appliance.
Be careful, the baking rack, the baking trays and the pretzels are hot.
14 Take the pretzels from the baking trays and leave them to cool on a wire cooling rack.
Tip: If you want soft and chewy pretzels, serve them warm with mustard.
Tip: For crispy, dry, crunchy pretzels, place the baked pretzels in a cool oven on an ungreased baking tray.
Allow them to stand for 3 hours or overnight to become dry and crunchy.
14

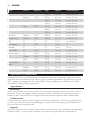
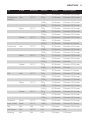
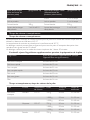
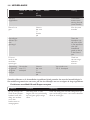
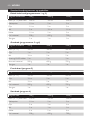
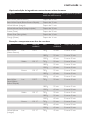
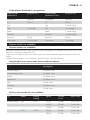
Multi Bread Shaper (program 13) Multi Bread Shaper
Sweet
(program 14)
Ingredients Quantities Ingredients Quantities
Water 150ml Water 100ml
Oil - Oil 1tbsp
Salt 1tsp Salt ½tsp
Sugar - Sugar 2tbsp
Milk powder - Milk powder 1tbsp
White our 300g White our 200g
Dried yeast 1½tsp Dried yeast 1tsp
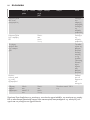
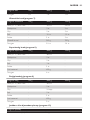
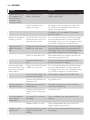
The standard keep-warm temperature for the bread types and the Bake Only program in the tables
below is 60°C.
The keep-warm temperature for jam is 20°C.
The maximum delay time that can be set for all bread types except Super Rapid and Gluten Free is
15 hours.
The maximum delay time for the Bake Only program is 1 hour and 30 minutes.
Program Adding extra ingredients (when appliance beeps)
Basic White After 26 min.
Basic White Rapid After 15 min.
Whole Wheat After 51 min.
Whole Wheat Rapid After 10 min.
Sweet Afer 20 min.
Gluten Free After 14 min.
Dough After 16 min.
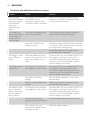
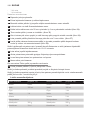
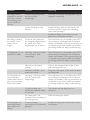
Type Crust Baking temp. Weight Baking time Process time
Basic White Light 110°C 750g 50 min. 3 hrs 30 min.
1000g 55 min. 3 hrs 35 min.
1250g 60 min. 3 hrs 40 min.
Medium 120°C 750g 50 min. 3 hrs 30 min.
1000g 55 min. 3 hrs 35 min.
15

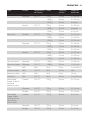
Type Crust Baking temp. Weight Baking time Process time
1250g 60 min. 3 hrs 40 min.
Dark 130°C 750g 55 min. 3 hrs 35 min.
1000g 60 min. 3 hrs 40 min.
1250g 65 min. 3 hrs 45 min.
Basic White
Rapid
Light 110°C 750g 50 min. 2 hrs 40 min.
1000g 55 min. 2 hrs 45 min.
1250g 60 min. 2 hrs 50 min.
Medium 120°C 750g 50 min. 2 hrs 40 min.
1000g 55 min. 2 hrs 45 min.
1250g 60 min. 2 hrs 50 min.
Dark 130°C 750g 55 min. 2 hrs 45 min.
1000g 60 min. 2 hrs 50 min.
1250g 65 min. 2 hrs 55 min.
Whole Wheat Light 115°C 750g 45 min. 3 hrs 55 min.
1000g 50 min. 4 hrs
1250g 55 min. 4 hrs 5 min.
Medium 125°C 750g 50 min. 4 hrs
1000g 55 min. 4 hrs 5 min.
1250g 60 min. 4 hrs 10 min.
Dark 135°C 750g 60 min. 4 hrs 10 min.
1000g 65 min. 4 hrs 15 min.
1250g 70 min. 4 hrs 20 min.
Whole Wheat
Rapid
Light 115°C 750g 45 min. 2 hrs 40 min.
1000g 50 min. 2 hrs 45 min.
1250g 55 min. 2 hrs 50 min.
Medium 125°C 750g 50 min. 2 hrs 45 min.
1000g 55 min. 2 hrs 50 min.
1250g 60 min. 2 hrs 55 min.
Dark 135°C 750g 60 min. 2 hrs 55 min.
1000g 65 min. 3 hrs
1250g 70 min. 3 hrs 5 min.
French Light 115°C 750g 50 min. 5 hrs 45 min.
16

Type Crust Baking temp. Weight Baking time Process time
1000g 55 min. 5 hrs 50 min.
1250g 60 min. 5 hrs 55 min.
Medium 125°C 750g 55 min. 5 hrs 50 min.
1000g 60 min. 5 hrs 55 min.
1250g 65 min. 6 hrs
Dark 135°C 750g 60 min. 5 hrs 55 min.
1000g 65 min. 6 hrs
1250g 70 min. 6 hrs 5 min.
Sweet Light 110°C 750g 52 min. 3 hrs 17 min.
1000g 54 min. 3 hrs 19 min.
1250g 56 min. 3 hrs 21 min.
Medium 115°C 750g 54 min. 3 hrs 19 min.
1000g 57 min. 3 hrs 22 min.
1250g 60 min. 3 hrs 25 min.
Dark 125°C 750g 58 min. 3 hrs 23 min.
1000g 61 min. 3 hrs 26 min.
1250g 64 min. 3 hrs 29 min.
Gluten Free Medium 110°C 1000g 95 min. 2 hrs 54 min.
Super Rapid Medium 135°C 1000g 50 min. 1 hrs 25 min.
Dough N/A N/A N/A 0 min. 1 hr 30 min.
Bake Only N/A 120°C N/A 10 min. N/A
Pasta Dough N/A N/A N/A 0 min. 14 min.
Jam N/A 115°C N/A 70 min. 1 hr 25 min
Multi Bread
Shaper
Light 120°C 750g 40 min. 2 hrs 15 min.
Medium 130°C 750g 40 min. 2 hrs 15 min.
Dark 140°C 750g 40 min. 2 hrs 15 min.
Multi Bread
Shaper Sweet
Light 110°C 750g 30 min. 2 hrs 5 min.
Medium 120°C 750g 30 min. 2 hrs 5 min.
Dark 130°C 750g 30 min. 2 hrs 5 min.
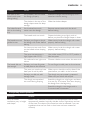
This chapter describes a number of ingredients and tools used for baking bread. Each ingredient has
a special purpose. It is important to purchase high-quality ingredients and use them in the exact
17

amounts specied in the recipes. While some ingredients are interchangeable, others will produce
poor results in bread.
White our contains enough protein (gluten) to give a lot of volume and texture to bread. It is
gluten that forms the cell wall structure, traps and holds the air bubbles and allows the bread to rise.
Most our is bleached. This does not affect the baking performance or the shelf life.
Wholewheat our is a coarsely ground type of our milled from the entire wheat kernel - brand,
germ and endosperm. The brand and germ provide the brown colour and nutty avour while
increasing bre. Baking with wholewheat our results in shorter, denser loaves.
Rye our is made by nely grinding rye kernels. Only ours made from wheat and rye contain
gluten-forming proteins. The gluten in rye our is not very elastic, therefore rye our must be used
in combination with wheat our.
Cereals, grains and seeds provide variety in texture, avour and appearance of breads. They increase
bre content. Three, ve, seven or twelve-grain cereals can be substituted in a recipe for any multi-
grain cereal. Cracked wheat is the wholewheat kernel that is cracked into particles of different sizes
from coarse to ne. Bulgur is the wheat kernel with the bran removed, which is steamed, dried and
ground. Natural bran, both wheat and oats, cuts the gluten strands. Therefore do not use more bran
than is stated in the recipe.
Gluten is present in many cereals, such as wheat, rye, barley, oats, etc. Gluten-free bread is to be
made exclusively from gluten-free our or gluten-free bread mixes.
Semolina, a creamy yellow coarsely ground our milled from hard durum wheat, is high in protein. It
is used to make fresh pasta. Pasta dough made of semolina is easier to knead and holds its shape
better during baking than pasta dough made with all-purpose our. You can replace part of the all-
purpose or wholewheat our by semolina.
Fats tenderise, add avour and extend shelf life of bread by retaining moisture. Shortening,
margarine, butter or oil can be interchanged in recipes. Loaves baked with these fats will vary slightly.
Avoid low-calorie soft margarine as the higher water content can greatly affect loaf size and texture.
Salt controls the action of the yeast and adds avour. Never omit salt from the dough. The amounts
used are small but necessary. Without salt, the bread may overrise or collapse.
Sugars provide food for the yeast as well as sweetness for the loaf and colour for the crust. Unless
indicated in the recipe, use granulated white sugar. Honey, brown sugar and molasses give bread a
unique avour and colour. Substituting one for the other may affect the nal result.
Aspartame-based (not saccharin-based) granular sugar substitutes can be used. Substitute equal
amounts for sugar in the recipe.
Liquids blend with the our to produce an elastic dough. Milk gives a tender texture while water
results in a crisper crust. Skimmed milk powder and buttermilk powder increase the nutritional value
while softening the texture. There is no need to reconstitute skimmed milk powder or buttermilk
18

powder. The use of these powders increases the number of recipes that may be used in
combination with the timer function. Do not use the timer function for recipes that require fresh
milk. Buttermilk powder tends to blend better when added after the our.
If you use milk instead of water and milk powder, use the same amount as the water. Homogenised,
2%, 1% or skimmed milk can be used in recipes that require milk. Unsweetened fruit and vegetable
juices can be used in amounts stated in the recipes. Read the labels of these juices to make sure
they do not contain added salt, sugar or sweeteners.
Eggs add colour, richness and avour. Always use large-size eggs fresh from the refrigerator. Do not
use the timer function for recipes that require fresh eggs.
Do not press cheese into the measuring spoon when you measure it. Low-fat cheeses may affect
the loaf height and shape. Do not use the timer function for recipes that require cheese
Yeast, a tiny single-celled living organism, feeds on the carbohydrates in our and sugar to produce
carbon dioxide gas that makes bread rise. Mixed with water and sugar, yeast wakes up during the
kneading process and lls the dough with tiny bubbles that make it rise. Initial baking causes the
dough to rise higher until the yeast is inactivated. Exposure to air, heat and humidity decreases yeast
activity. Always use yeast before the expiry date. After opening, store yeast in the refrigerator in its
original container, and use it within 6-8 weeks. There are 3 types of yeast available - active dry,
instant, and breadmaker yeast. Breadmaker yeast is a particularly active strain of yeast with increased
levels of ascorbic acid (vitamin C). It was developed specically for use in breadmakers. To substitute
active dry yeast or instant yeast for breadmaker yeast, increase the amount stated in the recipe by
¼ teaspoon. For the best results, use the type of yeast specied in the recipe. Heat kills yeast. When
you prepare llings, it is important that you let ingredients such as melted butter cool down before
you use them. Keep yeast away from liquids, fats and salt as they slow the activity. Do not increase
the amount of yeast stated in the recipe.
Cinnamon and garlic both inhibit rising. If you use these ingredients, add them at the corner of
the bread pan to make sure they do not touch the yeast.
Dissolve 1 tsp sugar into ½ cup lukewarm water in a measuring cup. Sprinkle 2 tsp yeast over the
surface. Stir gently. Let the mixture sit undisturbed for 10 minutes. The mixture should be foamy with
a strong smell of yeast. If not, purchase new yeast.
Bread mixes are available in many stores. Bread mix already includes our, salt, sugar and yeast in the
right amounts, so it is convenient to use. It also comes in many different avours and varieties. In
most cases you just have to put water or milk and butter or oil in the bread pan as indicated in the
instructions on the bread mix package, and then add the bread mix.
Perfect loaves depend on the correct amount of each ingredient. Therefore it is important that you
measure ingredients correctly. Even 1 or 2 incorrectly measured tablespoons (either to much or too
little) make a big difference for the end result. Never measure ingredients over the bread pan, as you
may spill excess ingredients into the bread pan.
Tip: When you have to add e.g. 280ml water, add 1 cup (250ml)of water using the measuring cup and
then add 2tbsp (30ml) of water using the measuring spoon.
Store our in an airtight container in a cool, dry place. Exposed to heat or moisture, our loses its
strength and ability to rise. Flour absorbs avours quickly, so store it away from onions or garlic.
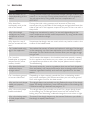
19

Store bread, sealed tightly in a plastic bag or other airtight container, at room temperature for 1 to 2
days. French-style breads should be stored in a paper bag or exposed to the air to retain their crisp
crust. They are best eaten the same day as baked
- You can use the measuring spoon supplied to measure yeast, sugar, salt, milk powder and spices.
- Do not use measuring spoons to scoop up dry ingredients. Spoon dry ingredients lightly into
the measuring spoon (Fig. 39).
- Heap the spoon, and then level it with the edge of a metal spatula or the straight edge of a
knife. Do not press the ingredients into the spoon, nor shake the spoon to level it (Fig. 40).
- The only ingredient that should be pressed into the measuring spoon is brown sugar. Press onto
the sugar until it has the shape of the measuring spoon.
- Use a graduated transparent measuring cup for all liquids. Place the measuring cup on a at
surface and read the graduation at eye level. If necessary, add or remove some liquid (Fig. 41).
- The brush can for instance be used to dampen the top of multi-shaper bread with water or to
apply beaten egg to the top of buns.
- It can also be used to remove excess water from the baking tray or the dough.
- The slitter can be used to cut the dough and make slits in the top of the shaped dough of
multi-shape bread.
Be careful when you handle the slitter. Its blade is very sharp.
Put the sheath back on the slitter after use and store the slitter in a safe place.
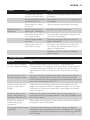
This chapter summarises the most common problems you could encounter with the appliance. If
you are unable to solve the problem with the information below, contact the Consumer Care
Centre in your country.
Water or
milk
Salt Sugar or
honey
Flour Yeast Other
Loaf rises,
then falls
Decrease
1-2tbsp,
use
colder
liquid
Increase
¼tsp
Increase 1-
2tbsp, use
fresher
our, use
right type
of our
Decrease
1/8-¼tsp,
use fresh
yeast, use
right type
of yeast at
right setting
Check power
supply
Loaf rises
too high
Decrease
1-2tbsp,
use
colder
liquid
Increase
1/4tsp
Decrease
½tsp
Decrease
1-2tbsp
Decrease
1/8-¼tsp,
use right
type of
yeast at
right setting
20
Sidan laddas ...
Sidan laddas ...
Sidan laddas ...
Sidan laddas ...
Sidan laddas ...
Sidan laddas ...
Sidan laddas ...
Sidan laddas ...
Sidan laddas ...
Sidan laddas ...
Sidan laddas ...
Sidan laddas ...
Sidan laddas ...
Sidan laddas ...
Sidan laddas ...
Sidan laddas ...
Sidan laddas ...
Sidan laddas ...
Sidan laddas ...
Sidan laddas ...
Sidan laddas ...
Sidan laddas ...
Sidan laddas ...
Sidan laddas ...
Sidan laddas ...
Sidan laddas ...
Sidan laddas ...
Sidan laddas ...
Sidan laddas ...
Sidan laddas ...
Sidan laddas ...
Sidan laddas ...
Sidan laddas ...
Sidan laddas ...
Sidan laddas ...
Sidan laddas ...
Sidan laddas ...
Sidan laddas ...
Sidan laddas ...
Sidan laddas ...
Sidan laddas ...
Sidan laddas ...
Sidan laddas ...
Sidan laddas ...
Sidan laddas ...
Sidan laddas ...
Sidan laddas ...
Sidan laddas ...
Sidan laddas ...
Sidan laddas ...
Sidan laddas ...
Sidan laddas ...
Sidan laddas ...
Sidan laddas ...
Sidan laddas ...
Sidan laddas ...
Sidan laddas ...
Sidan laddas ...
Sidan laddas ...
Sidan laddas ...
Sidan laddas ...
Sidan laddas ...
Sidan laddas ...
Sidan laddas ...
Sidan laddas ...
Sidan laddas ...
Sidan laddas ...
Sidan laddas ...
Sidan laddas ...
Sidan laddas ...
Sidan laddas ...
Sidan laddas ...
Sidan laddas ...
Sidan laddas ...
Sidan laddas ...
Sidan laddas ...
Sidan laddas ...
Sidan laddas ...
Sidan laddas ...
Sidan laddas ...
Sidan laddas ...
Sidan laddas ...
Sidan laddas ...
Sidan laddas ...
Sidan laddas ...
Sidan laddas ...
Sidan laddas ...
Sidan laddas ...
Sidan laddas ...
Sidan laddas ...
Sidan laddas ...
Sidan laddas ...
Sidan laddas ...
Sidan laddas ...
Sidan laddas ...
Sidan laddas ...
Sidan laddas ...
Sidan laddas ...
Sidan laddas ...
Sidan laddas ...
Sidan laddas ...
Sidan laddas ...
Sidan laddas ...
Sidan laddas ...
Sidan laddas ...
Sidan laddas ...
Sidan laddas ...
Sidan laddas ...
Sidan laddas ...
Sidan laddas ...
Sidan laddas ...
Sidan laddas ...
Sidan laddas ...
Sidan laddas ...
Sidan laddas ...
Sidan laddas ...
Sidan laddas ...
Sidan laddas ...
Sidan laddas ...
Sidan laddas ...
Sidan laddas ...
Sidan laddas ...
Sidan laddas ...
Sidan laddas ...
Sidan laddas ...
Sidan laddas ...
Sidan laddas ...
Sidan laddas ...
Sidan laddas ...
Sidan laddas ...
Sidan laddas ...
Sidan laddas ...
Sidan laddas ...
Sidan laddas ...
Sidan laddas ...
Sidan laddas ...
Sidan laddas ...
Sidan laddas ...
Sidan laddas ...
Sidan laddas ...
Sidan laddas ...
Sidan laddas ...
Sidan laddas ...
Sidan laddas ...
Sidan laddas ...
Sidan laddas ...
Sidan laddas ...
Sidan laddas ...
Sidan laddas ...
Sidan laddas ...
Sidan laddas ...
Sidan laddas ...
Sidan laddas ...
Sidan laddas ...
Sidan laddas ...
Sidan laddas ...
Sidan laddas ...
Sidan laddas ...
Sidan laddas ...
Sidan laddas ...
Sidan laddas ...
Sidan laddas ...
Sidan laddas ...
Sidan laddas ...
Sidan laddas ...
Sidan laddas ...
Sidan laddas ...
Sidan laddas ...
Sidan laddas ...
Sidan laddas ...
Sidan laddas ...
Sidan laddas ...
Sidan laddas ...
Sidan laddas ...
Sidan laddas ...
Sidan laddas ...
Sidan laddas ...
Sidan laddas ...
Sidan laddas ...
Sidan laddas ...
Sidan laddas ...
Sidan laddas ...
Sidan laddas ...
Sidan laddas ...
Sidan laddas ...
Sidan laddas ...
Sidan laddas ...
Sidan laddas ...
Sidan laddas ...
Sidan laddas ...
Sidan laddas ...
Sidan laddas ...
Sidan laddas ...
Sidan laddas ...
Sidan laddas ...
Sidan laddas ...
Sidan laddas ...
Sidan laddas ...
Sidan laddas ...
Sidan laddas ...
Sidan laddas ...
Sidan laddas ...
Sidan laddas ...
Sidan laddas ...
Sidan laddas ...
Sidan laddas ...
Sidan laddas ...
Sidan laddas ...
Sidan laddas ...
Sidan laddas ...
Sidan laddas ...
Sidan laddas ...
Sidan laddas ...
Sidan laddas ...
Sidan laddas ...
Sidan laddas ...
Sidan laddas ...
Sidan laddas ...
Sidan laddas ...
Sidan laddas ...
Sidan laddas ...
Sidan laddas ...
Sidan laddas ...
Sidan laddas ...
Sidan laddas ...
Sidan laddas ...
Sidan laddas ...
Sidan laddas ...
Sidan laddas ...
Sidan laddas ...
Sidan laddas ...
Sidan laddas ...
Sidan laddas ...
Sidan laddas ...
Sidan laddas ...
Sidan laddas ...
Sidan laddas ...
Sidan laddas ...
Sidan laddas ...
Sidan laddas ...
Sidan laddas ...
Sidan laddas ...
Sidan laddas ...
Sidan laddas ...
Sidan laddas ...
Sidan laddas ...
Sidan laddas ...
Sidan laddas ...
Sidan laddas ...
Sidan laddas ...
Sidan laddas ...
Sidan laddas ...
Sidan laddas ...
Sidan laddas ...
Sidan laddas ...
Sidan laddas ...
Sidan laddas ...
Sidan laddas ...
Sidan laddas ...
Sidan laddas ...
Sidan laddas ...
Sidan laddas ...
Sidan laddas ...
Sidan laddas ...
Sidan laddas ...
Sidan laddas ...
Sidan laddas ...
Sidan laddas ...
Sidan laddas ...
Sidan laddas ...
Sidan laddas ...
Sidan laddas ...
Sidan laddas ...
Sidan laddas ...
Sidan laddas ...
Sidan laddas ...
Sidan laddas ...
Sidan laddas ...
Sidan laddas ...
Sidan laddas ...
Sidan laddas ...
Sidan laddas ...
Sidan laddas ...
Sidan laddas ...
Sidan laddas ...
Sidan laddas ...
Sidan laddas ...
Sidan laddas ...
Sidan laddas ...
Sidan laddas ...
-
 1
1
-
 2
2
-
 3
3
-
 4
4
-
 5
5
-
 6
6
-
 7
7
-
 8
8
-
 9
9
-
 10
10
-
 11
11
-
 12
12
-
 13
13
-
 14
14
-
 15
15
-
 16
16
-
 17
17
-
 18
18
-
 19
19
-
 20
20
-
 21
21
-
 22
22
-
 23
23
-
 24
24
-
 25
25
-
 26
26
-
 27
27
-
 28
28
-
 29
29
-
 30
30
-
 31
31
-
 32
32
-
 33
33
-
 34
34
-
 35
35
-
 36
36
-
 37
37
-
 38
38
-
 39
39
-
 40
40
-
 41
41
-
 42
42
-
 43
43
-
 44
44
-
 45
45
-
 46
46
-
 47
47
-
 48
48
-
 49
49
-
 50
50
-
 51
51
-
 52
52
-
 53
53
-
 54
54
-
 55
55
-
 56
56
-
 57
57
-
 58
58
-
 59
59
-
 60
60
-
 61
61
-
 62
62
-
 63
63
-
 64
64
-
 65
65
-
 66
66
-
 67
67
-
 68
68
-
 69
69
-
 70
70
-
 71
71
-
 72
72
-
 73
73
-
 74
74
-
 75
75
-
 76
76
-
 77
77
-
 78
78
-
 79
79
-
 80
80
-
 81
81
-
 82
82
-
 83
83
-
 84
84
-
 85
85
-
 86
86
-
 87
87
-
 88
88
-
 89
89
-
 90
90
-
 91
91
-
 92
92
-
 93
93
-
 94
94
-
 95
95
-
 96
96
-
 97
97
-
 98
98
-
 99
99
-
 100
100
-
 101
101
-
 102
102
-
 103
103
-
 104
104
-
 105
105
-
 106
106
-
 107
107
-
 108
108
-
 109
109
-
 110
110
-
 111
111
-
 112
112
-
 113
113
-
 114
114
-
 115
115
-
 116
116
-
 117
117
-
 118
118
-
 119
119
-
 120
120
-
 121
121
-
 122
122
-
 123
123
-
 124
124
-
 125
125
-
 126
126
-
 127
127
-
 128
128
-
 129
129
-
 130
130
-
 131
131
-
 132
132
-
 133
133
-
 134
134
-
 135
135
-
 136
136
-
 137
137
-
 138
138
-
 139
139
-
 140
140
-
 141
141
-
 142
142
-
 143
143
-
 144
144
-
 145
145
-
 146
146
-
 147
147
-
 148
148
-
 149
149
-
 150
150
-
 151
151
-
 152
152
-
 153
153
-
 154
154
-
 155
155
-
 156
156
-
 157
157
-
 158
158
-
 159
159
-
 160
160
-
 161
161
-
 162
162
-
 163
163
-
 164
164
-
 165
165
-
 166
166
-
 167
167
-
 168
168
-
 169
169
-
 170
170
-
 171
171
-
 172
172
-
 173
173
-
 174
174
-
 175
175
-
 176
176
-
 177
177
-
 178
178
-
 179
179
-
 180
180
-
 181
181
-
 182
182
-
 183
183
-
 184
184
-
 185
185
-
 186
186
-
 187
187
-
 188
188
-
 189
189
-
 190
190
-
 191
191
-
 192
192
-
 193
193
-
 194
194
-
 195
195
-
 196
196
-
 197
197
-
 198
198
-
 199
199
-
 200
200
-
 201
201
-
 202
202
-
 203
203
-
 204
204
-
 205
205
-
 206
206
-
 207
207
-
 208
208
-
 209
209
-
 210
210
-
 211
211
-
 212
212
-
 213
213
-
 214
214
-
 215
215
-
 216
216
-
 217
217
-
 218
218
-
 219
219
-
 220
220
-
 221
221
-
 222
222
-
 223
223
-
 224
224
-
 225
225
-
 226
226
-
 227
227
-
 228
228
-
 229
229
-
 230
230
-
 231
231
-
 232
232
-
 233
233
-
 234
234
-
 235
235
-
 236
236
-
 237
237
-
 238
238
-
 239
239
-
 240
240
-
 241
241
-
 242
242
-
 243
243
-
 244
244
-
 245
245
-
 246
246
-
 247
247
-
 248
248
-
 249
249
-
 250
250
-
 251
251
-
 252
252
-
 253
253
-
 254
254
-
 255
255
-
 256
256
-
 257
257
-
 258
258
-
 259
259
-
 260
260
-
 261
261
-
 262
262
-
 263
263
-
 264
264
-
 265
265
-
 266
266
-
 267
267
-
 268
268
-
 269
269
-
 270
270
-
 271
271
-
 272
272
-
 273
273
-
 274
274
-
 275
275
-
 276
276
-
 277
277
-
 278
278
-
 279
279
-
 280
280
-
 281
281
-
 282
282
-
 283
283
-
 284
284
-
 285
285
-
 286
286
-
 287
287
-
 288
288
-
 289
289
-
 290
290
-
 291
291
-
 292
292
-
 293
293
-
 294
294
-
 295
295
-
 296
296
-
 297
297
-
 298
298
-
 299
299
-
 300
300
-
 301
301
-
 302
302
-
 303
303
-
 304
304
-
 305
305
-
 306
306
-
 307
307
-
 308
308
-
 309
309
-
 310
310


Philips HD9040/90 Bruksanvisning
- Kategori
- Maskiner för brödtillverkning
- Typ
- Bruksanvisning
på andra språk
- italiano: Philips HD9040/90 Manuale del proprietario
- Deutsch: Philips HD9040/90 Bedienungsanleitung
- português: Philips HD9040/90 Manual do proprietário
- français: Philips HD9040/90 Le manuel du propriétaire
- Türkçe: Philips HD9040/90 El kitabı
- dansk: Philips HD9040/90 Brugervejledning
Relaterade papper
Andra dokument
-
Moulinex NEO OW1201 Bruksanvisning
-
SEVERIN BM 3989 Bruksanvisning
-
Ide Line XBM938 Användarmanual
-
-
Kenwood BM250 Bruksanvisning
-
Kenwood BM256 Bruksanvisning
-
Kenwood BM366 Bruksanvisning
-
Kenwood BM450 Bruksanvisning
-
-
Kenwood BM350 Bruksanvisning