Hyundai 55267 Användarmanual
- Kategori
- Kraftgeneratorer
- Typ
- Användarmanual

HYUNDAI
HYUNDAI
A
A
H
H
H
H
Z
Z
V
V
K
K
W
W
V
V
LED6
LED6
–
–
PROG
PROG
RESET
RESET
+
+
30 mA
30 mA
AUTO
AUTO
ATS
ATS
AUTO
AUTO
AC 400V
AC 400V
V-A-KW-Hz/
V-A-KW-Hz/
LED
LED
AC 230V
AC 230V
DELDCI
DELDCI
400V
400V
230V
230V
DIESEL GENERATOR
55267
Handleiding
Instruction manual
Mode d’emploi
Gebrauchsanleitung
Bruksanvisning
Brugsanvisning

HYUNDAI
2
Nederlands 5
English 13
Français 21
Deutsch 29
Svenska 37
Dansk 45
• Verklaring van overeenstemming 55
• Declaration of conformity
• Certificat de conformité
• Konformitätserklärung
• Förklaring om överensstämmelse
• Overensstemmelseserklæring

3
HYUNDAI
A
H
H
Z
V
K
W
V
LED6
–
PROG
RESET
+
30 mA
AUTO
ATS
AUTO
AC 400V
V-A-KW-Hz/
LED AC 230V
DELDCI
400V 230V
A
B
A
H
HZ
V
KW
V
GV27VS
–
PROG
RESET
+
11
19
1
3
5a
6
2
8
20
12 13 14
15
16 17
18
21
22
23
24
25
26
27
28
4
5b
7
109

HYUNDAI
4

5
NEDERLANDS
DIESELGENERATOR
55267
WAARSCHUWING
Lees alle veiligheidswaarschuwingen en alle
instructies. Als u de waarschuwingen en instructies niet
volgt, kan dat leiden tot elektrische schokken, brand en/of
ernstig letsel. Bewaar alle waarschuwingen en
instructies voor toekomstig gebruik.
VEILIGHEIDSWAARSCHUWINGEN
Houd u tijdens het gebruik van de machine altijd aan de bijgesloten
veiligheidswaarschuwingen en volg tevens de aanvullende
veiligheidsinstructies hieronder.
AANVULLENDE VEILIGHEIDSINSTRUCTIES VOOR EEN
DIESELGENERATOR
De meeste ongevallen kunnen worden voorkomen als
u alle instructies in deze handleiding en op de machine
opvolgt. De meestvoorkomende gevaren worden hieronder
besproken tezamen met de beste manier om uzelf en
anderen te beschermen.
De waarschuwingen, opmerkingen en instructies die in
deze handleiding worden gegeven kunnen niet alle
mogelijke omstandigheden en situaties die zich kunnen
voordoen behandelen. De gebruiker moet begrijpen dat
gezond verstand en voorzichtigheid factoren zijn die niet in
dit product kunnen worden ingebouwd. De gebruiker moet
hierover zelf beschikken.
• Lees en begrijp deze instructiehandleiding voordat u de machine
bedient. Als u dit niet doet, kan dat leiden tot persoonlijk letsel of
schade aan het apparaat.
• Weet hoe u de machine snel kunt stoppen en begrijp de werking
van alle bedieningsorganen. Laat nooit iemand de machine
bedienen zonder goede instructie.
• Laat kinderen niet de machine bedienen. Houd kinderen en
huisdieren uit de buurt van de gebruikslocatie.
• De machine produceert zeer giftige dampen en uitlaatgassen,
zoals koolmonoxide. Dit is een onzichtbaar, reukloos en
smaakloos gas dat snel kan leiden tot bedwelming en zelfs de
dood. Als gevolg daarvan mag de machine uitsluitend buitenshuis
worden gestart en gebruikt.
• Verzeker u ervan dat de uitlaatgassen niet via openstaande
ramen en deuren in afgesloten ruimten kunnen komen, zoals
huizen, kelders en garages.
• De generator moet op minimaal één meter afstand van andere
machines en brandbare materialen worden geplaatst.
• Gebruik de machine niet bij ondergrondse werkzaamheden.
• Gebruik de machine niet op plaatsen waar explosiegevaar heerst.
• Bij gebruik van een uitlaatpijpverlenging, dient u zich ervan te
verzekeren dat deze door een vakman, veilig en lekvrij wordt
gemonteerd. In geval van een lek, bestaat een extreem gevaar
van verstikking. Het gebruik van een koolmonoxidemelder wordt
sterk aanbevolen. De maximaal toegestane lengte van de
verlenging mag niet worden overschreden. Anders bestaat het
risico dat het uitlaatgas terugstroomt, wat kan leiden tot
oververhitting en beschadiging van de motor.
• Brandstof en brandstofdampen zijn uiterst brandbaar! Roken,
open vuur, gloeiendhete voorwerpen en elektrische vonken zijn
verboden tijdens het werken met brandstof. Mobiele telefoons
mogen niet worden gebruikt.
• De machine mag alleen worden bijgevuld terwijl deze is
uitgeschakeld en koud is en buiten staat. Open nooit de
brandstoftankdop of olievuldop terwijl de motor draait of heet is.
Gemorste brandstof kan ontbranden op hete motoronderdelen.
• Gebruik voor het bijvullen van brandstof uitsluitend geschikte
jerrycans en een trechter. In het geval dat brandstof is gemorst,
veegt u het gebied schoon met een doek en laat u het restant
volledig verdampen voordat u de motor start.
• Voorkom dat brandstof of olie in contact komt met de huid en
ogen. In het geval van per ongeluk contact, moet het
contactgebied grondig worden afgespoeld met water. In het geval
van contact met de ogen, raadpleegt u onmiddellijk een arts.
• Adem de dampen niet in.
• Vul de machine nooit te ver bij. Brandstof heeft ruimte nodig om
uit te zetten.
• Bepaalde motoronderdelen, zoals de uitlaatpijp, kunnen tijdens
gebruik extreem heet worden. Raak de motor nooit aan terwijl de
machine is ingeschakeld. De motor zal na uitschakeling nog
gedurende een lange tijd heet blijven.
• Bescherminrichtingen mogen niet worden verwijderd vanaf de
motor. Er bestaat een risico van ernstige brandwonden.
Veiligheid tijdens brandstof bijvullen
• Vul de brandstoftank niet te vol. U moet ruimte vrijlaten zodat de
brandstof kan uitzetten. Als de brandstoftank te vol is, kan
brandstof eruit stromen op een hete motor en brand en/of een
explosie veroorzaken. Als brandstof gemorst wordt, wacht u tot
het is verdampt voordat u de motor start. Controleer de
brandstofleidingen, brandstoftank, brandstofdop en koppelingen
veelvuldig op barsten of lekkages. Vervang zo nodig.
• Steek geen sigaret op en rook niet terwijl u brandstof bijvult.
Benzine is uiterst brandbaar en de damp ervan is explosief.
• Vul de brandstoftank nooit wanneer de motor heet is of draait. Zet
de motor van de generator uit en laat de motor volledig afkoelen
voordat u de brandstoftank vult.
• Voorkom dat brandstof wordt gemorst op een hete motor.
• Houd de brandstof weg van vonken, open vuur, waakvlammen
hitte en andere ontstekingsbronnen.
• Nadat de brandstoftank is gevuld met benzine, plaatst u de
brandstofdop terug en draait u hem stevig vast. Veeg eventueel
gemorste brandstof af voordat u de motor start.
Persoonlijke veiligheid
Draag een veiligheidsbril.
Draag gehoorbescherming.
De volgende symbolen worden in deze handleiding gebruikt:
Wijst op het risico van persoonlijk letsel of schade aan de
machine.
Wijst op belangrijke informatie over het gebruik van de
machine.
Brandgevaar
Het volgende symbolen worden afgebeeld op de machine:
Niet roken of vuur maken
Explosiegevaar
Gevaar van corrosieve materialen
Verboden voor kinderen

HYUNDAI
6
ELEKTRISCHE VEILIGHEID
Voer de volgende controles van het elektrisch systeem vóór gebruik
uit terwijl alle elektrische voedingen zijn losgekoppeld.
• Alle elektriciteitskabels, stekkers en aansluitingen moeten intact
zijn en mogen geen tekenen vertonen van schade, zoals
blootliggende draden, schuurplekken, sneden of losse bedrading.
Als er tekenen van schade zijn, moet het beschadigde onderdeel
buiten bedrijf gesteld worden totdat de schade is gerepareerd
door een persoon die competent is op het gebied van elektriciteit.
• Alle elektrische kabels moeten zodanig worden geleid dat er geen
struikelgevaar is.
• Werk nooit aan of in de buurt van elektriciteit met natte handen,
natte kleding of natte handschoenen.
BESCHRIJVING (AFB. A EN B)
Uw dieselgenerator is ontworpen om te dienen als een
draagbare bron van elektriciteit.
1. Display
2. Startknop
3. Spanningskeuzeschakelaar
4. Circuitonderbreker
5. Aardlekschakelaar
a. Testknop
b. Resetknop
6. Auto-aansluiting
7. ATS-aansluiting
8. Voorverwarmingsknop
9. Aardaansluiting
10. 400V-stopcontact (16 A)
11. 230V-stopcontact (32 A)
12. Brandstoffilter
13. Oliefilter
14. Olieaftapplug
15. Brandstofpomp
16. Motorschakelaar
17. Mechanische stopschakelaar
18. Olievuldop
19. Trekstarthandgreep
20. Brandstofdop
21. Spanning/vermogen
22. Frequentie/accuspanning
23. Stroomsterkte/bedrijfsuren
24. Overbelast/oververhit
25. Display wisselen / waarde verhogen
26. Programmeren / alarm resetten
27. Display wisselen / waarde verlagen
28. Indicator laag oliepeil
Inhoud van de verpakking
• Generator
• Wielen (2x)
• Handgreep
• Wielassen (2x)
• Poten (2x)
• Steunen (2x)
• Bouten en moeren (2x)
• Instructiehandleiding
• Veiligheidsinstructies
• Garantie- en servicevoorwaarden
VOOR GEBRUIK (AFB. A)
De machine is bedoeld voor het aandrijven van elektrische
apparaten en het voeden van verlichtingstoestellen en
-systemen. Schade veroorzaakt door een verkeerd gebruik
is uitgesloten van garantie en vallen buiten de
aansprakelijkheid van de fabrikant.
Neem de informatie in deze instructies in acht. Schade
en gevolgschade veroorzaakt door het niet in acht nemen
van de informatie in deze instructies is uitgesloten van
garantie.
De generator werd vóór het verlaten van de fabriek gevuld
met brandstof en olie, en heeft als eindcontrole een
draaitest ondergaan. Het is daarom mogelijk dat ten tijde
van de levering nog resten brandstof en olie aanwezig zijn
in de generator. De bedrijfsurenteller kan een waarde van
maximaal 5 uur aangeven.
Montage
De generator moet vóór het eerste gebruik worden
afgemonteerd.
De wielen zijn bedoeld om de verplaatsbaarheid te
vergroten. Ze zijn niet bedoeld voor gebruik op de weg.
De wielen monteren
1. Schuif de as vanaf de buitenkant door het wiel en steek de as
daarna door een platte ring en het frame.
2. Nadat de as door het frame is gestoken, steekt u de borgveer
door het gaatje in de as.
3. Druk de wielafdekking op zijn plaats over het asgat.
4. Herhaal dit voor het tweede wiel.
De rubber poten monteren
1. Steek de bout door het rubber blok en de steun.
2. Steek het uiteinde van de bout door het frame en bevestig hem
op zijn plaats met behulp van de moer.
3. Herhaal dit voor de tweede poot.
AVR (automatische spanningsregeling)
De machine is uitgerust met een automatische
spanningsregeling. Dit helpt de spannings- en
frequentieschommelingen binnen een marge van ongeveer
3% te houden. Met name wanneer zware verbruikers
worden gestart, bestaat de kans dat gedurende een korte
tijd een grotere schommeling ontstaat. Raadpleeg een
elektrisch installateur of de fabrikant voordat u gevoelige
elektronische apparatuur aansluit op de generator.
Brandstoffen
In de generator moet zuivere diesel worden bijgevuld. De
motor kan permanent worden beschadigd door het gebruik
van een andere brandstof, zoals stookolie, plantaardige
olie en biodiesel. Deze vorm van schade is uitgesloten van
fabrieksgarantie.

7
NEDERLANDS
Elektrische aansluiting
Een omschakelautomaat (ATS) is vereist om de voeding
van de generator aan te sluiten op het elektrisch systeem
van een gebouw. De montage daarvan mag uitsluitend
worden uitgevoerd door een bevoegde installateur. De
lokale wet- en regelgeving moet in acht worden genomen.
De generator moet correct worden geaard, geïsoleerd van
het elektrisch systeem van het gebouw en losgekoppeld
door een geschikte circuitonderbreker.
Het nominale vermogen van de generator moet hoger zijn
dan het totale vermogen van alle aangesloten verbruikers.
Denk eraan dat het opgenomen vermogen van sommige
verbruikers tijdens het starten drie tot vijf keer hoger kan
zijn dan hun nominale vermogen.
Ongebalanceerde belastingen kunnen schade
veroorzaken aan aangesloten verbruikers en moeten
worden vermeden. Raadpleeg een elektrisch installateur.
Veiligheid tijdens voorbereidingen voor gebruik
• Blijf altijd goed opletten. Onachtzaamheid kan snel leiden tot
ernstig letsel.
• De veiligheidsvoorzieningen en bedieningsorganen moeten te
allen tijde toegankelijk zijn.
• Niet-werkende bescherminrichtingen, afdekkingen en
apparaatonderdelen moeten vóór gebruik door een vakman
worden gerepareerd of vervangen.
• Controleer of alle bewegende onderdelen en schakelaars
probleemloos werken. Alle onderdelen moeten correct
gemonteerd zijn en aan alle voorwaarden moet zijn voldaan om
verzekerd te zijn van een probleemloze werking van de machine.
• Gebruik de machine niet als de schakelaar niet aan en uit
schakelt.
• Verzeker u er vóór gebruik van dat er geen gereedschappen of
andere vreemde voorwerpen op de machine liggen.
Leveringsomvang
De machine is erg zwaar. Til de machine niet alleen op!
Zorg ervoor dat u hulp hebt of gebruik een hefvoorziening
(kraan).
• Controleer of alle onderdelen aanwezig en onbeschadigd zijn.
• Als u vaststelt dat de leveringsomvang van uw machine
onvolledig is, of dat de machine beschadigd is, neemt u contact
op met uw dealer.
Het verpakkingsmateriaal omvat plastic zakken, folie en
kleine onderdelen die door kinderen kunnen worden
ingeslikt. Risico van verstikking!
Opstellen en voorbereidende werkzaamheden
• Controleer de filters. Controleer of het luchtfilter, het
brandstoffilter (12) en het oliefilter (13) correct zijn aangebracht.
Vullen met olie
De machine wordt zonder olie geleverd. U moet de
machine vóór gebruik vullen met olie.
Houd sigaretten, vonken en vuur uit de buurt van alle
brandstof-gerelateerde onderdelen.
1. Draai de olievuldop (18) los en vul met nieuwe, schone olie
(10W-30 of 15W-30). Raadpleeg de tabel met technische
gegevens voor de benodigde hoeveelheid olie waarmee de
machine moet worden gevuld.
2. Controleer het oliepeil na ongeveer één minuut. Verzeker u
ervan dat de generator horizontaal staat. De peilstok zit vast aan
de olievuldop. Draai de olievuldop zo ver mogelijk in de
olievulnek. Draai de olievuldop weer los en controleer het
oliepeil. Het oliepeil is correct wanneer het oliepeil tussen de
markeringen MIN en MAX op de peilstok staat.
3. Nadat het correcte oliepeil is bereikt, draait u de olievuldop weer
stevig erop.
U moet het motoroliepeil controleren voordat u de motor
start elke keer wanneer u de generator gebruikt.
De accukabels aansluiten
De accu is ten tijde van de levering doorgaans niet aangesloten en
moet vóór gebruik worden aangesloten. Voordat de machine voor
het eerst wordt gestart, sluit u de accukabels aan in de onderstaande
volgorde:
1. Sluit de rode kabel aan op de positieve accupool.
2. Sluit de zwarte kabel aan op de negatieve accupool.
Als het ooit nodig is om de accukabels los te koppelen,
doet u dit in de omgekeerde volgorde.
De accu wordt automatisch opgeladen tijdens het gebruik
van de generator. Koppel de accu nooit los van de
generator terwijl de generator is ingeschakeld. Dit kan
leiden tot kortsluiting en schade aan de generator, naast
brand en elektrische schokken.
Vullen met brandstof
1. Verwijder de brandstofdop (20) vanaf de bovenkant van de
machine.
2. Vul de brandstoftank langzaam met nieuwe, schone brandstof en
gebruik daarbij zo nodig een trechter.
3. Monteer de dop.
Raadpleeg de tabel met technische gegevens voor de
inhoud van de brandstoftank van uw generator.
Brandstof en brandstofdampen zijn uiterst brandbaar!
Neem de veiligheidsinformatie in deze instructies in acht
tijdens het vullen met brandstof.

HYUNDAI
8
De brandstofleiding ontluchten
Nadat de brandstoftank voor het eerst is gevuld,
na langdurige opslag of nadat de generator heeft
drooggelopen moet de brandstofleiding worden ontlucht.
1. Zoek de brandstofslang die loopt tussen het brandstoffilter (12)
en de brandstofpomp (15).
2. Maak de klem bij de brandstofpomp los, trek de slang eraf en
laat een kleine hoeveelheid brandstof eruit stromen in een
geschikte opvangbak.
3. Sluit de slang weer aan en bevestig de klem.
Brandstof en brandstofdampen zijn uiterst brandbaar!
Neem de veiligheidsinformatie in deze instructies in acht
tijdens het vullen met brandstof.
De generator aarden
• Het frame en de externe elektriciteitgeleidende onderdelen van
deze generator moeten correct worden aangesloten op een
goedgekeurde aardaansluiting.
• Een goede aarde van de generator helpt een elektrische schok te
voorkomen in geval van een aardingsfout in de generator of een
aangesloten elektrisch apparaat.
• Een goede aarding bevordert tevens het wegvloeien van de
statische elektriciteit die zich vaak ophoopt in niet-geaarde
apparaten.
Zwevende aarde voor gebruik in een draagbare generator
• Deze generator maakt gebruik van een configuratie met
zwevende aarde, wat betekent dat de nul van de
wisselstroomdynamo niet is verbonden met de aarde van de
machine. Het is daarom belangrijk dat u de generator ALLEEN
gebruikt voor de voeding van apparatuur in de volgende
combinaties:
- één of meer apparaten van KLASSE II;
- één enkel apparaat van KLASSE I; of
- één of meer apparaten van KLASSE II en één enkel apparaat
van KLASSE I.
Bij apparaten van KLASSE I is een groen-gele aardedraad
aangesloten binnenin de stekker.
Bij apparaten van KLASSE II is geen groen-gele
aardedraad aangesloten binnenin de stekker en hebben
dit symbool in reliëf of afgedrukt op de behuizing.
GEBRUIK (AFB. A)
Uw machine wordt geleverd zonder olie en brandstof. U
moet hem vóór gebruik vullen met olie en brandstof. Als de
motor zonder olie wordt gestart, zal permanente schade
ontstaan. Dergelijke schade is uitdrukkelijk uitgesloten van
garantie.
De generator moet worden geaard als de aangesloten
verbruiker geaard is. De aardaansluiting van de generator
is aangesloten op het frame en de metalen onderdelen
van de generator die geen stroom geleiden. Neem contact
op met een lokale vakman voor advies over het juiste
gebruik van de aardaansluiting.
Veiligheid tijdens gebruik
• De machine mag niet worden aangesloten op het elektrisch
systeem van een gebouw of een andere generator. Het
terugleveren van elektriciteit kan illegaal en extreem gevaarlijk
zijn.
• Bij gebruik als reservevoeding, mag de generator alleen door een
vakbekwame installateur worden aangesloten op het elektrisch
systeem van een gebouw. De lokale wet- en regelgeving moet in
acht worden genomen. De generator moet correct worden
geaard, geïsoleerd van het elektrisch systeem van het gebouw en
losgekoppeld door een geschikte circuitonderbreker.
• Plaats de generator op een horizontale ondergrond om omvallen
en morsen van brandstof te voorkomen.
• Plaats de generator zodanig dat voldoende ventilatie en koeling
plaatsvindt. Anders bestaat het risico van oververhitting.
• Gebruik de machine niet in de regen, wanneer het sneeuwt of
onder natte omstandigheden.
• Bedien de machine niet met natte handen.
• Raak de elektrische onderdelen niet aan. Vermijd contact tussen
deze onderdelen, stopcontacten en vocht/water.
• Wees u bewust van mensen, kinderen en dieren in de buurt. De
gebruiker is verantwoordelijk voor letsel van anderen en voor
schade aan hun eigendommen.
• U mag de machine nooit optillen of kantelen terwijl deze draait.
• Draag een veiligheidsbril en gehoorbescherming als u gedurende
een langere tijd in de onmiddellijke nabijheid van de machine
moet blijven. Het dragen van gehoorbescherming helpt het
geluidsniveau te verlagen.
• Als tijdens het uitvoeren van de werkzaamheden stof wordt
gegenereerd, draagt u een ademhalingsbeschermingsmasker.
• Sommige onderdelen van de generator worden tijdens gebruik
zeer heet en blijven nog enige tijd heet nadat de generator is
uitgeschakeld. Raak deze onderdelen niet aan. Er bestaat een
risico van brandwonden.
Bij het starten van de generator en bij het aansluiten of
loskoppelen van verbruikers, moet de circuitonderbreker in
de stand 'OFF' worden gezet om de stroomvoorziening
van de stopcontacten te onderbreken. Als deze instructie
niet wordt gevolgd, kan de AVR worden beschadigd.
De generator starten
Als de generator niet binnen vijf seconden start, breekt u
de startprocedure af en wacht u minstens 30 seconden
voordat u het opnieuw probeert. Na drie pogingen laat u
de startmotor gedurende tien minuten afkoelen voordat u
het opnieuw probeert.
1. Zet de motorschakelaar (16) in de stand 'RUN'. De
motorschakelaar mag ook in deze stand blijven staan nadat de
motor is uitgeschakeld. Als op de mechanische stopschakelaar
(17) wordt gedrukt, wordt de motorschakelaar in de stand 'STOP'
gezet.
2. Alvorens te starten zet u de circuitonderbreker (4) in de stand
'OFF'.
3. Draai de startknop (2) naar de stand 'ON'.
4. Draai de startknop naar de stand 'START' en houd hem daar kort
tot de generator start. Laat de startknop terugkeren naar de
stand 'ON'.
Starten met de trekstarthandgreep
De generator starten met behulp van de
trekstarthandgreep vereist aanzienlijke kracht. Deze
mogelijkheid zou alleen in uitzonderlijke gevallen moeten
worden gebruikt.
1. Trek voorzichtig aan de trekstarthandgreep (19) tot u een lichte
weerstand voelt. Trek daarna krachtig aan de trekstarthandgreep
en laat deze langzaam teruglopen. Laat hem niet terug springen.
Herhaal deze procedure tot de generator start.

9
NEDERLANDS
In een koude omgeving, houdt u de voorverwarmingsknop
(8) gedurende tien tot vijftien seconden ingedrukt om de
lucht in de verbrandingskamer iets voor te verwarmen.
Hierdoor start de motor gemakkelijker.
Het beveiligingssysteem tegen laag oliepeil is ontwikkeld
om motorschade als gevolg van onvoldoende olie in
het carter te voorkomen. Het beveiligingssysteem tegen
laag oliepeil schakelt de motor automatisch uit voordat
het oliepeil in het carter lager wordt dan een veilige
grenswaarde. Als het beveiligingssysteem tegen laag
oliepeil de motor heeft uitgeschakeld, controleert u het
oliepeil, vult u olie bij en start u de generator weer.
Overbelastingsbeveiliging
• Als de generator overbelast raakt of een aangesloten apparaat
kortsluiting heeft, zal de circuitonderbreker (4) worden
geactiveerd. Hierdoor wordt de stroomvoorziening van de
stopcontacten onderbroken.
• Als dat gebeurt, verlaagt u het aantal elektrische verbruikers of
verwijdert u de defecte verbruiker. Schakel de overbelasting-
circuitonderbreker weer in. Hierdoor wordt de stroomvoorziening
hersteld.
LED-display
• De generator is uitgerust met een digitaal display, zoals
weergegeven in afbeelding B. Zie de overeenkomstige cijfers in
de tekst voor een beschrijving van de diverse onderdelen van het
display.
Het LED-display en de alarmfuncties zijn vooraf ingesteld
in de fabriek om een optimale werking te garanderen.
Het herprogrammeren daarvan mag uitsluitend worden
uitgevoerd door een installateur.
Circuitonderbreker (afb. A)
Een driefase-circuitonderbreker (4) regelt de
stroomvoorziening naar het stopcontact en beveiligt de
generator tegen overbelasting.
• Als de circuitonderbreker tijdens bedrijf in de stand 'OFF' wordt
gezet, controleert u de generator, verlaagt u het aantal
verbruikers, en zet u de circuitonderbreker terug in de stand 'ON'.
Een aardlekschakelaar (5) beveiligt de gebruiker tegen
elektrische schokken door de stroomvoorziening naar de
stopcontacten te onderbreken in het geval stroom weglekt
naar aarde. De aardlekschakelaar moet regelmatig worden
getest en kan alleen worden getest wanneer de generator
stroom levert.
• Volg de instructies in "Elektrische belastingen aansluiten en
overbelasting voorkomen", maar sluit geen apparaten aan op de
generator.
• Druk op de testknop (5a) om de werking van de
aardlekschakelaar te testen.
• Als de resetknop (5b) naar buiten springt, werkt de
aardlekschakelaar naar behoren. Zo niet, dan is de
aardlekschakelaar defect en moet deze worden vervangen door
een vakbekwame monteur. U mag de generator niet gebruiken
voordat de aardlekschakelaar correct werkt.
• Druk op de resetknop (5b) om de aardlekschakelaar te resetten.
Bij het starten van de generator en bij het aansluiten of
loskoppelen van verbruikers, moet de circuitonderbreker in
de stand 'OFF' worden gezet om de stroomvoorziening
van de stopcontacten te onderbreken. Als deze instructie
niet wordt gevolgd, kan de AVR worden beschadigd.
De generator starten in de automatische modus (ATS) (afb. A)
In de automatische modus wordt de generator gestart door
de ATS.
1. Zet de motorschakelaar (16) in de stand 'RUN'.
2. Draai de startknop (2) naar de stand 'AUTO/ATS'.
3. Alvorens te starten zet u de circuitonderbreker (4) in de stand
'OFF'.
4. Sluit het ATS-apparaat aan op de ATS-aansluiting (7).
5. Sluit de verbruiker aan op het stopcontact (10 of 11) op de
generator.
6. Zet de circuitonderbreker (4) in de stand 'ON'. De verbruiker
wordt nu voorzien van stroom zodra de ATS de generator
inschakelt.
Controleer regelmatig het oliepeil. De generator zal
niet starten als het oliepeil laag is. Als de machine niet
regelmatig wordt gebruikt, moet deze elke twee maanden
worden gestart en gedurende ongeveer 20 tot 30 minuten
draaien. Op die manier kunt u garanderen dat de machine
onmiddellijk inzetbaar is wanneer dat nodig is.
De generator uitschakelen (afb. A)
1. Zet de circuitonderbreker (4) in de stand 'OFF'.
2. Koppel de verbruiker los van het stopcontact op de generator.
3. Laat de generator twee tot drie minuten draaien zonder
aangesloten belastingen zodat de generator afkoelt.
4. Zet de motor uit door de startknop (2) naar de stand 'OFF' te
draaien.
De motor kan ook worden uitgeschakeld met behulp van
de mechanische stopschakelaar (17). Voordat u de motor
weer start, draait u de motorschakelaar (16) terug naar de
stand 'RUN'.
Elektrische belastingen aansluiten en overbelasting voorkomen
Overschrijd niet het/de nominale vermogen/stroomsterkte.
Anders kunnen de generator en/of eventueel erop
aangesloten elektrische apparaten beschadigd worden.
Controleer dit door de nominale vermogens (of
stroomsterkten) van alle belastingen die tegelijkertijd
zullen worden aangesloten bij elkaar op te tellen. Dit totaal
mag niet hoger zijn dan:
- De waarde van de circuitonderbreker van het
uitgangsstopcontact dat stoom levert, of
- Het/de nominale vermogen/stroomsterkte van de
generator.
Het nominale vermogen van lampen kan worden
afgelezen op de gloeilampen. Het nominale vermogen
van gereedschappen, toestellen en motoren vindt u
meestal op een typeplaatje of sticker aangebracht op het
apparaat. Als het vermogen niet wordt aangegeven op de
gereedschappen, toestellen of motoren, vermenigvuldigt
u de spanning met de nominale stroomsterkte om het
vermogen te bepalen (volt x ampère = watt).

HYUNDAI
10
Sommige elektrische inductiemotoren vereisen ongeveer
drie keer zo veel vermogen om te starten dan om te
draaien. Dit piekvermogen duurt slechts enkele seconden,
tijdens het starten. U moet rekening houden met dit hoge
startvermogen wanneer u elektrische apparaten kiest die
moeten worden aangesloten op de generator:
- Bereken het benodigde vermogen om de grootste motor
te starten.
- Tel bij die waarde het vermogen op van alle andere
aangesloten belastingen.
Start de grootste motor eerst en start slechts één motor
tegelijkertijd.
Overbelast de stopcontacten niet. De stopcontacten zijn
beveiligd tegen overbelasting door middel van een
driefase-circuitonderbreker. Als de maximaal toegestane
stroomsterkte van een circuitonderbreker wordt
overschreden, worden alle drie geactiveerd en wordt de
elektrische voeding naar de stopcontacten onderbroken.
Slechts één stopcontact mag tegelijkertijd worden gebruikt.
Selecteer met behulp van de spanningskeuzeschakelaar
(3) het 400V- of 230V-stopcontact.
1. Laat de motor draaien totdat het toerental stabiel is en de
machine de kans heeft gehad om een paar minuten op te
warmen.
2. Sluit één of meer elektrische apparaten aan:
- Verzeker u ervan dat het apparaat uit staat.
- Sluit het aan op de generator.
- Schakel het apparaat in om het te gebruiken.
3. Schakel alle elektrische apparaten uit en koppel ze los van de
generator voordat u de generator uitschakelt.
REINIGEN EN ONDERHOUD
Wij adviseren u de generator regelmatig te reinigen en
onderhouden voor een langdurig, veilig en betrouwbaar
gebruik.
De machine mag alleen worden onderhouden terwijl deze
uitgeschakeld en koud is. Neem de overige
veiligheidsinformatie in deze instructies in acht.
Er mogen geen wijzigingen worden aangebracht aan de
machine of de bedieningsorganen op de machine. De
standaardinstellingen, ingesteld in de fabriek, mogen niet
worden gewijzigd.
Draai de motorschakelaar naar de stand 'STOP' voordat u
aan het onderhoud begint.
Reinigen
Reinig de machine nooit met een hogedrukreiniger
of perslucht. Met name bij het reinigen van kunststof
onderdelen mag u geen chemicaliën, benzine of
andere oplosmiddelen gebruiken. In sommige gevallen
kunnen deze stoffen de onderdelen en beschermlagen
beschadigen.
Onderhoud
• Controleer regelmatig of alle schroeven, bouten en moeren
correct zijn aangedraaid.
• Controleer of alle bescherminrichtingen en afdekkingen goed zijn
bevestigd en goed werken. Beschadigde of versleten onderdelen
moeten worden vervangen door originele vervangingsonderdelen.
• Wij adviseren de machine minstens jaarlijks te laten inspecteren
en onderhouden door een vakman.
Veiligheid tijdens onderhoud
• Draag geschikte kleding. Gebruik geschikte
beschermingsmiddelen en veiligheidsschoenen.
• Reparatie- en onderhoudswerkaamheden mag alleen worden
uitgevoerd door vakbekwame en bevoegde personen.
• Schakel de machine uit voordat u begint met de onderhouds-,
reparatie- of reinigingswerkzaamheden. Wacht totdat de machine
is afgekoeld.
• Controleer regelmatig de toestand van de machine. Vervang
beschadigde of versleten onderdelen uitsluitend door originele
vervangingsonderdelen. Als niet-originele vervangingsonderdelen
worden gebruikt, kan de fabrikant geen aansprakelijkheid
accepteren voor mogelijk(e) persoonlijk letsel of schade aan de
machine.
• Nadat het onderhoud voltooid is, verzekert u zich ervan dat alle
bescherminrichtingen, schroeven, bouten en moeren correct zijn
gemonteerd en vastgedraaid.
• Nadat het onderhoud voltooid is, verzekert u zich ervan dat er
geen gereedschappen of andere vreemde voorwerpen op de
machine liggen.
Onderhoudsschema
Onderhoudsinterval/tijd Actie
Voorafgaand aan elk gebruik
Controleer het motoroliepeil.
Na de eerste 20 uur Ververs de motorolie.
Controleer/reinig het luchtfilter.
Controleer/reinig het oliefilter.
Controleer/reinig het brandstoffilter.
Elke 50 uur Controleer/reinig het luchtfilter.(*)
Elke 100 uur Ververs de motorolie.
Vervang het luchtfilter.(*)
Controleer/reinig het oliefilter.
Vervang het brandstoffilter.
Elke 300 uur Vervang het oliefilter.
Elke twee jaar Controleer de klepspeling.(**)
Reinig de brandstoftank en filterzeef.(**)
Reinig de verbrandingskamer.(**)
Controleer de brandstofleidingen.
Vervang deze zo nodig.(**)
(*) Voer vaker onderhoud uit bij gebruik in een stoffige omgeving.
(**) Dit onderhoud dient te worden uitgevoerd door een vakman.
Bij het uitvoeren van onderhoudswerkzaamheden moeten
geschikte gereedschappen en originele
vervangingsonderdelen worden gebruikt.
Onderhoudswerkzaamheden mogen uitsluitend worden
uitgevoerd door daarvoor opgeleide personen.
De olie verversen (afb. A)
Hete olie kan brandwonden veroorzaken. Laat de motor
afkoelen voordat u de motorolie aftapt. Vermijd langdurig
of herhaald huidcontact met gebruikte olie. Was
blootgestelde huid goed met zeep.
1. Schakel de generator in en laat hem twee tot drie minuten
draaien zodat de olie opwarmt. Zorg ervoor dat de motor niet te
lang draait zodat de olie niet heet wordt. Anders bestaat een
risico van brandwonden.
2. Plaats een geschikte opvangbak onder de olieaftapplug (14).
3. Draai de olieaftapplug en de olievuldop (18) los en laat zo veel
mogelijk olie in de opvangbak stromen.
4. Monteer de olieaftapplug.

11
NEDERLANDS
5. Vul met nieuwe, schone olie (10W-30 of 15W-30). Raadpleeg de
tabel met technische gegevens voor de benodigde hoeveelheid
olie.
6. Controleer het oliepeil na ongeveer één minuut. Verzeker u
ervan dat de generator horizontaal staat. De peilstok zit vast aan
de olievuldop. Draai de olievuldop zo ver mogelijk in de
olievulnek. Draai de olievuldop weer los en controleer het
oliepeil. Het oliepeil is correct wanneer het oliepeil tussen de
markeringen MIN en MAX op de peilstok staat.
7. Nadat het correcte oliepeil is bereikt, draait u de olievuldop weer
stevig erop.
Afgewerkte olie en de olieflessen moeten worden
gescheiden en ingeleverd bij een lokaal inzamelpunt.
Het olielter reinigen/vervangen (afb. A)
1. Verwijder de schroef vanaf het oliefilter (13) en verwijder het
oliefilter.
2. Reinig het oliefilter met diesel en een borstel.
3. Plaats het filter terug en monteer de schroef.
Een beschadigd filter moet worden vervangen door een
origineel filter.
Het luchtlter reinigen/vervangen
Een vuil luchtfilter hindert de luchtstroom naar de
verbrandingskamer in de cilinder. Reinig of vervang het
luchtfilter regelmatig als de generator in een stoffige
omgeving wordt gebruikt.
Gebruik geen benzine of oplosmiddelen voor het reinigen.
Onder bepaalde omstandigheden kunnen deze brandbaar
zijn en explosiegevaar opleveren.
Gebruik de generator nooit zonder dat het luchtfilter is
aangebracht. Ongefilterde lucht kan motorslijtage
veroorzaken.
1. Verwijder het luchtfilterdeksel door de schroeven los te draaien
en verwijder het luchtfilter.
2. Reinig of vervang het luchtfilter.
3. Monteer het luchtfilter en luchtfilterdeksel in de behuizing en
draai de schroef vast.
Het brandstoflter vervangen
Bij het vervangen van het brandstoffilter, zal de brandstof
uit de tank, de leidingen en het filter stromen zodra de
leidingen worden losgekoppeld. Voer het vervangen uit
wanneer de tank zo leeg mogelijk is. Gebruik een
geschikte opvangbak om eventueel gelekte brandstof op
te vangen. Draag dieselbestendige handschoenen. Houd
een absorberende doek bij de hand. Draag een
veiligheidsbril.
1. Maak de klem bovenop het filter los, verwijder de slang vanaf het
filter en laat alle resterende brandstof in de tank in de opvangbak
stromen.
2. Maak de klem onderop het filter los.
3. Vervang het filter en monteer de slangen.
4. Maak de twee klemmen weer vast.
5. Vul de tank weer met brandstof.
6. Ontlucht de slangen, zoals beschreven in deze handleiding.
7. Controleer de aansluitpunten op lekkage.
De accu vervangen
1. Draai de schroeven van het accuhuis los.
2. Verwijder eerst de zwarte kabel (-) vanaf de accu en vervolgens
de rode kabel (+).
3. Verwijder de oude accu en plaats een nieuwe accu. Een
lithiumaccu van 12 V en 30 Ah is vereist. Maximumafmetingen:
197 x 130 x 160 mm (l x b x h).
4. Sluit eerst de rode kabel aan op de positieve accupool en
vervolgens de zwarte kabel op de negatieve accupool.
5. Draai de schroef van het accuhuis vast.
De accu wordt automatisch opgeladen tijdens het gebruik
van de generator. Als de generator gedurende een lange
tijd niet gebruikt gaat worden, moet de accu worden
opgeladen voordat de machine wordt opgeslagen. De
accu moet uit de generator worden verwijderd om te
worden opgeladen met behulp van een externe acculader.
Veiligheid bij het hanteren van accu's
• Accu's mogen uitsluitend worden opgeladen door een geschikt
apparaat in een goed geventileerde ruimte uit de buurt van
ontstekingsbronnen.
• In het geval dat vloeistof uit de accu lekt, moet elke aanraking van
de vloeistof worden voorkomen. De vloeistof kan huidirritatie
veroorzaken. In het geval van per ongeluk contact, moet het
contactgebied grondig worden afgespoeld met water. In het geval
van contact met de ogen, raadpleegt u onmiddellijk een arts.
• De accu mag niet worden geopend.
• Door verkeerd gebruik kunnen dampen uit de accu ontsnappen
die de luchtwegen kunnen irriteren. Zorg in dat geval voor
voldoende ventilatie. Raadpleeg een arts in geval van
symptomen.
TRANSPORT EN OPSLAG
Transport (afb. A)
• Schakel de generator uit en laat hem volledig afkoelen.
• Draai de motorschakelaar (16) naar de stand 'STOP' om per
ongeluk starten van de machine te voorkomen.
• Transporteer de generator niet met te veel brandstof in de tank.
• Start de generator niet terwijl deze zich in het transportvoertuig
bevindt. De generator mag uitsluitend worden gebruikt op
onoverdekte en goed geventileerde plaatsen.
• Vermijd rechtstreekse blootstelling aan zonlicht wanneer de
generator wordt getransporteerd in een gesloten
transportvoertuig. De hoge temperaturen binnenin het
transportvoertuig kunnen de brandstof doen verdampen en
aanleiding zijn tot een explosie.
• Tap de brandstof volledig af als de generator waarschijnlijk over
een hobbelig wegdek getransporteerd gaat worden.
Veiligheid tijdens transport
• De machine mag alleen worden getransporteerd terwijl deze
uitgeschakeld en koud is.
• De machine mag alleen worden getransporteerd met een lege
brandstoftank.
• De machine moet worden vastgezet om verschuiven en
omkantelen tijdens transport te voorkomen.
• De machine mag niet worden gekanteld tijdens transport omdat
hierdoor olie- of brandstofresten kunnen worden gemorst.
Opslag (afb. A)
• De generator moet worden opgeslagen op een schone en droge
plaats in een gesloten en goed geventileerde ruimte die niet
toegankelijk is voor kinderen.
• Draai de motorschakelaar (16) naar de stand 'STOP' om per
ongeluk starten van de machine te voorkomen.
• De machine moet volledig afkoelen voordat hij wordt opgeslagen.
• Als de machine gedurende een lange tijd niet gebruikt gaat
worden, bijvoorbeeld tijdens de winter, moet de brandstoftank
worden leeg gemaakt. Verwijder de accu en bewaar deze op een
warme en droge plaats.

HYUNDAI
12
Veiligheid tijdens opslag
• De machine mag alleen worden opgeslagen in een goed
geventileerde ruimte.
• Laat de machine vóór opslag volledig afkoelen.
• De machine mag niet worden gekanteld. De kans bestaat dat olie
of brandstof wordt gemorst.
• Brandstof en olie mag alleen worden opgeslagen in geschikte en
afgesloten jerrycans/flessen, uit de buurt van ontstekingsbronnen.
• De machine en brandstof moeten uit de buurt van kinderen en
onbevoegde personen worden gehouden.
PROBLEMEN OPLOSSEN
Zorg ervoor dat de machine is uitgeschakeld en afgekoeld voordat u aan de machine gaat werken. Draai de motorschakelaar (16)
naar de stand 'STOP' om per ongeluk starten van de machine te voorkomen.
Probleemomschrijving Mogelijke oorzaak Mogelijke oplossing
De generator start niet. Er is onvoldoende brandstof. Vul brandstof bij.
De motorschakelaar staat in de stand 'STOP'. Zet de motorschakelaar in de stand 'RUN'.
Het oliepeil is laag. Vul olie bij.
De accu is leeg. Laad de accu op.
Er zit lucht in de brandstofleidingen. Ontlucht de brandstofleidingen.
De verstuiver is verstopt. Reinig de verstuiver.
De generator kan moeilijk worden
gestart of draait ongelijkmatig en/of
luid.
Het brandstoffilter is vuil. Reinig/vervang het brandstoffilter.
Het luchtfilter is vuil. Reinig/vervang het luchtfilter.
Het oliefilter is vuil. Reinig/vervang oliefilter.
Er zit vocht in de brandstof. Tap de brandstof af en vul met nieuwe brandstof.
Sommige onderdelen of afdekkingen zitten los
of zijn niet goed bevestigd. Bevestig de onderdelen goed en draai de
schroeven aan.
De generator levert geen of weinig
stroom. De circuitonderbreker staat in de stand 'OFF'. Zet de circuitonderbreker in de stand 'ON'.
De overbelasting-circuitonderbreker is
geactiveerd (alleen modellen met een
overbelasting-circuitonderbreker).
Verlaag de belasting door de verbruikers en
schakel de circuitonderbreker weer in.
De AVR is defect. Neem contact op met een servicepartner.
TECHNISCHE GEGEVENS
Uitgangsspanning V~ 230/400
Max. uitgangsstroom A 25,2/11,4
Frequentie Hz 50
Uitgangsvermogen kW/kVA 5,4/7,5
Max. uitgangsvermogen kVA 5,7/7,9
Aansluitingen A 16/32
Display led-6
Werkingsduur bij 75% belasting u 5,5
Lithiumaccu V/Ah 12/30
Brandstof diesel
Inhoud brandstoftank l 10
Olie SAE 10W-30/15W-30
Inhoud oliereservoir l 1,75
Motorvermogen pk 12
Starten van motor elektrisch/trekstarthandgreep
Cilinderinhoud van motor cm3 498
Type dynamo AL6-T
Vermogen van dynamo kW 6
Vermogensfactor van dynamo 0,8/1
Spanningsregeling van dynamo borstel/AVR
Gewicht kg 116
Geluid en trillingen
LpA (geluidsdrukniveau)* op 7 m dB(A) 79
LWA (geluidsvermogenniveau)** dB(A) 98
* Onzekerheid K = dB(A) 3
** Onzekerheid K = dB(A) 3
Draag gehoorbescherming.
GARANTIE
Voor de garantiebepalingen wordt verwezen naar de
bijgevoegde garantievoorwaarden.
MILIEU
Uw product, accessoires en verpakkingsmaterialen
dienen te worden gescheiden voor een milieuvriendelijke
verwerking.
Alleen voor EU-landen
Gooi elektrische gereedschappen niet weg met het huisvuil.
Overeenkomstig de Europese richtlijn 2002/96/EG inzake
oude elektrische en elektronische apparaten en de toepassing
daarvan binnen de nationale wetgeving, dienen elektrische
gereedschappen die niet meer bruikbaar zijn gescheiden te
worden ingezameld en op een milieuvriendelijke manier te worden
verwerkt.
ACCU'S/BATTERIJEN
Verbruikte accu's/batterijen dienen te worden verwerkt
of gerecycled op een milieuvriendelijke manier en in
overeenstemming met de plaatselijke regelgeving.
• Ontlaad de accu/batterij door de machine onbelast te
laten draaien tot de motor stopt.
• Verwijder de accu/batterij uit de machine.
• Lever de accu/batterij in als chemisch afval bij een
afvalinzamelpunt in uw gemeente.
Alleen voor EU-landen
Kapotte of verbruikte accu's/batterijen moeten worden gerecycled
overeenkomstig de richtlijn 91/157/EEG.
Onderhevig aan wijzigingen: de technische gegevens kunnen
worden gewijzigd zonder verdere kennisgeving.

13
ENGLISH
DIESEL GENERATOR
55267
WARNING
Read all safety warnings and all instructions. Failure to
follow the warnings and instructions may result in electric
shock, fire and/or serious injury. Save all warnings and
instructions for future reference.
SAFETY WARNINGS
When using the machine, always observe the enclosed safety
warnings as well as the additional safety instructions below.
ADDITIONAL SAFETY INSTRUCTIONS FOR DIESEL
GENERATORS
Most accidents can be prevented if you follow all
instructions in this manual and on the machine. The most
common hazards are discussed below, along with the best
way to protect yourself and others.
The warnings, cautions and instructions discussed in this
instruction manual cannot cover all possible conditions and
situations that may occur. It must be understood by the
operator that common sense and caution are factors which
cannot be built into this product; they must be supplied by
the operator.
• Read and understand this owner’s manual before operating the
machine. Failure to do so could result in personal injury or
equipment damage.
• Know how to stop the machine quickly, and understand the
operation of all controls. Never permit anyone to operate the
pump without proper instruction.
• Do not allow children to operate the machine. Keep children and
pets away from the area of operation.
• The machine produces highly toxic vapours and exhaust gases,
such as carbon monoxide. This is an invisible gas with no smell or
taste which can quickly lead to intoxication and even death.
Consequently, the machine may only be started up and used
outdoors.
• Ensure that exhaust gases cannot enter enclosed spaces such as
homes, basements and garages through open windows and
doors.
• The generator must be positioned at least one metre away from
other machines and flammable materials.
• Do not use the generator for underground work.
• Do not use the generator in areas at risk of explosion.
• If using an exhaust pipe extension, it must be ensured that this is
installed by a specialist, safely and without leaks. There is an
extreme risk of suffocation in the event of a leak. The use of a
carbon monoxide detector is highly recommended. The maximum
permissible length of the extension must not be exceeded.
Otherwise, there is a risk of exhaust gas backflow, which could
lead to overheating and damage to the engine.
• Fuel and its vapours are highly flammable! Smoking, naked
flames, glowing heat or electrical sparks are prohibited when
working with fuels. Mobile telephones must not be used.
• The machine may only be filled when switched off and cool and
only outdoors. Never open the tank or oil cap when the engine is
running or hot. Spilled fuel can ignite on hot engine parts.
• Use only suitable cans and a funnel for refilling. In the event of a
fuel spill, wipe the area with a cloth and allow the residue to
evaporate completely before restarting the machine.
• Avoid skin and eye contact with fuel and oil. In the event of
accidental contact, the contact point must be rinsed thoroughly
with water. In the event of contact with the eyes, consult a doctor
immediately.
• Do not inhale the vapours.
• Never overfill the machine. Fuel needs space in which to expand.
• Some engine parts, such as the exhaust pipe, may become
extremely hot during operation. Never touch the engine when the
machine is switched on. The engine will remain hot for a long time
after being switched off.
• Protective devices must not be removed from the engine. There is
a risk of severe burns.
Safety during refuelling
• Do not overfill the fuel tank; you must allow space for fuel
expansion. If the fuel tank is overfilled, fuel can overflow onto a
hot engine and cause fire and/or explosion. If fuel does spill, wait
until it evaporates before starting the engine. Check fuel lines,
tank, cap and fittings frequently for cracks or leaks. Replace as
required.
• Do not light cigarettes or smoke when filling the fuel tank. Petrol is
highly flammable and its vapours are explosive.
• Never fill fuel tank when engine is running or hot. Turn the
generator engine OFF and allow the engine to cool completely
before filling the fuel tank.
• Avoid spilling petrol onto a hot engine.
• Keep fuel away from sparks, open flames, pilot lights, heat and
other sources of ignition.
• After filling with petrol, refit the fuel cap and fully tighten. Wipe up
any spilled fuel before starting the machine.
Personal safety
Wear safety goggles.
Wear hearing protection.
The following symbols are used throughout this manual:
Denotes risk of personal injury or damage to the machine.
Denotes important information concerning the use of the
machine.
Fire hazard
The following symbols are shown on the machine:
Do not smoke or light a fire
Explosion hazard
Hazard of corrosive substances
Children not allowed

HYUNDAI
14
ELECTRICAL SAFETY
Perform the following electrical checks prior to use, with all electrical
supplies isolated:
• All electrical cables, plugs and connections must be intact and
have no signs of damage, such as bare wires, chaffing, cuts or
loose wiring. If there are any signs of damage, the damaged item
must be taken out of service until the damage has been repaired
by an electrically competent person.
• All electrical leads must be routed so as not to cause a trip
hazard.
• Never work on or near electricity with wet hands, wet clothing,
and wet gloves.
DESCRIPTION (FIG. A & B)
Your diesel generator is designed to serve as a portable
source of electrical power.
1. Display
2. Starter key
3. Voltage selector switch
4. Circuit breaker
5. RCD
a. Test button
b. Reset button
6. Auto connection
7. ATS connection
8. Pre-heat button
9. Earth connection
10. 400 V socket (16 A)
11. 230 V socket (32 A)
12. Fuel filter
13. Oil filter
14. Oil drain plug
15. Fuel pump
16. Engine switch
17. Mechanical stop switch
18. Oil cap
19. Pull cord
20. Fuel cap
21. Voltage/power
22. Frequency/battery voltage
23. Current/hours of operation
24. Overload/overheat
25. Change display/increase value
26. Programming/alarm stop
27. Change display/reduce value
28. Low oil indicator
Package contents
• Generator
• Wheels (2x)
• Handle
• Wheel axles (2x)
• Feet (2x)
• Brackets (2x)
• Bolts and nuts (2x)
• Instruction manual
• Safety instructions
• Warranty and service conditions
BEFORE USE (FIG. A)
The machine is intended to drive electrical devices and to
supply power to lighting equipment and systems. Damage
sustained due to improper use is excluded from the
warranty and liability of the manufacturer.
Please observe the information in these instructions.
Damage and consequential damage sustained due to
failure to observe the information in these instructions is
excluded from the warranty.
The generator was filled with fuel and oil and underwent a
test run as a final check before leaving the factory. There
may, therefore, be fuel and oil residue inside the generator
when it is delivered. The operating hours counter may
show a value of up to five hours.
Assembly
The generator requires some assembly prior to first use.
The wheels are intended to improve the portability. They
are not intended for on-road use.
Installing the wheels
1. Slide the axle through the wheel from the outside, then pass the
axle through the flat washer and frame.
2. Once the axle has been passed through the frame, put the ‘P’
clip through the axle hole.
3. Press the wheel cover in place over the axle hole.
4. Repeat for the second wheel.
Fitting the rubber feet
1. Pass the bolt through the rubber pad and support.
2. Pass the end of the bolt through the frame and secure it in place
with the nut.
3. Repeat for the second foot.
AVR (automatic voltage regulation)
The machine is equipped with automatic voltage
regulation. This helps to keep voltage and frequency
fluctuations within a range of approximately 3%. When
heavy-duty consumers are started up in particular, there
is a chance of higher fluctuations for a brief period.
Please consult an electrical specialist or the manufacturer
before connecting sensitive electronic equipment to the
generator.
Fuels
The generator should be operated with pure diesel. The
engine may be permanently damaged by the use of other
fuels, such as heating oil, vegetable oil and bio-diesel.
This form of damage is excluded from the manufacturer
warranty.

15
ENGLISH
Electrical connection
An automatic transfer switch (ATS) is required for the
feed-in of power into the building electrical system.
Installation may only be carried out by authorised
specialist personnel. Local rules and regulations must be
observed. The generator must be earthed correctly,
isolated from the building system and disconnected with a
suitable circuit breaker.
The rated power of the generator must be higher than the
total power of all connected consumers. Please note that
the power consumption when some consumers are started
up may be three to five times higher than their rated
power.
Unbalanced loads can cause damage to connected
consumers and must be avoided. Consult an electrical
specialist.
Safety during preparation for use
• Remain attentive at all times. Carelessness can quickly lead to
serious injury.
• Safety elements and controls must be accessible at all times.
• Faulty protective devices, covers and device parts must be
repaired or replaced by a specialist before use.
• Check that all moving parts and switches function flawlessly. All
parts must be properly fitted, and all conditions must be fulfilled to
ensure flawless operation of the machine.
• Do not use the machine if the switch does not switch on and off.
• Before use, ensure that there are no tools or other foreign objects
on the machine.
Delivery content
The machine is very heavy. Do not lift the machine alone!
Engage appropriate assistance or use lifting aids (crane).
• Check that all parts are complete and undamaged.
• If you determine that the delivery content of your machine is
incomplete or that the machine is damaged, please contact your
dealer.
The packaging material includes plastic bags, films and
small parts that could be swallowed by children. Risk of
suffocation!
Installation and preparatory work
• Check the filters. Check that the air filter, the fuel filter (12) and
the oil filter (13) are fitted properly.
Filling with oil
The machine is shipped without oil - You must add oil
before using this machine.
Keep cigarettes, sparks and flames away from all fuel-
related parts.
1. Unscrew the oil cap (18) and fill with fresh, clean oil (10W-30 or
15W-30). Please see the table of technical data for the quantity
of oil required for filling.
2. Check the oil level after approximately one minute. Ensure that
the generator is level. The dipstick is attached to the oil cap.
Screw the oil cap into the oil filler neck as far as it will go.
Unscrew the oil cap again and check the level. The oil level is
correct when there is oil between the MAX and MIN markings.
3. Once the correct level has been reached, screw the oil cap back
on firmly.
You must check the engine oil level before starting, every
time you use the generator.
Connecting the battery cables
The battery is usually not connected in the as-delivered condition
and must be connected before operation. Before starting the
machine for the first time, connect the battery cables in the following
sequence:
1. The red cable to the positive battery terminal.
2. The black cable to the negative battery terminal.
If it is ever necessary to disconnect the battery cables, do
so in the reverse order.
The battery is automatically charged while the generator is
operational. Never disconnect the battery from the
generator when the generator is switched on. This can
cause a short circuit and generator damage, as well as fire
and electric shock.
Filling fuel
1. Remove the fuel cap (20) on top of the machine.
2. Slowly fill with clean, fresh fuel, using a funnel if necessary.
3. Fit the cap.
Please see the technical data table for the tank capacity of
your generator.
Fuel and its vapours are highly flammable! When filling
with fuel, observe the safety information in these
instructions.

HYUNDAI
16
Bleeding the fuel line
The fuel line must be bled after filling the tank for the
first time, after a prolonged period of storage or after the
generator has been run dry.
1. Identify the fuel hose that runs between the fuel filter (12) and the
fuel pump (15).
2. Loosen the clamp at the fuel pump, pull off the hose and allow a
small amount of fuel to discharge into a suitable collecting
container.
3. Reconnect the hose and secure the clamp.
Fuel and its vapours are highly flammable! When filling
with fuel, observe the safety information in these
instructions.
Earthing the generator
• The frame and external electrically conductive part of this
generator must be properly connected to an approved earth
connection.
• Proper earthing of the generator will help prevent electric shock in
the event of an earth fault condition in the generator or connected
electrical devices.
• Proper earthing also helps dissipate static electricity, which often
builds up in unearthed devices.
Floating earth for portable generator use
• This generator uses a floating earth configuration, which means
that the neutral of the alternator is not connected to the earth of
the machine. It is therefore important that you ONLY use the
generator to supply equipment in the following combinations:
- one or more CLASS II devices
- a single CLASS I device
- one or more CLASS II devices and a single CLASS I device
CLASS I equipment has a green/yellow earth wire
connected inside the plug.
CLASS II equipment does not have a green/yellow earth
wire connected inside the plug and does have this symbol
embossed or printed on the casing.
USE (FIG. A)
Your machine is supplied without oil or fuel. You must fill it
with oil and fuel before operation. Starting the engine
without oil will cause permanent damage. This damage is
expressly excluded from the warranty.
The generator must be earthed if the connected consumer
is earthed. The earth terminal on the generator is
connected to the frame and the metallic parts of the
generator that are not live. Please contact a local specialist
for advice on correct use of the earthing terminal.
Safety during use
• The machine must not be connected to electrical systems of
buildings or to another generator. The return of electrical current
may be illegal and extremely dangerous.
• When used as a ‘standby’, the generator may only be connected
to the electrical system of the building by a qualified specialist.
Local rules and regulations must be observed. The generator
must be earthed correctly and isolated from the building system
and disconnected with a suitable circuit breaker.
• Position the generator on a level surface in order to prevent
tipping and the spillage of fuel.
• Position the generator in such a way that it can be sufficiently
ventilated and cooled. Otherwise, there is a risk of overheating.
• Do not use the machine in rain, snow or wet conditions.
• Do not operate the machine with wet hands.
• Do not touch electrical parts. Prevent contact between these
parts, sockets and moisture/water.
• Be aware of people, children and animals nearby. The operator is
responsible for injuries to other people and for damage to their
property.
• Never lift or tip the machine when the engine is running.
• Wear safety goggles and ear protection if you need to remain in
the immediate vicinity of the machine for a prolonged period of
time. Wearing ear protection will help to reduce the noise level.
• If dust is generated by the work being carried out, wear a
respiratory protection mask.
• Some parts of the generator will become very hot during
operation and remain hot for some time once the generator has
been switched off. Do not touch these parts. There is a risk of
burns.
When starting the generator, connecting or disconnecting
consumers the circuit breaker should be moved to the
‘OFF’ position to deactivate the power supply to the
sockets. Failure to follow this instruction may damage the
AVR.
Starting the generator
If the generator does not start within five seconds, abort
the starting process and wait at least 30 seconds before
trying again. After three attempts, allow the starter to cool
for ten minutes before trying again.
1. Turn the engine switch (16) to the ‘RUN’ position. The engine
switch can also remain in this position when switched off. When
the mechanical stop switch (17) is pressed, the engine switch
returns to the ‘STOP’ position.
2. Before starting, move the circuit breaker (4) to the ‘OFF’ position.
3. Turn the starter key (2) to the ‘ON’ position.
4. Turn the starter key to the ‘START’ position and hold it there
briefly until the generator starts. Allow the starter key to return to
the ‘ON’ position.
Starting with the starter cord
Starting the generator with the pull cord requires
considerable effort. This option should only be used in
exceptional cases.
1. Pull gently on the pull cord (19) until you feel slight resistance.
Then pull the pull cord forcefully and allow it to retract slowly. Do
not allow it to spring back. Repeat this process until the
generator starts.

17
ENGLISH
In cold environments, press the pre-heat button (8) for
ten to fifteen seconds to allow the air in the combustion
chamber to pre-heat slightly. This will make starting easier.
The low oil level protection warning system is designed to
prevent engine damage caused by insufficient oil in the
crankcase. The low oil level protection warning system
switches the engine off automatically before the oil level in
the crankcase falls below a safe limit value. If the low oil
level protection warning system switches the engine off,
check the oil level, top up the oil and restart the generator.
Overload protection
• If the generator becomes overloaded or the connected device has
a short circuit, the circuit breaker (4) will trip. This will interrupt
output to the AC connection.
• If this happens, reduce the number of electrical consumers or
remove the faulty consumers. Switch the overload circuit breaker
on again. This will restore the power supply.
LED display
• The generator is equipped with a digital display, which is shown in
figure B. See the corresponding numbers in the description for an
explanation of the various parts of the display.
The LED display and the alarm functions are preset in the
factory to ensure optimal functionality. Reprogramming
may only be carried out by a specialist.
Circuit breaker (g. A)
A three-phase circuit breaker (4) controls the power supply
to the sockets and protects the generator against overload.
• If the circuit breaker moves to the ‘OFF’ position during operation,
check the generator, reduce the number of consumers and move
the circuit breaker back to the ‘ON’ position.
An RCD (5) protects the user against electrical shock by
switching off the power supply to the sockets in the event
of current leakage to earth. The RCD must be tested
regularly, and can only be tested when power is being
supplied by the generator.
• Follow the instructions in ‘Connecting electrical loads and
preventing overload’, but do not connect any devices to the
generator.
• Press the test button (5a) to check operation of the RCD.
• If the reset button (5b) pops out, the RCD is operating properly.
Otherwise, it is defective and must be replaced by a qualified
technician. Do not use the generator until the RCD is operating
properly.
• Press the reset button (5b) to reset the RCD.
When starting the generator, connecting or disconnecting
consumers the circuit breaker should be moved to the
‘OFF’ position to deactivate the power supply to the
sockets. Failure to follow this instruction may damage the
AVR.
Starting the generator in automatic mode (ATS) (g. A)
In automatic mode, the generator is started by ATS.
1. Turn the engine switch (16) to the ‘RUN’ position.
2. Turn the starter key (2) to the ‘AUTO/ATS’ position.
3. Before starting, move the circuit breaker (4) to the ‘OFF’ position.
4. Connect the ATS device to the ATS connection (7).
5. Connect the consumer to the socket (10 or 11) on the generator.
6. Move the circuit breaker (4) to the ‘ON’ position. The consumer
will now be supplied with power as soon as the ATS switches the
generator on.
Check the oil level at regular intervals. The generator
will fail to start if the oil level is low. If the machine is not
operated on a regular basis, it should be started up for
20 to 30 minutes every two months. That way, you can
ensure that the machine will be immediately operational
when it is needed.
Switching the generator off (g. A)
1. Move the circuit breaker (4) to the ‘OFF’ position.
2. Disconnect the consumer from the socket on the generator.
3. Allow the engine to run for two to three minutes with no
connected loads so that the generator cools down.
4. Switch the engine off by turning the starter key (2) to the ‘OFF’
position.
The engine can also be switched off with the mechanical
stop switch (17). Before restarting, turn the engine switch
(16) back to the ‘RUN’ position.
Connecting electrical loads and preventing overload
Do not exceed the generator’s rated wattage/current
capacity. Otherwise, the generator and/or any electrical
devices connected to it may be damaged. Check this by
adding up the rated watts (or amps) of all loads to be
connected at the same time. This total must not exceed:
- The circuit breaker rating of the output socket supplying
the power, or
- The rated wattage/current capacity of the generator.
The rated wattage of lights can be taken from light bulbs.
The rated wattage of tools, appliances and motors can
usually be found on a data label or decal affixed to the
devices. If the appliance, tool or motor does not show
wattage, multiply the voltage by the current rating to
determine watts (volts × amps = watts).
Some electrical induction motors require about three times
more power for starting than for running. This surge of
power only lasts a few seconds, during starting. You must
allow for high starting wattage when selecting electrical
devices to connect to the generator:
- Calculate the watts needed to start the largest motor.
- Add to that figure the running watts of all other connected
loads.
- Start the largest motor first, and only start one motor at a
time.

HYUNDAI
18
Do not overload the sockets. The sockets are protected
against overload by a three-phase circuit breaker. If the
current rating of any circuit breaker is exceeded, all three
will trip and the electrical output to the sockets will be
disconnected.
Only one socket may be used at a time. Select either the
400 V or 230 V outlet with the voltage selector switch (3).
1. Let the engine run until the speed is stable and it has been
allowed to warm up for a few minutes.
2. Connect one or more electrical devices:
- Make sure the device is OFF.
- Connect it to the generator.
- Switch the device on for operation.
3. Switch off and disconnect all electrical devices from the
generator before stopping the generator.
CLEANING AND MAINTENANCE
Regular care and maintenance is recommended to ensure
long, safe and reliable use of the generator.
The machine may only be maintained when switched off
and cool. Please observe the other safety information in
these instructions.
No modifications may be made to the machine or controls
on the engine. The factory default settings must not be
modified.
Turn the engine switch to the ‘STOP’ position before
commencing maintenance.
Cleaning
Never clean the machine with a pressure washer or
compressed air. When cleaning plastic parts in particular,
do not use chemicals, petrol or other solvents. In some
cases, these substances can damage parts and protective
coatings.
Maintenance
• Check that all screws, nuts and bolts are properly tightened at
regular intervals.
• Verify that all protective devices and covers are properly attached
and operational. Damaged or worn parts must be replaced by
genuine accessories.
• We recommend having the machine inspected and maintained by
a specialist at least once annually.
Safety during maintenance
• Wear appropriate clothing. Use suitable protective equipment and
safety shoes.
• Repair and maintenance work may only be carried out by
qualified and authorised personnel.
• Switch the machine off before commencing maintenance, repair
or cleaning work. Wait until the machine has cooled down.
• Check the state of the machine at regular intervals. Only replace
damaged or worn parts with genuine accessories. If non-genuine
accessories are used, the manufacturer is unable to accept
liability for potential personal injury or damage to the machine.
• Once maintenance is complete, ensure that all protective devices,
nuts, bolts and screws have been properly fitted and tightened.
• Once maintenance is complete, ensure that there are no tools or
other foreign objects on the machine.
Maintenance schedule
Service interval/time Action
Before each use Check the engine oil level
After the first 20 hours Change the engine oil
Check/clean the air filter
Check/clean the oil filter
Check/clean the fuel filter
Every 50 hours Check/clean the air filter (*)
Every 100 hours Change the engine oil
Change the air filter (*)
Check/clean the oil filter
Replace the fuel filter
Every 300 hours Replace the oil filter
Every two years Check valve play setting (**)
Clean the fuel tank and filter screen (**)
Clean the combustion chamber (**)
Check the fuel lines. Replace if
necessary (**)
(*) Maintain more frequently if used in dusty environments.
(**) Maintenance by specialist required.
Suitable tools and genuine accessories must be used
when carrying out maintenance work. Maintenance work
may only be carried out by trained personnel.
Changing the oil (g. A)
Hot oil may cause burns. Allow engine to cool before
draining oil. Avoid prolonged or repeated skin exposure to
used oil. Thoroughly wash exposed areas with soap.
1. Switch the generator on and allow it to run for two to three
minutes so that the oil warms up. Ensure that the engine does
not run for too long to become hot. Otherwise, there is a risk of
burns.
2. Place a suitable collecting container under the oil drain plug (14).
3. Unscrew the oil drain plug and oil cap (18), and allow as much of
the oil as possible to drain into the collecting container.
4. Fit the oil drain plug.
5. Fill with fresh, clean oil (10W-30 or 15W-30). Please see the
table of technical data for the quantity of oil required.
6. Check the oil level after approximately one minute. Ensure that
the generator is level. The dipstick is attached to the oil cap.
Screw the oil cap into the oil filler neck as far as it will go.
Unscrew the oil cap again and check the level. The oil level is
correct when there is oil between the MAX and MIN markings.
7. Once the correct level has been reached, screw the oil cap back
on firmly.
Used oil and oil containers must be collected and sent to a
local disposal point.

19
ENGLISH
Cleaning/changing the oil lter (g. A)
1. Remove the screw from the oil filter (13), and remove the oil
filter.
2. Clean the oil filter with diesel and a brush.
3. Reinsert the filter, and fit the screw.
Damaged filters must be replaced by original filters.
Cleaning/changing the air lter
A soiled air filter impedes the flow of air into the engine’s
combustion chamber. Clean or replace the air filter at
regular intervals if the generator is operated in dusty
environments.
Do not use petrol or solvents for cleaning. Under some
circumstances, these may be flammable and pose a risk of
explosion.
Never operate the generator without the air filter in place.
Unfiltered air can increase engine wear.
1. Remove the air filter cover by loosening the screw, and remove
the air filter.
2. Replace or clean the filter.
3. Fit the air filter and air filter cover into the housing, and tighten
the screw.
Changing the fuel lter
When changing the fuel filter, fuel will flow out of the tank,
lines and filter when the lines are opened. Perform the
change when the tank is as empty as possible. Use a
suitable collecting container to catch any leaking fuel.
Wear diesel-resistant gloves. Have an absorbent cloth at
hand. Wear safety goggles.
1. Loosen the clamp on top of the filter, remove the hose from the
filter and allow all of the remaining fuel in the tank to drain into
the collecting container.
2. Loose the clamp on the bottom of the filter.
3. Replace the filter and fit the hoses.
4. Secure the two clamps again.
5. Refill the tank with fuel.
6. Bleed the hoses, as explained in this manual.
7. Check the connection points for leaks.
Changing the battery
1. Undo the screws from the battery attachment.
2. Remove the black cable (-) from the battery first, followed by the
red cable (+).
3. Remove the old battery and insert a new battery. A 12 V/ 30 Ah
lithium battery is required. Maximum dimensions: 197 x 130 x
160 mm (L x W x H).
4. Connect the red cable to the positive terminal followed by the
black cable to the negative terminal.
5. Refit the battery attachment.
The battery is charged automatically while the generator is
operational. If the generator is not going to be operated for
a prolonged period of time, the battery must be charged
before going into storage. The battery must be removed
from the generator to be charged with an external charger.
Safety when handling batteries
• Where present, batteries may only be charged by a suitable
device in a well-ventilated room away from sources of ignition.
• In the event that fluid leaks from a battery, bodily contact with the
fluid must be avoided. The fluid may cause skin irritation. In the
event of accidental contact, the contact point must be rinsed
thoroughly with water. In the event of contact with the eyes,
consult a doctor immediately.
• Batteries must not be opened.
• Improper use may cause vapours to leak from the battery, which
could irritate the airways. In that case, ensure sufficient
ventilation. Consult a doctor in the event of symptoms.
TRANSPORT AND STORAGE
Transport (g. A)
• Switch the generator off and allow it to cool down completely.
• Turn the engine switch (16) to the ‘STOP’ position to prevent
accidental start-up of the generator.
• Do not transport the generator with too much fuel in the tank.
• Do not start the generator while it is inside the transport vehicle.
The generator may only be used in open, well-ventilated areas.
• Avoid direct exposure to sunlight if the generator is being
transported in a closed transport vehicle. High temperatures
inside the transport vehicle may cause the fuel to evaporate and
give rise to explosion.
• Drain the fuel completely if the generator is to be transported on
uneven roads.
Safety during transport
• The machine may only be transported when switched off and
cool.
• The machine may only be transported with the fuel tank empty.
• The machine must be secured to prevent slipping and tipping
during transport.
• The machine must not be tipped during transport as this could
cause oil or fuel residue to leak.
Storage (g. A)
• The generator must be stored in a clean and dry location in a
closed and well-ventilated room that is not accessible to children.
• Turn the engine switch (16) to the ‘STOP’ position to prevent
accidental start-up of the generator.
• The machine must be allowed to cool down fully before storage.
• If the machine is not going to be used for a prolonged period of
time, e.g. over winter, the fuel tank must be emptied. Remove the
battery and store it in a warm and dry location.
Safety during storage
• The machine may only be stored in a well-ventilated room.
• Allow the machine to cool down completely before storage.
• The machine must not be tipped. There is a risk of oil and fuel
leaking.
• Fuel and oil may only be stored in appropriate and sealed cans,
away from sources of ignition.
• The machine and fuel must be kept away from children and
unauthorised persons.

HYUNDAI
20
TROUBLESHOOTING
When working on the machine, ensure that it is switched off and has cooled down. Turn the engine switch (16) to the ‘STOP’
position to prevent accidental start-up of the generator.
Problem Possible cause Possible solution
Generator does not start Insufficient fuel Top up fuel
Engine switch in ‘STOP’ position Move engine switch to ‘RUN’ position
Low oil level Top up oil
Battery depleted Charge battery
Air in fuel lines Bleed fuel lines
Injector blocked Clean injector
Generator is difficult to start or runs
unevenly, loud Fuel filter soiled Clean/replace fuel filter
Air filter soiled Clean/replace air filter
Oil filter soiled Clean/replace oil filter
Moisture in fuel Extract fuel, fill with fresh fuel
Loose, unsecured parts
Covers Secure parts correctly, tighten screws
Generator supplies no or low power Circuit breaker in ‘OFF’ position Move circuit breaker to ‘ON’ position
Overload switch activated (models with
overload switch only) Reduce consumer load, deactivate overload switch
AVR faulty Contact service partner
TECHNICAL DATA
Output voltage V~ 230/400
Max. output current A 25.2/11.4
Frequency Hz 50
Output power kW/kVA 5.4/7.5
Max. output power kVA 5.7/7.9
Connections A 16/32
Display LED6
Fuel tank capacity l 10
Run time at 75% load h 5.5
Lithium battery V/Ah 12/30
Fuel diesel
Fuel tank capacity l 10
Oil SEA 10W-30/15W-30
Oil container capacy l 1,75
Engine power hp 12
Engine start electric/pull cord
Engine displacement cm3 498
Alternator type AL6-T
Alternator power kW 6
Alternator power factor 0.8/1
Alternator voltage regulation brush/AVR
Weight kg 116
Noise and vibration
LpA (sound pressure level)* @ 7 m dB(A) 79
LWA (sound power level)** dB(A) 98
*Uncertainty K= dB(A) 3
**Uncertainty K= dB(A) 3
Wear hearing protection.
GUARANTEE
Refer to the enclosed guarantee conditions for the terms
and conditions of guarantee.
ENVIRONMENT
Your product, accessories and packaging should be sorted
for environmentally friendly recycling.
Only for EC countries
Do not dispose of power tools into domestic waste. According
to the European Guideline 2002/96/EC for Waste Electrical and
Electronic Equipment and its implementation in national law,
power tools that are no longer usable must be collected separately
and disposed of in an environmentally friendly way.
BATTERY PACKS/BATTERIES
Unwanted battery packs/batteries should be disposed
of or recycled in an environmentally friendly way and in
conformance with the local regulations.
• Discharge the battery pack/battery by letting the
machine run at no load until the motor stops.
• Remove the battery pack/battery from the machine.
• Hand in the battery pack/battery as chemical waste with
the recycling station in your municipality.
Only for EC countries
Defective or dead battery packs/batteries must be recycled
according to the guideline 91/157/EEC.
Subject to change; specifications can be changed without further
notice.
Sidan laddas...
Sidan laddas...
Sidan laddas...
Sidan laddas...
Sidan laddas...
Sidan laddas...
Sidan laddas...
Sidan laddas...
Sidan laddas...
Sidan laddas...
Sidan laddas...
Sidan laddas...
Sidan laddas...
Sidan laddas...
Sidan laddas...
Sidan laddas...
Sidan laddas...
Sidan laddas...
Sidan laddas...
Sidan laddas...
Sidan laddas...
Sidan laddas...
Sidan laddas...
Sidan laddas...
Sidan laddas...
Sidan laddas...
Sidan laddas...
Sidan laddas...
Sidan laddas...
Sidan laddas...
Sidan laddas...
Sidan laddas...
Sidan laddas...
Sidan laddas...
Sidan laddas...
Sidan laddas...
-
 1
1
-
 2
2
-
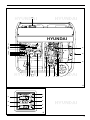 3
3
-
 4
4
-
 5
5
-
 6
6
-
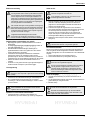 7
7
-
 8
8
-
 9
9
-
 10
10
-
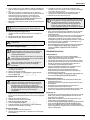 11
11
-
 12
12
-
 13
13
-
 14
14
-
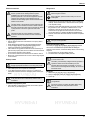 15
15
-
 16
16
-
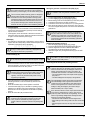 17
17
-
 18
18
-
 19
19
-
 20
20
-
 21
21
-
 22
22
-
 23
23
-
 24
24
-
 25
25
-
 26
26
-
 27
27
-
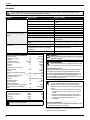 28
28
-
 29
29
-
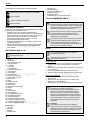 30
30
-
 31
31
-
 32
32
-
 33
33
-
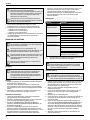 34
34
-
 35
35
-
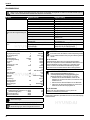 36
36
-
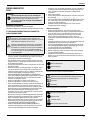 37
37
-
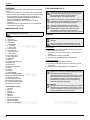 38
38
-
 39
39
-
 40
40
-
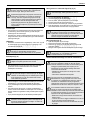 41
41
-
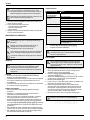 42
42
-
 43
43
-
 44
44
-
 45
45
-
 46
46
-
 47
47
-
 48
48
-
 49
49
-
 50
50
-
 51
51
-
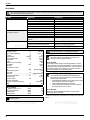 52
52
-
 53
53
-
 54
54
-
 55
55
-
 56
56


Hyundai 55267 Användarmanual
- Kategori
- Kraftgeneratorer
- Typ
- Användarmanual
på andra språk
- Deutsch: Hyundai 55267 Benutzerhandbuch
- français: Hyundai 55267 Manuel utilisateur
- English: Hyundai 55267 User manual
- dansk: Hyundai 55267 Brugermanual
- Nederlands: Hyundai 55267 Handleiding
Relaterade papper
Andra dokument
-
FXA PD 2500I Användarmanual
-
Scheppach 5906212901 Användarmanual
-
Dolmar GE-1100 Bruksanvisning
-
-
MSW MSW-PG-102 Bruksanvisning
-
Scheppach SG7100x Användarmanual
-
Scheppach SG3200x Användarmanual
-
KINZO 48P7400 Bruksanvisning
-
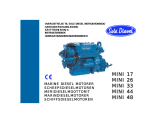 Solé Diesel MINI-48 Användarmanual
-
