Sidan laddas...

21.6V 2-in-1
POVC521MS
User Manual
Silver Stickvac

Thank you for purchasing your new POINT PRO SERIES Vacuum Cleaner.
These operating instructions will help you use it properly and safely. We
recommend that you spend some time reading this instruction manual
in order that you fully understand all the operational features it oers.
Read all the safety instructions carefully before use and keep this
instruction manual for future reference.
GB
Tack för att du har köpt din nya dammsugare från POINT PRO SERIES.
Denna bruksanvisning hjälper dig att använda den på ett säkert och
korrekt sätt. Vi rekommenderar att du tar dig tid att läsa igenom denna
bruksanvisning för att till fullo förstå alla driftfunktioner som den
erbjuder. Läs noga igenom alla säkerhetsinstruktioner före användning
och spara bruksanvisningen för framtida bruk.
SE
Tak fordi du har købt din nye POINT PRO SERIES Støvsuger.
Disse
brugsanvisninger hjælper dig med at bruge den korrekt og sikkert. Vi
anbefaler, at du læser denne brugsanvisning, så du får en fuld forståelse
af, hvordan alle funktionerne virker. Læs alle sikkerhedsinstruktioner
nøje før brug, og behold denne brugsanvisning til senere reference.
DK
Takk for at du kjøpte denne nye støvsugeren i POINT PRO SERIES.
Denne bruksanvisningen hjelper deg med å bruke den ordentlig og sikkert.
Vi anbefaler at du tar deg tid til å lese gjennom hele bruksanvisningen for
å bli fortrolig med alle funksjonene den har. Les alle sikkerhetsanvisningene
nøye før bruk, og oppbevar bruksanvisningen for fremtidig referanse.
NO
Kiitos, kun ostit uuden POINT PRO SERIES -pölynimurin.
Nämä
käyttöohjeet opastavat sinua käyttämään laitetta oikein ja turvallisest
i.
Suosittelemme, että vietät hetken tämän käyttöoppaan parissa, jotta
ymmärtäisit täysin kaikki laitteen tarjoamat toiminnalliset ominaisuudet.
Lue
kaikki turvallisuusohjeet huolellisesti ennen laitteen käyttöä ja säilytä
käyttöopas myöhempää käyttöä varten.
FI
2

P.4 - 17
P.18 - 31
P.32 - 45
P.46 - 59
P.60 - 73
3
GBFI
DK NOSE
Instruction Manual - English ........................... page
Bruksanvisning - Norsk ................................... side
Käyttöohjeet - Suomi ..................................... sivu
Brugsanvisning - Dansk .................................. side
Bruksanvisning - Svenska ............................... side

4
IMPORTANT SAFETY INSTRUCTIONS
For your continued safety and to reduce the risk of injury
or electric shock, follow all the safety precautions listed
below.
1. Read all the instructions carefully before using the
appliance and keep them for future reference.
2. Retain the manual. If you pass the appliance onto a
third party make sure to include this manual.
3. This appliance can be used by children aged from 8
years and above and persons with reduced physical,
sensory or mental capabilities or lack of experience
and
knowledge if they have been given supervision
or instruction concerning
use of the appliance in
a safe way and understand the hazards involved.
Children shall not play with the appliance. Cleaning
and user maintenance shall not be made by
children without supervision.
4. Only use the appliance with the supplied power
adaptor or charger.
5. Check that the voltage marked on the rating label
matches your mains voltage.

GB
5
6. Sparks inside the motor can ignite flammable vapors or
dust. Do not vacuum or use this product near flammable
or combustible liquids (e.g., gasoline or other fuels,
lighter fluid, cleaners, oil-based paints), gases (e.g.,
natural gas, hydrogen), or explosive dust (e.g., coal
dust, magnesium dust, grain dust, gunpowder).
7. Never suck up water or any other liquid.
8. Never suck up flammable substances and do not suck
up ashes until they are cold.
9. Do not continue to operate the appliance if you are in
any doubt about it working normally (e.g. abnormal
noise, smell, smoke), or if it is damaged in any way -
switch o, withdraw the mains plug and consult your
dealer.
10. Never touch the power plug or the appliance itself
with wet hands.
11. To protect against electrical shock, do not immerse
the mains cable, mains plug, charging base or any
part of the appliance in water or other liquids.
12. Do not store the vacuum cleaner in areas with high
temperature, keep it away from heat sources such as
radiators or gas/electric fires.

6
13. To disconnect the power cable from the mains socket,
remove the plug direct, do not pull at the power cable.
14. If using an extension cord with this product, the
marked electrical rating of the cord set or extension
cord must be at least as great as the electrical rating
of the product.
15. Do not operate an appliance with a damaged mains
cable or mains plug, or in an abnormal state. If the
mains cable is damaged it must be replaced by the
manufacturer, its service agent, or similarly qualified
persons in order to avoid a hazard.
16. This vacuum cleaner is intended for normal household
use only. Do not recharge and use the appliance
outdoors. Do not use the appliance for other uses
than its intended use.
17. Remove the appliance from the charging base, before
cleaning or replacing the filter. Allow the appliance to
cool completely before cleaning or storing.
18. If a blockage is found in the brushes, hoses or tubes,
it should be removed before use.
19. Do not use the product to vacuum metal objects such
as coins, screws, nails, tacks, etc.

GB
7
20. Keep hair, loose clothing, and body parts away from
openings or moving parts, especially the part of the
product where there is suction.
21. Do not point the appliance at the eyes, ears or mouth
during operation.
22. Make sure the dust container is properly installed
before use. Never use the appliance without the
motor protection filter. This damages the motor and
shortens the life of the appliance.
23. Keep the charger base clean and free of dust.
24. The use of accessories not recommended by the
appliance manufacturer may cause injuries.

8
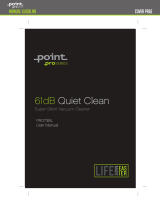
1. ON/OFF switch
2. ECO speed switch
3. Foldable handle release
button
4. Handheld Release Button
5. Handheld ON/OFF Switch
UPRIGHT UNIT:
PRODUCT OVERVIEW
6. Battery / charging
indicator
7. Dust Container
Release Button
8. Power Brush
Release Button
1
2
3
4
5
6
7
8
9
10
11
12
13
14
9. LED Light
10. Power Brush
11. Folding Handle
12. Handheld Handle
13. Handheld Unit
14. Charging Bracket

GB
9
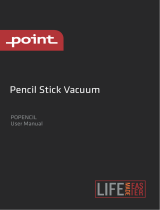
15. Dust container
16. Outer filter
17. Inner filter
18. Seal ring
19. Dust container release button
20. Battery/ Charging indicator
21. ON/OFF switch
22. Handheld vacuum cleaner
15
16
17
1920 21
22
18

10
FOLDABLE HANDLE
To lower the handle, press the
folding handle release button.
Off
Lift the handle to an upright
position, the handle will lock
automatically.
ASSEMBLING THE CHARGER BASE
Wall Mount Hole
Mounting Screws
Plastic Wall Anchors
DETACHABLE POWER BRUSH Motorized Brush
LED Light
Press

GB
11
1. Insert the handheld unit to the upright unit
Make sure the upright unit is switched OFF. Avoid
any obstacles in between the hand-held unit and
the upright unit.
2. Attach the upright unit onto the charger base
˙Make sure the charger base is placed on a flat stable floor.
˙Attached the upright unit onto the charger base.
˙If the upright unit is not attached to the charger
base properly, charging will not start.
˙Avoid any dust in between the charger base
and the unit, clean the contacts if necessary.
˙Be careful of the unit will be tripped
over by the power cable during charging.
˙The charging indicator will illuminate red to
indicate that the vacuum cleaner is being charged.
NOTE: The charging indicator will turns to blue when
the battery is fully charged.
HINT: It is recommended to charge the vacuum
cleaner for at least 6 hours for before use.
˙It is normal that the charger base and the unit will
get warm while charging.
3. Connect the power cable to the main socket
Socket for
Adaptor
Charge the battery when:
˙using the product for the first time
˙after not using the product for a long period of time
˙when the unit is at low power and the battery/ charging indicator
flashes red.
Light
on
CHARGING THE VACUUM CLEANER

12
LED INDICATOR
Status LED color
Power ON Blue
Low battery Blue flashing
Empty battery Red flashing
Charging Red
Charging complete Blue
Bad battery Red & Blue alternative flashing
OPERATION
Make sure the battery is fully charged before use.
Operation of the upright vacuum cleaner
1. Press the ON/OFF switch to switch on the upright vacuum cleaner.
2. During use, press the ECO speed switch to shift between Normal
Speed and ECO Speed.
3. When in operation, the LED light on the floor brush will illuminate.
Operation of the handheld vacuum cleaner
1. Press the handheld button to detach the handheld vacuum cleaner
from the upright unit. Press the ON/OFF switch to turn on the
vacuum cleaner. The handheld vacuum cleaner will start to work.
2. Vacuum the surface in any direction until the area is clean.
3. Press the ON/OFF switch to turn o the vacuum cleaner. Slightly lift
the vacuum clenaer head upward to avoid dust falling out from the
dust container before switching o.
4. Empty the container before doing any more vacuuming and clean it
before putting it away.
5. Return the handheld vacuum cleaner to the upright unit.

GB
13
MAINTENANCE / CLEANING
Empty the dust container
˙Dirt and liquid in the dust container should be emptied after each
use or at the time when the dust exceeds the maximum dust marking.
˙Always switch o the vacuum cleaner before cleaning.
1. Hold the vacuum cleaner vertically with the air-intake (nozzle end)
pointing downward to avoid spillage. Press the release button on
the top of the vacuum cleaner and release the dust container over a
rubbish bin and remove the filter bracket from the dust container.
2. Remove the filters by holding the two lips on the outer filter and
pull them out from the dust container.
3. Empty the contents of the dust container into the rubbish bin.

1414
4. Remove the filters and wash with water. Dry it before re-installing it.
NOTE: Do not clean the vacuum cleaner with paint thinner or
chemical solutions as this will damage the vacuum cleaner.
5. Fit the inner and outer filter into the dust container. Make sure you
have dried the inside of the dust container.
6. Re-install the dust container.
Caution:
˙Do not vacuum up large objects such as tissue papers. This will
cause a blockage and lower the suction power.
˙Never vacuum up flammable substances and do not vacuum up
ashes until they are cold.
˙Always dispose of the dust and clean the filter frequently,
otherwise the dust will damage the motor.

GB
15
Maintenance when the power brush cannot be manually rotated
1. Slide the brush lock.
4. Remove the dust on the
rotating brush.
Lift up the right side of the
rotating brush, then take out
the rotating brush.
3. Take out the rotating brush.
Brush lock
Slide
Carry out the maintenance if any waste threads or hair gets tangled in
the brush. Press the Power Brush Release Button to detach the power
brush from the upright unit.
Regular Maintenance
Slowly rotate the brush manually
and remove any foreign objects
tangled around the brush.
MAINTENANCE FOR POWER BRUSH
Take out
the dust
Cutter
2. Rotate to open the brush door.

16
5. Re-install the rotating brush back into the power brush
REMOVING THE BATTERIES
The Li-ion batteries in this vacuum cleaner are rechargeable and have
a service life of many years (depending on use and storage conditions).
When the batteries eventually expire, they should be removed for
recycling. Contact your local authority for recycling information.
˙Always dispose of batteries safely.
˙Never dispose of batteries in a fire.
˙Never try to dismantle batteries.
˙Never short circuit batteries.
1. Unscrew and disassemble the vacuum cleaner.
2. Pull out the batteries and cut the wires connected.
3. Disconnect the battery terminals with “NON” conductive tape such
as packing or insulation tape to prevent accidental short circuit of
the battery terminals and place the batteries in a strong plastic bag.
4. Take the batteries to your local recycling station.
PRODUCT SPECIFICATIONS
Model : POVC521MS
Battery : 21.6V Li-ion
Adaptor :
Input: AC 100-240V~ 50/60Hz
Output: DC 27V 500mA

GB
17
DISPOSAL OF THE APPLIANCE
This symbol on the product or in the instructions means that your
electrical and electronic equipment should be disposed at the
end of its life separately from your household waste. There are
separate collection systems for recycling in the EU. For more
information, please contact the local authority or your retailer
where you purchased the product.
Imported and Exclusively marketed by:
Power International AS,
PO Box 523, N-1471 Lørenskog, Norway
Power Norge:
https://www.power.no/kundeservice/
T: 21 00 40 00
Expert Danmark:
https://www.expert.dk/kundeservice/
T: 70 70 17 07
Power Danmark:
https://www.power.dk/kundeservice/
T: 70 33 80 80
Punkt 1 Danmark:
https://www.punkt1.dk/kundeservice/
T: 70 70 17 07
Expert Finland:
https://www.expert.fi/tuki/asiakaspalvelu/
T: 020 7100 670
Power Finland:
https://www.power.fi/tuki/asiakaspalvelu/
T: 0305 0305
Power Sverige:
https://www.power.se/kundservice/
T: 08 517 66 000

18
VIKTIGE SIKKERHETSANVISNINGER
For din egen sikkerhet og for å redusere risikoen
for personskade eller elektrisk støt må du følge alle
forholdsreglene som er oppført nedenfor.
1. Les alle anvisninger nøye før du tar i bruk apparatet,
og oppbevar dem for fremtidig referanse.
2. Ta vare på bruksanvisningen. Hvis du overleverer
apparatet til noen andre, må du passe på at denne
bruksanvisningen følger med.
3. Dette apparatet kan brukes av barn over åtte (8) år
og personer med reduserte fysiske-, sensoriske- eller
mentale evner eller mangel på erfaring og kunnskap
hvis de er under tilsyn eller har mottatt anvisning om
bruk av apparatet på en sikker måte og forstår farene
dette innebærer. Barn må ikke leke med apparatet.
Rengjøring og brukervedlikehold må ikke utføres av
barn uten tilsyn.
4. Apparatet skal bare brukes med den medfølgende
strømadapteren eller laderen.
5. Kontroller at spenningen som er markert på
strømkravetiketten samsvarer med spenningen i
stikkontakten.

19
NO
6. Gnister inni motoren kan antenne brennbare
damper eller støv. Ikke støvsug eller bruk produktet
i nærheten av brannfarlige eller brennbare væsker
(f.eks. bensin eller andre brennstoer, tennvæske,
rengjøringsmidler, oljebasert maling), gasser (f.eks.
naturgass, hydrogen) eller eksplosivt støv (f.eks.
kullstøv, magnesiumstøv, kornstøv eller krutt).
7. Aldri støvsug vann eller andre væsker.
8. Aldri bruk støvsugeren på lettantennelige stoer, og
ikke støvsug aske før den er kald.
9. Ikke fortsett å bruke apparatet hvis du tviler på at
det fungerer normalt (f.eks. om det er unormal støy,
lukt eller røyk), eller om det er skadet på noen måte
– slå det av, trekk ut støpslet, og ta kontakt med
forhandleren.
10. Berør aldri støpslet eller apparatet med våte hender.
11. Ikke la strømledningen, støpselet, ladebasen eller
annen del av apparatet komme ned i vann eller andre
væsker, fordi dette kan føre til elektrisk støt.
12. Ikke oppbevar støvsugeren i områder med høy
temperatur, og hold den borte fra varmekilder som
radiatorer eller gass-/elektriske ovner.

20
13. Koble strømkabelen fra stikkontakten ved å dra
direkte i støpselet; ikke dra i strømkabelen.
14. Hvis du bruker en skjøteledning med dette produktet,
må den elektriske klassifiseringen til ledningen
eller skjøteledningen være minst like stor som den
elektriske klassifiseringen til produktet.
15. Ikke bruk apparatet hvis strømledningen eller
støpslet er skadet eller ikke virker ordentlig. Hvis
strømledningen er skadet, må den skiftes av
produsenten, av produsentens servicerepresentant
eller av en tilsvarende kvalifisert person for å unngå
fare.
16. Denne støvsugeren er kun beregnet for normal
husholdningsbruk. Ikke bruk eller lad opp dette
apparatet utendørs. Ikke bruk apparatet til noe annet
enn hva det er beregnet for.
17. Koble apparatet fra ladebasen før rengjøring eller
bytte av filter. La apparatet kjøles helt ned før
rengjøring eller oppbevaring.
18. Hvis det er noe som blokkerer børstene, slangene
eller rørene, må det ernes før bruk.
19. Ikke bruk produktet til å støvsuge metallgjenstander
som mynter, skruer, spiker, stifter osv.
/