
FT6-1775 (010) XXXXXXXXXX Copyright CANON INC. 2017 PRINTED IN XXXXX
Getting Started
Quick Operation
P.73
Quick Setup
NEXT PAGE
Please read "Important Safety Instructions" before operating this product. After you finish
reading this guide, store it in a safe place for future reference.
The information in this document is subject to change without notice.
You can access canon.com/oip-manual
to read the User's Guide that describes all functions of this machine.

2
Sådan kommer du i gang
Før du bruger dette produkt, skal du læse "Vigtige sikkerhedsanvisninger".
S.168
Når du er færdig med at læse denne vejledning, skal du gemme den et
sikkert sted til fremtidig reference.
Informationerne i dette dokument kan ændres uden varsel.
Aan de slag
Lees de "Belangrijke veiligheidsinstructies" voordat u het apparaat
gebruikt.
pag.178
Berg deze handleiding na het lezen op een veilige plaats op zodat u haar
later nog kunt raadplegen.
De informatie in dit document kan zonder voorafgaande kennisgeving
worden gewijzigd.
Komme i gang
Les "Viktige sikkerhetsinstruksjoner" før du tar dette produktet i bruk.
S.188
Etter at du har lest denne brukerveiledningen, anbefaler vi at du
oppbevarer den på et sikkert sted slik at du kan slå opp i den senere.
Det tas forbehold om at informasjonen i dette dokumentet kan endres
uten forvarsel.
Komma igång
Läs noggrant igenom "Viktiga säkerhetsanvisningar" innan du använder
produkten.
s.198
Spara sedan handboken som framtida referens.
Informationen i detta dokument kan ändras utan föregående
meddelande.
Aloittaminen
Lue kohta Tärkeitä turvallisuusohjeita ennen tuotteen käyttämistä.
s.208
Säilytä tämä opas huolellisesti myöhempää käyttöä varten.
Tämän asiakirjan tietoja voidaan muuttaa ilman erillistä ilmoitusta.
Начало работы
Прежде чем приступать к работе с этим изделием, прочитайте
«Важные указания по технике безопасности».
стр.218
Прочитав данное руководство, храните его в надежном месте для
дальнейшего использования в качестве справочника.
Информация в настоящем документе может быть изменена без
уведомления.
Початок роботи
Прочитайте розділ «Важливі інструкції з техніки безпеки» перед
початком роботи з виробом.
стор.228
Прочитавши цей посібник, зберігайте його в зручному та надійному
місці для подальшого звертання до нього.
Інформація у цьому документі може змінюватися без попереднього
повідомлення.
Getting Started
Please read "Important Safety Instructions" before operating this product.
P.78
After you nish reading this guide, store it in a safe place for future
reference.
The information in this document is subject to change without notice.
Mise en route
Prenez connaissance des "Consignes de sécurité importantes" avant
toute utilisation de ce produit.
P. 88
Après en avoir pris connaissance, conservez ce guide dans un endroit sûr
en vue de consultations ultérieures.
Les informations contenues dans ce document peuvent être modiées
sans avis préalable.
Erste Schritte
Lesen Sie vor der Inbetriebnahme dieses Produkts den Abschnitt
"Wichtige Sicherheitsvorschriften".
S.98
Nachdem Sie diese Anleitung gelesen haben, bewahren Sie sie zum
späteren Nachschlagen an einem sicheren Platz auf.
Die Angaben in diesem Dokument können ohne vorherige
Ankündigung geändert werden.
Introduzione
Prima di utilizzare il prodotto, leggere la sezione "Importanti istruzioni per
la sicurezza".
pag.108
Dopo aver letto la presente guida introduttiva, conservarla in un luogo
sicuro per future consultazioni.
Le informazioni contenute in questo documento sono soggette a
modiche senza preavviso.
Introducción
Lea las "Instrucciones de seguridad importantes" antes de usar este
producto.
pág.118
Cuando termine de leer esta guía, guárdela en un lugar seguro para
futuras consultas.
La información de este documento puede ser modicada sin previo
aviso.
Abans de començar
Llegiu les "Instruccions importants de seguretat" abans de fer servir
aquest producte.
pàg.128
En acabar de llegir aquesta guia, deseu-la en un lloc segur per poder
consultar-la en el futur.
La informació d'aquest document pot patir canvis sense cap avís.
Lehen urratsak
Irakurri mesedez "Segurtasun-argibide garrantzitsuak" produktu hau
erabili baino lehen.
138. or.
Gidaliburu hau irakurtzen amaitu ondoren, gorde toki seguruan behar
duzunean eskura izateko.
Dokumentu honetako informazioa abisatu gabe alda daiteke.
Introdução
Leia "Instruções de segurança importantes" antes de operar este produto.
pág.148
Depois de ler este guia, guarde-o em um local seguro para referência
futura.
As informações contidas neste documento estão sujeitas a alterações
sem aviso prévio.
Πρώτα βήματα
Διαβάστε τις «Σημαντικές οδηγίες ασφάλειας» προτού χρησιμοποιήσετε
το παρόν προϊόν.
σελ.158
Αφού διαβάσετε τον παρόντα οδηγό, φυλάξτε τον σε ένα ασφαλές μέρος
για μελλοντική αναφορά.
Οι πληροφορίες σε αυτό το έγγραφο υπόκεινται σε αλλαγές χωρίς
προειδοποίηση.
Quick Setup

3
You can access
canon.com/oip-manual to read the User's Guide that describes all
functions of this machine.
Le guide de l'utilisateur,
qui décrit toutes les fonctions de cet appareil se trouve sur canon.com/
oip-manual.
Sie können auf die Website
canon.com/oip-manual zugreifen, um das Anwenderhandbuch zu lesen,
das alle Funktionen dieses Geräts beschreibt.
Per una descrizione di tutte le funzioni della macchina, consultare la
Guida per l'utente disponibile sul sito canon.com/oip-manual.
Puede acceder a
canon.com/oip-manual para leer la Guía de usuario donde se describen
todas las funciones de este equipo.
Podeu accedir a
canon.com/oip-manual per llegir la Guia de l'usuari, que explica totes les
funcions d'aquest equip.
Makina honen funtzio guztiak deskribatzen dituen Erabiltzailearen
gidaliburua
canon.com/oip-manual web gunean eskura dezakezu.
Você pode acessar
canon.com/oip-manual para ler o Guia do usuário que descreve todas as
funções desta máquina.
Μπορείτε να επισκεφθείτε τη διεύθυνση
canon.com/oip-manual για να διαβάσετε τον Οδηγό χρήστη που
περιγράφει όλες τις λειτουργίες του παρόντος μηχανήματος.
Du kan oprette adgang til
canon.com/oip-manual for at læse den brugervejledning, der beskriver
alle denne maskines funktioner.
Op canon.com/oip-manual
kunt u de gebruikershandleiding lezen met alle functies van dit apparaat.
Du kan gå til
canon.com/oip-manual hvis du vil lese bruksanvisningen som beskriver
alle funksjonene for denne maskinen.
På adressen
canon.com/oip-manual kan du läsa användarhandboken som beskriver
alla funktioner i den här enheten.
Osoitteessa
canon.com/oip-manual voit lukea Käyttöoppaan, jossa kuvataan kaikki
laitteen toiminnot.
Для того чтобы прочитать Руководство пользователя, в котором
содержится описание всех функций аппарата, посетите веб-сайт
canon.com/oip-manual.
На веб-сайті
canon.com/oip-manual ви можете ознайомитися з Посібником
користувача, у якому описано всі функції цього апарата.
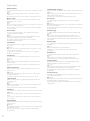
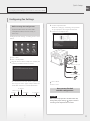
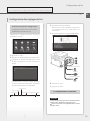
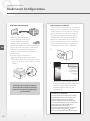
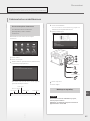
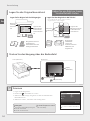
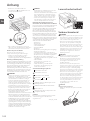
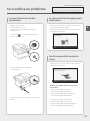
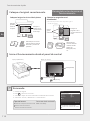
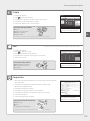
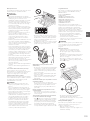
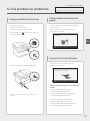
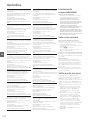
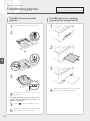
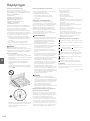
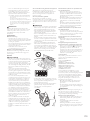
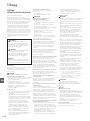
Quick Setup

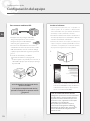
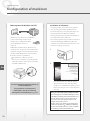
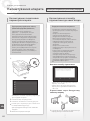
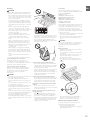
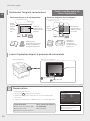
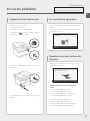
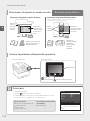
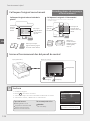
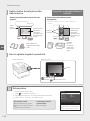
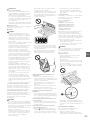
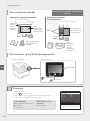
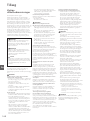
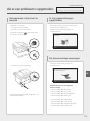
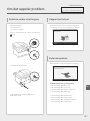
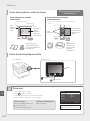
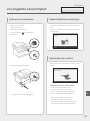
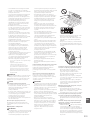
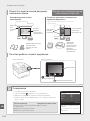
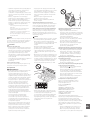
Before starting the installation
• Remove all of the tape.
• Do not remove the cap that covers the USB port.
Cap
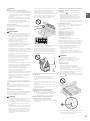
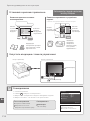
Installation Requirements
Provide a space of 100 mm or more around the
machine.
MF635Cx/MF633Cdw
377 mm 460 mm 216 mm
451 mm 79 mm
Handset
(optional)
400 mm 276 mm
MF631Cn
377 mm 460 mm 216 mm
451 mm
321 mm347 mm
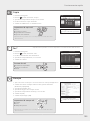
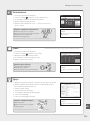
× 4
*
* This item may not be
included depending
on the model of the
machine.
Starter toner cartridges are included.
4
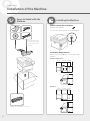
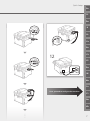
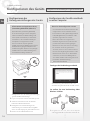
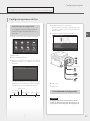
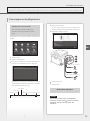
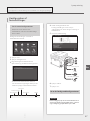
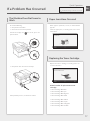
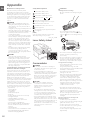
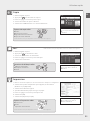
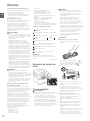
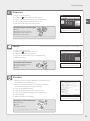
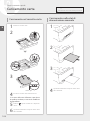
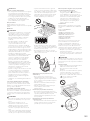
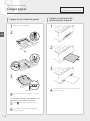
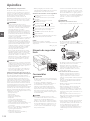
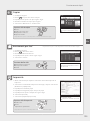
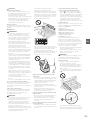
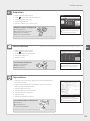
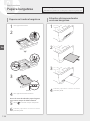
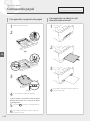
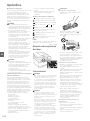
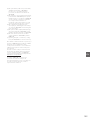
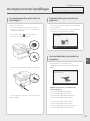
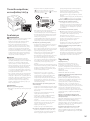
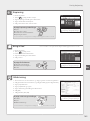
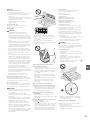
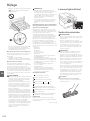
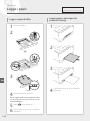
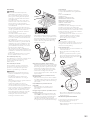
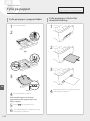
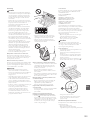
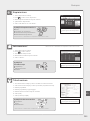
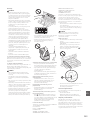
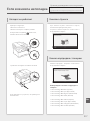
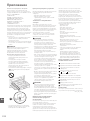
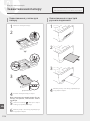
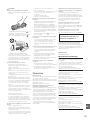
Installation of the Machine
Installing the Machine
Items Included with the
Machine
Quick Setup

1
2
3
4
5
6
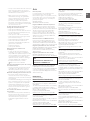
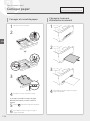
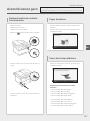
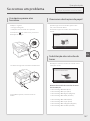
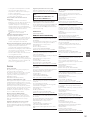
5
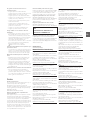
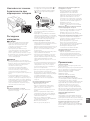
Quick Setup

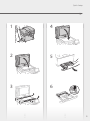
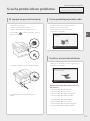
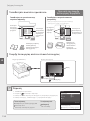
Up to here
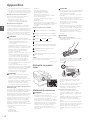
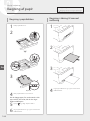
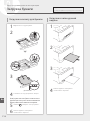
7
8
9
Attach the handset (optional).
10
11
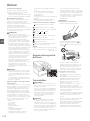
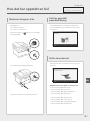
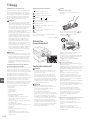
6
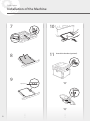
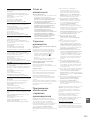
Installation of the Machine
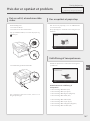
Quick Setup

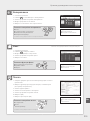
Next, proceed to configure the machine.
2
1
12
7
Quick Setup
En
Fi
El
It
Ru
Da
Es
Fr
Nl
Ca
De
No
Eu
Uk
Sv
Pt

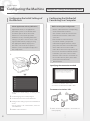
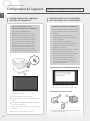
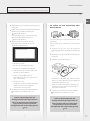
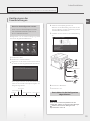
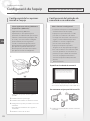
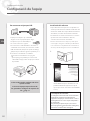
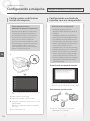
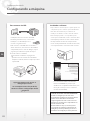
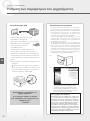
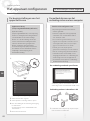
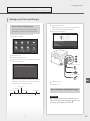
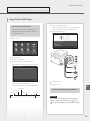
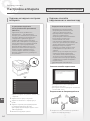
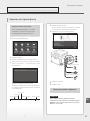
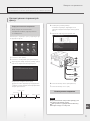
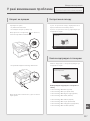
Configuring the Method of
Connecting to a Computer
About Application Library (MF635Cx)
Application Library is an application
that allows you to use useful functions
for routine jobs or other convenient
functions in a one-touch operation
without necessity of making functional
settings every time. You can access each
registered function by simply pressing
the appropriate button displayed in
the Home screen. For the respective
function, see the description displayed in
the Setup Guide.
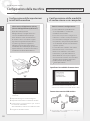
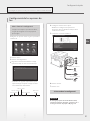
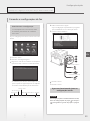
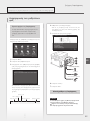
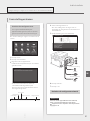
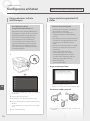
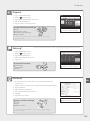
1.
• Configure the initial settings, according to the
screen.
2.
Set the language and country/region.
3.
Set the time zone and current date/time.
4.
Configure the settings to prevent unauthorized
access.
• For the purpose of confirmation, enter the
same PIN twice.
5.
Perform color correction.
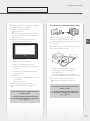
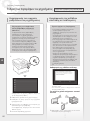
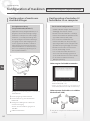
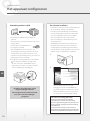
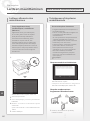
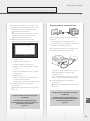
Before starting the configuration
• Wireless LAN cannot be used depending
on the model of the machine.
• The machine cannot be connected to
both wired and wireless LANs at the
same time.
• If the machine is connected to an
unsecured network, your personal
information might be leaked to a third
party. Please be aware and careful of this.
• The machine does not come with a
router. Please have one ready, if necessary.
• Even in an environment without wireless
LAN router, you can use Access Point
Mode to make a wireless connection to
the machine directly from your mobile
device (Direct Connection).
User's Guide
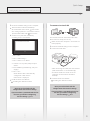
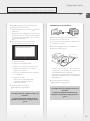
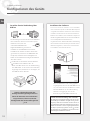
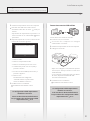
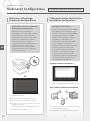
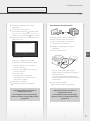
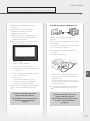
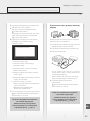
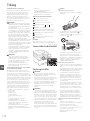
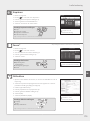
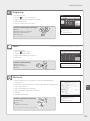
Specifying the connection method
• To connect via wireless LAN : <Yes>
• To connect via wired LAN or USB : <No>
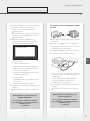
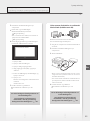
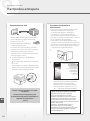
To connect via wireless LAN
1.
Make sure that the computer is connected to a
router properly.
8
Configuring the Machine
Configuring the Initial Settings of
the Machine
Configure the settings in the following order.
Quick Setup
En

For details
"Setting Up Using the Setup Guide" in the User's Guide
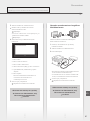
2.
Check the network settings on the computer.
3.
Take note of the SSID and network key.
• Check the label on the router.
User's Guide
• The setting operation is easier if the router is
provided with a WPS mark.
User's Guide
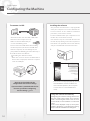
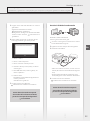
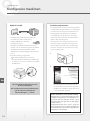
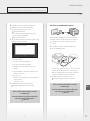
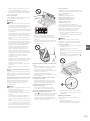
4.
Set the access point and network key
according to the screen below.
1. Press <OK>.
2. Press <SSID Settings>.
3. Press <Select Access Point>.
4. Select the access point (SSID), and press
<Next>.
5. Enter a WEP key (network key), and press
<Apply>.
6. Press <Yes>.
• The IP address will be automatically
configured in a few minutes.
• "Connected." is displayed.
5.
Install the driver and software.
"Installing the software" on P.10
Now you are finished with the
configuration of the initial settings.
If your machine is provided with the fax
function, proceed to configuring
the fax settings.
P.11
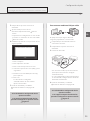
To connect via wired LAN
The machine does not come with a LAN cable.
Please have one ready, if necessary.
1.
Make sure that the computer is connected to a
router properly.
2.
Check the network settings on the computer.
3.
Connect the LAN cable.
• After connecting the cable, wait a few minutes
(until the IP address is set automatically).
• If a static IP address has been set on the
computer, set the machine's IP address
manually.
4.
Install the driver and software.
"Installing the software" on P.10
Now you are finished with the
configuration of the initial settings.
If your machine is provided with the fax
function, proceed to configuring
the fax settings.
P.11
9
Quick Setup
En

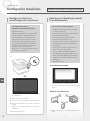
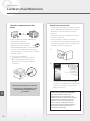
To connect via USB
• The machine does not come with a USB cable.
Please have one ready, if necessary.
• Make sure that the USB cable you
use has the following mark.
• Do not connect the USB cable before installing
the driver. If you did, disconnect the USB cable
from the computer, close the dialog box, and
then perform the following procedure from step 1.
1.
Install the driver and software.
"Installing the software" on P.10
• When the screen to connect the USB cable to
the machine is displayed, remove the cap that
covers the USB port.
Now you are finished with the
configuration of the initial settings.
If your machine is provided with the fax
function, proceed to configuring
the fax settings.
P.11
Installing the software
• The procedure described here is only applicable
when your computer runs on the Windows OS.
For more details on the software installation
procedure, see the driver's manual.
• For the installation when your computer runs on
the Mac OS, see the driver's manual.
• Your machine may not come with the driver for
the Mac OS, depending on the time of purchase.
New drivers are uploaded to the Canon website,
and you can download and use the latest one.
1.
2.
If the screen is not displayed properly, re-insert
the DVD-ROM or search for "D:\MInst.exe"
on the Windows platform (This description
assumes that "D:" is the DVD-ROM drive
name).
Using the scanner conveniently
Configuring the network settings with "Send
Function Setting Tool" allows you to directly
send scanned originals with e-mail or I-Fax
or store them in a shared folder or on the FTP
server.
In the screen displayed in step 2, select [Start
Software Programs] [Send Function Setting
Tool] to start the Send Function Setting Tool.
10
Configuring the Machine
Quick Setup
En

Before starting the configuration:
If your machine does not come with
a telephone cable, have one ready, as
necessary.
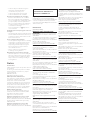
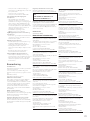
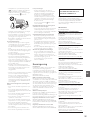
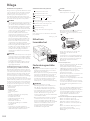
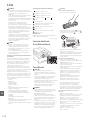
Configure the fax settings, according to the screen
below.
1.
Press <Fax>.
2.
Press <Set Up Now>.
3.
Register the machine's telephone number (fax
number) and abbreviated user name.
• The information below will be printed at
the top part of the paper output from the
destination machine as sender information.
02/02 2017 10:00AM CANON123XXXXXXXFAX 0001
Sent Time Unit Name Page Number
Number's Type
Fax Number
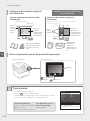
4.
Set the reception mode.
• Make the setting by answering the questions
on your purposes of using the fax function.
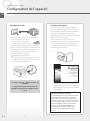
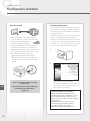
5.
Connect to a telephone line.
A
B
C
Telephone line jack
Telephone
Handset (optional)
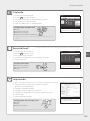
6.
Press <End>.
7.
Press <Yes>.
Now you are finished
with the configuration.
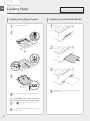
CAUTION!
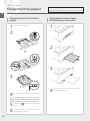
When you load paper of a size other than A4,
change the paper settings.
Steps 5 and 6 in
"Loading in the Paper Drawer" on P.76
For details
"Configuring Initial Settings for Fax Functions" in the User's Guide
11
Configuring Fax Settings
Quick Setup
En

Configuration de la méthode
de connexion à un ordinateur
À propos d'Application Library
(Bibliothèque d'applications) (MF635Cx)
Application Library (Bibliothèque
d'applications) vous permet d'utiliser des
raccourcis associés à des boutons 1touche
pour les fonctions fréquemment utilisées,
pour ne pas avoir à refaire tous les réglages
correspondant à chaque utilisation de ces
fonctions. Vous pouvez accéder à chaque
fonction enregistrée en appuyant sur le
bouton correspondant affiché sur l'écran
d'accueil. Pour une description de chaque
fonction, consultez le guide de configuration.
1.
• Configurez les réglages initiaux en suivant les
instructions à l'écran.
2.
Spécifiez la langue et le pays/région.
3.
Spécifiez le fuseau horaire et réglez la date et
l'heure.
4.
Configurez les réglages permettant d'empêcher
les accès non autorisés.
• Pour confirmation, saisissez le même code PIN
deux fois.
5.
Exécutez une correction des couleurs.
Avant de commencer la configuration
• La connexion par réseau sans fil ne peut
pas être utilisée sur tous les modèles de
l'appareil.
• Il n'est pas possible de connecter
l'appareil à la fois à un réseau sans fil et
à un réseau filaire.
• Faites attention, si l'appareil est
connecté à un réseau non sécurisé, vos
données personnelles peuvent être
divulguées à un tiers.
• L'appareil n'est pas livré avec un routeur.
Vous devez vous en procurer un.
•
Même dans un environnement sans routeur
de réseau sans fil, vous pouvez utiliser
le mode Point d'accès pour établir une
connexion sans fil entre l'imprimante et
votre appareil mobile (connexion directe).
Guide de l'utilisateur
Spécification de la méthode de connexion
• Connexion par réseau sans fil: <Oui>
• Connexion par réseau filaire ou USB: <Non>
Connexion par réseau sans fil
1.
Assurez-vous que l'ordinateur est correctement
connecté à un routeur.
12
Configuration de l'appareil
Configuration des réglages
initiaux de l'appareil
Configurez les réglages dans l'ordre suivant.
Conguration rapide
Fr

Pour en savoir davantage
voir "Conguration à l'aide du guide de conguration" dans le Guide de l'utilisateur
2.
Vérifiez les réglages réseau sur l'ordinateur.
3.
Notez le SSID et la clé réseau.
• Vérifiez l'étiquette sur le routeur.
Guide de
l'utilisateur
• La procédure de configuration est plus facile si
le routeur prend en charge le protocole WPS
(indiqué par la marque WPS sur le routeur).
Guide de l'utilisateur
4.
Spécifiez le point d'accès et la clé réseau
comme indiqué sur l'écran ci-dessous.
1. Appuyez sur <OK>.
2. Appuyez sur <Réglages SSID>.
3. Appuyez sur <Sélection du point d'accès>.
4. Sélectionnez le point d'accès (SSID), et
appuyez sur <Suivant>.
5. Saisissez la clé WEP (clé réseau), et appuyez
sur <Appliquer>.
6. Appuyez sur <Oui>.
• L'adresse IP est automatiquement
configurée en quelques minutes.
• "Connecté." s'affiche.
5.
Installez le pilote et le logiciel.
"Installation du logiciel", P.14
La configuration des réglages initiaux est
terminée.
Si l'appareil comprend la fonction de
télécopie, configurez les réglages de fax.
P.15
Connexion par réseau filaire
L'appareil n'est pas fourni avec un câble réseau.
Vous devez vous en procurer un.
1.
Assurez-vous que l'ordinateur est correctement
connecté à un routeur.
2.
Vérifiez les réglages réseau sur l'ordinateur.
3.
Branchez le câble réseau.
• Après avoir branché le câble, attendez
quelques minutes (le temps que l'adresse IP
soit automatiquement configurée).
• Si une adresseIP permanente a été attribuée à
l'ordinateur, attribuez une adresseIP à l’appareil
manuellement.
4.
Installez le pilote et le logiciel.
"Installation du logiciel", P.14
La configuration des réglages initiaux est
terminée.
Si l'appareil comprend la fonction de
télécopie, configurez les réglages de fax.
P.15
13
Conguration rapide
Fr

Connexion par USB
• L'appareil n'est pas fourni avec un câble USB.
Vous devez vous en procurer un.
•
Assurez-vous que le câble USB que
vous utilisez porte la marque suivante.
• Ne branchez pas le câble USB avant d'installer le
pilote. Si le câble est déjà branché, débranchez-le
de l'ordinateur, fermez la boîte de dialogue, puis
suivez la procédure suivante depuis l'étape1.
1.
Installez le pilote et le logiciel.
"Installation du logiciel", P.14
• Une fois que l'écran vous invitant à brancher
le câble USB à l’appareil est affiché, retirez le
cache recouvrant le port USB.
La configuration des réglages initiaux est
terminée.
Si l'appareil comprend la fonction de
télécopie, configurez les réglages de fax.
P.15
Installation du logiciel
• La procédure ici décrite n'est applicable que
pour un ordinateur sous Windows OS. Pour en
savoir davantage sur la procédure d'installation
du logiciel, consultez le manuel du pilote.
• Pour l'installation sur un ordinateur sous Mac OS,
consultez le manuel du pilote.
• Selon sa date d'achat, il est possible que
l'appareil ne soit pas livré avec le pilote pour Mac
OS. Les nouveaux pilotes sont disponibles sur
le site Web Canon, vous pouvez y télécharger la
dernière version et l'utiliser.
1.
2.
Si l'écran ne s'affiche pas correctement,
réinsérez le DVD ou cherchez "D:\MInst.exe"
dans Windows ("D:" étant le nom du lecteur
du DVD-ROM.).
Utiliser au mieux le scanner
La configuration des réglages réseau avec "Outil
de paramétrage de la fonction d'envoi" vous
permet d’envoyer les documents numérisés
directement par e-mail ou I-Fax ou de les stocker
dans un dossier partagé ou sur le serveur FTP.
Dans l’écran affiché à l'étape2, sélectionnez
[Démarrer les programmes] [Outil de
paramétrage de la fonction d'envoi ] pour
démarrer l'outil de réglage de la fonction
d'envoi.
14
Configuration de l'appareil
Conguration rapide
Fr

Avant de commencer la configuration:
Si l'appareil n'est pas livré avec un câble
téléphonique, procurez-en un.
Configurez les réglages de fax en suivant les
instructions à l'écran.
1.
Appuyez sur <Fax>.
2.
Appuyez sur <Définir réglages immédiatement>.
3.
Enregistrez le numéro de téléphone (numéro
de fax) de l'appareil et le nom d'utilisateur
abrégé.
• Les informations ci-dessous seront imprimées
en haut du fax par le télécopieur destinataire
en tant qu'informations de l'expéditeur.
02/02 2017 10:00AM CANON123XXXXXXXFAX 0001
Heure d'envoi Nom de l'appareil Numéro de page
Type de numéro
Numéro de fax
4.
Spécifiez le mode de réception.
• Pour choisir un mode, répondez aux questions
sur l'utilisation que vous voulez faire de la
fonction fax.
5.
Raccordez l'appareil à une ligne téléphonique.
A
B
C
Prise de ligne téléphonique
Téléphone
Combiné (en option)
6.
Appuyez sur <Fin>.
7.
Appuyez sur <Oui>.
La configuration est terminée.
ATTENTION!
Si vous chargez du papier d'un autre format que
le format A4, changez les réglages papier.
Étapes5 et 6 dans "Chargement de la cassette
à papier", P.86
Pour en savoir davantage
voir "Configuration des réglages initiaux du fax" dans le Guide de l'utilisateur
15
Configuration des réglages de fax
Conguration rapide
Fr

Konfigurieren der Anschlussmethode
an einen Computer
Informationen zur Application Library
(Anwendungsbibliothek) (MF635Cx)
Application Library (Anwendungsbibliothek)
ist eine Anwendung, die es Ihnen ermöglicht,
nützliche Funktionen für Routineaufträge oder
andere praktische Funktionen per Tastendruck
auszuwählen, so dass Funktionseinstellungen
nicht jeweils neu vorgenommen werden
müssen. Sie können auf jede registrierte
Funktion durch einfache Betätigung der auf dem
Startbildschirm angezeigten entsprechenden
Schaltfläche zugreifen. Näheres zu der jeweiligen
Funktion finden Sie in der Beschreibung, die in
der Installationsanleitung enthalten ist.
1.
• Konfigurieren Sie die Anfangseinstellungen
gemäß der Bildschirmanzeige.
2.
Legen Sie die Sprache und das Land/die Region fest.
3.
Stellen Sie die Zeitzone und das aktuelle
Datum/die aktuelle Uhrzeit ein.
4.
Konfigurieren Sie die Einstellungen zur
Verhinderung von unautorisierten Zugriffen.
•
Geben Sie zur Bestätigung die gleiche PIN zweimal ein.
5.
Führen Sie eine Farbkorrektur durch.
Bevor Sie die Konfiguration starten
•
Je nach Modell des Geräts kann Wireless LAN
möglicherweise nicht verwendet werden.
•
Das Gerät kann nicht gleichzeitig an Wired
LAN (kabelgebunden) und Wireless LAN
(drahtlos) angeschlossen werden.
•
Wenn das Gerät an ein ungesichertes
Netzwerk angeschlossen ist, könnten Ihre
persönlichen Daten an Dritte gelangen.
Beachten Sie dies, und seien Sie vorsichtig.
•
Das Gerät wird ohne Router geliefert. Wenn
erforderlich, müssen Sie diesen selbst bereitstellen.
•
Auch in einer Umgebung ohne Wireless LAN-
Router können Sie den Access Point-Modus
verwenden, um von Ihrem Mobilgerät aus
eine direkte drahtlose Verbindung zum Gerät
herzustellen (Direktverbindung).
Anwenderhandbuch
Festlegen der Verbindungsmethode
• Zur Verbindung über Wireless LAN : <Ja>
•
Zur Verbindung über Wired LAN oder USB : <Nein>
So stellen Sie eine Verbindung über
Wireless LAN her
1.
Vergewissern Sie sich, dass der Computer
ordnungsgemäß mit einem Router verbunden ist.
16
Konfigurieren des Geräts
Konfigurieren der
Anfangseinstellungen des Geräts
Konfigurieren Sie die Einstellungen in folgender Reihenfolge.
Schnellinstallation
De

Näheres finden Sie unter
"Einrichten mithilfe der Installationsanleitung" im Anwenderhandbuch.
2.
Überprüfen Sie die Netzwerkeinstellungen im
Computer.
3.
Notieren Sie die SSID und den Netzwerkschlüssel.
• Prüfen Sie das Etikett auf dem Router.
Anwenderhandbuch
• Der Einstellvorgang ist einfacher, wenn der
Router mit WPS gekennzeichnet ist.
Anwenderhandbuch
4.
Stellen Sie den Access Point und den
Netzwerkschlüssel gemäß dem unten
abgebildeten Bildschirm ein.
1. Drücken Sie <OK>.
2. Drücken Sie <Einstellungen SSID>.
3. Drücken Sie <Zugriffspunkt wählen>.
4. Wählen Sie den Access Point (SSID), und
drücken Sie dann <Weiter>.
5. Geben Sie einen WEP-Schlüssel
(Netzwerkschlüssel) ein, und drücken Sie
dann <Anwenden>.
6. Drücken Sie <Ja>.
• Die IP-Adresse wird innerhalb von einigen
Minuten automatisch konfiguriert.
• "Verbunden." wird angezeigt.
5.
Installieren Sie den Treiber und die Software.
"Installieren der Software" auf S. 18
Damit ist die Konfiguration der
Anfangseinstellungen abgeschlossen.
Wenn Ihr Gerät mit einer Faxfunktion
ausgestattet ist, fahren Sie mit der
Konfiguration der Faxeinstellungen fort.
S.19
So stellen Sie eine Verbindung über
Wired LAN her
Im Lieferumfang des Geräts befindet sich kein
LAN-Kabel.
Wenn erforderlich, erwerben Sie dieses Kabel
separat.
1.
Vergewissern Sie sich, dass der Computer
ordnungsgemäß mit einem Router verbunden
ist.
2.
Überprüfen Sie die Netzwerkeinstellungen im
Computer.
3.
Schließen Sie das LAN-Kabel an.
• Nachdem Sie das Kabel angeschlossen haben,
warten Sie einige Minuten (bis die IP-Adresse
automatisch zugewiesen ist).
• Wenn eine statische IP-Adresse im Computer
eingerichtet wurde, stellen Sie die IP-Adresse
des Geräts manuell ein.
4.
Installieren Sie den Treiber und die Software.
"Installieren der Software" auf S. 18
Damit ist die Konfiguration der
Anfangseinstellungen abgeschlossen.
Wenn Ihr Gerät mit einer Faxfunktion
ausgestattet ist, fahren Sie mit der
Konfiguration der Faxeinstellungen fort.
S.19
17
Schnellinstallation
De

So stellen Sie eine Verbindung über
USB her
•
Im Lieferumfang des Geräts befindet sich kein USB-Kabel.
Wenn erforderlich, erwerben Sie dieses Kabel separat.
• Stellen Sie sicher, dass das
verwendete USB-Kabel mit
folgender Markierung versehen ist.
• Schließen Sie das USB-Kabel nicht vor der
Installation des Treibers an. Wenn dies bereits
geschehen ist, trennen Sie das USB-Kabel vom
Computer, schließen Sie das Dialogfeld, und
führen Sie anschließend das folgende Verfahren
ab Schritt 1 durch.
1.
Installieren Sie den Treiber und die Software.
"Installieren der Software" auf S. 18
• Wenn der Bildschirm mit der Aufforderung,
das USB-Kabel an das Gerät anzuschließen,
angezeigt wird, entfernen Sie die Kappe, die
den USB-Anschluss abdeckt.
Damit ist die Konfiguration der
Anfangseinstellungen abgeschlossen.
Wenn Ihr Gerät mit einer Faxfunktion
ausgestattet ist, fahren Sie mit der
Konfiguration der Faxeinstellungen fort.
S.19
Installieren der Software
•
Das hier beschriebene Verfahren ist nur anwendbar,
wenn auf Ihrem Computer ein Windows-Betriebssystem
ausgeführt wird. Weitere Einzelheiten zum Software-
Installationsverfahren finden Sie im Treiber-Handbuch.
•
Näheres zur Installation, wenn auf Ihrem Computer ein
Mac OS ausgeführt wird, finden Sie im Treiber-Handbuch.
•
Je nach Zeitpunkt des Kaufs befindet sich
möglicherweise kein Treiber für Mac OS im Lieferumfang
Ihres Geräts. Neue Treiber werden jedoch auf die Canon-
Website hochgeladen, so dass Sie die neuesten Treiber
herunterladen und verwenden können.
1.
2.
Wenn der Bildschirm nicht ordnungsgemäß
angezeigt wird, setzen Sie die DVD-ROM erneut
ein, oder suchen Sie nach "D:\MInst.exe" auf der
Windows-Plattform. (In dieser Beschreibung
wird davon ausgegangen, dass "D:" die
Bezeichnung des DVD-ROM-Laufwerks ist.)
Praktische Verwendung des Scanners
Die Konfiguration der Netzwerkeinstellungen mit dem "Tool für
die Einstellung der Sendefunktion" ermöglicht es Ihnen, gescannte
Originale per E-Mail oder I-Fax direkt zu versenden oder diese in
einem freigegebenen Ordner bzw. auf dem FTP-Server zu speichern.
Wählen Sie auf dem in Schritt 2 angezeigten Bildschirm
die Option [Softwareprogramme starten] [Tool für
die Einstellung der Sendefunktion], um das Tool für die
Einstellung der Sendefunktion zu starten.
18
Konfigurieren des Geräts
Schnellinstallation
De

Bevor Sie die Konfiguration starten:
Wenn sich im Lieferumfang Ihres Geräts
kein Telefonkabel befindet, müssen Sie
dieses selbst bereitstellen.
Konfigurieren Sie die Faxeinstellungen gemäß
dem unten abgebildeten Bildschirm.
1.
Drücken Sie <Fax>.
2.
Drücken Sie <Jetzt einrichten>.
3.
Registrieren Sie die Telefonnummer (Faxnummer)
des Geräts und den abgekürzten Benutzernamen.
•
Diese Angaben werden als Absenderinformation
auf dem oberen Rand der Papierausgabe am
Zielgerät ausgedruckt.
02/02 2017 10:00AM CANON123XXXXXXXFAX 0001
Sendezeit Name des Geräts Seitennummer
Typ der Nummer
Faxnummer
4.
Stellen Sie den Empfangsmodus ein.
• Nehmen Sie die Einstellung vor, indem Sie die
Fragen in Bezug auf den Verwendungszweck
der Faxfunktion beantworten.
5.
Schließen Sie das Gerät an eine Telefonleitung
an.
A
B
C
Telefonkabelanschlussdose
Telefon
Hörer (optional)
6.
Drücken Sie <Beenden>.
7.
Drücken Sie <Ja>.
Damit haben Sie die Konfiguration
abgeschlossen.
VORSICHT!
Wenn Sie ein anderes Papierformat als A4
verwenden, ändern Sie die Papiereinstellungen.
Schritte 5 und 6 unter "Einlegen in die
Papierkassette" auf S. 96
Näheres finden Sie unter
"Konfigurieren der Anfangseinstellungen für Faxfunktionen" im Anwenderhandbuch.
19
Konfigurieren der
Faxeinstellungen
Schnellinstallation
De

Configurazione della modalità
di connessione a un computer
Informazioni sull'Application Library
(Libreria dell'applicazione) (MF635Cx)
Application Library (Libreria
dell'applicazione) è un'applicazione che
consente di utilizzare funzioni utili per
lavori di routine o altre comode funzioni
di selezione veloce senza dover eseguire
ogni volta le impostazioni funzionali. Per
accedere a ogni funzione registrata è
sufficiente premere l'apposito pulsante
visualizzato nella schermata principale. Per la
rispettiva funzione, consultare la descrizione
visualizzata nella Guida all'installazione.
1.
• Configurare le impostazioni iniziali in base alla
schermata.
2.
Impostare la lingua e la nazione/regione.
3.
Impostare il fuso orario e la data/ora corrente.
4.
Configurare le impostazioni per evitare
l'accesso non autorizzato.
• Per confermare, inserire lo stesso PIN due volte.
5.
Eseguire la correzione colore.
Prima di iniziare la configurazione
• La rete LAN wireless potrebbe non
essere disponibile a seconda del
modello della macchina.
•
La macchina non può essere collegata a reti
LAN wireless e cablate contemporaneamente.
• Se la macchina è collegata a una rete
non protetta, i dati personali potrebbero
essere utilizzati da terzi. Fare attenzione
a questo aspetto.
• La macchina non è dotata di un router.
Procurarsene uno, se necessario.
• Anche in un ambiente senza router
LAN wireless, è possibile utilizzare il
Modo Punto di accesso per eseguire
una connessione wireless alla macchina
direttamente dal proprio dispositivo
mobile (Connessione diretta).
Guida per l'utente
Specificare la modalità di connessione
• Connessione tramite LAN wireless: <Sì>
• Connessione tramite LAN o USB cablata: <No>
Connessione tramite LAN wireless
1.
Assicurarsi che il computer sia collegato
correttamente a un router.
20
Configurazione della macchina
Configurazione delle impostazioni
iniziali della macchina
Configurare le impostazioni nel seguente ordine.
Installazione rapida
It
Sidan laddas...
Sidan laddas...
Sidan laddas...
Sidan laddas...
Sidan laddas...
Sidan laddas...
Sidan laddas...
Sidan laddas...
Sidan laddas...
Sidan laddas...
Sidan laddas...
Sidan laddas...
Sidan laddas...
Sidan laddas...
Sidan laddas...
Sidan laddas...
Sidan laddas...
Sidan laddas...
Sidan laddas...
Sidan laddas...
Sidan laddas...
Sidan laddas...
Sidan laddas...
Sidan laddas...
Sidan laddas...
Sidan laddas...
Sidan laddas...
Sidan laddas...
Sidan laddas...
Sidan laddas...
Sidan laddas...
Sidan laddas...
Sidan laddas...
Sidan laddas...
Sidan laddas...
Sidan laddas...
Sidan laddas...
Sidan laddas...
Sidan laddas...
Sidan laddas...
Sidan laddas...
Sidan laddas...
Sidan laddas...
Sidan laddas...
Sidan laddas...
Sidan laddas...
Sidan laddas...
Sidan laddas...
Sidan laddas...
Sidan laddas...
Sidan laddas...
Sidan laddas...
Sidan laddas...
Sidan laddas...
Sidan laddas...
Sidan laddas...
Sidan laddas...
Sidan laddas...
Sidan laddas...
Sidan laddas...
Sidan laddas...
Sidan laddas...
Sidan laddas...
Sidan laddas...
Sidan laddas...
Sidan laddas...
Sidan laddas...
Sidan laddas...
Sidan laddas...
Sidan laddas...
Sidan laddas...
Sidan laddas...
Sidan laddas...
Sidan laddas...
Sidan laddas...
Sidan laddas...
Sidan laddas...
Sidan laddas...
Sidan laddas...
Sidan laddas...
Sidan laddas...
Sidan laddas...
Sidan laddas...
Sidan laddas...
Sidan laddas...
Sidan laddas...
Sidan laddas...
Sidan laddas...
Sidan laddas...
Sidan laddas...
Sidan laddas...
Sidan laddas...
Sidan laddas...
Sidan laddas...
Sidan laddas...
Sidan laddas...
Sidan laddas...
Sidan laddas...
Sidan laddas...
Sidan laddas...
Sidan laddas...
Sidan laddas...
Sidan laddas...
Sidan laddas...
Sidan laddas...
Sidan laddas...
Sidan laddas...
Sidan laddas...
Sidan laddas...
Sidan laddas...
Sidan laddas...
Sidan laddas...
Sidan laddas...
Sidan laddas...
Sidan laddas...
Sidan laddas...
Sidan laddas...
Sidan laddas...
Sidan laddas...
Sidan laddas...
Sidan laddas...
Sidan laddas...
Sidan laddas...
Sidan laddas...
Sidan laddas...
Sidan laddas...
Sidan laddas...
Sidan laddas...
Sidan laddas...
Sidan laddas...
Sidan laddas...
Sidan laddas...
Sidan laddas...
Sidan laddas...
Sidan laddas...
Sidan laddas...
Sidan laddas...
Sidan laddas...
Sidan laddas...
Sidan laddas...
Sidan laddas...
Sidan laddas...
Sidan laddas...
Sidan laddas...
Sidan laddas...
Sidan laddas...
Sidan laddas...
Sidan laddas...
Sidan laddas...
Sidan laddas...
Sidan laddas...
Sidan laddas...
Sidan laddas...
Sidan laddas...
Sidan laddas...
Sidan laddas...
Sidan laddas...
Sidan laddas...
Sidan laddas...
Sidan laddas...
Sidan laddas...
Sidan laddas...
Sidan laddas...
Sidan laddas...
Sidan laddas...
Sidan laddas...
Sidan laddas...
Sidan laddas...
Sidan laddas...
Sidan laddas...
Sidan laddas...
Sidan laddas...
Sidan laddas...
Sidan laddas...
Sidan laddas...
Sidan laddas...
Sidan laddas...
Sidan laddas...
Sidan laddas...
Sidan laddas...
Sidan laddas...
Sidan laddas...
Sidan laddas...
Sidan laddas...
Sidan laddas...
Sidan laddas...
Sidan laddas...
Sidan laddas...
Sidan laddas...
Sidan laddas...
Sidan laddas...
Sidan laddas...
Sidan laddas...
Sidan laddas...
Sidan laddas...
Sidan laddas...
Sidan laddas...
Sidan laddas...
Sidan laddas...
Sidan laddas...
Sidan laddas...
Sidan laddas...
Sidan laddas...
Sidan laddas...
Sidan laddas...
Sidan laddas...
Sidan laddas...
Sidan laddas...
Sidan laddas...
Sidan laddas...
Sidan laddas...
Sidan laddas...
Sidan laddas...
Sidan laddas...
Sidan laddas...
Sidan laddas...
-
 1
1
-
 2
2
-
 3
3
-
 4
4
-
 5
5
-
 6
6
-
 7
7
-
 8
8
-
 9
9
-
 10
10
-
 11
11
-
 12
12
-
 13
13
-
 14
14
-
 15
15
-
 16
16
-
 17
17
-
 18
18
-
 19
19
-
 20
20
-
 21
21
-
 22
22
-
 23
23
-
 24
24
-
 25
25
-
 26
26
-
 27
27
-
 28
28
-
 29
29
-
 30
30
-
 31
31
-
 32
32
-
 33
33
-
 34
34
-
 35
35
-
 36
36
-
 37
37
-
 38
38
-
 39
39
-
 40
40
-
 41
41
-
 42
42
-
 43
43
-
 44
44
-
 45
45
-
 46
46
-
 47
47
-
 48
48
-
 49
49
-
 50
50
-
 51
51
-
 52
52
-
 53
53
-
 54
54
-
 55
55
-
 56
56
-
 57
57
-
 58
58
-
 59
59
-
 60
60
-
 61
61
-
 62
62
-
 63
63
-
 64
64
-
 65
65
-
 66
66
-
 67
67
-
 68
68
-
 69
69
-
 70
70
-
 71
71
-
 72
72
-
 73
73
-
 74
74
-
 75
75
-
 76
76
-
 77
77
-
 78
78
-
 79
79
-
 80
80
-
 81
81
-
 82
82
-
 83
83
-
 84
84
-
 85
85
-
 86
86
-
 87
87
-
 88
88
-
 89
89
-
 90
90
-
 91
91
-
 92
92
-
 93
93
-
 94
94
-
 95
95
-
 96
96
-
 97
97
-
 98
98
-
 99
99
-
 100
100
-
 101
101
-
 102
102
-
 103
103
-
 104
104
-
 105
105
-
 106
106
-
 107
107
-
 108
108
-
 109
109
-
 110
110
-
 111
111
-
 112
112
-
 113
113
-
 114
114
-
 115
115
-
 116
116
-
 117
117
-
 118
118
-
 119
119
-
 120
120
-
 121
121
-
 122
122
-
 123
123
-
 124
124
-
 125
125
-
 126
126
-
 127
127
-
 128
128
-
 129
129
-
 130
130
-
 131
131
-
 132
132
-
 133
133
-
 134
134
-
 135
135
-
 136
136
-
 137
137
-
 138
138
-
 139
139
-
 140
140
-
 141
141
-
 142
142
-
 143
143
-
 144
144
-
 145
145
-
 146
146
-
 147
147
-
 148
148
-
 149
149
-
 150
150
-
 151
151
-
 152
152
-
 153
153
-
 154
154
-
 155
155
-
 156
156
-
 157
157
-
 158
158
-
 159
159
-
 160
160
-
 161
161
-
 162
162
-
 163
163
-
 164
164
-
 165
165
-
 166
166
-
 167
167
-
 168
168
-
 169
169
-
 170
170
-
 171
171
-
 172
172
-
 173
173
-
 174
174
-
 175
175
-
 176
176
-
 177
177
-
 178
178
-
 179
179
-
 180
180
-
 181
181
-
 182
182
-
 183
183
-
 184
184
-
 185
185
-
 186
186
-
 187
187
-
 188
188
-
 189
189
-
 190
190
-
 191
191
-
 192
192
-
 193
193
-
 194
194
-
 195
195
-
 196
196
-
 197
197
-
 198
198
-
 199
199
-
 200
200
-
 201
201
-
 202
202
-
 203
203
-
 204
204
-
 205
205
-
 206
206
-
 207
207
-
 208
208
-
 209
209
-
 210
210
-
 211
211
-
 212
212
-
 213
213
-
 214
214
-
 215
215
-
 216
216
-
 217
217
-
 218
218
-
 219
219
-
 220
220
-
 221
221
-
 222
222
-
 223
223
-
 224
224
-
 225
225
-
 226
226
-
 227
227
-
 228
228
-
 229
229
-
 230
230
-
 231
231
-
 232
232
-
 233
233
-
 234
234
-
 235
235
-
 236
236


Canon i-SENSYS MF633Cdw Användarguide
- Typ
- Användarguide
- Denna manual är också lämplig för
på andra språk
- italiano: Canon i-SENSYS MF633Cdw Guida utente
- español: Canon i-SENSYS MF633Cdw Guía del usuario
- Deutsch: Canon i-SENSYS MF633Cdw Benutzerhandbuch
- português: Canon i-SENSYS MF633Cdw Guia de usuario
- français: Canon i-SENSYS MF633Cdw Mode d'emploi
- English: Canon i-SENSYS MF633Cdw User guide
- dansk: Canon i-SENSYS MF633Cdw Brugervejledning
- русский: Canon i-SENSYS MF633Cdw Руководство пользователя
- suomi: Canon i-SENSYS MF633Cdw Käyttöohjeet
- Nederlands: Canon i-SENSYS MF633Cdw Gebruikershandleiding
Relaterade papper
-
Canon LBP312 Användarmanual
-
Canon MF5980dw Användarmanual
-
Canon LBP351 Bruksanvisning
-
Canon PIXMA TS5040 Användarmanual
-
Canon Pixma TS6000 series Användarmanual
-
Canon PIXMA TS8051 Användarmanual
-
Canon LBP151 - i-SENSYS Bruksanvisning
-
Canon i-SENSYS LBP253x Användarmanual
-