Hitachi Room Unit Bruksanvisningar
- Kategori
- Termostater
- Typ
- Bruksanvisningar

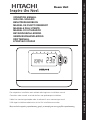
OPERATION MANUAL
GUÍA DEL USUARIO
BENUTZERHANDBUCH
MANUEL DE FUNCTIONNEMENT
MANUALE DELL’UTENTE
MANUAL DO UTILIZADOR
BETJENINGSVEJLEDNING
GEBRUIKERSHANDLEIDING
DRIFTMANUAL
Room Unit
ΕΛΛΗΝΙΚΆ SVENSKA NEDERLANDS DANSK PORTUGUÊS ITALIANO FRANÇAIS DEUTSCH ESPAÑOL ENGLISH
Do not perform installation work without referring to our installation manual.
Consulter notre manuel avant de réaliser une quelconque installation.
Udfør ikke monteringsarbejde uden at referere til vores monteringsmanual.
Utför inget installationsarbete utan att ha läst installationsmanualen.
Μην εκτελείτε εργασίες εγκατάστασης χωρίς να ανατρέχετε στο εγχειρίδιο εγκατάστασης.

2
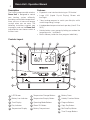
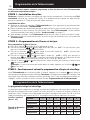
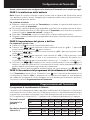
Room Unit - Operation Manual
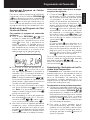
Features
backlight.
Description
The Hitachi programmable wireless
Room Unit is designed to control
providing comfortable temperatures
following instructions explain how
to program and use the Room Unit
to provide the most home comfort at
the least cost.
1 . . 6
OFFMANAUTO
1 2 3 4 5 6 7
PROGRAM
15
14
16
1 2 43 5
7
8
9
6
11
12
13
10
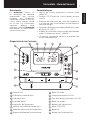
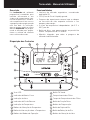
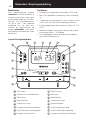
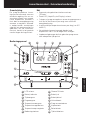
Controls Layout
LCD Screen
1
2
3
4
5
6
7
8
9
10
16
11
12
13
14
15

3
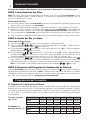
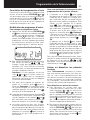
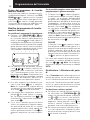
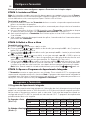
Setting-up the Room Unit
This section shows you how to setup and run the Room Unit in 3 simple steps:
STEP 1: Installing the Batteries
Note: Please follow the instructions in this section only if the Room Unit screen is blank (no
symbols or digits are displayed). If the room temperature is already displayed move on to Step
2: Setting the Day and Time.
To install the Batteries:
a. Lift up the front cover of the Room Unit
b.
c. Room Unit
Controls Layout
d.
After a short pause the Room Unit
e Room Unit.
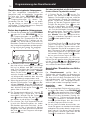
STEP 2: Setting the Date and Time
To set the Date and Time:
a. Press the
button to begin setting the date.
b. Press the
or d01
c. Press the
or m01
press the green
d. Press the
or yr09
12
e. Use the
or buttons to set the correct time then press the green
Note: If this mode is entered accidentally then press the
, or buttons to exit.
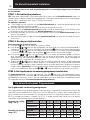
STEP 3: Running the Built-in Heating Program
The Room Unit
will start running. Note: The built-in heating program has been designed to provide normal
comfort requirements, but if you want to customise the settings please see the next section
‘Programming the Room Unit’.
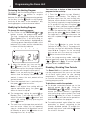
Programming the Room Unit
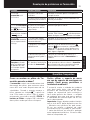
The Built-in Heating Program
Saturday & Sunday
(Day 6 & 7)
Monday to Friday
(Day 1 to 5)
Period 1 2 3 4 5 6
Time
6:30 8:00 12:00 14:00 18:00 22:30
Temperature
21°C 18°C 21°C 18°C 21°C 18°C
Period 1 2 3 4 5 6
Time
8:00 10:00 12:00 14:00 18:00 23:00
Temperature
21°C 21°C 21°C 21°C 21°C 18°C
ΕΛΛΗΝΙΚΆ SVENSKA NEDERLANDS DANSK PORTUGUÊS ITALIANO FRANÇAIS DEUTSCH ESPAÑOL ENGLISH

4
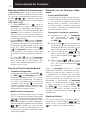
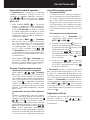
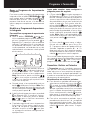
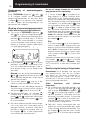
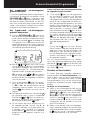
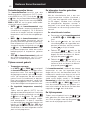
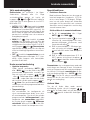
Reviewing the Heating Program
To review or edit the heating program use the
PROGRAM or buttons to navigate
button to step through
heating program can be reviewed or edited.
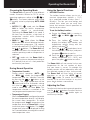
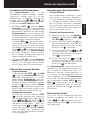
Modifying the Heating Program
To change the heating program:
a.
Press either of the PROGRAM or
buttons to enter the programming mode.
The time / temperature settings for period
1
b.
To adjust the period start time use the
or
Note: If you are pressing the or
buttons and the display flashes the next
period, it means the next period will be
pushed forward.
c. Once the required time is reached press
the green
Note: If the original time setting did not
require adjustment press the green
button to move to step ‘d’.
d. The temperature setting for period
1
on
adjust this press the
or buttons and
green
button.
e. The next time and temperature period will
button to run
You now have a choice of how to set the
program for the next day:
f.
Press the
the
pressing the green
button. Note: Once
the target day is confirmed it becomes the
day that is copied if the
button is pressed
again.
OR
Press the
steps b to e. Programs for the remaining
To exit the programming mode select the
or buttons. Note: To run the adjusted
program select the AUTO mode.
Disabling / Enabling Time Periods
The Room Unit
To disable or enable time periods:
a. To disable unwanted periods go to the
2
to
6
PROGRAM
or
ensure the correct period is highlighted
hold the
button for at least 2 seconds
been removed from the program.
b. To enable periods again follow the same
period again press and hold the
button
for at least 2 seconds.
1 2 3 4 5 6 7
4 5 6321
Programming the Room Unit

5
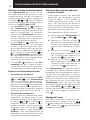
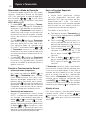
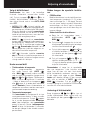
Choosing the Operating Mode
The Room Unit can operate in three different
operating mode press either of the
or
buttons. The screen indicates which mode
AUTOMAN
or OFF.
AUTO
Room
Unit
Operating the Room Unit in this mode is
temperature comfort whilst maximising
MANUAL
Room
Unit
in temperature programme. The setpoint
the
or buttons. The Room Unit will
continue to maintain this temperature until
another operating mode or temperature is
selected.
OFF
Room Unit to
control to a minimum temperature setting of
During Normal Operation
Temperature Override
AUTO
or MAN
or buttons or the
this time the
or buttons can be
Note: This
temperature override is cancelled at the
next programmed temperature change.
Temperature Enquiry
When the Room Unit
the current room temperature. To review
the programmed ‘target’
temperature which the Room Unit
target
room temperature value.
Using the Special Functions
HOLIDAY Function
To set the Holiday function:
a. Ensure the Room Unit is running in
AUTO
MAN operating
modes.
b.
button to
.
c. Press the
or time buttons to set
the green
d. Press the
or buttons to set the
press the green
The Room Unit will now control to the new
The Room Unit will then return to normal
AUTO
MAN
mode. To cancel the HOLIDAY
press the
button a second time.
Adjusting the Time
use the
or buttons to adjust the time
and press the green
button again to
Operating the Room Unit
ΕΛΛΗΝΙΚΆ SVENSKA NEDERLANDS DANSK PORTUGUÊS ITALIANO FRANÇAIS DEUTSCH ESPAÑOL ENGLISH

6
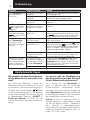
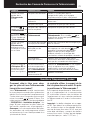
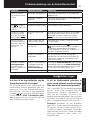
How do I change the batteries on the
Room Unit when they run out?
The Room Unit
batteries follow the steps in the above section
STEP 1: Installing the Batteries
in Step c. Note: While changing the batteries
correct.
I want to use the table stand instead
of wall mounted bracket. Where can I
position the Room Unit?
It is important to keep the Room Unit in a
location where reliable RF communication
Room Unit and he will
check if the RF communication is reliable in
Important: As this is a wireless device certain
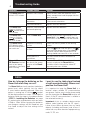
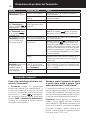
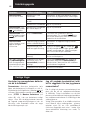
Symptom Possible Cause Remedy
The Room Unit has
a blank LCD screen.
Check to see if there are batteries in the
been removed.
orientation.
Check that the batteries have been installed
in the correct orientation.
Exhausted batteries. Replace with new batteries.
The Room Unit
LCD screen.
and need replacing.
Replace with new batteries.
The Room Unit
the LCD screen.
Fault in Room Unit
Room Unit. If the
clear itself in a few minutes call the installer.
The Room Unit’s
but the heating does
not switch on.
No power to heating
Check that there is power to the heating
Program does not call
for heat.
Press the button and then press the
to increase the temperature a few degrees
above the current room temperature. The
heating should come on after a few seconds.
Wrong electrical
connection.
Call the installer to check the electrical
connections
The red LED on the
RF Receiver
located
next to heat pump
RF communication
lost due to the wrong
location of the Room
Unit.
Hook the Room Unit back on the wall
bracket or replace the Room Unit on
the table stand in the position where RF
communication was reliable.
RF communication fault. Call installer.
Troubleshooting Guide
FAQ's

7
Caractéristiques
tamaño.
Descripción
El termostato Hitachi es
un termostato de ambiente
programable que permite
mantener una temperatura
confortable cuando se está en
no se está. Las instrucciones
termostato
para obtener el máximo confort
Disposición de los Controles
Pantalla LCD
1
2
3
4
5
6
7
8
Compartimiento para las Pilas
Tapa del Compartimiento para las Pilas
10
11
12
13
14
15
16
9
Termostato - Guía del Usuario
1 . . 6
OFFMANAUTO
1 2 3 4 5 6 7
PROGRAM
15
14
16
1 2 43 5
7
8
9
6
11
12
13
10
ΕΛΛΗΝΙΚΆ SVENSKA NEDERLANDS DANSK PORTUGUÊS ITALIANO FRANÇAIS DEUTSCH ESPAÑOL ENGLISH

8
Esta sección le indica cómo ajustar y hacer funcionar el termostato en 3 sencillos pasos:
PASO 1: Instalación de las Pilas
Nota: Por favor, siga las instrucciones de esta sección sólo si la pantalla del termostato está en
blanco (no aparece ningún símbolo ni dígito). Si ya aparece la temperatura ambiente, vaya al
Paso 2: Ajuste del Día y la Hora.
Para instalar las Pilas:
a. Levante la cubierta frontal del termostato para dejar al descubierto la tapa del compartimento
termostato.
b.
c.
termostato
Disposición de los Controles
d.
termostato
e.
PASO 2: Ajuste del Día y la Hora
Para ajustar el Día y la Hora:
a.
b. Pulse los botones
o d 01
c. Pulse los botones
o m 01
d. Pulse los botones
o yr 09
12
e.
Utilice los botones o
Nota: si se accede a este modo accidentalmente, pulse el botón , o para salir.
PASO 3: Ejecución del Programa de Calefacción de Fábrica
Ahora el termostato
Nota: El programa de calefacción de fábrica ha sido di-
señado para ofrecer unos requisitos de confort normales, pero si quiere personalizar los ajustes,
por favor vea la siguiente sección, “Programación del termostato”.
El Programa de Calefacción de Fábrica
ratura de la tarde después de la medianoche. Cada nivel de temperatura puede ajustarse entre
es el siguiente:
El sábado y el
domingo (días 6 y 7)
De lunes a viernes
(del 1 al 5)
Período 1 2 3 4 5 6
Hora
6:30 8:00 12:00 14:00 18:00 22:30
Temperatura
21°C 18°C 21°C 18°C 21°C 18°C
Período 1 2 3 4 5 6
Hora
8:00 10:00 12:00 14:00 18:00 23:00
Temperatura
21°C 21°C 21°C 21°C 21°C 18°C
Ajuste del Termostato
Programación del Termostato

9
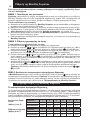
Revisión del Programa de Calefac-
ción de Fábrica
PROGRAM
o
Modicación del Programa de Cale-
facción de Fábrica
Para cambiar el programa de calefacción
de fábrica :
a. PROGRAM o para
ajustes de hora / temperatura para el pe
1
resalta mediante un cuadrado que parpa
dea alrededor de los números en la parte
b.
botones
o ; los ajustes de la pan
sado se cambiará la hora rápidamente.
Nota: Si está pulsando el botón
o y
en la pantalla parpadea el siguiente perío-
do de cambio, significa que se avanzará la
hora de inicio del siguiente período.
c.
mar. Nota: Si el ajuste de hora original no
requería cambio, pulse el botón verde
para pasar al paso “d”.
d.
Ahora parpadeará el ajuste de temperatura
1
o
.
e.
pasos bd
para ejecutar el programa de la
Ahora puede elegir cómo ajustar el progra-
ma para el día siguiente:
f.
para copiar el progra
ma del lunes al martes. La pantalla se pon
.
. Nota: Una
vez se haya confirmado el día deseado,
ése es el día que se copia si vuelve a pul-
sarse el botón .
O también
be. Los
cione el modo de funcionamiento deseado
pulsando los botones
o .
leccione el modo
.
Desactivación / Activación de los Pe-
ríodos Hora/Temperatura
El termostato
Para desactivar o activar períodos temporales:
a.
2
a
6
PROGRAM o
durante al menos 2 se
se ha eliminado del programa.
b.
durante al
menos 2 segundos.
Programación del Termostato
1 2 3 4 5 6 7
4 5 6321
ΕΛΛΗΝΙΚΆ SVENSKA NEDERLANDS DANSK PORTUGUÊS ITALIANO FRANÇAIS DEUTSCH ESPAÑOL ENGLISH

10
Elección del Modo de Funcionamiento
El termostato puede funcionar en tres modos
u . La pantalla indica qué
AUTOMAN u OFF.
AUTO
termostato para seguir el programa de
ter-
mostato en este modo es la mejor forma
para mantener un alto nivel de confort de
MANUAL termos-
tato actuar como un termostato simple con
El punto de consigna puede ajustarse en
o . El termostato seguirá manteniendo
esta temperatura hasta que se seleccione
otro modo de funcionamiento o temperatu
ra.
OFF ajusta el termostato
para controlar hasta un ajuste de tempe
heladas para su casa.
Durante el Funcionamiento Normal
Temperatura Programada:
En los modos de funcionamiento AUTO
ou MAN termostato indicará la
temperatura ambiente actual. Para revisar
tura que el termostato está tratando de
. Este valor de
temperatura programada parpadeará du
de temperatura ambiente actual.
Modicación de Temperatura
o . La temperatura programada apa
o
Nota: Esta modificación de temperatura se
cancela en el siguiente cambio de tempe-
ratura programada.
Utilización de las Funciones Espe-
ciales
Función de VACACIONES
Para ajustar la función de vacaciones:
a. Asegúrese de que el termostato
esté funcionando en los modos
de funcionamiento AUTO
ou MAN .
b.
de vacaciones para
con el indicador de vacaciones
.
c.
o para
para
d.
o para ajus
tar la temperatura de vacaciones
Ahora el termostato controlará la nueva
reducirá su valor en una unidad hasta que
termostato
volverá al funcionamiento normal según
la forma ajustada en el modo AUTO
ou MAN
una
Ajuste de la Hora
o para
Funcionamiento del Termostato

11
¿Cómo se cambian las pilas en el
Termostato cuando se agotan?
El termostato controla constantemente el
duran aproximadamente 2 años antes de
precisarse su cambio. Cuando las pilas se
pantalla
“PASO
1: Instalación de las Pilas
cambiando las pilas usadas por otras nuevas
en el paso c.
Solución de problemas
Preguntas más frecuentes
Quiero utilizar la sobremesa en vez del
soporte para montaje en pared. ¿Dónde
puedo colocar la Unidad de Ambiente?
Es importante mantener la Unidad de
donde quiere colocar la Unidad de Ambiente
Importante: como se trata de un dispositivo
distancia de 30 cm desde cualquier objeto
menos 1 metro desde cualquier otro equipo
Síntoma Causa Posible Solución
El termostato tiene
la pantalla LCD en
blanco
Pilas no instaladas
Compruebe si están las pilas en el
compartimiento para las pilas
de las pilas
Pilas agotadas Cámbielas por pilas nuevas
En el termostato
parpadeando
en la pantalla LCD
Las pilas están
cambiarlas
Cámbielas por pilas nuevas
En el termostato
parpadeando
en la pantalla LCD
Fallo en el termostato.
no
desaparece solo transcurridos unos
La pantalla LCD del
termostato funciona
no se conecta
está desconectado
este conectado.
El programa no pide
púlselo para aumentar la temperatura unos
cuantos grados por encima de la temperatura
transcurridos unos cuantos segundos.
El termostato no está
conectado a la caldera
de forma adecuada
Llame al instalador para comprobar la
caldera.
El LED rojo en el
Receptor situado
junto al controlador
de la bomba de
calor está encendido
constantemente o
parpadea.
Pérdida de la
RF a causa de la
la Termostato.
Encaje la parte trasera de la Termostato
sobre el soporte de pared o vuelva a
colocar la Termostato sobre el pie de
de RF
Llame al instalador
ΕΛΛΗΝΙΚΆ SVENSKA NEDERLANDS DANSK PORTUGUÊS ITALIANO FRANÇAIS DEUTSCH ESPAÑOL ENGLISH

12
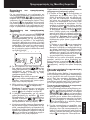
Raumthermostat - Benutzerhandbuch
Ausstattungsmerkmale
ersparnis bewirkt.
ren.
Beschreibung
Der ist ein programmierbarer
Raumthermostat
sind. Die folgenden Anweisungen
Raumthermostat programmieren
bieten.
1 . . 6
OFFMANAUTO
1 2 3 4 5 6 7
PROGRAM
15
14
16
1 2 43 5
7
8
9
6
11
12
13
10
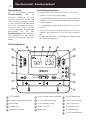
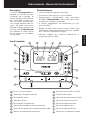
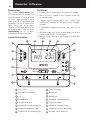
Steuerungslayout
1
2
3
4
5
Taste Urlaubsfunktion
Tasten Programm
Taste Kopiere Tag
Taste Wähle Tag
Tasten Zeiteinstellung
Tasten Temperaturveränderung
Taste Temperaturabfrage
6
7
8
9
10
16
11
12
13
14
15

13
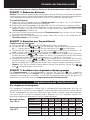
Einstellen des Raumthermostat
Dieser Abschnitt zeigt Ihnen in 3 einfachen Schritten, wie Sie den Raumthermostat einstellen und betreiben:
SCHRITT 1: Einbau der Batterien
Hinweis: Bitte verfahren Sie gemäß den Anweisungen in diesem Abschnitt nur, wenn die Anzeige des
Raumthermostats leer ist (keine Symbole oder Zahlen werden angezeigt). Wenn die Raumtemperaturs
schon angezeigt wird, gehen Sie bitte weiter zu Schritt 2: Einstellen von Tag und Uhrzeit.
To install the Batteries:
a. Heben Sie die Frontabdeckung des Raumthermostat
b.
c. Raumthermostat
Steuerungslayout
d. Raumthermostat
an und ist nun betriebsbereit.
e.
Raumthermostats
SCHRITT 2: Einstellen von Tag und Uhrzeit
Einstellen von Tag und Uhrzeit:
a.
b. oder d
01
c. oder
m 01
d.
oder yr 09
e.
Verwenden Sie die Tasten oder
Hinweis: Falls Sie nur zufällig in diesen Modus gelangt sind, drücken Sie die Taste ,
oder
, um diesen Modus zu verlassen.
SCHRITT 3: Ausführen des eingebauten Heizprogramms
Der Raumthermostat
Hinweis: Das eingebaute Heizprogramm wurde entwickelt, um
normale Komfortansprüche zu erfüllen. Falls Sie die Einstellungen anpassen wollen, gehen Sie
bitte weiter zum nächsten Abschnitt ‚Programmierung des Raumthermostat’.
Programmierung des Raumthermostat
Das eingebaute Heizprogramm
Samstag bis Sonntag
(Tag 6 & 7)
Montag bis Freitag
(Tag 1 bis 5)
Intervall 1 2 3 4 5 6
Tag
6:30 8:00 12:00 14:00 18:00 22:30
Heiztemperaturen
21°C 18°C 21°C 18°C 21°C 18°C
Intervall 1 2 3 4 5 6
Tag
8:00 10:00 12:00 14:00 18:00 23:00
Heiztemperaturen
21°C 21°C 21°C 21°C 21°C 18°C
ΕΛΛΗΝΙΚΆ SVENSKA NEDERLANDS DANSK PORTUGUÊS ITALIANO FRANÇAIS DEUTSCH ESPAÑOL ENGLISH

14
Überprüfen des eingebauten Heizprogramms
Sie bitte die Tasten PROGRAM
oder
Verwenden Sie die Taste
oder bearbeitet werden kann.
Ändern des eingebauten Heizprogramms
a.
PROGRAM
oder die Tasten PROGRAM
vall
1
blinkendes Quadrat um die Ziffern unten auf
b. Verwenden Sie die Tasten
oder
OK
Hinweis:
Wenn Sie die Tasten
oder
drücken
und die Anzeige stellt das nächste Inter-
vall blinkend dar, bedeutet dies, dass die
nächste Änderung vorgeschoben wird.
c.
stätigen. Hinweis: Wenn die ursprüngliche
Zeiteinstellung keine neue Einstellung erfor-
dert, drücken Sie die grüne Taste
und
gehen über zu Schritt ‘d’.
d.
1
oder
und bestätigen Sie die Einstellun
.
e.
die Taste
Sie haben jetzt die Wahl, wie Sie Ihr Programm
für den nächsten Tag einstellen werden:
f.
gen. Hinweis: Wenn der Zieltag einmal be-
stätigt ist, wird dieser Tag kopiert, wenn die
Taste wieder gedrückt wird.
ODER
der folgenden Schritte b - e angepasst wer
können auf die gleiche Art und Weise einge
stellt werden. Dabei wird die Taste verwen
mit den Tasten oder . Hinweis: Um
das eingestellte Programm ablaufen zu las-
sen, wählen Sie den Modus AUTO.
Ausschalten / Einschalten von Zeitin-
tervallen
Der Raumthermostat
Ausschalten oder Einschalten der
Zeitintervalle:
a.
PROGRAM
oder
2
to
6
Intervall mit dem blinkenden Quadrat her
Taste
aus dem Programm entfernt wurde.
b.
fahren Sie genau so wie oben beschrieben
teten Intervall. Um dieses Intervall wieder
Taste
1 2 3 4 5 6 7
4 5 6321
Programmierung des Raumthermostat

15
Auswählen des Betriebsmodus
Der Raumthermostat kann in drei
entweder die Taste
oder . Die
AUTOMAN oder OFF.
AUTO Raum-
thermostat
Raumthermostat
MAN
einfacher Thermostat mit einem festen Soll
wert arbeitet. Der Sollwert kann mit hilfe der
Tasten
und
eingestellt werden. Der Raumthermostat
andere Temperatur gewählt wird.
OFF
Raumther-
mostat
Während des normalen Betriebs
• Temperaturabfrage
AUTO MAN
Raumthermostat die ge
genwärtige Raumtemperatur an. Um die
Zieltemperatur
Raumthermostat
Sie die Taste
Zieltem-
peratur
gegenwärtige Raumtemperatur wechselt.
• AufhebenderTemperatur
AUTO
Tasten
oder
Zieltemperatur
mithilfe der Tasten
oder der einge
stellte Wert verändert werden. Hinweis:
Dieses Aufheben der Temperatur wird
beim nächsten programmierten Tempera-
turwechsel gelöscht.
Verwendung der Spezialfunktionen
• FunktionURLAUB
Sie viel Energie und damit verbundene
Einstellen der Urlaubsfunktion:
a.
Raumther-
mostat AUTO
oder MAN
eingestellt ist.
b.
c.
oder
Taste
d.
oder
Der Raumthermostat
Tagen abgelaufen ist. Der Raumthermostat
AUTO
MAN
Einstellen der Uhrzeit
Tasten oder
der Änderungen.
Betrieb des Raumthermostat
ΕΛΛΗΝΙΚΆ SVENSKA NEDERLANDS DANSK PORTUGUÊS ITALIANO FRANÇAIS DEUTSCH ESPAÑOL ENGLISH

16
Wie wechsle ich beim Raumthermos-
tat die Batterien aus, wenn diese leer
sind?
wird dies durch ein blinkendes
SCHRITT 1:
Einbau der Batterien
c
neuen.
Ich möchte statt der Wandhalterung
das Tischgestell verwenden. Wo kann
ich die Raumeinheit positionieren?
Raumeinheit an
Sie die Raumeinheit positionieren möchten und
Wichtig:
könnten bestimmte Gegenstände störend
Symptom Mögliche Ursache Lösung
Der Thermostat
eingelegt
fach eingelegt sind.
eingelegt
richtigen Polung eingelegt wurden.
verbraucht
Der Thermostat
ausgetauscht werden
Der Thermostat
Der Thermostat ist
fehlerhaft
mostat und legen Sie diese erneut ein. Falls
das
des Thermostats
nicht an.
Keine Stromversorgung
Strom versorgt wird.
Das Programm fordert
keineWärme an
Stellen Sie den Schiebeschalter auf .
um die Temperatur
einigen Sekunden wieder arbeiten.
Der Thermostat ist nicht
richtig an den Kessel
angeschlossen
Die rote LED auf dem
RF Receiver neben
dem Wärmepumpen
regler ist dauerhaft
erleuchtet oder blinkt.
unterbrochen aufgrund
einer falschen Lokalisie
rung des Raumgerät.
Hängen Sie den Raumgerät wieder an der
Wandhalterung auf oder stellen Sie den
Raumgerät
kation betriebssicher war.
Kontaktieren Sie Ihren Installateur
Problemlösung
Häug Gestellte Fragen

17
Caractéristiques
Telécommande
Description
La Hitachi Telécommande est
destinée au contrôle de votre
ture confortable lorsque vous
explique comment programmer
et utiliser votre Telécommande
tout en optimisant vos dépen
Vue d’ensemble
Témoin de changement de piles
Indicateur du jour
Touches de changement de la température
Touches du mode de fonctionnement
1
2
3
4
5
6
7
8
Touche de fonction Vacances
Touches de programmation
Touche de copie du jour
Touche de sélection du jour
10
11
12
13
14
15
16
9
Telécommande - Manuel de Functionnement
1 . . 6
OFFMANAUTO
1 2 3 4 5 6 7
PROGRAM
15
14
16
1 2 43 5
7
8
9
6
11
12
13
10
ΕΛΛΗΝΙΚΆ SVENSKA NEDERLANDS DANSK PORTUGUÊS ITALIANO FRANÇAIS DEUTSCH ESPAÑOL ENGLISH

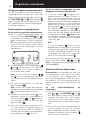
18
Cette section vous montre comment programmer et faire fonctionner votre Telécommande
en effectuant 3 opérations simples :
ETAPE 1 : Installation des piles
Remarque : Veuillez suivre les consignes de cette section uniquement si l’écran de votre Telé-
commande n’affiche pas symbole ou chiffre). Si la température de la pièce est déjà affichée,
passez à l’opération 2 : Programmation de l’heure et du jour.
Installation des piles :
a. Telécommande pour faire apparaître le compartiment des
piles et les commandes Telécommande.
b.
c. Telécommande
Vue d’ensemble
d.
Telécommande
e.
Telécommande.
ETAPE 2 : Programmation de l’heure et du jour
Pour programmer le date et l’heure :
a.
pour démarrer le réglage de la date.
b.
ou d 01
c.
ou m 01
d.
ou yr 09
touche verte
12
e.
ou
Remarque : Si vous êtes entrés par erreur dans ce mode, appuyez sur la touche
, ou
pour en sortir.
ETAPE 3 : Fonctionnement suivant la programmation intégrée de chauffage
Votre Telécommande pour lancer le
fonctionnement du programme de chauffage. Remarque : Le programme intégré de chauffage a été
conçu pour vous offrir des conditions normales de confort mais si vous souhaitez personnaliser ces
réglages, veuillez consulter la section suivante intitulée “Programmation de la Telécommande”.
Le programme intégré de chauffage
Samedi et dimanche
(jours 6 et 7)
Lundi au vendredi
(jours 1 à 5)
Période 1 2 3 4 5 6
Heure
6:30 8:00 12:00 14:00 18:00 22:30
Température
21°C 18°C 21°C 18°C 21°C 18°C
Période 1 2 3 4 5 6
Heure
8:00 10:00 12:00 14:00 18:00 23:00
Température
21°C 21°C 21°C 21°C 21°C 18°C
Programmation de la Telécommande
Programmation de la Telécommande

19
Consultation de la programmation d’usine
Pour passer en revue ou réviser la programmation
PROGRAM ou
pour visua
but de passer en revue ou réviser le programme
Modication du programme d’usine
Pour changer le programme d’usine
a.
PROGRAM
ou pour entrer dans le mode de program
de la période
1
comme illustré. La période active est mise en
évidence par un carré clignotant qui entoure
b. Pour ajuster le premier point de commuta
ou
de la pression sur cette touche permet de
Remarque : Si vous appuyez sur les tou-
ches
ou et le niveau suivant cli-
gnote, cela signifie que le changement
d’heure de ce niveau suivant sera déplacé
en fonction du précédent.
c.
pour la
Remarque : Si la programmation
de l’heure d’origine n’a pas besoin d’être
modifiée, appuyez sur la touche verte
pour passer au paragraphe “d”.
d.
Le réglage de température pour la période
1
ou
.
e.
le en procédant de nouveau comme décrit
des paragraphes b d
pour activer le
tout moment.
Vous avez maintenant le choix quant à votre
programmation de la journée suivante :
f.
pour copier
verte . Pour sélectionner un autre jour
se placer sous le jour puis valider en ap
. Remarque
: Dès que ce jour cible est confirmé, il de-
vient le jour à copié, à condition que vous
appuyiez de nouveau sur la touche .
OU
pour amener
journée en procédant comme indiqué aux
paragraphes b e
programme des autres jours de la semaine
la touche pour passer au jour suivant.
ou .
.
Activer ou désactiver les périodes
horaires
Votre Telécommande
soin de tous ces points de commutation pour
assurer vos besoins en matière de chauffage.
Pour désactiver ou activer des niveaux :
a. Pour désactiver les niveaux dont vous
2
6
touches PROGRAM
ou
touche pendant au moins deux secon
bien été supprimée du programme.
b.
2
6
touches PROGRAM ou
de maintenir la pression sur la touche pen
dant au moins 2 secondes.
Programmation de la Telécommande
1 2 3 4 5 6 7
4 5 6321
ΕΛΛΗΝΙΚΆ SVENSKA NEDERLANDS DANSK PORTUGUÊS ITALIANO FRANÇAIS DEUTSCH ESPAÑOL ENGLISH

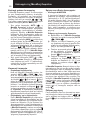
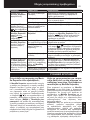
20
Sélection du mode de fonctionnement
Votre Telécommande
trois modes de fonctionnement suivants : Auto
les touches ou
mode de fonctionnement actuellement actif en
AUTOMAN ou OFF.
Le mode AUTO
votre Telécommande
ment de votre Telécommande constitue le
ture très confortable tout en économisant
Le mode MAN
Telécommande pour le faire fonctionner
comme un simple thermostat avec un point
ou
. Votre Telécommande continue de main
pas sélectionné un autre mode de fonction
nement ou une autre température.
Le mode OFF programme votre Telé-
commande
Durant un fonctionnement normal
Consultation de température
Dans les modes de fonctionnement AUTO
MAN Telécommande
. Cette température
condes avant que la température ambiante
Dérogation de la température
les touches ou sur la touche . La
ou
Remarque : Cette commande prioritaire de
température est annulée au prochain
point de
commutation
de température programmé.
Utilisation des fonctions spéciales
Fonction VACANCES
Cette fonction Vacances vous permet de
programmer une température constante
coûts en énergie lorsque vous vous absen
tionnement normal dès votre retour.
Pour programmer la fonction Vacances :
a.
Telécommande soit
en mode AUTO
MAN .
b.
vacances et le réglage de la tempéra
.
c.
ou
pour programmer la durée des vacan
touche verte
d.
ou
pour programmer la température des
la touche verte
Votre Telécommande va maintenant effectuer
un contrôle de la nouvelle température durant
bre sélectionné de jours se soit écoulé. Votre
Telécommande revient alors dans le mode
normal de fonctionnement qui a été programmé
par le mode AUTO
MAN . Pour
annuler cette fonction VACANCES ou pour en
touche
.
Réglage de l’heure
or
sur la touche verte
changement éventuel.
Fonctionnement de Votre Telécommande
Sidan laddas...
Sidan laddas...
Sidan laddas...
Sidan laddas...
Sidan laddas...
Sidan laddas...
Sidan laddas...
Sidan laddas...
Sidan laddas...
Sidan laddas...
Sidan laddas...
Sidan laddas...
Sidan laddas...
Sidan laddas...
Sidan laddas...
Sidan laddas...
Sidan laddas...
Sidan laddas...
Sidan laddas...
Sidan laddas...
Sidan laddas...
Sidan laddas...
Sidan laddas...
Sidan laddas...
Sidan laddas...
Sidan laddas...
Sidan laddas...
Sidan laddas...
Sidan laddas...
Sidan laddas...
Sidan laddas...
Sidan laddas...
-
 1
1
-
 2
2
-
 3
3
-
 4
4
-
 5
5
-
 6
6
-
 7
7
-
 8
8
-
 9
9
-
 10
10
-
 11
11
-
 12
12
-
 13
13
-
 14
14
-
 15
15
-
 16
16
-
 17
17
-
 18
18
-
 19
19
-
 20
20
-
 21
21
-
 22
22
-
 23
23
-
 24
24
-
 25
25
-
 26
26
-
 27
27
-
 28
28
-
 29
29
-
 30
30
-
 31
31
-
 32
32
-
 33
33
-
 34
34
-
 35
35
-
 36
36
-
 37
37
-
 38
38
-
 39
39
-
 40
40
-
 41
41
-
 42
42
-
 43
43
-
 44
44
-
 45
45
-
 46
46
-
 47
47
-
 48
48
-
 49
49
-
 50
50
-
 51
51
-
 52
52


Hitachi Room Unit Bruksanvisningar
- Kategori
- Termostater
- Typ
- Bruksanvisningar
på andra språk
- italiano: Hitachi Room Unit Istruzioni per l'uso
- español: Hitachi Room Unit Instrucciones de operación
- Deutsch: Hitachi Room Unit Bedienungsanleitung
- português: Hitachi Room Unit Instruções de operação
- français: Hitachi Room Unit Mode d'emploi
- English: Hitachi Room Unit Operating instructions
- dansk: Hitachi Room Unit Betjeningsvejledning
- Nederlands: Hitachi Room Unit Handleiding