A
B
B
M16MI420 A11-09/18
EN INSTRUCTION MANUAL
FI KÄYTTÖOHJE
NOR LEGGE MERKE TIL UTNYTTELSE
SVE ANVÄNDARMANUAL
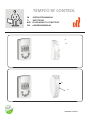
TEMPCO RF CONTROL
A

SYNOPSIS
DISPLAY OVERVIEW ......................................................................................................................................................................................................................3
STARTING THE SYSTEM................................................................................................................................................................................................................4
Receiver (Thermostat) .................................................................................................................................................................................................................. 4
Receiver indicator light status ...................................................................................................................................................................................................4
Transmitter (Remote control) ....................................................................................................................................................................................................5
DESCRIPTION OF TRANSMITTER MODES (REMOTE CONTROL) ....................................................................................................................................
Comfort ............................................................................................................................................................................................................................................. 5
Auto .................................................................................................................................................................................................................................................... 5
Eco .......................................................................................................................................................................................................................................................6
Anti Frost ..........................................................................................................................................................................................................................................7
Vacation ............................................................................................................................................................................................................................................7
Boost ..................................................................................................................................................................................................................................................7
Timer Program operating mode ...............................................................................................................................................................................................8
Locking the keypad ........................................................................................................................................................................................................................9
Open window detection .............................................................................................................................................................................................................9
Factory settings .............................................................................................................................................................................................................................. 9
ADVANCED SETTINGS .................................................................................................................................................................................................................9
Fan installed ....................................................................................................................................................................................................................................9
Pairing menu ................................................................................................................................................................................................................................... 10
Ambient temperature ..................................................................................................................................................................................................................10
Smart time Adaptive ....................................................................................................................................................................................................................10
Open window detection .............................................................................................................................................................................................................10
Setpoint temperature ..................................................................................................................................................................................................................10
Radiator sensor / Remote control sensor ..............................................................................................................................................................................10
Setpoint temperature regulation ............................................................................................................................................................................................. 10
Limit the surface temperature .................................................................................................................................................................................................. 10
Room sensor calibration ..............................................................................................................................................................................................................10
Time ....................................................................................................................................................................................................................................................10
Reset your remote control ..........................................................................................................................................................................................................10
Software version ............................................................................................................................................................................................................................10
MAINTENANCE, REPAIR AND REMOVAL ............................................................................................................................................................................... 11
Important .........................................................................................................................................................................................................................................11
Cleaning ............................................................................................................................................................................................................................................ 11
Replacing remote control batteries ......................................................................................................................................................................................... 11
WARRANTY ......................................................................................................................................................................................................................................11
TECHNICAL DATA ...........................................................................................................................................................................................................................11
2
EN

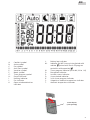
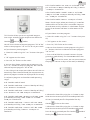
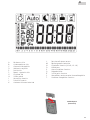
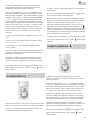
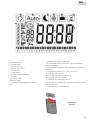
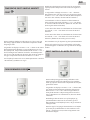
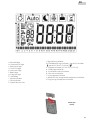
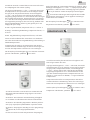
A- Comfort symbol
B- Auto symbol
C- Eco symbol
D- Anti-frost symbol
E- Vacation symbol
F- Boost symbol
G- Timer program symbol
H- Day of the week
I- Heating indicator
J- Fan indicator
K- Open window detection
indicator
L- Battery low indicator
M- Indicator for WiFi transmission/paired with
radiator /paired with Touch E3 program
controller sold separately)
N- Timer program indicator (d1 to d9, U1 to U4)
O- Exemption indicator
P- Installer menu indicator
Q- Screen locked indicator
R- 24-hr timer program indicator
S- Setpoint or ambient temperature indicator
T- Ambient temperature indicator
ABCD E F
H I
J
K
L
M
G
N
O P
Q
R
S
T
Power adapter
(sold separately)
3
EN

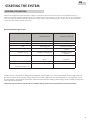
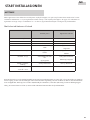
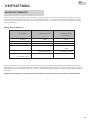
Receiver indicator light status
Operating mode Indicator status
Radiator paused
Indicator status
Radiator Heating up
Standby Off Off
Comfort Steady green Steady red
Eco Flashing green Flashing red-green
Anti-frost Slow ashing green Slow ashing red-
green
Comfort -1°C (*) Double ashing green Double ashing
redgreen
Comfort -2°C (*) Double slow ashing
green
Double slow ashing
red-green
Pairing mode Flashing orange Flashing orange
Sensor fault or
Measured temp. > 35°C
Flashing red --
The RF receiver is tted with an independent regulation system which saves status information (start/standby) and tem-
perature set points to its memory. Storage of the last received setpoint ensures the temperature is still regulated even if
the transmitter is turned off or its batteries exhausted. Also note that during a power outage to the radiators, pairing does
not need to be reinitialized.
Important: If your receiver is turned off , your radiator will not receive any commands from the remote control.
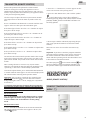
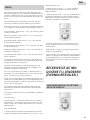
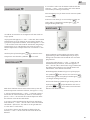
STARTING THE SYSTEM
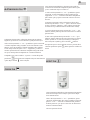
RECEIVER (THERMOSTAT)
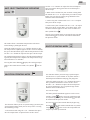
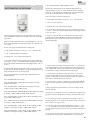
Connect your appliance to the electricity supply. Press button «B» located on the receiver at the bottom of the ap-
pliance to start the radiator. Indicator light «A» is illuminated and you will hear 2 short «beep» sounds. Pressing button
«B» again will turn off your radiator and produce a long «beep» sound. Indicator light «A» goes out, and no communi-
cation with the remote control is possible.
4
EN

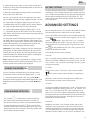
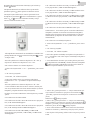
Remove the protective ap from the remote control
batteries. During rst startup, the appliance starts in
comfort mode. When changing at batteries and a long pe-
riod has elapsed (more than 2 minutes), the appliance starts
in the previous operating mode.
The rst step is to adjust the time on your remote control.
This adjustment can be made from any mode and at any
time.
Press and hold the OK button for 5 seconds until the time
appears. Release it then press the OK button again.
The hour gure ashes. Use the «+ or -» buttons to adjust
then press OK to accept.
The minute gure ashes. Use the «+ or -» buttons to ad-
just then press OK to accept.
The day of the week ashes. Use the «+ or -» buttons to
adjust then press OK to accept.
The date ashes. Use the «+ or -» buttons to adjust then
press OK to accept.
The month ashes. Use the «+ or -» buttons to adjust then
press OK to accept.
The year ashes. Use the «+ or -» buttons to adjust then
press OK to accept.
You will now be returned to the previous mode after accepti
ng the nal setting. The time, date and year are now set on
your remote control. They will be used in Auto and Vacation
modes.
Note: Setting the time is not necessary if your remote
control is paired with the Touch E3 program controller (sold
separately), as the time is automatically synchronized.
To view the adjusted time, press and hold the OK button for
5 seconds until the time appears. It will remain displayed for
10 seconds before returning to the previous mode.
Important: You can always cancel the last setting by pres-
sing the return button . Also note that if the screen’s
background light is not turned on, simply press any button
to activate it.
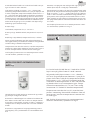
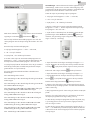
To establish communications between the transmitter (Re-
mote Control) and the receiver (Thermostat) follow the ins-
tructions below. This operation is also known as pairing. The
radiator must be turned on.
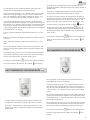
On the thermostat:
Press and hold button «B» on the thermostat for 5 seconds.
Indicator light «A» ashes orange slowly. This is the signal
to release button «B» as the radiator is now in pairing
mode.
On the remote control:
1. Press and hold the OK butt on on the remote control for
10 seconds until the installer menu appears «bL no», the
symbol appears.
TRANSMITTER (REMOTE CONTROL)
2. Press the « + » button once, «rF INI» appears on the
screen. You are now at the pairing menu.
3. Press the «OK» button once, «INI» and the symbol
start ashing on the screen. Your radiator is
currently pairing. When the screen returns to the
previous mode, your rst radiator has been suc-
cessfully paired
4. You can pair another radiator by repeating the pre-
vious steps (On the thermostat and on the remote
control).
Note: You can access the installer menu from any
mode.
Important: If you have a Touch E3 program controller
(sold separately) installed in your system, always pair
the remote control rst then the radiator in accor-
dance with the operating modes described above and
in the Touch E3 instruction manual.
The Timer program and vacation function will
then be handle by Touch E3 program controller and
the symbols will disappear from the Remote control
COMFORT TEMPERATURE OPERATING
MODE
DESCRIPTION OF
TRANSMITTER
MODES (REMOTE CONTROL)
5
EN

AUTO TEMPERATURE OPERATING MODE
ECO TEMPERATURE OPERATING MODE
Designed to be used in normal operation, when you don´t
want to use weekly program or external control..
Select this mode using the "+ or -" buttons then press OK. The
temperature set point appears on the screen. To modify this,
press the OK button again and the temperature ashes. Use
the "+ or -" button to adjust it then press OK to accept.
The ambient temperature appears for 10 seconds followed
again by the temperature set point. The temperature range can
be between 5.5°C and 30°C. A three-colour visual behavior indi-
cator displays during adjustment to inform you which tempe-
rature ranges involve low, medium or high energy consumption
and allow you to save energy.
Green: Low consumption, temperature between 5.5°C and
19°C
Orange: Medium consumption, temperature between 19.5°C
and 24°C
Red: High consumption, temperature between 24.5°C and
30°C
This visual indicator allows the user to be aware of the risk of
excessive energy consumption when setting the comfort tem-
perature.
The temperature you have set it to is the desired room tempe-
rature for this operating mode. You need to wait several hours
for the room temperature to become stable again.
Pressing the return button displays the ambient tempera-
ture in the room for 10 seconds, the symbol also displays.
Designed to be used when people require automatic and
independent radiator by any of the operations as follows:
Priority 1: If the radiator is connected, control is via the
pilot wire. Read the radiator installation manual for more
information.
Priority 2: The program currently set on the Touch E3
program controller (sold separately) if the remote control is
paired with it.
Priority 3: A program previously selected in program
mode on the remote control (d1 to d9, U1 to U9).
You can at any time change the temperature setpoint in
your program by pressing the OK button. The temperature
then ashes on the screen. Change it using the "+" and "-"
buttons then press OK again to accept. In this case, you
are now in timer exemption and the symbol appears
on the screen. Pressing the return button exits the
exemption and returns to the temperature setpoint for
your program. If not, the exemption exits automatically
after 2 hours.
Pressing the return button displays the ambient tem-
perature in the room for 10 seconds, the symbol also
displays.
Designed to be used at night-time or when the house is
unoccupied for a few hours or more.
Select this mode using the "+ or -" buttons then press OK.
The temperature setpoint appears on the screen. To mo-
dify this, press the OK button again and the temperature
ashes. Use the "+ or -" button to adjust it then press OK to
accept.
The ambient temperature appears for 10 seconds followed
again by the temperature setpoint. The temperature range
can be between 5.5°C and 19°C but always 0.5°C lower than
the comfort temperature.
The temperature you have set it to is the desired room tem-
perature for this operating mode. You need to wait several
hours for the room temperature to become stable again.
Pressing the return button displays the ambient tem-
perature in the room for 10 seconds, the symbol also
displays.
6
EN

ANTI -FROST TEMPERATURE OPERATING
MODE
VACATION OPERATING MODE
BOOST OPERATING MODE
This mode allows a minimum temperature to be main-
tained during a prolonged absence.
Select this mode using the "+ or -" buttons then press OK.
The temperature setpoint appears on the screen. To modify
this, press the OK button again and the temperature ashes.
Use the "+ or -" button to adjust it then press OK to accept.
The ambient temperature appears for 10 seconds followed
again by the temperature setpoint. The temperature range
can be between 5°C and 10°C.
Pressing the return button displays the ambient tempe-
rature in the room for 10 seconds, the symbol also dis-
plays.
Use the "+ or -" buttons to adjust the desired tempera-
ture to maintain during your absence and then press
OK to accept.
2. Now set the end date for your vacation starting with
the month. Use "+ or - to adjust then press OK to accept.
(Note: the year changes when you go below the rst
month or above the twelfth.).
3. Set the day your vacation ends. Use «+ or -» to adjust
then press OK to accept.
4. Set the time your vacation ends. Use «+ or -» to adjust
then press OK to accept. (Note: set to hours only); Your
vacation end date appears on the screen and the vaca-
tion symbol ashes
vacation end date appears on the screen and the vaca-
You can exit vacation mode at any time by pressing the
return button for 2 seconds. You will be returned to
the previous mode.
This function allows you to manage rapid tempera-
ture increases in your radiator at any time and for a
de ned period without modifying your programs.
Select this mode using the "+ or -" buttons then press
OK. A period of 30 minutes ashes on the screen.
Use the "+ or -" buttons to adjust the desired period
in steps of 10 minutes. The set period range can be
between 10 and 120 minutes.
Press OK to accept.
The boost period countdown appears on the screen
and the symbol ashes. You can exit boost mode
at any time by pressing the return button . You will
be returned to the previous mode.
You can also access boost mode directly by pressing
the button on the remote control from any mode
except and . Then set the desired period and
accept as previously instructed.
This function allows you to set your heating system to your
desired temperature while you are away and is set using
the following 4 steps:
1. Select this mode using the «+ or -» buttons then press
OK. The temperature set point ashes on the screen.
7
EN

TIMER PROGRAM OPERATING MODE
This function allows you to set regulated tempera-
ture ranges according to the temperatures de ned in
Comfort and Eco modes.
You will have a choice of 9 preset programs "d1" to "d9"
and 4 custom programs "U1" to "U4" to suit your needs.
If you choose a preset program:
1. Select this mode using the "+ or -" buttons then press
OK,
2. "d1" appears on the screen
3. Press OK, "d1" ashes on the screen.
4. You can then choose another preset program using
the "+ or -" buttons or keep this program. You have the
choice of 9 preset programs "d1" to "d9".
5. Press OK again to accept your choice. You will then au-
tomatically move into Auto mode (the temperature set
point and program number are displayed on the screen).
List of preset programs and comfort mode operating
ranges.
o d1: Comfort mode all week.
o d2: Comfort mode 6:30 - 8:30 a.m. Monday to Friday /
8:30 - 10:30 a.m. at weekends.
o d3: Comfort mode 6:30 - 8:30 a.m. Monday to Friday /
8:30 - 10:30 a.m. and 7:00 - 9:00 p.m. at weekends.
o d4: Comfort mode 8:00 - 10:00 a.m. and 9:00 - 11:00
p.m. Monday to Friday / 9:00 - 11:00 a.m. and 9:00 -
11:00 p.m. at weekends.
o d5: Comfort mode 4:30 - 7:30 a.m. and 4:30 - 10:30
p.m. Monday to Friday / 7:00 - 11:00 p.m. at weekends.
o d6: Comfort mode 6:30 - 9:30 a.m. and 5:00 - 11:00
p.m. Monday to Friday / 8:00 a.m. - 11:00 p.m. at
weekends.
o d7: Comfort mode 6:30 - 8:30 a.m. and 12:00 - 2:00
p.m. and 5:00 - 11:00 p.m. Monday to Friday / 7:00 a.m.
- 11:00 p.m. at weekends.
o d8: Comfort mode 7:30 AM - 9:30 a.m. and 12:00 -
2:00 p.m. and 5:00 - 11:00 p.m. Monday to Friday / 8:00
a.m. - 11:00 p.m. at weekends.
o d9: Comfort mode 7:00 a.m. - 11:00 p.m. all week.
Notes: Preset ranges where your heating is in comfort
mode and the rest of the time in eco mode. Programs
d1 to d4 cover mainly radiators in a bathroom and pro-
grams d5 to d9 cover radiators in other rooms of the
house.
If you choose a custom program:
1. Select this mode using the "+ or -" buttons then press
OK,
2. "d1" appears on the screen
3. Press OK, "d1" ashes on the screen.
4. You can then choose a custom program using the "+
or -" buttons. You have a choice of 4 custom programs
"U1" to "U4".
5. Press and hold OK for 2 seconds to access the pro-
gramming mode directly. The time 00:00 and the Eco
symbol ash on the screen. You can now customize
the program. You are at day 1 of the week (1=Monday).
6. Advance the time of day using the «+» button in steps
of 30 minutes to create your rst Eco mode period. Press
OK. You just created your rst Eco period of the day.
Comfort ashes on the screen.
7. Advance the time of day using the «+» button in steps
of 30 minutes to create your rst Comfort mode period.
Press OK. You just created your rst Comfort period of
the day. Eco ashes on the screen.
8
EN

LOCKING THE KEYPAD
FACTORY SETTINGS
OPEN WINDOW DETECTION
ADVANCED SETTINGS
8. Repeat the previous steps as many times are you wish
to create as many Eco and Comfort periods as you wish to
have in the same day.
9. When the timer programming reaches the end of the
day, 23:30 ashes. Press OK.
10. Day 2 (2=Tuesday) and CP YES appear on the screen.
You can choose to copy the day 1 program to day 2 or not.
11. If you choose to copy the program, press OK. Day 3
(3=Wednesday) and CP YES appear on the screen. Repeat
this step until you reach the last day of the week.
12. If you choose not to copy the program, press «+» or
«-», CP no now ashes on the screen. Press OK to accept
your choice. You will now have to repeat the programming
steps described above.
13. When you have nished programming the last day of
the week, you must save your program. SAVE appears on
the screen. Press OK to save it. You will then automatically
move into Auto mode. (The temperature set point and
program number are displayed on the screen).
Important: If you choose a program that has already pre-
viously been customized but which you do not want to
modify, press OK to accept. You will automatically move
into Auto mode (The temperature setpoint and program
number are displayed on the screen).
Notes: program ranges are displayed in a graphic at the
bottom of the screen and the time segment ashes. This
enables you to view an entire day’s program.
Use this function to avoid making any changes to the
transmitter settings. To lock the keypad, press «+» and
«-» simultaneously then press OK. The symbol
transmitter settings. To lock the keypad, press «+» and
is
displayed and the keypad is now locked. Repeat the same
procedure to unlock the keypad. The symbol
displayed and the keypad is now locked. Repeat the same
disap-
pears.
The symbol is visible on the screen and disap-
pears when you have deactivated this function in
the advanced settings. When the thermostat detects
an open window, the symbol
the advanced settings. When the thermostat detects
will start to ash
and the radiator will switch temporarily to Anti -frost
mode and return to its previous operating mode after
the window has been closed.
To reset the thermostat press and hold button "B" for
20 seconds. The indicator light ashes orange and then
turns stable orange before nally going out completely.
Restart your thermostat by pressing button "B". The
indicator light will ash orange rapidly. Your thermos-
tat is now reset.
Your remote control has an installer menu which allows
you to modify various settings to suit your needs.
Press and hold the OK button on the remote control for
10 seconds until the installer menu appears "bL no", the
symbol appears. Then press the "+ or -" buttons
to move through the various settings. You can exit the
installer menu at any time by pressing the return but-
ton , or going down to the "End" setting to exit and
return to the previous mode.
Descriptions of the various settings:
o "bL no":
Fan is installed (certain radiator models), set to " no" by
default. To choose a diff erent setting, press OK, " no" a-
shes, use the "+ or -" buttons to change it to "YES", press
OK again to accept.
o "rF INI":
Pairing menu, press "OK" once, "INI" and the symbol
ash on the screen. Your radiator is currently pai-
ring.
When the screen returns to the previous mode, your
rst radiator has been successfully paired.
o "tP no":
Display the ambient temperature, set to " no" by default.
To choose a diff erent setting, press OK, " no" ashes, use
the "+ or -" to change it to "YES", press OK again to ac-
cept. In this case, the ambient temperature will always
be displayed on the remote control screen with the sym-
bol and you will have to press to display the set point
temperature for 10 seconds.
o "At YES":
Adaptive start time. This function allows you to anti
cipate the starting of your system. You will reach the
setpoint temperature in the room at the desired time.
It is activated when your system changes from eco to
comfort in AUTO mode. It is set to "YES" by default. For
9
EN

a different setting, press OK, "YES" ashes. Use the "+
or -" buttons to change it to "no". Press OK again to ac-
cept. You have now deactivated the adaptive start time
function.
o "oP YES":
Open window detection: when the thermostat detects
an open window, the radiator will switch temporarily
to Anti -frost mode and return to its previous operati
ng mode after the window has been closed. It is set to
"YES" by default. For a different setting, press OK, "YES"
ashes. Use the "+ or -" buttons to change it to "no".
Press OK again to accept. When you deactivate the
open window detection function, the symbol is no lon-
ger displayed on the remote control.
o "t 30.0 °c":
For safety reasons, you can limit the setpoint tempera-
ture. The default setting is 30°C, but you can lower this
temperature down to 20°C. Press OK, " 30.0 °c" ashes.
Use the "+ or -" buttons to change it. Press OK again to
accept.
o "Sd EHt":
Sensor regulated temperature, set to " EHt" by default.
This means the radiator sensor is used to regulate the
temperature.
You can change this setting. Press OK, " EHt" ashes.
Use the "+ or -" buttons to change it to "Int".
Press OK again to accept. You are now using the remote
control's sensor to regulate the temperature.
" EHt" = Radiator sensor "Int"= Remote control sensor
o "t 0.0 °c":
Set point temperature regulation: use this if you noti
ce a discrepancy between the setpoint temperature
and the ambient temperature indicated on the remote
control. This is set to 0.0°c by default. Press OK, " 0.0
°c" ashes. Use the "+ or -" buttons to change it. Press
OK again to accept. Settings range between -3.0°C and
+3.0°C. Regulation is only possible if you are using the
radiator's internal sensor to regulate the temperature:
" EHt" = Radiator sensor.
o "tS 100":
You can limit the surface temperature of your radiator
to 3 different levels
100% 70% or 55% .
This function allows you to reduce the amount of heat
produced and must be taken into consideration when
assessing a room's heating requirements. This is set to
100% by default. To change this setting, press OK, " 100
" ashes. Use the "+ or -" to change it. Press OK again
to accept. Following a change to this setting, the sym-
bol will appear differently on the screen of
your remote control.
o "AC no":
Room sensor calibration (sensor located on your
radiator). Calibration must be carried out after
one day's operation at the same setpoint. Place
a thermometer in the middle of the room about
1.5 m above ground level and note the tempera-
ture measured after 1 hour. When going into the
calibration setting for the rst time, the display
will show "no" to indicate that calibration has
not been done. Press OK, and the temperature
will ash. Enter the temperature reading from
your thermometer using the "+ or -" buttons,
then accept your setting by pressing OK. "AC
YES" appears on the screen. You have success-
fully completed calibration. You can cancel the
calibration and return to "no" by pressing both
"+" and "-" simultaneously.
Important note: If another room temperature is
shown on the Remote control it can mean that
your remote control is in an inappropriate place.
o "Ch YES":
Automatic switch to Daylight Saving Time and
back again, this is set to " YES" by default. You
can change it by pressing OK, " YES" ashes. Use
the "+ or -" buttons to change it to "no". Press
OK again to accept. In this case, you will have
to change the time manually each summer and
winter.
o "CL ":
Reset your remote control, return to default fac-
tory settings. Press and hold OK for 8 seconds.
When all the icons are displayed on the screen
and the remote control ashes orange once,
your remote control has been successfully reset.
You will be returned to comfort mode at 19°C,
and all custom timer programs U1 to U4 are
cleared.
o "UE 0.1":
Software version, for your information.
o " End":
Display shows "End". Press OK to exit the instal-
ler menu and return to the previous mode.
Note: When navigating inside the installer
menu, you can exit at any time and return to the
previous mode by pressing the return button
10
EN

MAINTENANCE, REPAIR
AND REMOVAL
CLEANING
REPLACING REMOTE CONTROL BATTERIES
WARRANTY
TECHNICAL DATA
Important: Before carrying out any maintenance work,
make sure the appliance is turned off .
To ensure the lifespan of your appliance, we recom-
mend carrying out these simple maintenance tasks.
o To clean the radiator, do not use abrasive or corrosive
products. Simply use warm, soapy water
o To clean the remote control, use a dry cloth without
any solvent.
When the battery low icon is displayed on the
screen, you must change the batteries. Press down on
the clip located on the back of the remote control and
push forwards. Replace both batteries with LR03 AAA
alkaline batteries. Your remote control will save all your
settings, except for the time.
This product is covered by a 10-year warranty except for
the electrical and electronic components which are cove-
red by a 2-year warranty.
Temperature measurement accuracy: 0.1°C
Temperature regulation accuracy: +/- 0,15°C (at a
constant heat demand)
Temperature range:
o Comfort: 5.5°C to 30°C, temperature below the
safety temperature (set in advanced settings).
o Eco: 5.5°C to 19°C, temperature below the
comfort temperature setpoint.
o Anti -frost: 5.0°C to 10.0°C
Electrical protection:
o Thermostat: Class II - IP44
o Remote Control: Class III - IP31
Remote control batteries: 2 x LR03 AAA 1.5V alkaline
batteries
Operating temperature (Thermostat): -10°C to +50°C
Storage temperature (Thermostat): -20°C to +50°C
Humidity: Maximum 90% at 25°C
Radio signal transmission frequency: 868.3 MHz
Transmission range: 30 m / 150 m range outdoors
11
EN

SISÄLLYSLUETTELO
NÄYTTÖ..............................................................................................................................................................................................................................................13
ASENNUKSEN KÄYTTÖÖNOTTO ..............................................................................................................................................................................................
Vastaanotin (Termostaatti) ........................................................................................................................................................................................................14
Vastaanottimen merkkivalo.......................................................................................................................................................................................................14
Lähetin (Kauko-ohjain) ................................................................................................................................................................................................................
LÄHETTIMEN TOIMINTATILOJEN KUVAUS (KAUKO-OHJAIN) .......................................................................................................................................
Mukavuus tila .................................................................................................................................................................................................................................15
Automaattinen tila .......................................................................................................................................................................................................................16
Alennettu lämpötila .....................................................................................................................................................................................................................16
Jäätymissuoja tila .......................................................................................................................................................................................................................... 17
Poissa tila ..........................................................................................................................................................................................................................................17
Tehostettu lämmitys tila - Boost .............................................................................................................................................................................................. 17
Ohjelmointi tila ..............................................................................................................................................................................................................................18
Näppäimistön lukitus ..................................................................................................................................................................................................................19
Avoimen ikkunan tunnistin ........................................................................................................................................................................................................19
Tehdasasetukset ............................................................................................................................................................................................................................
LISÄASETUKSET ..............................................................................................................................................................................................................................
Lämmittimen puhallin käytössä ..............................................................................................................................................................................................19
Lämmittimen yhdistäminen ......................................................................................................................................................................................................19
Huoneen lämpötila ....................................................................................................................................................................................................................... 19
Mukautuva käynnistys .................................................................................................................................................................................................................19
Avoimen ikkunan tunnistin ........................................................................................................................................................................................................20
Lämpötilan rajoittaminen ..........................................................................................................................................................................................................20
Käytettävän lämpöanturin valinta ..........................................................................................................................................................................................20
Lämpötilan kalibrointi ..................................................................................................................................................................................................................20
Pintalämpötilan valinta ............................................................................................................................................................................................................... 20
Lämmittimen termostaatin kalibrointi .................................................................................................................................................................................. 20
Kesä/talvi ajan muutos ...............................................................................................................................................................................................................20
Kauko-ohjaimen tehdasasetus .................................................................................................................................................................................................20
Ohjelmistoversio ............................................................................................................................................................................................................................
HUOLTO, PUHDISTUS, PARISTOJEN VAIHTO JA TUOTTEEN KIERRÄTYS ......................................................................................................................... 21
Huolto ................................................................................................................................................................................................................................................21
Puhdistus .......................................................................................................................................................................................................................................... 21
Kauko-ohjaimen paristojen vaihto ..........................................................................................................................................................................................21
Tuotteen kierrätys ..........................................................................................................................................................................................................................21
Takuu ..................................................................................................................................................................................................................................................21
TEKNISET TIEDOT ...........................................................................................................................................................................................................................21
12
FI

A- Mukavuus tila
B- Automaattinen tila
C- Alennettu lämpötila
D- Jäätymissuoja tila
E- Poissa tila
F- Boost - ajastettu tila
G- Ohjelma tila
H- Viikon päivä
I- Lämmitys ilmaisin
J- Puhallin ilmaisin
K- Avoimen ikkunan toiminta
L- Pariston alhainen varaus
M- Radiosignaalin toiminta
N- Ohjelman ilmaisin (d1-d9, U1-U4)
O- Käsiohjaus
P- Asennusvalikon ilmaisin
Q- Näppäinlukko
R- 24 h ajastin ilmaisin
S- Lämpötilan asetusarvo tai huonelämpötila
T- Huoneen lämpötilan ilmaisin
ABCD E F
H I
J
K
L
M
G
N
O P
Q
R
S
T
Verkkoadapteri
(Lisävaruste)
13
FI

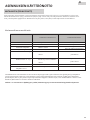
Vastaanottimen merkkivalo
Toimintatila Merkkivalon tila
Lämmitin ei toiminnassa
Merkkivalon tila
Lämmitin lämmittää
Valmiustila Pois päältä Pois päältä
Mukavuus tila Jatkuva vihreä Jatkuva punainen
Alennettu lämpötila Vilkkuva vihreä Vilkkuva puna-vihreä
Jäätymissuoja tila Hitaasti vilkkuva vihreä Hitaasti vilkkuva punavihreä
Mukavuus tila-1 °C (*) Kahdesti vilkkuva
vihreä
Kahdesti vilkkuva
punavihreä
Mukavuus tila -2 °C (*) Kahdesti ja hitaasti vilkkuva
vihreä
Kahdesti ja hitaasti vilkkuva
puna-vihreä
Yhdistäminen Vilkkuva oranssi Vilkkuva oranssi
Anturivika tai mitattu
lämpötila >35°C Vilkkuva punainen --
Lämmittimen RF-vastaanottimessa on itsenäinen ohjausjärjestelmä, joka tallentaa tilan (päälle/pois) ja lämpötilan
asetusarvot muistiin. Viimeisen vastaanotetun asetusarvon tallentaminen takaa oikean säädön myös lähettimen
(kauko-ohjain) ollessa pois päältä tai paristojen kuluttua loppuun. Huomaa myös, että sähkökatkoksen sattuessa läm-
mittimen yhdistämistä ei tarvitse suorittaa uudelleen.
Tärkeää : Jos vastaanotin on kytketty pois päältä, lämmitin ei pysty vastaanottamaan käskyjä kauko-ohjaimesta.
ASENNUKSEN KÄYTTÖÖNOTTO
VASTAANOTIN (TERMOSTAATTI)
Kytke lämmitin sähköverkkoon. Käynnistä lämmitin painamalla laitteen alla olevassa vastaanottimessa olevaa pai-
niketta B. Merkkivalo A syttyy ja kuulet kaksi lyhyttä ”piip”-ääntä. Kun painat B-painiketta uudelleen, lämmitin sam-
muu ja kuulet pitkän piippauksen. Merkkivalo A on pois päältä, eikä yhteys kauko-ohjaimella ole mahdollista.
14
FI

Avaa kauko-ohjaimen paristokotelon kansi ja poista paristojen
suojamuovi. Ensimmäisen käynnistyksen aikana lämmitin
käynnistyy mukavuus tilaan, Kun vaihdat käytetyt paristot
(katko yli 2 minuuttia), lämmitin käynnistyy ja muistaa edel-
lisen toimintatilan.
Ensimmäinen askel on asettaa kauko-ohjaimeen aika. Asetus
voidaan tehdä missä tahansa tilassa ja milloin tahansa.
Paina OK-painiketta viiden sekunnin ajan, kunnes aika tulee
näkyviin, päästä irti ja paina uudelleen OK-painiketta.
Kun tunnit vilkkuvat , paina ”+” tai ”-” painikkeita säätääkse-
si niitä ja paina sitten OK vahvistaaksesi tunnit.
Kun minuutit vilkkuvat , paina ”+” tai ”-” painikkeita
säätääksesi niitä ja paina sitten OK vahvistaaksesi minuutit.
Kun viikonpäivä vilkkuu , paina ”+” tai ”-” painikkeita
säätääksesi sitä ja paina sitten OK vahvistaaksesi päivän.
Kun päivämäärä vilkkuu, paina ”+” tai ”-” painikkei-
ta säätääksesi sitä ja paina sitten OK vahvistaaksesi
päivämäärän.
Kun kuukausi vilkkuu, paina ”+” tai ”-” painikkeita
säätääksesi sitä ja paina sitten OK vahvistaaksesi kuukauden.
Kun vuosi vilkkuu, paina ”+” tai ”-” painikkeita muuttaaksesi
sitä ja paina sitten OK vahvistaaksesi vuoden.
Voit palata edelliseen tilaan viimeisen vahvistuksen jälkeen.
Aika, päivämäärä ja vuosi on nyt säädetty kauko-ohjaimellasi,
niitä voidaan käyttää Automaattinen ja Poissa –tiloissa
Huomio: Ajan asetus ei ole välttämätön, kun kauko-ohjain on
kytketty Touch E3 ohjaimeen (lisävaruste), aikasynkronointi on
tällöin automaattinen.
Voit tarkastella asetettua aikaa painamalla OK-painiketta
5 sekunnin ajan, kunnes kellonaika tulee näkyviin. Se pysyy
näytössä 10 sekuntia ja palaa sitten aiempaan tilaan.
Tärkeää: Viimeisin tallennus on aina mahdollista peruuttaa
painamalla
Takaisin-painiketta . Huomaa myös kun kauko-ohjaimen
taustavalo on pois päältä, paina näppäintä uudelleen, jolloin
valo kytkeytyy päälle uudelleen.
Lähettimen (kauko-ohjain) ja vastaanottimen (termostaatti)
välisen yhteyden luomiseksi on suoritettava seuraavat toimin-
not.
Tätä kutsutaan yhdistämiseksi. Lämmitin on oltava päälle
kytkettynä.
Vastaanotin (Termostaatti) :
Pidä lämmittimen termostaatin ”B”-painiketta painettuna 5
sekunnin ajan. Merkkivalo ”A” vilkkuu hitaasti oranssina. Tämä
tarkoittaa, että voit irrottaa ”B”-painikkeesta; lämmittimen
vastaanotin on nyt yhdistyminen tilassa.
Lähetin (Kauko-ohjain) :
1. Paina ja pidä kauko-ohjaimen OK-painiketta pohjassa 10
sekunnin ajan, kunnes asennusvalikkoon ilmestyy ”bL no ” .
Merkki ilmestyy näkyviin.
LÄHETIN (KAUKO-OHJAIN)
2. Paina ”+” -painiketta kerran, ”rF INI ”ilmestyy näytöl-
le, jolloin pääset yhdistysvalikkoon. Kauko-ohjain on
nyt yhdistyminen tilassa
3. Paina kerran ”OK”-painiketta; ”INI” ja merkki
vilkkuvat näytöllä, lämmittimen termostaatti muo-
dostaa yhteyttä. Kun näyttö palaa aiempaan tilaan,
ensimmäinen lämmitin on nyt yhdistetty.
MUKAVUUS TILA
LÄHETTIMEN TOIMIN-
TATILOJEN KUVAUS
( KAUKO-OHJAIN)
4. Voit yhdistää toisen lämmittimen toistamalla edel-
liset vaiheet (termostaatilla ja kauko-ohjaimella).
Huomio : Asennusvalikkoon pääsee kaikkien tilojen
kautta.
Tärkeää : Jos asennuksessa käytetään Touch E3
ohjainta (lisävaruste), yhdistä aina ensin kauko-ohjain
ja sitten lämmitin edellä kuvattujen toimintatapojen
ja Touch E3 ohjaimen käyttöohjeiden mukaan.
Ohjelmointi ja poissa tilan toiminnot ohjataan
silloin ohjaimen Touch E3 avulla ja tilojen symbolit
eivät näy kauko-ohjaimessa.
15
FI

AUTOMAATTINEN TILA
ALENNETTU LÄMPÖTILA
Tarkoitettu käytettäväksi normaalissa huoneläm-
mityskäytössä silloin kun viikko-ohjelmointia tai
ulkopuolista ohjausta ei haluta käyttää.
Valitse tila käyttämällä ”+” tai ”-” painikkeita, paina
sitten OK, asetettu lämpötila näkyy näytöllä. Jos ha-
luat muuttaa lämpötilaa, paina OK uudelleen, jolloin
lämpötila alkaa vilkkua; säädä sitä painamalla joko
«+ tai -» -näppäintä ja vahvista muutos painamal-
la OK. Huoneen lämpötila näkyy 10 sekunnin ajan,
minkä jälkeen näkyy asetettu lämpötila-arvo. Lämpö-
tilaa voi säätää välillä 5,5 °C ja 30 °C. Säädön aikana
syttyy merkkivalo, joka voi olla kolmea eri väriä. Se
ilmaisee pienen, keskisuuren tai suuren energianku-
lutuksen tason ja näin mahdollistaa säästämään
energiaa.
Vihreä väri :Pieni kulutus, lämpötila välillä 5,5 °C ja
19 °C
Oranssi väri : Keskisuuri kulutus, lämpötila välillä
19,5 °C ja 24°C
Punainen väri : Suuri kulutus, lämpötila välillä
24,5°C ja 30°C
Tämän visuaalisen ilmaisimen avulla käyttäjä voi olla
tietoinen liiallisesta energiankulutuksesta asettaes-
saan sopivaa lämpötilaa.
Säätämäsi lämpötila on tämän huoneen ja tämän
käyttötilan haluttu lämpötila. Huoneen lämpötila
asettuu haluttuun lämpötilaan muutamassa tunnis-
sa.
Painamalla paluu painiketta tulee huoneen läm-
pötila näkyviin 10 sekunnin ajaksi ja myös merkki
tulee näkyviin.
Tarkoitettu käytettäväksi silloin, kun lämmittimen halutaan
toimivan automaattisesti ja itsenäisesti seuraavilla tavoilla:
Tapa 1 : Jos lämmittimen ohjausjohdin on kytketty. Lue
lämmittimen käyttöohje lisätietoja varten.
Tapa 2 : Touch E3 ohjainyksikön (lisävaruste) kanssa
yhdistettynä
Tapa 3 :Kauko-ohjaimen ohjelmatilassa (d1–d9,
U1–U4) aikaisemmin valittu ohjelma.
Voit muuttaa ohjelman asetettua lämpötilaa milloin
tahansa painamalla OK-painiketta. Lämpötila vilkkuu
näytöllä ja voit muuttaa sitä painamalla ”+” ja ”-”.
Paina OK uudelleen vahvistaaksesi valintasi. Tässä
tapauksessa katsotaan tapahtuneen poikkeus, ja –
merkki tulee näkyviin. Painikkeen painaminen mahdol-
listaa sen ohittamisen ja palauttaa ohjelmaan asete-
tun lämpötilan, muussa tapauksessa poikkeustilanne
poistuu kahden tunnin kuluttua.
Painamalla paluu painiketta tulee huoneen lämpö-
tila näkyviin 10 sekunnin ajaksi. Myös merkki tulee
näkyviin.
Tarkoitettu käytettäväksi yöllä tai kun asunto on
tyhjillään muutamia tunteja tai pidempään kuten va-
paa-ajan asunto.
Valitse tila käyttämällä ”+” tai ”-” painikkeita, paina
sitten OK, asetettu lämpötila näkyy näytöllä. Jos haluat
muuttaa lämpötilaa, paina OK uudelleen, jolloin läm-
pötila alkaa vilkkua; säädä sitä painamalla joko «+ tai
-» -näppäintä ja vahvista muutos painamalla OK.
Huoneen lämpötila näkyy 10 sekunnin ajan, minkä
jälkeen lämpötila on asetettu uudelleen. Lämpötilaa
voi säätää välillä 5,5 °C ja 19°C, mutta se on aina 0,5°C
matalampi kuin Mukavuus tilassa asetettu lämpötila.
Säätämäsi lämpötila on tämän huoneen ja tämän
käyttötilan haluttu lämpötila. Huoneen lämpötila aset-
tuu haluttuun lämpötilaan muutamassa tunnissa.
Painamalla paluu painiketta tulee huoneen läm-
pötila näkyviin 10 sekunnin ajaksi. Myös merkki
tulee näkyviin.
16
FI

JÄÄTYMISSUOJA TILA
POISSA TILA
BOOST TILA
Tarkoitettu käytettäväksi silloin kun kiinteistö on pitkään
tyhjillään ja halutaan estää huonetilaa jäähtymästä täysin.
Valitse tila käyttämällä ”+” tai ”-” painikkeita, paina sitten OK,
asetettu lämpötila näkyy näytöllä. Jos haluat muuttaa läm-
pötilaa, paina OK uudelleen, jolloin lämpötila alkaa vilkkua;
säädä sitä painamalla joko «+ tai -» -näppäintä ja vahvista
muutos painamalla OK. Huoneen lämpötila näkyy 10 sekun-
nin ajan, minkä jälkeen lämpötila on asetettu uudelleen.
Lämpötilaa voi säätää välillä 5 °C ja 10°C . Painamalla paluu
painiketta tulee huoneen lämpötila näkyviin 10 sekunnin
ajaksi. Myös merkki tulee näkyviin.
Tämä toiminto mahdollistaa lämmitysjärjestelmän
asettamisen haluttuun lämpötilaan poissaolosi ajaksi,
ja sitä säädetään neljässä vaiheessa:
1. Valitse tila käyttämällä ”+” tai ”-” painikkeita, paina
sitten OK, asetettu lämpötila näkyy näytöllä. Käytä
näppäimiä ”+” tai ”-” asettaaksesi halutun lämpötilan
poissaolosi ajaksi ja paina sitten OK valintasi vahvista-
miseksi.
2. Määritä sitten poissaolosi paluupäivä alkaen kuu-
kaudesta painamalla ”+” tai ”-” , paina sitten OK vahvis-
taaksesi valintasi. (Huomaa: vuosi vaihtuu siirtymällä
ensimmäisen ja kahdennentoista kuukauden välillä).
3. Säädä paluupäivämäärää painamalla ”+” tai ”-” -pai-
nikkeita, minkä jälkeen paina OK vahvistaaksesi valitun
päivämäärän.
4. Voit säätää paluutunnin painamalla ”+” tai ”-” -pai-
nikkeita, minkä jälkeen paina OK vahvistaaksesi valitun
tunnin. (Huomaa : Aseta täysiä tunteja). Paluupäivä
tulee näkyviin näytölle ja poissa merkki
tunnin. (Huomaa : Aseta täysiä tunteja). Paluupäivä
vilkkuu.
Voit poistua poissa tilasta milloin tahansa painamalla 2
sekuntia painiketta paluu , jolloin palataan edelliseen
tilaan.
Tämä toiminto mahdollistaa lämmittimen lämpötilan
nostamisen nopeasti määrätyksi ajaksi ilman ohjel-
mien muuttamista.
Valitse tila käyttämällä ”+” tai ”-” painikkeita, paina
sitten OK, 30 minuutin aika näkyy näytöllä. Käytä näp-
päimiä ”+” tai ”-” asettaaksesi 10 minuutin jaksoilla
halutun pituisen ajan. Ajan asetusalue voi olla 10 mi-
nuutista 120 minuuttiin.
Vahvista painamalla OK.
17
FI

OHJELMOINTI TILA
Näyttöön ilmestyy tehostetun lämmitysajan laskenta ja
merkki
Näyttöön ilmestyy tehostetun lämmitysajan laskenta ja
vilkkuu.
Voit poistua Boost tilasta milloin tahansa painamalla
painiketta paluu , jolloin palataan edelliseen tilaan.
Voit myös käyttää tehostusta suoraan painamalla kau-
ko-ohjaimen painiketta
Voit myös käyttää tehostusta suoraan painamalla kau-
kaikissa toimintatiloissa, paitsi
tiloissa
ko-ohjaimen painiketta
ja
ko-ohjaimen painiketta
, aseta sitten haluttu lämmitys aika ja
vahvista edellä kuvatulla tavalla.
Tällä ohjelmointi toiminnolla on mahdollista vaihdella läm-
pötiloja Mukavuus tila ja Alennettu lämpötila asetu-
sarvojen välillä.
Voit valita yhdeksästä valmiista ohjelmasta ”d1”–”d9” ja
neljästä itse luomastasi ohjelmasta ”U1”–”U4”
Jos valitset valmiin esiasetetun ohjelman :
1. Valitse tila käyttämällä ”+” tai ”-” painikkeita, paina sitten
OK,
2. ”d1” ilmestyy näytölle
3. Paina OK , ”d1” vilkkuu näytöllä.
4. Voit valita jonkin muun esiasetetuista ohjelmista
käyttämällä ”+” tai ”-” painikkeita tai pitää tämän ohjel-
man.
Voit valita yhdeksästä valmiista ohjelmasta ”d1”–”d9”
5. Paina uudelleen OK vahvistaaksesi valintasi, minkä jälk-
een siirryt automaattisesti tilaan Automaattinen (asetettu
lämpötila ja ohjelmanumero näkyvät näytöllä).
Luettelo esiasetetuista Mukavuus tilan ohjelmista ja niiden
ajoista.
o d1 : Mukavuus tila koko viikolle.
o d2 : Mukavuus tila klo 6:30–8:30 maanantaista perjantai-
hin / 8:30–10:30 viikonloppuna.
o d3 : Mukavuus tila klo 6:30–8:30 maanantaista perjantai-
hin / 8:30–10:30 ja 19:00–21:00 viikonloppuna.
o d4 : Mukavuus tila klo 8:00–10:00 ja 21:00–23:00
maanantaista perjantaihin / 9:00–11:00 ja 21:00–23:00
viikonloppuna.
o d5 : Mukavuus tila klo 4:30–7:30 ja 16:30–22:30 maanan-
taista perjantaihin / 7:00–23:00 viikonloppuna.
o d6 : Mukavuus tila klo 6:30–9:30 ja 17:00–23:00 maanan-
taista perjantaihin / 8:00–23:00 viikonloppuna.
o d7 : Mukavuus tila klo 6:30–8:30 ja 12:00–14:00 ja 17:00–
23:00 maanantaista perjantaihin / 7:00–23:00 viikonloppu-
na.
o d8 : Mukavuus tila klo 7:30–9:30 ja 12:00–14:00 ja 17:00–
23:00 maanantaista perjantaihin / 8:00–23:00 viikonloppu-
na.
o d9 : Mukavuus tila klo 7:00–23:00 koko viikon ajan.
Huomioitavaa : Esiasetetut ajat on asetustilana Mukavuus
lämpötila, muulloin asetustilana on Alennettu lämpötila.
Ohjelmat d1–d4 sopivat erityisesti kylpyhuoneessa oleville
lämmittimille ja ohjelmat d5–d9 muualla talossa oleville
lämmittimille.
Jos valitset itse räätälöidyn ohjelman :
1. Valitse tila käyttämällä ”+” tai ”-” painikkeita, paina sitten
OK,
2. ”d1” ilmestyy näytölle
3. Paina OK , ”d1” vilkkuu näytöllä.
4. Voit valita jonkin räätälöidyistä ohjelmista käyttämällä ”+”
tai ”-” painikkeita. Voit valita neljästä räätälöidystä ohjelmas-
ta ”U1”–”U4”
5. Paina OK kahden sekunnin ajan, minkä jälkeen pääset kä-
siksi ohjelmointiin. Aika 00:00 ja merkki Alennettu lämpötila
välkkyvät näytöllä, ohjelmointi voi alkaa, olet viikon en-
simmäisen päivän kohdalla (1=maanantai).
6. Valitse aika ja päivä painamalla ”+” siirtyen 30 minuutin jak-
soja luodaksesi ensimmäisen ajanjaksosi tilaan Alennettu
, paina OK, ja pääset luomaan päivän ensimmäisen Alennettu
jakson,
Mukavuus tila välkkyy näytöllä.
7. Valitse aika ja päivä painamalla ”+” siirtyen aina 30 minuutin
jaksoja luodaksesi ensimmäisen ajanjaksosi tilaan Mukavuus
lämpötila , paina OK, ja pääset luomaan päivän ensimmäisen
Mukavuus jakson, Alennettu välkkyy näytöllä.
8. Toista edellä mainitut vaiheet niin monta kertaa kuin haluat
luodaksesi Alennettu- ja Mukavuus-jaksoja kyseiselle päivälle.
9. Kun ohjelma illalla päättyy, vilkkuu aika 23:30, paina painiket-
ta OK.
18
FI

NÄPPÄIMISTÖN LUKITUS
TEHDASASETUKSET
AVOIMEN IKKUNAN TUNNISTIN
LISÄASETUKSET
10. Päivä 2 (2=Tiistai) ja CP YES ilmestyvät näytölle. Tällöin sinul-
la on mahdollisuus kopioida päivän 1 ohjelma päivälle 2
11. Jos päätät kopioida ohjelman, paina painiketta OK , Päivä 3
(3=Keskiviikko) ja CP YES ilmestyvät näytölle. Toista nämä toi-
minnot viikon viimeiseen päivään asti.
12. Jos päätät olla kopioimatta ohjelmaa, paina painiketta
”+” tai ”- ”, CP no vilkkuu näytöllä, paina painiketta OK vahvis-
taaksesi valintasi. Tässä tapauksessa sinun on toistettava edellä
kuvatut ohjelmointi toiminnot.
13. Sinun on ohjelmoinnin lopuksi tallennettava viikon
viimeinen päivä ohjelmointiin Paina uudelleen, minkä jälkeen
SAVE ilmestyy näytölle. Paina OK vahvistaaksesi valintasi, minkä
jälkeen siirryt automaattisesti tilaan Automaattinen. (Asetettu
lämpötila ja ohjelmanumero näkyvät näytöllä).
Tärkeää : Jos valitset aiemmin räätälöidyn ohjelman, jota et
halua enää muuttaa, paina OK vahvistaaksesi valintasi , minkä
jälkeen siirryt automaattisesti tilaan Automaattinen (asetettu
lämpötila ja ohjelmanumero näkyvät näytöllä).
Huomioitavaa : Ohjelmointi alueet näkyvät näytön alareunassa
olevassa kuvassa, ja aikakenttä vilkkuu. Näin pääset näkemään
koko päivän täyden ohjelman.
Paina termostaatin nollaamiseksi painiketta ”B” 20 sekun-
nin ajan, merkkivalo alkaa vilkkua oranssina. Tämän jälkeen
oranssi valo muuttuu jatkuvaksi ja lopulta sammuu. Kytke
termostaatti päälle painamalla painiketta ”B”. Merkkivalo
alkaa vilkkua nopeasti oranssina, ja termostaatti nollautuu.
Kauko-ohjaimessa on asennusvalikko, jonka avulla voit
muuttaa tarpeittesi mukaan erilaisia asetuksia.
Paina ja pidä kauko-ohjaimen OK-painiketta pohjassa 10
sekunnin ajan, kunnes asennusvalikkoon ilmestyy ”bL no ”.
Merkki ilmestyy näkyviin. Paina sitten painikkeita ”+”
tai ”-” selataksesi eri parametreja. Voit poistua asennusvali-
kosta milloin tahansa painamalla painiketta paluu , tai
siirtymällä kohtaan ”End” poistuaksesi ja palataksesi edel-
liseen tilaan.
Erilaisten parametrien kuvaus :
o « bL no » :
Puhallin lämmitys (joissakin lämmitin malleissa), oletusase-
tuksena ei käytössä ” no” . Eri asetukseen pääset painamalla
OK , ” no” vilkkuu, käytä painikkeita ”+” tai ”-” vaihtaaksesi
asetukseksi käytössä ”YES”, paina uudelleen OK vahvis-
taaksesi.
o « rF INI » :
Lämmittimen ja kauko-ohjaimen yhdistäminen, paina ker-
ran ”OK” , ”INI” ja merkki alkaa vilkkua näytöllä. Lämmi-
tin muodostaa yhteyttä. Katso myös lämmittimen manuaali
yhdistämisestä. Kun näyttö palaa aiempaan tilaan, ensim-
mäinen lämmitin on yhdistetty.
o « tP no » :
Huoneen lämpötila, oletusasetuksena on ei käytössä «no».
Eri asetukseen pääset painamalla OK , ” no” vilkkuu, käytä
painikkeita ”+” tai ”-” vaihtaaksesi asetukseksi ”YES”, paina
uudelleen OK vahvistaaksesi. Tässä tapauksessa huoneen
lämpötila näkyy aina kauko-ohjaimen näytöllä merkin kans-
sa. Asetetun lämpötilan nähdäksesi on sinun painettava
”OK” jotta asetettu lämpötila näkyy 10 sekunnin ajan.
o ”At YES” :
Mukautuvan käynnistyksen alkamisaika. Tämä toiminto
mahdollistaa lämmityksen aloittamisen niin, että saat halu-
tun lämpötilan huoneeseesi haluamaasi aikaan. Se aktivoi-
Tätä toimintoa voit käyttää estääksesi lähettimen ase-
tusten muuttamisen. Voit lukita näppäimistön paina-
malla yhtä aikaa ”+” ja ”-”, sitten OK, minkä jälkeen esiin
tulee
malla yhtä aikaa ”+” ja ”-”, sitten OK, minkä jälkeen esiin
merkki , ja näppäimistö on lukittu. Toista sa-
mat toimenpiteet poistaaksesi näppäimistön lukituksen,
minkä jälkeen merkki
mat toimenpiteet poistaaksesi näppäimistön lukituksen,
katoaa
Merkki näkyy näytöllä ja katoaa, kun olet poista-
nut toiminnon lisäasetuksissa.
Kun termostaatti havaitsee avoimen ikkunan, siirtyy
lämmitin väliaikaisesti Jäätymissuoja tilaan. Se palaa
edelliseen toimintatilaan, kun ikkuna on jälleen suljet-
tu.
19
FI

tuu kun lämmitys muuttuu Alennetusta tilasta Mukavuus
tilaan AUTO tilassa.
Oletusasetuksena on kyllä ”YES”. Eri asetukseen pääset pai-
namalla OK , ”YES” vilkkuu, käytä painikkeita ”+” tai ”-” vaih-
taaksesi asetukseksi ”no”, paina uudelleen OK vahvistaaksesi.
Olet nyt poistanut mukautuva käynnistys –toiminnon.
o ”oP YES” :
Avoimen ikkunan tunnistin. Kun termostaatti havaitsee avoi-
men ikkunan, siirtyy lämmitin väliaikaisesti Jäätymissuoja
tilaan.
Se palaa edelliseen toimintatilaan, kun ikkuna on suljettu.
Oletusasetuksena on kyllä ”YES”. Eri asetukseen pääset pai-
namalla OK , ”YES” vilkkuu, käytä painikkeita ”+” tai ”-” vaih-
taaksesi asetukseksi ”no”, paina uudelleen OK vahvistaaksesi.
Kun poistat avoimen ikkunan toiminnon, merkki ei enää näy
kauko-ohjaimessa.
o ”t 30,0 °c” :
Turvallisuuden vuoksi voit rajoittaa asetettua lämpötilaa.
Oletusasetus on 30 °C, mutta voit laskea lämpötilan esim. 20
°C. Paina OK , ” 30,0°C” vilkkuu, käytä painikkeita ”+” tai ”-”
vaihtaaksesi asetuksia, paina uudelleen OK vahvistaaksesi.
o ”Sd EHt” :
Lämmittimen anturia ”EHt” käytetään oletusarvoisesti läm-
pötilan säätämisessä.
Voit tehdä muutoksia painamalla OK, ” EHt” vilkkuu, käytä
painikkeita ”+” tai ”-” vaihtaaksesi asetukseksi ”Int”, paina
uudelleen OK vahvistaaksesi. Käytät nyt kauko-ohjaimen
anturia lämpötilan säätämisessä.
” EHt” = Lämmittimen anturi ”Int”= Kauko-ohjaimen anturi
o ”C 0,0 °c” :
Lämpötilan kompensointi asetukset, jos havaitset siirtymän
asetetun lämpötilan ja kauko-ohjaimen ympäristölämpö-
tilan välillä, oletusarvoisesti asetus on 0,0°C. Paina OK, ”
0,0°C” vilkkuu, käytä painikkeita ”+” tai ”-” muuttaaksesi
sitä, paina uudelleen OK vahvistaaksesi asetuksen, asetusa-
lue välillä -3,0°C ja +3,0°C . Asetus on mahdollinen vain, jos
käytät lämmittimen sisäistä anturia ” EHt” = Lämmittimen
anturi.
o ”tS 100” :
Voit rajoittaa lämmittimen pintalämpötilaa seuraavien kol-
men eri lämmitystehon tason mukaisesti 100% 70%
tai 55% lämmittimen nimellistehosta. Tämä toiminto on
otettava huomioon tehomitoituksessa korvaamaan lasken-
nalliset tehohäviöt, oletusasetus on 100%. Voit tehdä muu-
toksia asetuksiin painamalla OK , ”100” vilkkuu, käytä painik-
keita ”+” tai ”-” vaihtaaksesi asetuksen, paina uudelleen OK
vahvistaaksesi. Merkki vaihtuu kauko-ohjaimesi näytöllä
asetuksista riippuen.
o ”AC no”:
Lämmittimessä olevan anturin kalibrointi.
Kalibroinnin voi tehdä aikaisintaan yhden päivän
käytön jälkeen samassa asetuspisteessä. Aseta läm-
pömittari huoneen keskelle noin 1,5 metrin korkeu-
delle lattiasta, lue mitattu lämpötila yhden tunnin
kuluttua.
Kun kirjaat kalibrointi parametrit ensimmäistä
kertaa, näytössä lukee ”no”, mikä tarkoittaa, että
kalibrointia ei ole suoritettu, paina OK, lämpötila
vilkkuu, korjaa lämpömittarilla mittaamasi lämpöti-
la painikkeiden”+” tai ”-” avulla, vahvista asetuksesi
painamalla OK. ”AC YES” ilmestyy näytölle, kalibroin-
ti on suoritettu. Voit peruuttaa kalibroinnin ja palata
vaihtoehtoon ”no” painamalla yhtä aikaa painikkei-
ta ”+” ja ” -” . Tärkeä huomautus :Liian suuri lämpö-
tilaero voi merkitä myös sitä, että kauko-ohjaimen
sijainti ei ole hyvä.
o ”Ch YES” :
Kesä- ja talviajan muutos, automaattinen muutos
on oletusarvoisesti päällä, ” YES”. Voit tehdä muu-
toksia painamalla OK , ” YES” vilkkuu, käytä painik-
keita ”+” tai ”-” vaihtaaksesi asetukseksi ”no”, paina
uudelleen OK vahvistaaksesi. Tässä tapauksessa
sinun on vaihdettava kesä- ja talviaika manuaalises-
ti.
o ”CL ” :
Kauko-ohjaimen palauttaminen tehdasasetuksiin.
HUOM! Kaikki räätälöidyt ohjelmat U1–U4 pois-
tetaan. Paina OK kahdeksan sekunnin ajan. Tällöin
kaikki kuvakkeet näkyvät näytöllä ja kauko-ohjai-
men näytöllä vilkkuu kerran oranssi valo nollauksen
suorituksen merkiksi. Ohjain palaa oletusasetuksiin
ja Mukavuus tilaan 19°C.
o ”UE 0,1” :
Ohjelmistoversio joka on käytössä.
o ” End” :
Näytössä teksti ”End”, paina OK poistuaksesi asen-
nusvalikosta ja palataksesi edelliseen tilaan.
Huomio :Liikkuessasi asennusvalikossa voit milloin
tahansa poistua ja palata aiempaan tilaan paina-
malla painiketta paluu .
20
FI
Sidan laddas...
Sidan laddas...
Sidan laddas...
Sidan laddas...
Sidan laddas...
Sidan laddas...
Sidan laddas...
Sidan laddas...
Sidan laddas...
Sidan laddas...
Sidan laddas...
Sidan laddas...
Sidan laddas...
Sidan laddas...
Sidan laddas...
Sidan laddas...
Sidan laddas...
Sidan laddas...
Sidan laddas...
Sidan laddas...
Sidan laddas...
Sidan laddas...
-
 1
1
-
 2
2
-
 3
3
-
 4
4
-
 5
5
-
 6
6
-
 7
7
-
 8
8
-
 9
9
-
 10
10
-
 11
11
-
 12
12
-
 13
13
-
 14
14
-
 15
15
-
 16
16
-
 17
17
-
 18
18
-
 19
19
-
 20
20
-
 21
21
-
 22
22
-
 23
23
-
 24
24
-
 25
25
-
 26
26
-
 27
27
-
 28
28
-
 29
29
-
 30
30
-
 31
31
-
 32
32
-
 33
33
-
 34
34
-
 35
35
-
 36
36
-
 37
37
-
 38
38
-
 39
39
-
 40
40
-
 41
41
-
 42
42