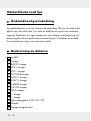
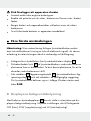
Auriol H14371 Operation and Safety Notes
- Kategori
- Väckarklockor
- Typ
- Operation and Safety Notes

WAKE-UP LIGHT ALARM CLOCK
IAN 91958
WAKE-UP LIGHT
AL ARM CLOCK
Operation and Safety Notes
VÄCKARKLOCKA
MED LJUS
Bruksanvisning och säkerhetsanvisningar
SARASTUSVAL O
Käyttö- ja turvallisuusohjeet
SVETLOBNA BUDILKA
Navodila za upravljanje in varnostna
opozorila

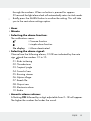
GB / IE Operation and Safety Notes Page 5
FI Käyttö- ja turvallisuusohjeet Sivu 20
SE Bruksanvisning och säkerhetsanvisningar Sidan 35
SI Navodila za upravljanje in varnostna opozorila Stran 50

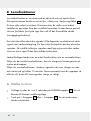
3
ALARM
RADIO
SNOOZE
TEST
CLOCK
OFF HI
LO
A
B
3
10
12
14
11
13
9
48
57
6
2
1

4
RESET
C
D
1
18
15
19
20
17
16

5 GB/IE
Intended use ........................................................................ Page 6
Parts description ..............................................................Page 6
Technical Data ....................................................................Page 7
Scope of delivery.............................................................Page 7
General Safety Instructions .................................... Page 8
Safety instructions for batteries..........................Page 9
Before using
Display backlight ........................................................................Page 10
Adjusting the time .......................................................................Page 11
Alarm functions
Setting the alarm ........................................................................Page 12
Switching off the alarm .............................................................. Page 14
Set radio
Station scan ................................................................................ Page 14
Save station ................................................................................ Page 15
Rapid Test ................................................................................... Page 16
Illumination .................................................................................Page 16
Mood light function ....................................................................Page 16
Battery operation ...........................................................Page 17
Change Batteries..............................................................Page 17
Cleaning and Care .......................................................... Page 17
Troubleshooting ...............................................................Page 18
Disposal ................................................................................... Page 18

6 GB/IE
Wake-up light alarm clock
Intended use
The light alarm clock shows the time, date and weekday. It features
visual and acoustic alarm functions, light and an electronic alarm signal
and radio reception. This product is not a lighting lamp and not suitable
for lighting purpose. Please use others lighting device for illumination
purpose. It is designed for use in private, dry, indoor areas.
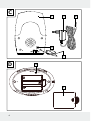
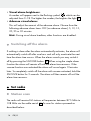
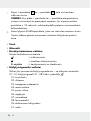
Parts description
1
Luminous field
2
Display
3
RADIO button
4
VOL+ button
5
VOL— button
6
SNOOZE button
7
LIGHT— button
8
LIGHT+ button
9
ALARM button
10
CLOCK button
11
TEST button
12
+ Button
13
— Button
14
Slider (OFF / LO / HI)
15
Mains adapter
16
Low voltage plug
17
Cable aerial

7 GB/IE
18
Low voltage jack
19
RESET button
20
Battery compartment cover
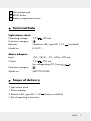
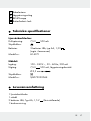
Technical Data
Light alarm clock:
Operating voltage: 7.5 V
, 500 mA
Protection category:
Batteries: 3 batteries LR6, type AA, 1.5 V (included)
Model no.: H14371
Mains adapter:
Input: 100 – 240 V
~
, 50 – 60 Hz, 300 mA
Output: 7.5 V
, 500 mA,
low voltage plug Ø 5.5 mm
Protection category:
Model no.: SJB0750500AE
Scope of delivery
1 Light alarm clock
1 Mains adapter
3 Batteries LR6, type AA, 1.5 V
(factory installed)
1 Set of operating instructions

8 GB/IE
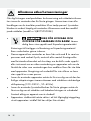
General Safety Instructions
Before using the product, please familiarise yourself with all of the safety
information and instructions for use! When passing this product on to
others, please also include all the documents! The light alarm clock is
only suited for use with the included mains adapter (model no.
SJB0750500AE).
DANGER TO LIFE AND RISK OF
ACCIDENTS FOR INFANTS AND CHILDREN!
Never leave children unattended with the packaging
material. The packaging material represents a danger of suffocation.
Children frequently underestimate the dangers.
This appliance can be used by children aged from 8 years and
above and persons with reduced physical, sensory or mental
capabilities or lack of experience and knowledge if they have been
given supervision or instruction concerning use of the appliance in a
safe way and understand the hazards involved. Children shall not
play with the appliance. Cleaning and user maintenance shall not
be made by children without supervision.
Before using the product, ensure that the available mains voltage
corresponds with the operating voltage required for the mains
supply (100–240 V∼, 50–60 Hz).
Before using the product, verify the light alarm clock and the mains
supply and the cable connection aren‘t damaged! Never operate a
damaged device!
The appliance must be plugged into an easily accessible socket so it
can easily be unplugged in the event of an emergency.
This product does not contain any parts that can be serviced by the
user. The LEDs cannot be exchanged.

9 GB/IE
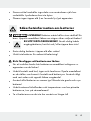
No naked flame sources, such as lighted candles, should be placed
on the apparatus.
Safety instructions for batteries
DANGER TO LIFE! Batteries are not intended for
children. If accidentally swallowed seek immediate medical attention!
CAUTION! EXPLOSION HAZARD! Never recharge
non-rechargeable batteries, short-circuit and / or open
batteries!
Never throw batteries into fire or water!
Do not exert mechanical loads to batteries!
Risk of battery leakage
In the event of a battery leak, immediately remove it from the device
to prevent damage!
Avoid contact with the skin, eyes and mucous membranes! In the
event of contact with battery acid, thoroughly flush the affected area
with plenty of clean water and seek immediate medical attention!
Only use the same type of batteries! Do not mix used and new
batteries!
Avoid extreme conditions and temperatures which may impact
batteries, e.g. radiators!
Remove the batteries from the device if they have not been used for
a long period!
Risk of equipment damage
Only use the specified battery type!

10 GB/IE
When inserting the battery ensure the correct polarity! This is shown
in the battery compartment!
If necessary, clean the battery and device contacts before inserting
the battery!
Promptly remove drained batteries from the product!
Before using
Note: unplugged from the mains the light alarm clock only has two
emergency functions (clock and electronic alarm signal). An electric
connection is therefore required prior to use.
First remove the protective film from the display
2
of the light alarm
clock.
A plastic strip protrudes from the battery compartment cover
20
on
the bottom of the light alarm clock. Remove this plastic strip to utilise
the inserted batteries.
Plug the low voltage plug
16
of the mains adapter
15
into the low
voltage jack
18
on the light alarm clock and plug the mains
adapter into an easily accessible outlet.
Your light alarm clock is now in clock mode. The clock starts at 0:00.
Display backlight
The slider
14
allows you to adjust the backlight of the display. Choose
from the settings OFF, LOW and HI.

11 GB/IE
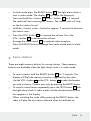
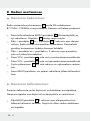
Adjusting the time
In clock mode press and hold the CLOCK button
10
for approx.
3 seconds to access settings mode.
Press the + button
12
or the — button
13
to change the respective
flashing value.
TIP: Holding the + or — button will fast scan forward or backward
through the numbers. When no button is pressed for approx.
30 seconds the light alarm clock will automatically return to clock
mode.
Briefly press the CLOCK button to confirm the setting. This will take
you to the next clock settings option.
This will allow you to successively adjust the following:
• Year
• Month
• Day
• Hour
• Minute
• 24h or 12h display:
In 12h mode, the acronym PM – for post meridiem (lat. for afternoon)
- will also appear next to times between 12 and 23:59.
• Weekday language:
These acronyms indicate the following languages: GE for German,
EN for English, FR for French, DU for Dutch, SP for Spanish, IT for Italian.
Set the desired language by pressing the CLOCK button. The light
alarm clock will then return to clock mode.

12 GB/IE
Alarm functions
The light alarm clock features an acoustic and a visual alarm.
The visual alarm is a white light appearing in the light field
1
. The
brightness is adjustable. You may further set a lead time.
The lead time is the time from the alarm time setting during which the
brightness of the light field will gradually increase from zero to the set
value (sunrise simulation).
Choose from eight different soundscapes, an electronic alarm sound or
radio reception as the acoustic alarm. The volume of the acoustic signal
can be selected. The signal starts at the set alarm time at a low volume
and adjusts to the set value within a few minutes.
The alarm features an alternate simple alarm function and snooze function.
When selecting the simple alarm function, shut off the alarm with a
simple button of a button.
When selecting the snooze function the signal will turn off and sound
again 10 minutes later. This process can be repeated any number of
times until the alarm finally shuts off.
Setting the alarm
Press and hold the ALARM button
9
for 3 seconds in clock mode
to access the alarm settings.
Press the + button
12
or the — button
13
to change the respective
flashing value.
TIP: Holding the + or — button will fast scan forward or backward

13 GB/IE
through the numbers. When no button is pressed for approx.
30 seconds the light alarm clock will automatically return to clock mode.
Briefly press the ALARM button to confirm the setting. This will take
you to the next alarm settings option.
• Hour
• Minute
• Selecting the alarm function:
The notifications mean:
= Snooze function
= simple alarm function
No display = Alarm deactivated.
• Selecting the alarm signal:
Choose from the following alarms, 01-08 are indicated by the note
sign
and the numbers 01 to 10:
01: Birds twittering
02: Thunderstorm
03: Tropical jungle
04: Sound of sea
05: Running stream
06: Alpine village
07: Beach life
08: Ship at sea
09: Electronic alarm
10: Radio
• Acoustic alarm volume:
A flashing VO followed by a digit adjustable from 0–18 will appear.
The higher the number the louder the sound.

14 GB/IE
• Visual alarm brightness:
A number will appear next to the flashing symbol
, which can be
adjusted from 0–18. The higher the number, the brighter the light
1
.
• Advance visual alarm:
This will adjust the amount of the advance alarm. Choose from the
following advance alarm times: OFF (no advance alarm), 5, 10, 15,
20, 25 or 30 minutes.
Hint: During visual alarm leadtime, other functions are disabled.
Switching off the alarm
If nothing is done after the alarm automatically activates, the alarm will
automatically switch off after one hour and will only reactivate the next
time the alarm time occurs. When the alarm sounds you may switch it
off by pressing the SNOOZE button
6
. When using the simple alarm
function the alarm will remain off until the alarm time reoccurs. If the
snooze function was activated the alarm will sound again 10 minutes
later. To completely switch off the alarm with snooze activated, hold the
SNOOZE button for 3 seconds. The alarm will then remain off until the
alarm time reoccurs.
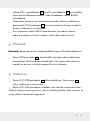
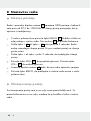
Set radio
Station scan
The radio will receive FM stations at frequencies between 87.5 MHz to
108 MHz via the cable aerial
17
. To scan for stations proceed as
described below:

15 GB/IE
In clock mode press the RADIO button
3
. The light alarm clock is
now in radio mode. The display
2
will show the frequency.
Press and hold the + button
12
or the — button
13
for 3 seconds.
The radio will start scanning for stations. The station scan will stop
on the first station found.
Hold the + button or the — button for approx. 3 seconds to continue
the station scan.
Press the VOL+ button
4
to increase the volume. Press the
VOL— -button
5
to decrease the volume.
Arrange the cable aerial
17
for optimal radio reception.
Press the RADIO button to change from radio mode back to clock
mode.
Save station
There are eight memory buttons for saving stations. These memory
buttons are available when the light alarm clock is in radio mode.
To save a station hold the RADIO button
3
for 3 seconds. The
display will flash the memory location suggested by the radio.
Use the VOL + button
4
or the VOL - button
5
to select the location
you wish to save to. Confirm your entry by pressing the RADIO button.
To recall a saved station repeatedly press the TEST button
11
with
the light alarm clock in radio mode until the desired memory loca-
tion appears in the display.
When switching the radio off by pressing the RADIO button, the
radio will play the last station selected when turned back on.

16 GB/IE
Rapid Test
Note: The light alarm clock must be in clock mode for the rapid test.
Press the TEST button
11
. The alarm will cycle through the settings
of the selected alarm. The advance alarm will not be run. Instead,
the light will be adjusted to the set value, then the alarm will sound.
Illumination
Press the SNOOZE button
6
in clock mode. A white guide light
will appear in the light field
1
.
Press the SNOOZE button again to switch off the light.
The visual alarm will also work when the light is on. The light will then
be deactivated and will reappear after the alarm.
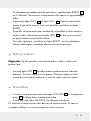
Mood light function
The mood light function will activate a weak, coloured light in the light
field
1
.
Repeatedly press the LIGHT+ button
8
to activate the mood light
and to increase the following colour scale, or decrease mood light
and switch off by pressing the LIGHT– button
7
:
Mood light starts from: → Red → Green → Blue → Yellow → Pink →
Sky blue → Purple → Automatic colour change
Activating the mood light does not impact the functionality of the visual
alarm. The mood light will then be deactivated and reactivated after the
alarm.

17 GB/IE
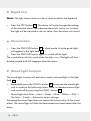
Battery operation
The inserted batteries are only to backup the clock display and alarm
function. In the event of a power failure the light alarm clock will auto-
matically switch to battery mode. The clock will continue running in battery
mode. To save energy, only the electronic alarm will sound. All light functions
and the radio are non-operational. Once power returns via the low voltage
jack
18
, all functions of the light alarm clock will be available again.
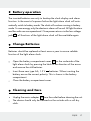
Change Batteries
Batteries should be replaced at least once a year to ensure reliable
function of the light alarm clock.
Open the battery compartment cover
20
on the underside of the
light alarm clock by pressing the latch in the direction of the arrow
and remove the old batteries.
Insert three new type AA, 1.5 V batteries. When inserting the
battery ensure the correct polarity. This is shown in the battery
compartment.
Close the battery compartment cover.
Cleaning and Care
Unplug the mains adapter
15
from the outlet before cleaning the unit.
The device should only be cleaned on the outside with a soft dry
cloth.

18 GB/IE
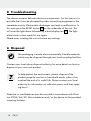
Troubleshooting
The device contains delicate electronic components. For this reason it is
possible that it can be disrupted by radio transmitting equipment in the
immediate vicinity. Electrostatic discharges can lead to malfunctions. In
this case press the RESET button
19
on the underside of the unit. This
will reset the light alarm followed by a brief display test
2
. The light
alarm clock is then ready for use again.
Please note, resetting the unit will erase any settings.
Disposal
The packaging is made of environmentally friendly materials,
which may be disposed through your local recycling facilities.
Contact your local refuse disposal authority for more details on how to
dispose of your worn-out product.
To help protect the environment, please dispose of the
product properly, and not in household waste, when it has
reached the end of its useful life. Please contact your local
authority for information on collection points and their open-
ing hours.
Defective or used batteries must be recycled in accordance with Direc-
tive 2006 / 66 / EC. Return batteries and / or the device to the provided
recycling facilities.

19 GB/IE
Pb Hg
Improper disposal of batteries can harm the
environment!
Never dispose of batteries in your household waste. They may contain
toxic heavy metals and are subject to hazardous waste regulations. The
chemical symbols of the heavy metals are: Cd = cadmium, Hg = mer-
cury, Pb = lead. Therefore dispose of used batteries through your munici-
pal collection site.
EMC

20 FI
Määräystenmukainen käyttö ............................... Sivu 21
Osien kuvaus ....................................................................... Sivu 21
Tekniset tiedot ..................................................................... Sivu 22
Toimituksen sisältö .......................................................... Sivu 22
Yleiset turvallisuusohjeet .......................................... Sivu 23
Paristoja koskevat turvallisuusohjeet............ Sivu 24
Toimenpiteet ennen käyttöönottoa
Näytön taustavalo ...................................................................... Sivu 25
Kellonajan asettaminen .............................................................. Sivu 25
Hälytystoiminnot
Hälytyksen asettaminen .............................................................. Sivu 27
Hälytyksen poiskytkentä ............................................................. Sivu 29
Radion asettaminen
Kanavien hakeminen .................................................................. Sivu 30
Kanavien tallentaminen .............................................................. Sivu 30
Pikatesti ........................................................................................ Sivu 31
Valaistus ....................................................................................... Sivu 31
Tunnelmavalaistus ....................................................................... Sivu 32
Paristokäyttö ....................................................................... Sivu 32
Paristojen vaihto ............................................................... Sivu 32
Puhdistus ja hoito ............................................................. Sivu 33
Virheiden korjaaminen ............................................... Sivu 33
Hävittäminen ....................................................................... Sivu 33
Sidan laddas...
Sidan laddas...
Sidan laddas...
Sidan laddas...
Sidan laddas...
Sidan laddas...
Sidan laddas...
Sidan laddas...
Sidan laddas...
Sidan laddas...
Sidan laddas...
Sidan laddas...
Sidan laddas...
Sidan laddas...
Sidan laddas...
Sidan laddas...
Sidan laddas...
Sidan laddas...
Sidan laddas...
Sidan laddas...
Sidan laddas...
Sidan laddas...
Sidan laddas...
Sidan laddas...
Sidan laddas...
Sidan laddas...
Sidan laddas...
Sidan laddas...
Sidan laddas...
Sidan laddas...
Sidan laddas...
Sidan laddas...
Sidan laddas...
Sidan laddas...
Sidan laddas...
Sidan laddas...
Sidan laddas...
Sidan laddas...
Sidan laddas...
Sidan laddas...
Sidan laddas...
Sidan laddas...
Sidan laddas...
Sidan laddas...
Sidan laddas...
Sidan laddas...
Sidan laddas...
-
 1
1
-
 2
2
-
 3
3
-
 4
4
-
 5
5
-
 6
6
-
 7
7
-
 8
8
-
 9
9
-
 10
10
-
 11
11
-
 12
12
-
 13
13
-
 14
14
-
 15
15
-
 16
16
-
 17
17
-
 18
18
-
 19
19
-
 20
20
-
 21
21
-
 22
22
-
 23
23
-
 24
24
-
 25
25
-
 26
26
-
 27
27
-
 28
28
-
 29
29
-
 30
30
-
 31
31
-
 32
32
-
 33
33
-
 34
34
-
 35
35
-
 36
36
-
 37
37
-
 38
38
-
 39
39
-
 40
40
-
 41
41
-
 42
42
-
 43
43
-
 44
44
-
 45
45
-
 46
46
-
 47
47
-
 48
48
-
 49
49
-
 50
50
-
 51
51
-
 52
52
-
 53
53
-
 54
54
-
 55
55
-
 56
56
-
 57
57
-
 58
58
-
 59
59
-
 60
60
-
 61
61
-
 62
62
-
 63
63
-
 64
64
-
 65
65
-
 66
66
-
 67
67


Auriol H14371 Operation and Safety Notes
- Kategori
- Väckarklockor
- Typ
- Operation and Safety Notes
på andra språk
- eesti: Auriol H14371
- English: Auriol H14371
Relaterade papper
Andra dokument
-
Silvercrest KH 2029 Operating Instructions Manual
-
Medisana WAKE-UP LIGHT SAC Bruksanvisning
-
-
-
LIVARNO 290164 Bruksanvisning
-
-
-
-