Auriol 291528 Operation and Safety Notes
- Typ
- Operation and Safety Notes

TEMPERATURE STATION
TEMPERATURSTATION
Bedienungs- und Sicherheitshinweise
VÄDERST ATION
Bruksanvisning och säkerhetsanvisningar
SÄÄASEMA
Käyttö- ja turvallisuusohjeet
TEMPERATURE ST ATION
Operation and Safety Notes
ST ACJA METEO
Wskazówki dotyczące obsługi i bezpieczeństwa
TEMPERATŪROS MATAVIMO STOTELĖ
Nurodymai dėl valdymo ir saugumo
IAN 291528

GB Operation and
Safety Notes Page 5
FI Käyttö- ja turvallisuusohjeet Sivu 27
SE Bruksanvisning och
säkerhetsanvisningar Sidan 48
PL Wskazówki dotyczące
obsługi i bezpieczeństwa Strona 69
LT Nurodymai dėl valdymo
ir saugumo Puslapis 94
DE / AT / CH Bedienungs- und
Sicherheitshinweise Seite 117

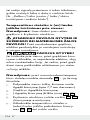
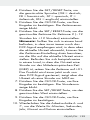
25
B
28 27
222119 20 23 24
26
A
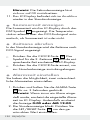
5
4
6
7
2
9
15
16
17
18
1 3
8
11121314 10

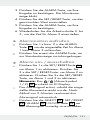
D
30
C
29
31
33 32

5 GB
Introduction .....................................................Page 6
Proper use ..........................................................Page 6
Description of parts and features ......................Page 6
Technical data ....................................................Page 8
Scope of delivery ...............................................Page 9
Safety ..................................................................Page 9
General safety information................................Page 9
Safety instructions for batteries /
rechargeable batteries ......................................Page 10
Before initial use ..........................................Page 12
General information ..........................................Page 12
Preparing to use the outdoor sensor .................Page 13
Preparing the temperature station for use ........Page 13
Setting the language / time zone /
time / date manually ..........................................Page 16
Displaying summer time .....................................Page 17
Calling up the time zone ...................................Page 17
Setting the alarm time ........................................Page 18
Calling up the alarm times ................................Page 18
Switching the alarm on / off ..............................Page 19
Using the snooze button ....................................Page 19
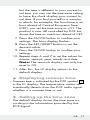
Displaying temperature .....................................Page 20
Calling up the minimum / maximum values ......Page 20
Displaying temperature trends ..........................Page 21
Battery state display ..........................................Page 21
Replacing the batteries ......................................Page 21
Troubleshooting ...........................................Page 22
Cleaning and maintenance ...................Page 23
Disposal .............................................................Page 23
Simplified EU declaration
of conformity ..................................................Page 25
Warranty ..........................................................Page 25

6 GB
Temperature station
Introduction
We congratulate you on the purchase of your
new product. You have chosen a high quality
product. The instructions for use are part of the
product. They contain important information
concerning safety, use and disposal. Before
using the product, please familiarise yourself
with all of the safety information and instruc-
tions for use. Only use the product as described
and for the specified applications. If you pass
the product on to anyone else, please ensure
that you also pass on all the documentation
with it.
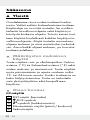
Proper use
The product displays the indoor and outdoor
temperatures in degrees Celsius (°C) or de-
grees Fahrenheit (°F) and their maximum and
minimum values. The product also displays
the time in 12 / 24-hour clock modes and the
date. In addition, the product has two alarm
functions. The product is only suitable for use
in private households and is not intended for
commercial use.
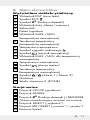
Description of parts
and features
LC display
1
DST summer time symbol
2
DCF symbol

7 GB
3
Z
Z
snooze function symbol
4
Date / month
5
Second
6
Day of the week display
7
MAX / MIN display (outdoor temperature)
8
Temperature trend (outdoor)
9
Outdoor temperature
10
Radio signal symbol
11
Low battery symbol (outdoor sensor)
12
MAX / MIN display (indoor temperature)
13
Indoor temperature
14
Low battery symbol (temperature
station)
15
Temperature trend (indoor)
16
/ Alarm 1 / 2 symbol
17
Hour / minute
18
ZONE time zone 2 symbol
Temperature station
19
CLOCK button
20
ALARM button
21
Z
Z
(snooze function) / REGISTER button
22
Hanging slot
23
SELECT button
24
SET / RESET button
25
Battery compartment
26
Stand
27
Screw (ø 3 mm)
28
Dowel (ø 7.7 mm)
Outdoor sensor
29
Control LED
30
Hanging slot

8 GB
31
Battery compartment
32
Screw (ø 3 mm)
33
Dowel (ø 7.7 mm)
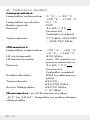
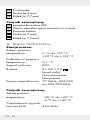
Technical data
Temperature station:
Temperature
measurement range: 0 °C to + 50 °C
+32 °F to +122 °F
Temperature interval: 0.1 °C
Radio signal: DCF
Batteries: 2 x AA 1.5 V
(direct current)
(pre-installed)
Frequency band: 77.5 kHz, 433.050
to 434.790 MHz
Outdoor sensor:
Temperature
measurement range: –20 °C to +60 °C
–4 °F to +140 °F
HF transmission signal: 433 MHz
HF transmission range: max. 30 metres
(in open area)
Batteries: 2 x AA 1.5 V
(direct current)
(pre-installed)
Degree of protection: IPX4 (splash-proof)
Frequency band: 433.05 to
434.790 MHz
Max. Transmitted
power: 433.92 MHz,
<10 dBm

9 GB
Note: If the LC display shows “LL.L” or
“HH.H”, that indicate the temperature is out
of measuring range.
Scope of delivery
1 Temperature station
1 Outdoor sensor
4 Batteries AA, 1.5 V (pre-installed)
2 Screws (ø 3 mm)
2 Dowels (ø 7.7 mm)
1 Instructions for use
Safety
YOU SHOULD STORE ALL SAFETY INFOR-
MATION AND INSTRUCTIONS IN A SAFE
PLACE IN CASE YOU NEED TO REFER TO
THEM AGAIN IN THE FUTURE!
General safety
information
This product can be used by children
aged from 8 years and above and per-
sons with reduced physical, sensory or
mental capabilities or lack of experience
and knowledge if they have been given
supervision or instruction concerning use
of the product in a safe way and under-
stand the hazards involved. Children shall
not play with the product. Cleaning and

10 GB
user maintenance shall not be made by
children without supervision.
Do not expose the product to an extremely
high electromagnetic field. This may impair
the correct functioning of the product.
Please note that the guarantee does not
cover damage caused by incorrect han-
dling, non-compliance with the operating
instructions or interference with the product
by unauthorised individuals.
Safety instructions
for batteries /
rechargeable batteries
DANGER TO LIFE! Keep batteries /
rechargeable batteries out of reach of
children. If accidentally swallowed seek
immediate medical attention.
DANGER OF EXPLOSION!
Never recharge non-recharge-
able batteries. Do not short-circu
it
batteries / rechargeable batteries and /
or open them. Overheating, fire or bursting
can be the result.
Never throw batteries / rechargeable
batteries into fire or water.
Do not exert mechanical loads to batter-
ies / rechargeable batteries.

11 GB
Risk of leakage of batteries /
rechargeable batteries
Avoid extreme environmental conditions
and temperatures, which could affect
batteries / rechargeable batteries, e.g.
radiators / direct sunlight.
Avoid contact with the skin, eyes and mu-
cous membranes. In the event of contact
with battery acid, thoroughly flush the
affected area with plenty of clean water
and seek immediate medical attention.
WEAR PROTECTIVE
GLOVES! Leaked or dam-
aged batteries / rechargeable
batteries can cause burns on contact with
the skin. Wear suitable protective gloves
at all times if such an event occurs.
In the event of a battery leak, immediately
remove it from the product to prevent
damage.
Only use the same type of batteries /
rechargeable batteries. Do not mix used
and new batteries / rechargeable batteries.
Remove the batteries / rechargeable bat-
teries if the product will not be used for a
longer period.
Risk of damage of the product
Only use the specified type of battery /
rechargeable battery!
When inserting ensure the correct polarity!
This is shown inside the battery compart-
ment!

12 GB
Clean the contacts on the battery and in
the battery compartment before inserting!
Remove exhausted batteries / rechargea-
ble batteries from the product immediately.
Before initial use
Activate the batteries first inside the
outdoor sensor, then inside the tem-
perature station.
Note: Remove all packaging materials from
the product.
Note: Before initial use, remove the protective
film from the LC display.
General information
CAUTION! When choosing where to
position the product, make sure it is not exposed
to direct sunlight, vibrations, dust, heat, cold
or moisture. Do not place the product near to
heat sources, e.g. radiators, as this may result
in damage to the products.
Please ensure that neighbouring devices
are not operated at the same frequency
of 433 MHz. Such devices may cause
interference to the radio connection.
Do not place the product next to or on
metal plates. Otherwise the quality of ra-
dio wave transmission may be reduced.
Radio signal (DCF):
The DCF-Signal (time signal transmitter) is
made up of time pulses transmitted from one

13 GB
of the highest precision clocks in the world
close to Frankfurt / Main in Germany – it
varies by 1 second in 1million years.
In ideal conditions, your temperature station
can pick up this signal over a distance of up
to approx. 1,500 km around Frankfurt / Main.
Preparing to use
the outdoor sensor
Remove the battery compartment cover
from the back of the outdoor sensor.
Remove the battery safety strip.
The outdoor sensor is now ready for use
and the control LED
29
illuminates briefly.
Close the battery compartment cover.
Preparing the temperature
station for use
Remove the battery compartment cover
from the back of the temperature station.
Remove the battery safety strip and tem-
perature station will sound ‘’beep’’.
Close the battery compartment cover.
Connecting the temperature station
with the outdoor sensor and the DCF
radio signal:
After removal of the battery safety strip, the
temperature station attempts to establish a con-
nection with the outdoor sensor. This process
can take a few minutes. The
Radio signal
symbol
10
flashes. Once the temperature sta-
tion has successfully connected to the outdoor

14 GB
sensor, the Radio signal symbol
10
stops
flashing and the temperature is shown in the
LC display.
Note: If the temperature station does not
receive the signal from the outdoor sensor w
ithin
3 minutes, the temperature station automatical
ly
starts with the reception of the radio time signal.
After successful reception of the outdoor sen-
sor signal or after 3 minutes, the temperature
station starts with the reception of the radio t
ime
signal. This process can take up to 5 minutes
and is indicated in the LC display by the flash-
ing
DCF symbol
2
.
After successful reception of the DCF radio
signal, the
DCF symbol
2
is displayed
continuously in the LC display.
Note: Do not move the temperature station
while it is receiving the signal. Otherwise this
could interfere with reception. If synchronisation
is not possible when the temperature station
is being first set up, try changing the location
(e.g. place the temperature station near to a
window).
Reception may be considerably reduced by
obstructions (e.g. concrete walls) or sources
of interference (e.g. other electrical devices).
If the reception of the radio signal continues
to be interrupted, you can set the time and
date manually (see “Setting the language /
time zone / time / date manually”).

15 GB
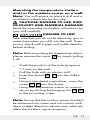
Mounting the temperature station
and / or the outdoor sensor on a wall:
Note: You will require an electric drill and a
crosshead screwdriver for this step.
CAUTION! DANGER TO LIFE, RISK
OF INJURY AND MATERIAL DAMAGE!
Read the operating and safety instructions for
your drill carefully.
DANGER TO LIFE!
Take care that you do not hit electricity, gas or
water lines when you drill into the wall. If nec-
essary, check with a pipe and cable detector
before drilling.
Note: Before mounting the temperature statio
n,
please remove the stand
26
by simply pulling
it off.
Mark the position of the hole (ø approx.
7.7 mm) on the wall.
Drill the hole with an electric drill.
Insert the dowel
28
,
33
into the drilled
hole.
Using a crosshead screwdriver, screw the
screw
27
,
32
into the dowel.
Hang the temperature station or outdoor
sensor by placing the hanging slot
22
,
30
to the according screw.
Note: Ensure that the outdoor sensor shouldn’t
be immersed into water and not contact with
direct sunlight. Electronic devices may adversely
affect the wireless signal reception.

16 GB
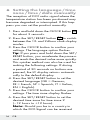
Setting the language / time
zone / time / date manually
The reception of DCF radio signal where the
temperature station has been positioned may
become degraded or interrupted. If this hap-
pens you can set the product manually.
1. Press and hold down the CLOCK button
19
for about 3 seconds.
2. Press the SET / RESET button
24
to switch
between the 12- and 24-hour clock display
modes.
3. Press the CLOCK button to confirm your
settings. The language option flashes.
Tip: If you press and hold down the SET /
RESET button, you accelerate the process
and reach the desired value more quickly.
This quicker method can also be used for
making the following settings. If during
a period of 30seconds no buttons are
pressed, the LC display returns automati-
cally to the default display.
4. Press the SET / RESET button to set the
desired language (GE = German,
FR = French, SP = Spanish, IT = Italian,
EN = English).
5. Press the CLOCK button to confirm your
settings. The time zone display flashes.
6. Press the SET / RESET button to set the
desired time zone for time zone 2
(–12 hours to +12hours).
Note: Should you be in a country in
which the DCF-Signal can be received

17 GB
but the time is different to your current lo-
cal time, you can use the time zone setting
to have the clock display your current lo-
cal time. If you find yourself in a country
in which, for example, the local time is an
hour ahead of Central European Time
(CET), you set the time zone to +01. The
product is now still controlled by DCF but
shows the time as one hour ahead of CET.
7. Press the CLOCK button to confirm your
settings. The hour display flashes.
8. Press the SET / RESET button to set the
desired value.
9. Press the CLOCK button to confirm your
settings.
10. Repeat steps 6 and 7 to set the values for
minute, second, year, month and date.
Note: The seconds display can only be
reset to 00.
11. After this, the LC display returns to the
default display.
Displaying summer time
Summer time is indicated by the DST symbol
1
in
the LC display. The temperature station
au-
tomatically detects from the DCF radio signal
whether it is summer time or not.
Calling up the time zone
The default display shows the time zone ac-
cording to the information provided by the
DCF-Signal.

18 GB
Press the CLOCK button
19
. The time
zone 2 symbol
18
and the according
time appear in the LC display.
Press the CLOCK button again to return to
the default display.
Setting the alarm time
You can set two different alarm times.
1. Press and hold down the ALARM button
20
for about 3 seconds.
Note: If an alarm time has been set be-
fore, then that previously set alarm time
appears in the LC display. If not, then the
display shows 0:00 or AM 12:00.
2. The hour display flashes. Press the SET /
RESET button
24
to set the desired value.
3. Press the ALARM button to confirm your
settings. The minute display flashes.
4. Press the SET / RESET button to set the
desired value.
5. Press the ALARM button to confirm your
settings.
6. Repeat steps 2 to 5 to set the time for
Alarm 2.
Calling up the alarm times
Press ALARM button
20
once or twice to
call up the set time for Alarm 1 or Alarm
2 respectively.
Press the ALARM button again to return
to the default display.

19 GB
Switching the alarm on / off
Press the SET / RESET button
24
once to
activate Alarm 1. Press the SET / RESET
button twice to activate Alarm 2. Press the
SET / RESET button three times to activate
Alarm1 and Alarm 2.
Note: The
/ Alarm 1 / 2 symbol
16
appears in the LC display.
The alarm signal sounds as soon as the set
alarm time is reached. The alarm signal
ceases automatically after a period of
2minutes.
Press the SELECT
23
/ SET / RESET
24
/
ALARM
20
/ CLOCK button
19
to switch
off the alarm signal before it switches off
automatically.
Note: The alarm signal sounds every
day at the set time.
Press the SET / RESET button three times
to deactivate Alarm 1. Press the SET /
RESET button twice to deactivate Alarm
2. Press the SET / RESET button once to
deactivate Alarm 1 and Alarm 2.
Using the snooze button
Press the Z
Z
/ REGISTER button
21
while
the alarm signal is sounding to activate
the snooze function.
The alarm signal is silenced and the
/ Alarm 1 / 2 symbol
16
flash with
the Z
Z
snooze function symbol
3
.
The alarm signal sounds again after
approx. 5 minutes.

20 GB
Press the SELECT button
23
to deactivate
the snooze function.
Displaying temperature
The LC display shows the indoor temperature
13
and the outdoor temperature
9
.
Press and hold down the SELECT button
23
for approx. 3 seconds. The °C display
flashes.
Press the SET / RESET button
24
to switch
between the °C (Celsius) and °F (Fahr-
enheit) temperature scales.
Press the SELECT button to confirm your
settings.
Calling up the minimum /
maximum values
The temperature station stores the maximum
and minimum values of the outdoor sensor
and of the temperature station itself.
Press the SELECT button
23
to display the
maximum values of the indoor and out
door
temperature.
Press the SELECT button again to display
the minimum values of the indoor and
outdoor temperature.
Press the SET / RESET button
24
while the
maximum and minimum values, are being
displayed to reset the values.
Press the SELECT button, to return to the
default display.
Sidan laddas...
Sidan laddas...
Sidan laddas...
Sidan laddas...
Sidan laddas...
Sidan laddas...
Sidan laddas...
Sidan laddas...
Sidan laddas...
Sidan laddas...
Sidan laddas...
Sidan laddas...
Sidan laddas...
Sidan laddas...
Sidan laddas...
Sidan laddas...
Sidan laddas...
Sidan laddas...
Sidan laddas...
Sidan laddas...
Sidan laddas...
Sidan laddas...
Sidan laddas...
Sidan laddas...
Sidan laddas...
Sidan laddas...
Sidan laddas...
Sidan laddas...
Sidan laddas...
Sidan laddas...
Sidan laddas...
Sidan laddas...
Sidan laddas...
Sidan laddas...
Sidan laddas...
Sidan laddas...
Sidan laddas...
Sidan laddas...
Sidan laddas...
Sidan laddas...
Sidan laddas...
Sidan laddas...
Sidan laddas...
Sidan laddas...
Sidan laddas...
Sidan laddas...
Sidan laddas...
Sidan laddas...
Sidan laddas...
Sidan laddas...
Sidan laddas...
Sidan laddas...
Sidan laddas...
Sidan laddas...
Sidan laddas...
Sidan laddas...
Sidan laddas...
Sidan laddas...
Sidan laddas...
Sidan laddas...
Sidan laddas...
Sidan laddas...
Sidan laddas...
Sidan laddas...
Sidan laddas...
Sidan laddas...
Sidan laddas...
Sidan laddas...
Sidan laddas...
Sidan laddas...
Sidan laddas...
Sidan laddas...
Sidan laddas...
Sidan laddas...
Sidan laddas...
Sidan laddas...
Sidan laddas...
Sidan laddas...
Sidan laddas...
Sidan laddas...
Sidan laddas...
Sidan laddas...
Sidan laddas...
Sidan laddas...
Sidan laddas...
Sidan laddas...
Sidan laddas...
Sidan laddas...
Sidan laddas...
Sidan laddas...
Sidan laddas...
Sidan laddas...
Sidan laddas...
Sidan laddas...
Sidan laddas...
Sidan laddas...
Sidan laddas...
Sidan laddas...
Sidan laddas...
Sidan laddas...
Sidan laddas...
Sidan laddas...
Sidan laddas...
Sidan laddas...
Sidan laddas...
Sidan laddas...
Sidan laddas...
Sidan laddas...
Sidan laddas...
Sidan laddas...
Sidan laddas...
Sidan laddas...
Sidan laddas...
Sidan laddas...
Sidan laddas...
Sidan laddas...
Sidan laddas...
Sidan laddas...
Sidan laddas...
Sidan laddas...
-
 1
1
-
 2
2
-
 3
3
-
 4
4
-
 5
5
-
 6
6
-
 7
7
-
 8
8
-
 9
9
-
 10
10
-
 11
11
-
 12
12
-
 13
13
-
 14
14
-
 15
15
-
 16
16
-
 17
17
-
 18
18
-
 19
19
-
 20
20
-
 21
21
-
 22
22
-
 23
23
-
 24
24
-
 25
25
-
 26
26
-
 27
27
-
 28
28
-
 29
29
-
 30
30
-
 31
31
-
 32
32
-
 33
33
-
 34
34
-
 35
35
-
 36
36
-
 37
37
-
 38
38
-
 39
39
-
 40
40
-
 41
41
-
 42
42
-
 43
43
-
 44
44
-
 45
45
-
 46
46
-
 47
47
-
 48
48
-
 49
49
-
 50
50
-
 51
51
-
 52
52
-
 53
53
-
 54
54
-
 55
55
-
 56
56
-
 57
57
-
 58
58
-
 59
59
-
 60
60
-
 61
61
-
 62
62
-
 63
63
-
 64
64
-
 65
65
-
 66
66
-
 67
67
-
 68
68
-
 69
69
-
 70
70
-
 71
71
-
 72
72
-
 73
73
-
 74
74
-
 75
75
-
 76
76
-
 77
77
-
 78
78
-
 79
79
-
 80
80
-
 81
81
-
 82
82
-
 83
83
-
 84
84
-
 85
85
-
 86
86
-
 87
87
-
 88
88
-
 89
89
-
 90
90
-
 91
91
-
 92
92
-
 93
93
-
 94
94
-
 95
95
-
 96
96
-
 97
97
-
 98
98
-
 99
99
-
 100
100
-
 101
101
-
 102
102
-
 103
103
-
 104
104
-
 105
105
-
 106
106
-
 107
107
-
 108
108
-
 109
109
-
 110
110
-
 111
111
-
 112
112
-
 113
113
-
 114
114
-
 115
115
-
 116
116
-
 117
117
-
 118
118
-
 119
119
-
 120
120
-
 121
121
-
 122
122
-
 123
123
-
 124
124
-
 125
125
-
 126
126
-
 127
127
-
 128
128
-
 129
129
-
 130
130
-
 131
131
-
 132
132
-
 133
133
-
 134
134
-
 135
135
-
 136
136
-
 137
137
-
 138
138
-
 139
139
-
 140
140


Auriol 291528 Operation and Safety Notes
- Typ
- Operation and Safety Notes
på andra språk
- Deutsch: Auriol 291528
- polski: Auriol 291528
- English: Auriol 291528
- suomi: Auriol 291528
Relaterade papper
-
Auriol 270302 Operation and Safety Notes
-
Auriol Z29962A Bruksanvisning
-
-
-
-
Auriol Z29962C - IAN 70340 Bruksanvisning
-
-
-
-
Andra dokument
-
LIVARNO 366214 Bruksanvisning
-
-
-
Silvercrest 297635 Operation and Safety Notes
-
-
Silvercrest SPWS 180 E1 Operation and Safety Notes
-
Sony ICF-SW07 Bruksanvisning
-
-