
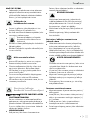
LIGHT STRIP WITH SENSOR
IAN 290164
ANTURIVALONAUHA
Asennus-, käyttö- ja turvallisuusohjeet
LIGHT STRIP WITH SENSOR
Assembly, operating and safety instructions
SENSOR-LICHTBAND
Montage-, Bedienungs- und Sicherheitshinweise
SENSORSTYRT LJUSBAND
Monterings-, bruks- och säkerhetsanvisningar
TAŚMA ŚWIETLNA Z CZUJNIKIEM
Wskazówki montażu, obsługi i bezpieczeństwa

GB Assembly, operating and safety instructions Page 5
FI Asennus-, käyttö- ja turvallisuusohjeet Sivu 15
SE Monterings-, bruks- och säkerhetsanvisningar Sidan 25
PL Wskazówki montażu, obsługi i bezpieczeństwa Strona 35
DE / AT / CH Montage-, Bedienungs- und Sicherheitshinweise Seite 45
Before reading, unfold both pages containing illustrations and familiarise yourself with all functions of the
device.
Käännä ennen lukemista molemmat kuvalliset sivut esiin ja tutustu seuraavaksi laitteen kaikkiin toimintoihin.
Vik ut båda bildsidorna och ha den till hands när du läser igenom anvisningarna och gör dig bekant med
apparatens / maskinens funktioner.
Przed przeczytaniem proszę rozłożyć obie strony z ilustracjami, a następnie proszę zapoznać się z
wszystkimi funkcjami urządzenia.
Klappen Sie vor dem Lesen die beiden Seiten mit den Abbildungen aus und machen Sie sich anschließend mit
allen Funktionen des Gerätes vertraut.

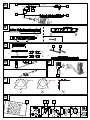
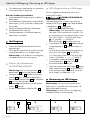
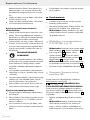
5000mm
120°
3000mm 3000mm
+
12V
100mm
Blue
Red
Green
+
12V
Blue
Red
Green
33.3mm
3000mm
1500mm
+
12V
Blue
Red
Green
+
12V
Blue
Red
Green
OF F
WHITE
ON
BLUE
GR E E N
RED
PURPLE
CYAN
YELLOW
ORANGE
FADE 7
FADE3
JUMP 7
JUMP 3
124
3
50mm
A
3M
3M
3M
3M
3M
+
12V
100mm
Blue
Red
Green
33.3mm
+
12V
Blue
Red
Green
+
12V
Blue
Red
Green
+
12V
Blue
Red
Green
+
12V
Blue
Red
Green
+
12V
Blue
Red
Green
10mm
B
11.1cm
(X2)
+12V
Blue
Red
Green
+12V
Blue
Red
Green
+12V
Blue
Red
Green
+12V
Blue
Red
Green
+12V
Blue
Red
Green
(1)
(2) (4)
(3)
+
12V
Blue
Red
Green
+
12V
Blue
Red
Green
+
12V
Blue
Red
Green
+
12V
Blue
Red
Green
+12V
Blue
Red
Green
+12V
Blue
Red
Green
+12V
Blue
Red
Green
+12V
Blue
Red
Green
+
12V
Blue
Red
Green
+
12V
Blue
Red
Green
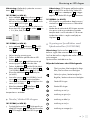
C
0 . 3 c m
0 . 3 c m
a 60
r
a 60
r
F
O F F
WH ITE
ON
B LUE
G R E E N
R E D
PU R PL E
CYAN
YELLO W
OR AN GE
F ADE 7
FADE3
J UMP 7
J U MP 3
1234
+
CR2025
3V
-
CR2025
3V
+
CR2025
3V
+
CR2025
3V
G
14125106L
12
5
7 8
E
6
12
(1)
(2)
D9
10
13 14
43
6
15

1500mm
100mm
8mm
3000mm
mm
input:5-24VDC
LED Light:MAX60W
50mm
150
A
5
3M
3M
3M
3M
3M
100mm
8mm
B
10cm
(X2)
(1)
(2) (4)
(3)
C
0 . 3 c m 0 . 3 c m
a 60
r
a 60
r
F
(1)
(2)
D
14125206L
30sec 10min
E
11
9
10
7 8
2
1
11
16
34 16

5 GB
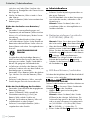
Table of contents
List of pictograms used ........................................................................................................ Page 6
Introduction ................................................................................................................................... Page 7
Intended use ........................................................................................................................................ Page 7
Scope of delivery ................................................................................................................................Page 7
Parts Description ..................................................................................................................................Page 7
Technical Data ....................................................................................................................................Page 7
Safety .................................................................................................................................................Page 8
Safety instructions ................................................................................................................................Page 8
Safety instructions for batteries / rechargeable batteries .................................................................Page 9
Initial use .........................................................................................................................................Page 10
Replacing / inserting batteries ............................................................................................................Page 10
Trimming / connecting the LED tape ...................................................................................................Page 10
Installing the LED strip ..........................................................................................................Page 11
Switching the LED strip on / off ........................................................................................................... Page 11
Controlling light effects with the remote control ................................................................................ Page 12
Maintenance and Cleaning ..............................................................................................Page 12
Disposal ............................................................................................................................................Page 12
Warranty and Service .......................................................................................................... Page 13
Warranty .............................................................................................................................................Page 13
Service address ................................................................................................................................... Page 13
Declaration of Conformity ..................................................................................................................Page 13
Manufacturer .......................................................................................................................................Page 13

6 GB
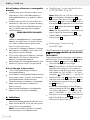
Introduction
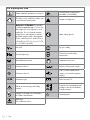
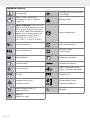
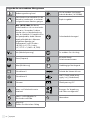
List of pictograms used
Please read the operating instructions! The light bulbs used are not
dimmable
(14125206L)
.
This light is only suitable for indoor use
in dry and enclosed spaces. Danger of explosion!
Only for 14125106L: This product
is an illuminated decoration. Do not use
these lights for room lighting or as a
night light. This is a special product,
as the colour value amounts are be-
yond the ranges listed in the brackets.
Colour value amounts: (x<0.270 or x
> 0.530); (y<-2.172 x² or y >-2.3172
x² + 2.3653 x -0.1595).
Wear safety gloves!
Volt (AC) For your safety
Hertz (frequency) Short-circuit proof safety
transformer
Watt (effective power) Separate control unit
Protection class II Polarity of the power supply
Protection class III SMPS (Switch mode power
supply unit) (switching power
supply)
IP20 Protection type d.c. DC Direct current D.C.
Observe the warnings and safety
notices! b
a
Dispose of the packaging and
product in an environmentally-
friendly manner!
Danger to life and risk of accidents
for infants and children Operating life
Warning!
Risk of electric shock

7 GB
Introduction
Light Strip with Sensor
Introduction
Please be sure to carefully read the com-
plete instructions for use. These instructions
are part of the product and contain im-
portant information on setup and handling. Always
follow all safety instructions. Before using this prod-
uct for the first time verify the correct voltage and
that all parts are properly installed. If you have any
questions or you are unsure about operating the
product, please contact the distributor or service
centre. Please keep these instructions in a safe place
and pass them on to third parties if necessary.
Intended use
This luminaire is only suitable for indoor
use, in dry and enclosed rooms. This
product is suitable for indoors and out-
door use. This device is only intended for use in a
private domestic environment, not for commercial
use. Any use other than that described above is
prohibited and will result in product damage. It is
further associated with dangers, e.g. short circuit,
fire, electric shock, etc.
Only for 14125106L:
This product is an illuminated decoration.
Do not use these lights for room lighting
or as a night light.
This is a special product, as the colour value amounts
are beyond the ranges listed in the brackets. Colour
value amounts: (x<0.270 or x > 0.530); (y<-2.172 x²
or y >-2.3172 x² + 2.3653 x -0.1595).
Scope of delivery
Check immediately after unpacking that the parts
are complete and that the product is in proper
condition.
1 LED strip, model 14125106L / 14125206L
1 mains adapter with sensor (14125106L)
1 mains adapter (14125206L)
2 connectors
4 end caps
2 cable holder
1 adhesive strip
2 screws for sensor unit (14125106L)
1 remote control (14125106L)
1 set of instructions for use
Parts Description
1 Supply cable
2 Mains adapter
3 Plug
4 Socket
5 LED strip
6 Music sensor (14125106L)
7 Plug connection
8 End cap
9 Cable holder
10 Protective film
11 Sensor (14125206L)
12 Remote control (14125106L)
13 Battery compartment (14125106L)
14 Battery (14125106L)
15 Insulating strip (14125106L)
16 Slider (14125206L)
17 Adhesive strip
Technical Data
Art. no.:14125106L
Operating voltage: 100 - 240 V ~
50 / 60 Hz
Total capacity: LED / max. 17 W
LED strip:
Operating voltage: 12 V
Performance (LED strip): 14 W
Protection category: III
Level of protection: IP20

8 GB
SafetyIntroduction / Safety
Mains adapter:
Operating voltage: 100 - 240 V~
50 / 60 Hz
Output power: 1.5 A
Protection category: II
Level of protection: IP20
Battery for remote control:
Type: CR 2025
Art. no.:14125206L
Operating voltage: 100 - 240 V ~
50 / 60 Hz
Total capacity: LED / max. 6 W
LED strip:
Operating voltage: 12 V
Performance (LED strip): 4.5 W
Protection category: III
Level of protection: IP20
Mains adapter:
Operating voltage: 100 - 240 V ~
50 / 60 Hz
Output power: 0.5 A
Protection category: II
Level of protection: IP20
Safety
Safety instructions
Damage due to failure to comply with these instruc-
tions for use will void the warranty! We assume no
liability for consequential damages! We assume no
liability for property damage or personal injury
due to improper handling or failure to comply with
the safety instructions!
RISK OF FATAL INJURY AND
ACCIDENT HAZARD FOR TOD-
DLERS AND SMALL CHILDREN!
Never leave children unsupervised with the
packaging material. The packaging material
poses a suffocation hazard. Children frequently
underestimate the dangers. Please always keep
the product out of the reach of children.
This device may be used by children aged
8 years and up, as well as by persons with
reduced physical, sensory or mental capacities,
or lacking experience and/or knowledge, so
long as they are supervised or instructed in the
safe use of the device and understand the
associated risks. Do not allow children to play
with the product. Cleaning and user maintenance
must not be performed by children without
supervision.
Avoid the risk of fatal injury
from electric shock
Check the LED strip for damage before every
use. Never use the LED strip if any damage is
detected.
A damaged mains cable poses a risk of fatal
injury from electrical shock. In the case of dam-
age, repairs or other problems, please contact
the service centre or a qualified electrician. The
supply cable of this appliance cannot be re-
placed. If the cable is damaged, the appliance
must be disposed of. The appliance contains no
parts which may be serviced by the consumer.
Make sure before use that the available supply
voltage corresponds to the required operating
voltage of the item (see "Technical Data").
Never allow the live power leads and contacts
to come into contact with water or other liquids.
Never open any of the components of the elec-
trical equipment or insert any objects into the
same components. This will pose a risk of fatal
injury from electric shock.
Do not use the LED strip if it is covered with
objects or is inlaid into a surface.
Do not install the lamp on damp or conductive
surfaces.
This LED strip must not be connected electroni-
cally with other LED strips.
Protect the product from sharp edges, mechani-
cal loads and hot surfaces (see Fig. F).
Do not secure with sharp staples or nails.

9 GB
Safety
Always unplug the mains plug from the socket
before assembly, disassembly or cleaning.
Never catch hold of the mains plug or the LED
strip with wet hands.
Only use the individual parts supplied, other-
wise all warranty claims will become invalid.
This item must not be connected with the power
supply while it is still in its packaging provided
that the packaging has not been adjusted for
exhibition purposes. Lay out the item completely
before you connect it to the power supply.
Do not connect the rope light to the supply
while it is in the packing or wound onto a reel.
Do not use the rope light when covered or
recessed into a surface.
Do not open or cut the rope light.
Do not connect this rope light to another
manufacturer’s product.
Interconnection shall be made only by the use
of the supplied connectors. Any open ends
must be sealed- off before use.
Model 14125106L
For some people, this can lead to epileptic
seizures or disturbances of consciousness if
they are exposed to certain flashes or light
effects. Immediately visit a doctor if you expe-
rience epileptic symptoms.
Prevent fire and injury
hazards
This product does not contain any parts that
can be serviced by the user. The LEDs cannot
be replaced.
If the LEDs cease to function at the end of their
operational life, the entire item must be replaced.
The installed LEDs are not suitable
for dimmers or electronic switches
(14125206L).
Do not look into the LED from a close distance
during operation.
Do not look at the LED with an optical instrument
(e.g. magnifier).
Safe working
Install the light so that it is protected from dirt
and excessive heating.
Always be attentive! Always pay attention to
what you are doing and use common sense.
Never use the LED strip if you are having
difficulty concentrating or do not feel well.
Before use, familiarise yourself with all the
instructions and diagrams in these instructions,
as well as with the LED strip itself.
To completely disconnect the LED strip from
the power supply, the mains adapter must be
removed from the mains socket.
Safety instructions for
batteries / rechargeable
batteries
KEEP BATTERIES OUT OF THE REACH OF
CHILDREN! Swallowing batteries can cause
chemical burns, perforation of soft tissue, and
death. Severe burns may occur within 2 hours
of swallowing batteries. Seek immediate medi-
cal attention.
DANGER TO LIFE!
Keep batteries / rechargeable batteries out of
reach of children. If accidentally swallowed
seek immediate medical attention.
DANGER OF EXPLOSION!
Never recharge non-rechargeable batteries. Do
not short-circuit batteries / rechargeable batteries
and / or open them. Overheating, fire or bursting
can be the result.
Never throw batteries / rechargeable batteries
into fire or water.
Do not exert mechanical loads to batteries /
rechargeable batteries.
Introduction / Safety

10 GB
Initial use / Installing the LED stripSafety / Initial use
Risk of leakage of batteries / rechargeable
batteries
Avoid extreme environmental conditions and
temperatures, which could affect batteries /
rechargeable batteries, e.g. radiators / direct
sunlight.
Avoid contact with the skin, eyes and mucous
membranes. In the event of contact with battery
acid, thoroughly flush the affected area with
plenty of clean water and seek immediate
medical attention.
WEAR PROTECTIVE GLOVES!
Leaked or damaged batteries / rechargeable
batteries can cause burns on contact with the
skin. Wear suitable protective gloves at all
times if such an event occurs.
In the event of a leakage of batteries / recharge-
able batteries, immediately remove them from
the product to prevent damage.
Only use the same type of batteries / recharge-
able batteries. Do not mix used and new
batteries / rechargeable batteries.
Remove batteries / rechargeable batteries if the
product will not be used for a longer period.
Risk of damage of the product
Only use the specified type of battery /
rechargeable battery!
Insert batteries / rechargeable batteries accord-
ing to polarity marks (+) and (-) on the battery /
rechargeable battery and the product.
Clean the contacts on the battery / rechargeable
battery and in the battery compartment
before inserting!
Remove exhausted batteries / rechargeable
batteries from the product immediately.
Initial use
Remove all packaging materials before first use.
Never connect the LED strip to the mains power
supply whilst in the packaging.
Note: Ensure that a plug socket is located in
close proximity to the installation area.
Replacing / inserting batteries
(14125106L) (Fig. G)
Note: Before first use, pull the insulating strip
15 out of the battery compartment 13 .
If the range of the remote control
12
reduces,
the battery
14
needs to be replaced.
To do so,
slide the battery compartment out of the remote
control 12 . Remove the old battery 14 and in-
sert a new one.
Note: The correct polarity is indicated on the
reverse side of the remote control 12 .
Slide the battery compartment back into the
remote control 12 .
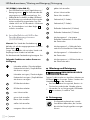
Trimming / connecting
the LED tape
The LED tape may be trimmed to size or connected.
DANGER TO LIFE BY ELEC-
TRIC SHOCK!
Disconnect the lights from the power supply before
performing any work on the LED strip 5. Unplug
the mains adapter 2 from the socket to do so.
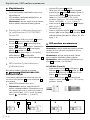
Choose the desired LED strip length.
Note Ensure that you cut the LED strip at the
right place. The cutting point lies exactly be-
tween the plus and minus pole and is marked
with a black line (14125106L: + 12 V, blue,
red, green - ; 14125206L: +, -) (see Fig. C).
Shorten the LED strip 5 using a pair of scissors.
Then press both ends of the LED strip 5 onto
the displacement contact of the plug connec-
tion 7 (see Fig. C).
Ensure the correct polarity of the connector
when connecting the LED strip 5 (14125106L:
+12 V, blue, red, green <> +12 V, blue, red,
green; 14125206L: +, - <> +, -) (see Fig. C).
Then press one end cap 8 at a time onto the
ends of the plug connection 7 (See Fig. C).
Check the correct positioning.

11 GB
Initial use / Installing the LED strip
Be sure to cover the open end of the LED tape
5 with the adhesive strip 17 if you do not
wish to connect the end after trimming the tape
(see below Fig. 1–4).
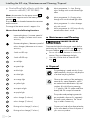
Installing the LED strip
Note: Ensure that the installation area is clean,
grease-free and dry. Otherwise the functionality of
the adhesive strip may be impaired.
Note: Ensure that a plug socket is located in close
proximity to the installation area.
Note: Light incidence affects the sensor unit 11
(14125206L).
14125106L (see Fig. A):
Connect the supply cable 1 using the plug
3 and socket 4 to the music sensor 6 if
they have not been preassembled. Then con-
nect the music sensor 6 to the LED strip 5.
Ensure the correct polarity of the connector
when connecting the LED strip 5 (see below,
<> + 12 V, blue, red, green).
14125206L (see Fig. A):
Connect the supply cable 1 to the sensor 11
and the LED strip 5 using the plug 3 and
socket 4.
Choose a suitable installation area.
Remove the protective foil from the reverse side
of the LED strip 5.
Stick the LED strip 5 with the adhesive strip
onto the installation area and press it on firmly.
Remove the protective foil 10 (see Fig. B) from
the reverse side of the cable holder 9 and the
sensor 11 (14125206L) / the music sensor 6
(14125106L).
Stick the cable holder 9 onto the desired
position (see Fig. D).
Stick the sensor 11 (14125206L) / the music
sensor 6 (14125106L) onto the desired
location.
Screw down the music sensor 6 using the
screws (14125106L).
Squeeze the mains cable 1 into the cable
hold 9.
Insert the mains adapter 2 into the plug socket.
Your light is now ready to use.
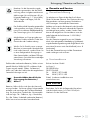
Switching the LED strip on / off
14125106L (see Fig. G):
Press the ON button on the remote control 12 ,
to switch on the LED strip 5. Press the OFF
button on the remote control 12 , to switch off
the LED strip 5.
Note: the OFF button on the remote control
12 is only suitable to temporarily switch off the
LED strip 5. Unplug the mains adapter 2
from the socket to switch off the LED strip 5
permanently.
14125206L (see Fig. E):
The LED strip has a daylight sensor / movement
sensor 11 . The motion sensor has a maximum
range of max. 5 m.
During darkness, the LED strip will automatically
turn on when it detects movement in the detection
zone. The light turns on for approx. 30 seconds
to 10 minutes. The lighting period can be conti-
nuously adjusted using the controler 16 .
Safety / Initial use
1. 2. 3. 4.
17 5

12 GB
Disposal / Warranty and ServiceInstalling the LED strip / Maintenance and Cleaning / Disposal
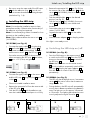
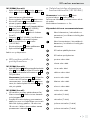
Controlling light effects with the
remote control (14125106L)
Note: the transmitter for the remote control 12 is
located on the opposite end of the battery com-
partment 13 .
Ensure there are no obstacles between the transmitter
and the receiver.
The range of the remote control is approx. 5 m.
Choose from the following functions:
: Increase brightness / increase speed of
colour changes / increase music sensor
sensitivity
: Decrease brightness / decrease speed of
colour changes / decrease music sensor
sensitivity
ON : Switch on LED strip
OFF : Switch off LED strip
RED : set red light
GREEN
: set green light
BLUE : set blue light
WHITE . set white light
ORANGE
: set orange light
YELLOW
: set yellow light
CYAN : set turquoise light
PURPLE
: set purple light
JUMP3 : colour change (3 colours)
JUMP7 : colour change (7 colours)
FADE3: flowing colour change (3 colours)
FADE7: flowing colour change (7 colours)
1: Music programme 1 = slow, flowing
colour change with sound induced light
reflex
2: Music programme 2 = flowing colour
change with sound induced light reflex
3: Music programme 3 = colour changes
only with sound
4: Music programme 4 = LED strip will only
activate when there's sound.
Maintenance and Cleaning
DANGER TO LIFE BY
ELECTRIC SHOCK!
Disconnect the lights from the power supply before
performing any work on the LED strip 5. Unplug
the mains adapter 2 from the socket to do so.
Do not use solvents, benzene or similar sub-
stances. They could damage the light.
Use a dry, lint-free cloth to clean the LED
strip 5.
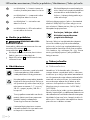
Disposal
The packaging is made entirely of recy-
clable materials, which you may dispose
of at local recycling facilities.
b
a
Observe the marking of the packaging
materials for waste separation, which
are marked with abbreviations (a) and
numbers (b) with following meaning:
1–7: plastics / 20–22: paper and fibre-
board / 80–98: composite materials.
The product and packaging materials
are recyclable, dispose of it separately
for better waste treatment. The Triman
logo is valid in France only.
Contact your local refuse disposal author-
ity for more details of how to dispose of
your worn-out product.

13 GB
Disposal / Warranty and ServiceInstalling the LED strip / Maintenance and Cleaning / Disposal
To help protect the environment, please
dispose of the product properly when it
has reached the end of its useful life and
not in the household waste. Information
on collection points and their opening
hours can be obtained from your local
authority.
Faulty or used batteries / rechargeable batteries
must be recycled in accordance with Directive
2006/66/EC and its amendments. Please return
the batteries / rechargeable batteries and / or the
product to the available collection points.
Environmental damage through
incorrect disposal of the batteries /
rechargeable batteries!
Batteries / rechargeable batteries may not be dis-
posed of with the usual domestic waste. They may
contain toxic heavy metals and are subject to haz-
ardous waste treatment rules and regulations. The
chemical symbols for heavy metals are as follows:
Cd = cadmium, Hg = mercury, Pb = lead. That is why
you should dispose of used batteries / rechargeable
batteries at a local collection point.
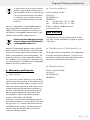
Warranty and Service
Warranty
You receive a 36 month warranty on this product,
valid from the date of purchase. The appliance has
been carefully produced under strict quality control.
Within the warranty period we shall rectify without
charge all material and manufacturing defects. In
the event of a defect during the warranty period,
please send the appliance to the listed Service
Centre address, referencing the following item
number: 14125106L / 14125206L.
Wear parts (such as bulbs) and damage caused
by improper handling, non-observance of the oper-
ating instructions or unauthorised interference are
excluded from the warranty. The performance of
services under the warranty does not extend or
renew the warranty period.
Service address
Briloner Leuchten GmbH
Im Kissen 2
DE-59929 Brilon
GERMANY
Tel.: +49 (0) 29 61 / 97 12–800
Fax: +49 (0) 29 61 / 97 12–199
E-Mail: [email protected]
www.briloner.com
IAN 290164
Please have your receipt and the product number
(e.g. IAN 12345) available for all queries as proof
of purchase.
Declaration of Conformity
This product fulfils the requirements of the applicable
European and national directives. Conformity has
been demonstrated. The relevant declarations and
documents are held by the manufacturer.
Manufacturer
Briloner Leuchten GmbH
Im Kissen 2
DE-59929 Brilon
GERMANY

14
Sisällysluettelo

15 FI
Sisällysluettelo
Merkkien selitykset ................................................................................................................. Sivu 16
Johdanto ........................................................................................................................................... Sivu 17
Tarkoituksenmukainen käyttö .............................................................................................................. Sivu 17
Toimituksen sisältö ................................................................................................................................ Sivu 17
Osien kuvaus ........................................................................................................................................ Sivu 17
Tekniset tiedot ....................................................................................................................................... Sivu 17
Turvallisuus ..................................................................................................................................... Sivu 18
Turvallisuusohjeet ................................................................................................................................. Sivu 18
Paristoja / akkuja koskevat turvallisuuohjeet ...................................................................................... Sivu 19
Käyttöönotto ................................................................................................................................. Sivu 20
Paristojen sisäänasettaminen ja vaihtaminen ..................................................................................... Sivu 20
LED-nauhan lyhentäminen / yhdistäminen .......................................................................................... Sivu 20
LED-nauhan asentaminen ................................................................................................... Sivu 20
LED-nauhan päälle- ja poiskytkeminen ............................................................................................... Sivu 21
Valotehosteiden ohjaaminen kaukosäätimellä ................................................................................... Sivu 21
Huolto ja puhdistus .................................................................................................................. Sivu 22
Hävittäminen ................................................................................................................................ Sivu 22
Takuu ja huolto ........................................................................................................................... Sivu 22
Takuuselostus ........................................................................................................................................ Sivu 22
Huoltopalvelun osoite .......................................................................................................................... Sivu 23
Yhdenmukaisuusvakuutus .................................................................................................................... Sivu 23
Valmistaja ............................................................................................................................................. Sivu 23

16 FI
Johdanto
Merkkien selitykset
Lue käyttöohje! Valonlähteitä ei voi himmentää
(14125206L)
.
Valaisin soveltuu käytettäväksi
ainoastaan kuivissa ja suljetuissa
sisätiloissa. Räjähdysvaara!
Vain 14125106L: Tuote on koriste-
valaisin. Älä käytä valaisinta huoneva-
laistuksena tai yövalona. Kyseessä on
erikoistuote, koska värikoordinaatit po-
ikkeavat suluissa mainituista arvoista.
Värikoordinaatit: (x<0,270 tai x
> 0,530); (y<-2,172 x² tai y
>-2,3172 x² + 2,3653 x -0,1595).
Käytä suojakäsineitä!
Voltti (vaihtojännite) Näin menettelet oikein
Hertsi (verkkotaajuus) Oikosulkusuojattu
turvamuuntaja
Watti (pätöteho) Riippumaton käyttölaite
Suojausluokka II Virtaliitännän napaisuus
Suojausluokka III SMPS (Switch mode power
supply unit) (hakkuriteholähde)
IP20 IP-luokitus d.c. DC Tasajännite D.C.
Noudata varoituksia ja
turvallisuusohjeita! b
a
Hävitä pakkaus ja laite
ympäristöystävällisesti!
Lapsia uhkaava hengen- ja
tapaturmanvaara Käyttöikä
Varoitus!
Sähköiskun vaara

17 FI
Johdanto
Anturivalonauha
Johdanto
Lue tämä käyttöohje huolellisesti läpi.
Tämä ohje on osa tuotetta ja se sisältää
tärkeää käyttöönottoon ja käsittelyyn liit-
tyvää tietoa. Noudata aina kaikkia turvallisuusoh-
jeita. Tarkista ennen käyttöönottoa, että käytössä
oleva jännite on sopiva ja että kaikki osat on oikein
asennettu. Jos sinulla on kysymyksiä tai olet epä-
varma laitteen käytön suhteen, ota yhteyttä jälleen-
myyjään tai huoltopisteeseen. Säilytä tämä ohje
huolellisesti ja anna tarvittaessa muille henkilöille.
Tarkoituksenmukainen käyttö
Valaisin soveltuu käytettäväksi ainoas-
taan kuivissa ja suljetuissa sisätiloissa.
Tuote on tarkoitettu vain kotikäyttöön,
ei kaupalliseen käyttöön. Tuotetta ei saa käyttää
muuhun kuin edellä kuvattuun tarkoitukseen, muu-
toin tuote saattaa vaurioitua. Tämän lisäksi muu
käyttö voi johtaa vaaratilanteisiin esim. oikosulkuun,
tulipaloon tai sähköiskuun.
Vain 14125106L:
Tuote on koristevalaisin. Älä käytä valai-
sinta huonevalaistuksena tai yövalona.
Kyseessä on erikoistuote, koska värikoor-
dinaatit poikkeavat suluissa mainituista arvoista.
Värikoordinaatit: (x<0,270 tai x > 0,530);
(y<-2,172 x² tai y >-2,3172 x² + 2,3653 x
-0,1595).
Toimituksen sisältö
Tarkista välittömästi aina pakkauksen avaamisen
jälkeen toimituksen täydellisyys sekä laitteen moit-
teeton kunto.
1 LED-nauha, malli 14125106L / 14125206L
1 verkkoadapteri anturilla (14125106L)
1 verkkoadapteri (14125206L)
2 liitintä
4 suojusta
2 johdon pidikettä
1 teippi
2 ruuvia anturiyksikköön (14125106L)
1 kaukosäädin (14125106L)
1 käyttöohje
Osien kuvaus
1 Verkkojohto
2 Verkkolaite
3 Pistoke
4 Pistorasia
5 LED-nauha
6 Musiikkianturi (14125106L)
7 Pistokeliitin
8 Suojus
9 Johdon pidike
10 Suojakalvo
11 Anturi (14125206L)
12 Kaukosäädin (14125106L)
13 Paristolokero (14125106L)
14 Paristo (14125106L)
15 Eristysliuska (14125106L)
16 Liukusäädin (14125206L)
17 Teippi
Tekniset tiedot
Tuotenro: 14125106L
Käyttöjännite: 100 - 240 V~ 50 / 60 Hz
Kokonaisteho: LED / maks. 17 W
LED-nauha:
Käyttöjännite: 12 V
Teho (LED-nauha): 14 W
Suojausluokka: III
IP-luokitus: IP20
Verkkolaite:
Käyttöjännite: 100 - 240 V~ 50 / 60 Hz
Lähtövirta: 1,5 A
Suojausluokka: II
IP-luokitus: IP20

18 FI
Johdanto / Turvallisuus
Kaukosäätimen paristo:
Tyyppi: CR 2025
Tuotenro: 14125206L
Käyttöjännite: 100 - 240 V~ 50 / 60 Hz
Kokonaisteho: LED / maks. 6 W
LED-nauha:
Käyttöjännite: 12 V
Teho (LED-nauha): 4,5 W
Suojausluokka: III
IP-luokitus: IP20
Verkkolaite:
Käyttöjännite: 100 - 240 V~ 50 / 60 Hz
Lähtövirta: 0,5 A
Suojausluokka: II
IP-luokitus: IP20
Turvallisuus
Turvallisuusohjeet
Takuu ei korvaa vahinkoja, jotka aiheutuvat käyttö-
ohjeen noudattamatta jättämisestä! Valmistaja ei
ota vastuuta välillisistä vahingoista! Valmistaja ei
vastaa esine- tai henkilövahingoista, jotka aiheutuvat
tuotteen asiattomasta käytöstä tai käyttöohjeiden
noudattamatta jättämisestä!
LAPSIA UHKAAVA HENGEN-JA
TAPATURMANVAARA!
Älä koskaan jätä lapsia pakkausmateriaalien
läheisyyteen ilman valvontaa. Pakkausmateri-
aaleihin liittyy tukehtumisvaara. Lapset aliarvi-
oivat useimmiten vaaratilanteet. Pidä tuote aina
lasten ulottumattomissa.
Laitetta voivat käyttää 8 vuotta täyttäneet lap-
set sekä henkilöt, jotka ovat fyysisiltä tai psyyk-
kisiltä kyvyiltään tai aisteiltaan rajoittuneita tai
joilla ei ole kokemusta tai tietoa laitteen käy-
töstä, jos he käyttävät laitetta valvonnan alai-
sina tai heitä on opastettu laitteen turvallisessa
käytössä ja he ovat tietoisia laitteeseen
liittyvistä vaaroista. Lapset eivät saa leikkiä lait-
teella. Lapset eivät saa puhdistaa tai huoltaa
laitetta ilman valvontaa.
Vältä sähköiskun aiheuttamaa
hengenvaaraa
Tarkista aina ennen käyttöä, ettei LED-nauha
ole vioittunut. ÄLä koskaan käytä LED-nauhaa,
jos olet havainnut siinä jotakin vikaa.
Viallinen verkkojohto voi aiheuttaa hengenvaa-
rallisen sähköiskun. Käänny valaisimen vaurioita
tai korjausta koskevissa ja muissa siinä esiinty-
vissä ongelmissa huoltopisteen tai sähköalan
ammattilaisen puoleen. Tuotteen verkkojohtoa ei
voi vaihtaa uuteen. Johdon vaurioituessa tuote
tulee hävittää. Tuote ei sisällä osia, jotka käyt-
täjä voisi itse huoltaa.
Varmista ennen käyttöä, että käytössä oleva
verkkojännite vastaa verkkolaitteen tarvitsemaa
käyttöjännitettä (katso kappale "Tekniset tiedot").
Vältä ehdottomasti jännitteenalaisten johtojen
ja pintojen kosketusta veden tai muiden nestei-
den kanssa.
Älä koskaan avaa sähkölaitteita tai laita mitään
esineitä laitteiden sisälle. Tällaiset toimet voivat
aiheuttaa hengenvaarallisen sähköiskun.
Älä käytä LED-nauhaa esineillä peitettynä tai
pinnalle asetettuna.
Älä asenna valaisinta kostealle tai sähköä joh-
tavalle pinnalle.
LED-nauhaa ei saa liittää sähköisesti toiseen
LED-nauhaan.
Suojaa tuote teräviltä reunoilta, mekaaniselta
rasitukselta ja kuumilta pinnoilta (kuva F).
Älä kiinnitä sitä terävillä kiinnittimillä tai nauloilla.
Irrota pistoke pistorasiasta aina ennen tuotteen
asennusta, purkamista tai puhdistusta.
Älä milloinkaan kosketa pistoketta tai tuotetta
märin käsin.
Käytä ainoastaan toimitukseen sisältyviä osia,
muutoin takuu raukeaa.
Tuotetta ei saa kytkeä sähköverkkoon sen ollessa
pakkauksessa, jos pakkausta ei ole tarkoitettu
näyttelykäyttöön. Ota tuote kokonaan pakka-
uksesta ennen kuin kytket sen sähköverkkoon.
Turvallisuus

19 FI
Johdanto / Turvallisuus
Malli 14125106L
Salamavalot ja valotehosteet voivat aiheuttaa
epileptisiä kohtauksia tai tajunnanhäiriöitä tie-
tyillä henkilöillä. Hakeudu välittömästi lääkärin
hoitoon, jos kärsit epileptisistä oireista.
Vältä palo- ja
loukkaantumisvaaraa
Tuote ei sisällä osia, jotka käyttäjä voisi itse
huoltaa. LEDejä ei voi vaihtaa uusiin.
Kun ledit ovat tulleet elinkaarensa päähän, koko
tuote täytyy vaihtaa uuteen.
Asennettuja ledejä ei voi käyttää
himmentimessä tai elektronisessa
kytkimessä.
Älä katso suoraan päällekytkettyihin led-valoihin
lähietäisyydeltä.
Älä katso led-valoihin optisella välineellä (esim.
suurennuslasilla).
Näin menettelet oikein
Asenna LED-nauha niin, että se on suojassa
likaantumiselta ja liialta kuumumiselta.
Ole aina tarkkaavainen! Keskity siihen mitä
teet ja toimi järkevästi. Älä koskaan käytä
LED-nauhaa, jos et pysty keskittymään tai et
tunne oloasi hyväksi.
Tutustu ennen käyttöä kaikkiin käyttöoppaan
ohjeisiin ja kuviin sekä itse LED-nauhaan.
LED-nauha on täysin jännitteetön vasta, kun se
irrotetaan pistorasiasta.
Paristoja / akkuja
koskevat turvallisuuohjeet
SÄILYTÄ PARISTOT LASTEN
ULOTTUMATTOMISSA!
Pariston nieleminen voi aiheuttaa kemiallisen
palovamman, vahingoittaa pehmytkudosta ja
johtaa kuolemaan. Palovammat ovat mahdollisia
2 tunnin sisällä nieluun joutumisesta. Hakeudu
välittömästi lääkärin hoitoon.
HENGENVAARA!
Pidä paristot / akut lasten ulottumattomissa.
Pariston / akun nielaisseen henkilön on välittömästi
otettava yhteyttä lääkäriin!
RÄJÄHDYSVAARA!
Älä koskaan lataa paristoja, jotka eivät ole
uudelleenladattavia. Älä oikosulje paristoja /
akkuja äläkä avaa niitä. Siitä voi seurata yli-
kuumeneminen, tulipalo tai räjähdys.
Älä koskaan heitä paristoja / akkuja tuleen tai
veteen.
Älä altista paristoja / akkuja mekaaniselle
kuormitukselle.
Paristojen / akkujen vuotamisesta
johtuva vaara
Vältä äärimmäisiä olosuhteita ja lämpötiloja,
jotka voivat vaikuttaa paristoihin / akkuihin
esim. lämpöpatterit tai suora auringonvalo.
Vältä kosketusta ihoon, silmiin ja limakalvoihin!
Huuhtele paristohapolle altistuneet kohdat välit-
tömästi pelkällä vedellä ja ota yhteyttä lääkäriin!
KÄYTÄ SUOJAKÄSINEITÄ!
Vuotaneet tai vaurioituneet paristot / akut voivat
syövyttää ihoa. Käytä siksi ehdottomasti aina
sopivia suojakäsineitä.
Jos paristot / akut vuotavat, poista ne välittömästi
tuotteesta, jotta tuote ei vaurioidu.
Käytä vain samantyyppisiä paristoja / akkuja.
Älä käytä vanhoja ja uusia paristoja / akkuja
yhdessä!
Poista paristot / akut tuotteesta, jos sitä ei käy-
tetä pitkään aikaan.
Tuotteen vaurioitumisvaara
Käytä ainoastaan ohjeessa mainittua paristo- /
akkutyyppiä!
Aseta paristot / akut tuotteen sisään paristoon/
akkuun ja tuotteeseen merkittyjen napojen (+)
ja (-) mukaan.
Puhdista pariston / akun ja paristolokeron
kontaktipinnat ennen sisäänasettamista!
Poista loppuunkäytetyt paristot / akut välittömästi
tuotteesta.
Turvallisuus

20
LED-nauhan asentaminen
FI
Käyttöönotto / LED-nauhan asentaminen
Käyttöönotto
Poista kaikki pakkausmateriaalit ennen ensim-
mäistä käyttöä.
LED-nauhaa ei saa kytkeä sähköverkkoon sen
ollessa pakkauksessa.
Huomautus: tarkista, että pistorasia sijaitsee
asennuspaikan välittömässä läheisyydessä.
Paristojen sisäänasettaminen
ja vaihtaminen (14125106L)
(kuva G)
Huomautus:
vedä eristysliuska
15 paristolo-
kerosta 13 ennen ensimmäistä käyttöä.
Kun kaukosäätimen 12 kantama heikkenee,
paristo 14 täytyy vaihtaa uuteen. Vedä paristo-
lokero kaukosäätimestä 12 . Poista käytetty
paristo 14 ja aseta uusi sisään.
Huomautus: oikea napaisuus on merkitty
kaukosäätimen 12 kääntöpuolelle.
Aseta paristolokero takaisin kaukosäätimeen 12 .
LED-nauhan lyhentäminen /
yhdistäminen
LED-nauha voidaan lyhentää tai yhdistää.
HENGENVAARA SÄH-
KÖISKUN VUOKSI!
Irrota valaisin sähköverkosta aina ennen kuin teet
muutoksia LED-nauhaan 5. Irrota verkkolaite 2
pistorasiasta.
Valitse LED-nauhasta haluttu pituus.
Huomautus: varmista, että lyhennät LED-
nauhan oikeasta kohdasta. Yhtymäkohta on ta-
san napojen välissä ja on merkitty mustalla vii-
valla (14125106L: + 12V, sininen, punainen,
vihreä - ; 14125206L: +, -) (kuva C).
Lyhennä LED-nauha 5 saksilla.
Paina sitten LED-nauhan 5 molemmat päät
pistokeliittimen 7 leikkauskontakteihin (kuva C).
Huomioi LED-nauhan 5 liitännässä oikea
napaisuus (14125106L: +12V, sininen,
punainen, vihreä <> +12V, sininen, punainen,
vihreä; 14125206L: +, - <> +, -) (kuva C).
Aseta suojukset 8 pistokeliittimen 7 molempiin
päihin (kuva C).
Tarkista kiinnitys.
Huomioi, että peität teipillä 17 LED-nauhan 5
avoimen pään ennen käyttöä, jos et halua
yhdistää nauhaa lyhentämisen jälkeen (Ks. alla
kuvat 1–4).
LED-nauhan asentaminen
Huomautus: tarkista, että asennuspinta on puhdas,
rasvaton ja kuiva. Muutoin liimanauha ei kiinnity
kunnolla pintaan.
Huomautus: tarkista, että pistorasia sijaitsee
asennuspaikan välittömässä läheisyydessä.
Huomautus: Valon tulokulma vaikuttaa anturiyk-
sikön 11 toimintaan (14125206L).
14125106L (kuva A):
Kytke verkkoliitinjohto 1 musiikkianturiin 6
liitännän 3 ja pistorasian 4 avulla, jos ne
eivät ole vielä käytössä. Yhdistä sitten musiik-
kianturi 6 LED-nauhaan 5.
Huomioi LED-nauhan 5 liitännässä oikea
napaisuus (katso alta, <> + 12 V, sininen,
punainen, vihreä).
1. 2. 3. 4.
17 5
Sidan laddas...
Sidan laddas...
Sidan laddas...
Sidan laddas...
Sidan laddas...
Sidan laddas...
Sidan laddas...
Sidan laddas...
Sidan laddas...
Sidan laddas...
Sidan laddas...
Sidan laddas...
Sidan laddas...
Sidan laddas...
Sidan laddas...
Sidan laddas...
Sidan laddas...
Sidan laddas...
Sidan laddas...
Sidan laddas...
Sidan laddas...
Sidan laddas...
Sidan laddas...
Sidan laddas...
Sidan laddas...
Sidan laddas...
Sidan laddas...
Sidan laddas...
Sidan laddas...
Sidan laddas...
Sidan laddas...
Sidan laddas...
Sidan laddas...
Sidan laddas...
Sidan laddas...
Sidan laddas...
Sidan laddas...
-
 1
1
-
 2
2
-
 3
3
-
 4
4
-
 5
5
-
 6
6
-
 7
7
-
 8
8
-
 9
9
-
 10
10
-
 11
11
-
 12
12
-
 13
13
-
 14
14
-
 15
15
-
 16
16
-
 17
17
-
 18
18
-
 19
19
-
 20
20
-
 21
21
-
 22
22
-
 23
23
-
 24
24
-
 25
25
-
 26
26
-
 27
27
-
 28
28
-
 29
29
-
 30
30
-
 31
31
-
 32
32
-
 33
33
-
 34
34
-
 35
35
-
 36
36
-
 37
37
-
 38
38
-
 39
39
-
 40
40
-
 41
41
-
 42
42
-
 43
43
-
 44
44
-
 45
45
-
 46
46
-
 47
47
-
 48
48
-
 49
49
-
 50
50
-
 51
51
-
 52
52
-
 53
53
-
 54
54
-
 55
55
-
 56
56
-
 57
57


på andra språk
- eesti: LIVARNO 290164 Omaniku manuaal
- Deutsch: LIVARNO 290164 Bedienungsanleitung
- polski: LIVARNO 290164 Instrukcja obsługi
- English: LIVARNO 290164 Owner's manual
